By clicking “Accept All Cookies”, you agree to the storing of cookies on your device to enhance site navigation, analyze site usage, and assist in our marketing efforts. View our Privacy Policy for more information.
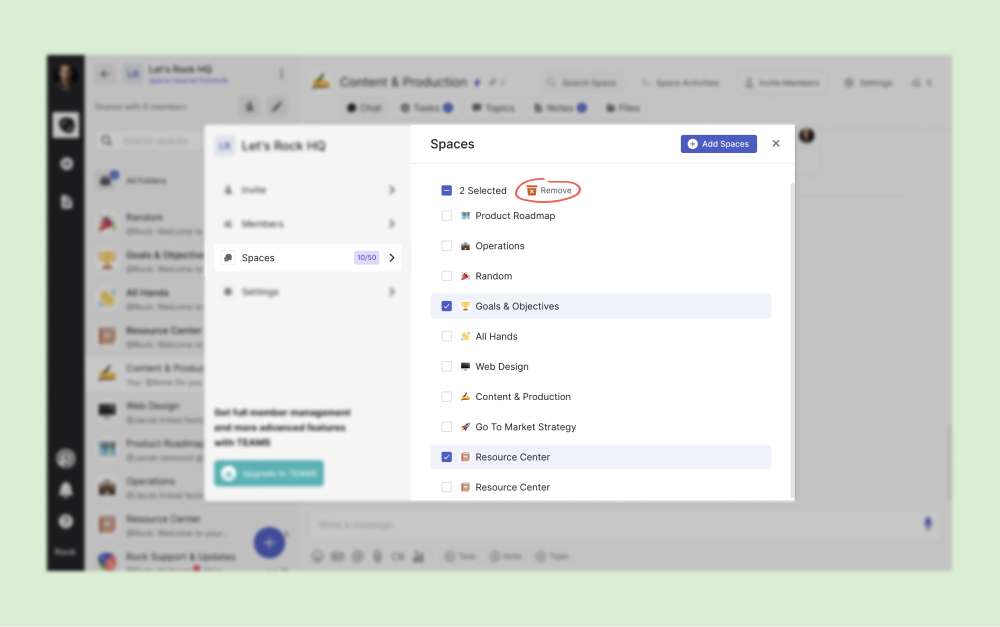
Tutorials, documentation and other resources to help you become a Rock expert.
Thank you! Your submission has been received!
Oops! Something went wrong while submitting the form.
or continue with
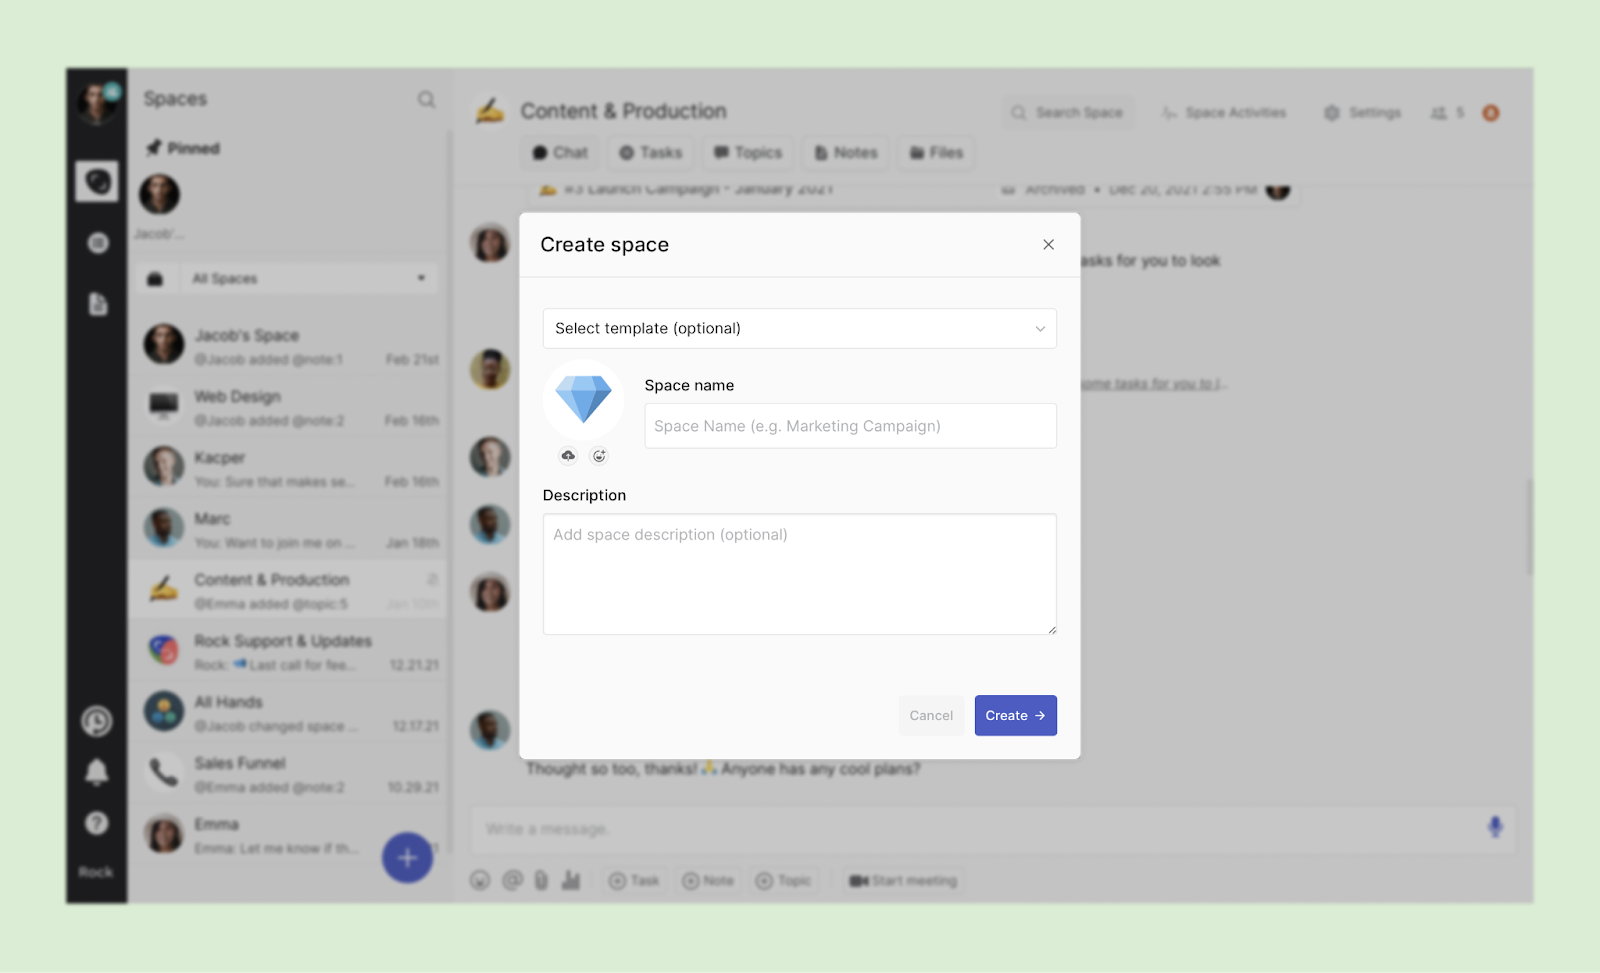
Create new projects in seconds with space templates by duplicating existing space configurations for future collaborations. Use templates for onboarding clients, managing marketing campaigns, organizing events and so much more.
Creating new templates
The number of templates you can create depends on your plan. Unlimited plan users can create up to 100 templates, while those on the free plan can only create up to 5 templates. Creating a template is easy - you can either convert an existing space or start from scratch.
Converting an existing space into a template
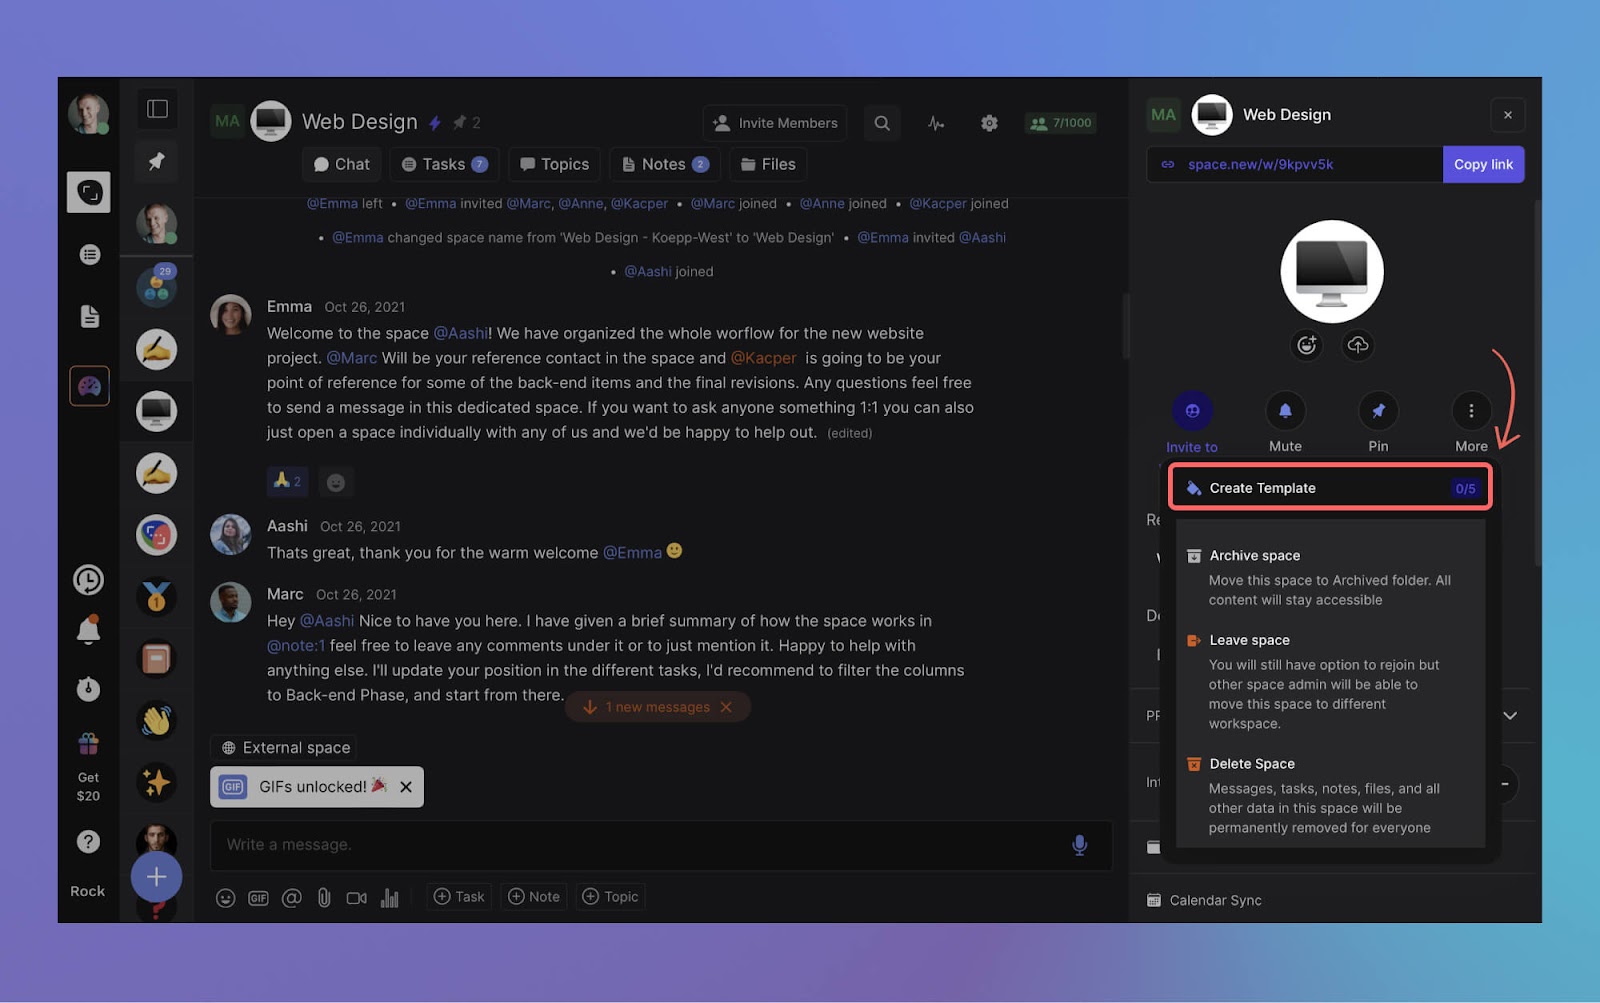
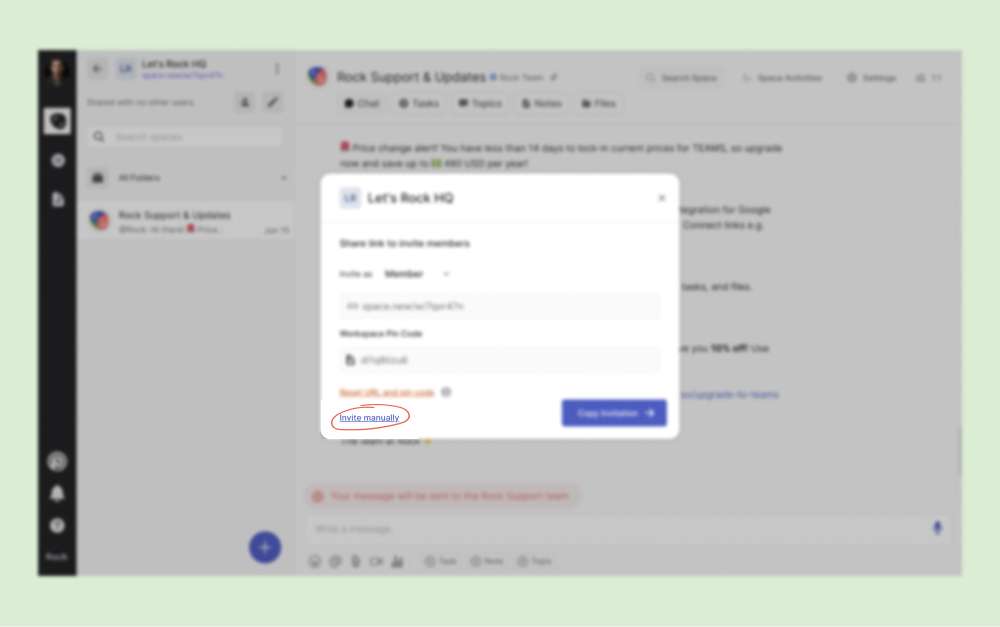
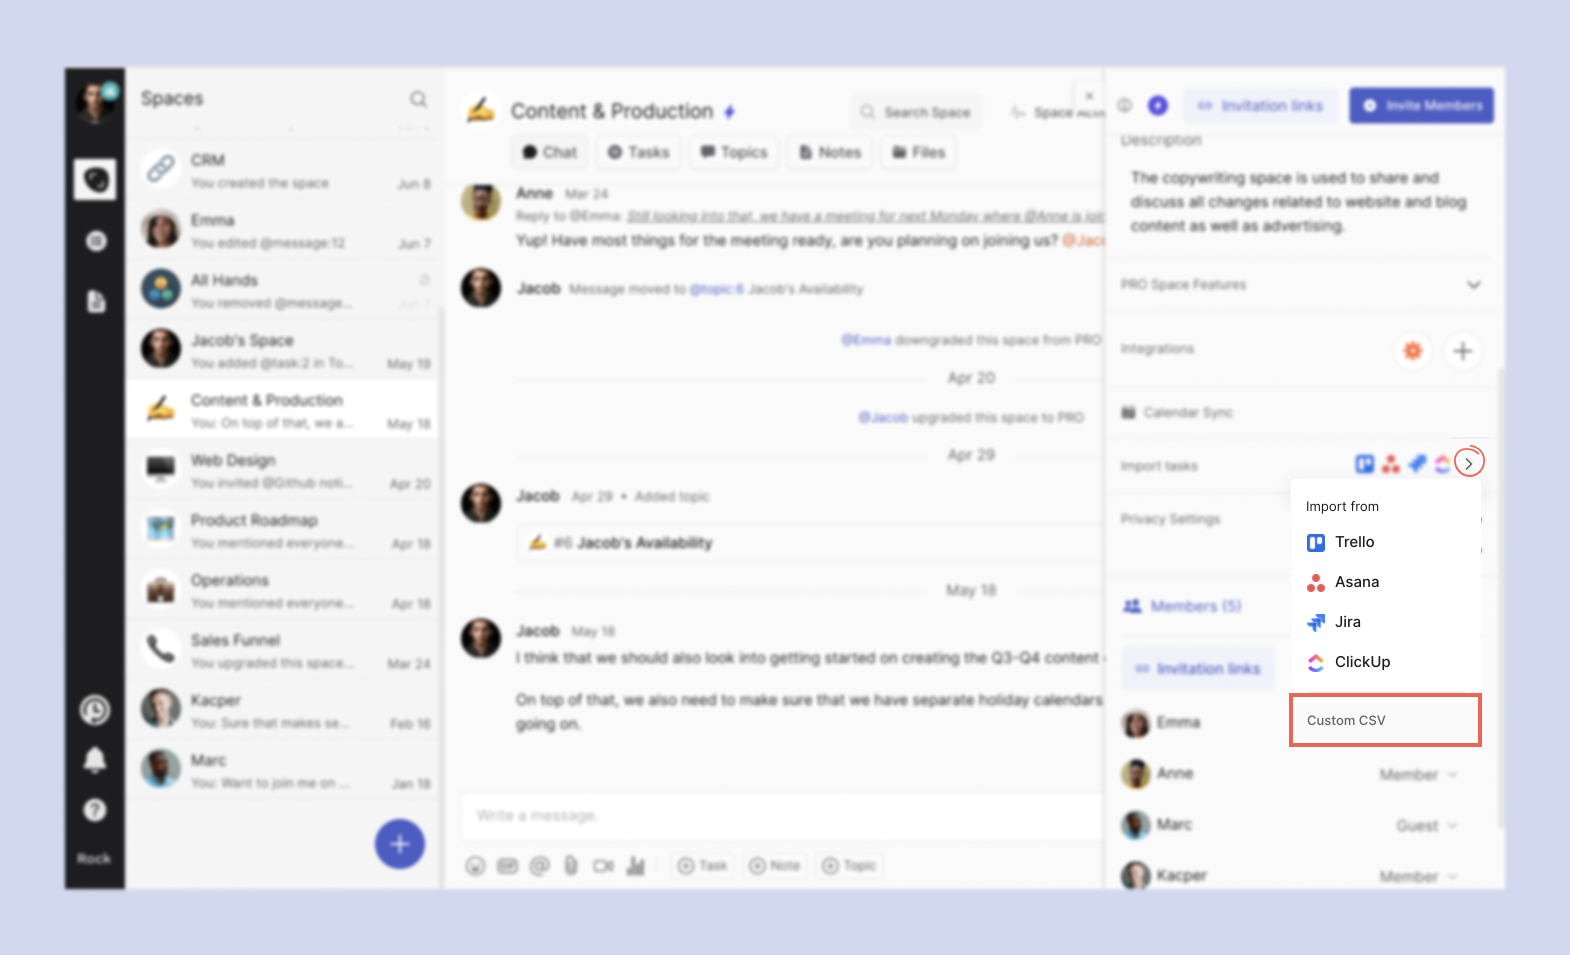
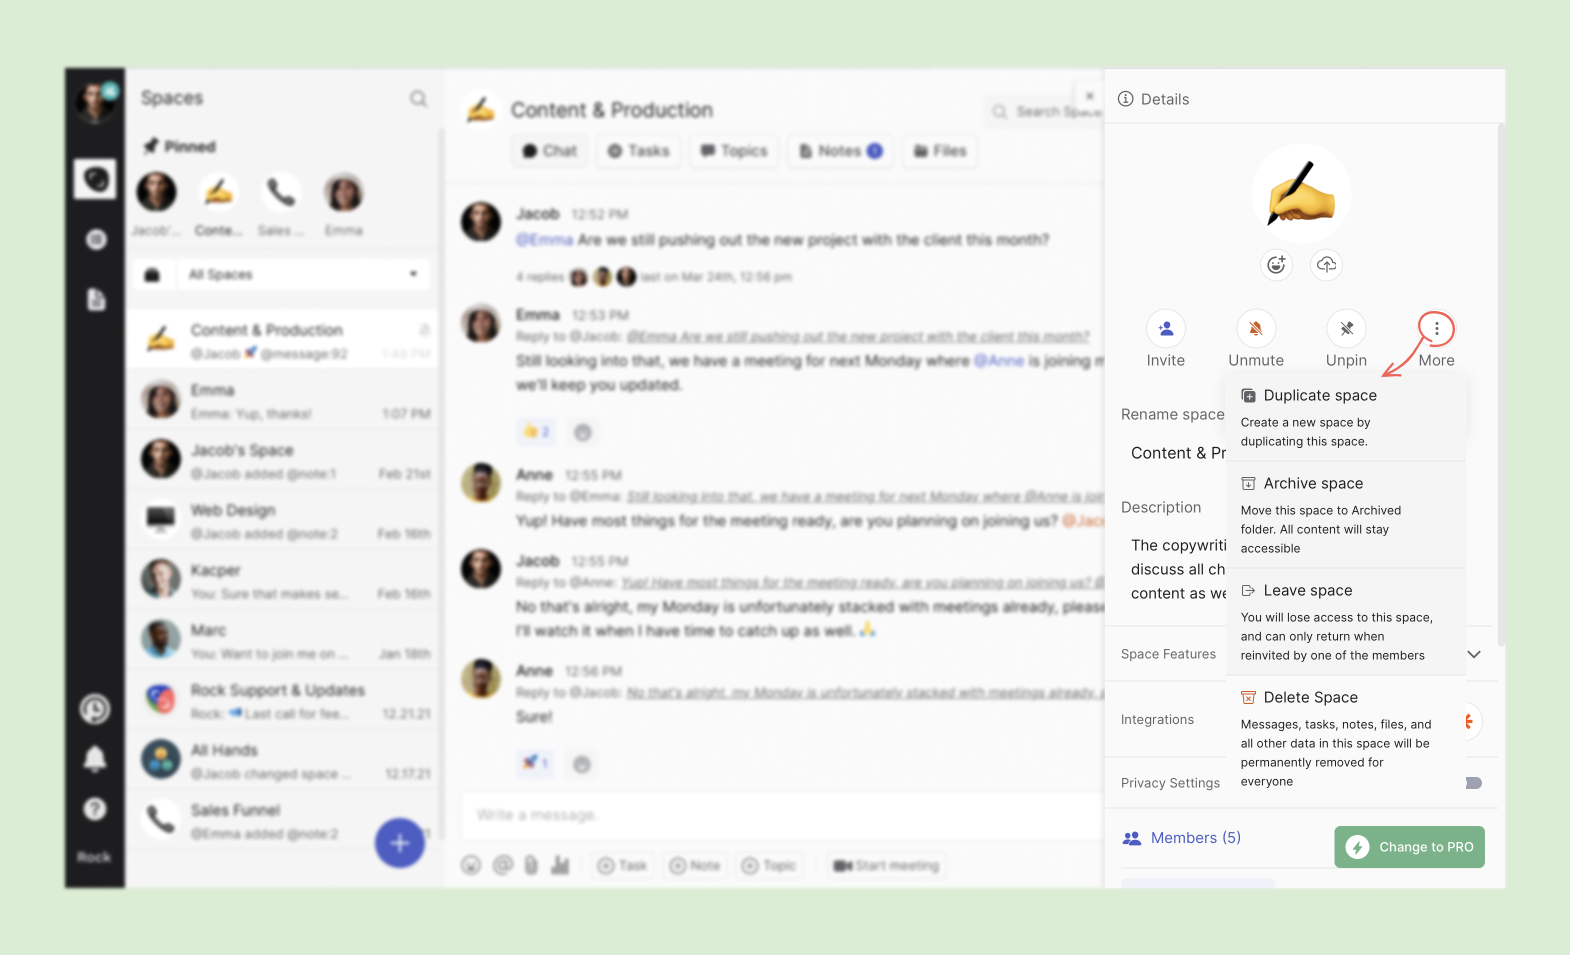
If you have an existing space that you'd like to turn into a template, simply access space settings and select "create template."
Note that admin permissions are required to convert an existing space into a template.
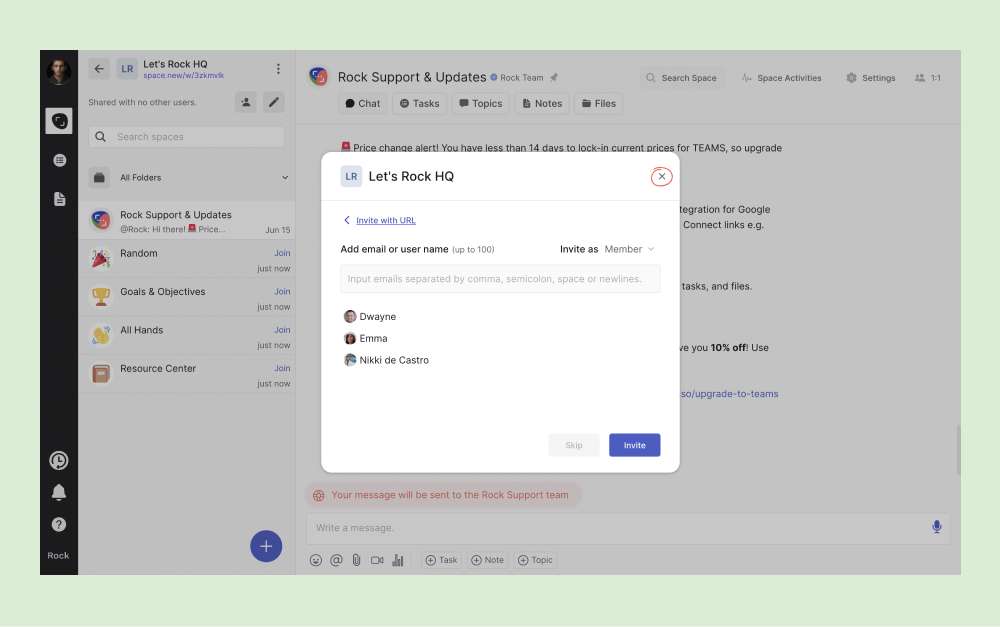
Select the icon and default space name of your template. You can choose what information you want to carry over to future copies:
Up to 50 tasks with lists and labels
All task descriptions
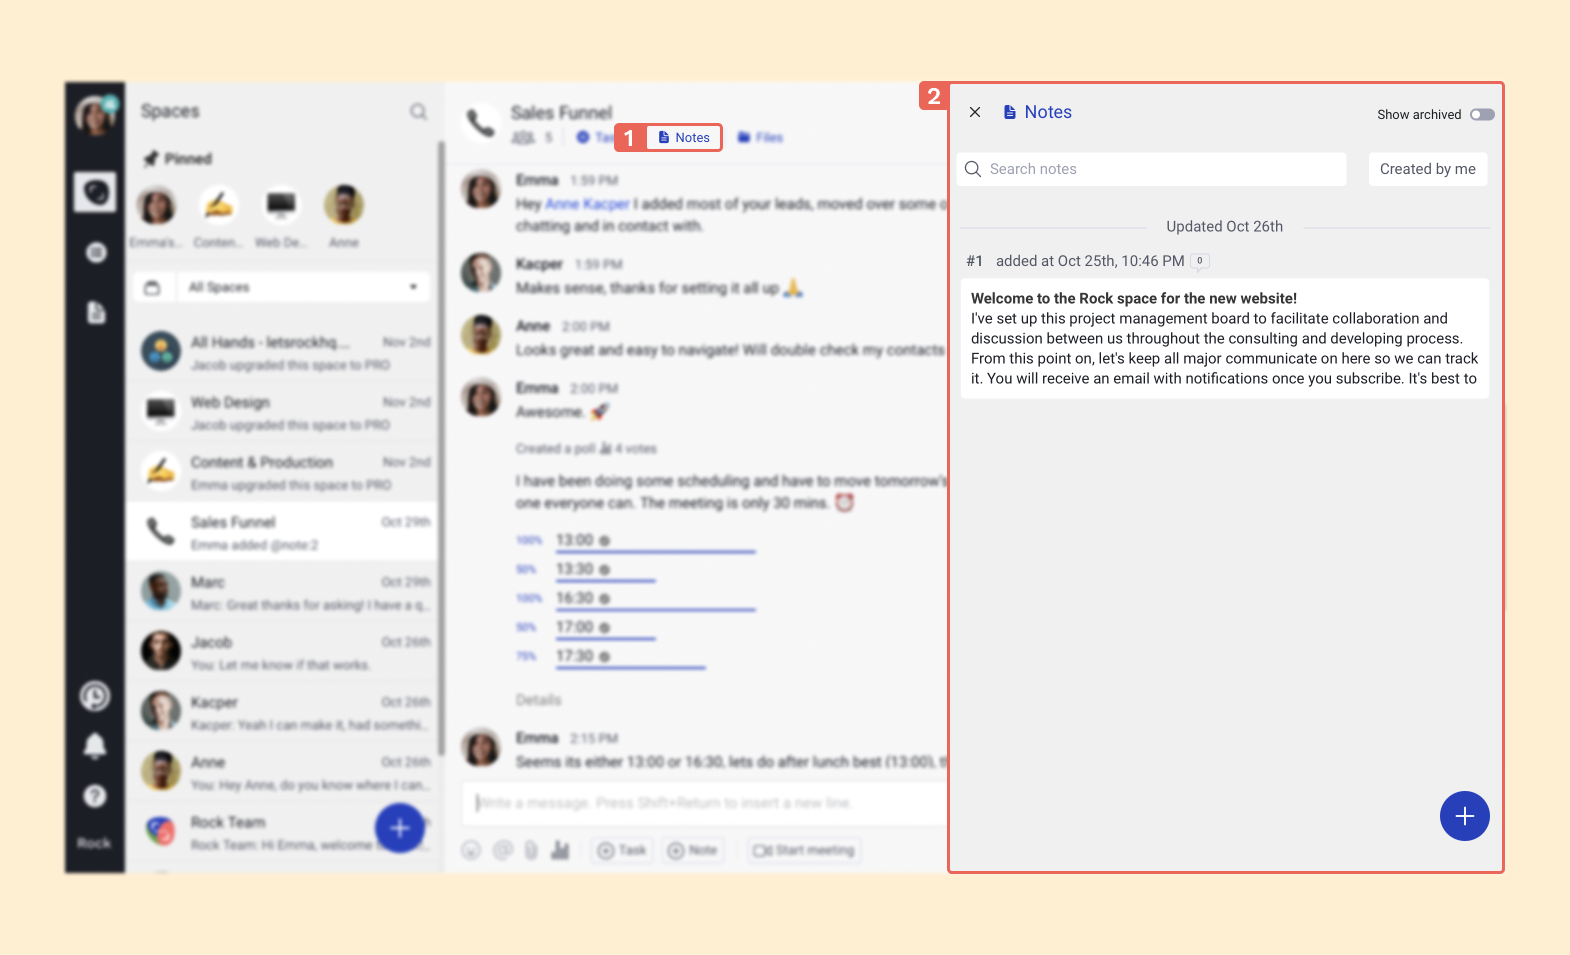
Up to 50 notes
Up to 50 topics
All pinned items
After you select “create” a new template is added under your quota. Note that you can still add new tasks, notes, and other objects after the template has already been created.
Creating a template from scratch
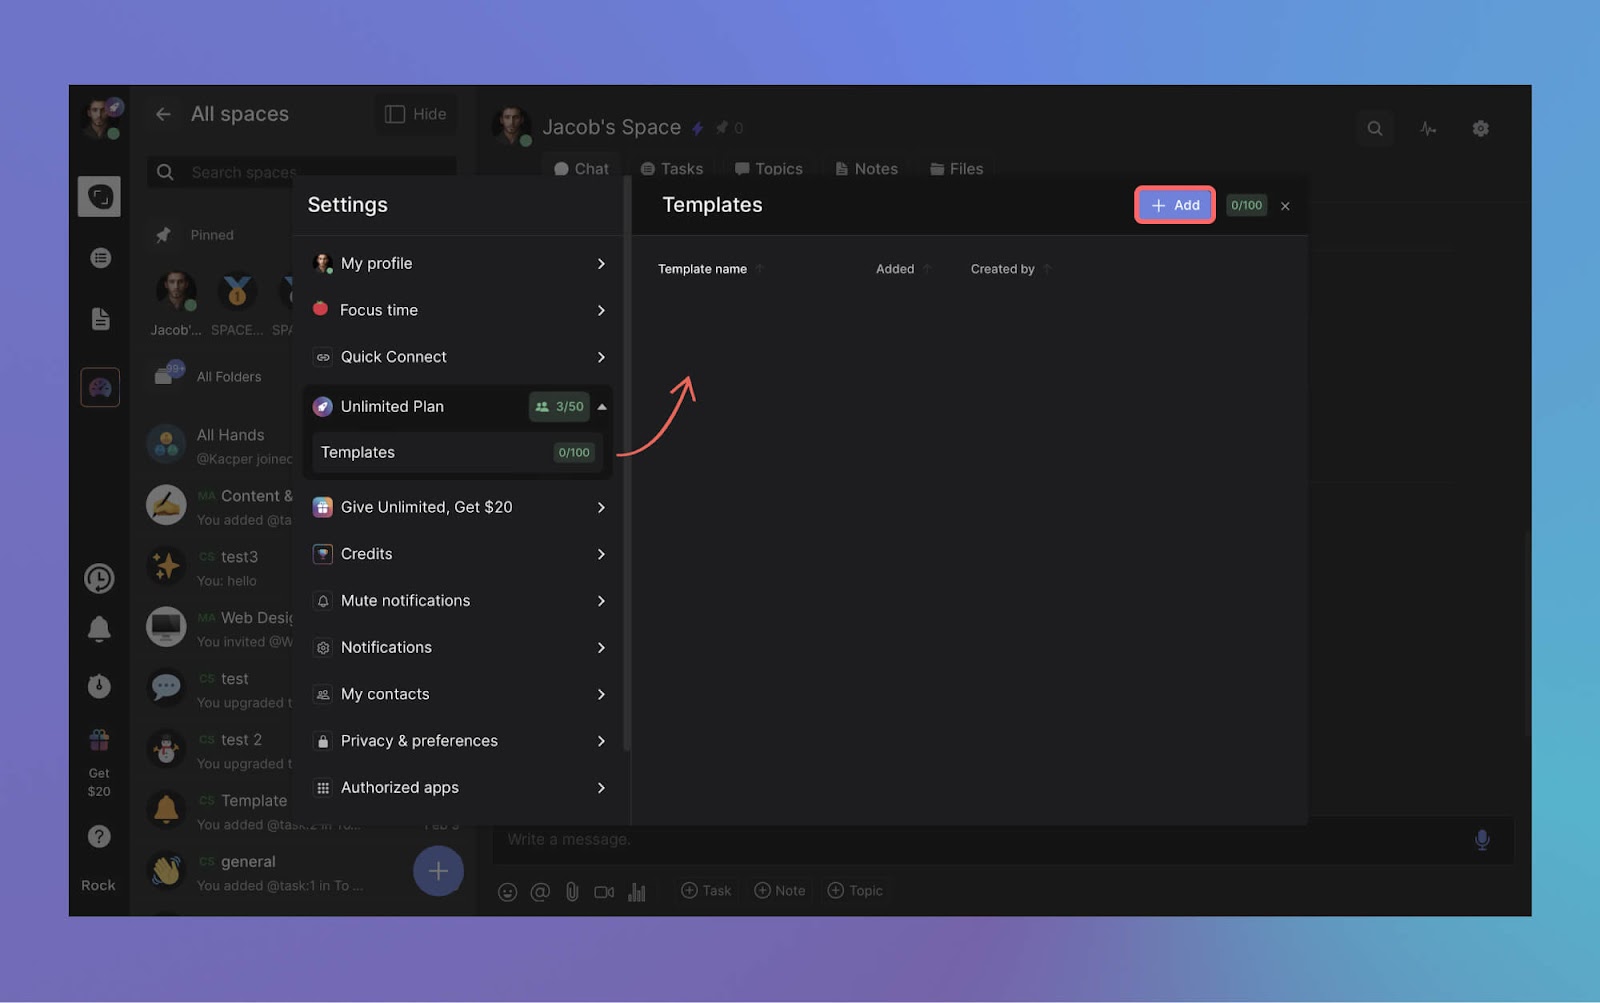
If you don't have an existing space you want to use as a template, you can create one from scratch by accessing your user settings. Simply navigate to the "templates" section and click "add" to create an empty template space.
Once created you can add new tasks, notes, etc, and modify the template according to the needs of your projects.
Once you click on the "add" option, the same configuration panel appears. Select the data that you wish to transfer to future duplicates (tasks, notes, topics…). Note that you can change this configuration in the future through the space settings of the template.
Creating new spaces from templates
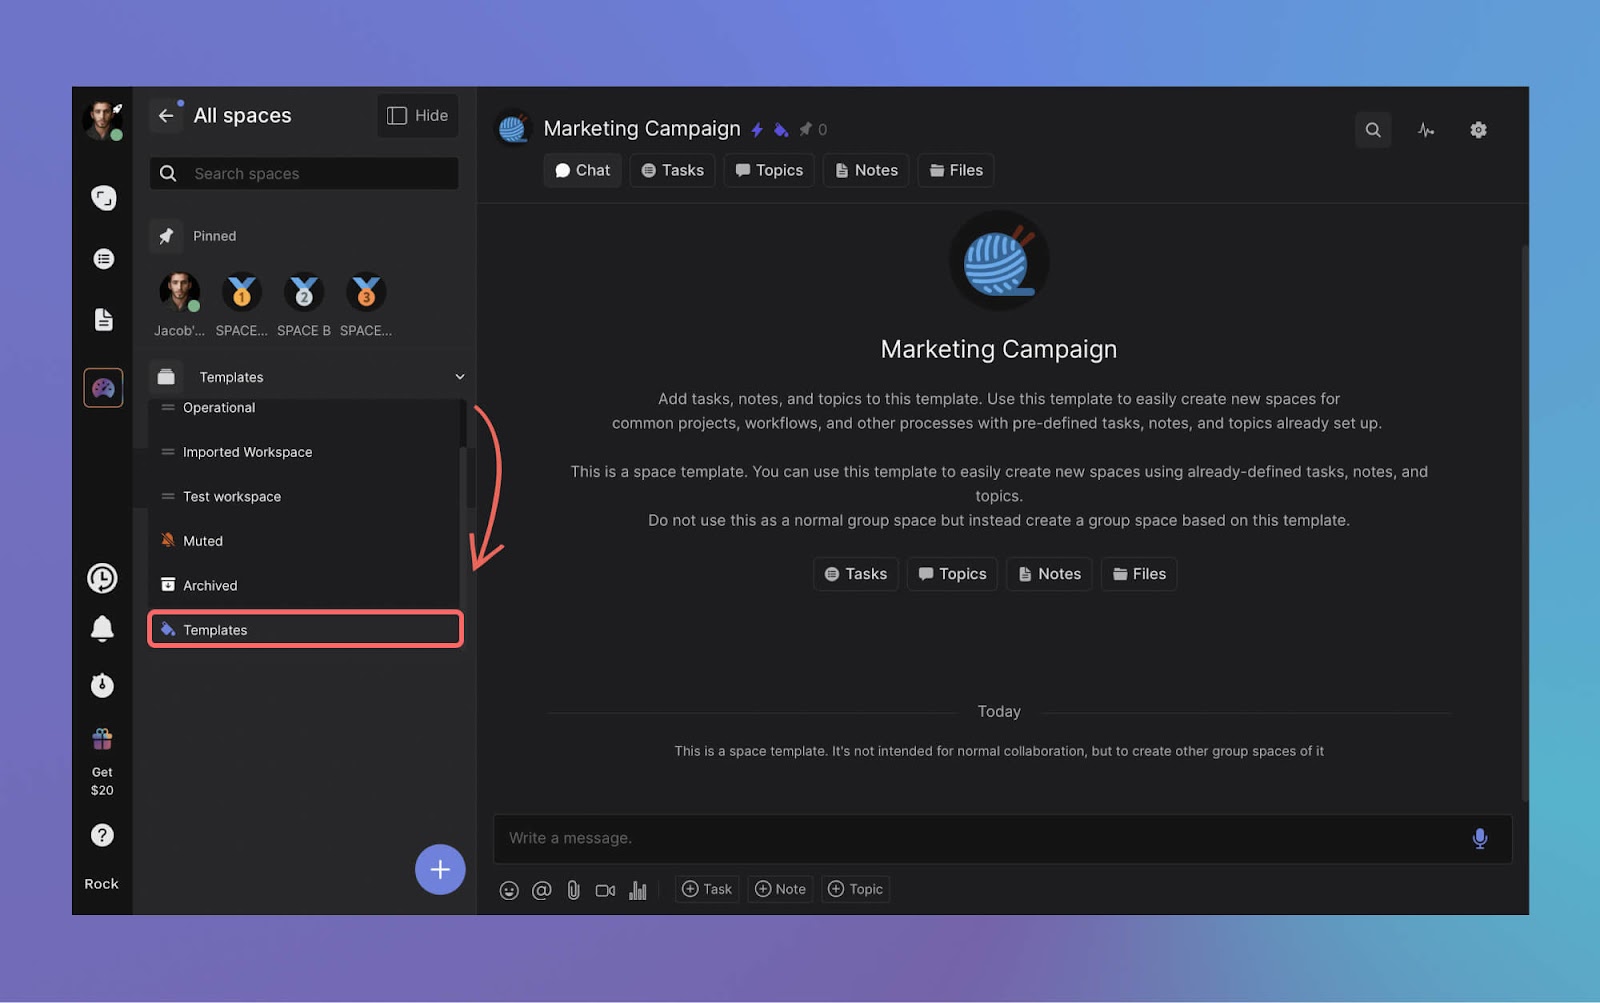
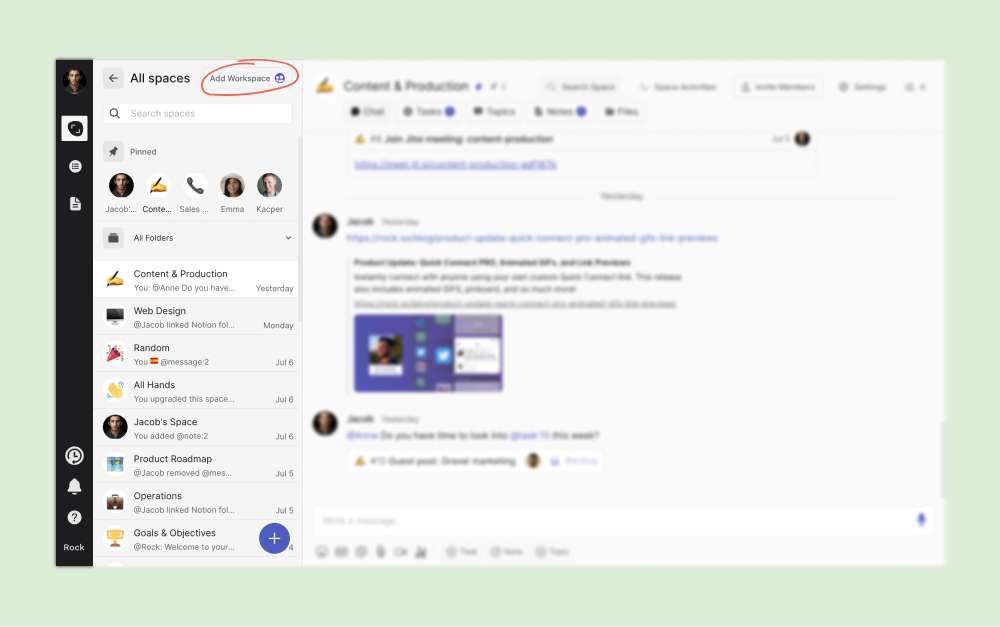
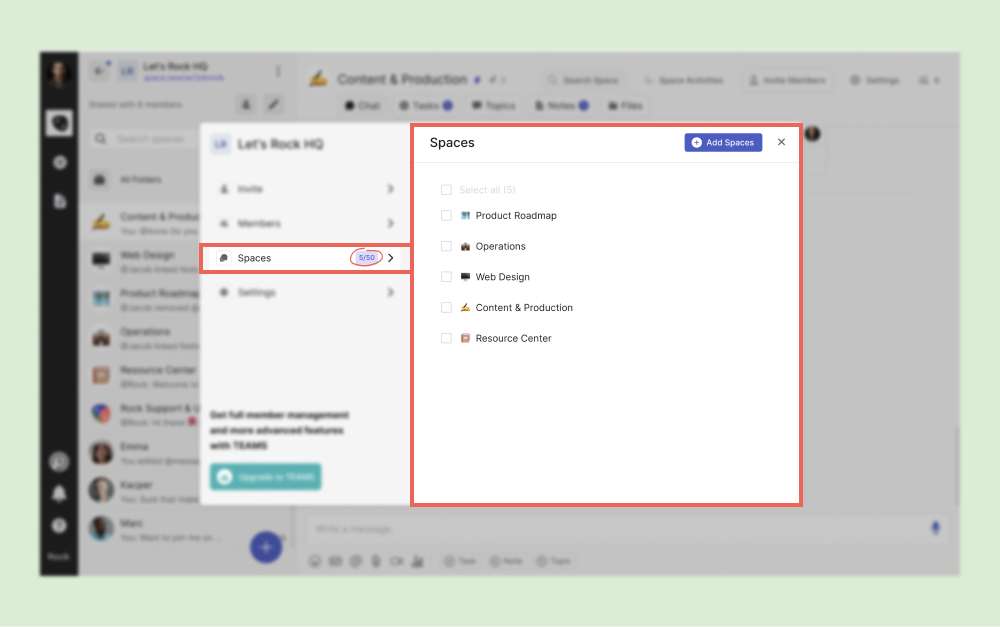
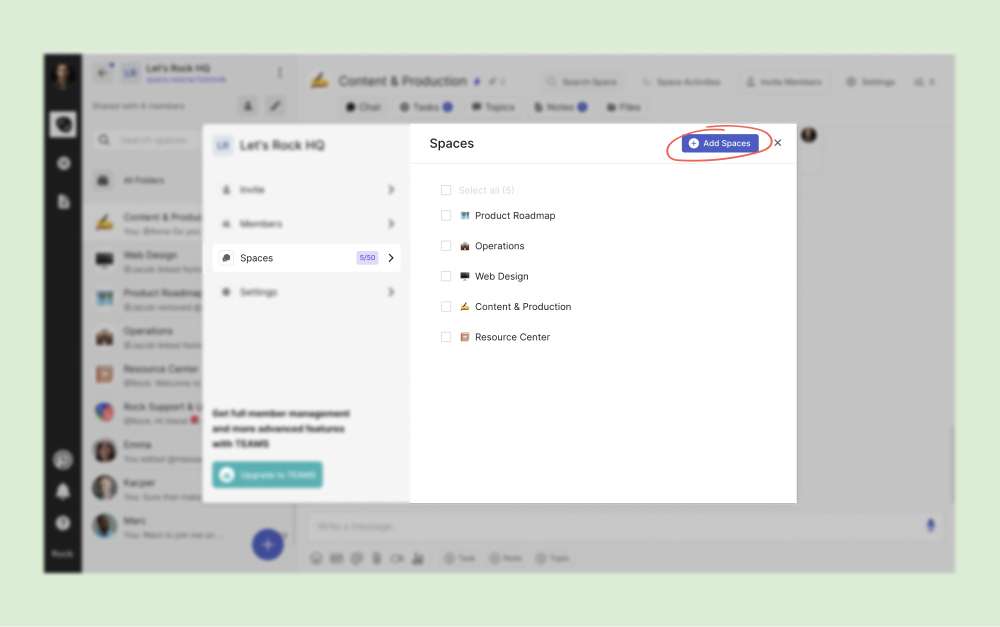
After creating a template, you can easily access it from either the spaces overview or user settings.
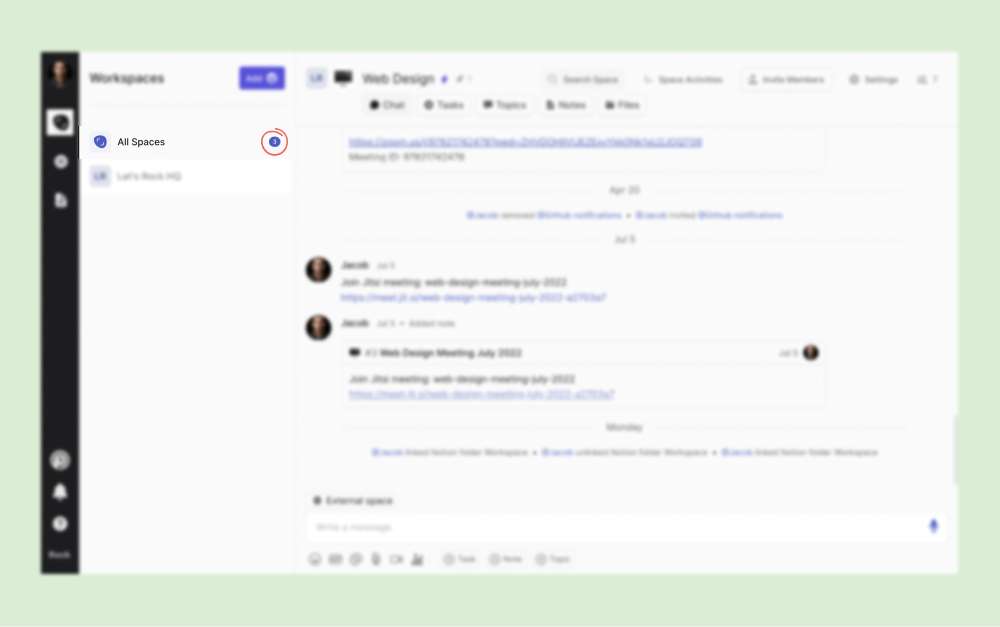
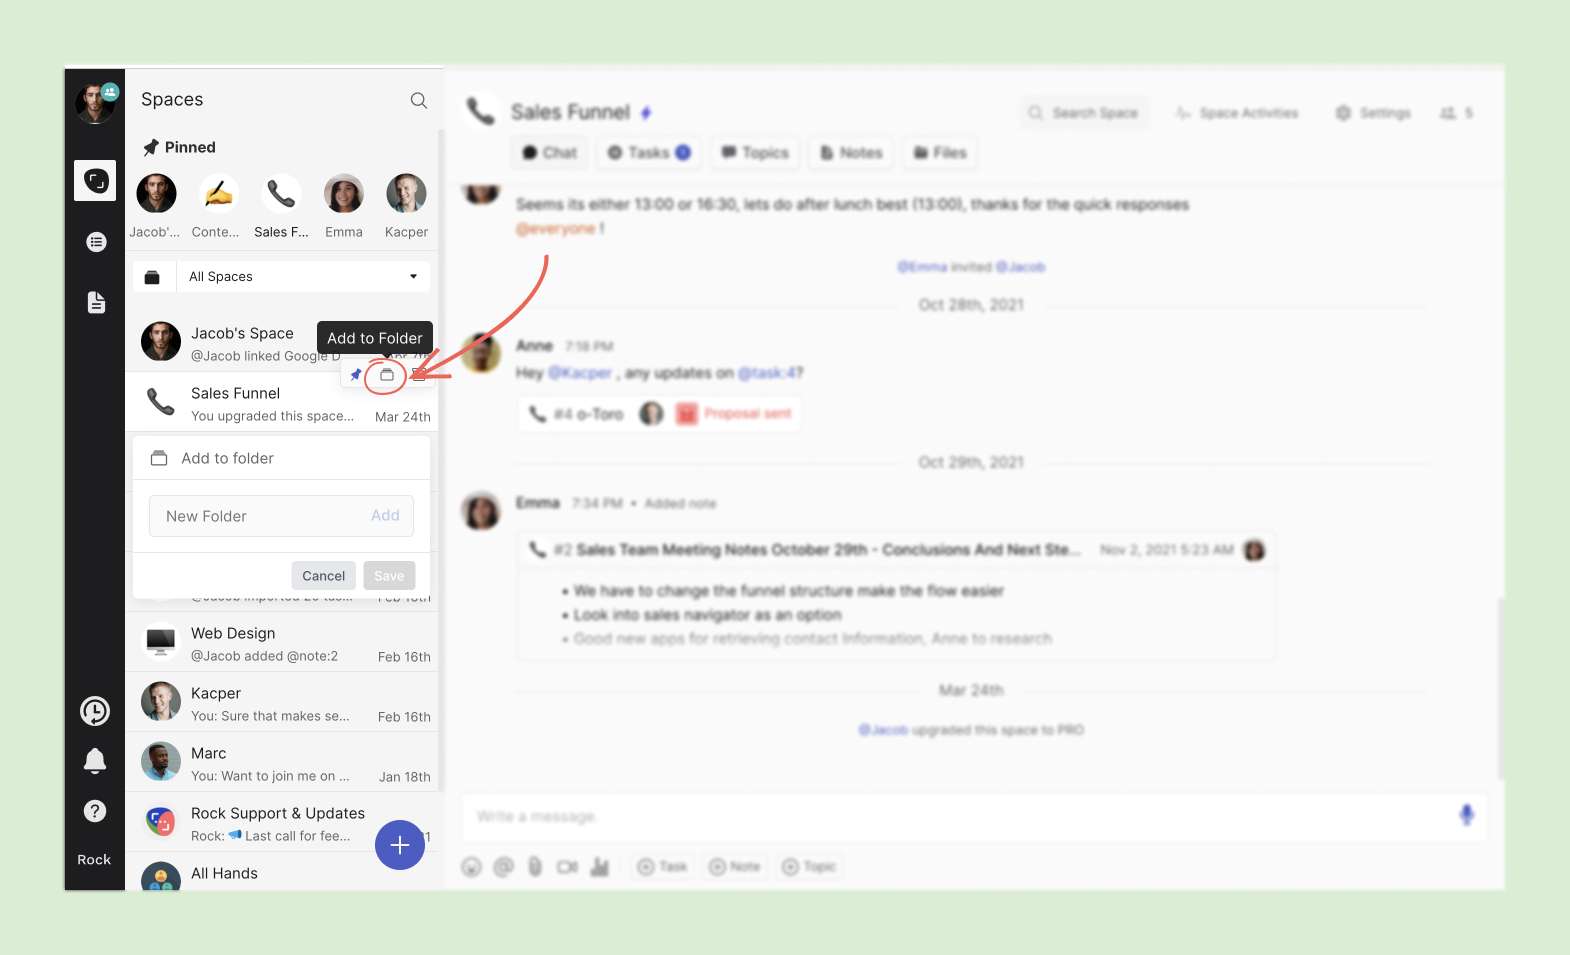
To access templates from the spaces overview, click on the dropdown icon under your pinned spaces, scroll down, and select "templates" to see an overview of all your space templates.
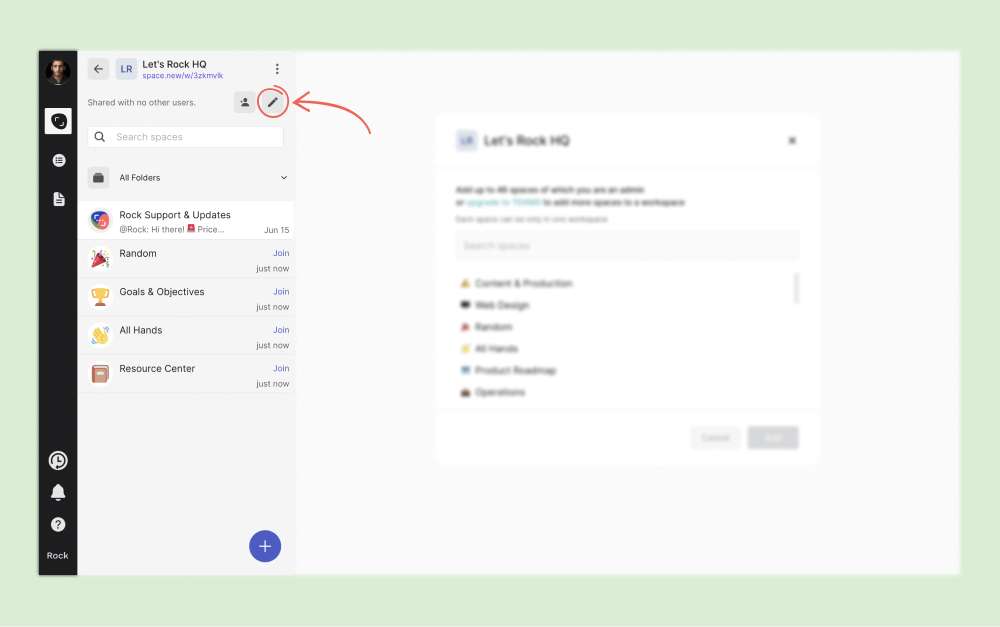
You can also access your templates through user settings by clicking on the edit icon. This will take you to the same view as the spaces view dropdown where you can access your space templates.
Creating new spaces and editing
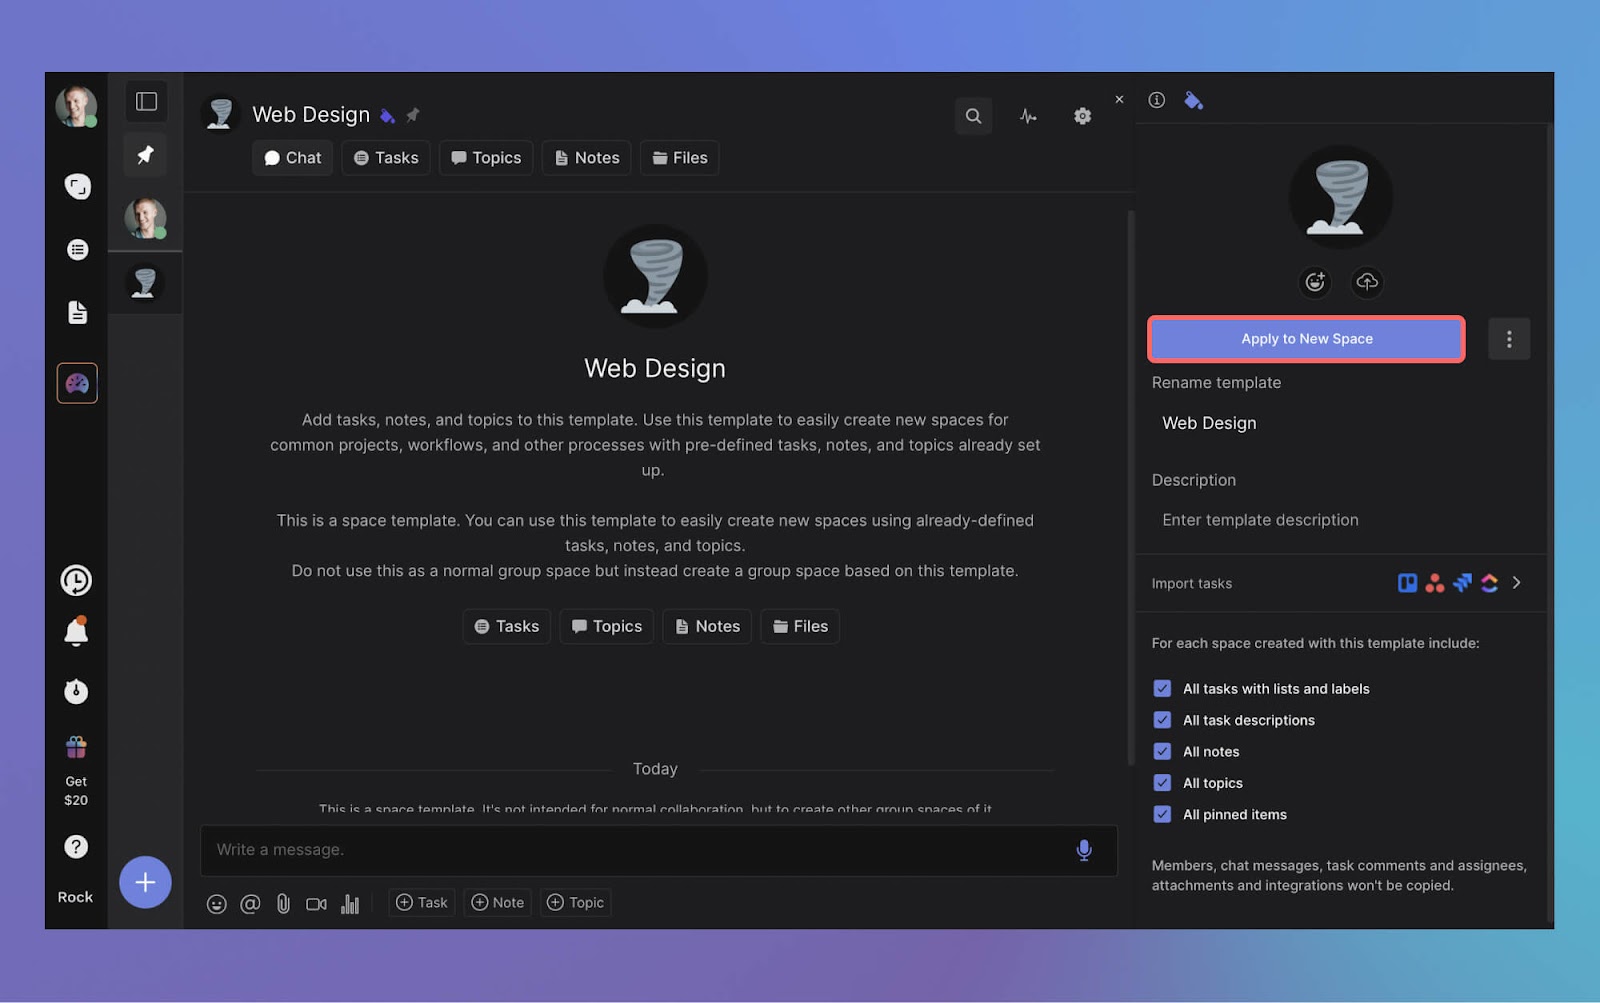
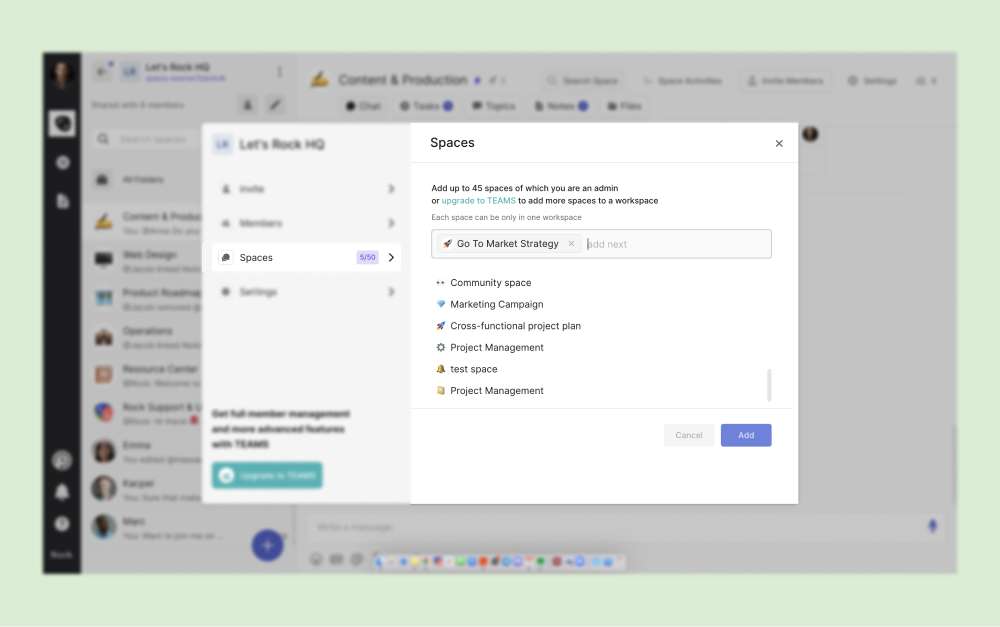
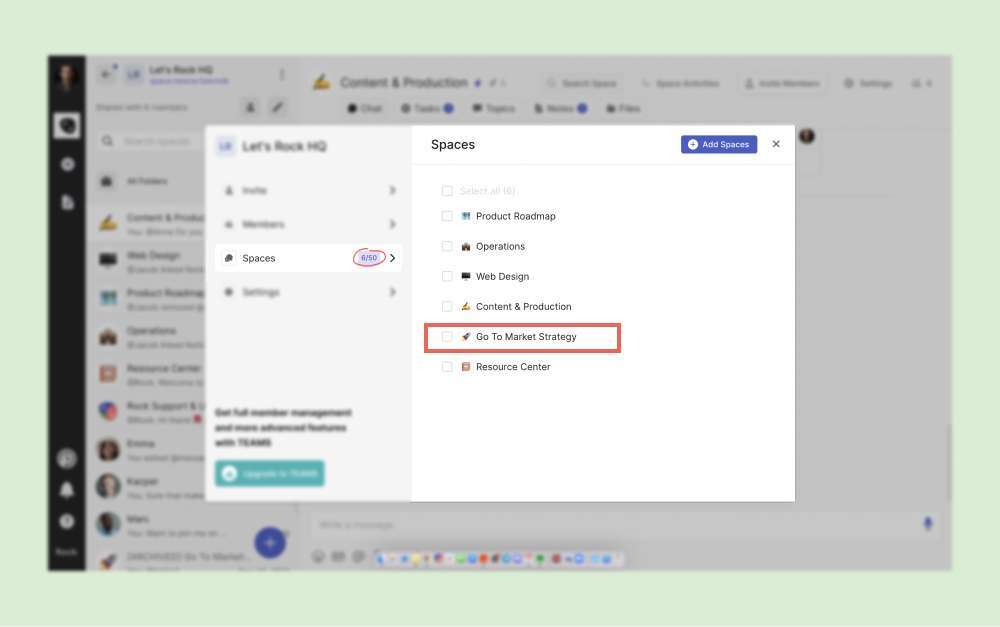
To make use of a template, navigate to the space settings of the desired template and select "Apply to new space". This will generate a new group space with the same configuration as the selected template, based on the information you chose to copy over.
To customize the information that is carried over to a new space, you can easily modify the template by updating the checkbox configurations in the space settings. Any new tasks, notes, or other objects created in the template space will be included in future copies.
However, it's important to note that any changes made to the original template will not affect the group spaces that have already been created from it.
Removing templates
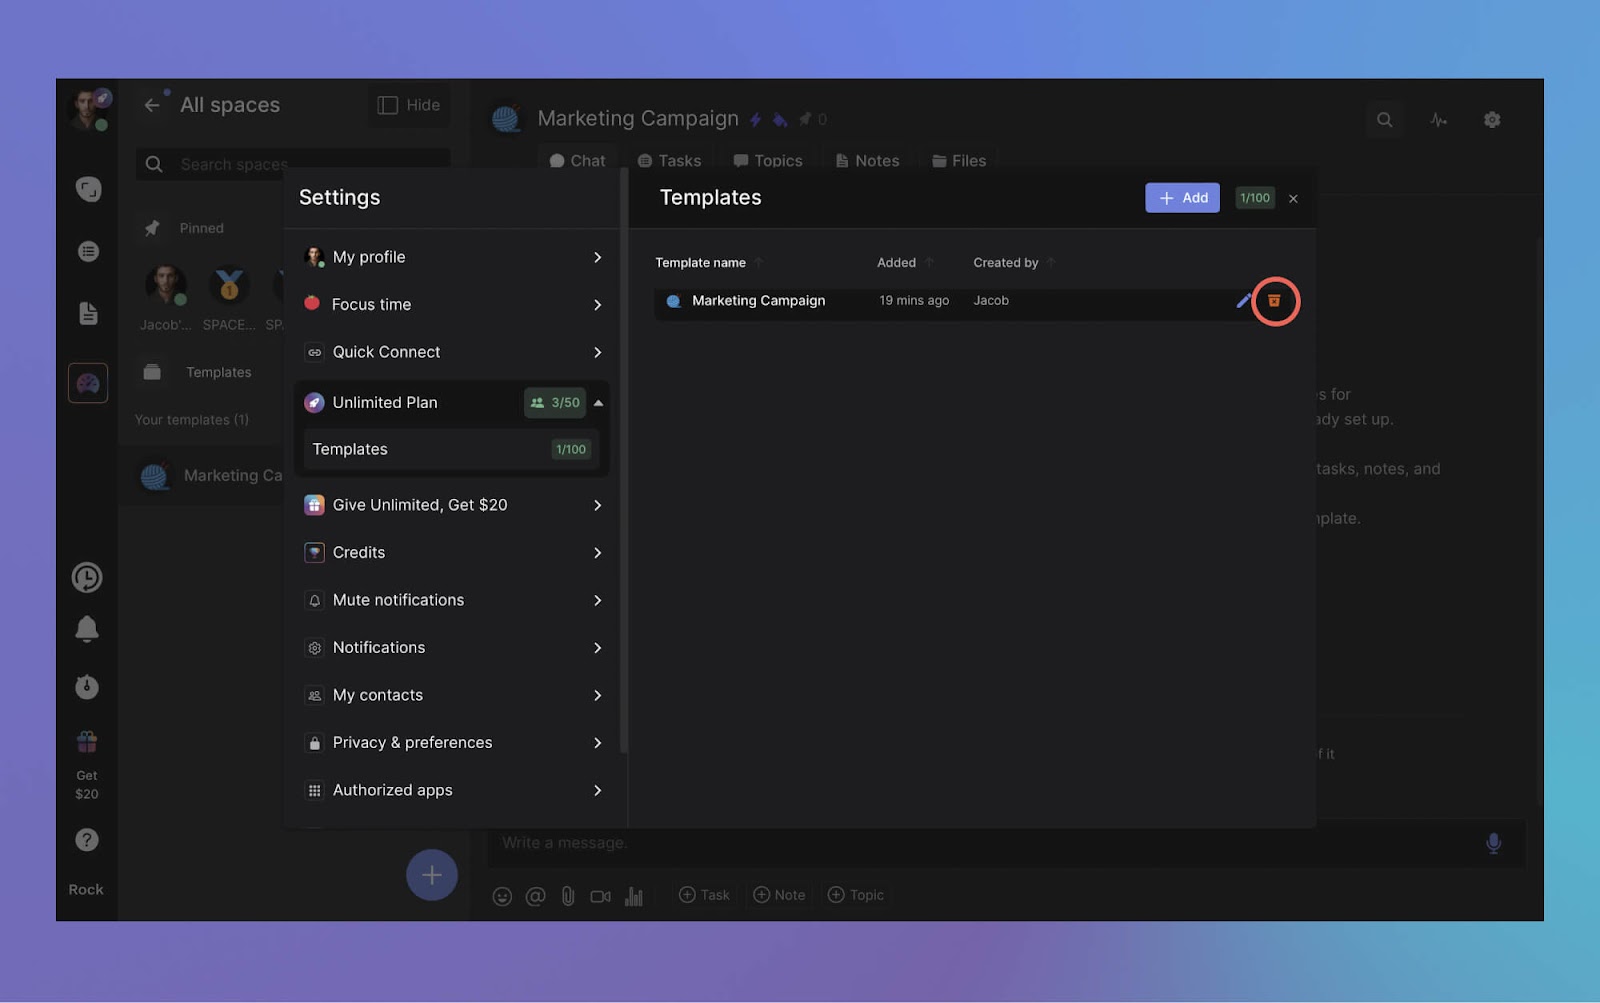
Templates can be removed through the dedicated panel in user settings. Locate the template you want to remove, hover over it, and click on the delete icon. Note that once a template has been removed, it cannot be retrieved.
It's important to remember that if the template was created from an existing space, the space will still exist, and deleting the template won't affect it.
Similarly, any spaces created from a template won't be removed when you delete the original template.
Questions and Answers
Are spaces created from templates removed when I delete a template?
No, spaces created from templates are not removed when you delete the original template.
I’m on the free plan, do templates count toward my spaces quota?
Templates are not included in your space quota. However, it's important to note that the spaces you create using a template will count toward your space quota.
Can I invite people to edit a template space together?
Collaborative editing of a space template is not possible as it can have only one member. However, you can make the necessary edits by creating a group space, and later converting it into a template.
It's easier than ever to upgrade to Unlimited! Offer a free month of Unlimited to a new signup and receive 20 USD off your own Unlimited Plan.
Who can qualify?
A few basic conditions apply to successfully redeem a Give Get reward.
1. The user must be a first-time signup.
2. The account must make use of the offer.
The 20 USD in balance can be redeemed once a user has made their first payment on the unlimited plan.
How it works
Every user has a personalized upgrade link that offers one free month of Unlimited to new signups. These links can be found in user settings under "Give Unlimited”.
Sharing your link
New signups who click on the personalized link will be redirected to a payment page where they can redeem the offer. On mobile, the link can be manually entered when signing up.
The signup will need to manually enter their credit card information, but they will not be charged for the first month. After the initial month, they will be automatically enrolled in the monthly subscription.
To discontinue automatic payments after the free trial, the user must cancel the plan before the trial's end.
Keeping track of your links
"Give Get" includes a panel that tracks new signups generated through your link, allowing for reminders or follow-up messages if needed.
The panel displays active signups under five categories: All, Available, Pending, Redeemed, and Expired. Use the dropdown option to filter and manage active link redemptions.
Redeeming your rewards
To redeem rewards, select the checkbox next to users with available rewards. If redeeming rewards exceeds the installment cost on the plan, the remaining value will not carry over to the next billing period.
On an unlimited plan, redeemed rewards will be discounted from the next billing period.
You have 30 days to redeem your reward. Once it's redeemed and added to your balance, it doesn’t expire, but it does not carry over to the next payment.
Questions and Answers
Is there a limit to the number of times I can share Rock with others?
There is no limit on the number of times a code can be redeemed!
Is the available balance under the program transferable across accounts on Rock?
“Give Get” rewards are not transferable among accounts so make sure that your team uses the same URL when inviting new people.
Can I give a month of Unlimited to a user that is already on Rock?
No, It is not possible to give a month of unlimited to a user who has already signed up to Rock.
Can I give multiple months of unlimited to the same user?
No, it is only possible to give one month of unlimited to a user.
Can I give a month of Unlimited to a user that has already upgraded?
No, it is impossible to give a month of unlimited to users already on the unlimited plan.
Are rewards stackable?
Yes! You receive 20 USD in credit to upgrade within Rock,
I am already on Unlimited, what are the benefits when I gift Rock to new users?
Definitely! The 20 USD rewards are discounted from your next billing period. If you are on a monthly plan, the amount will be deducted from your next installment. If you are on an annual plan the same logic applies.
If you gathered multiple rewards (i.e., successfully gifted Rock 3 times), then those rewards are stackable on your next billing period.
Do I also receive rewards within the credit program when someone uses the Give Get link?
Yes! You also receive credits within the credit program when someone uses the link. This means that you can earn an additional 11 credits (1 for the signup and 1 if they are a new corporate domain) when someone uses your give get link.
Can the 20 USD in balance expire?
No, the balance you earn through the program does not expire.
The webform is a free feature that allows you to redirect website responses as tasks into a dedicated Rock space. This can be useful to more intuitively manage contact forms, newsletter or event signups, collect feedback or manage new leads.
This dedicated product guide explains how to can create a new webform on Rock and the required steps to add it to your website.
How to add a new webform in your Rock space
There are two different locations where you can create a new webform. Note that for the feature to appear you must have admin permissions within the space.
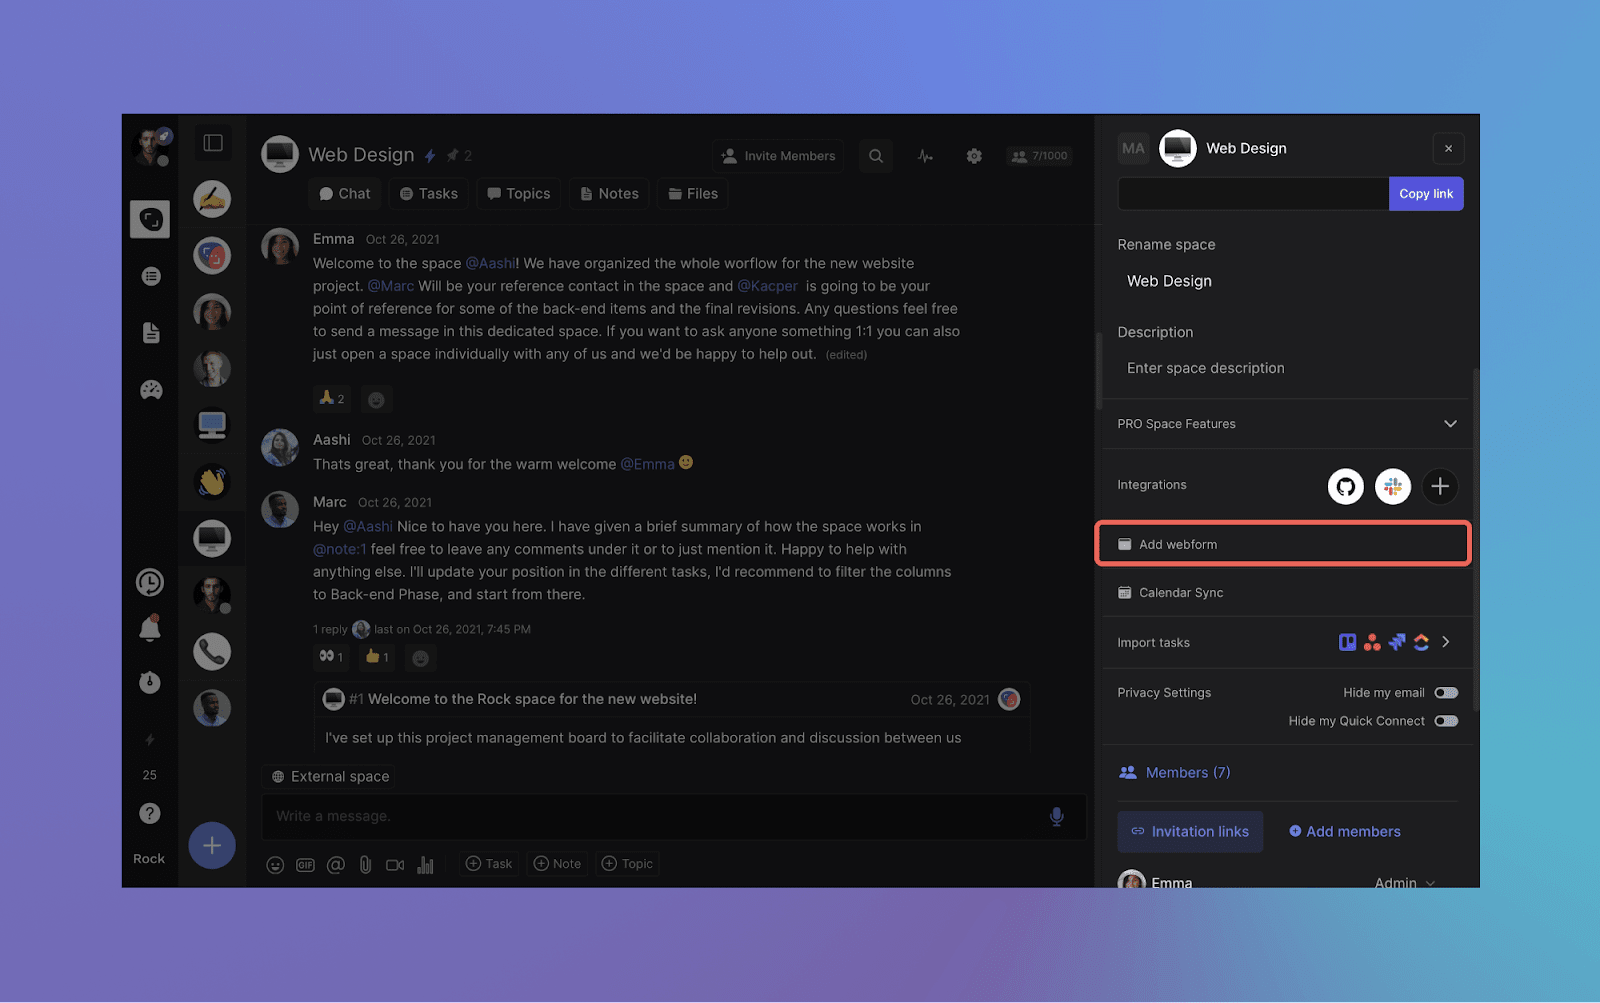
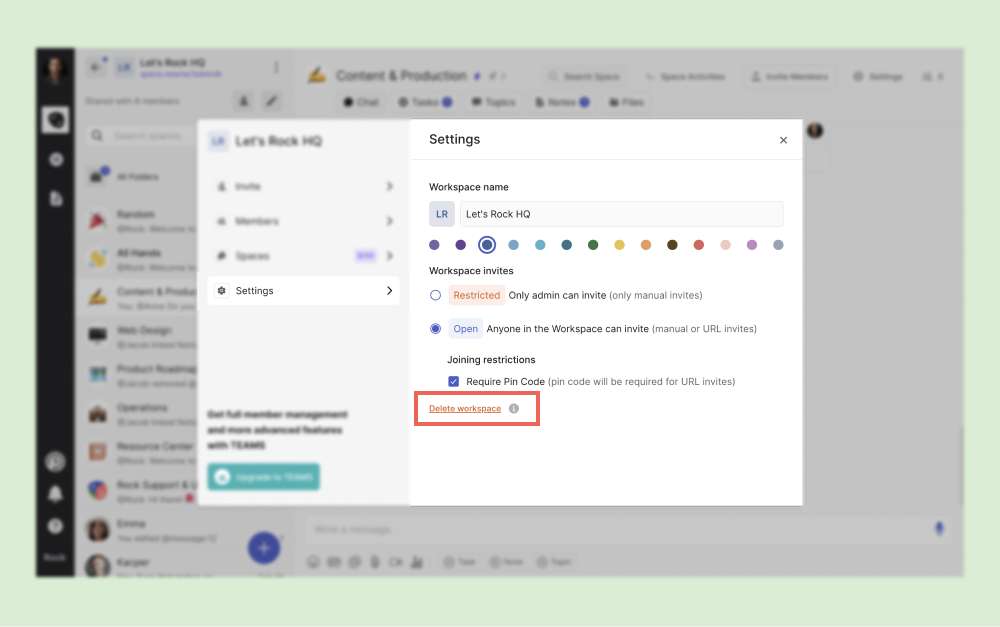
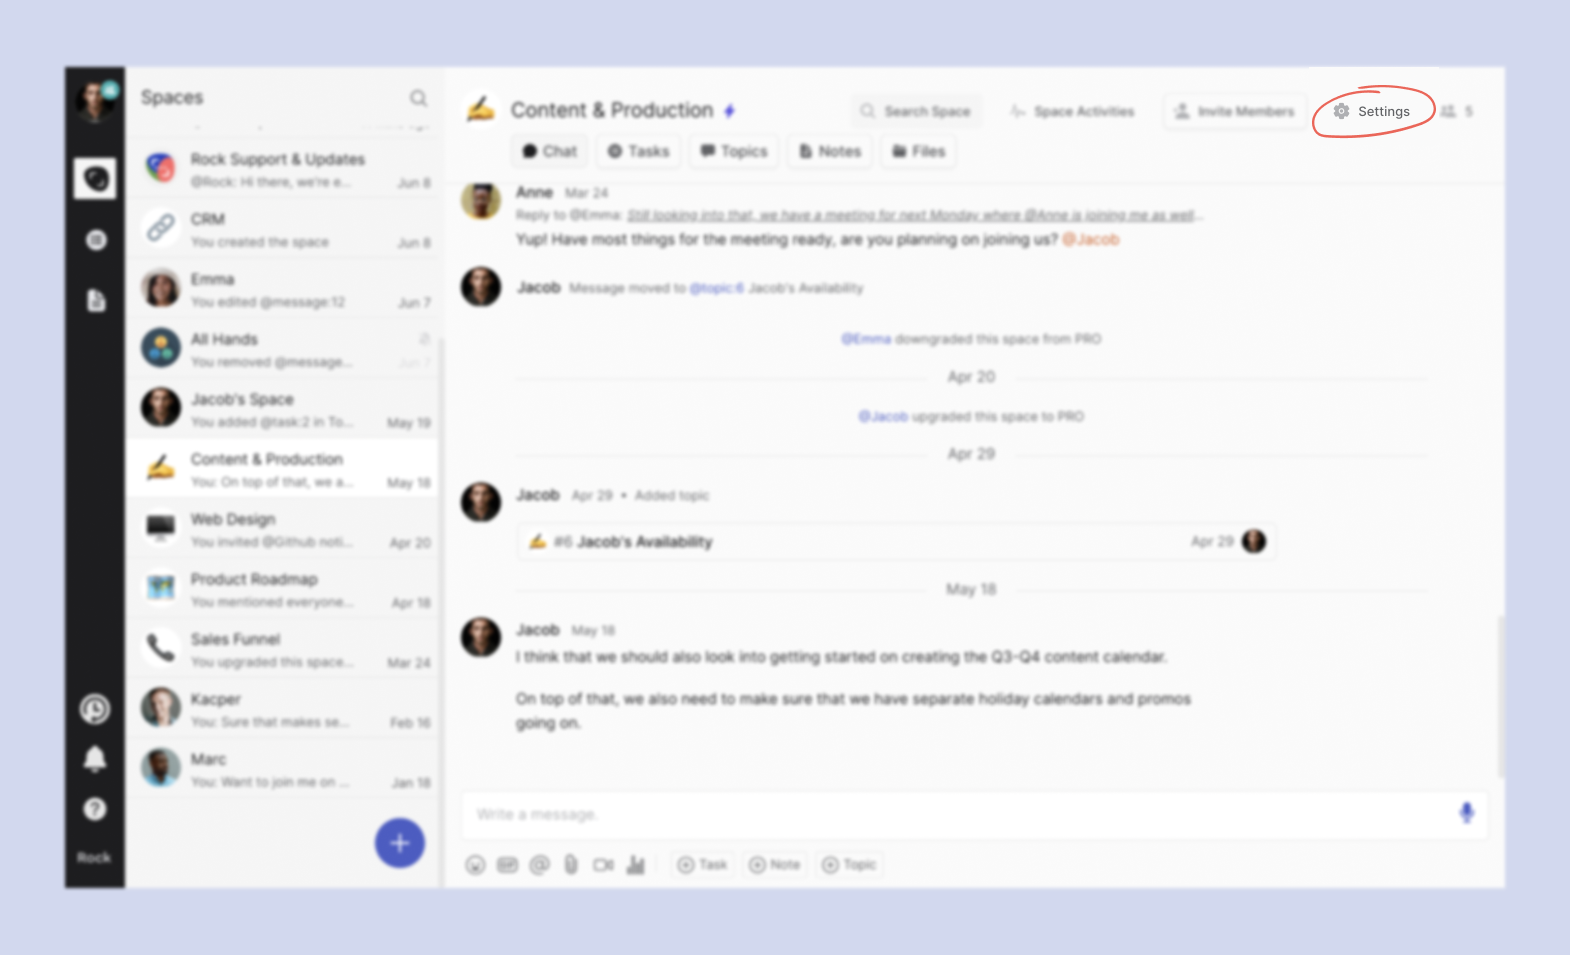
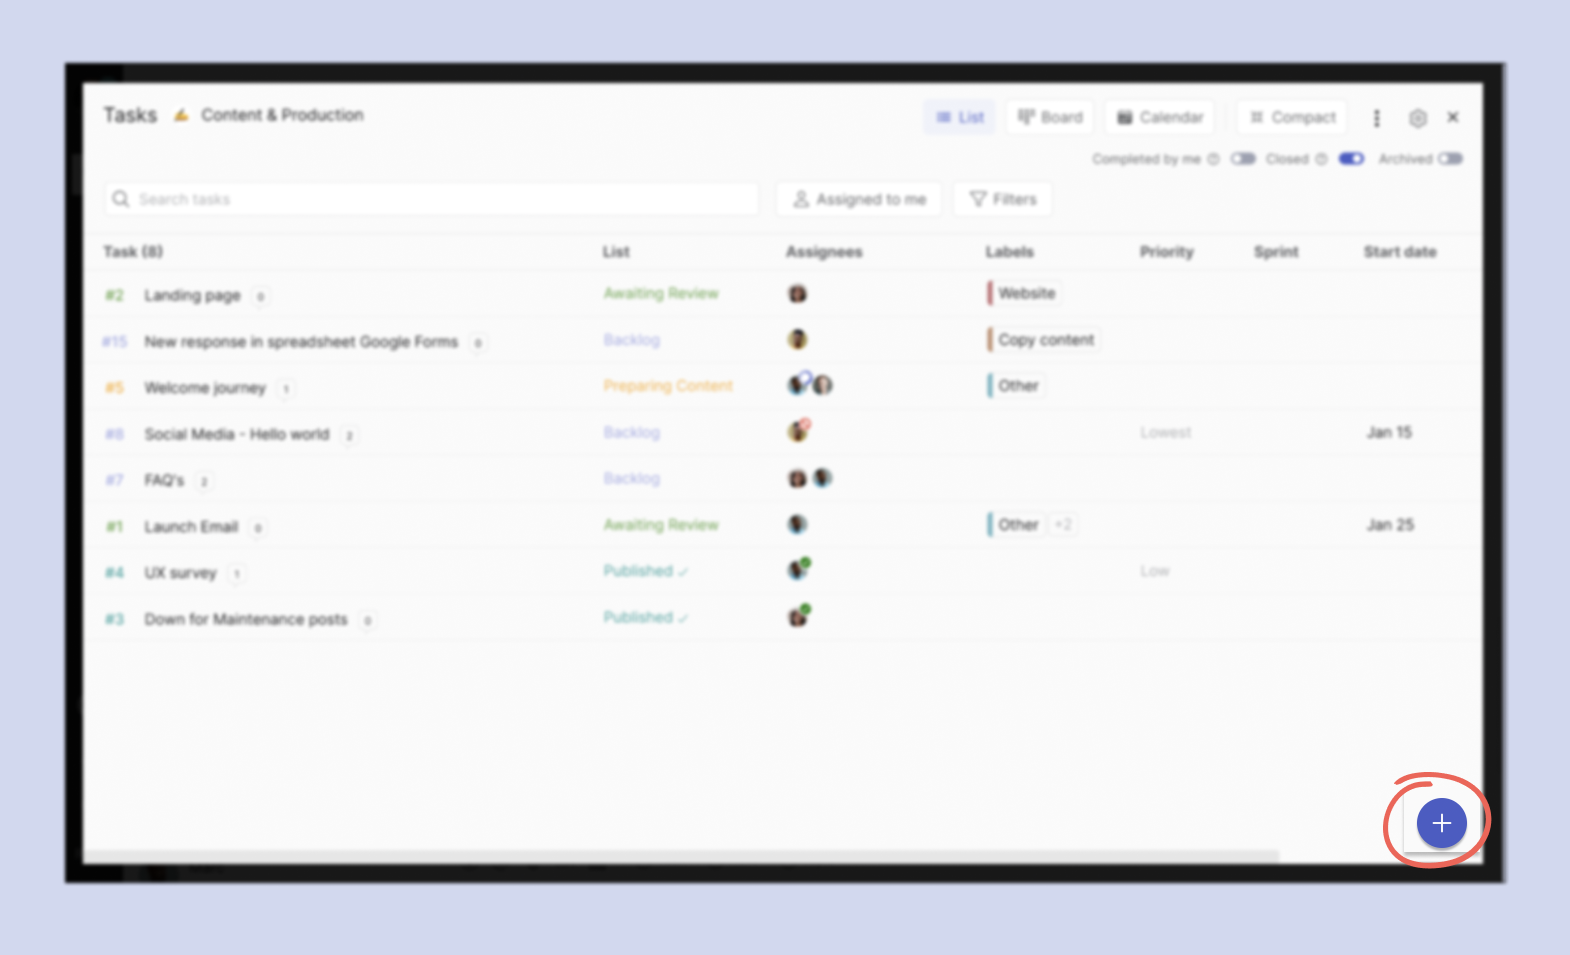
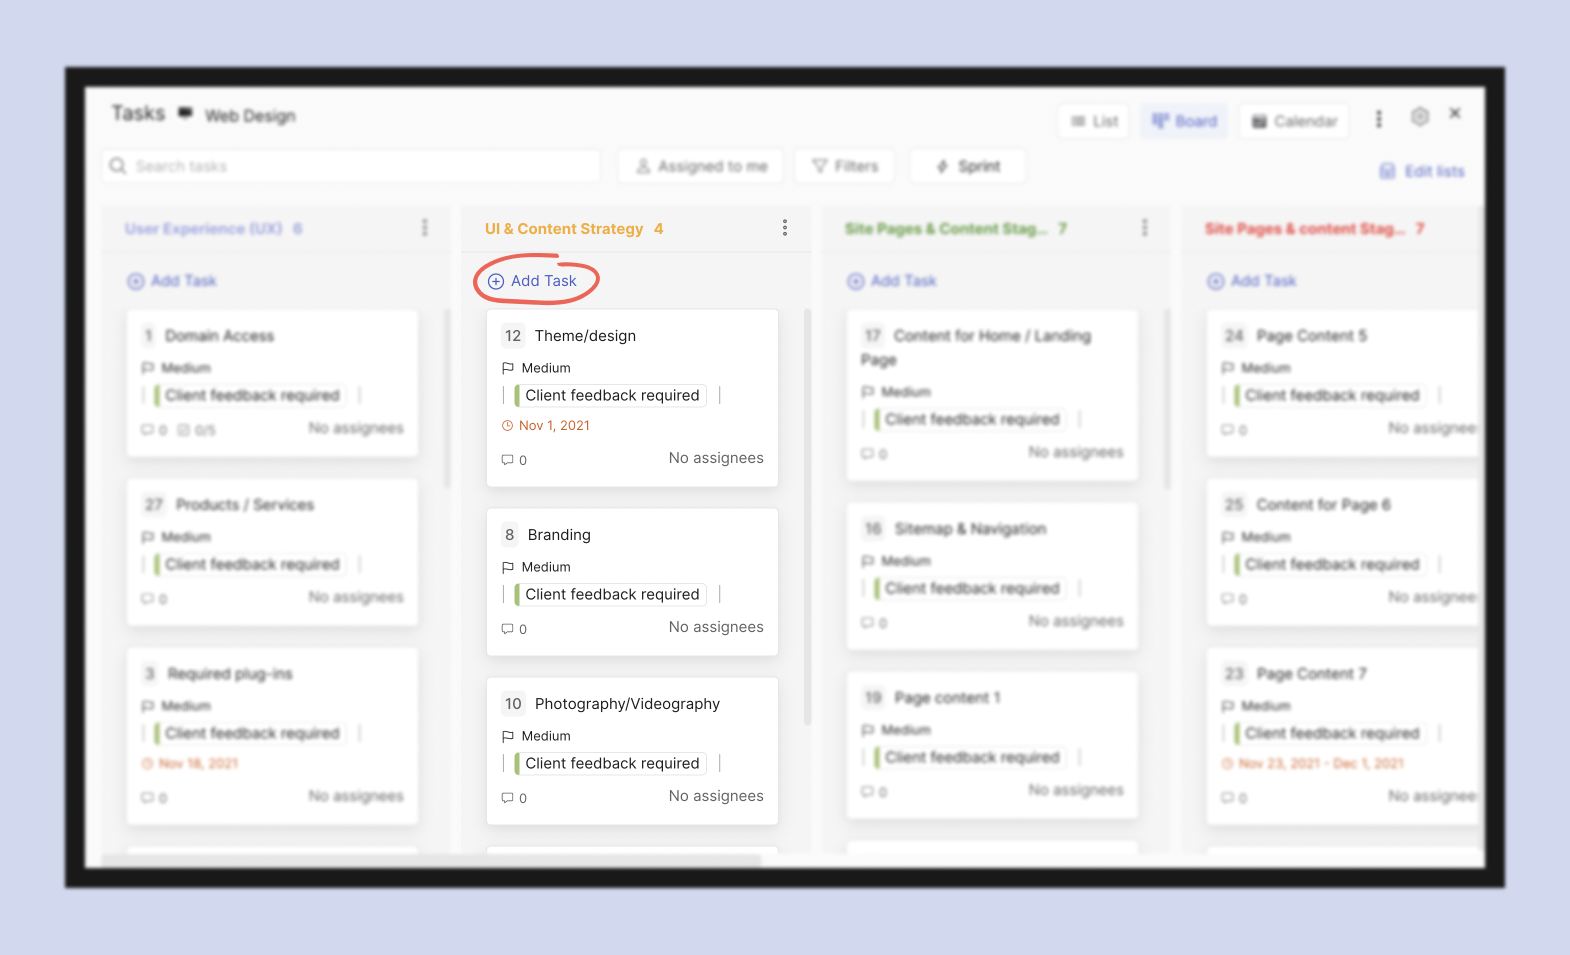
The first place where you can add a new form is through space settings. To access the feature, click on settings at the top right corner of your space and scroll down to “Add webform”.
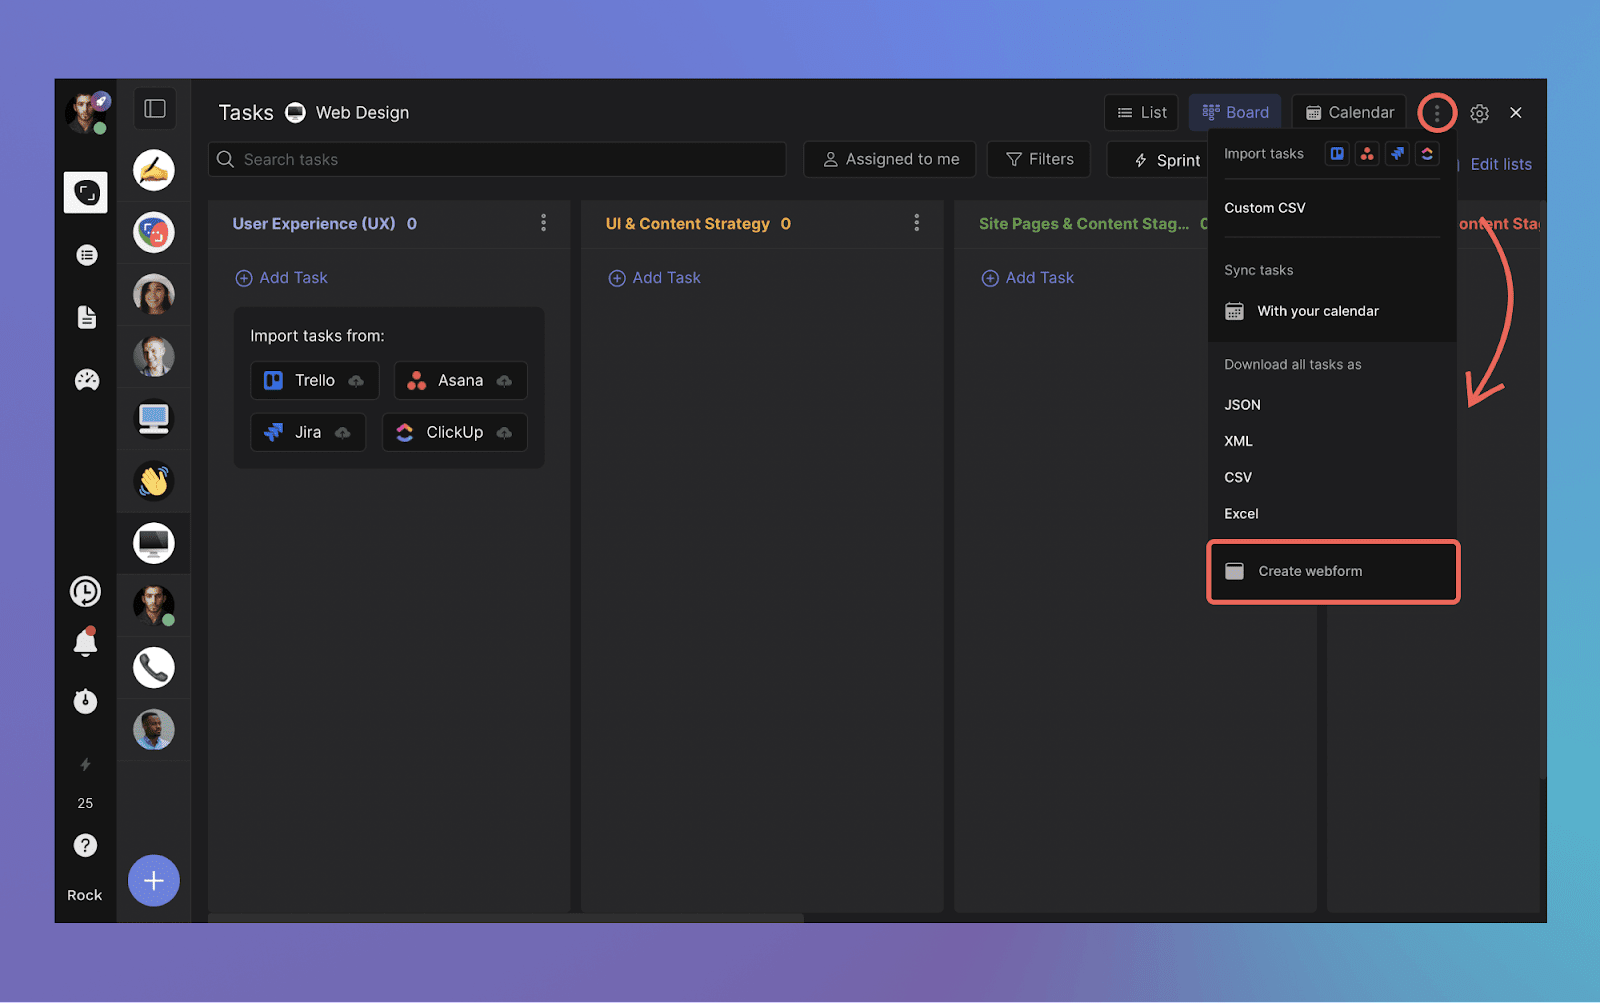
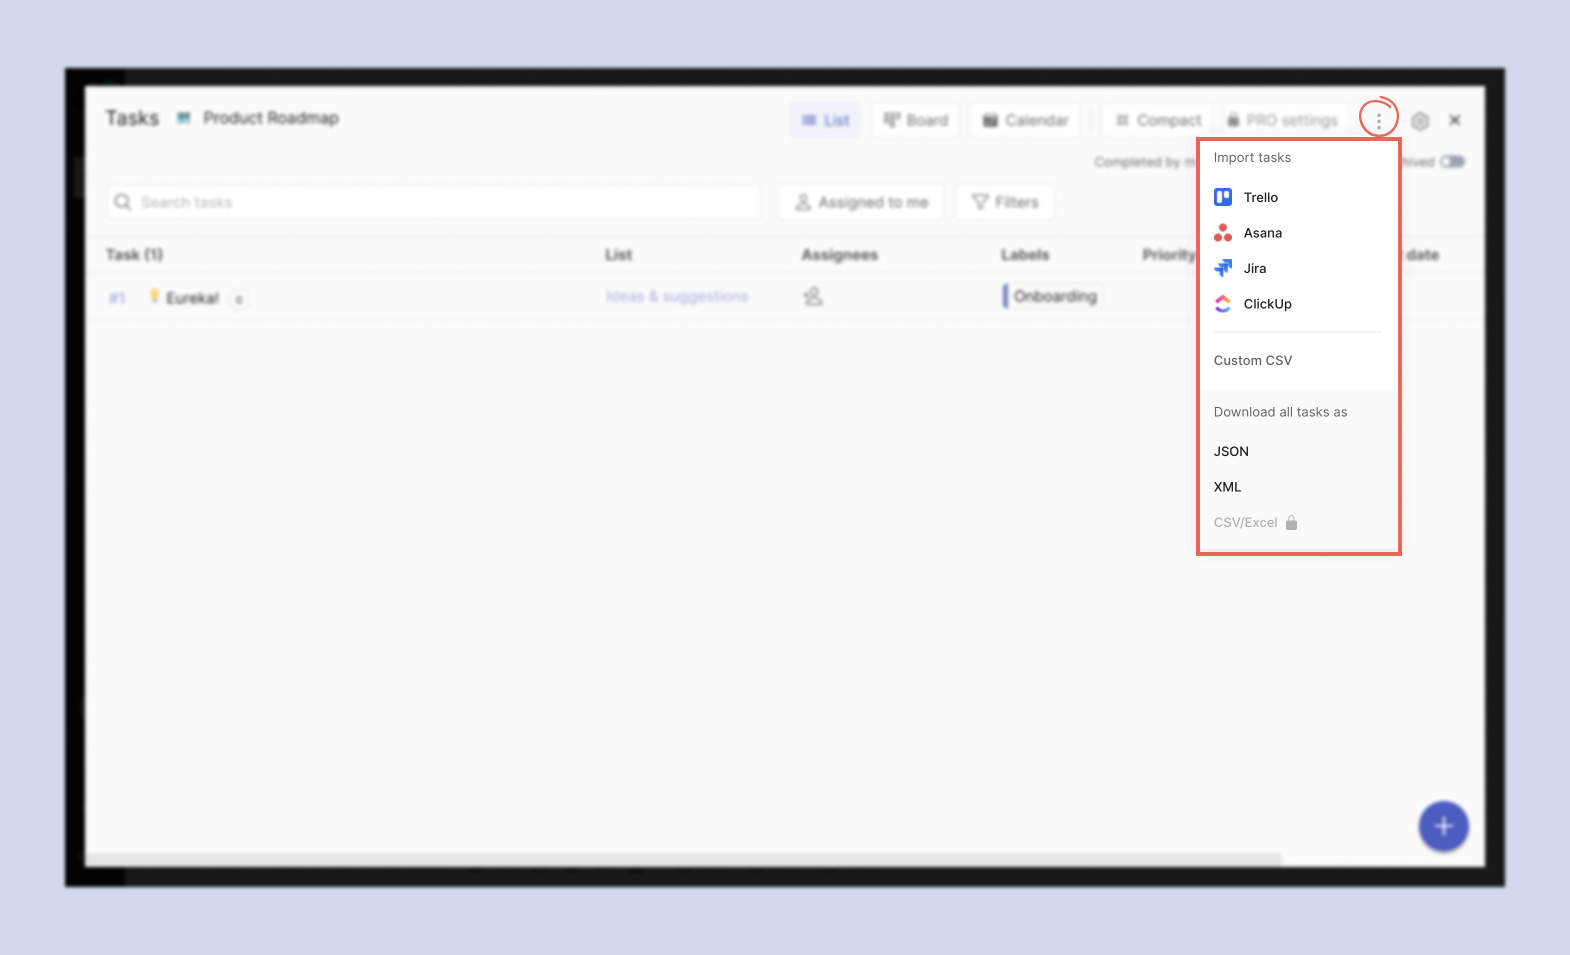
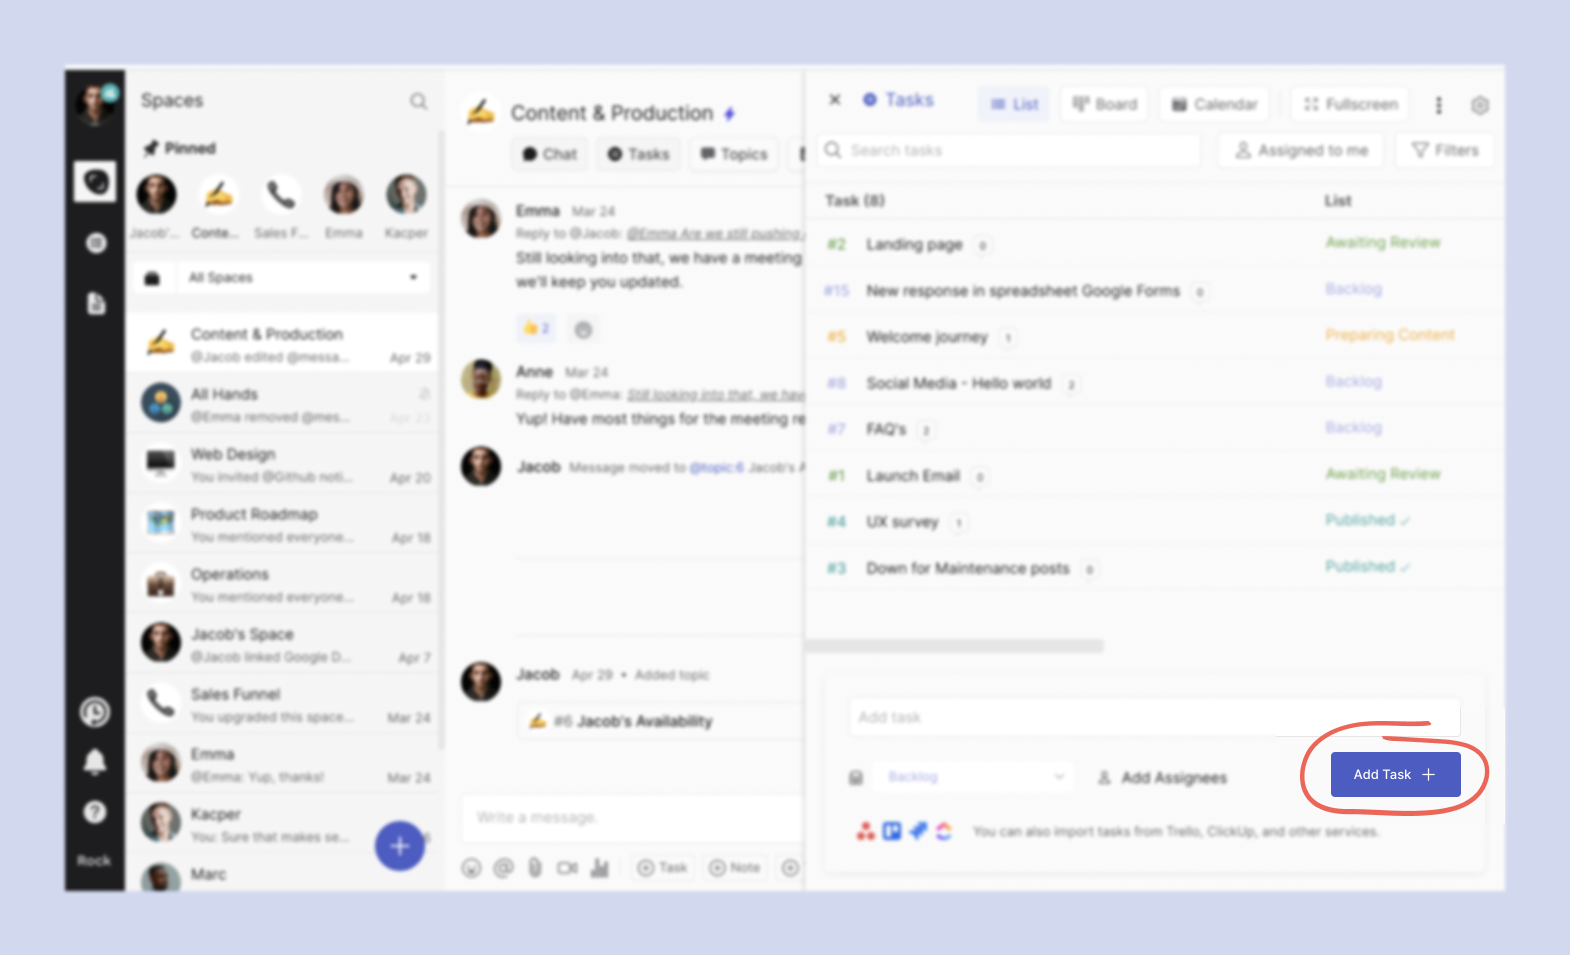
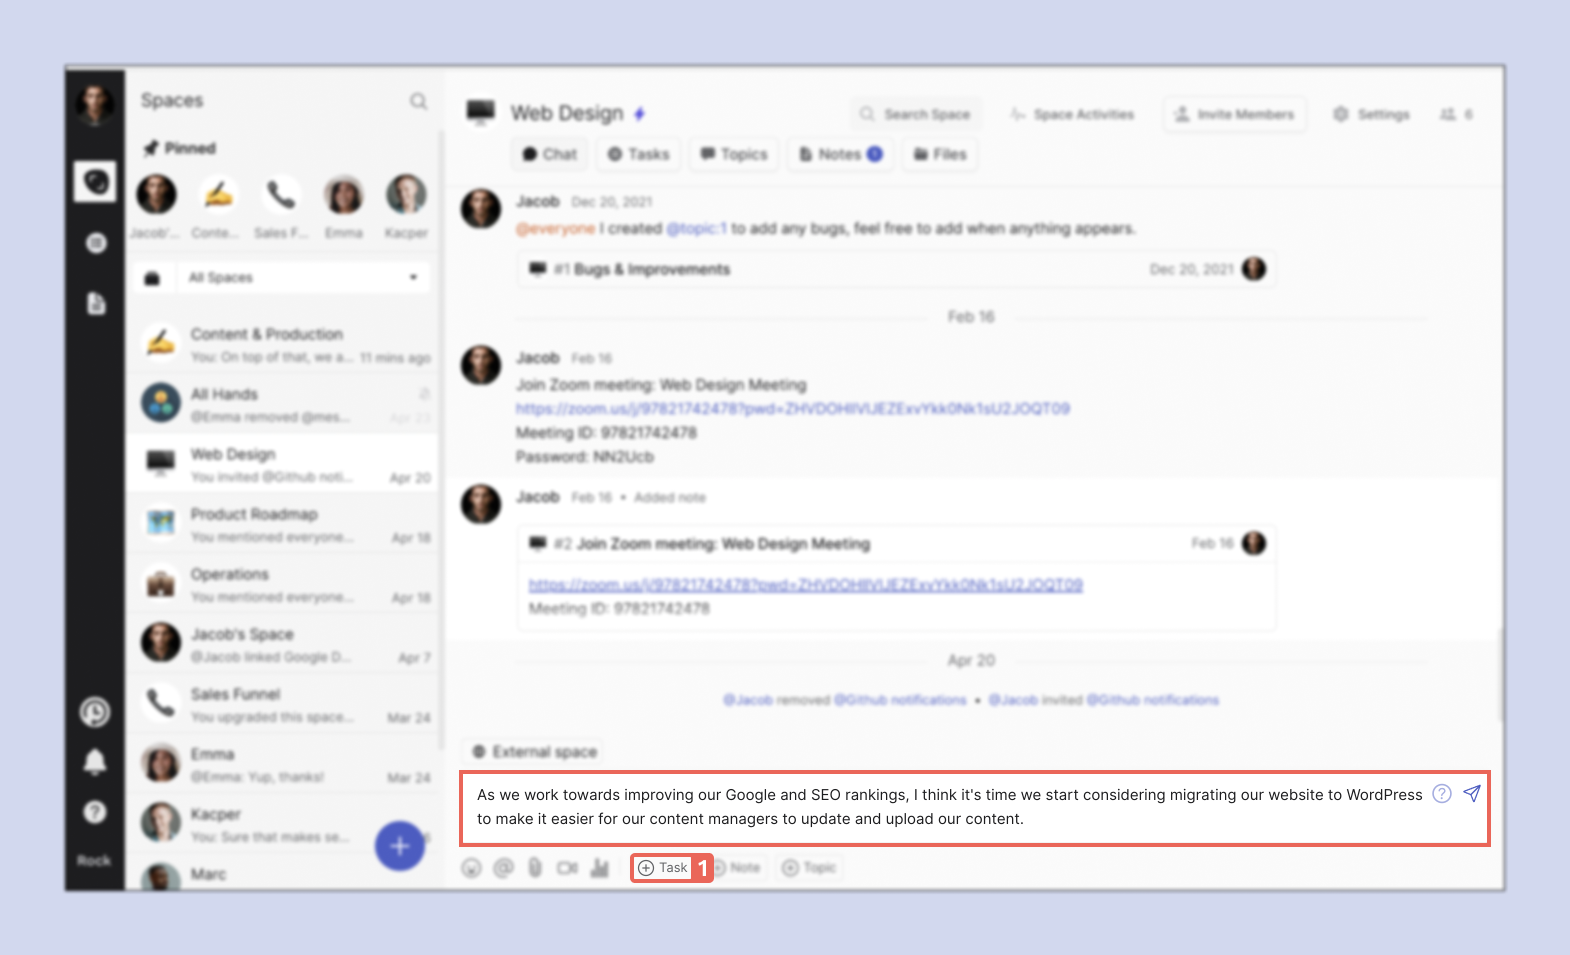
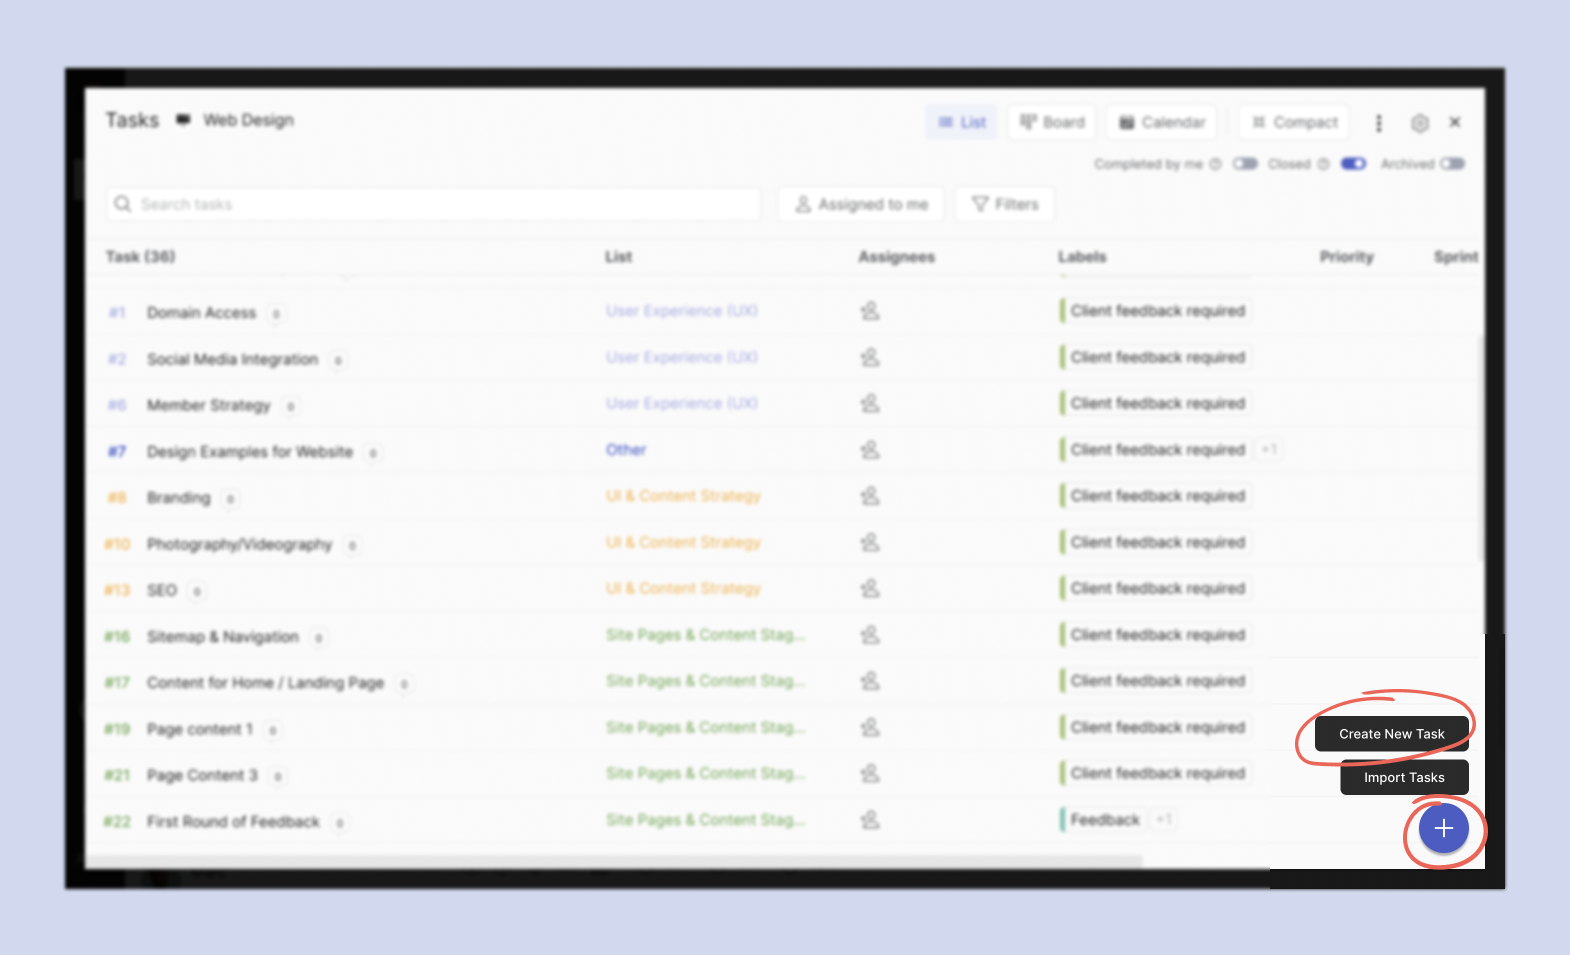
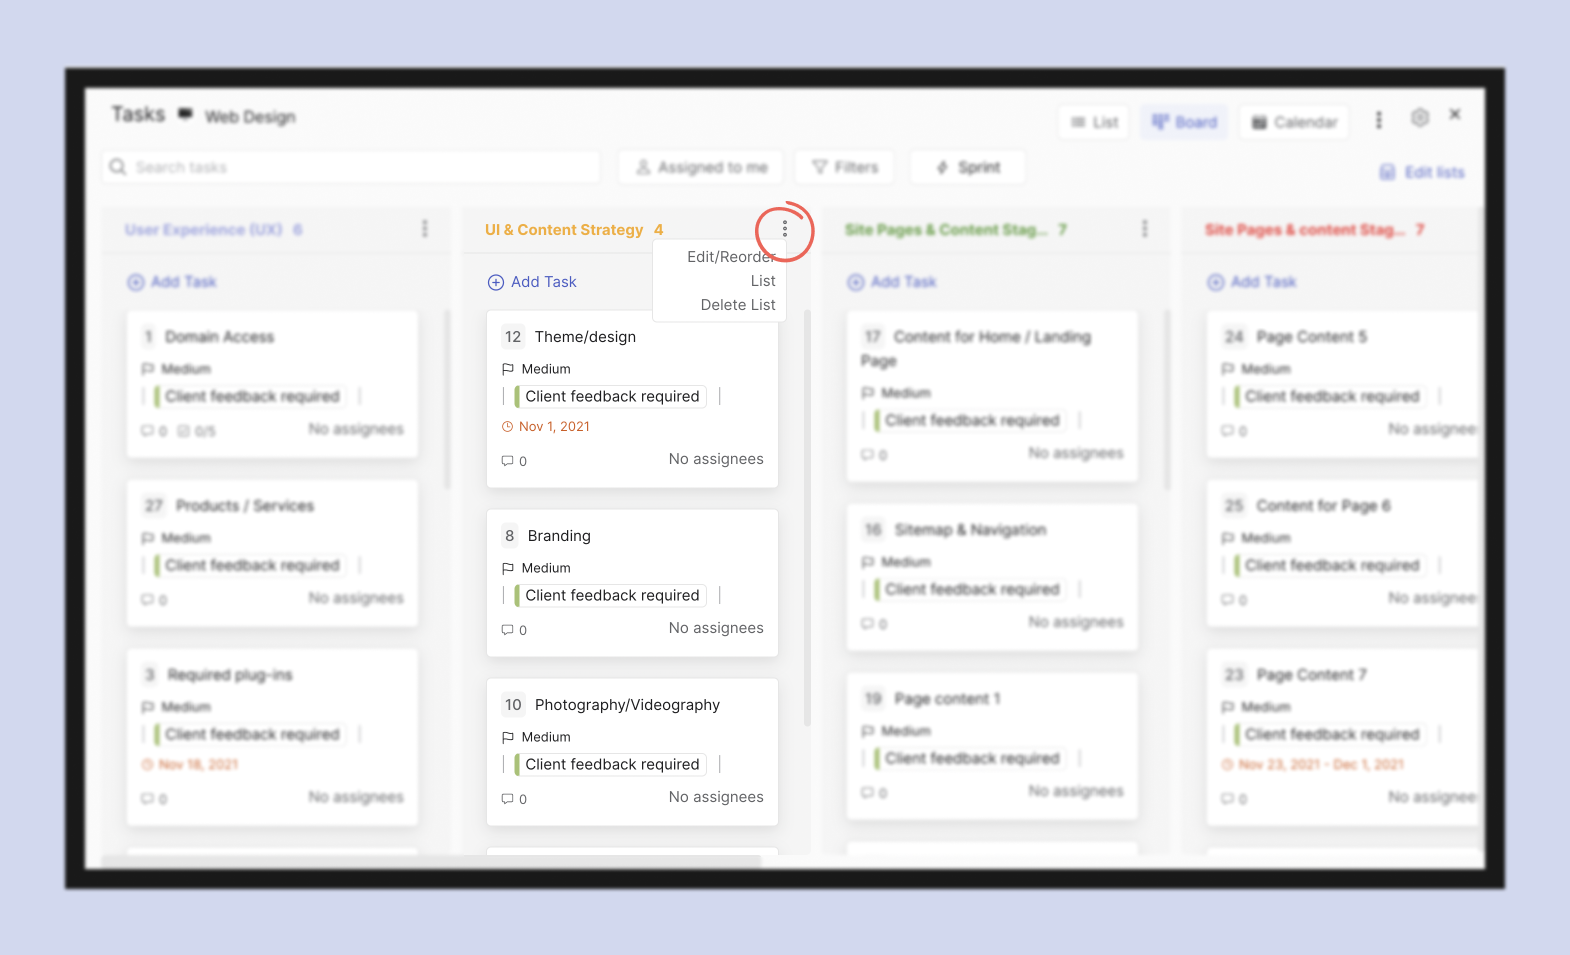
A second location where you can create a new webform is the Tasks mini-app. When entering a space click on tasks -> Select the three dots in the top right corner of the view -> Select “create webform”.
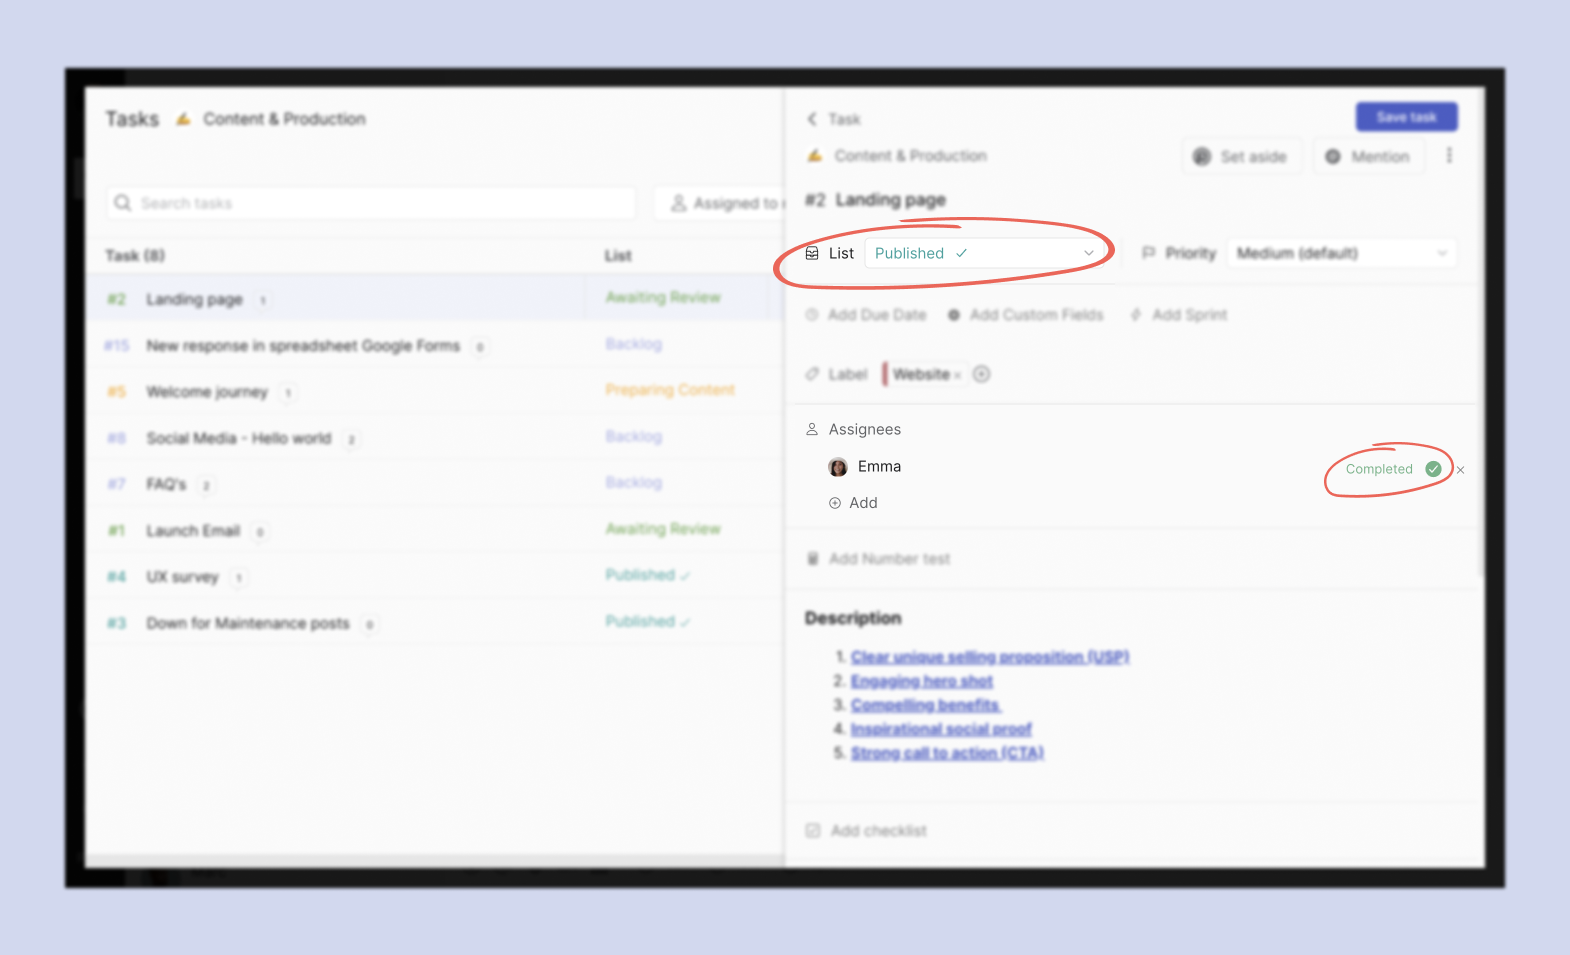
After creating your new webform you can configure three fields to your liking:
[Required] Name: This name will display next to the bot on your space (so you know which one to edit when making future changes to your webform). This name is not visible on the live webform.
[Optional] Label: Add a dedicated label to newly created tasks (i.e. “website lead” or “webinar signup”)
[Required] List: Pick a list from your space where new responses should be added (i.e. “To do”, “Website leads” or “new signups”)
Select “generate webform” after you have completed configuring to create the webform.
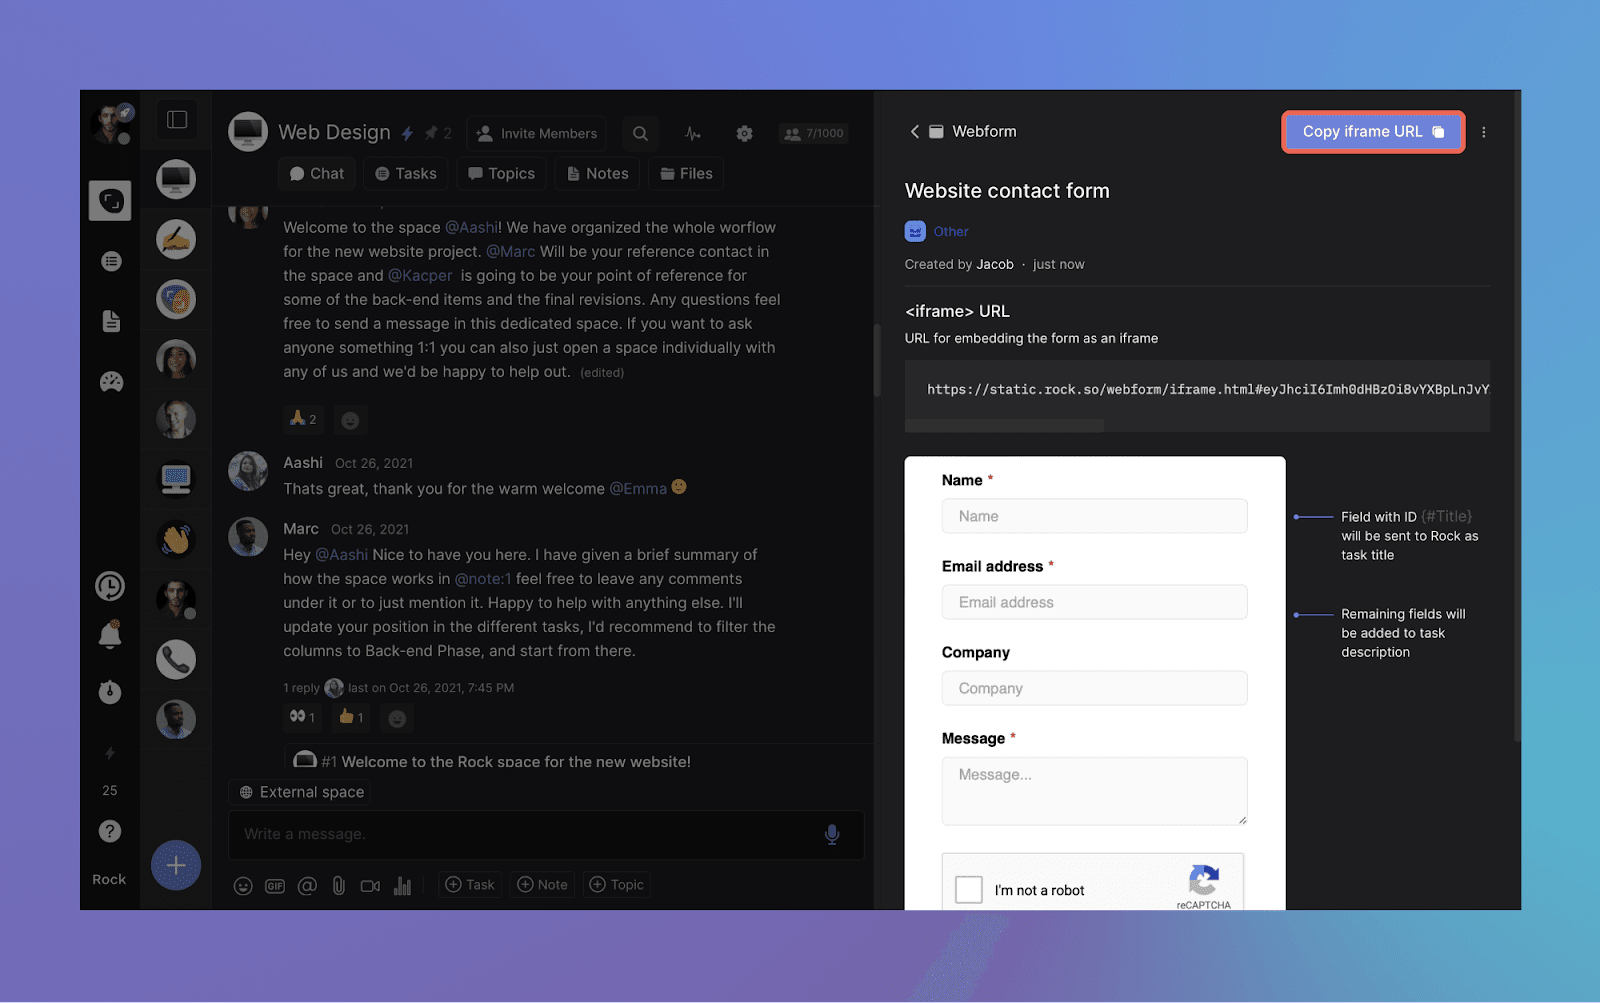
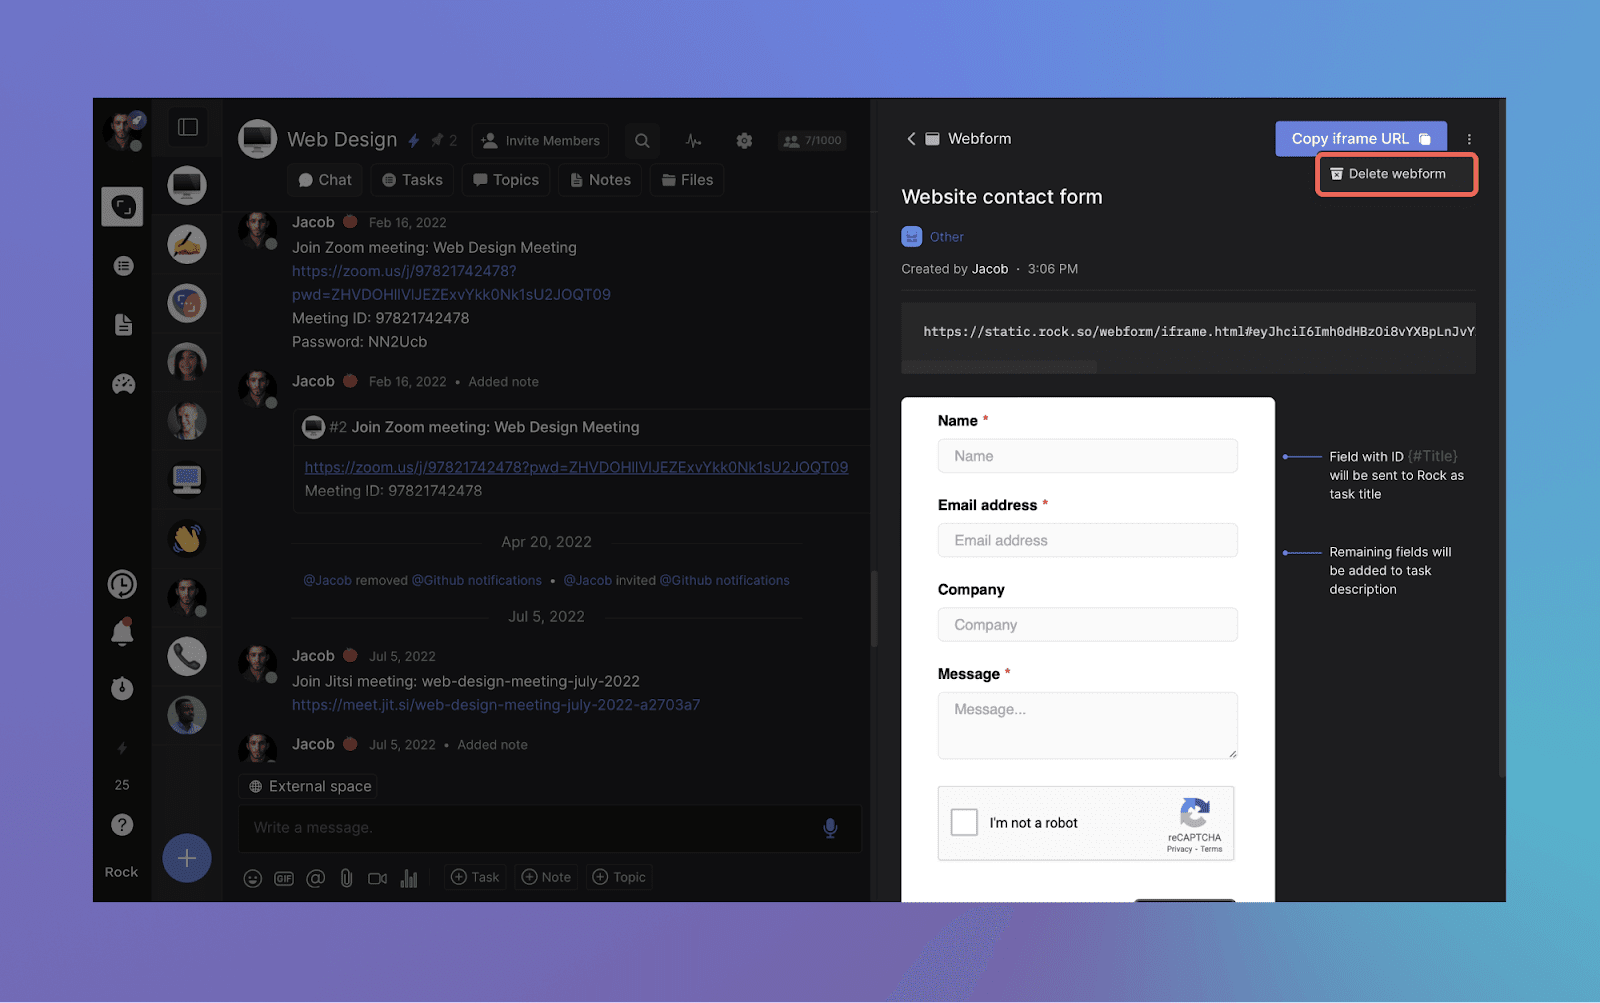
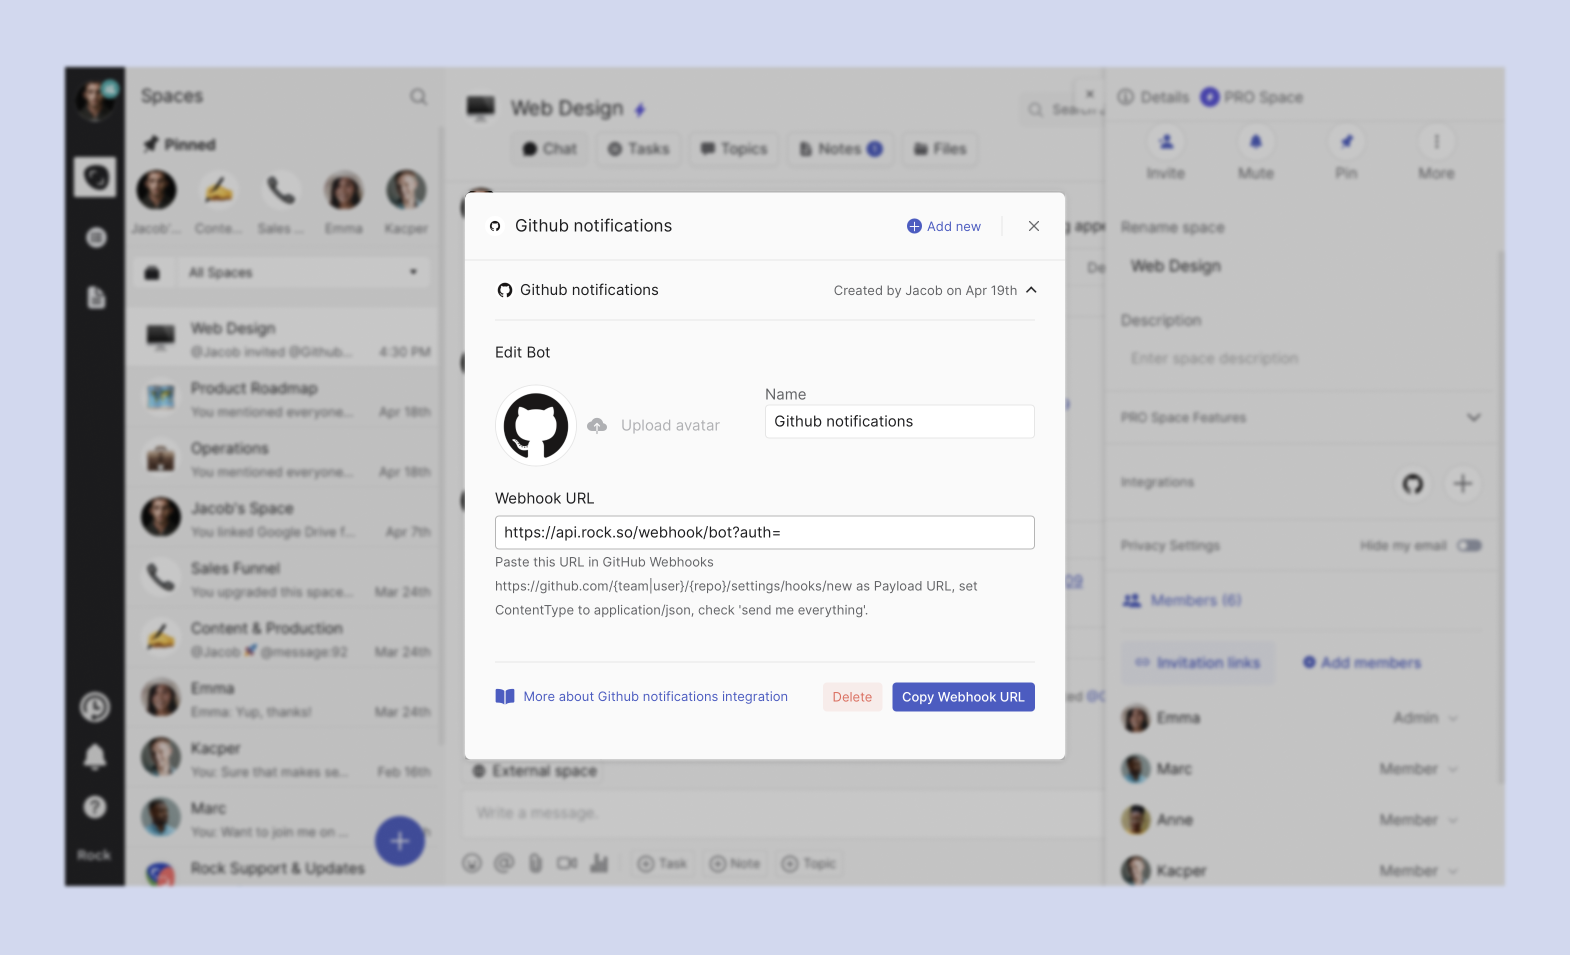
Once the webform has been created, you will receive a URL that has to be added to your website through an embeddable iframe.
Embedding a webform into your website
Rock’s webform feature works with iframe. When the webpage containing this iframe is loaded, it will create a window within the page that displays the webform. You can also specify the size and other attributes of the iframe using HTML or CSS.
Adding the webform might look different depending on the CMS you are using. Here is a short summary for working with Wix, a hardcoded site, Webflow and Wordpress.
How to embed a webform in Wix
To embed an iframe with the Wix CMS, follow these steps:
Go to your Wix Editor and open the page where you want to add the iframe.
Click on the Add (+) button in the left-hand side menu and select "More."
Select "HTML Code" from the list of options.
In the HTML Code box, paste the code for your iframe. For example: <iframe src="Rock-webform-URL"></iframe>. Replace "Rock-webform-URL" with the URL of the website you want to embed.
Click "Update" to save your changes.
Note that the process for embedding an iframe with Wix may vary depending on your specific use case and the type of iframe you want to embed. Make sure to test your embedded content to ensure it works as intended.
How to embed a webform in a hardcoded HTML website
To embed an iframe in a hardcoded HTML website, follow these steps:
Open your HTML file in a code editor.
Find the place in your HTML code where you want to embed the iframe.
Create an iframe element by typing the following code: <iframe src="Rock-webform-URL"></iframe>. Replace "Rock-webform-URL" with the URL of the website you want to embed.
Customize the iframe element to your liking by adding attributes such as height, width, frameborder, etc. For example: <iframe src="Rock-webform-URL" width="100%" height="500" frameborder="0"></iframe>
Save your HTML file and open it in a web browser to test the embedded iframe.
How to embed a webform in wordpress
To embed an iframe in WordPress:
Go to the page or post where you want to add the iframe.
Click on the "Text" tab in the editor to switch to the text editor.
Find the place in the content where you want to embed the iframe.
Create an iframe element by typing the following code: <iframe src="Rock-webform-URL"></iframe>. Replace "Rock-webform-URL" with the URL of the website you want to embed.
Customize the iframe element to your liking by adding attributes such as height, width, frameborder, etc. For example: <iframe src="Rock-webform-URL" width="100%" height="500" frameborder="0"></iframe>
Switch back to the "Visual" editor to preview the embedded iframe.
Publish or update the page or post to save the changes.
Note that some WordPress themes or plugins may restrict the use of iframes for security reasons. If you encounter issues embedding iframes, you may need to consult your theme or plugin documentation.
How to embed a webform with Webflow
To embed an iframe in Webflow, follow these steps:
Open your Webflow project and go to the page where you want to embed the iframe.
Drag an Embed element from the Elements panel onto the canvas where you want to place the iframe.
Double-click the Embed element to open the Embed settings.
In the Embed settings, click the "</>" button to switch to code view.
Create an iframe element by typing the following code: <iframe src="Rock-webform-URL"></iframe>. Replace "Rock-webform-URL" with the URL of the website you want to embed.
Customize the iframe element to your liking by adding attributes such as height, width, frameborder, etc. For example: <iframe src="Rock-webform-URL" width="100%" height="500" frameborder="0"></iframe>
Click "Save and Close" to save the Embed settings and close the code view.
Preview the page to test the embedded iframe.
Publish the website to make the embedded iframe live.
Webform in action
Curious about what the webform looks like in action? Check out our support page to see a webform live on our website!
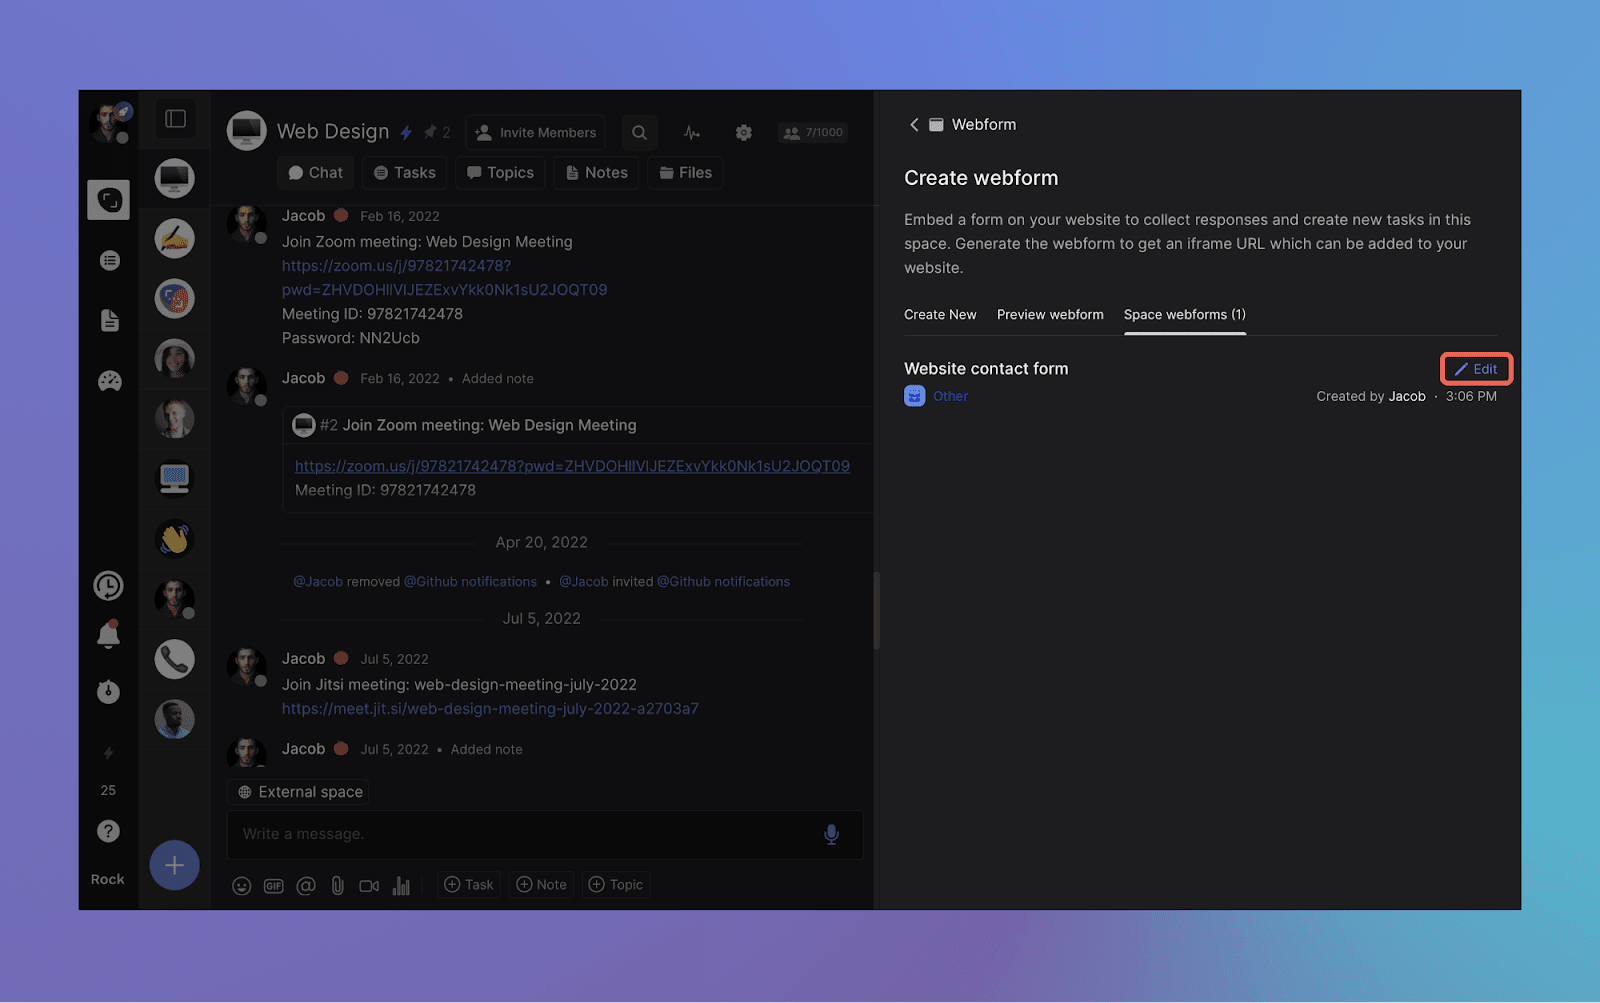
Removing your webform on Rock
To remove a webform from Rock, navigate to the webform panel by going to space settings -> Webforms.
A new panel opens with the configuration of your webform. Click on the three dots in the top right corner to remove the webform. Note that you cannot restore a deleted webform.
Frequently Asked Questions
Is the webform a paid feature?
No, the webform feature is available for free and in PRO spaces. All users are welcome to connect webforms to their Rock project spaces.
How many webforms can I create in a space?
There is no limit on the number of webforms that can be created in a space.
Can I edit the labels or list of a webform once created?
No, after creating a webform it is not possible to edit the configuration of the label or the list. Note that you can always create a new webform and update the URL uploaded to your website.
Can I change the fields in the webform?
Not yet! We will add further customization to webforms in future releases.
Who can create webforms in my space?
Users must have admin permissions in order to create a new webform in your space.
Schedule messages or polls to be sent at a time that's most convenient. This enables you to send messages at a time that aligns with your team members' time zones, plan ahead or set reminders.
Note that this feature is only available in PRO spaces under the unlimited plan.
Scheduling messages and polls on web
Everyone in your PRO space has access to the message scheduling feature.
How to schedule a message or poll on web
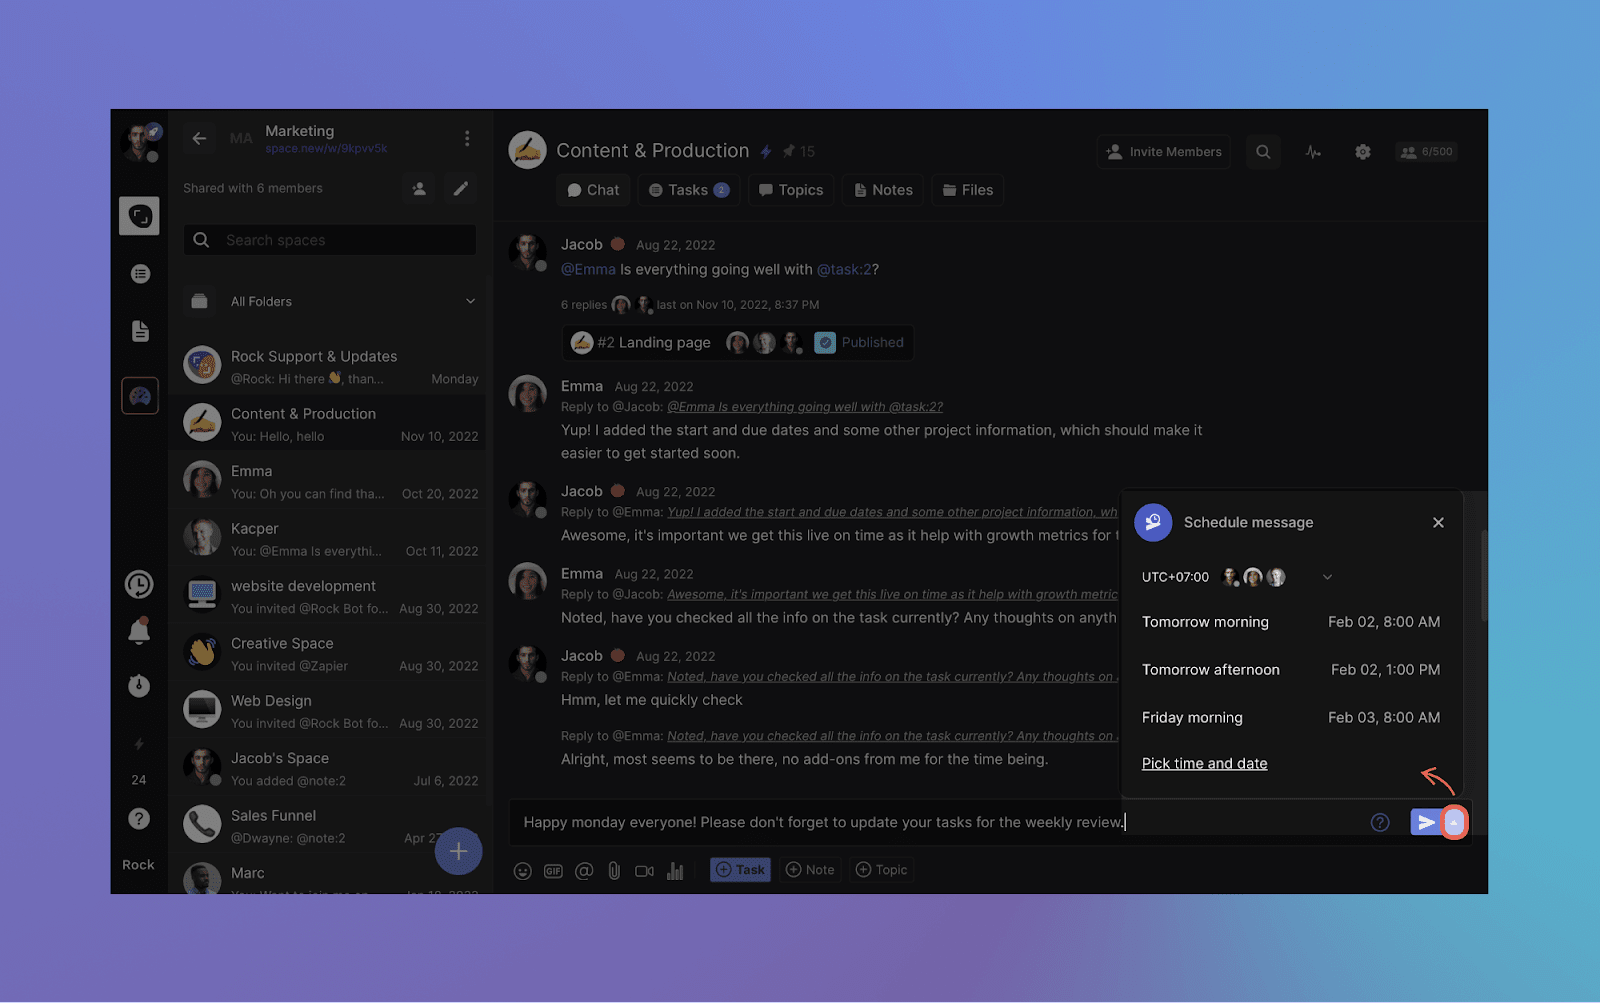
Step 1: Write down the message or poll you want to schedule in the Chat mini-app.
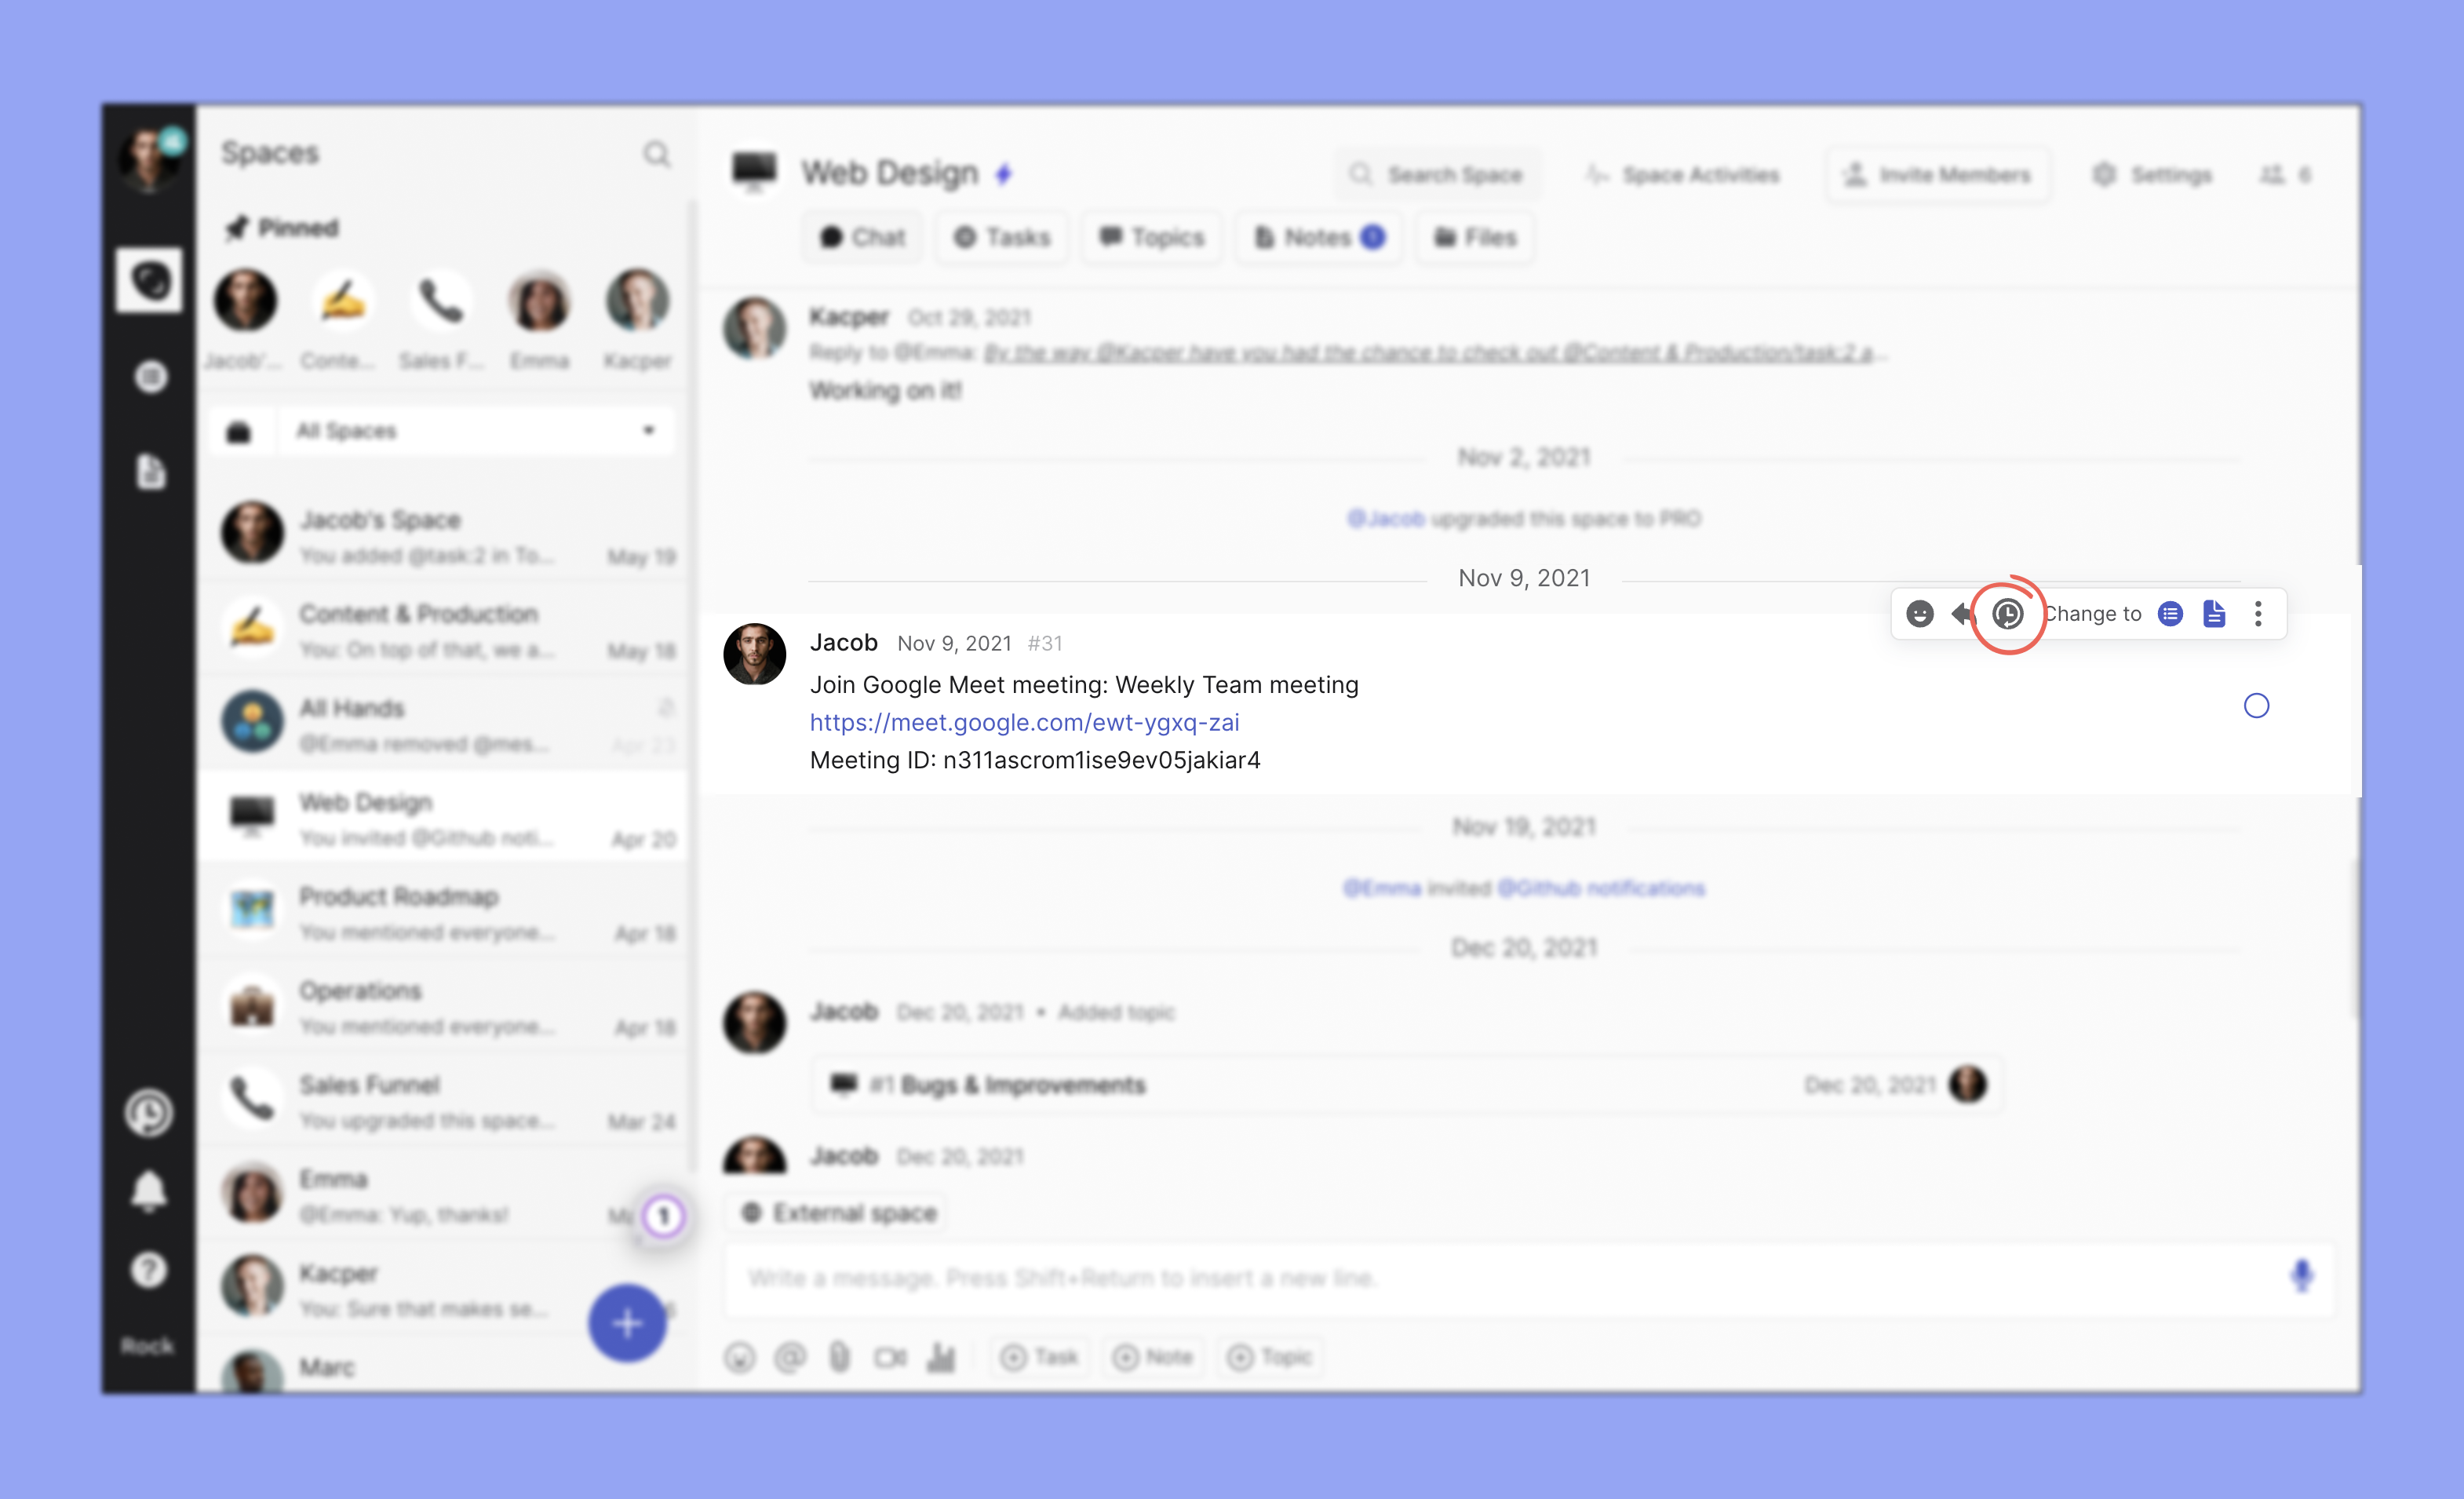
Step 2: Select the dropdown next to the send button.
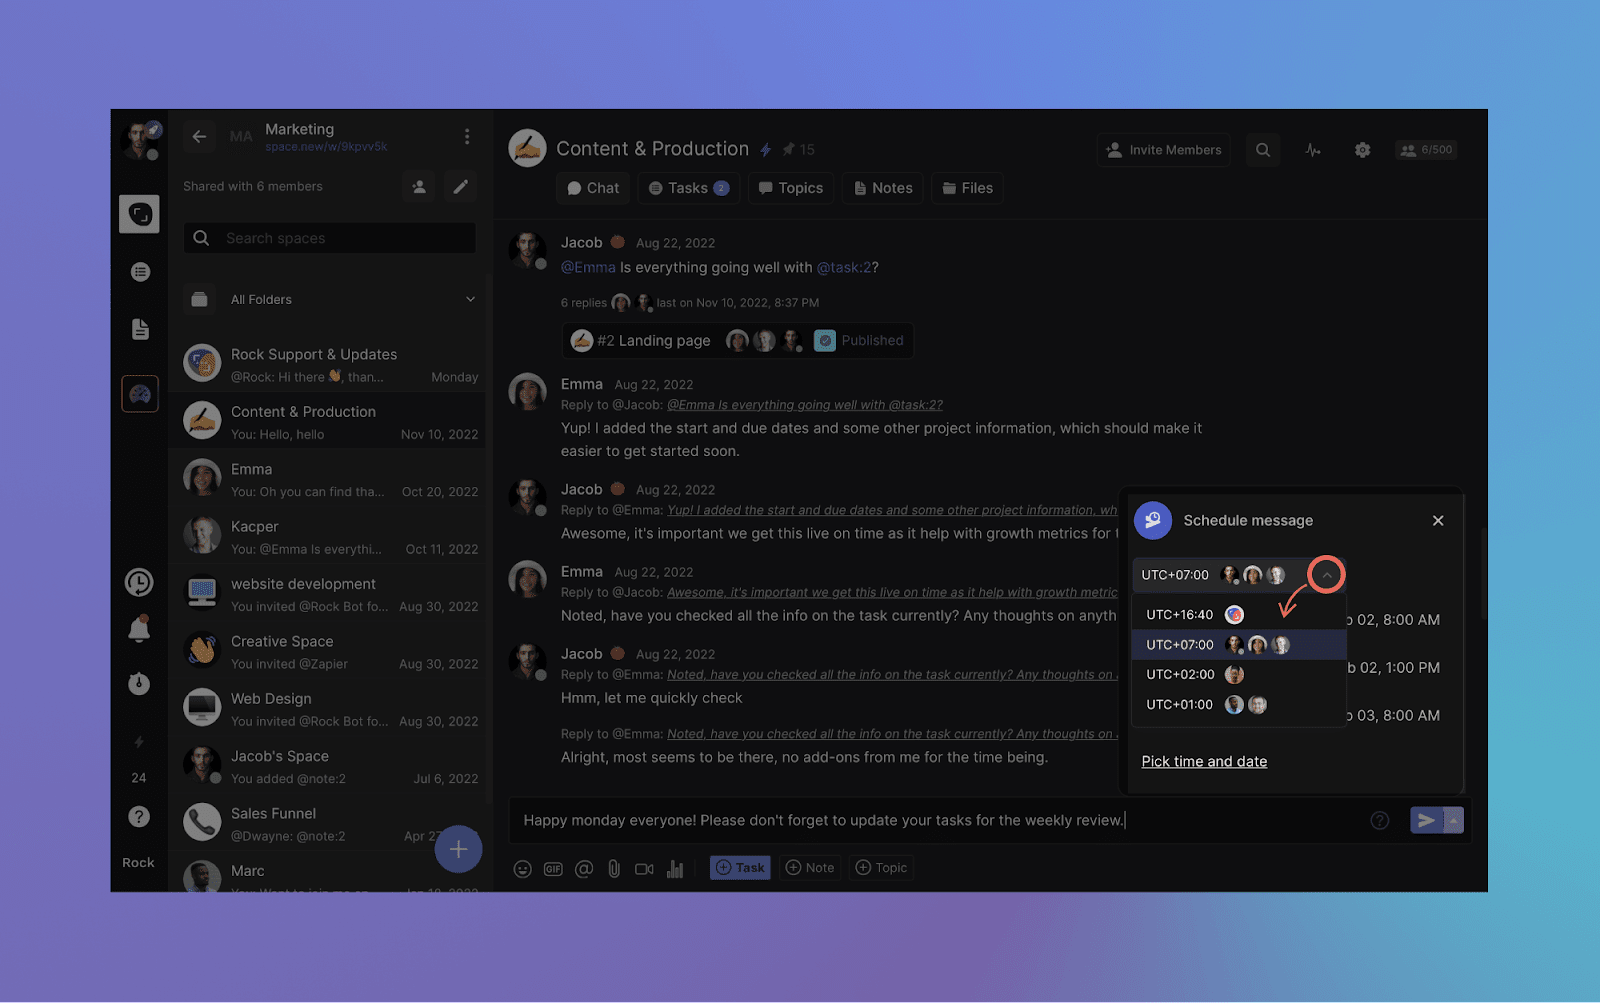
Step 3: Select the timezone you want to send the message in by pressing the member dropdown.
Step 4: Select one of the suggestions or click on “Pick time and date” to configure your own time.
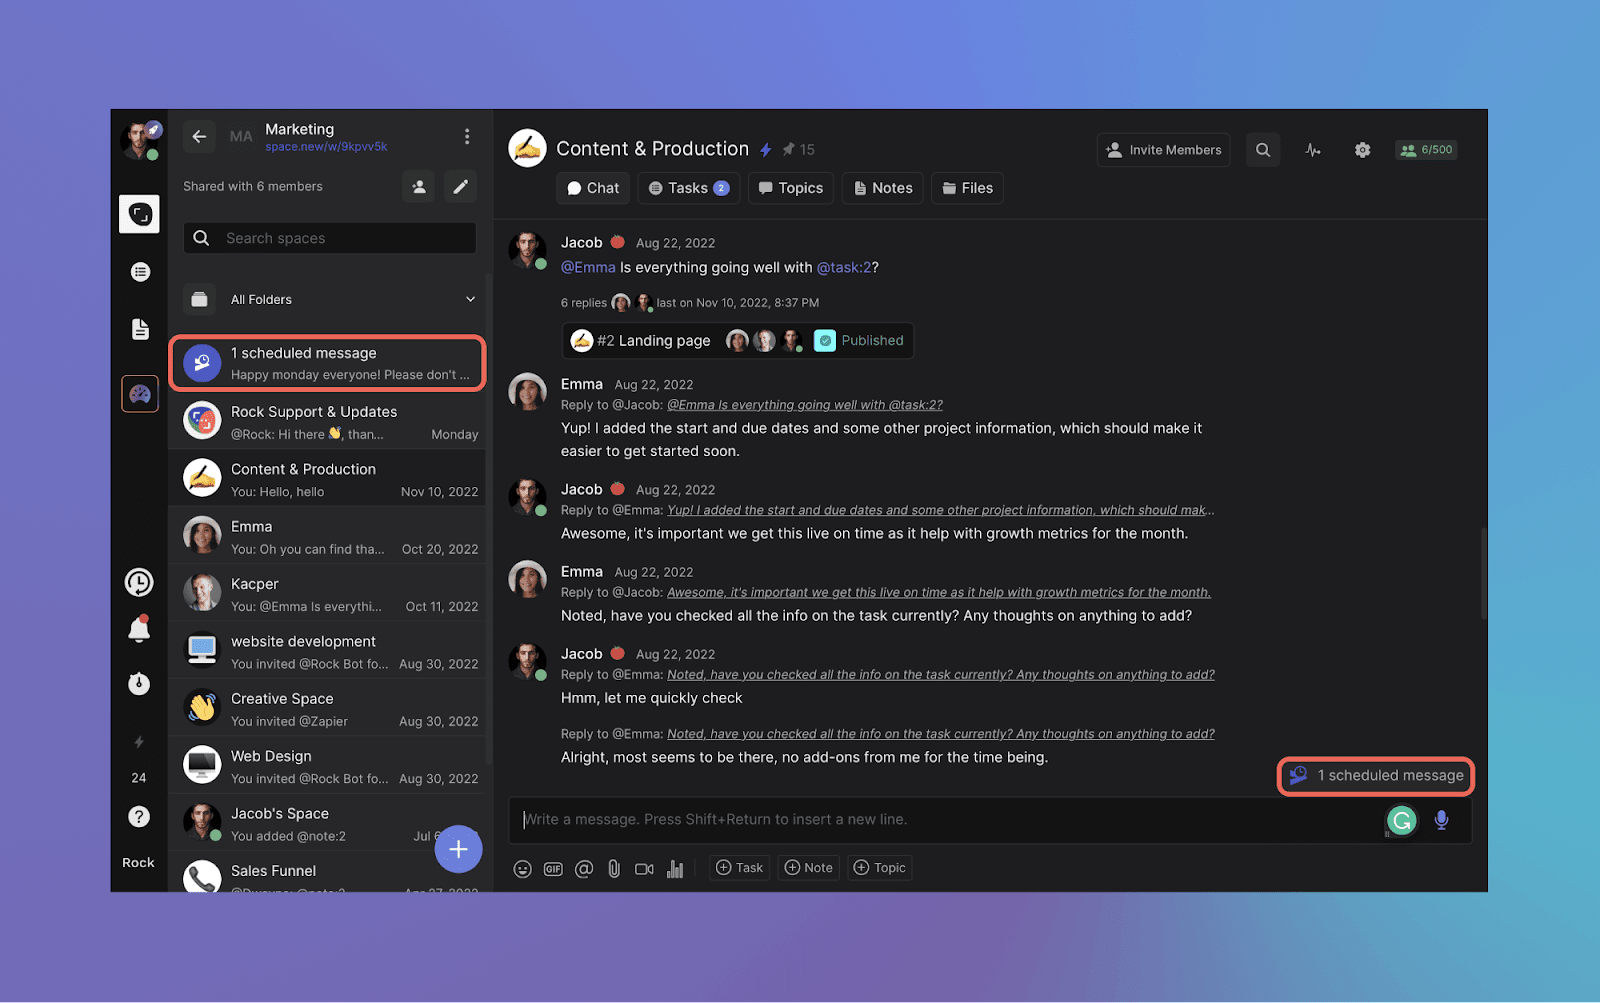
Step 5: Complete! You can find your schedule messages at the top of your spaces list or above the chat input panel in your space.
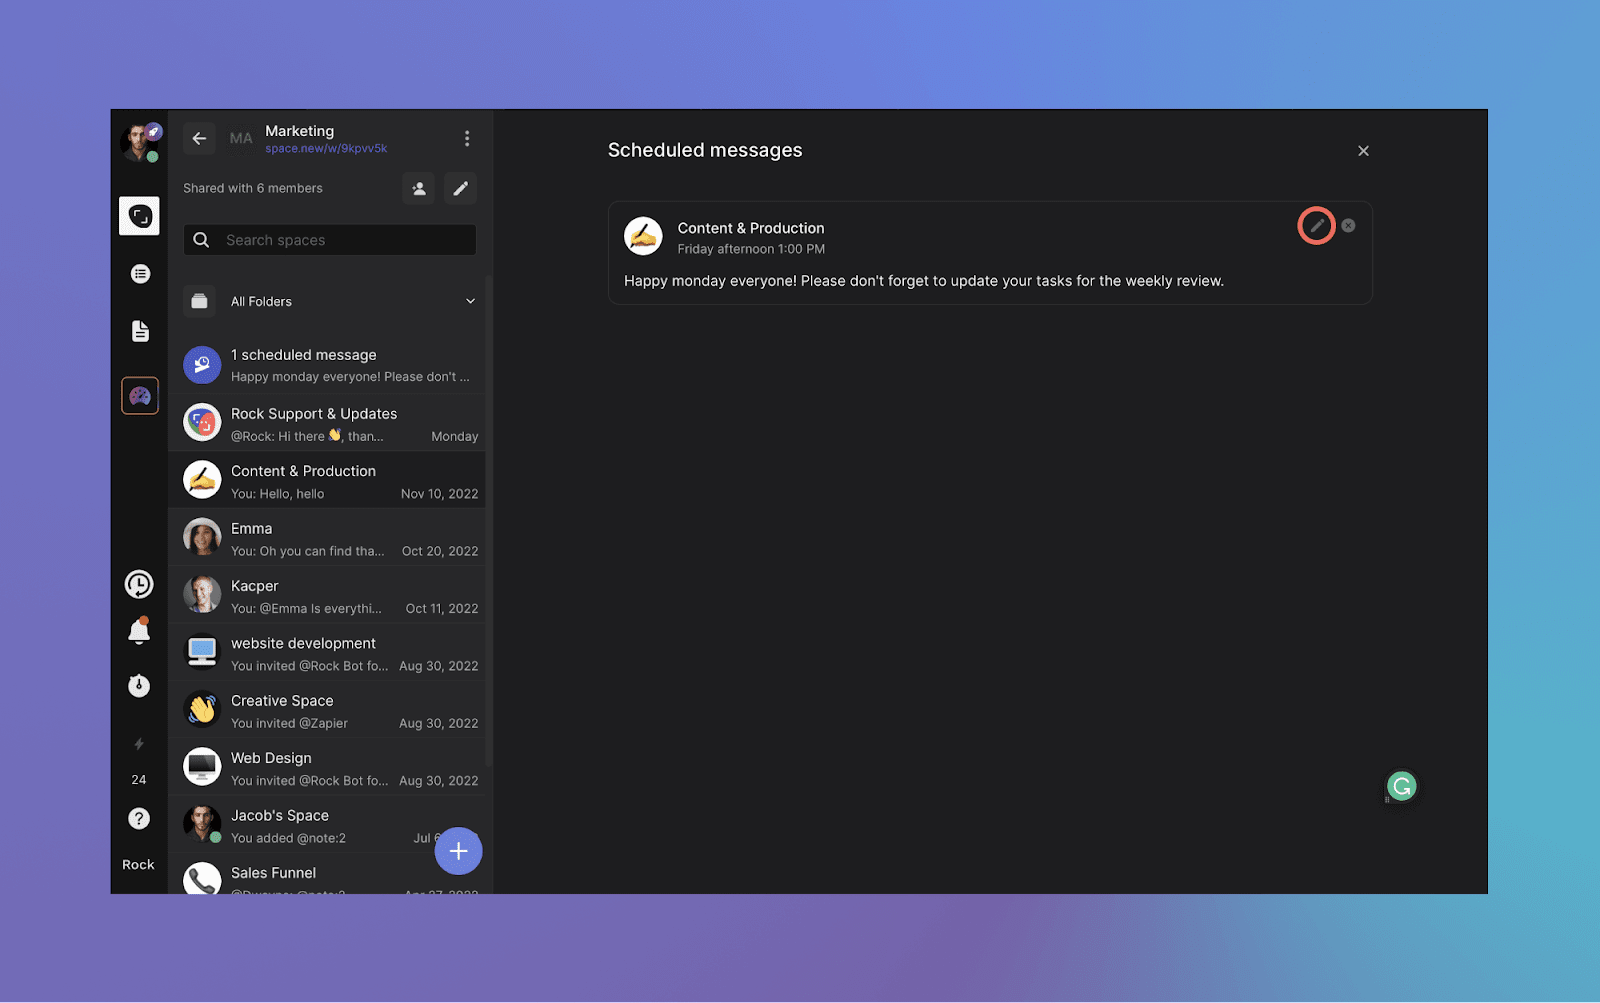
You can subsequently edit the scheduled message by clicking on the prompt in the spaces list or the highlight for the scheduled messages in your space -> pen icon -> Repeat the aforementioned steps.
To delete your scheduled message, press the “x” button next to the edit option.
Schedule messages and polls on mobile
You can also easily schedule messages on the mobile version of Rock.
How to schedule a message or poll on mobile
Write down the message or poll you want to schedule in the Chat mini-app.
Keep the send button pressed for a few seconds. The schedule message panel will automatically open.
Check the time zones of everyone in the space if needed by pressing the arrow right under 'Schedule message'.
Pick one of the suggested times or press 'Pick date and time' to manually adjust a time for the scheduled message.
Press 'Schedule' in the bottom right corner of your screen and your message should be scheduled!
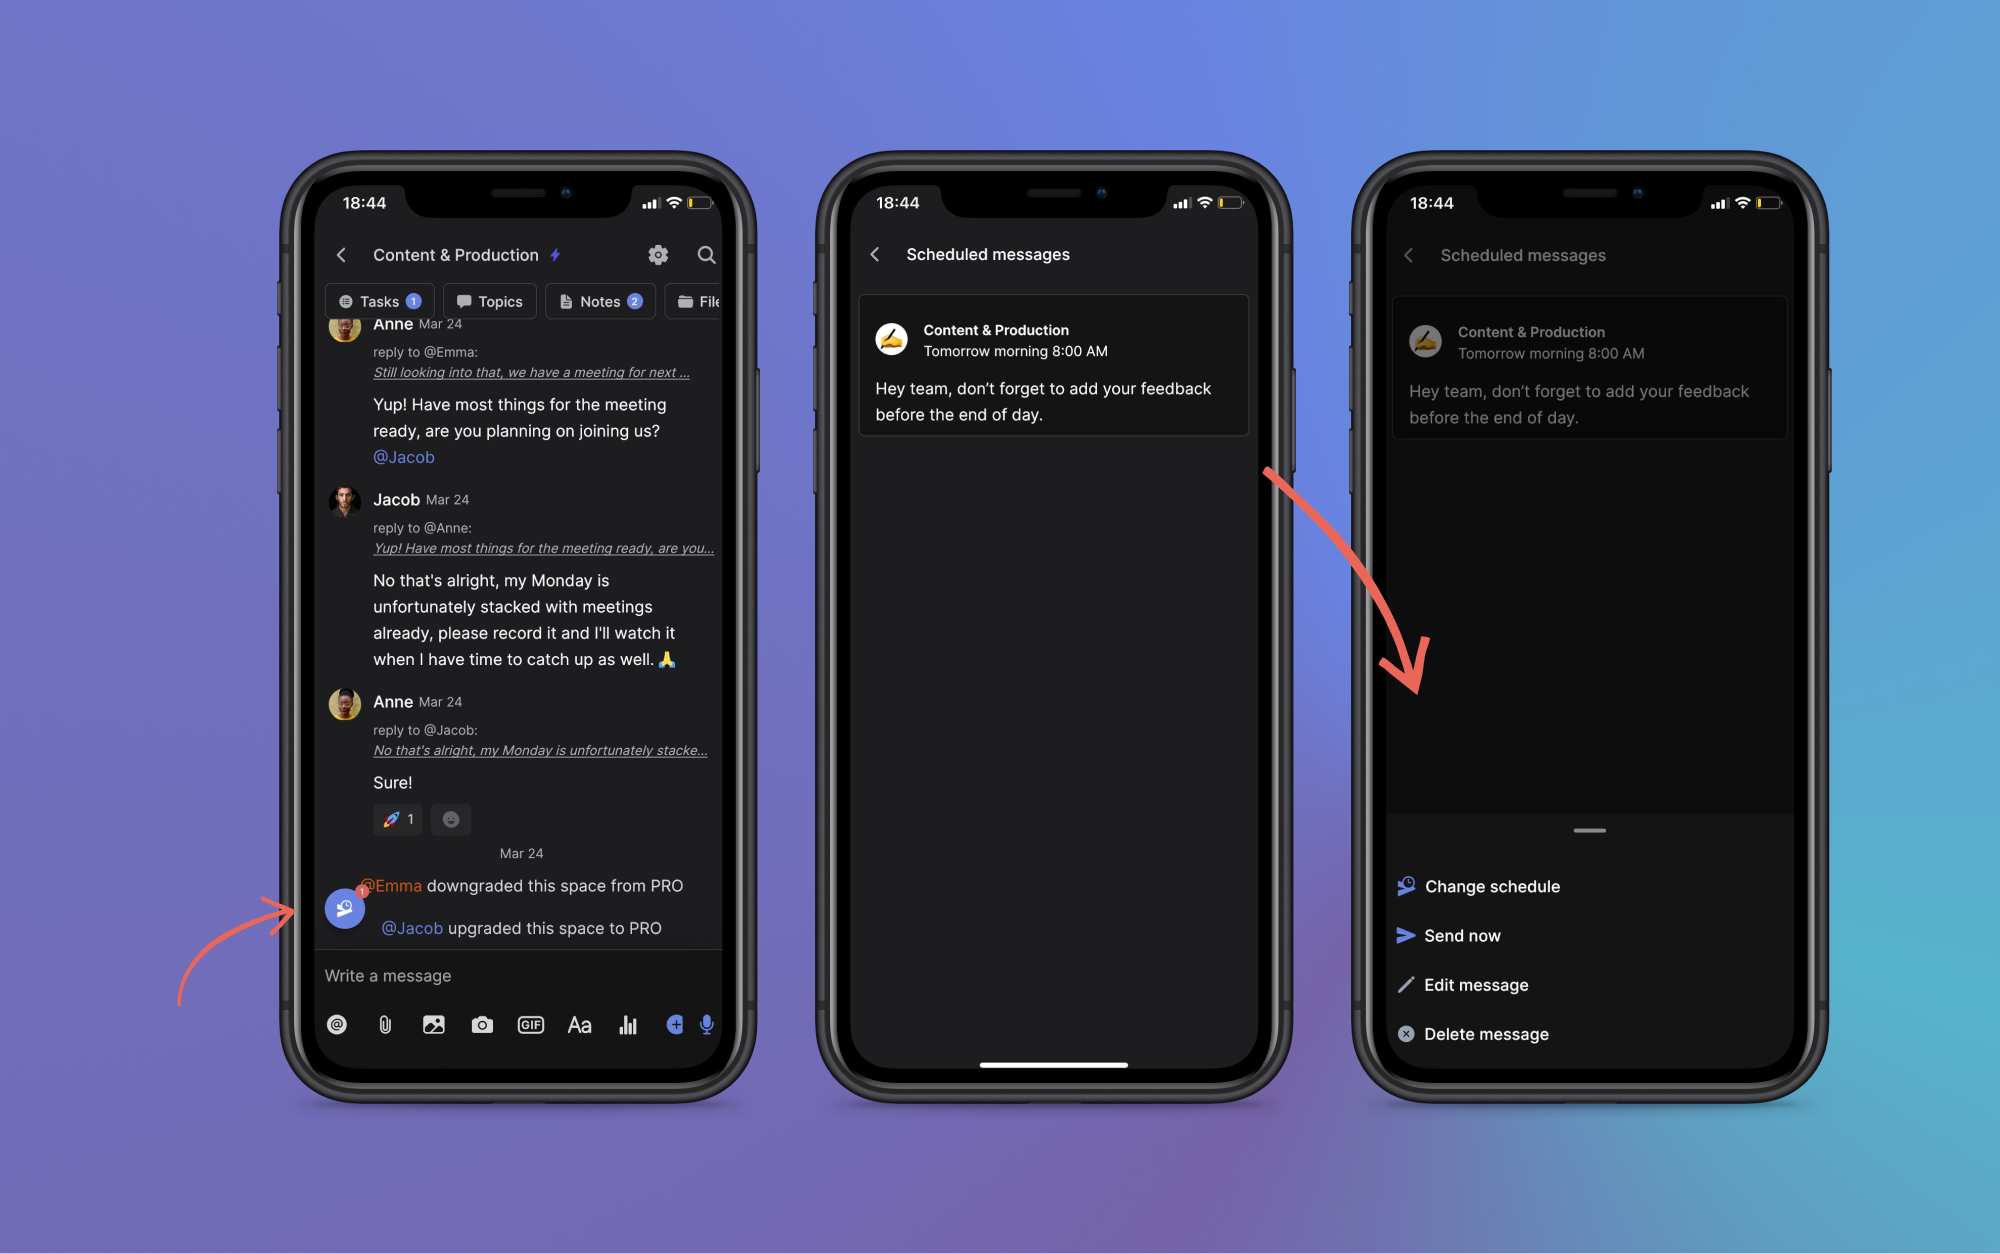
Editing your scheduled messages on mobile
You can edit your scheduled message in a few different ways by following these steps:
Press the scheduled messages button on the bottom left corner of your screen. Note that this button only appears when you have one or more messages scheduled.
Press the scheduled message or poll you want to edit.
Pick from the option menu: change schedule, send now, edit the message or delete the message.
PRO spaces remove limits from the FREE plan and unlock new features for improved collaboration on Rock.
This article explains how PRO spaces work, how to incorporate them into your workflow, and the premium benefits they offer.
Free space vs PRO space
All users have access to Free spaces, but they come with limitations. Specifically, you can only create 50 tasks and notes, add 10 members, and upload 250MB of files.
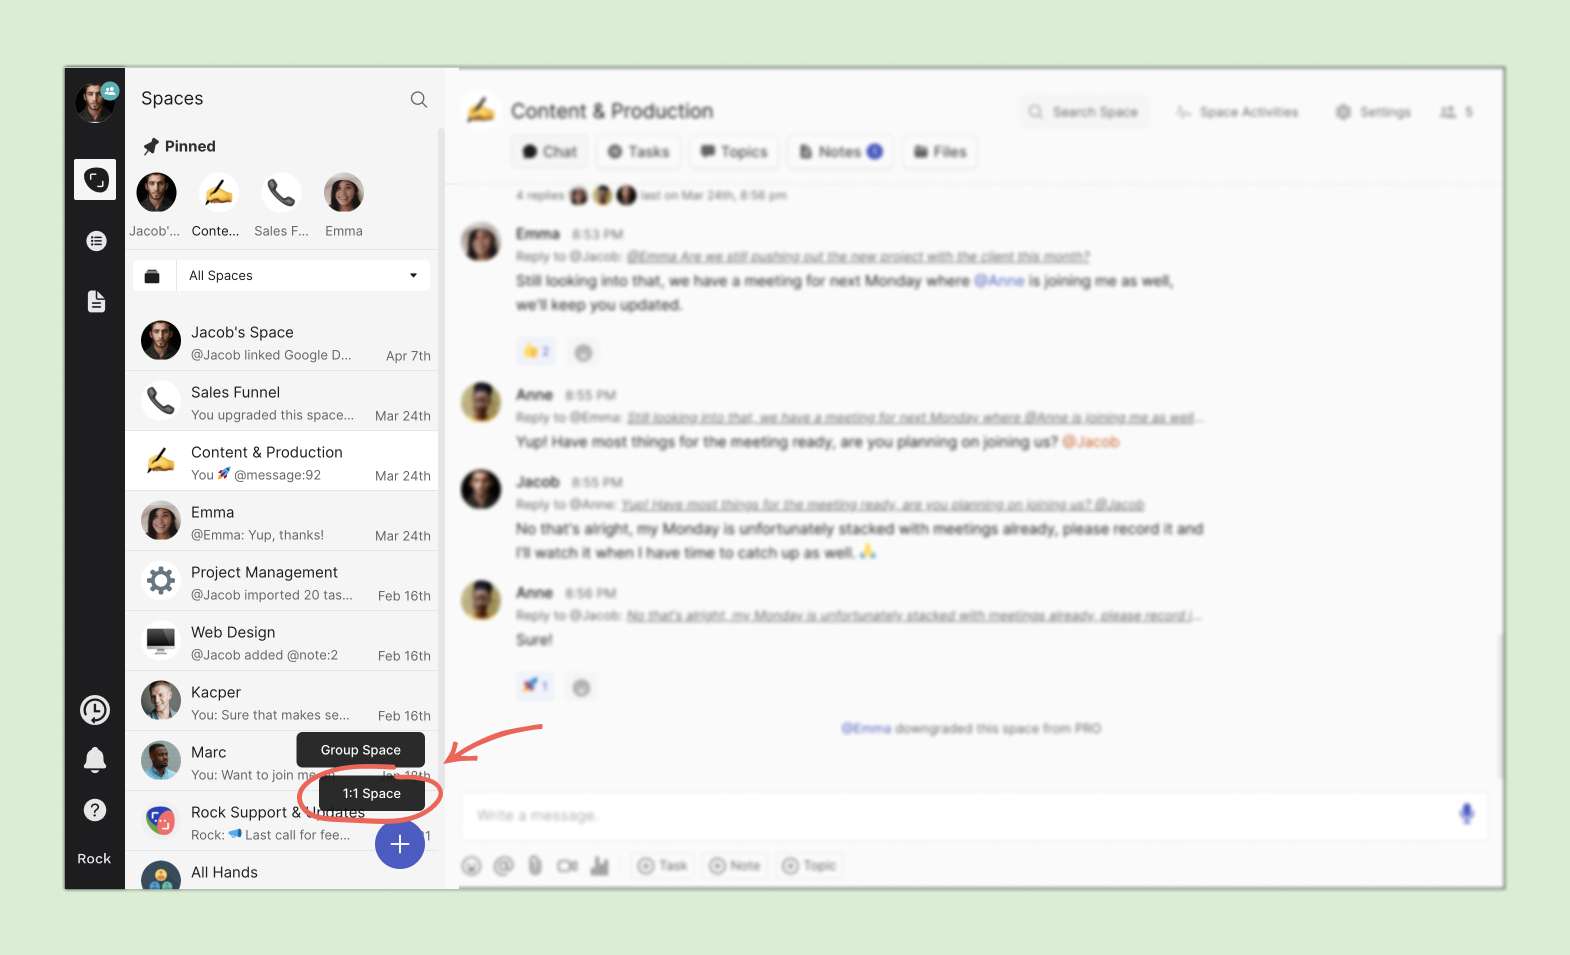
You are also limited to creating 3 group spaces and one workspace. However, you can create unlimited 1:1 spaces and use the Chat and Topics mini-apps without restrictions.
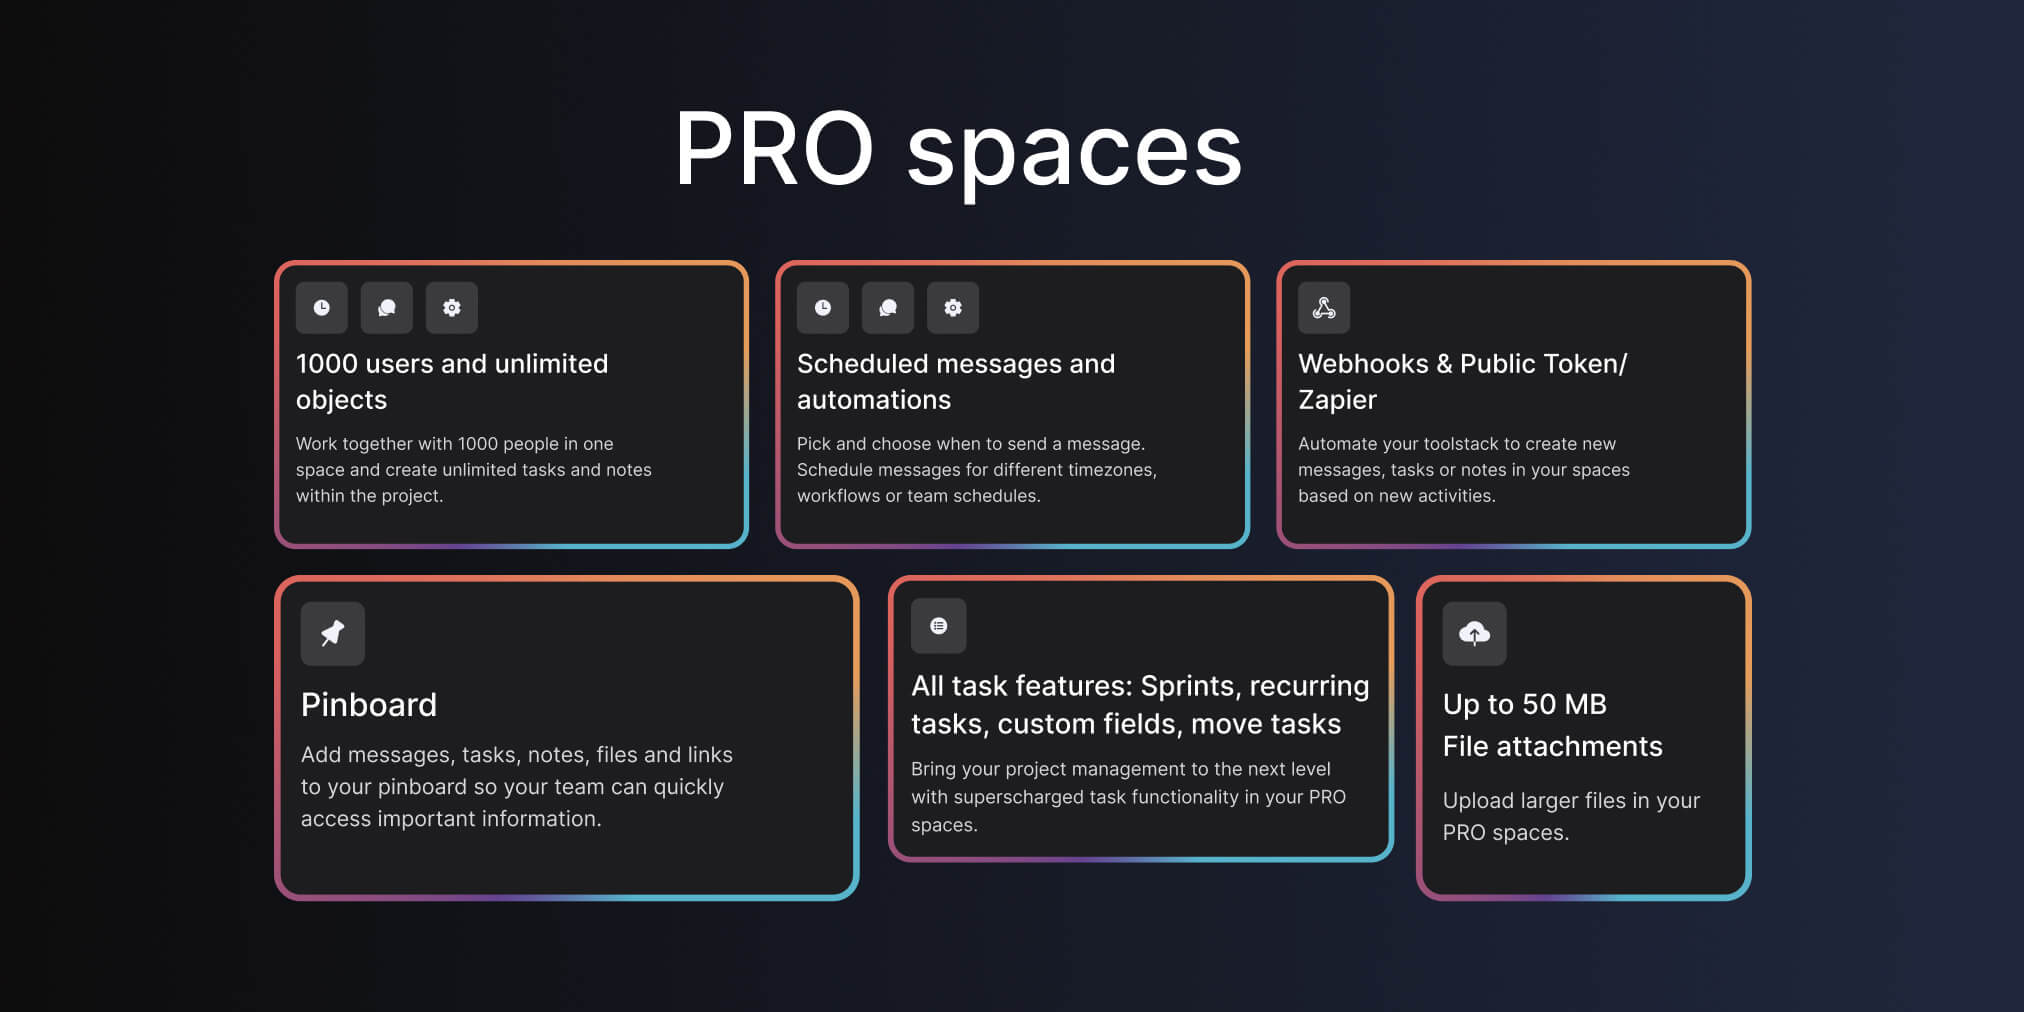
Upgrading a FREE space to PRO will eliminate these limitations and unlock the following PRO features:
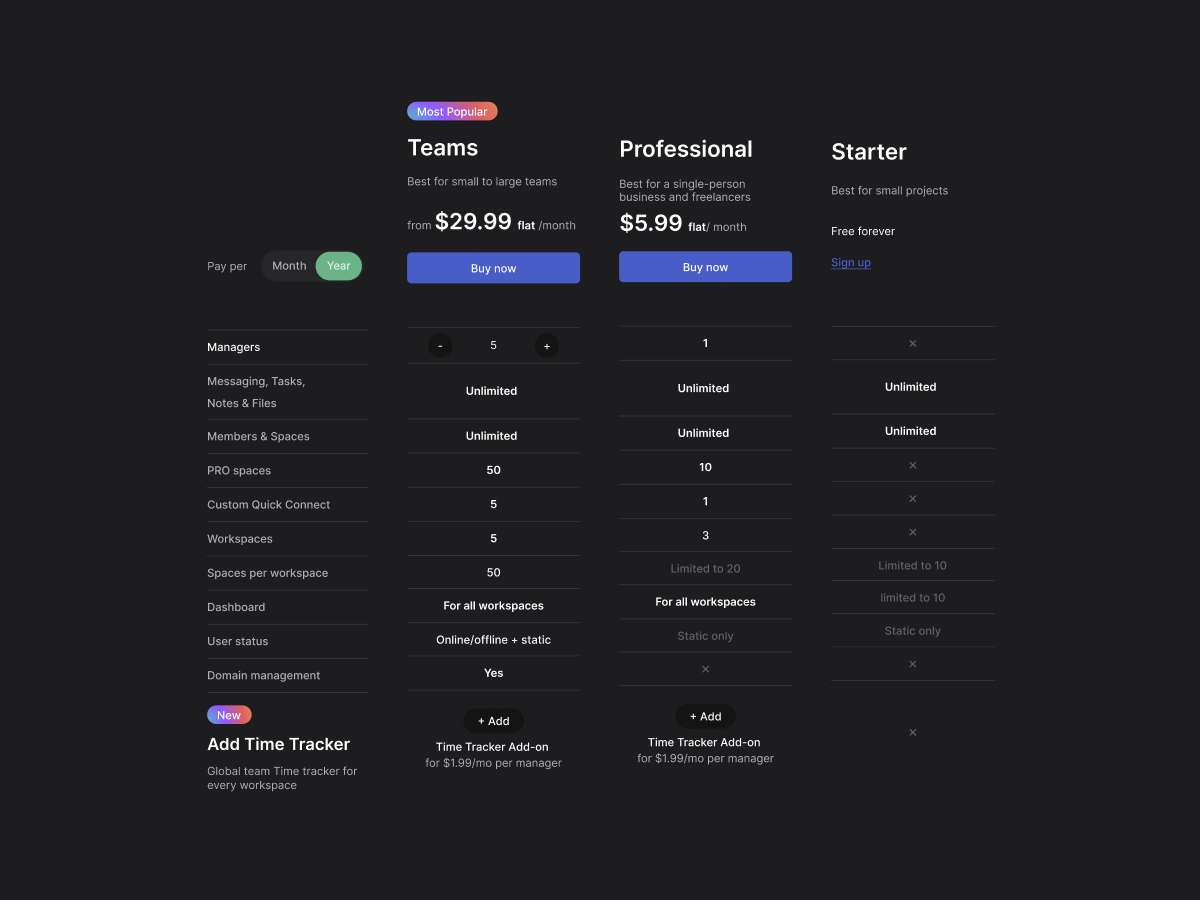
Up to 500 users, tasks, notes, set aside items, and file uploads
With the Unlimited plan, purchasers and managers can create as many PRO spaces as needed. However, users without manager status cannot create new PRO spaces. To learn more about user management, please refer to the dedicated guide.
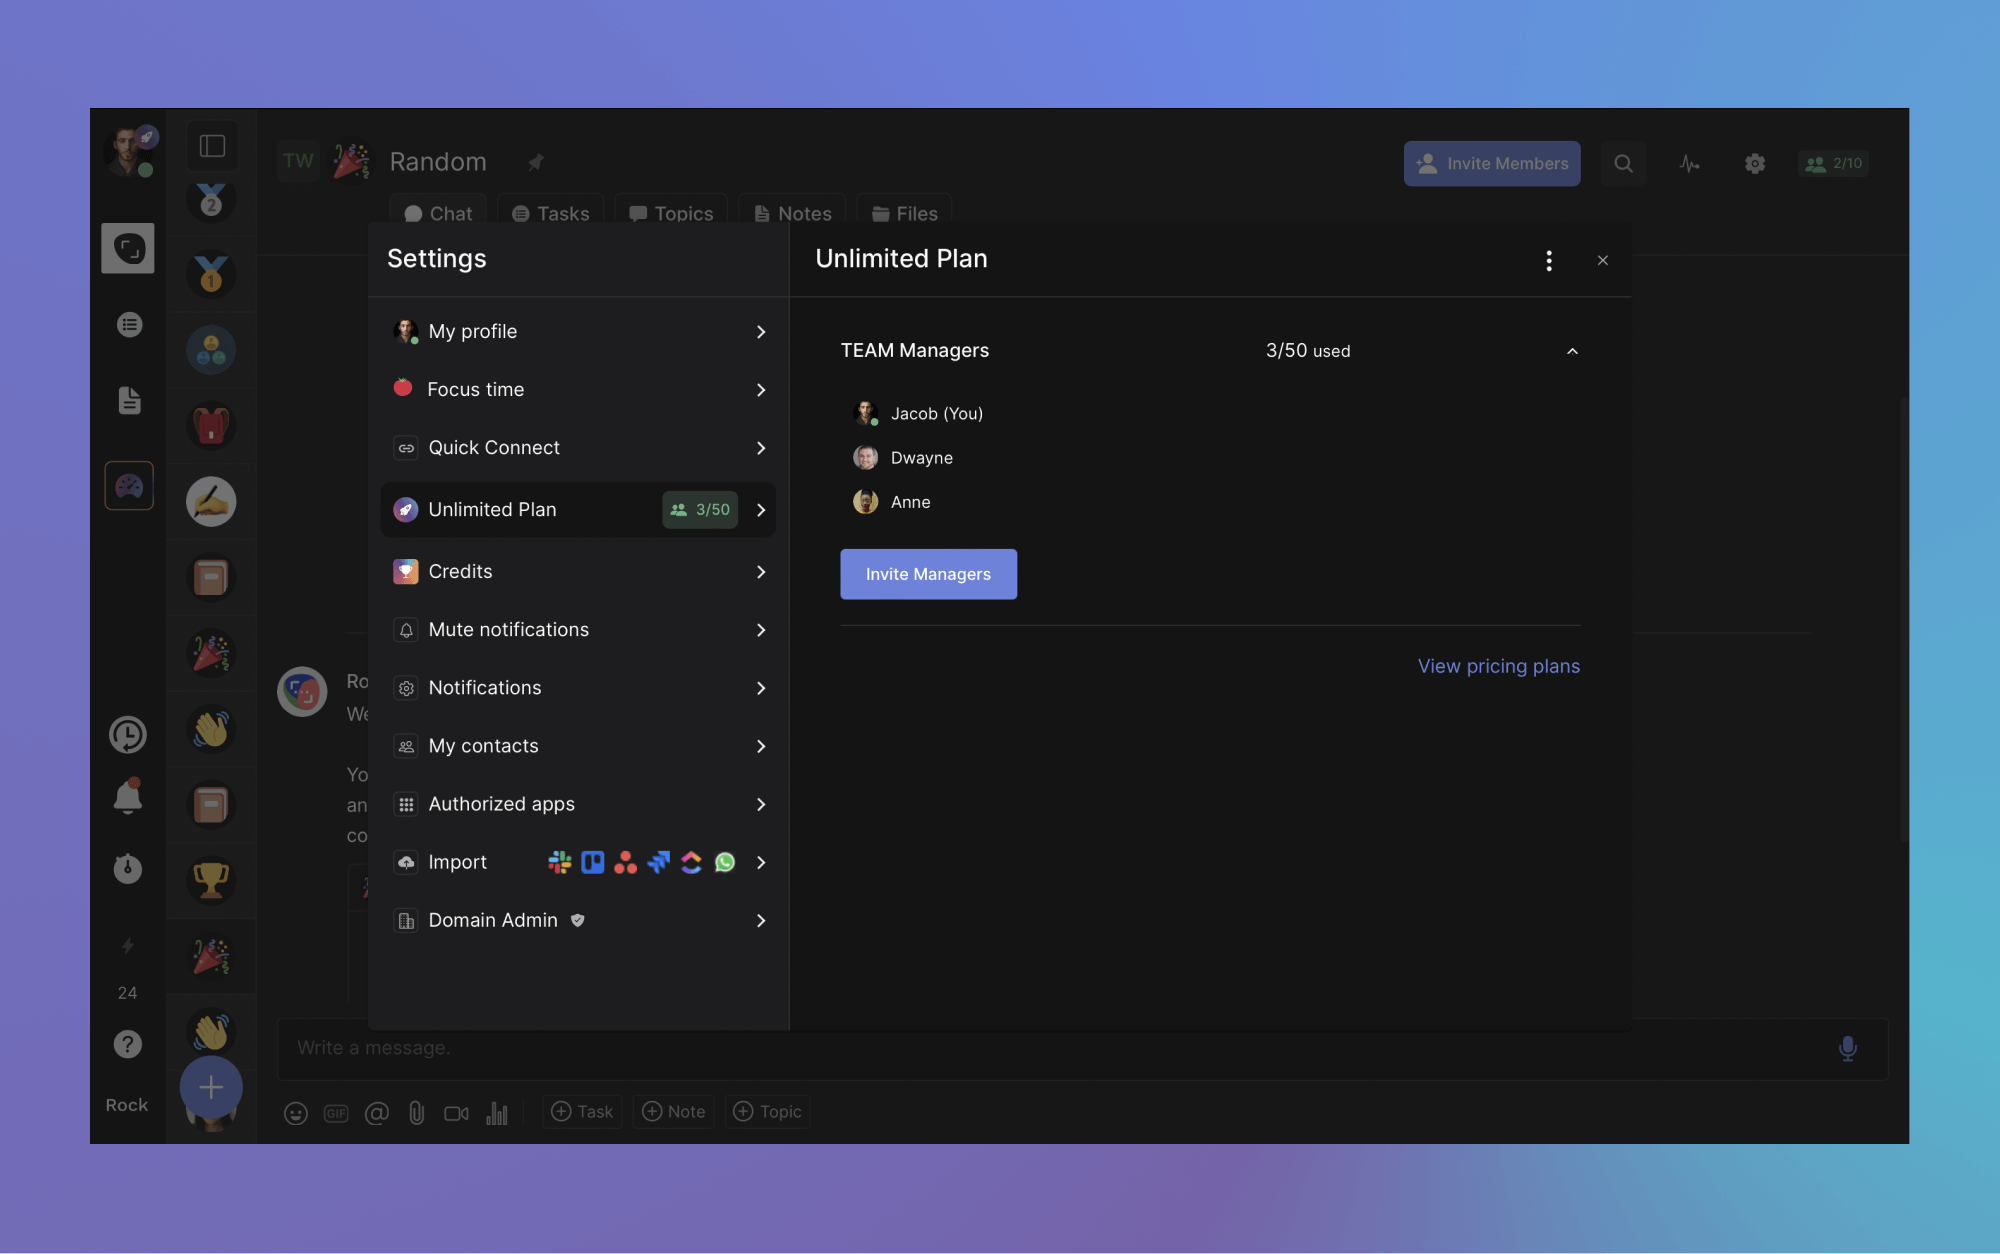
Managers are users with the ability to upgrade spaces from FREE to PRO. Under the Unlimited plan, up to 5 users can be granted this capability, including the plan purchaser.
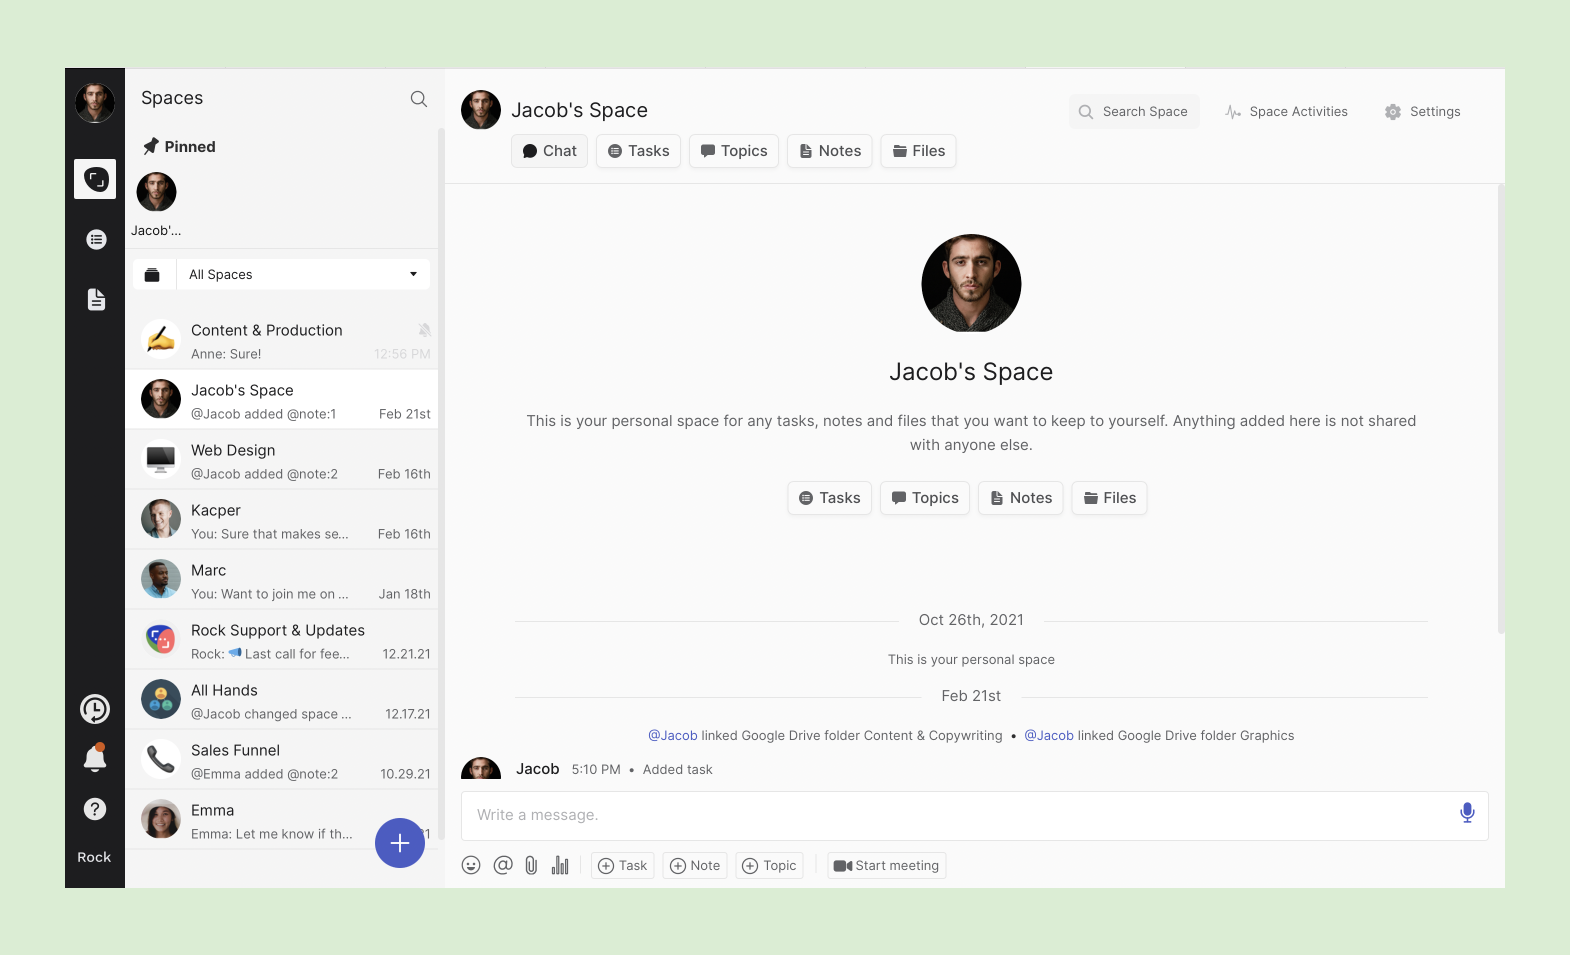
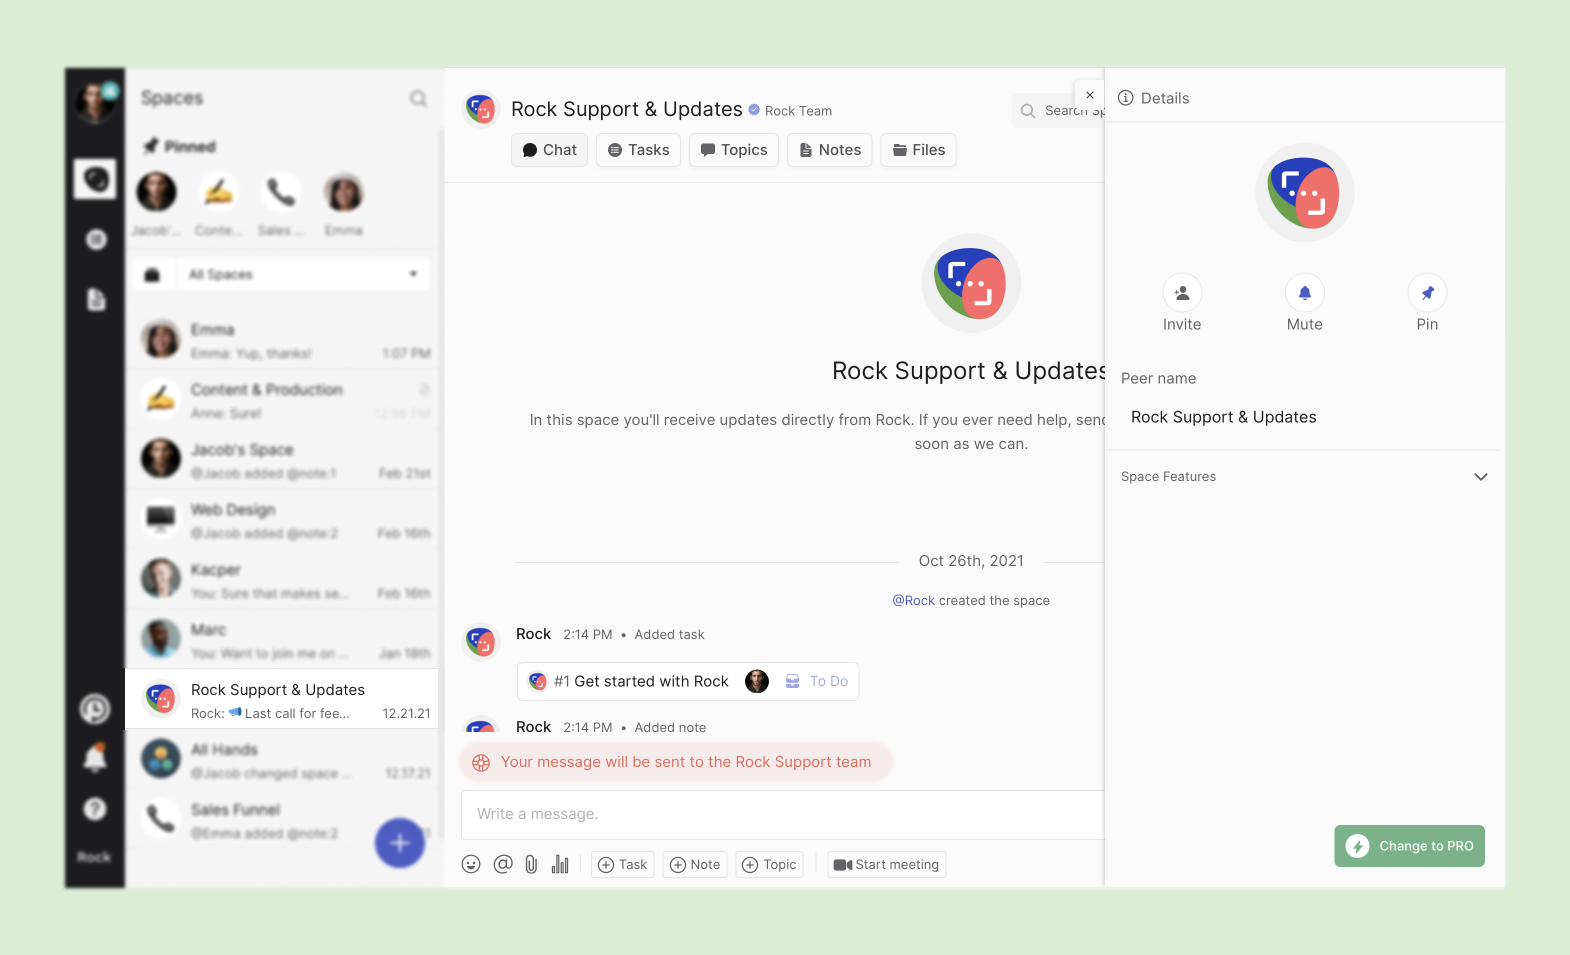
PRO spaces are enhanced versions of Rock spaces. This can be your personal space, 1:1 spaces and even group spaces. They eliminate collaboration restrictions of the FREE plan and provide access to features that are otherwise unavailable.
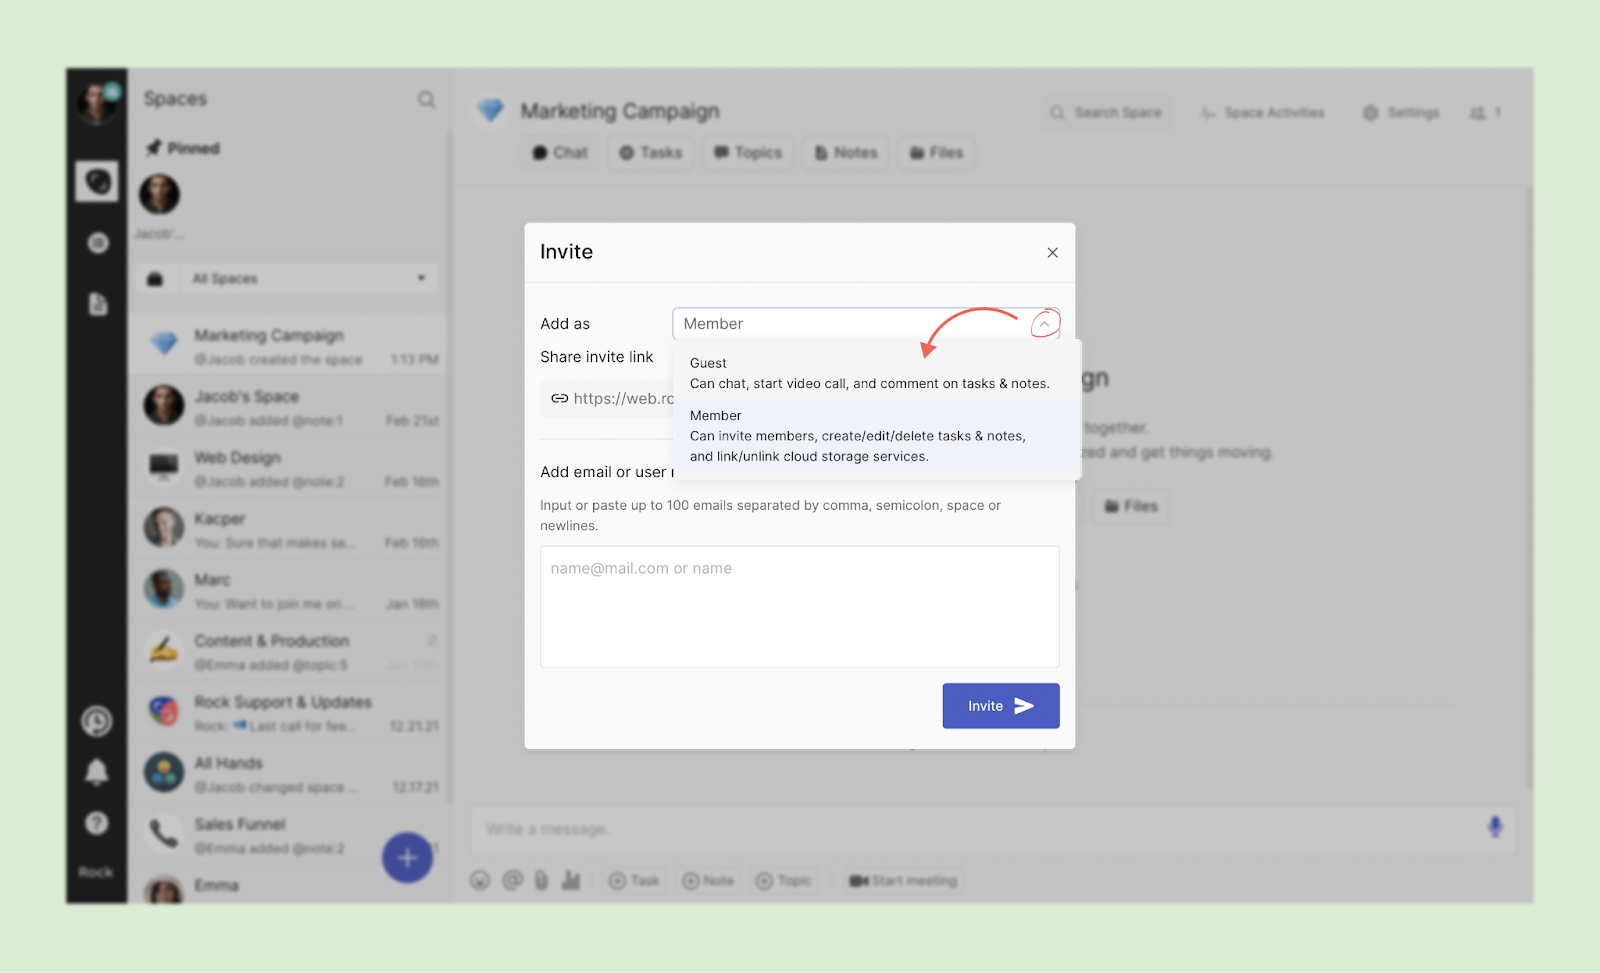
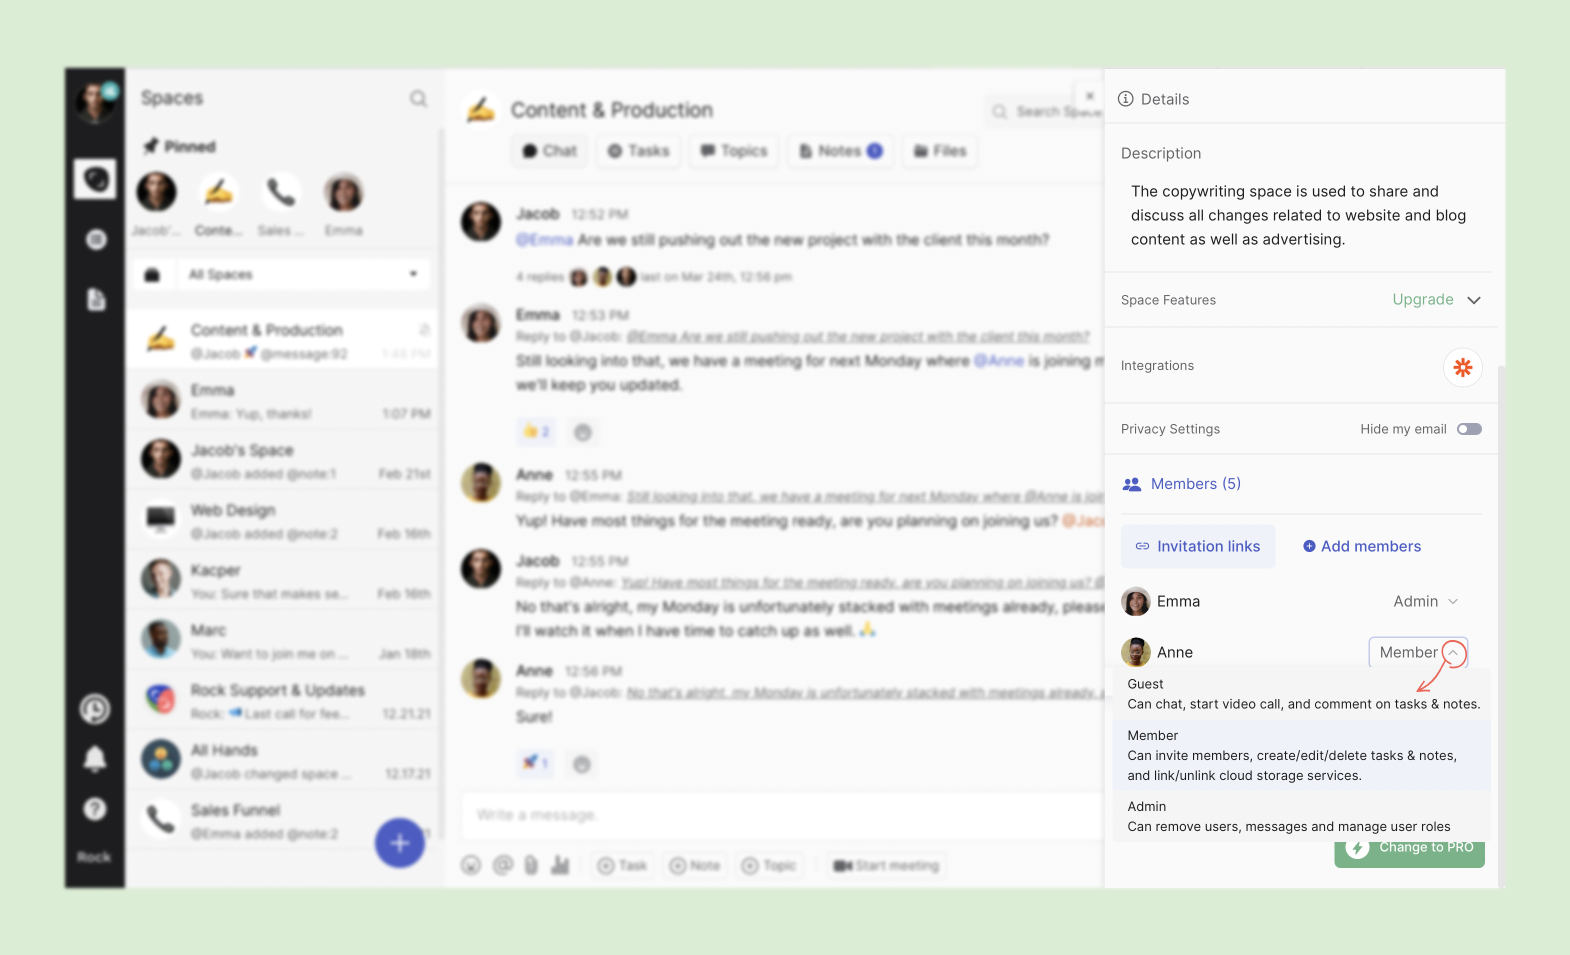
Anyone can be invited to join a PRO space, and their access to new features will depend on their role (guest, member, or admin) within the space. Access to advanced functionality is not tied to the plan and is available to all users, regardless of whether they have a Free or Unlimited plan. This means that even free users you invite to collaborate can use all of the advanced features.
How to change spaces to PRO?
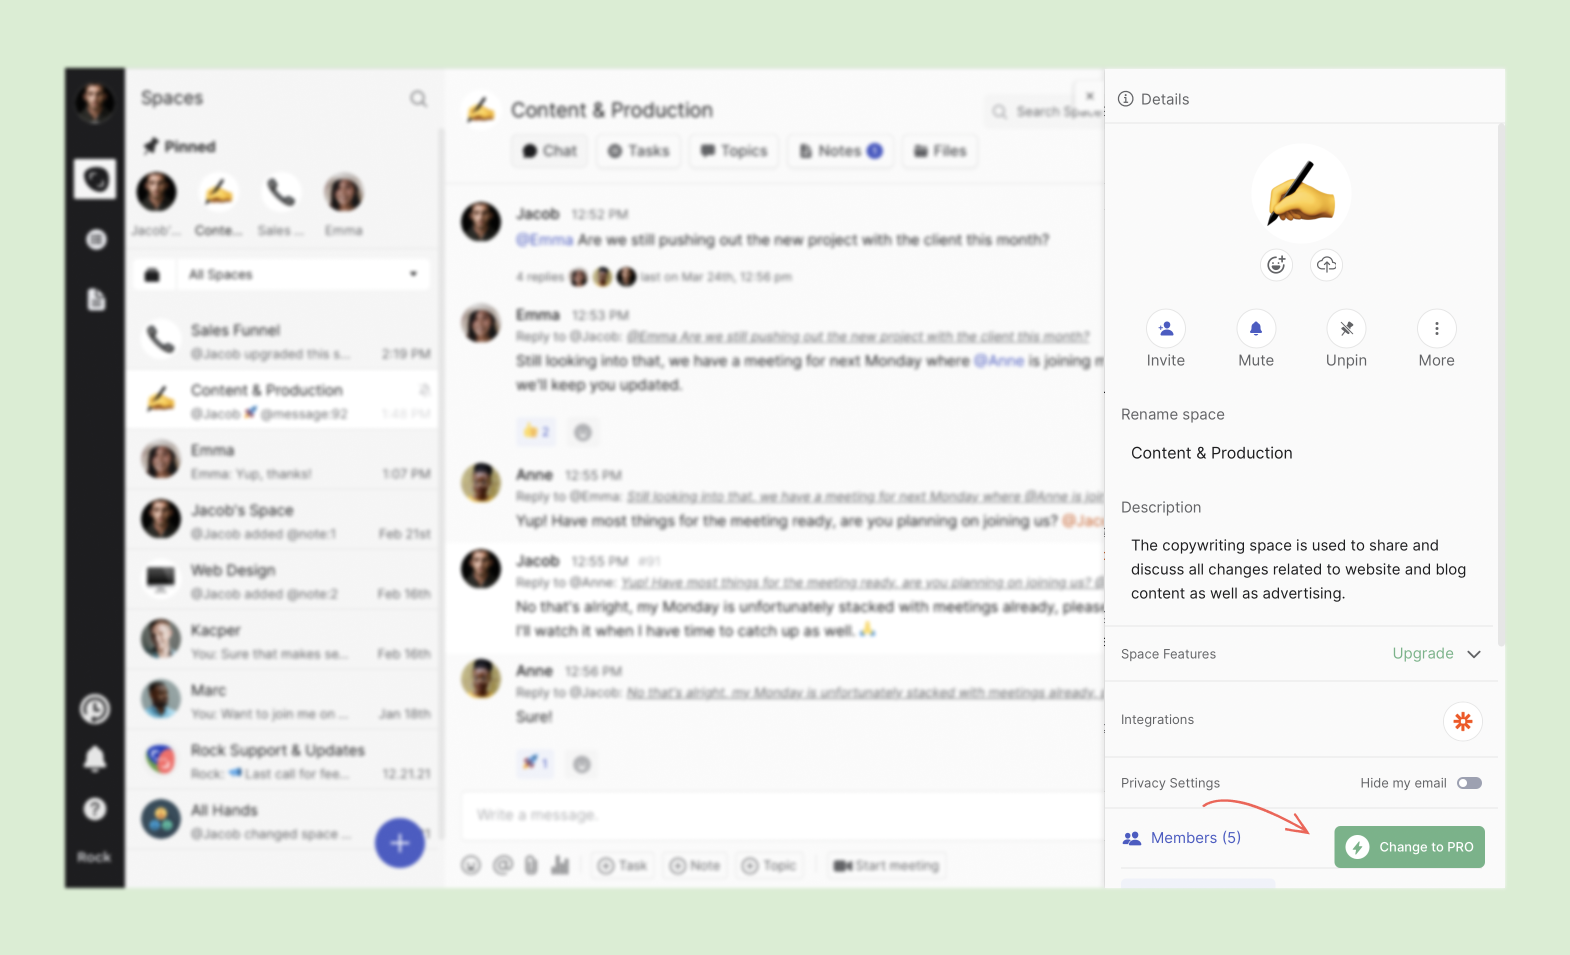
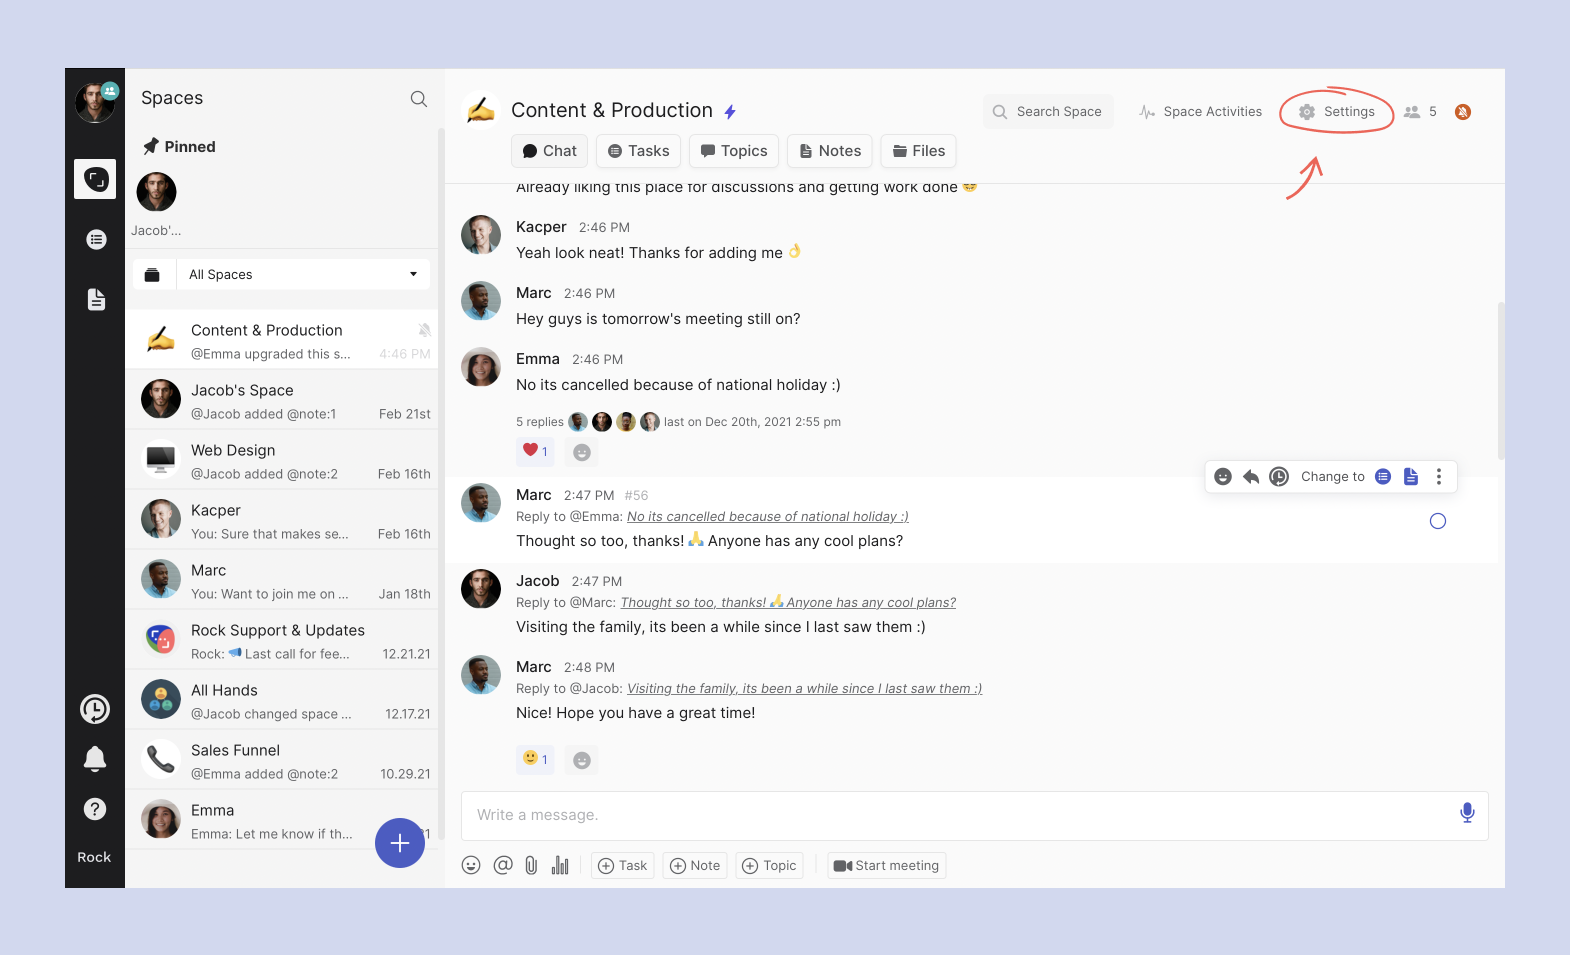
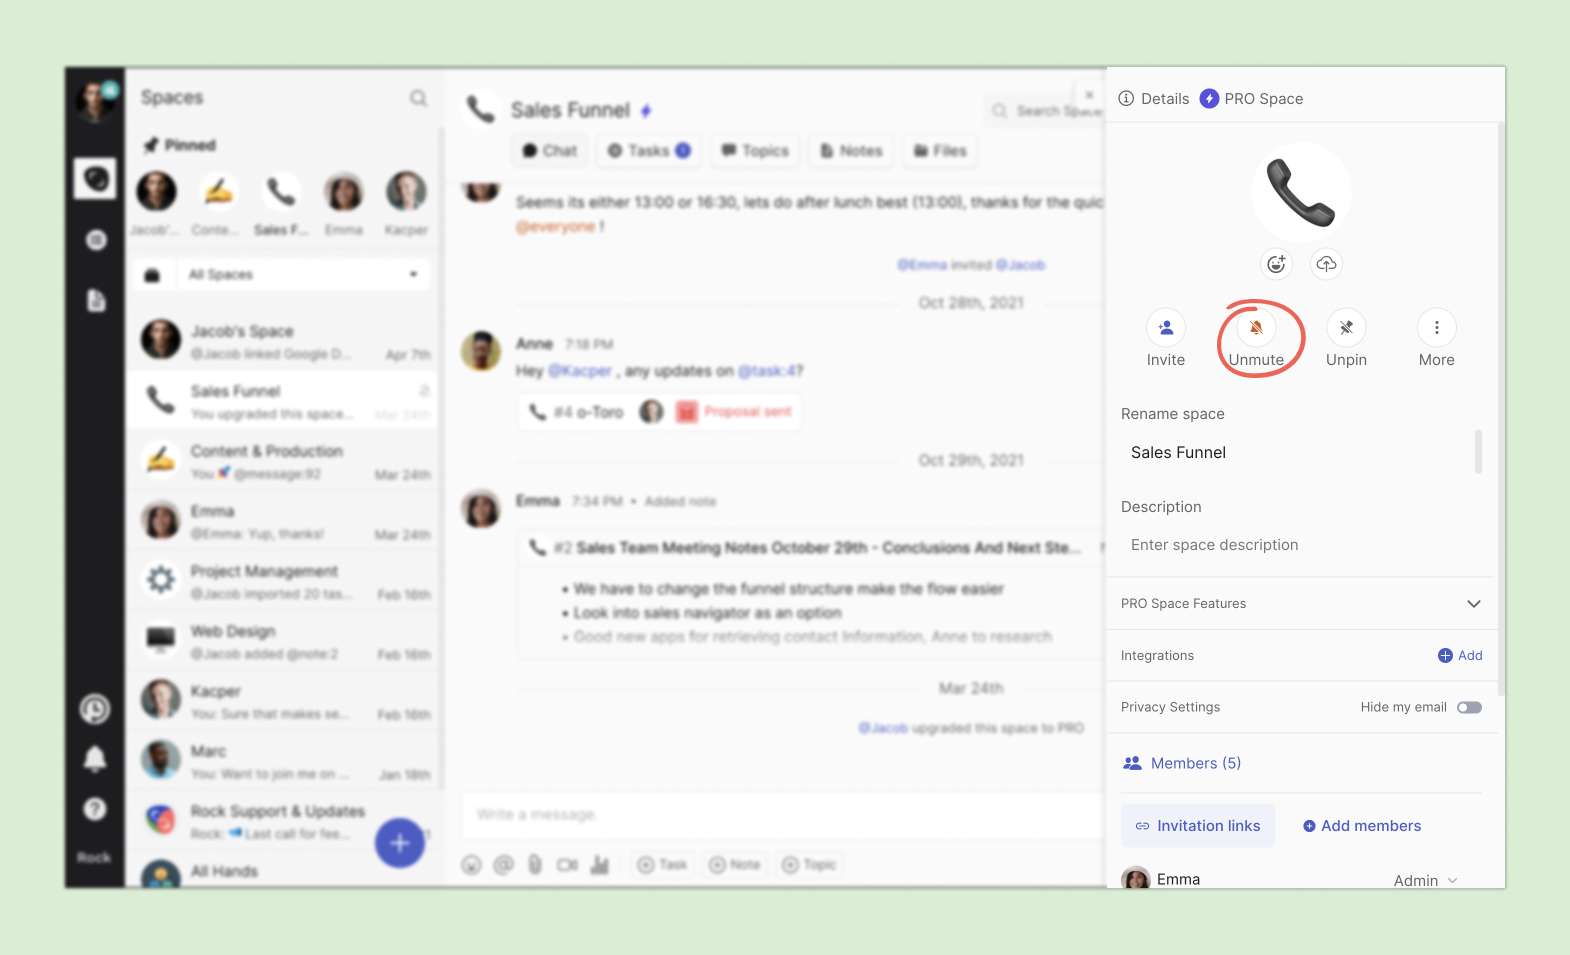
Upgrading to the Unlimited plan does not automatically convert your spaces to PRO. You and any new managers assigned to the plan must manually change spaces created while using the Free plan to PRO.
To do so, follow these simple steps:
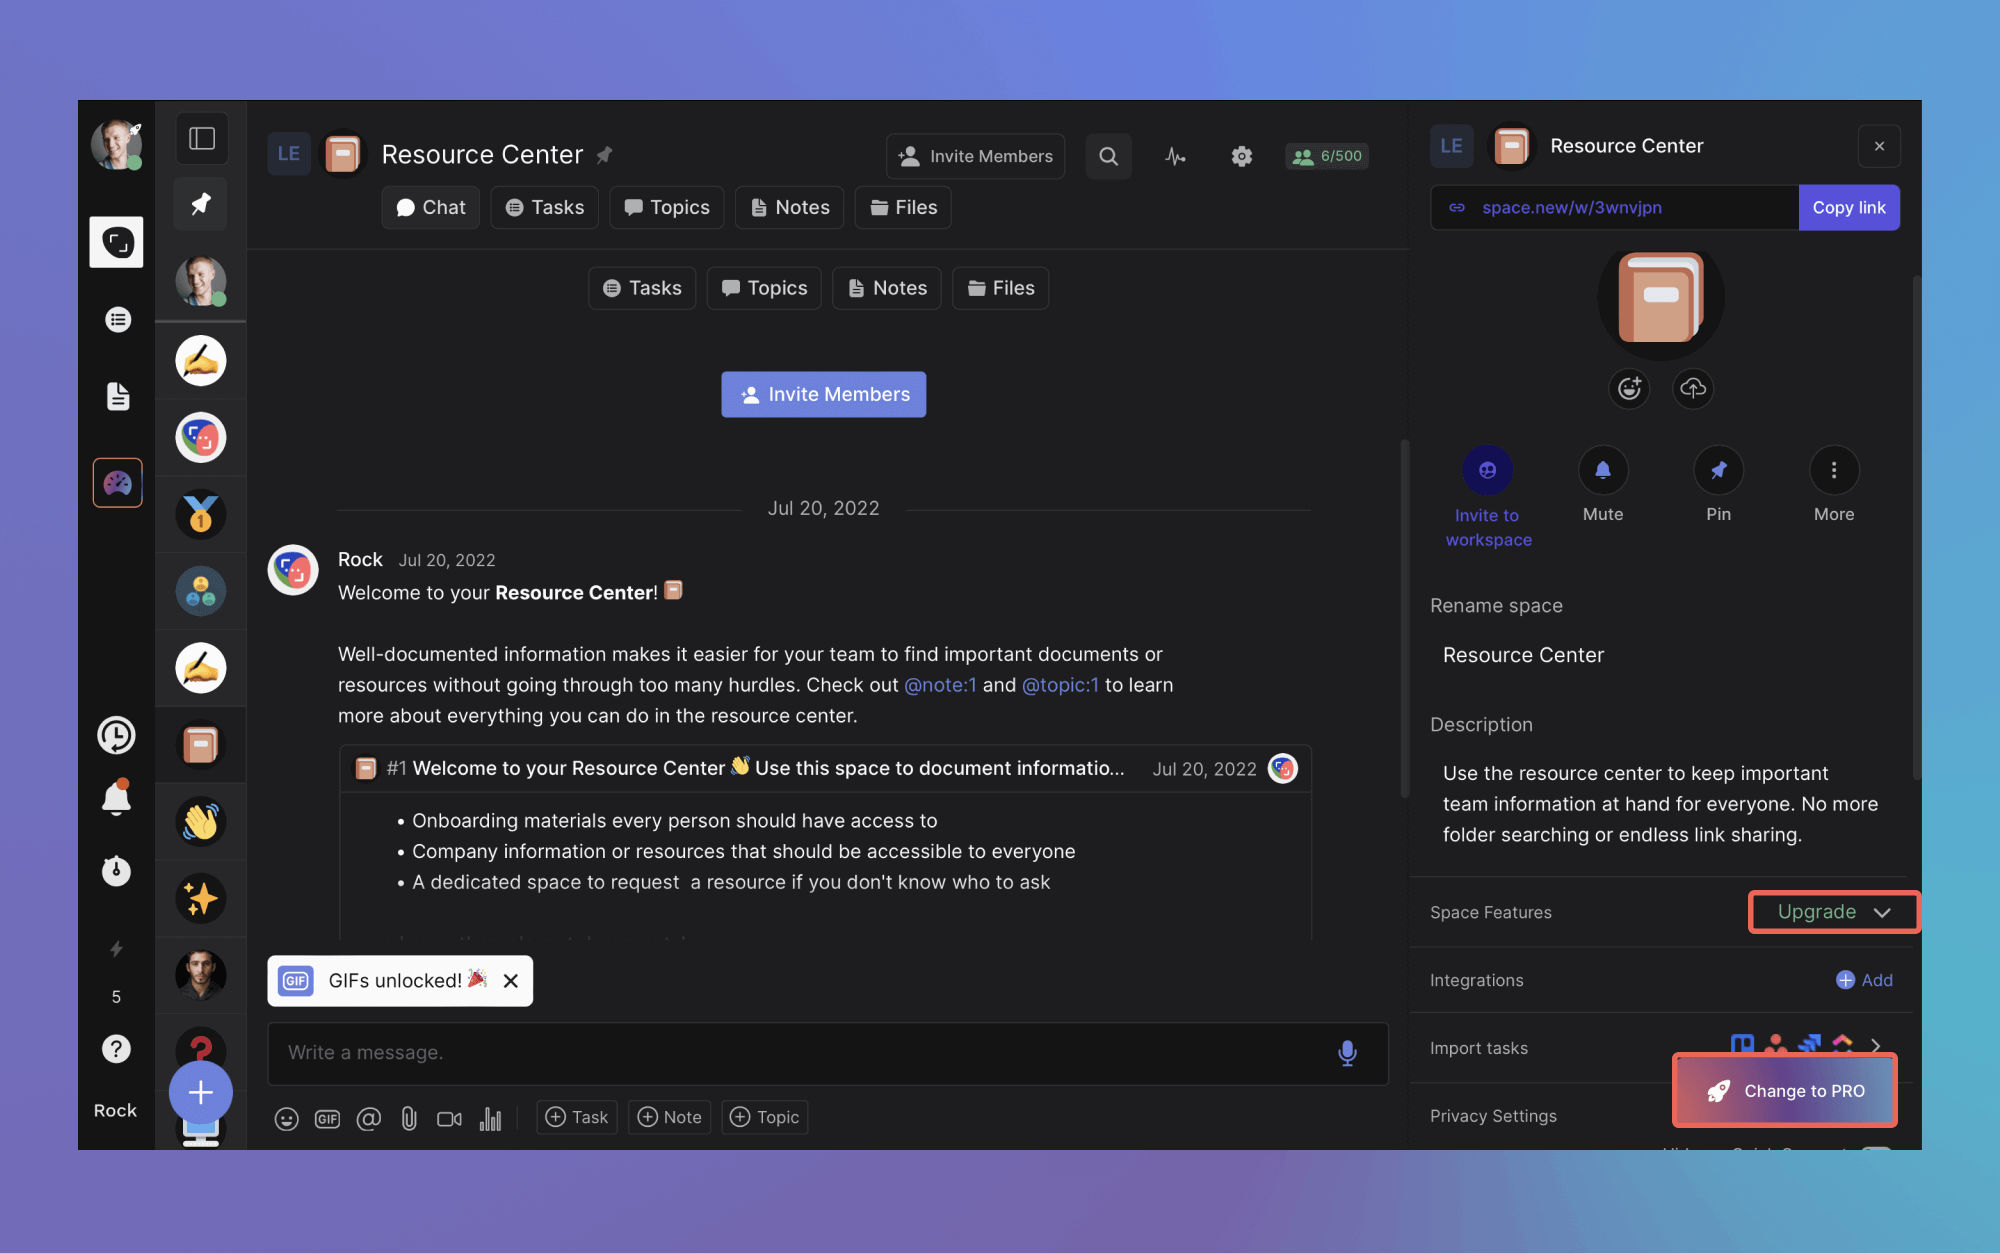
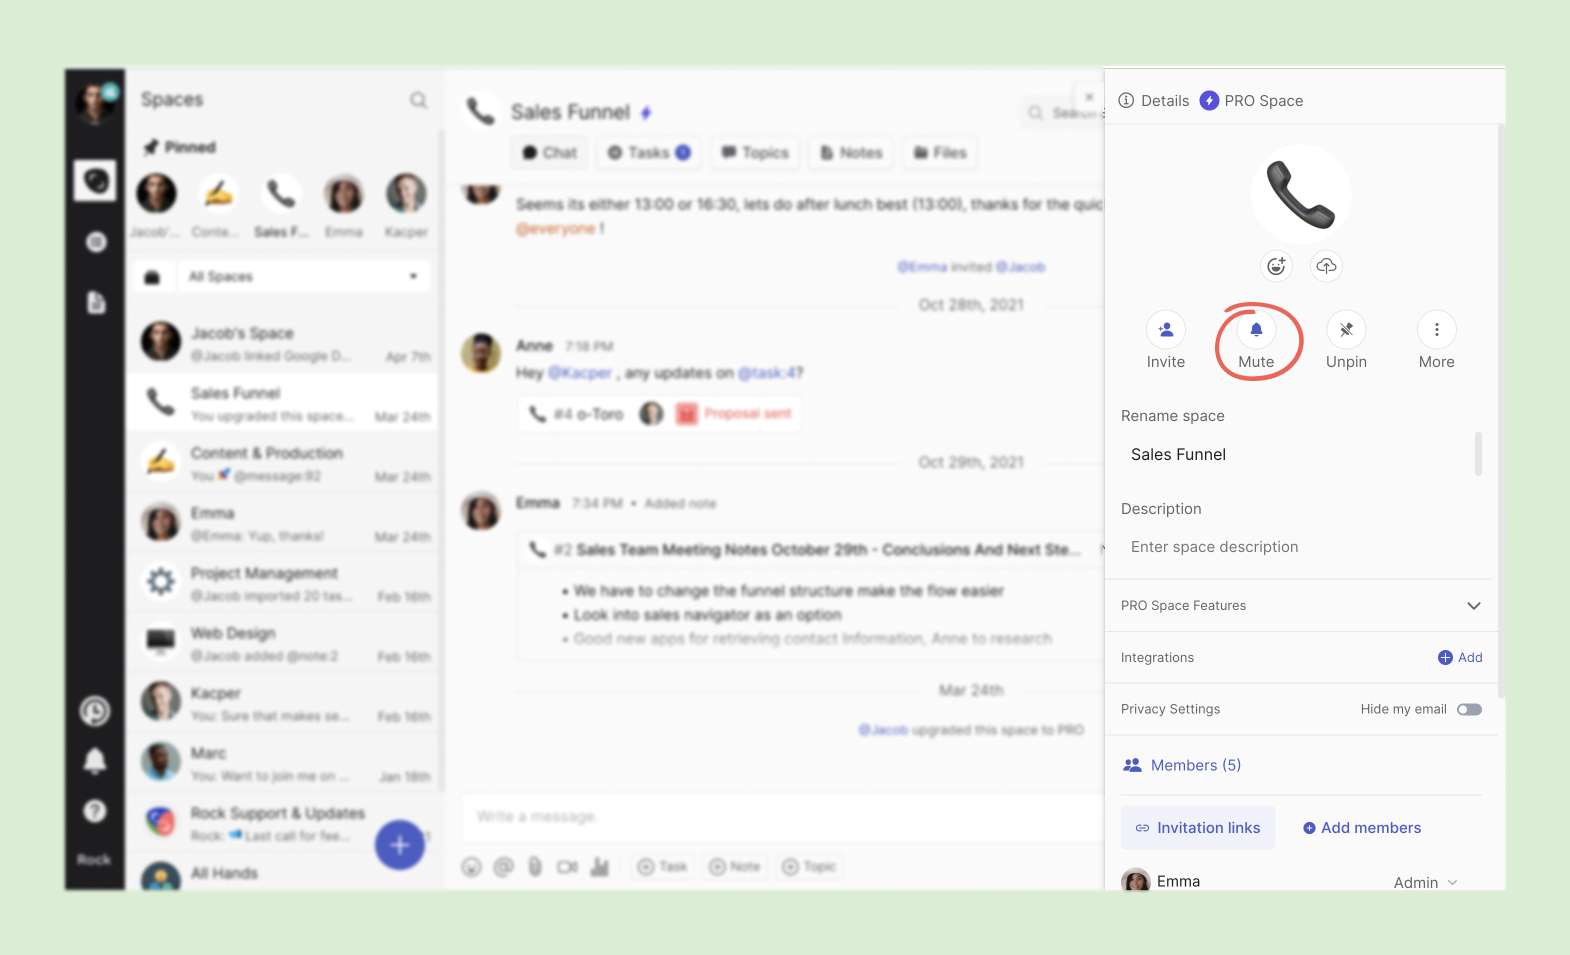
Step 1: Enter space settings
Step 2: Select “Change to PRO” at the bottom of the screen
📝 Note that the purchaser of the plan or manager needs to have admin status in a space to change it to PRO. This does not apply to 1:1 spaces or the personal space as there are no user roles for those spaces.
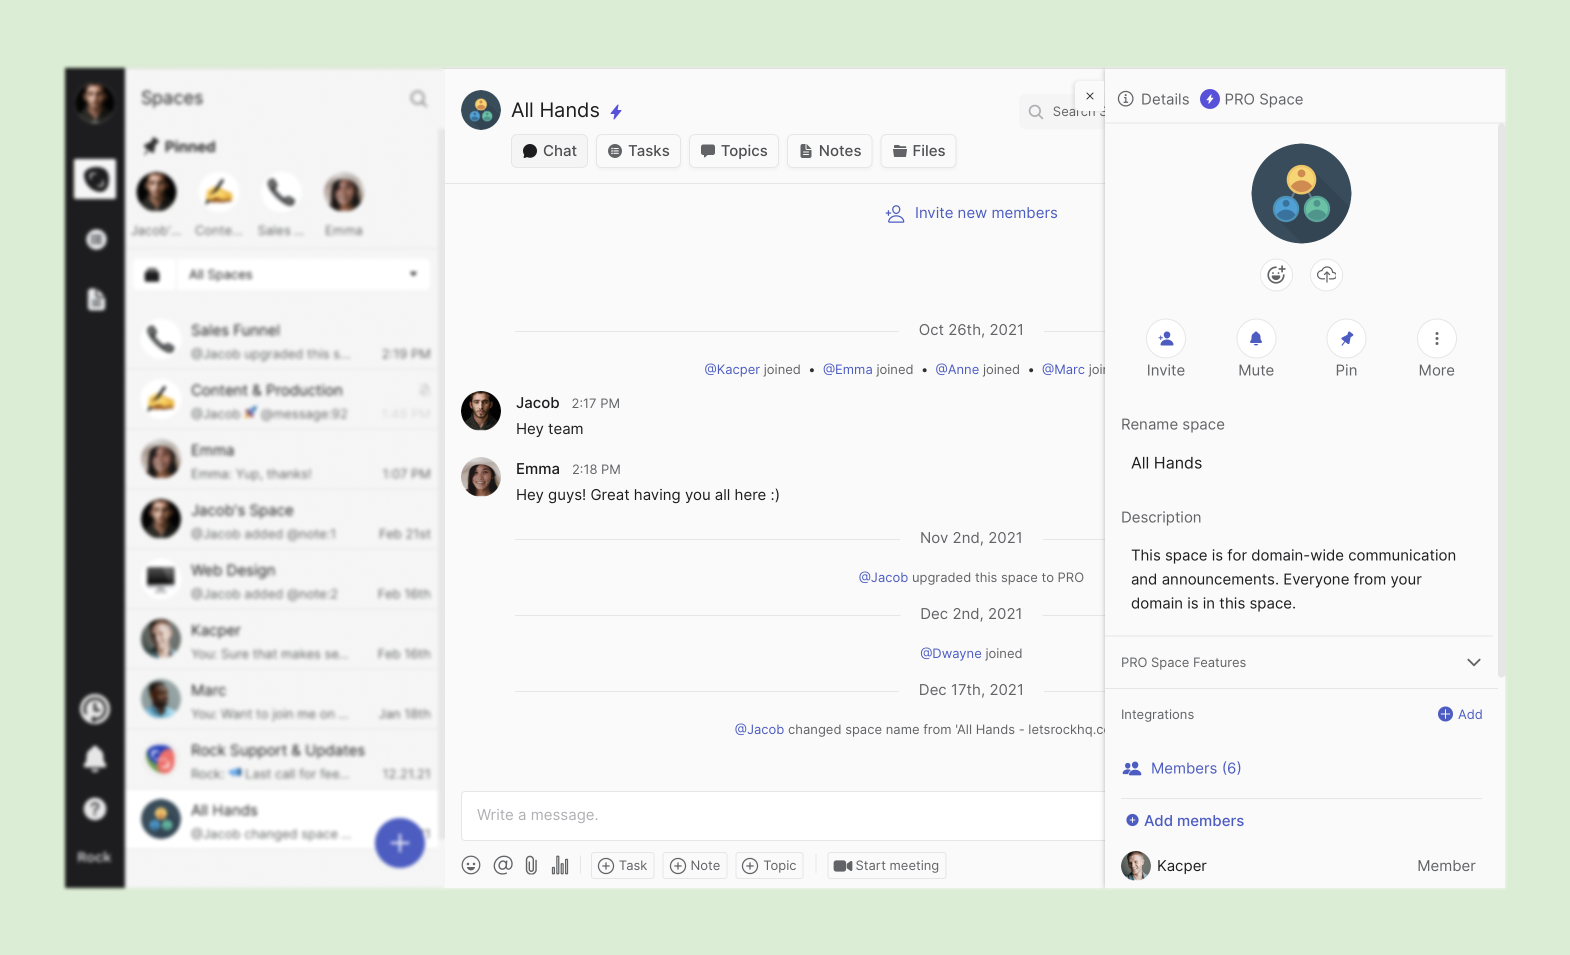
Every new space that the purchaser or a manager creates after changing to the unlimited plan will be instantly changed to PRO upon creation.
What do PRO spaces offer?
New functionality unlocks when you upgrade a space to PRO.
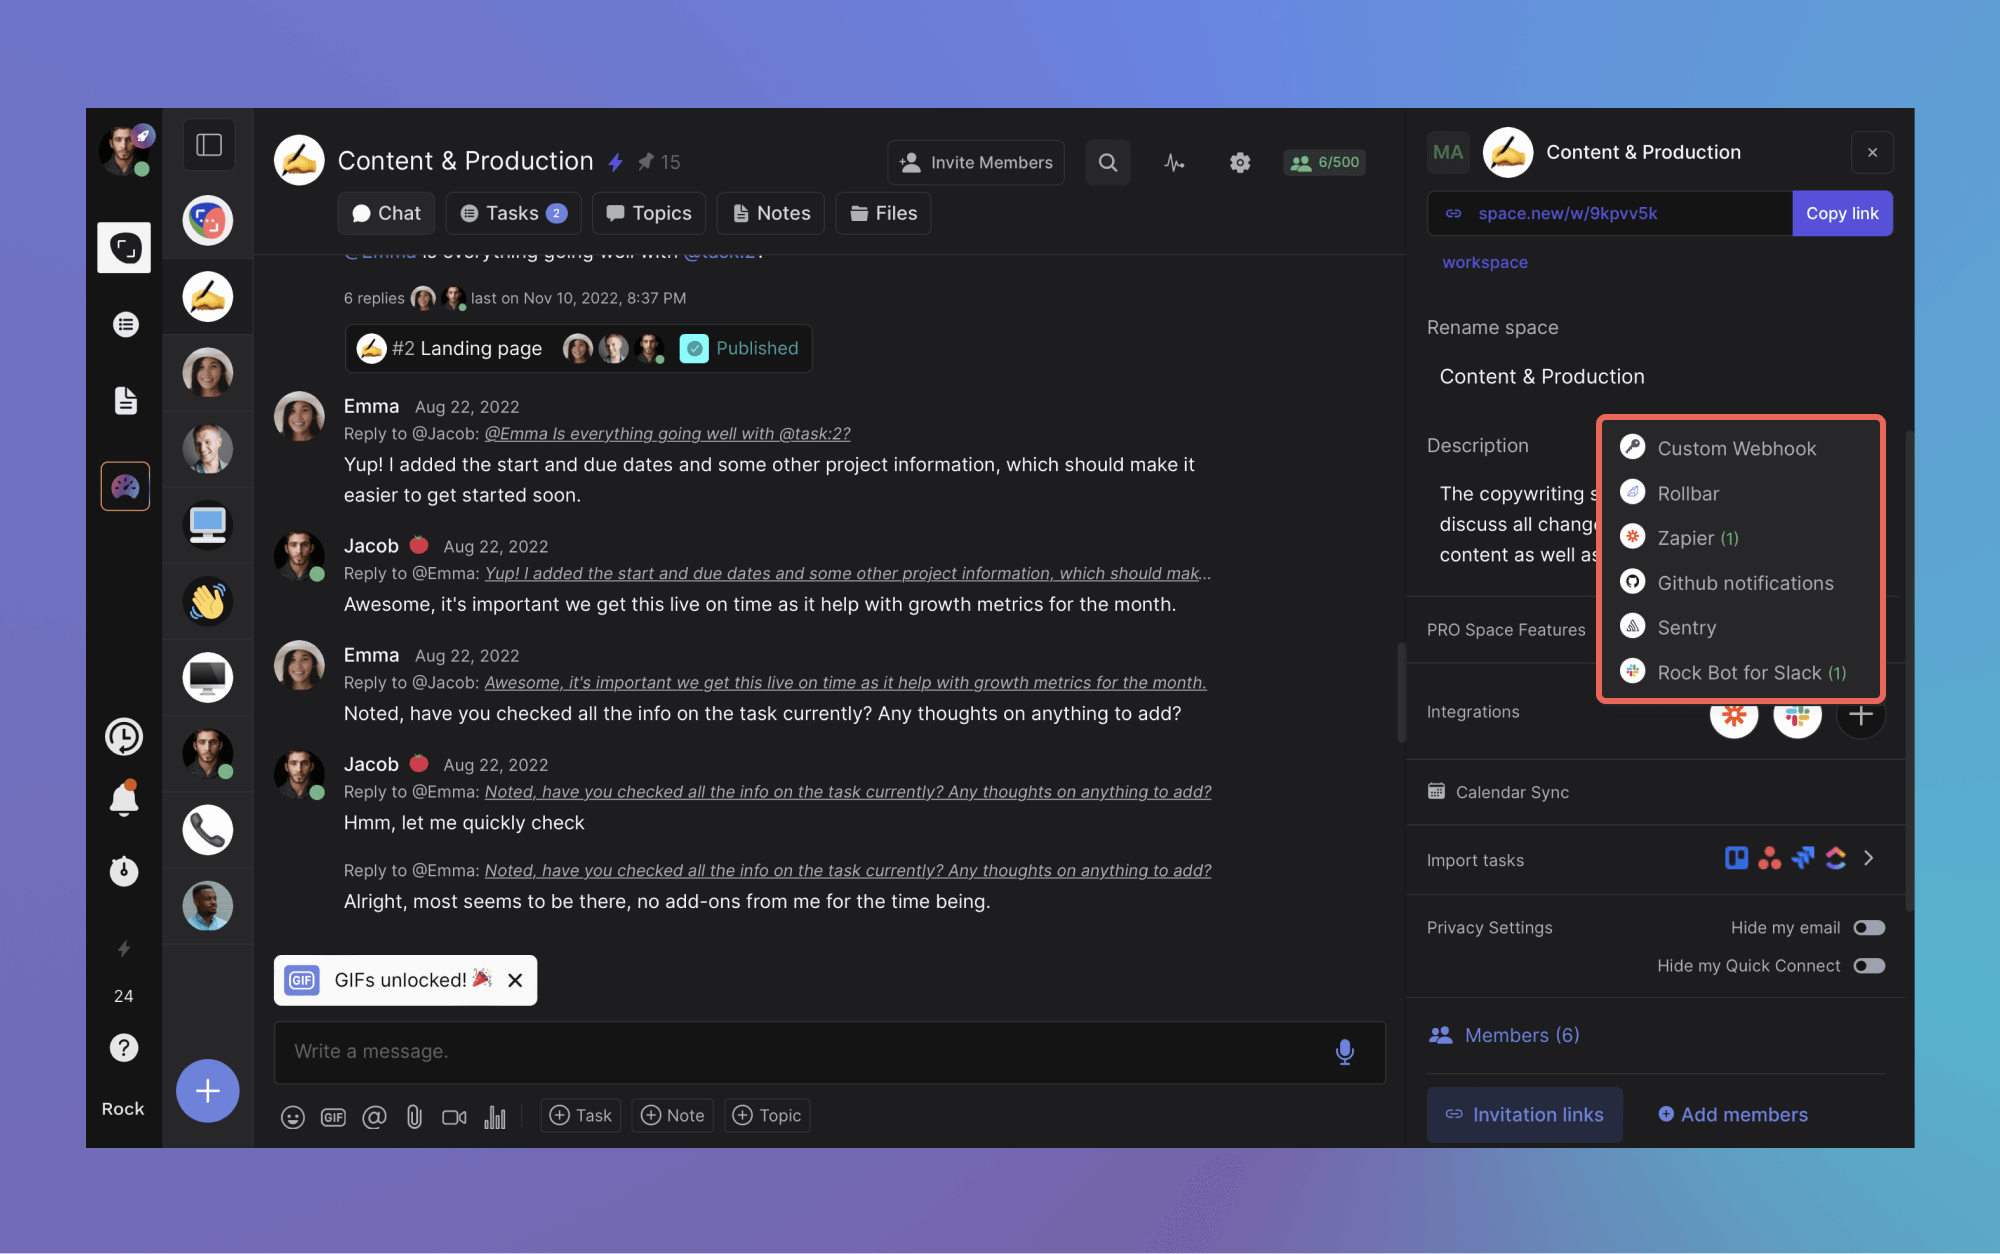
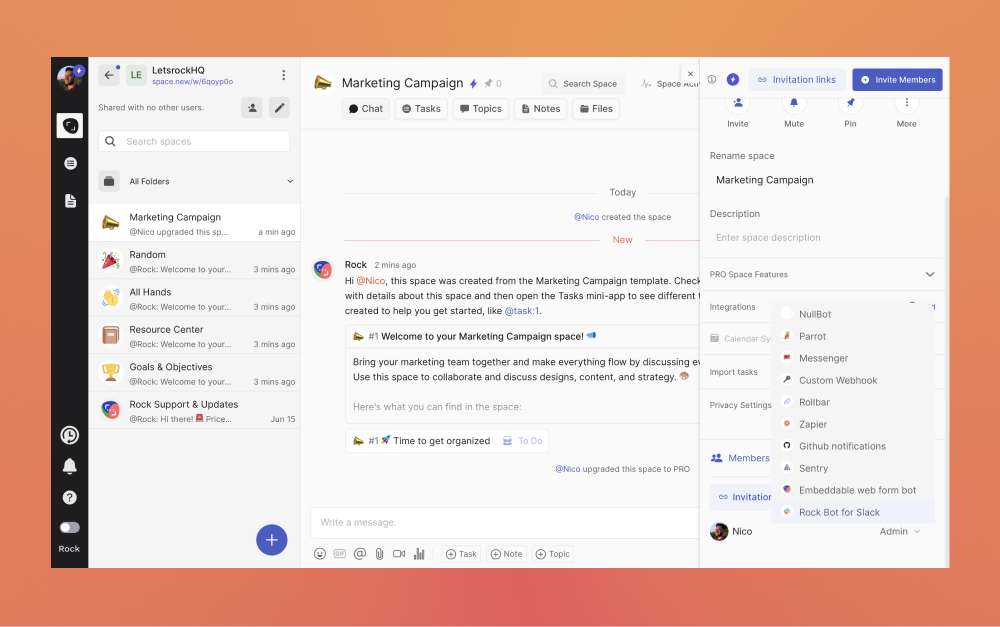
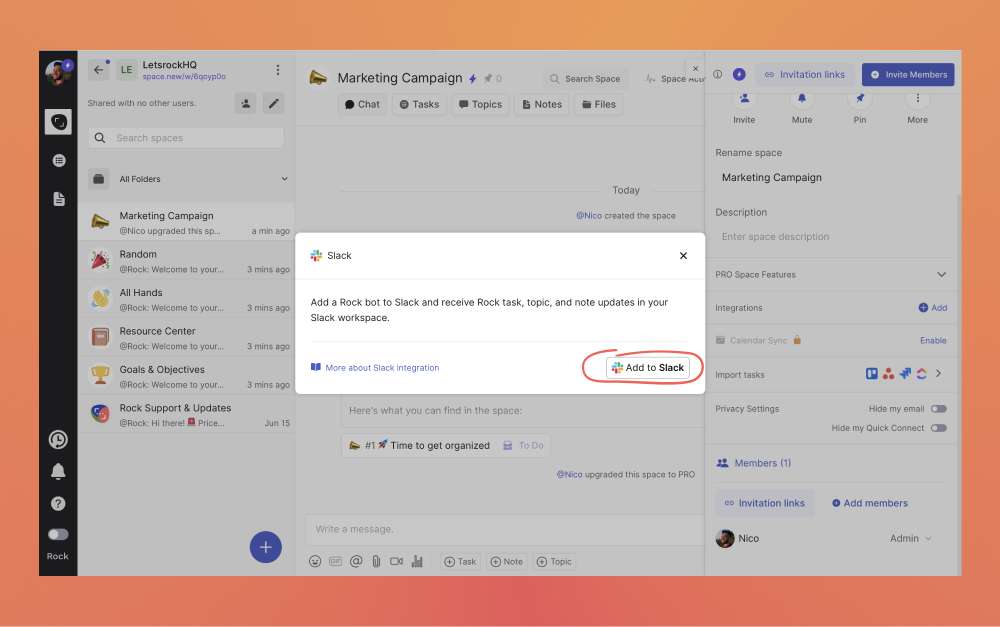
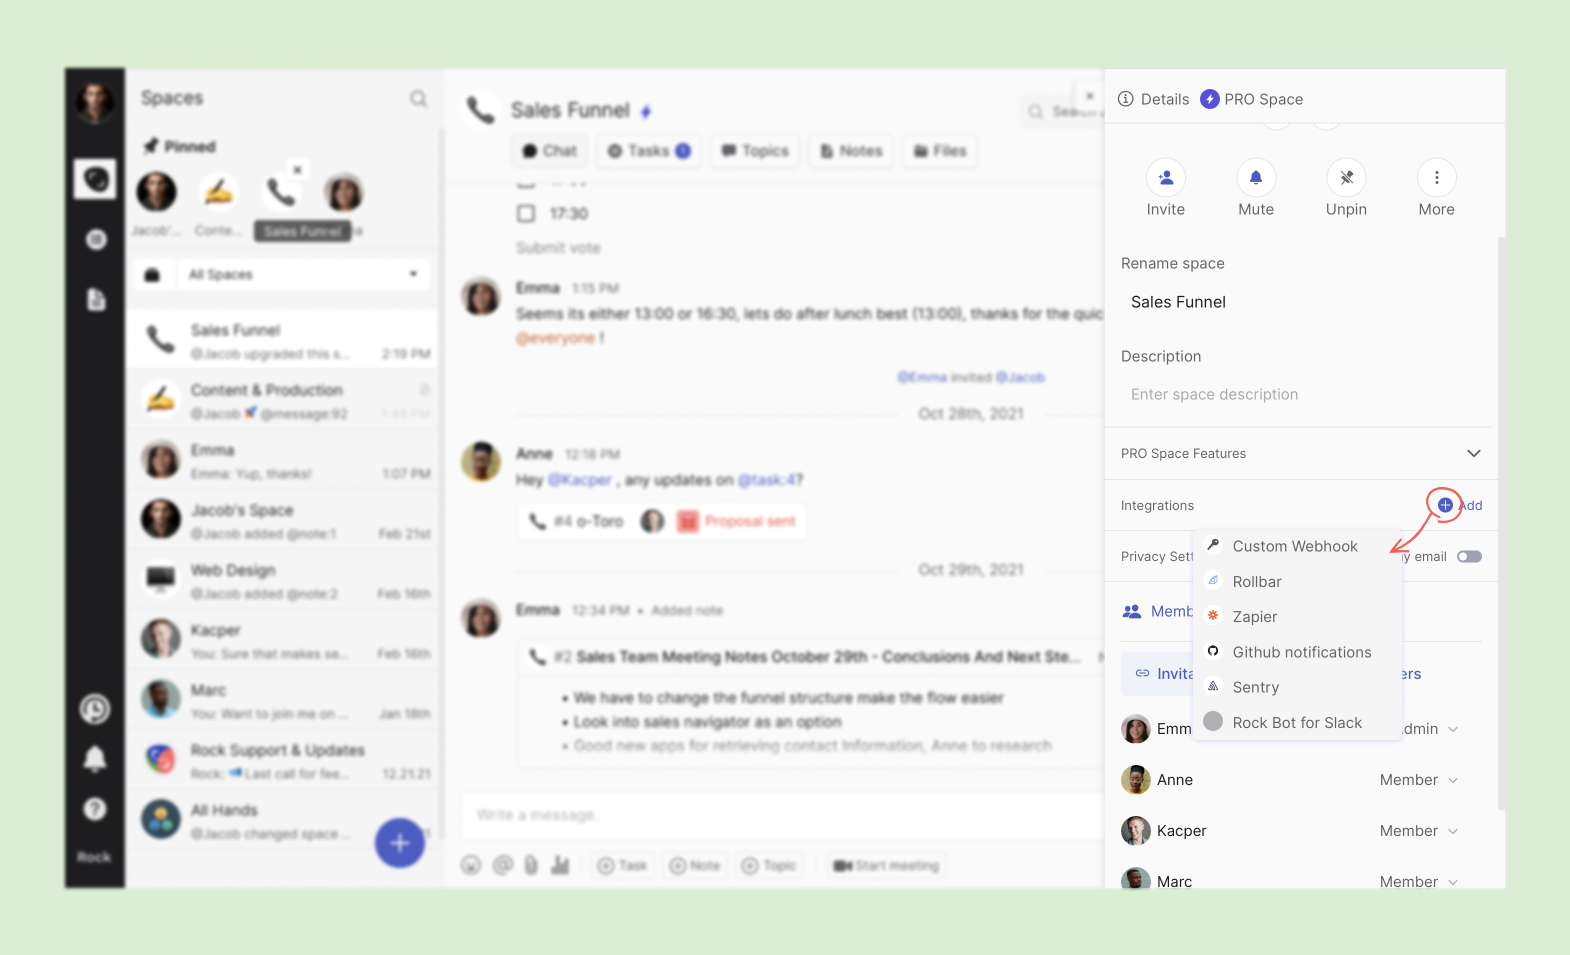
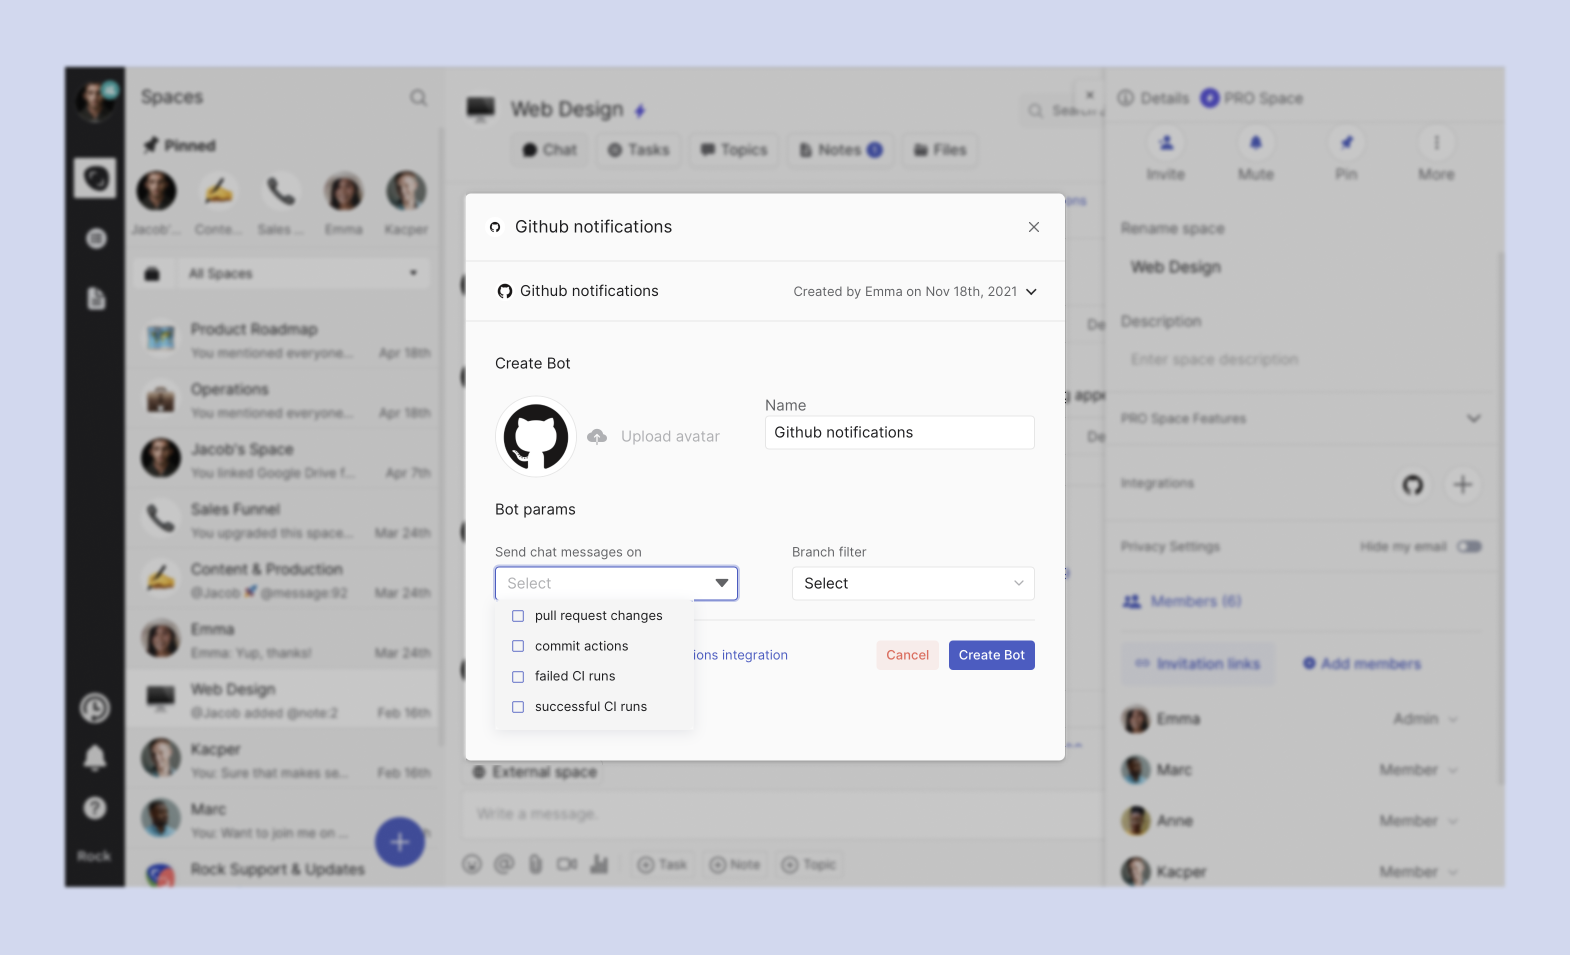
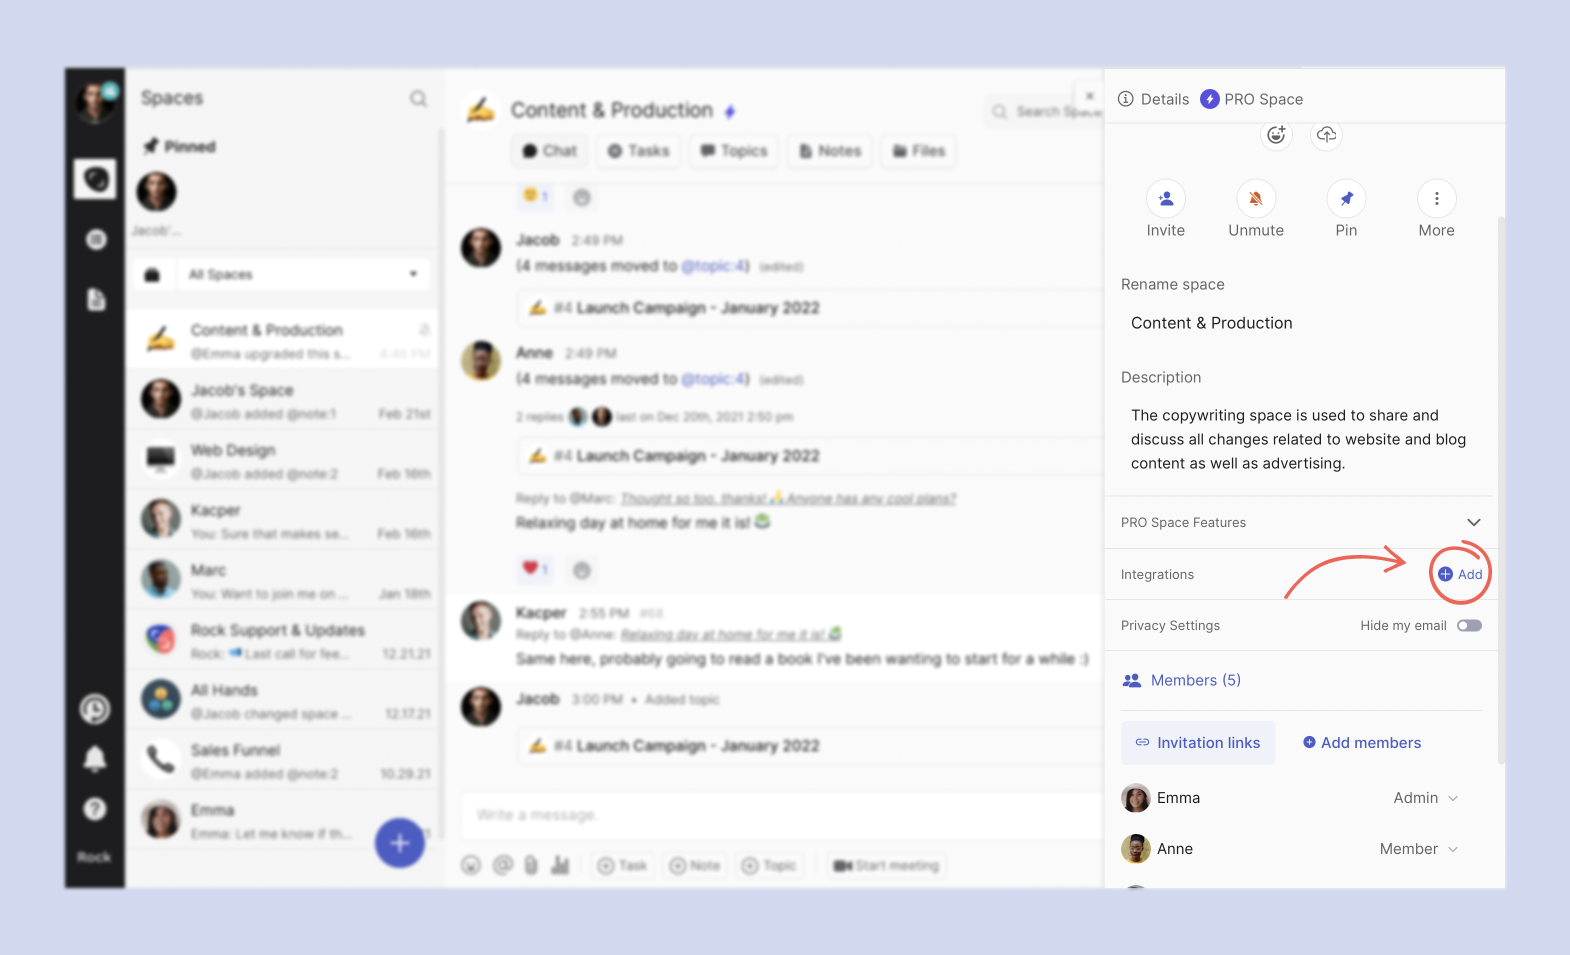
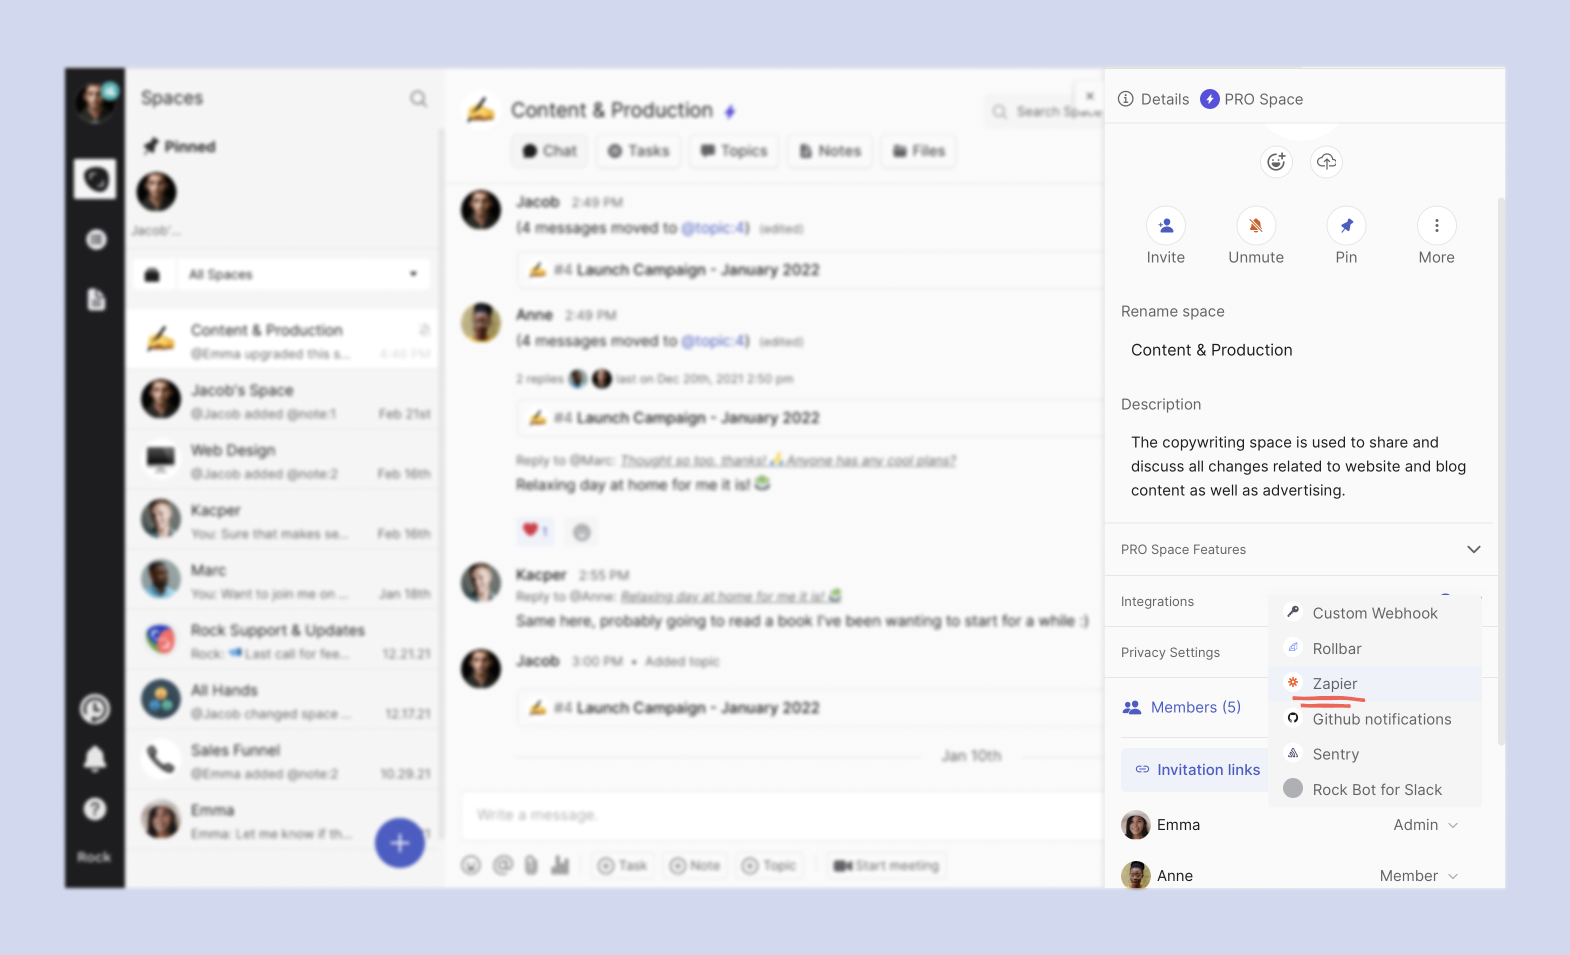
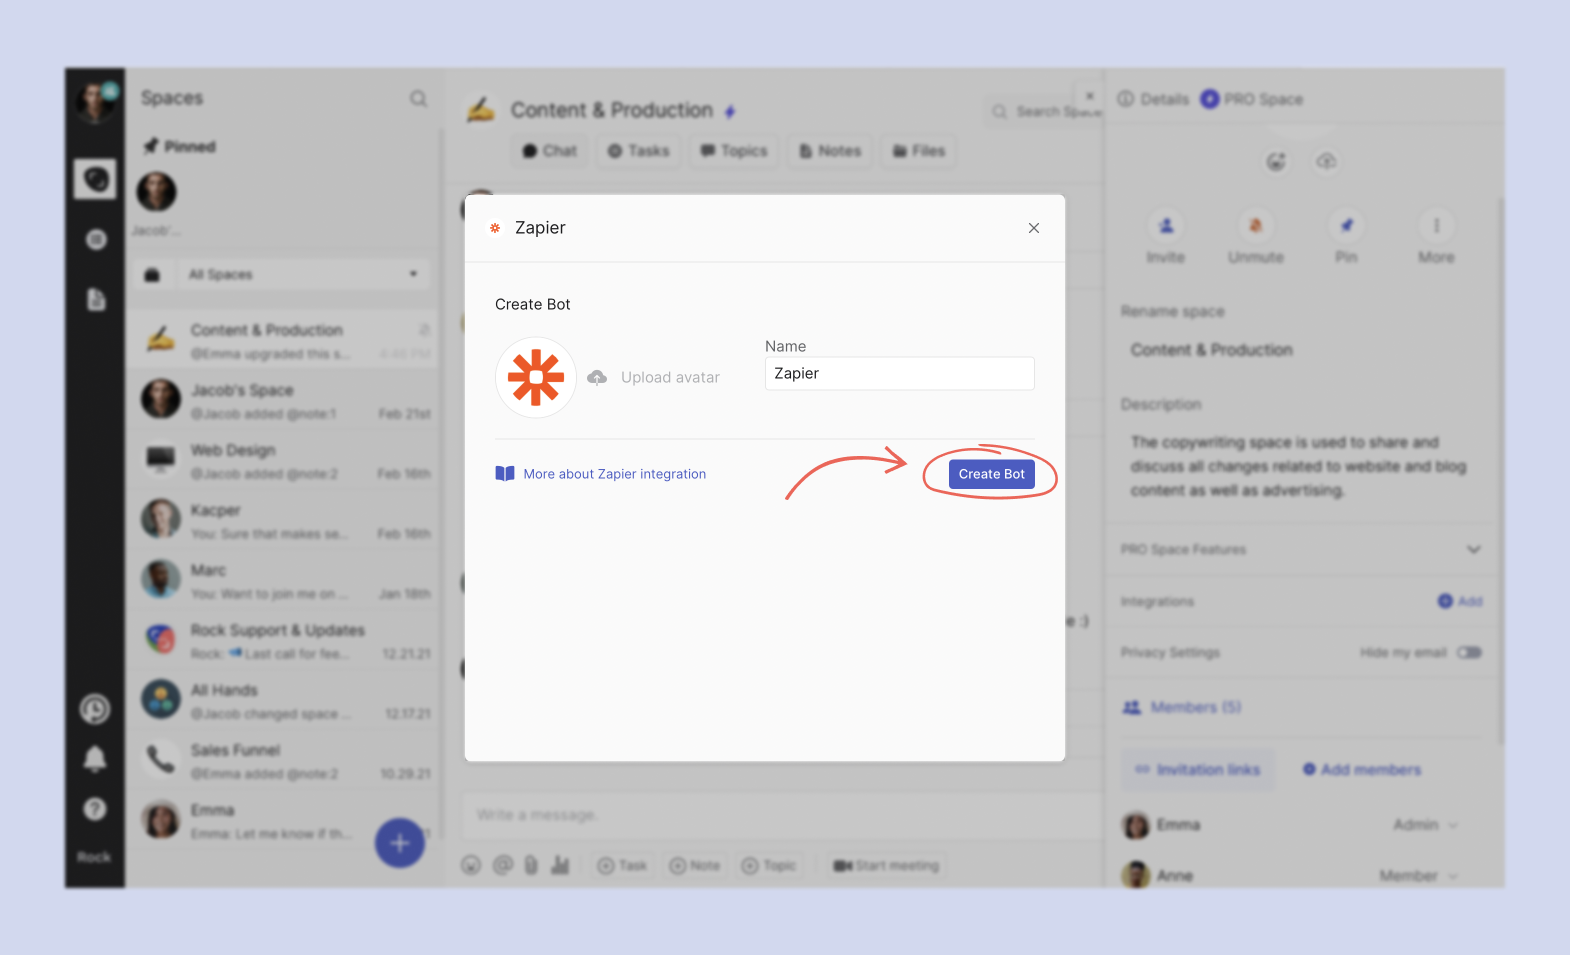
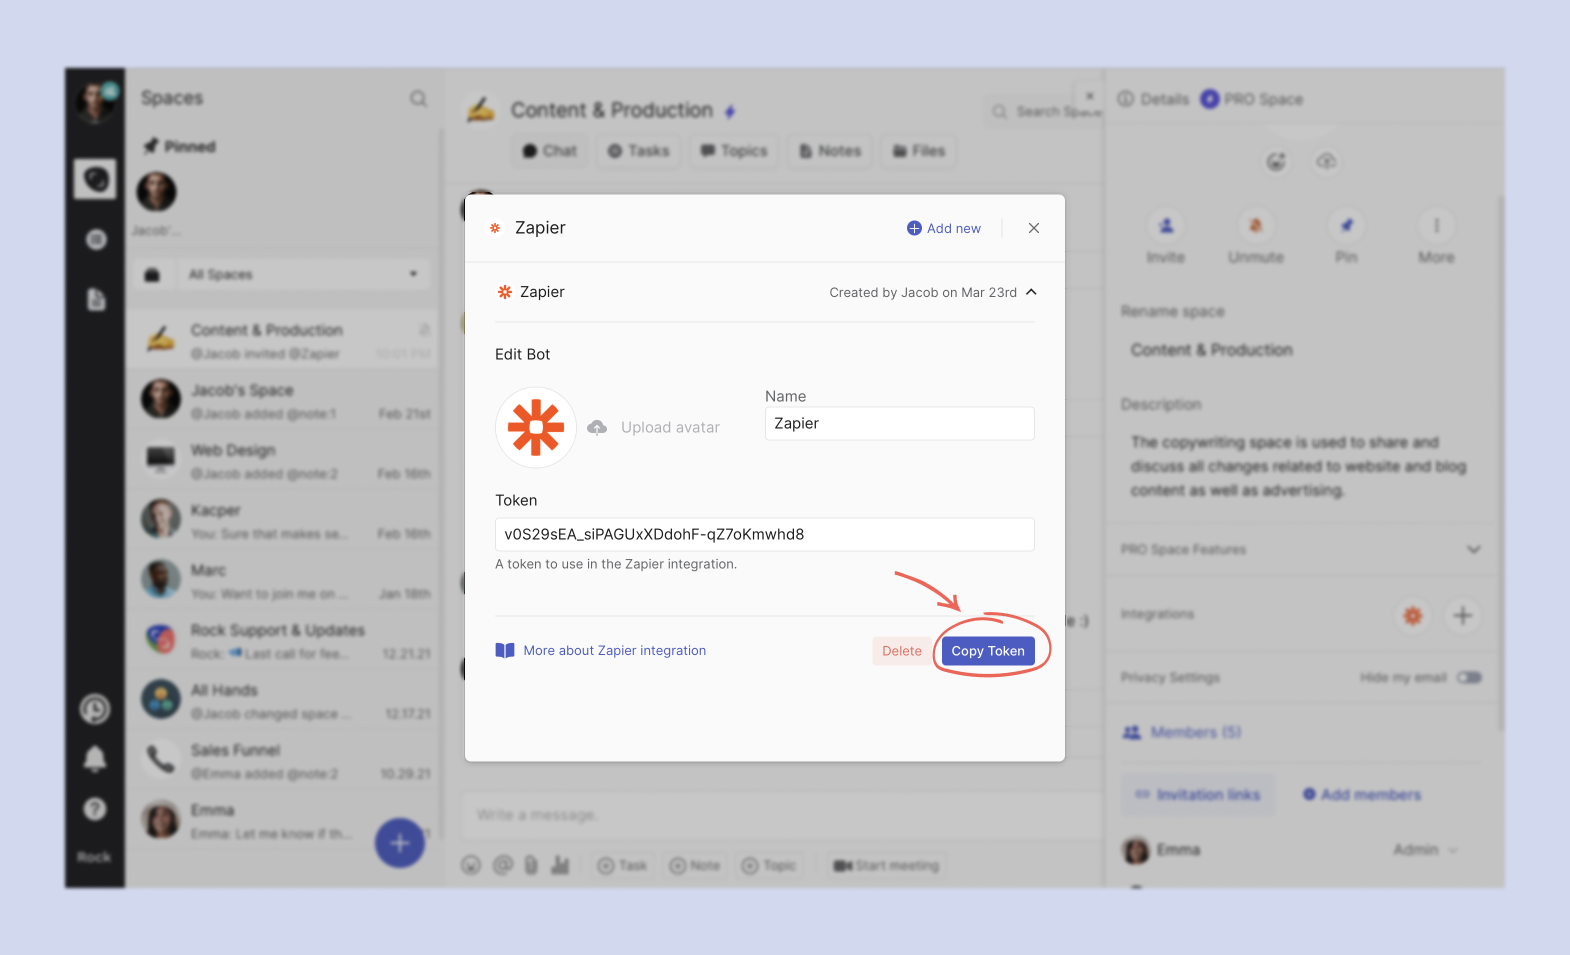
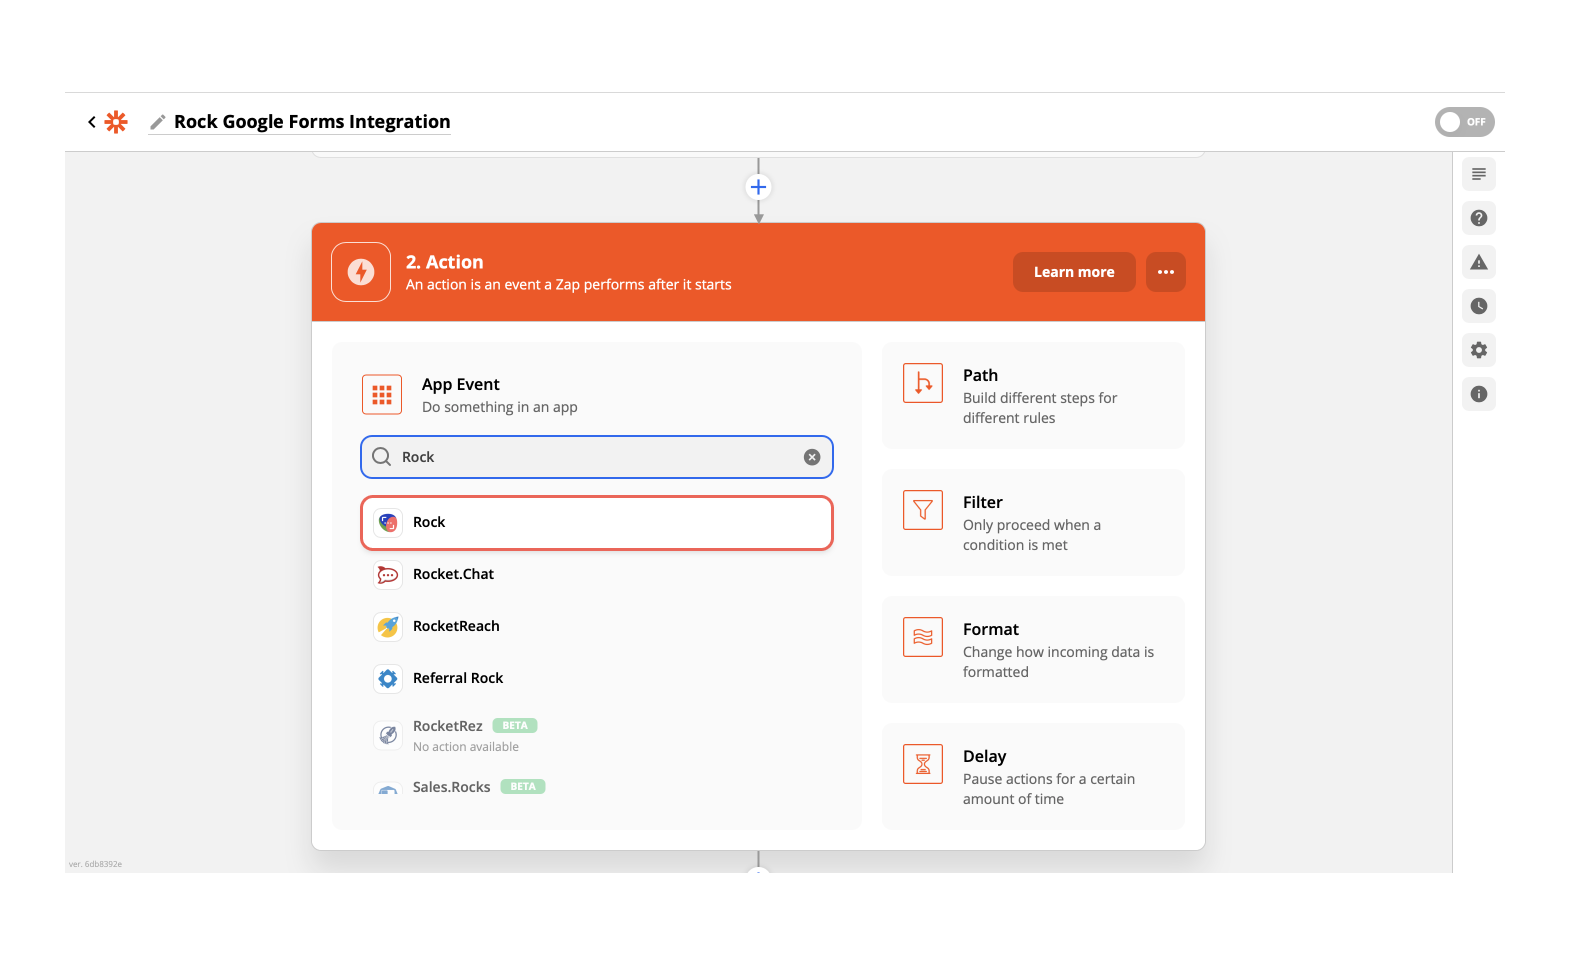
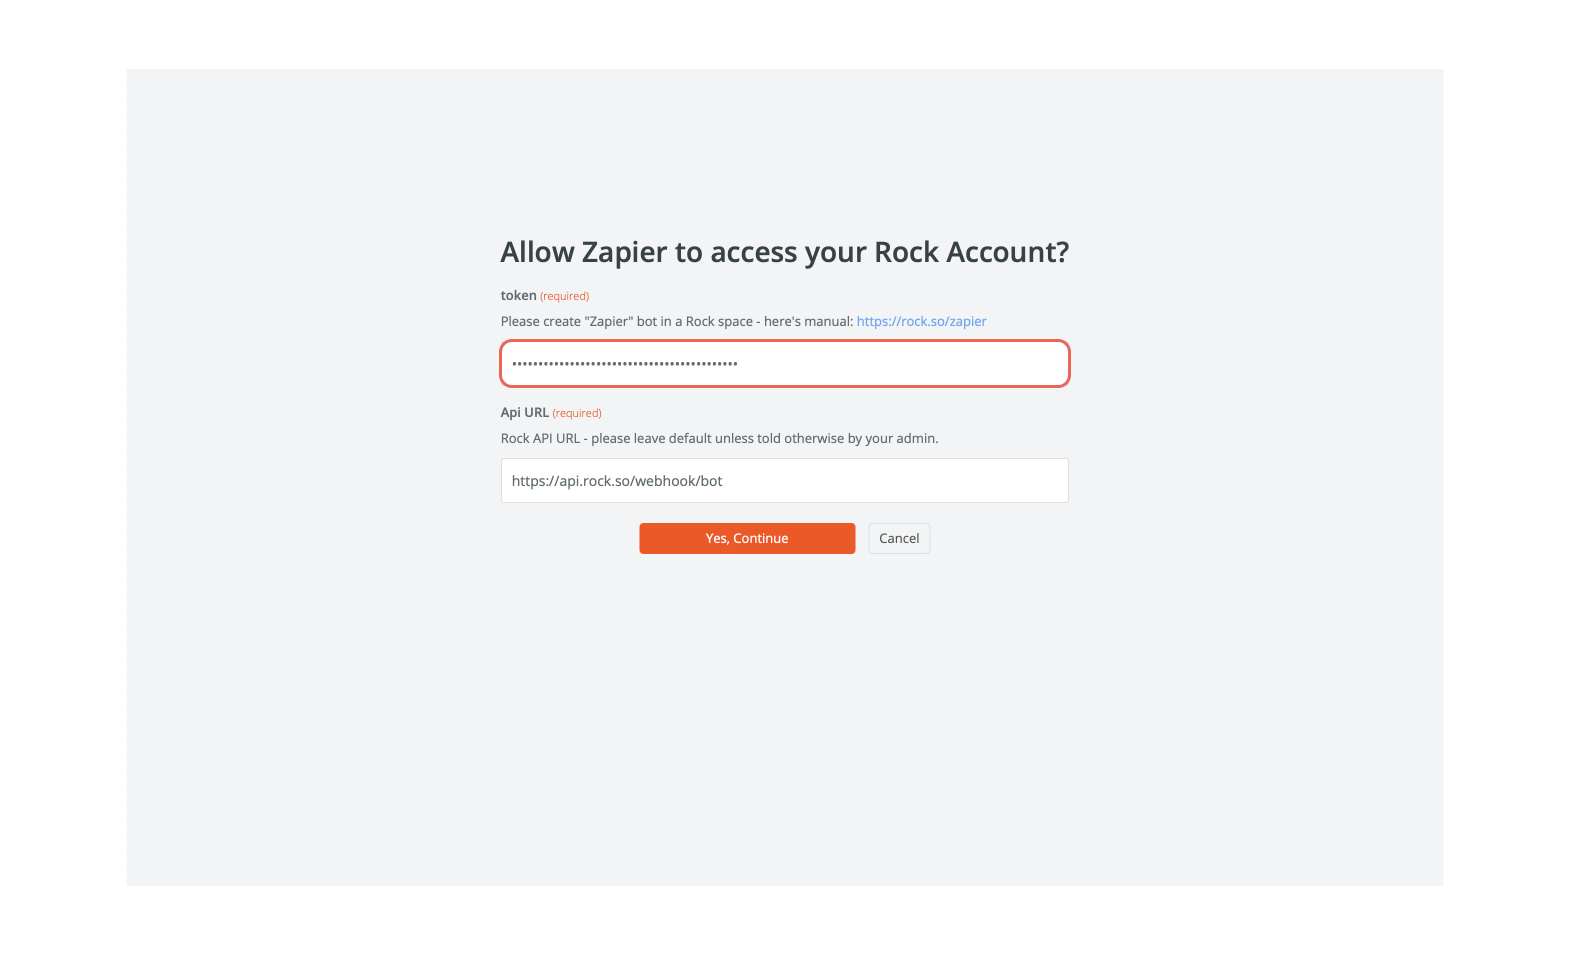
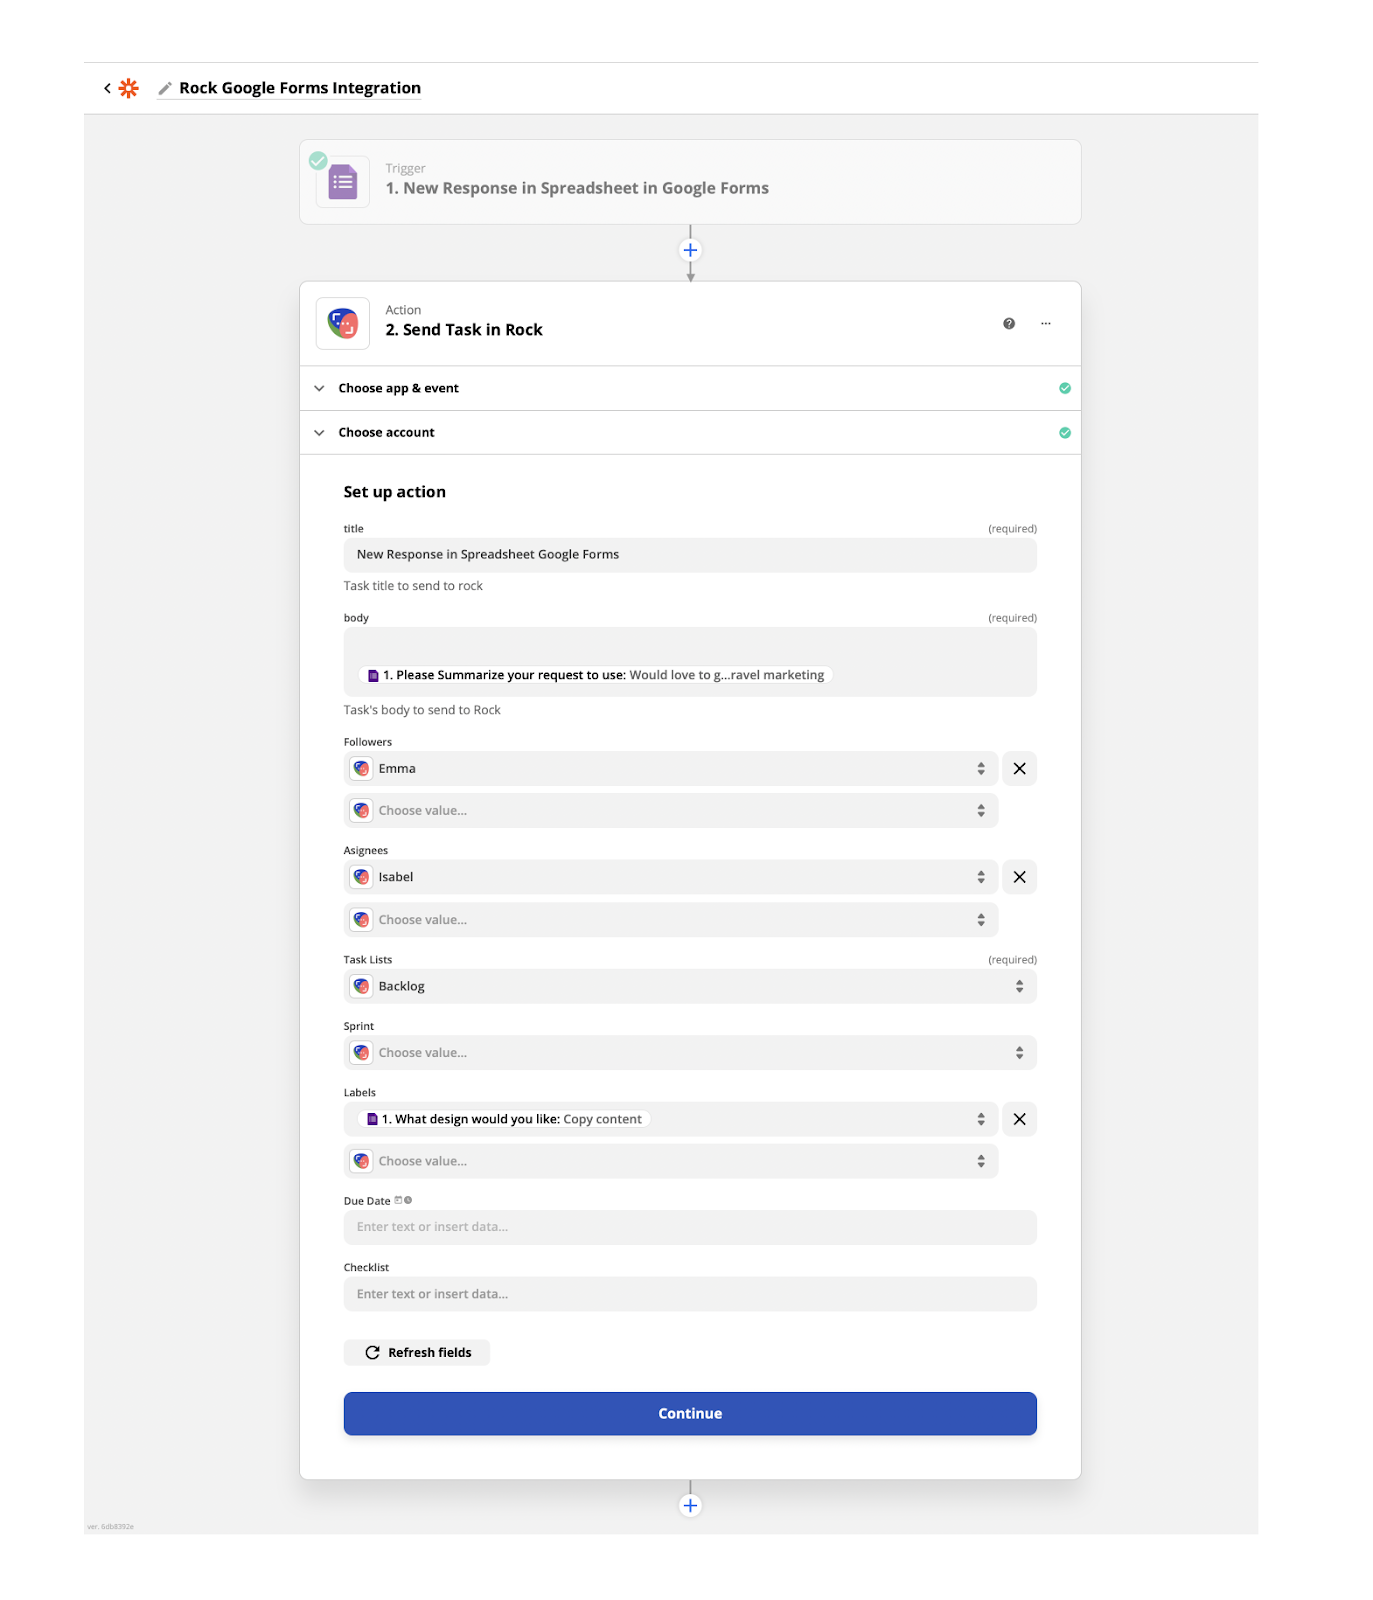
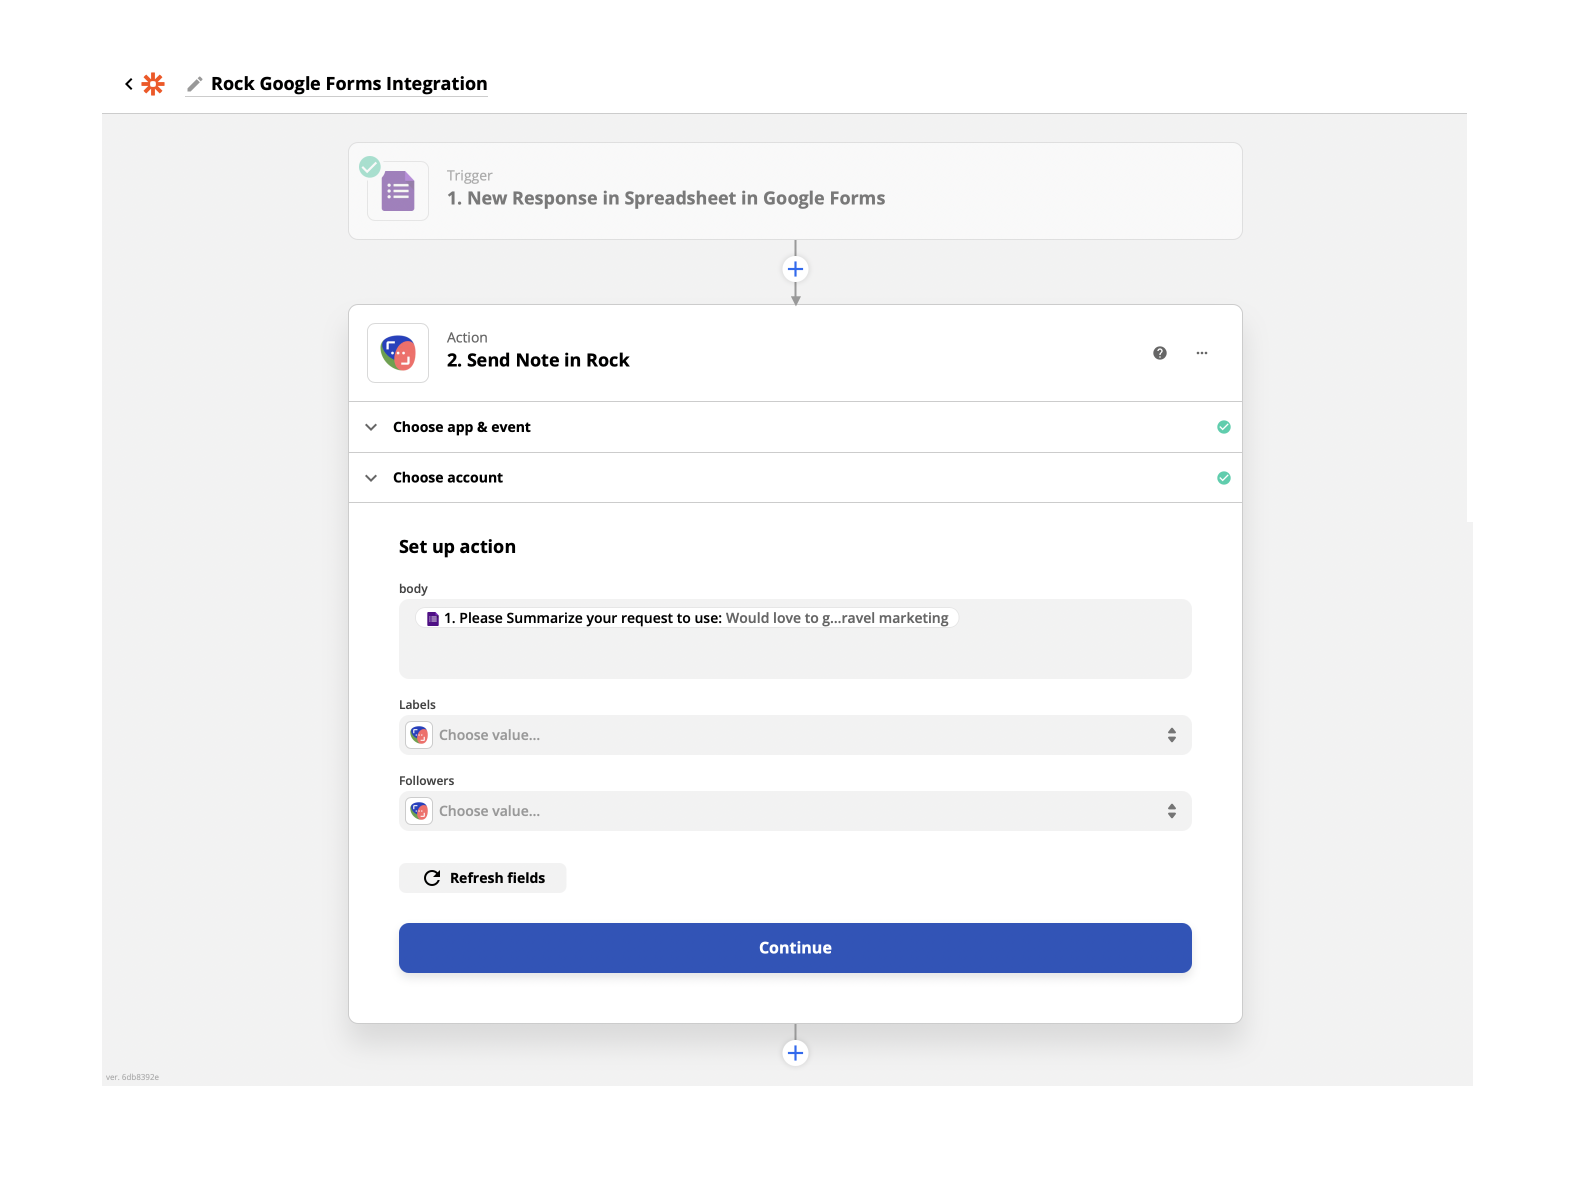
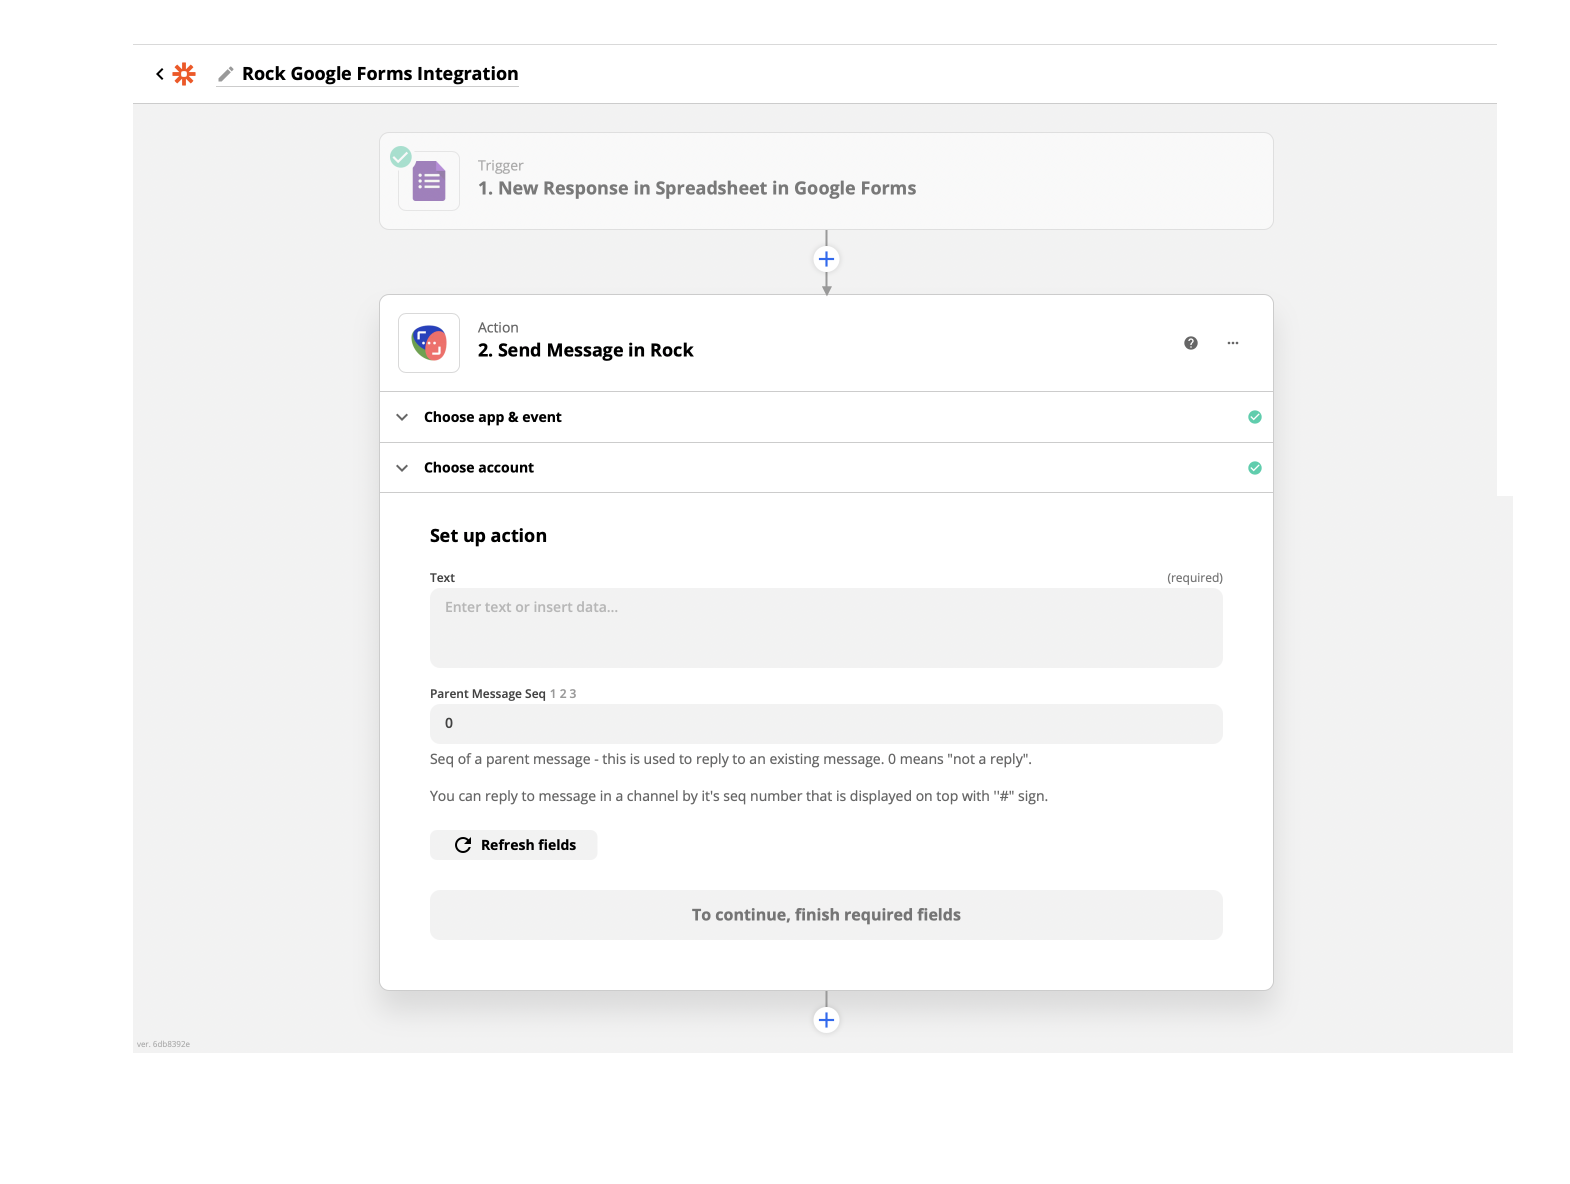
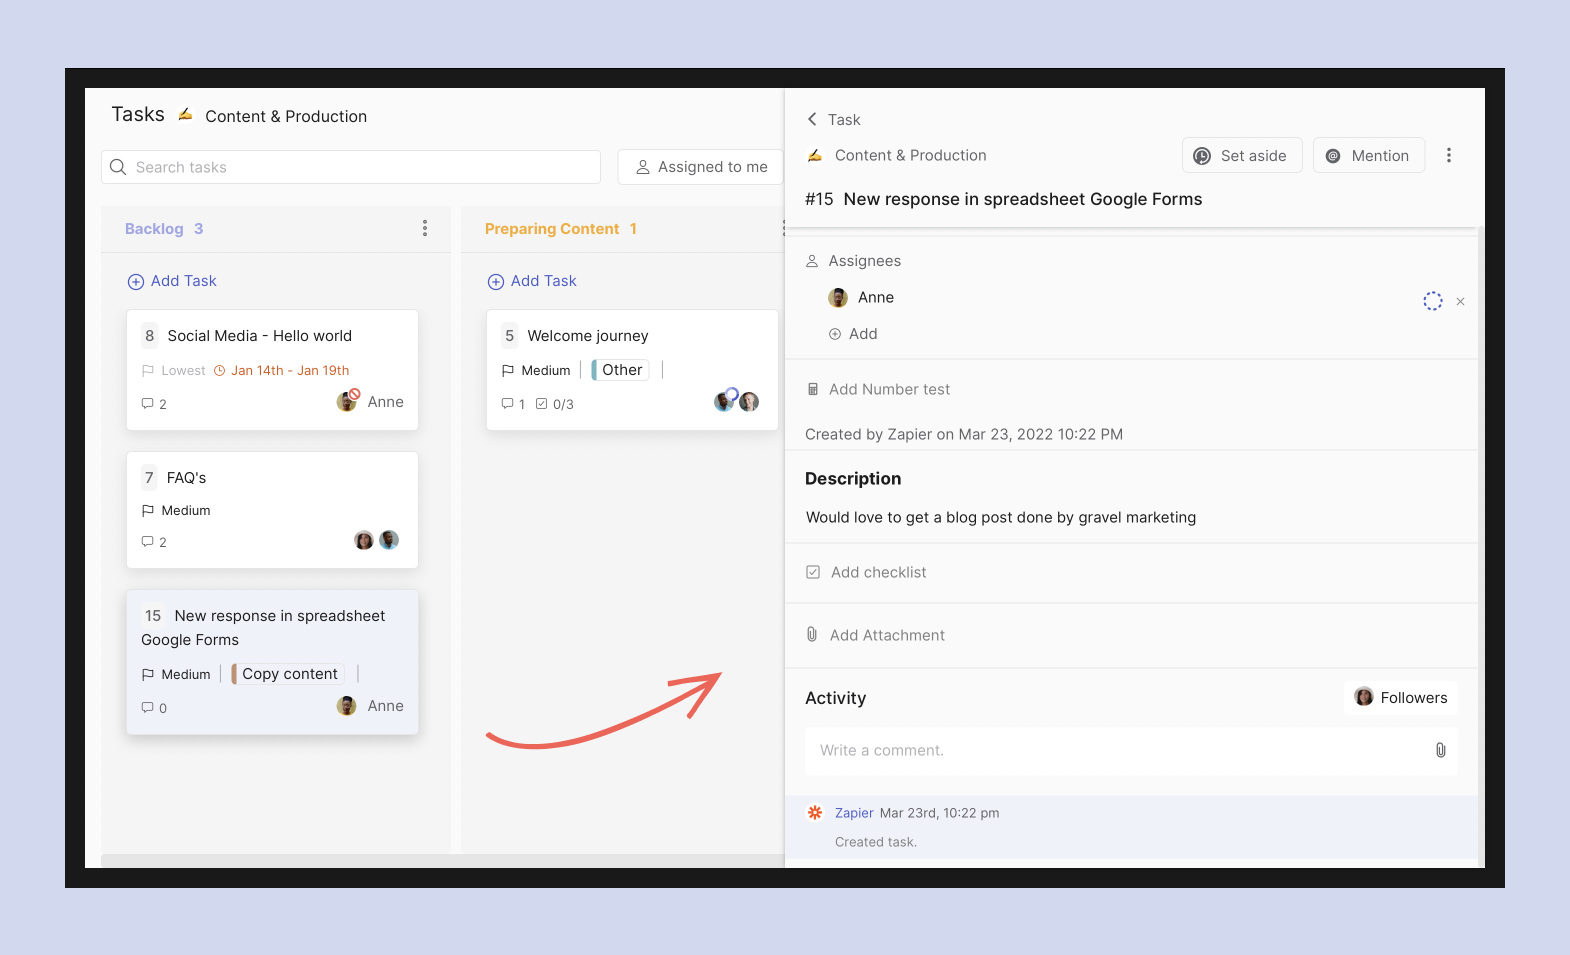
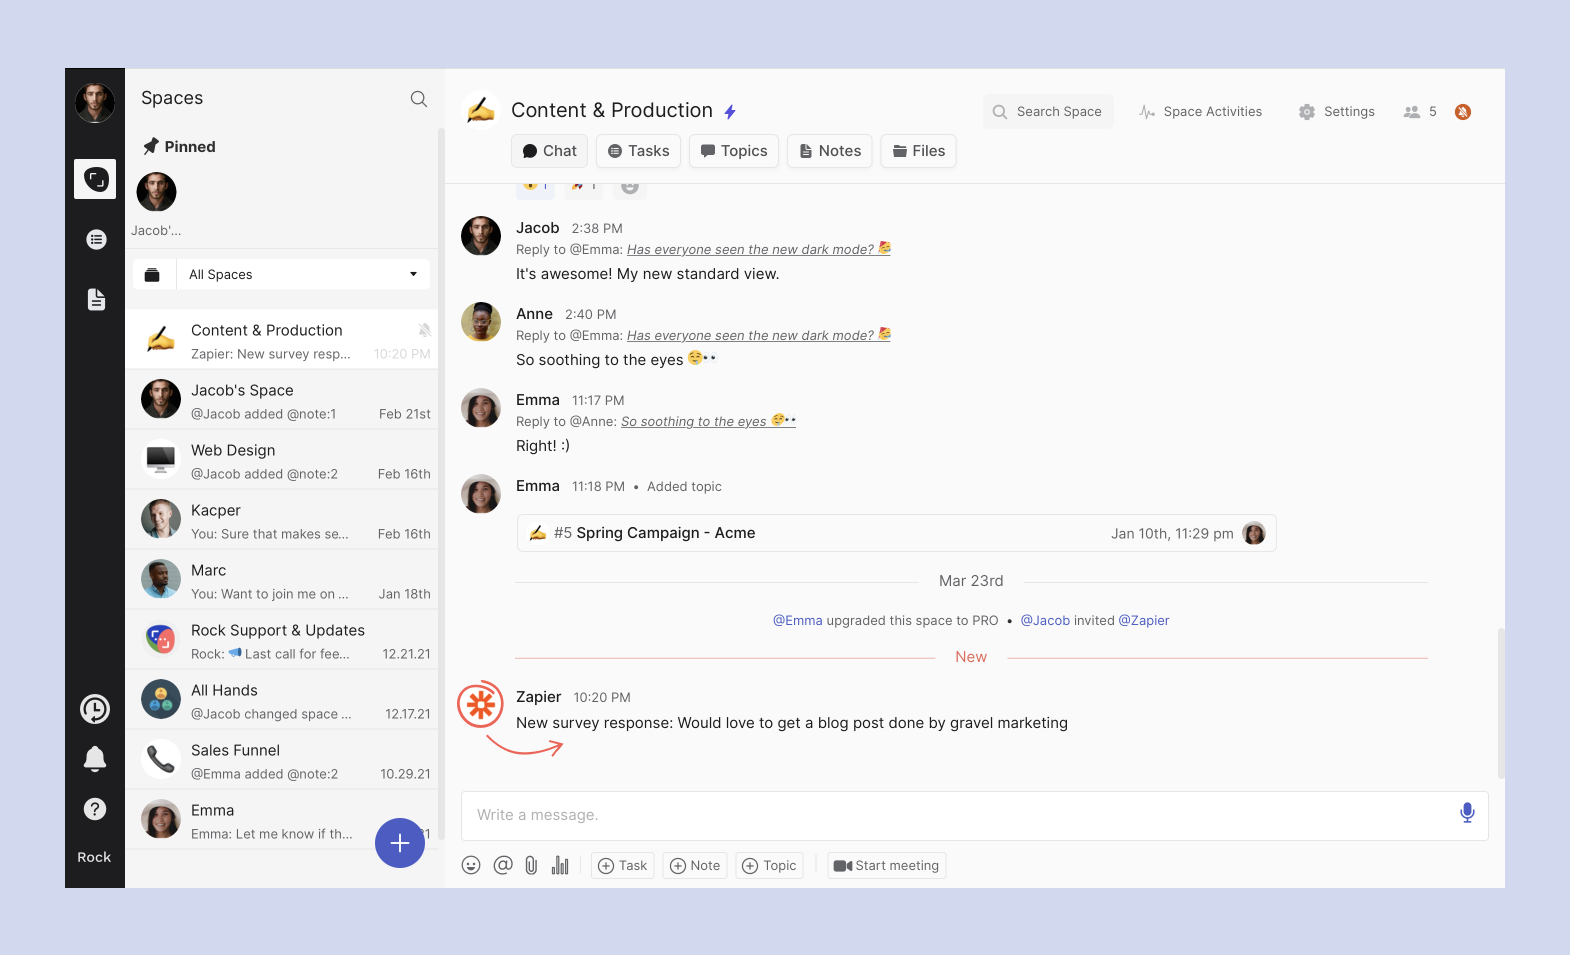
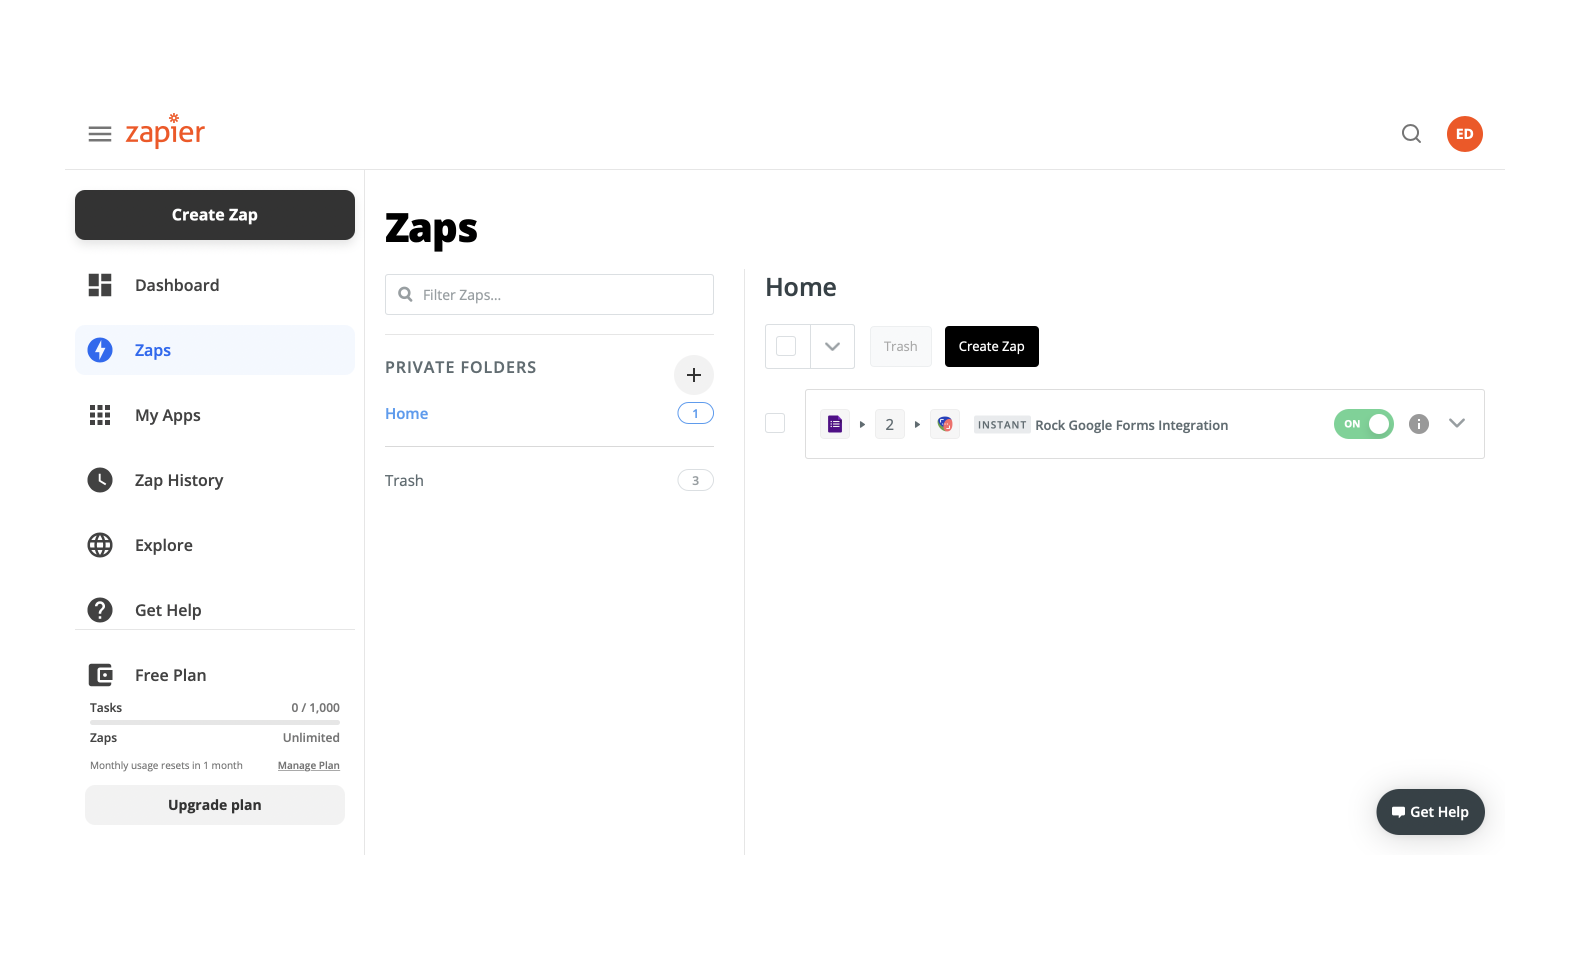
We offer automations with Zapier, Github, Rollbar, and Sentry. These integrations enable you to funnel information directly into your spaces in the form of a chat message, task, or note, and configure them for various use cases.
Additionally, we have a Custom API that allows you to create custom automations between third-party systems and Rock. To learn more about automations, refer to our official documentation page.
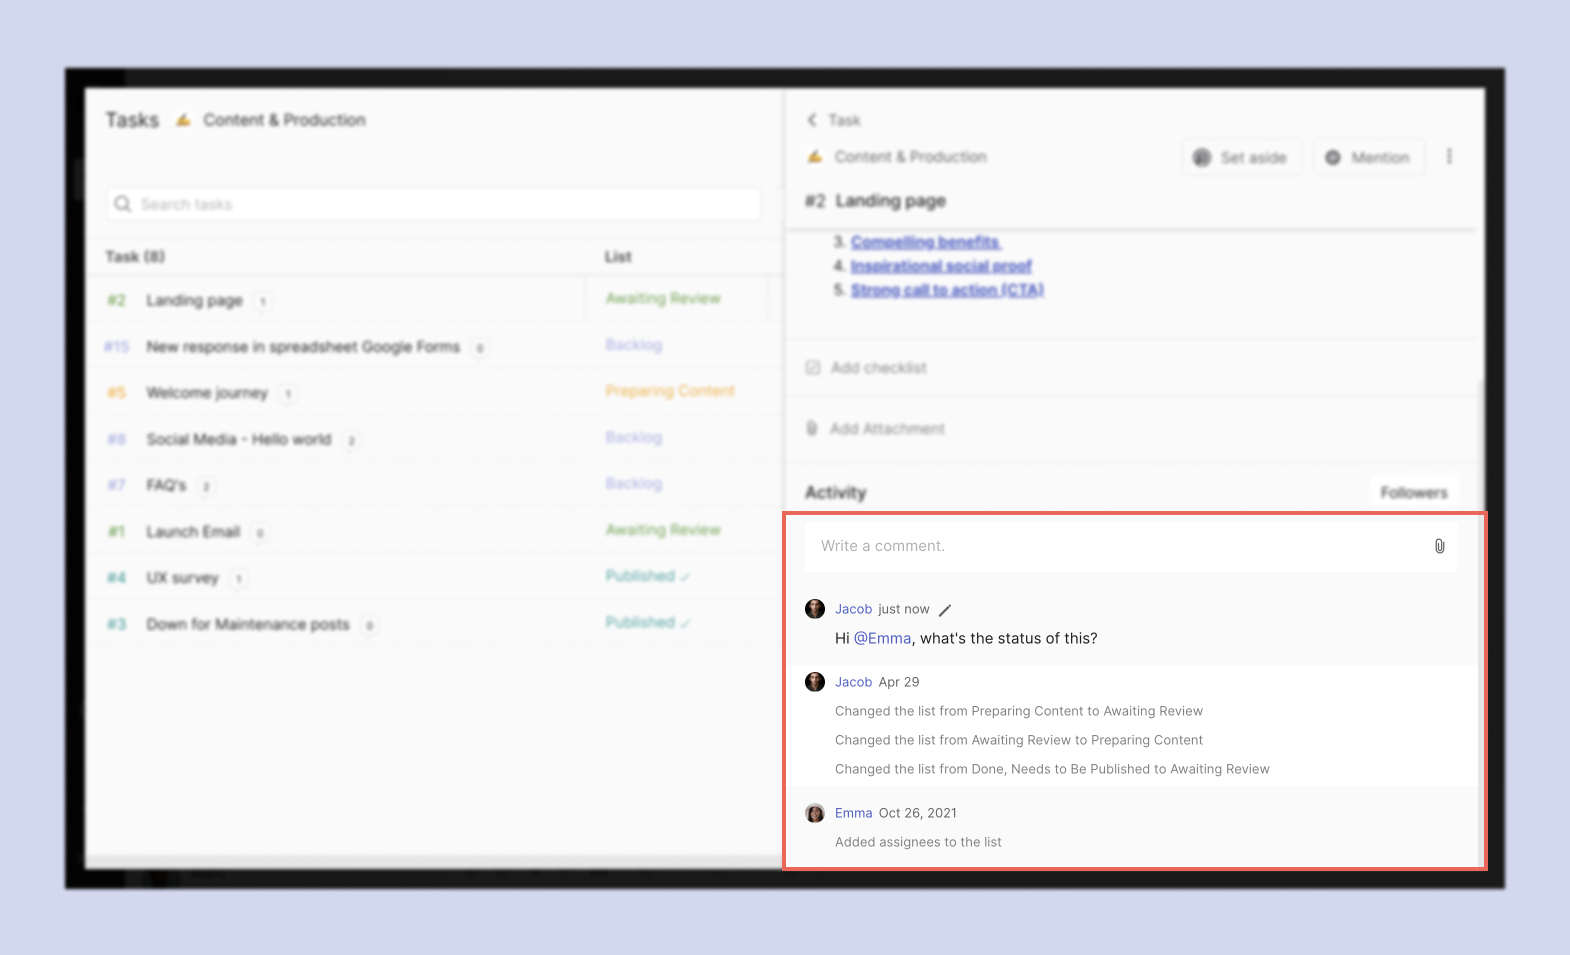
Advanced task management functionality
Changing a space to PRO unlucks a multitude of new task management features that your whole team can leverage. Added functionality to the
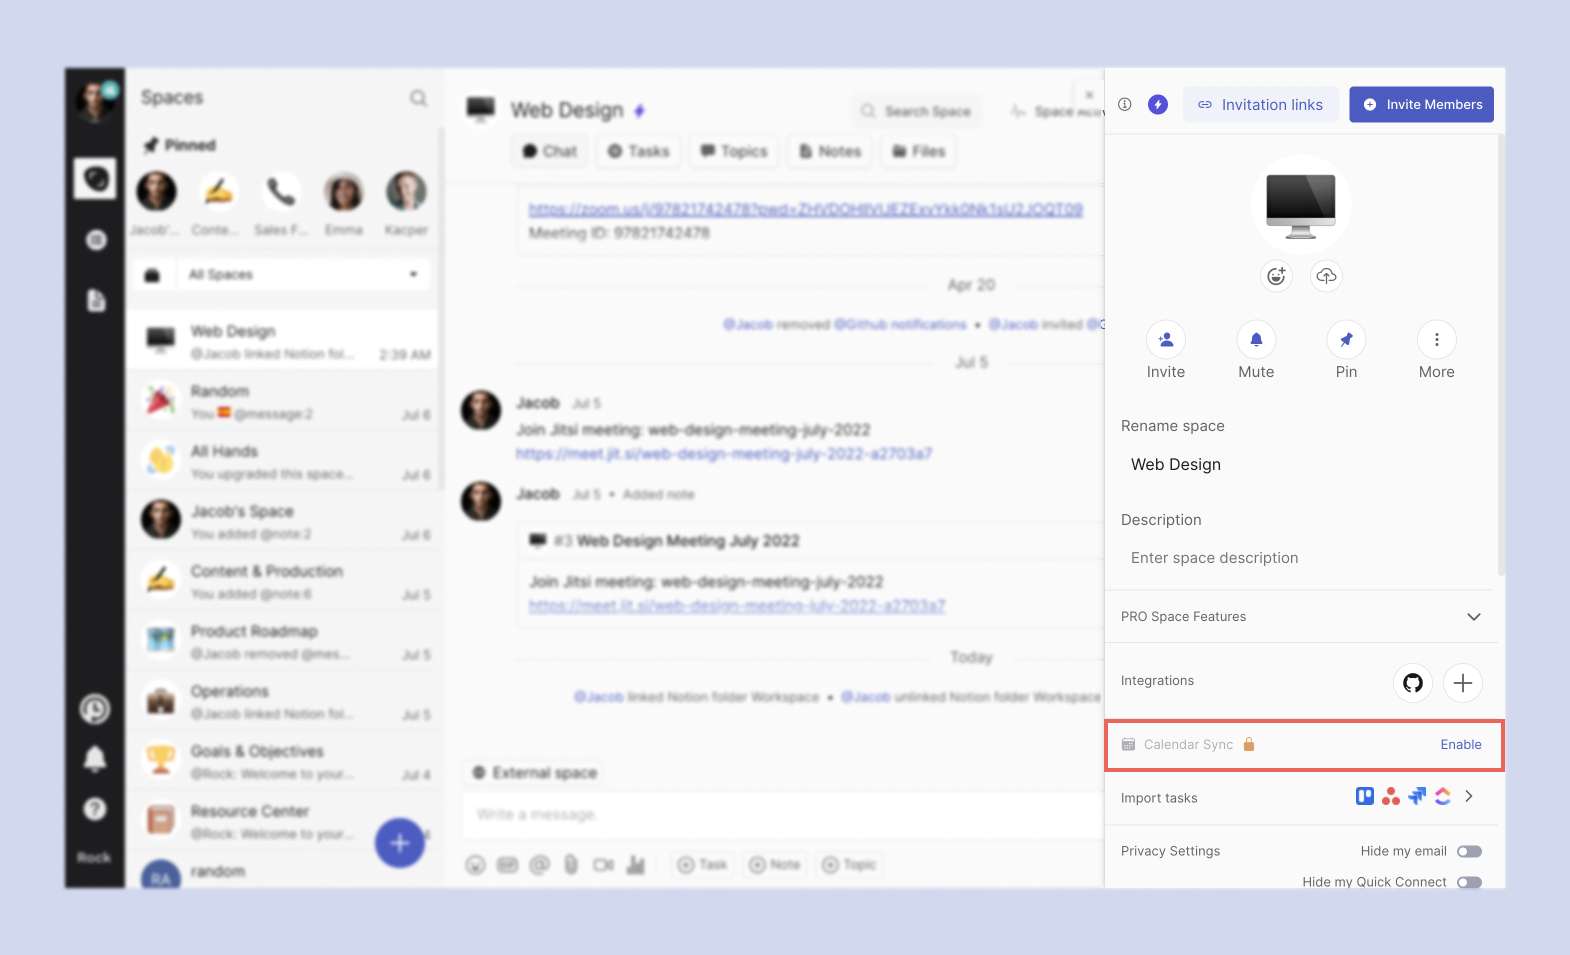
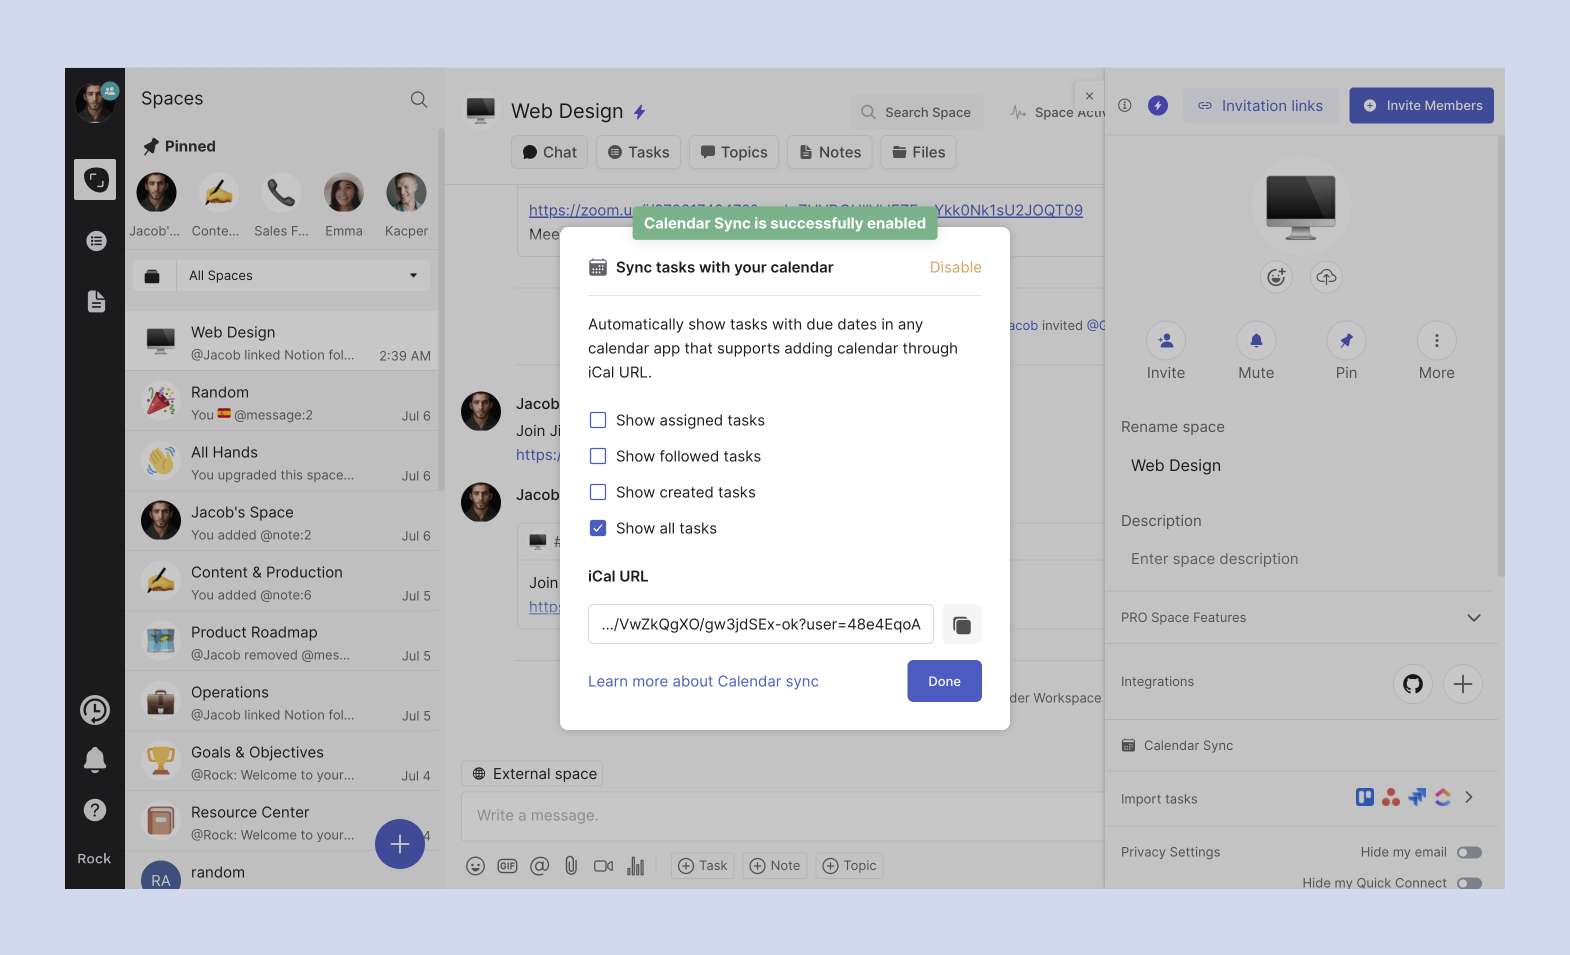
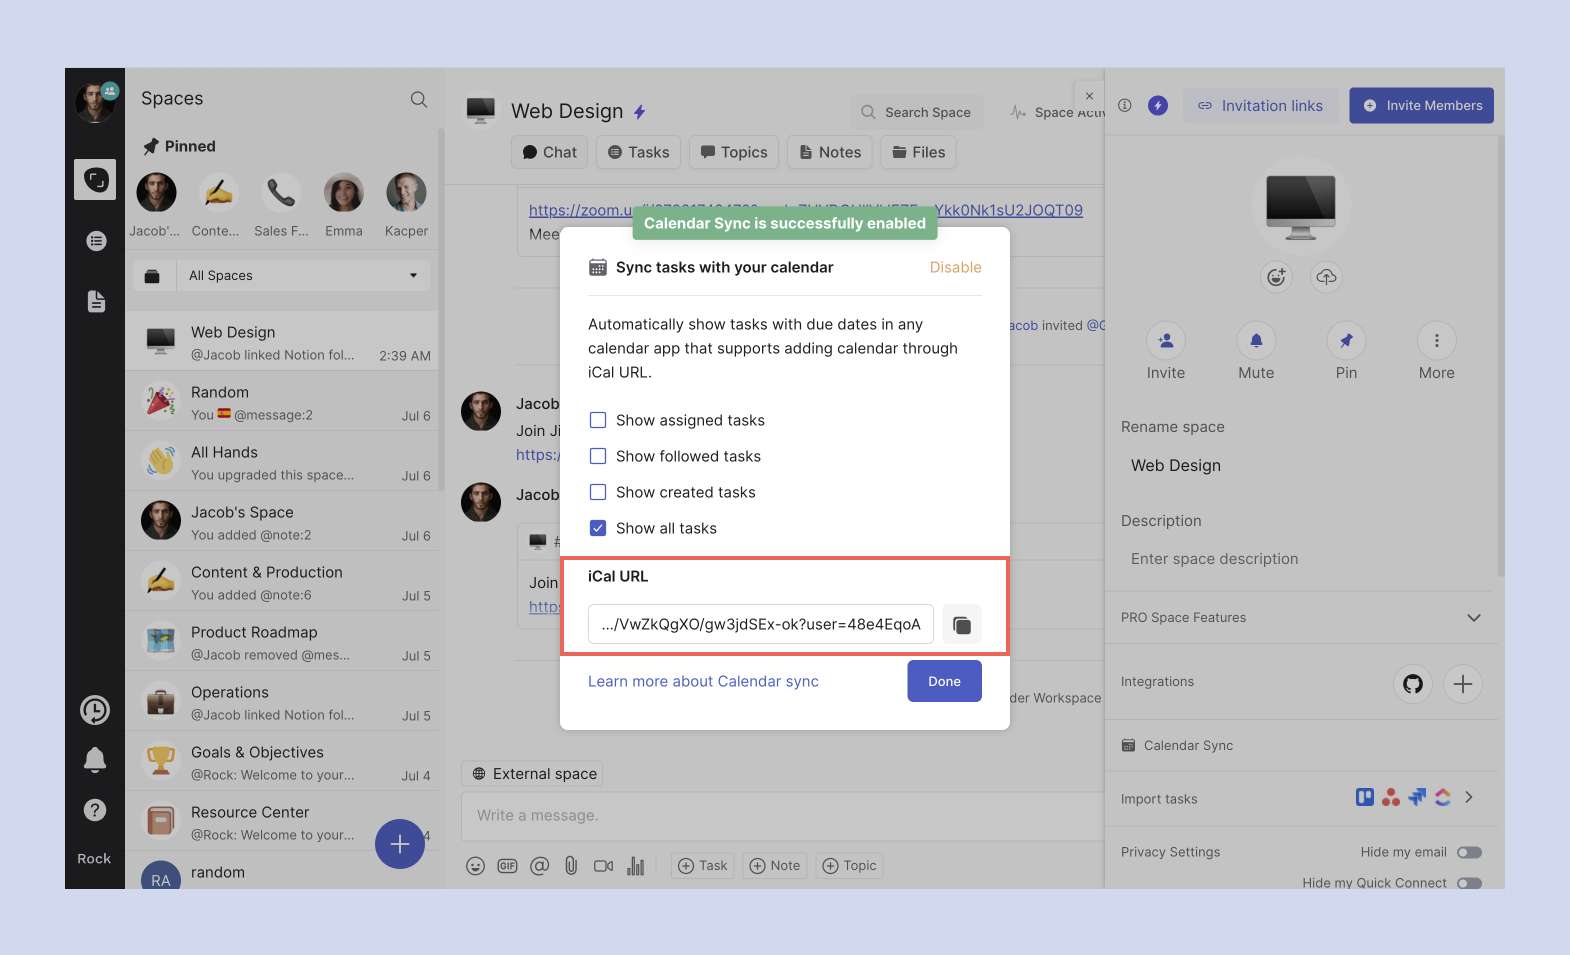
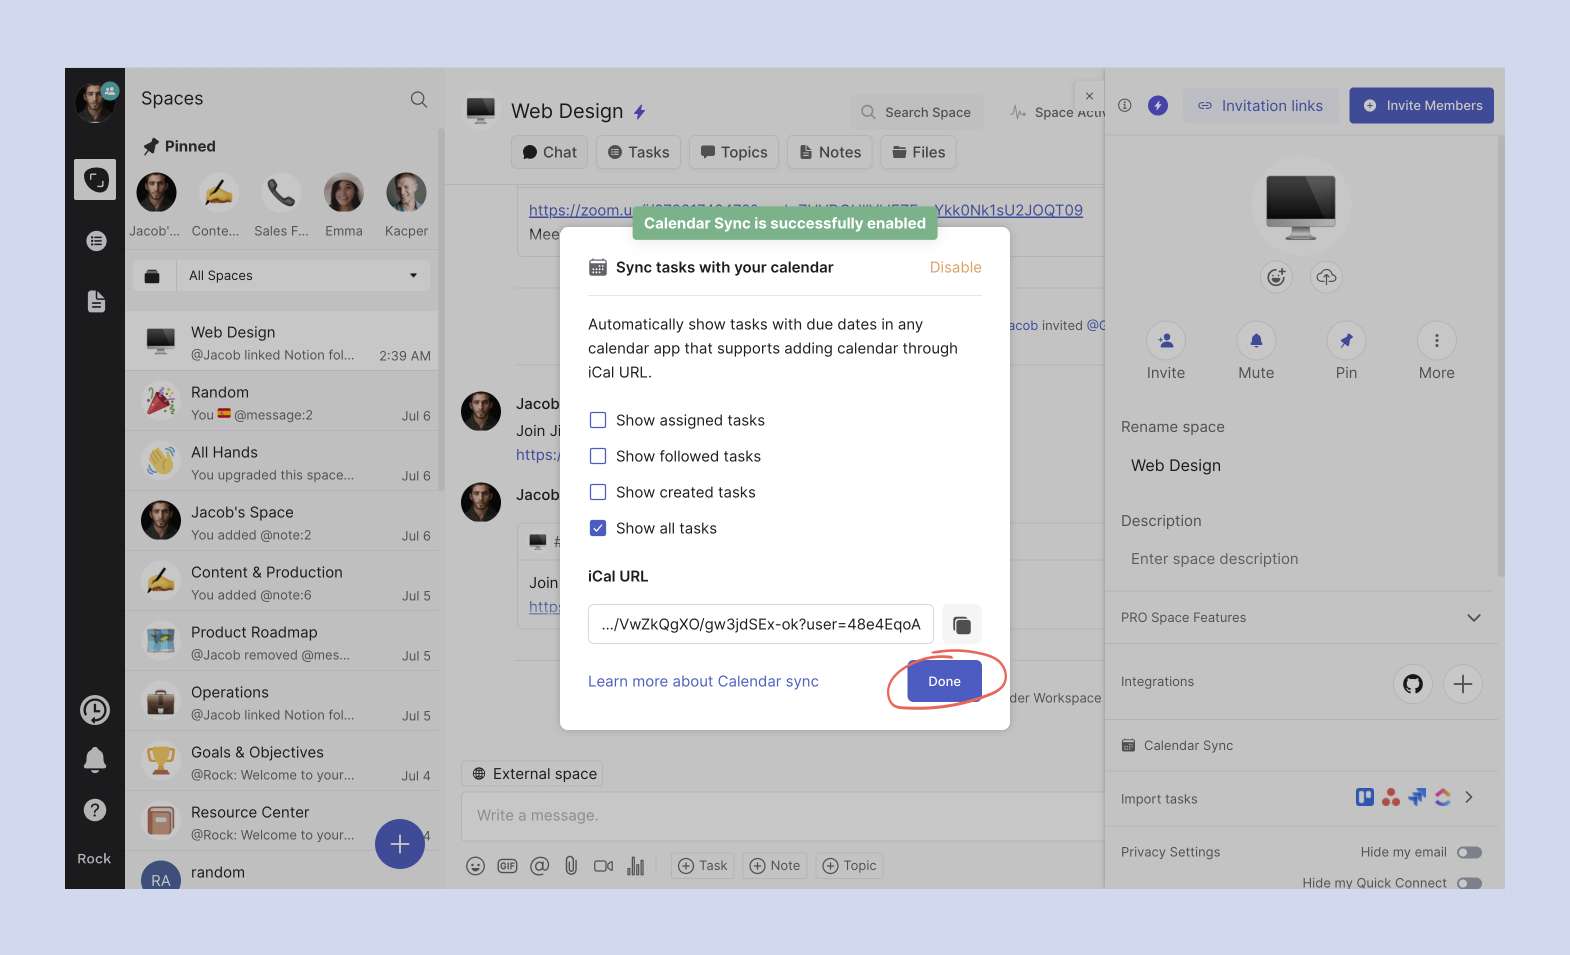
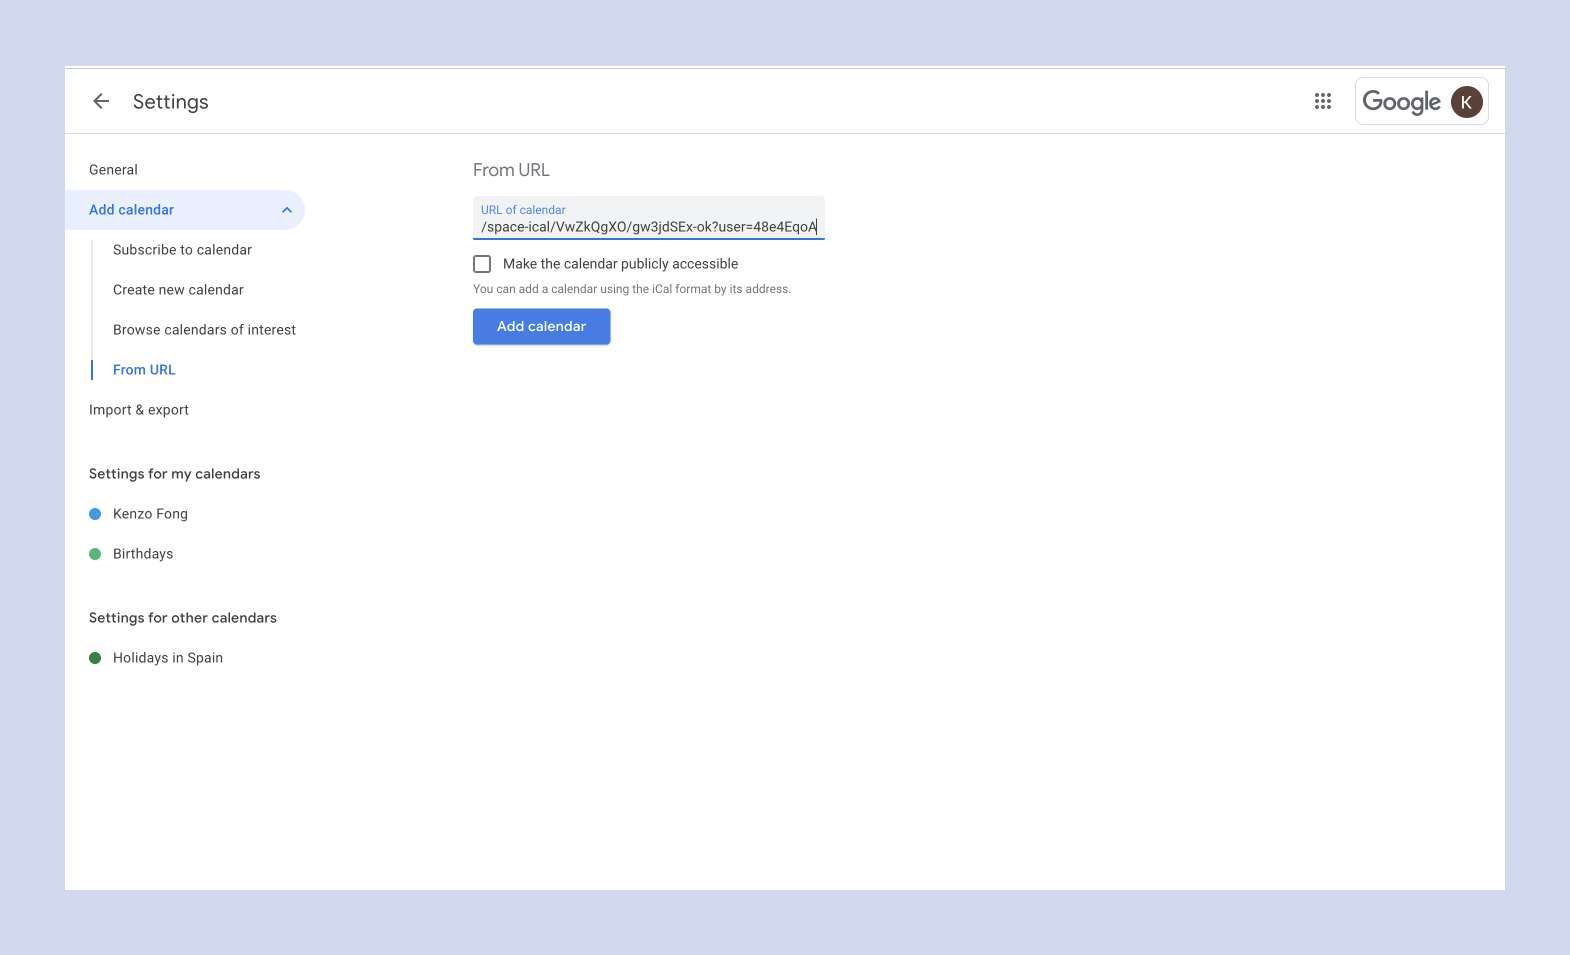
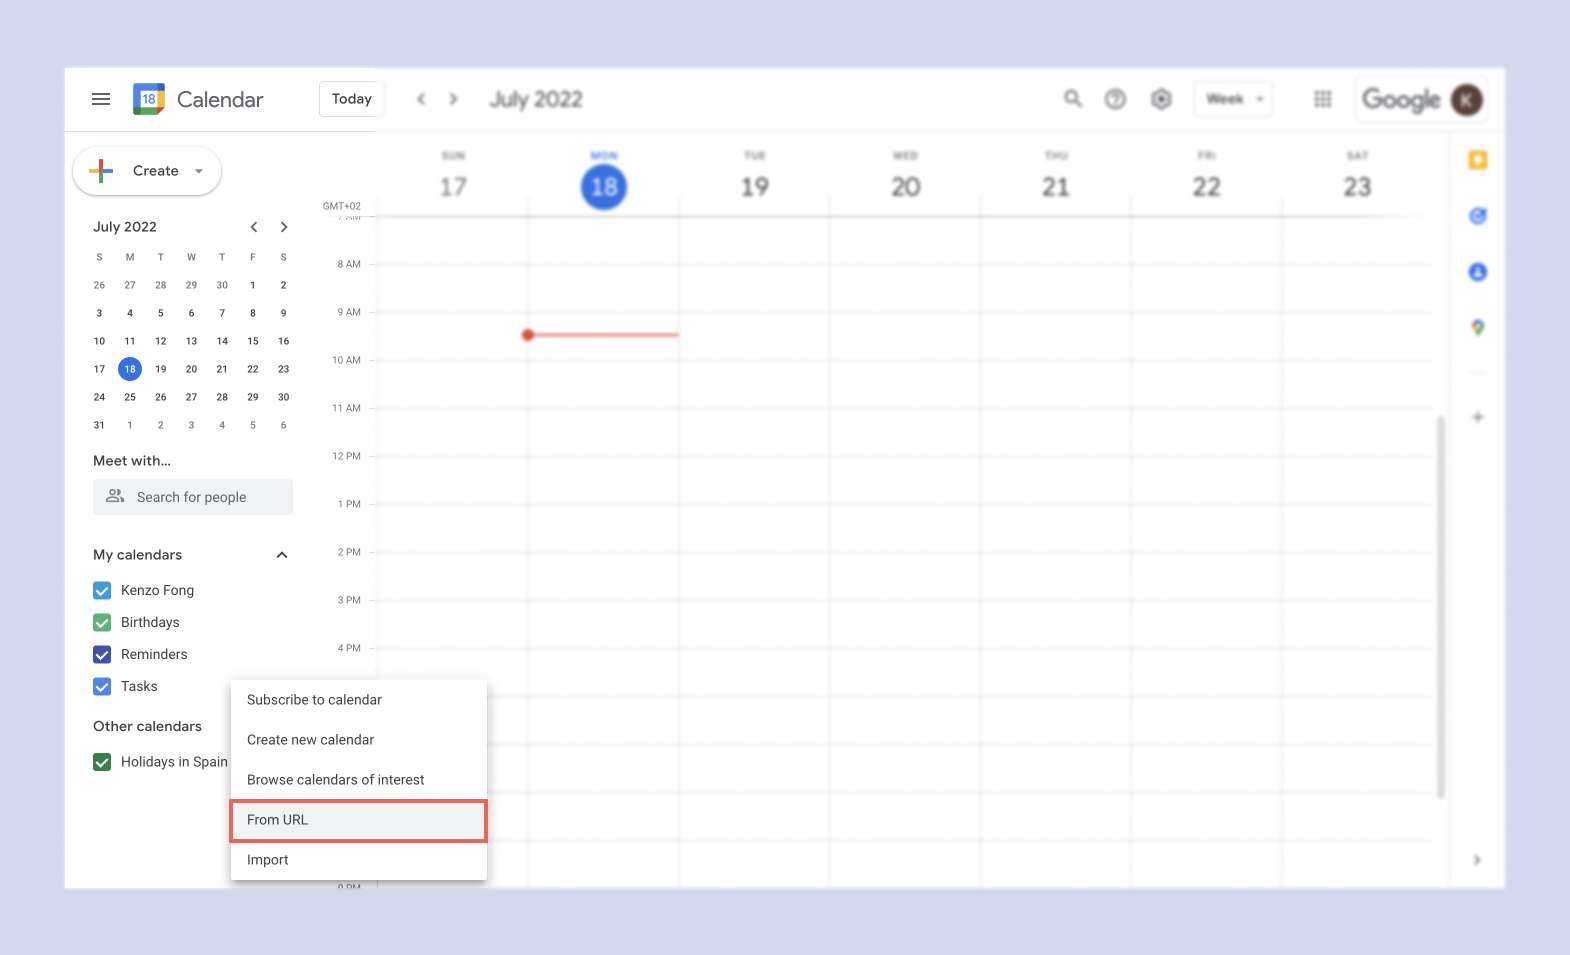
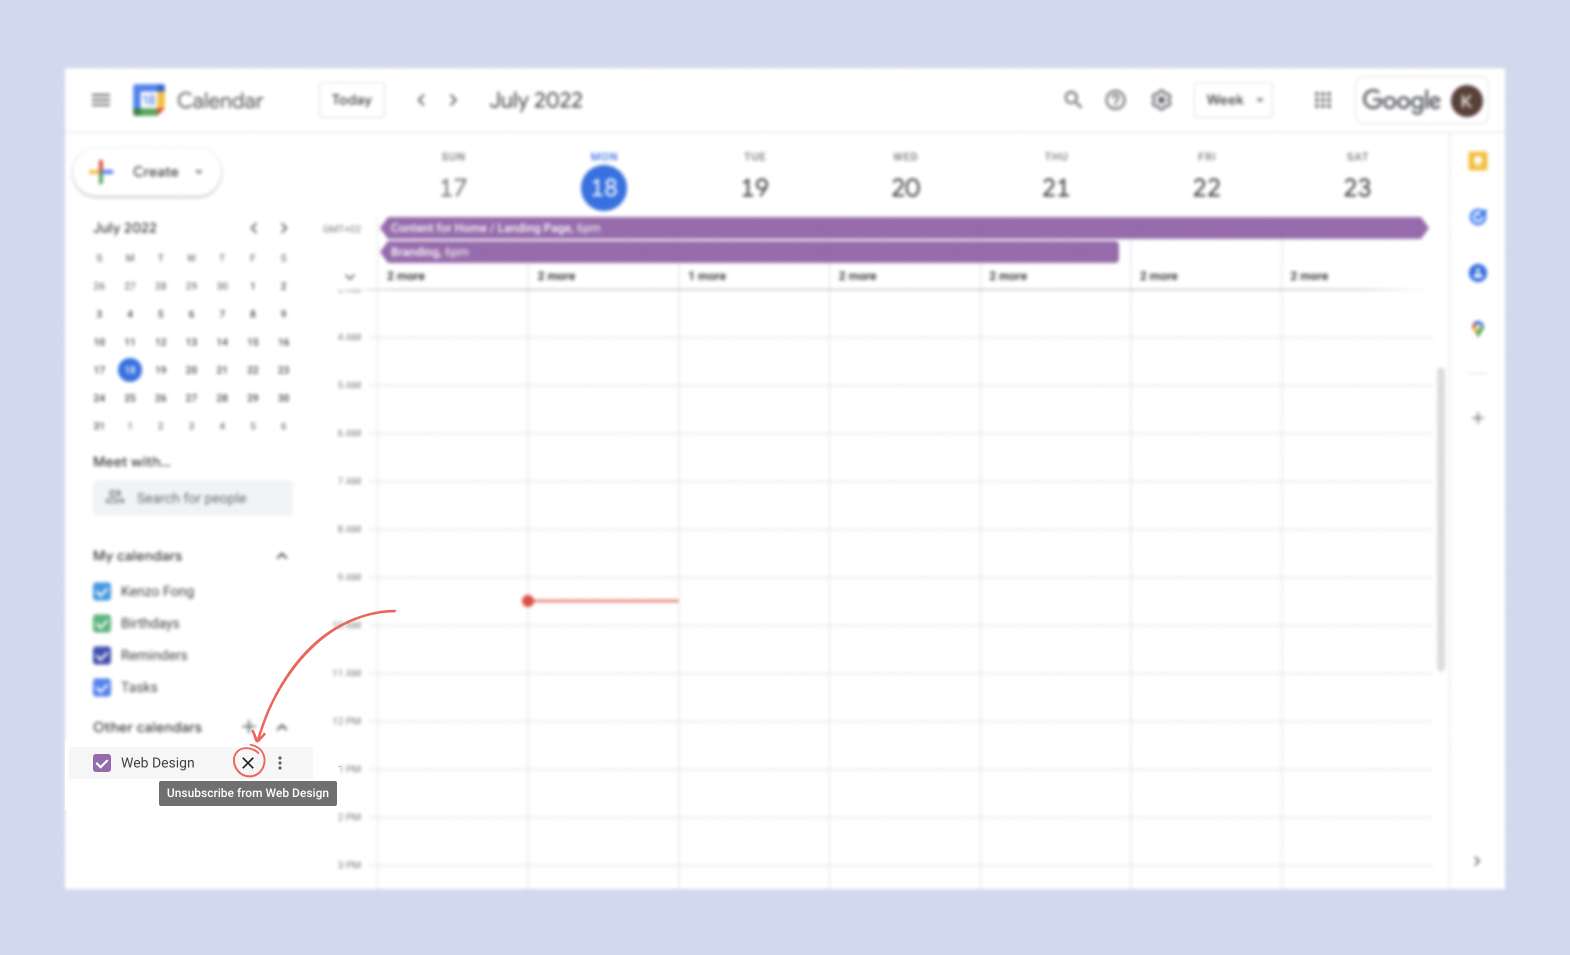
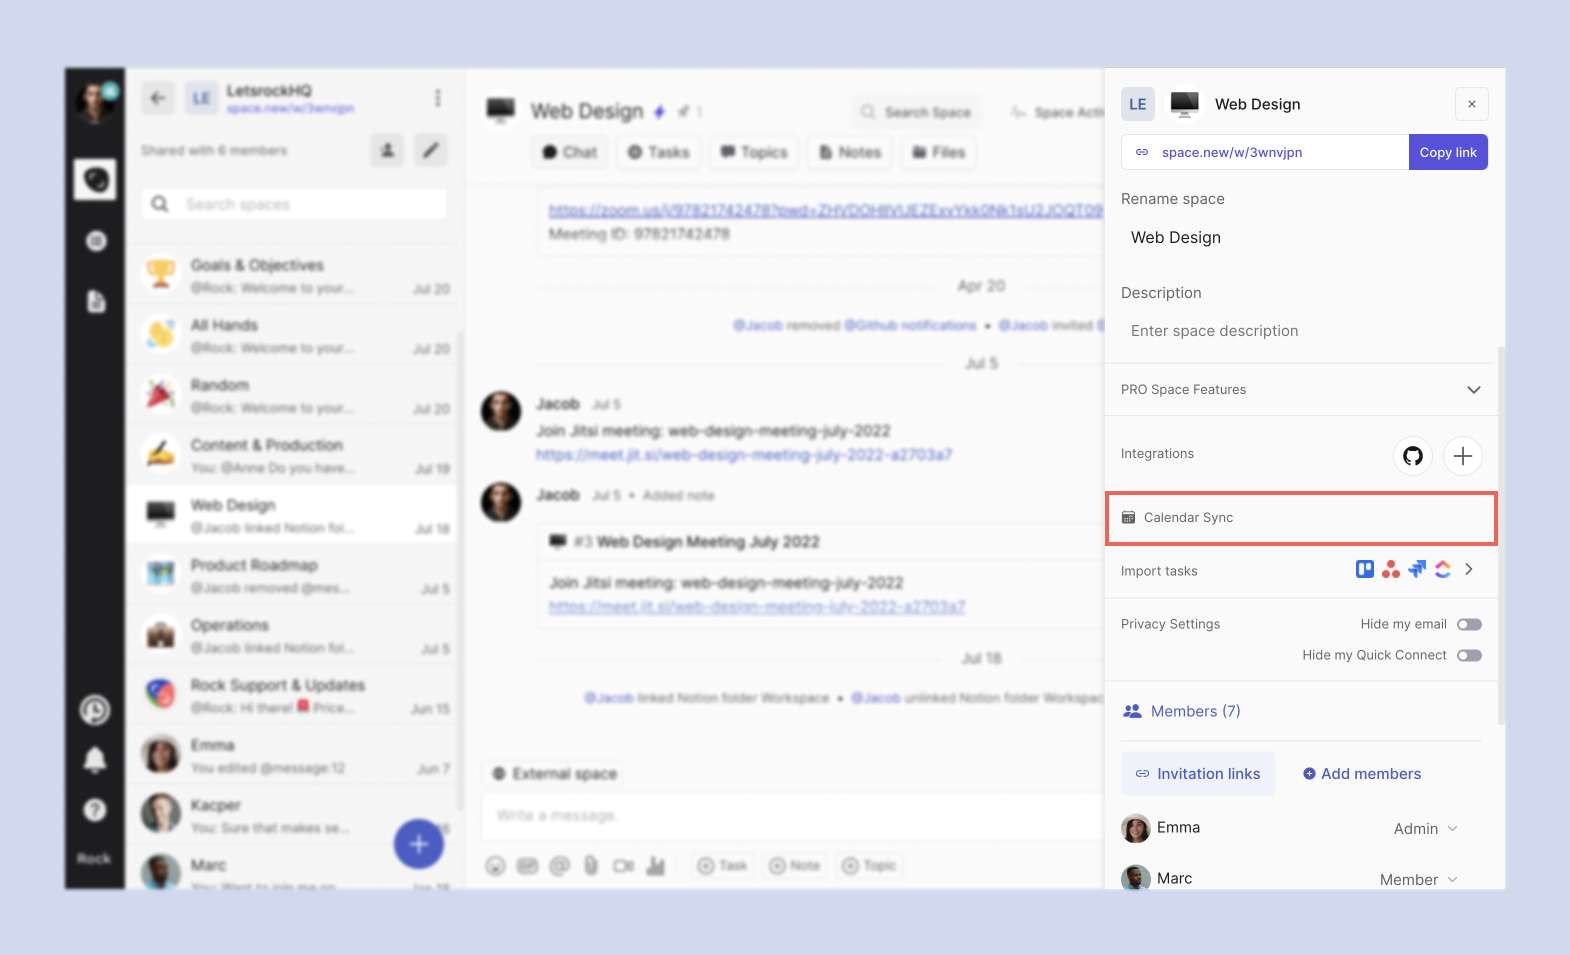
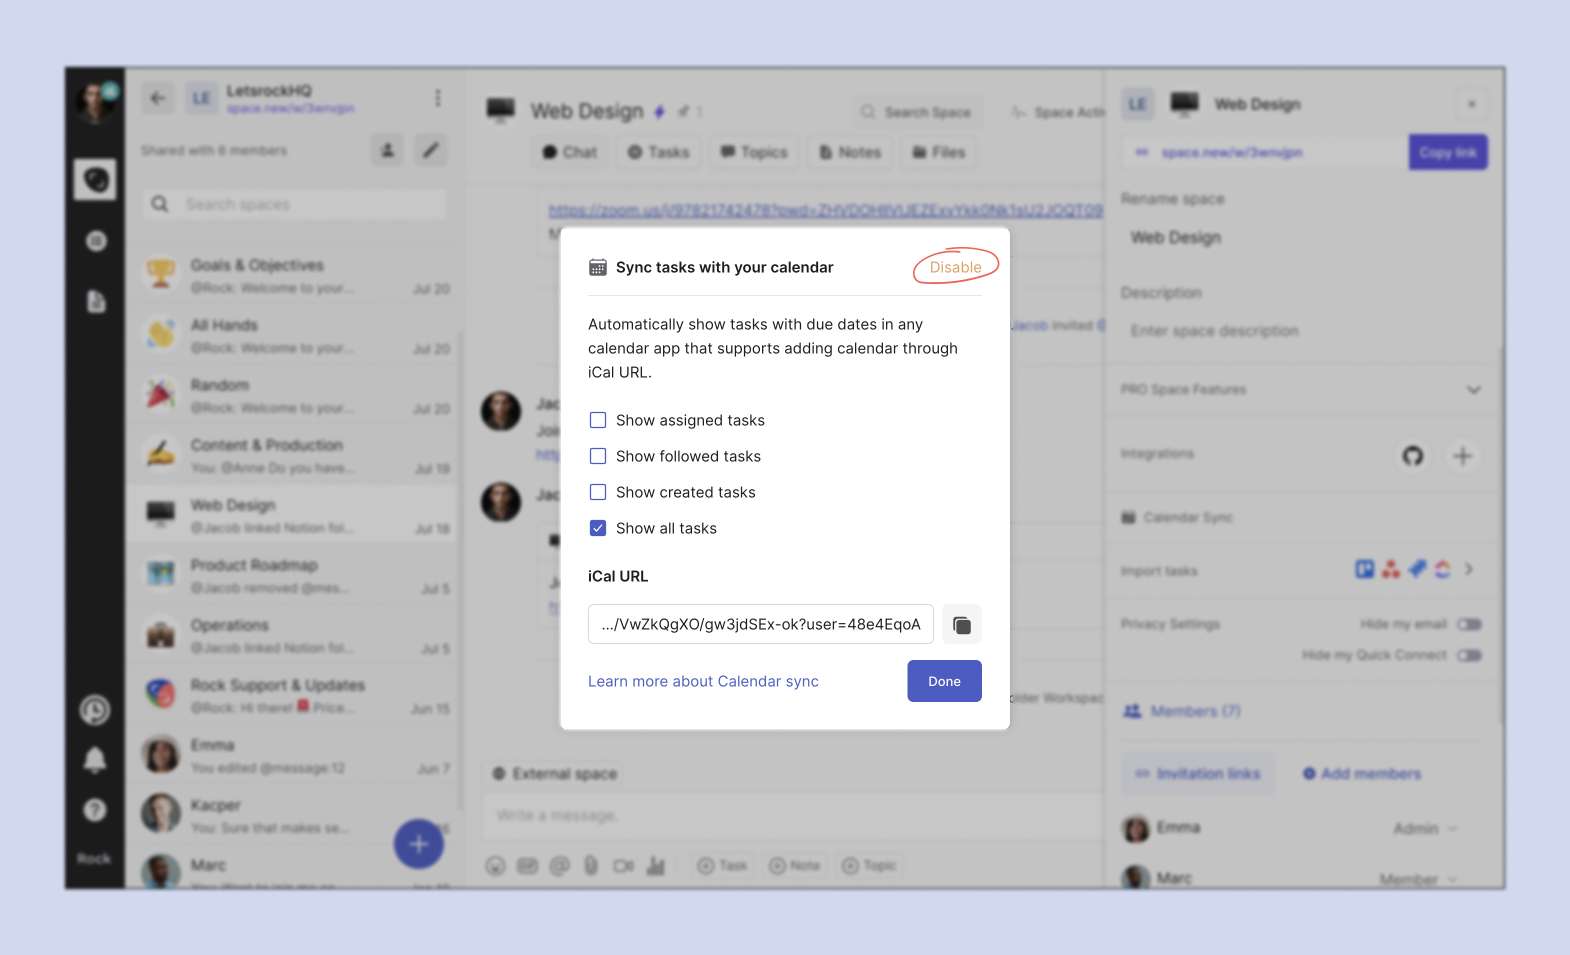
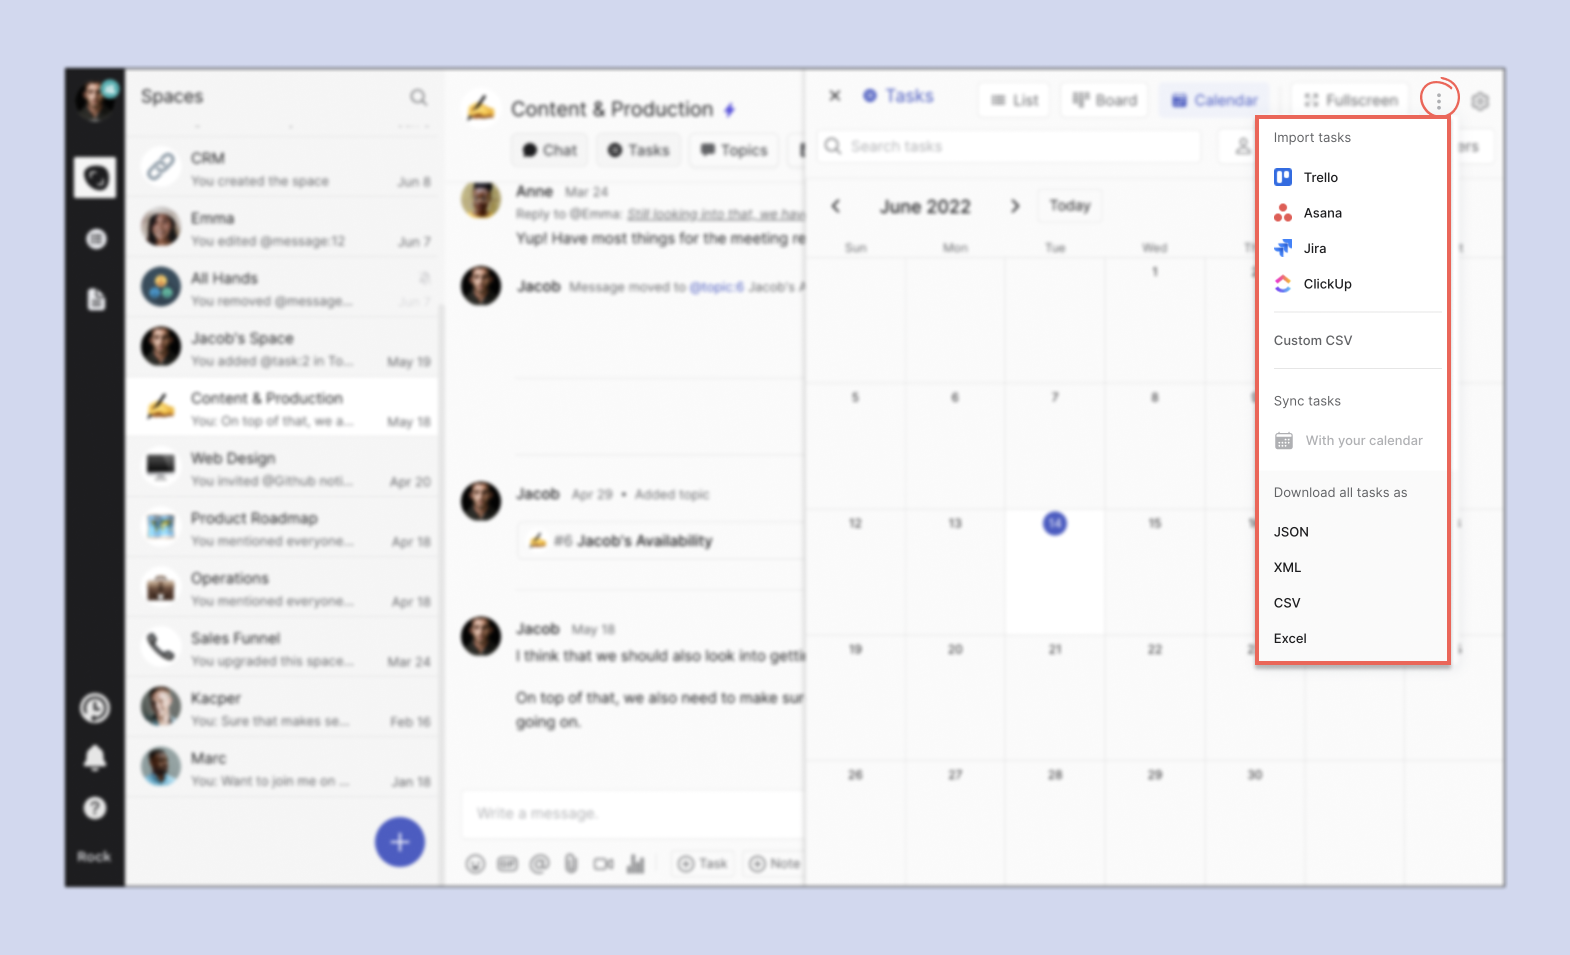
The Calendar Integration enables you to view task deadlines on your calendar. Popular third party calendars will display deadlines for tasks within a space. This makes it useful for working with tight deadlines and keeping track of important tasks outside of Rock.
The Tasks mini-app also has a dedicated Calendar view, allowing you to view deadlines within the app. Learn more about the Calendar Integration in this dedicated guide.
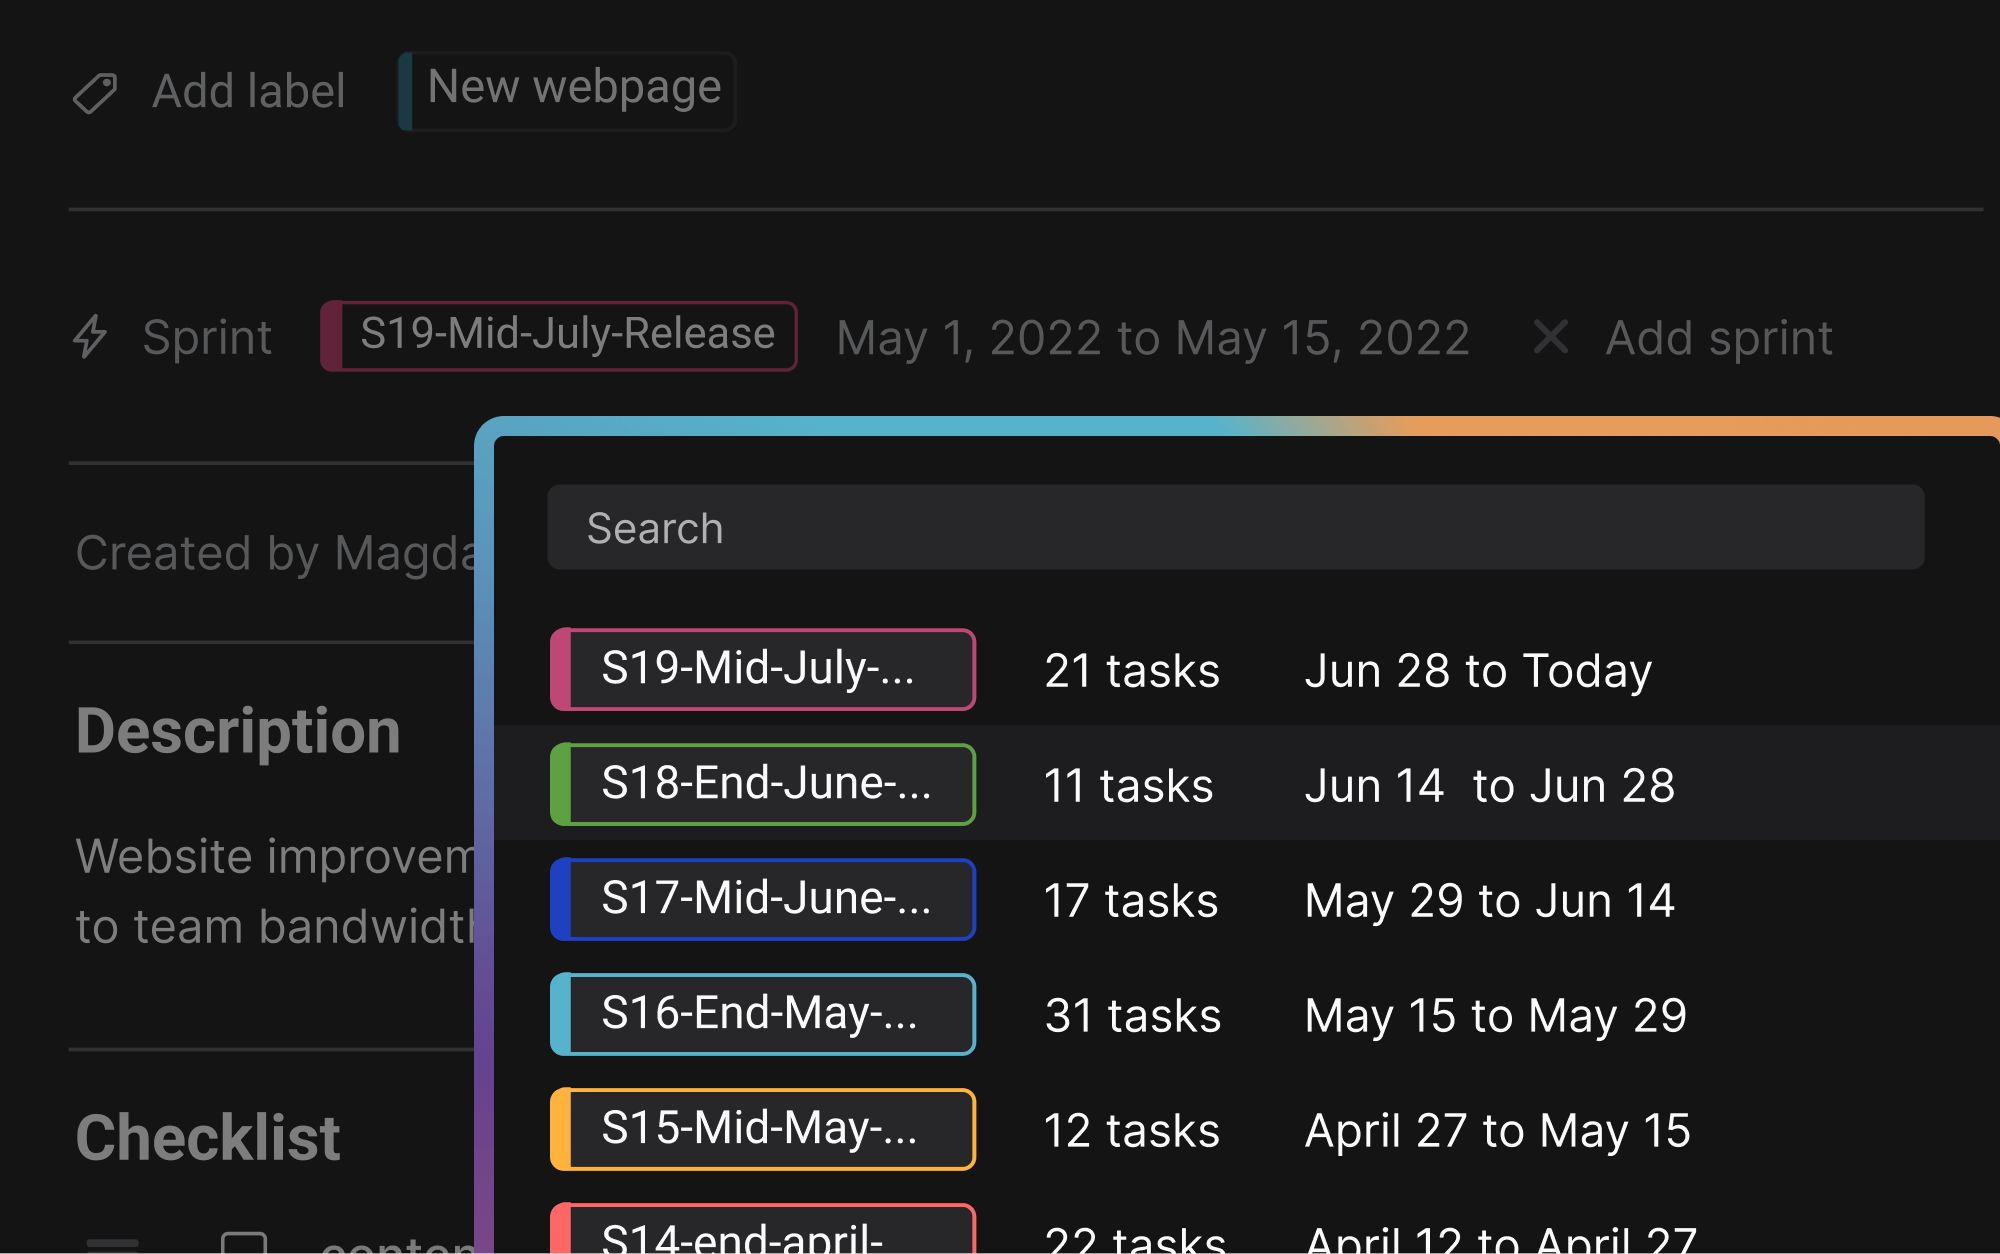
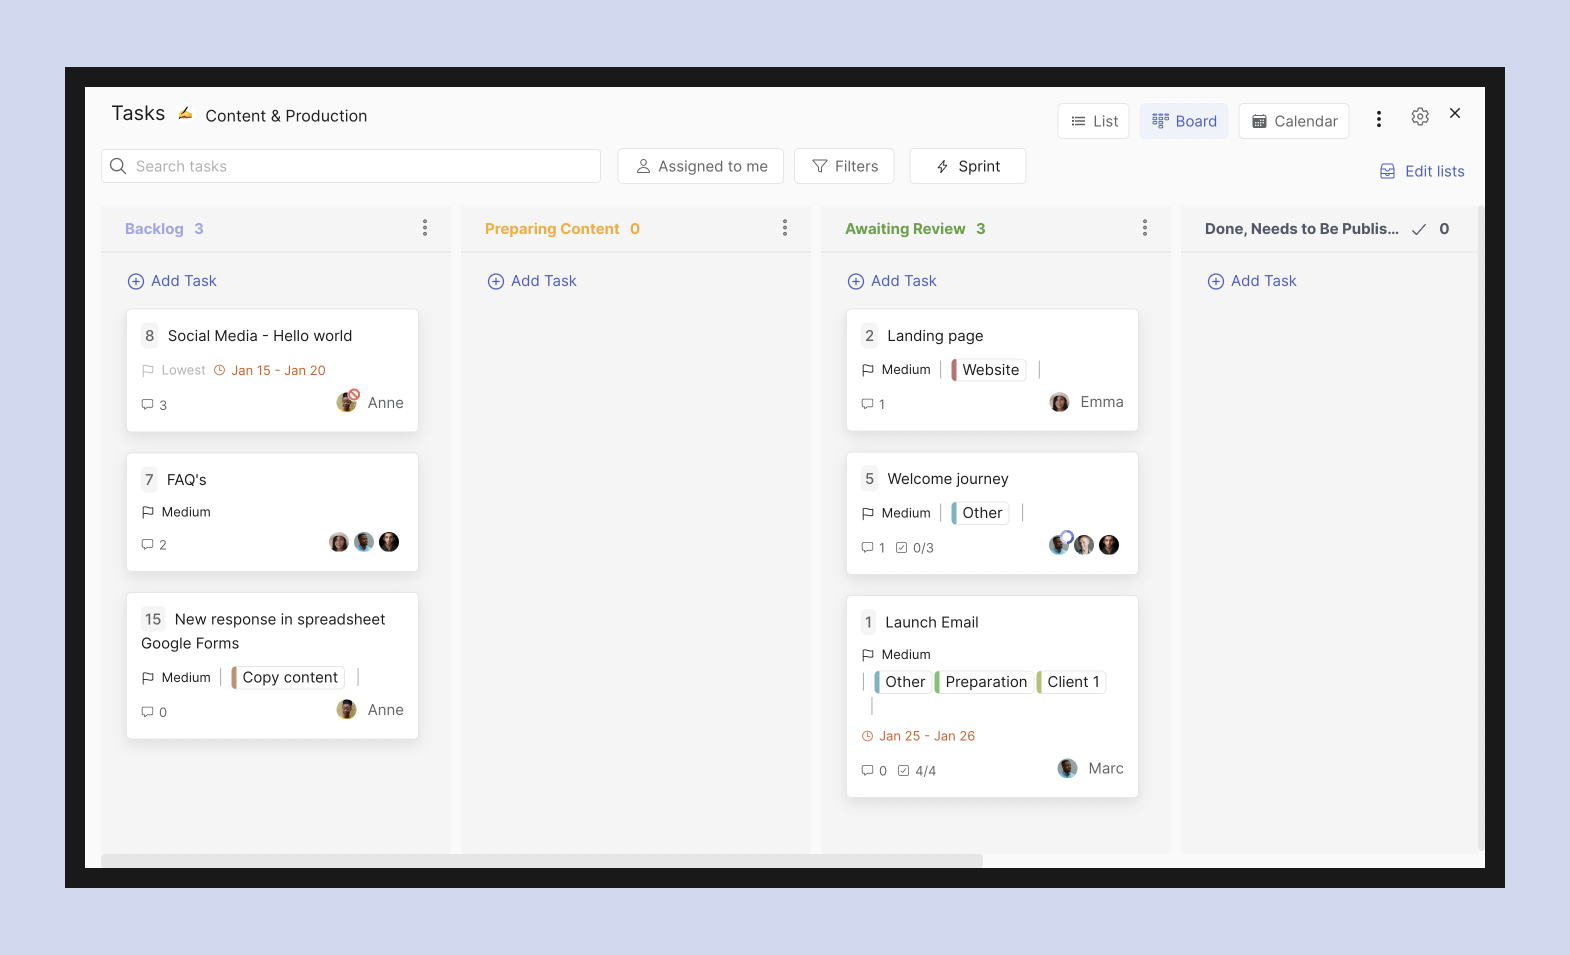
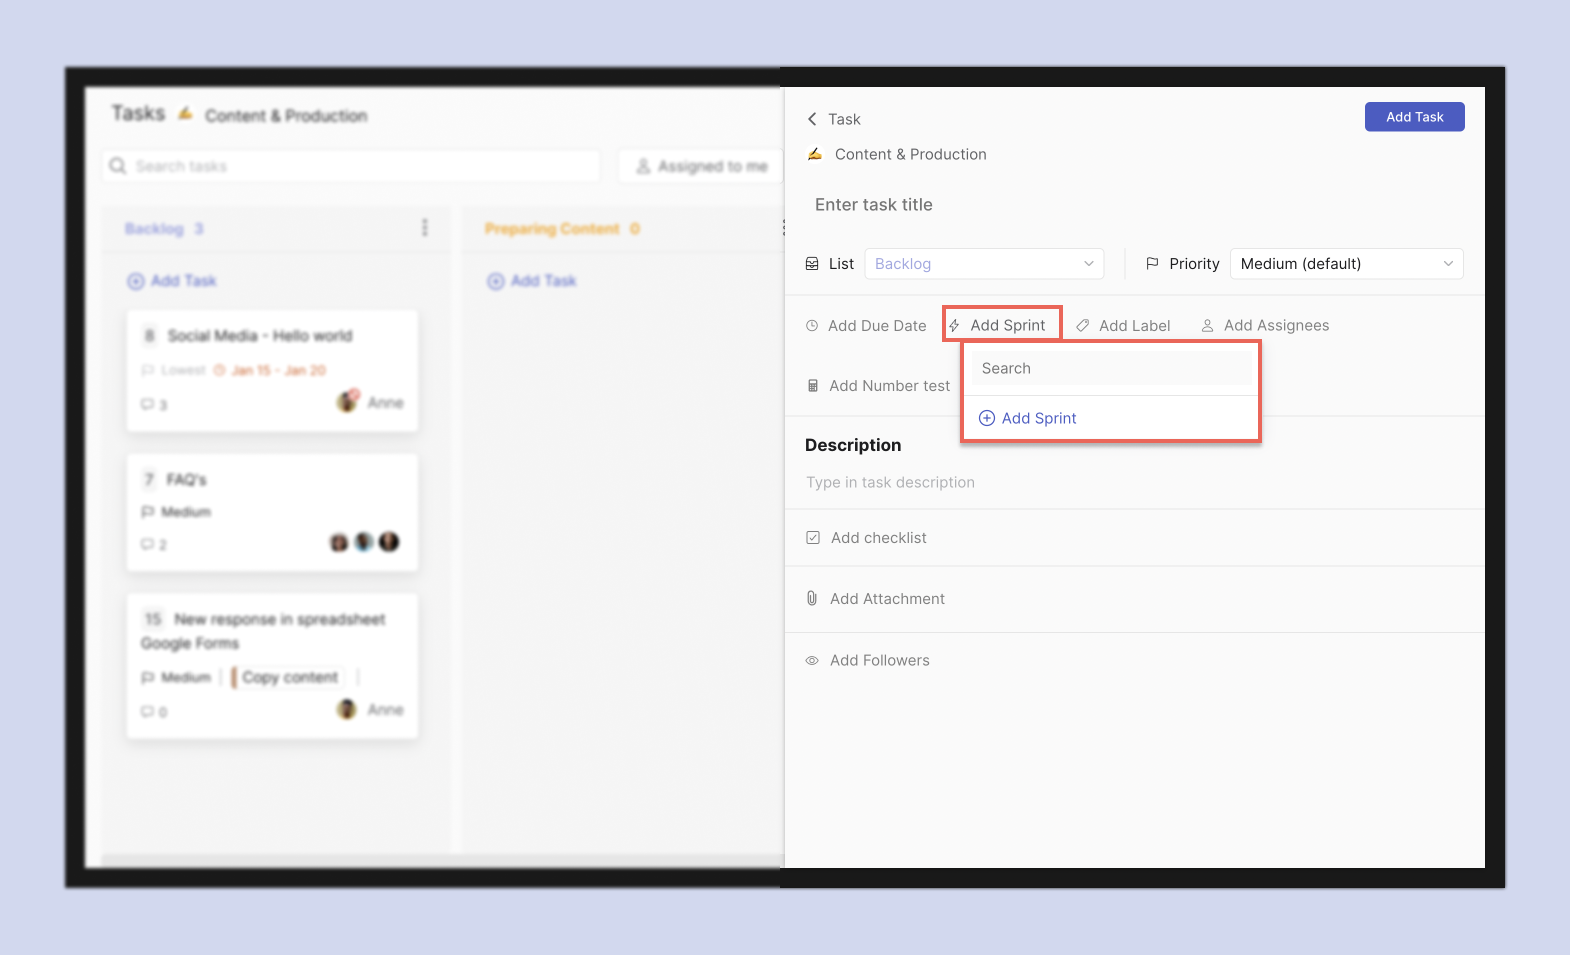
Sprints
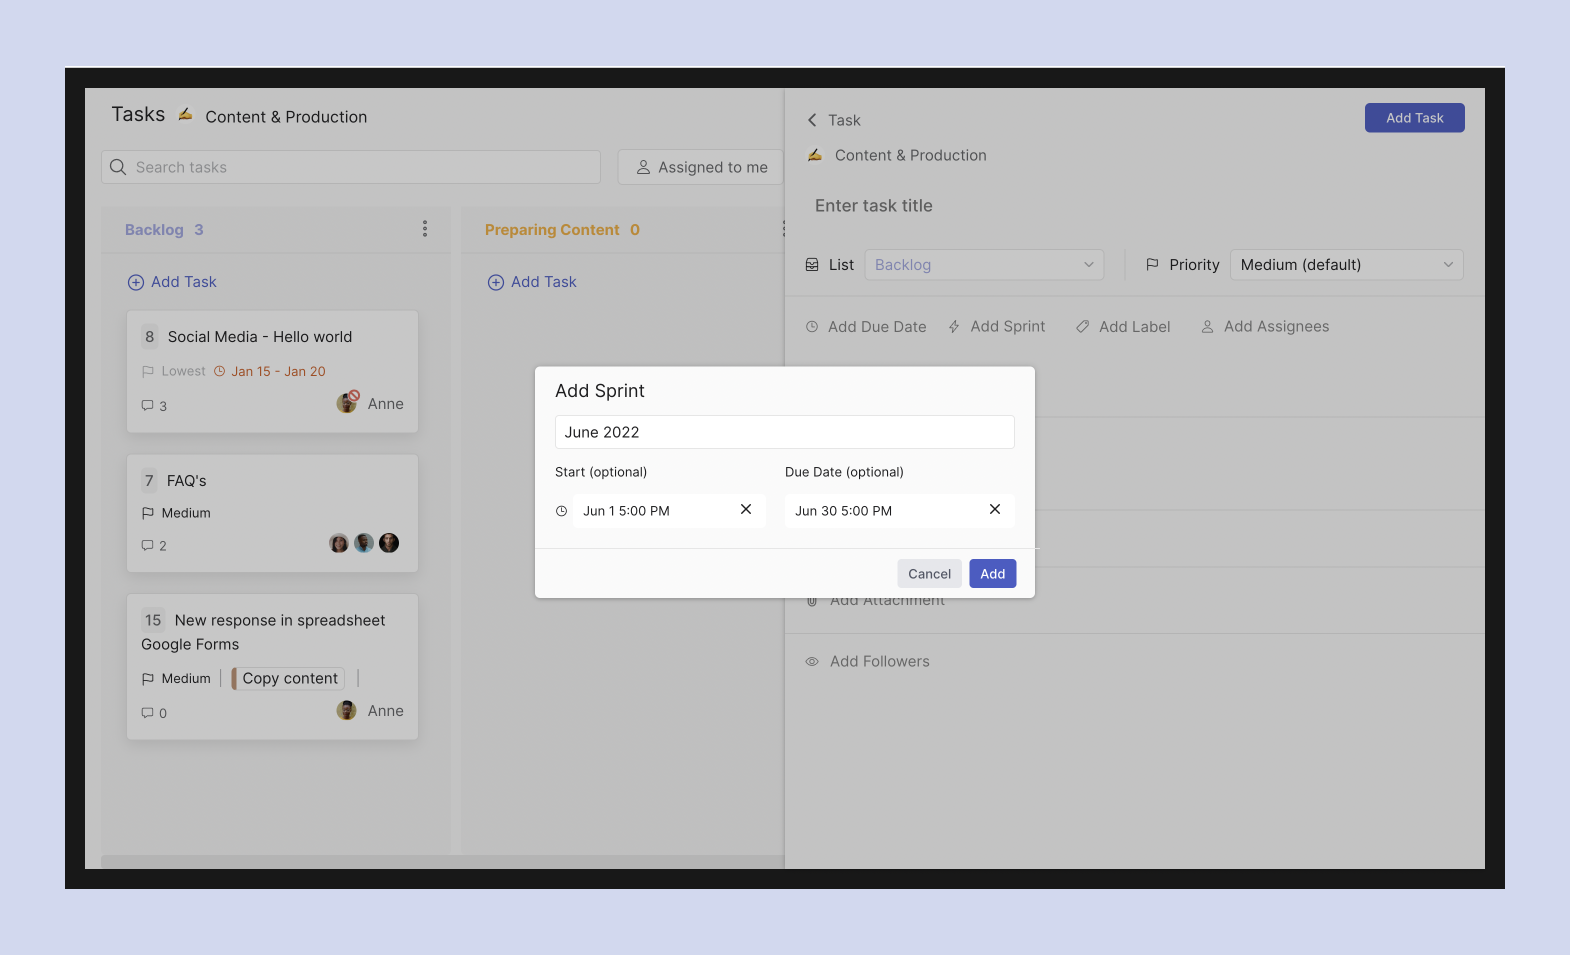
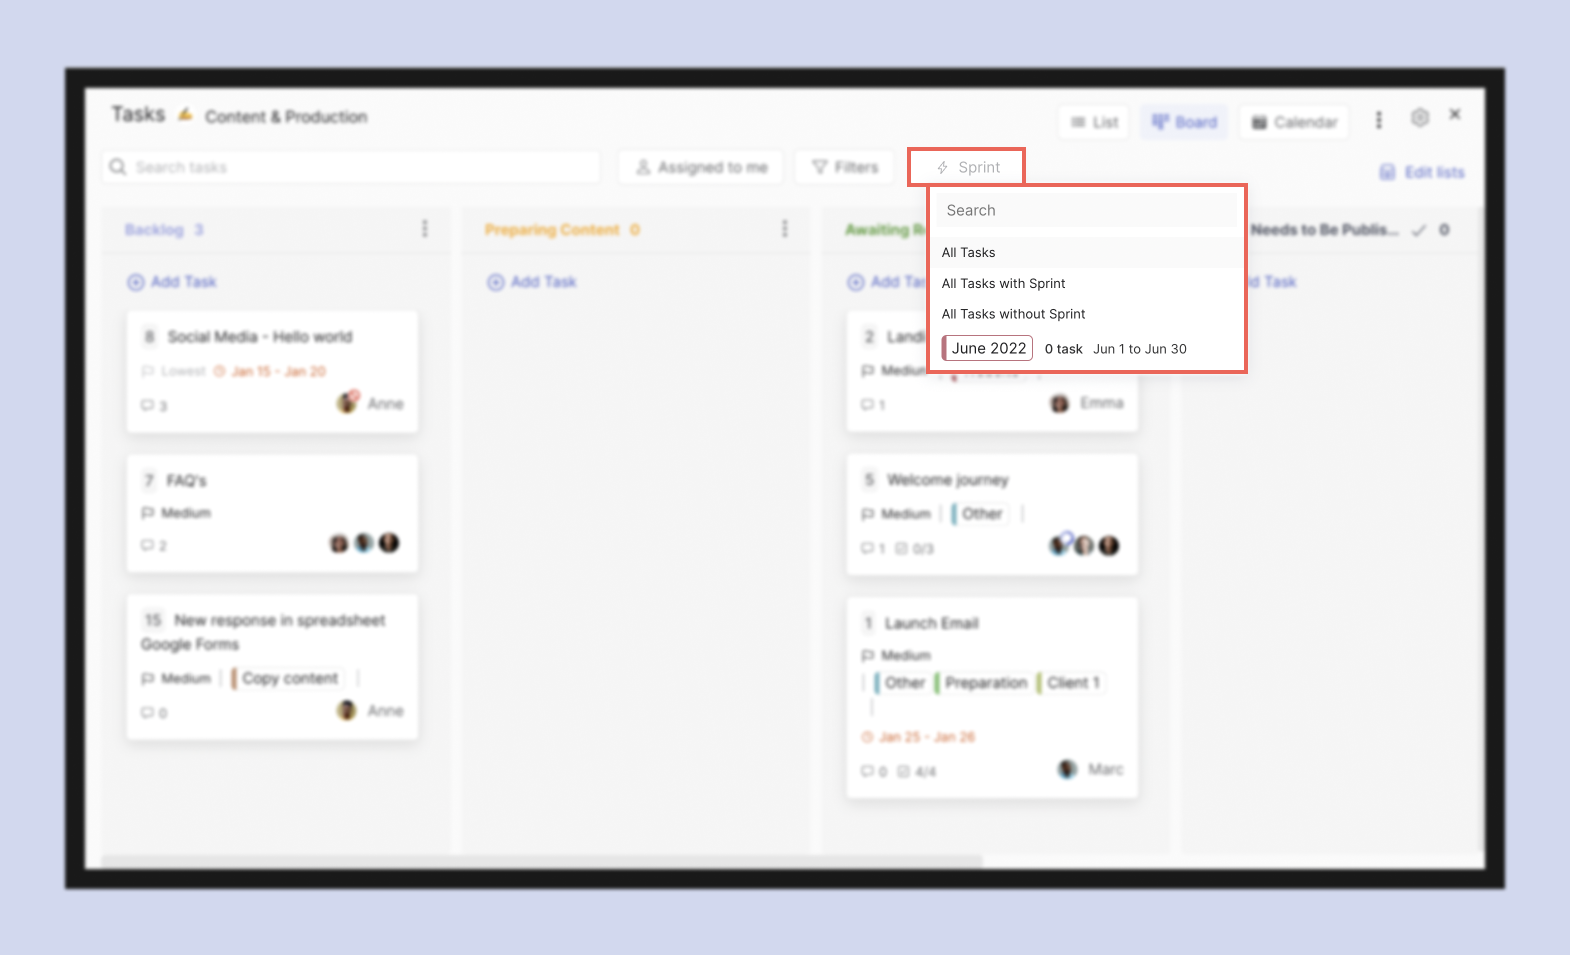
Sprints in Rock allow you to adopt agile methodologies and work in cycles. Adding sprints to tasks makes it easier to manage tasks in a specified time frame. A sprint is a time-bound filter that you can apply to a set of tasks you aim to complete within a specific period.
This helps you to prioritize tasks, track progress, and meet deadlines more efficiently. Additionally, sprints provide a visual representation of your team's workflow. This makes it easier to identify areas for improvement and make necessary adjustments.
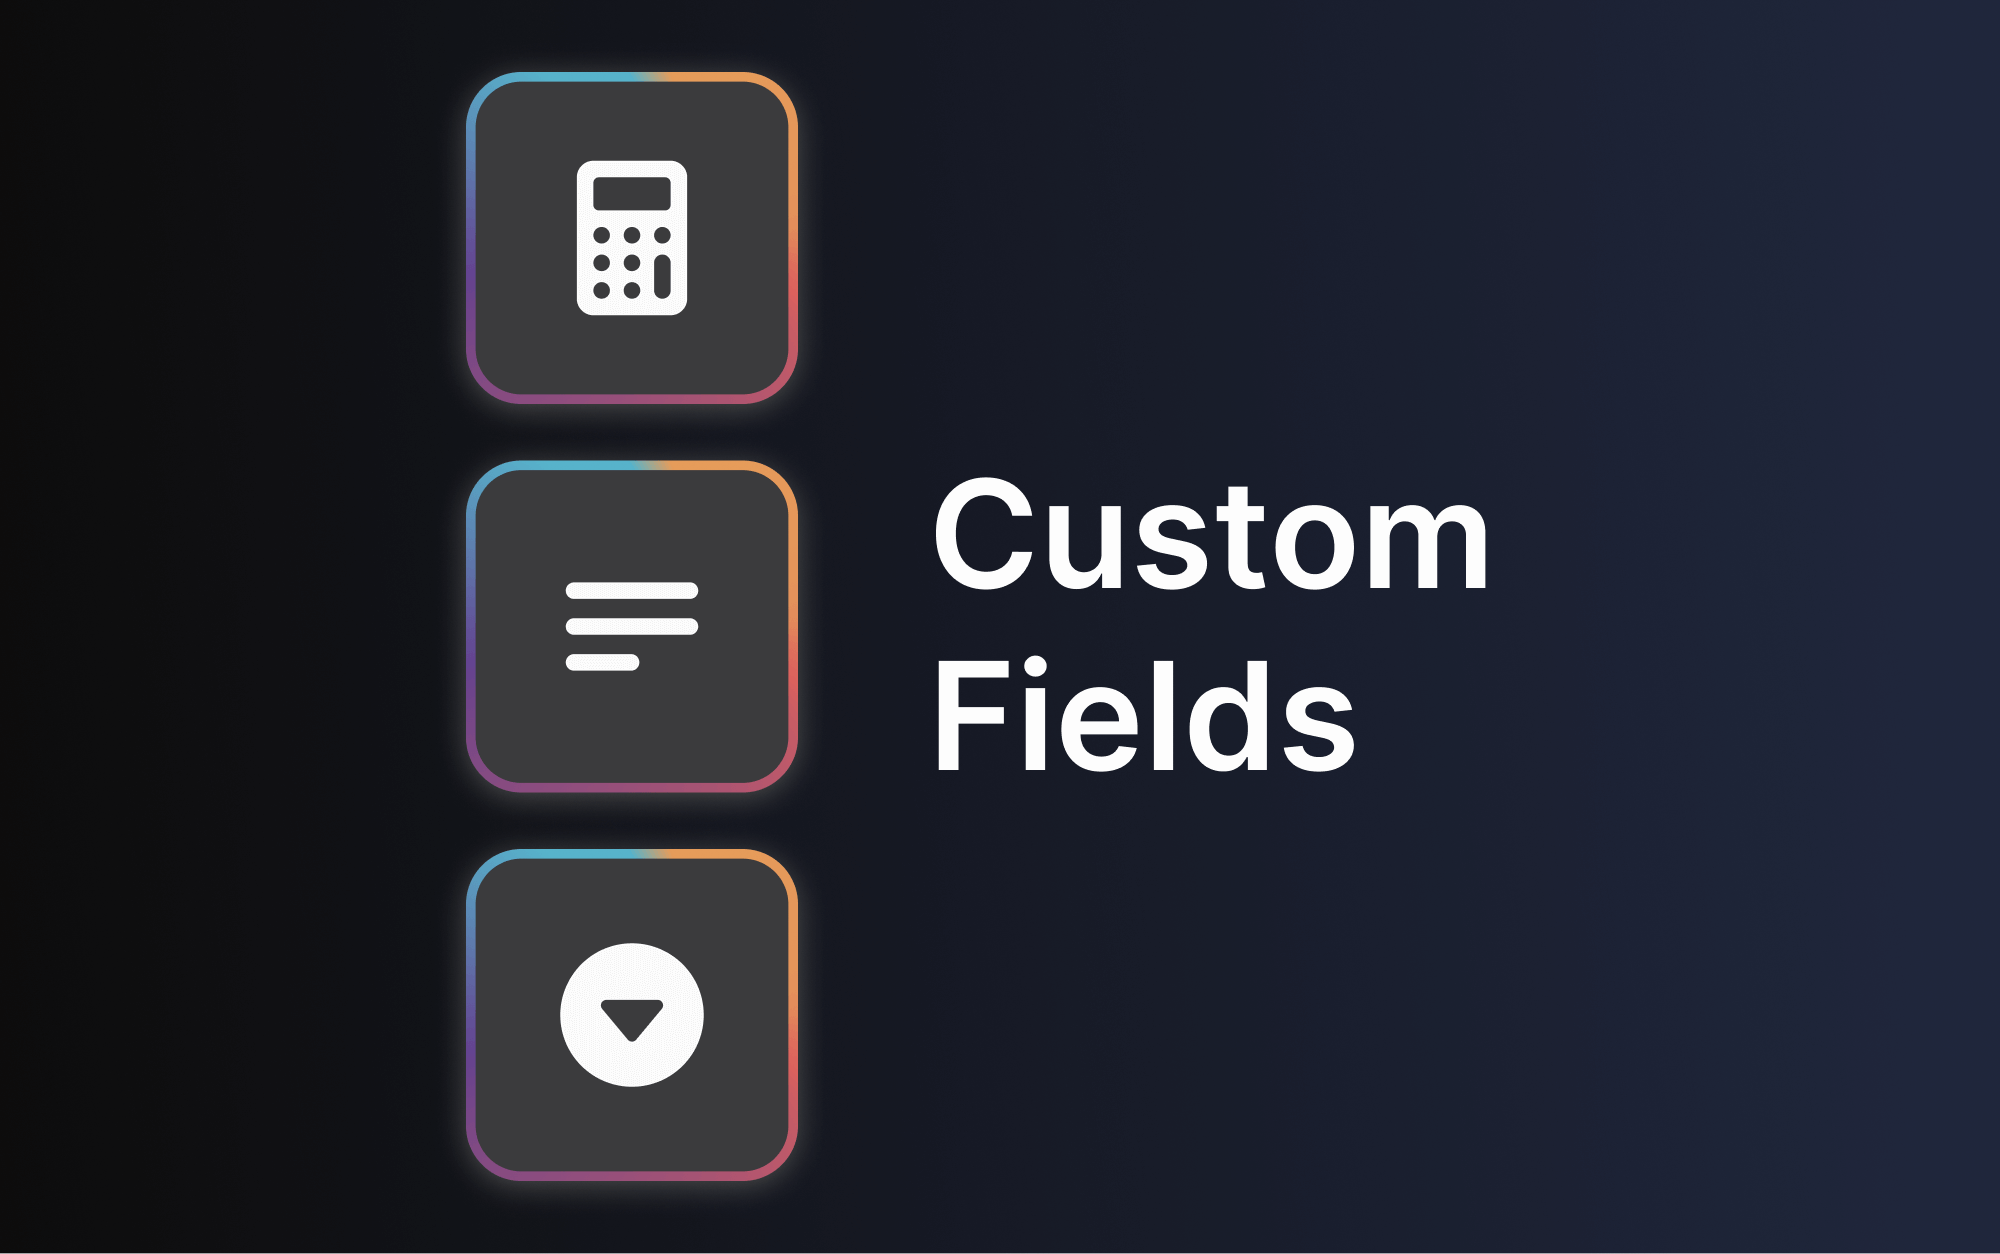
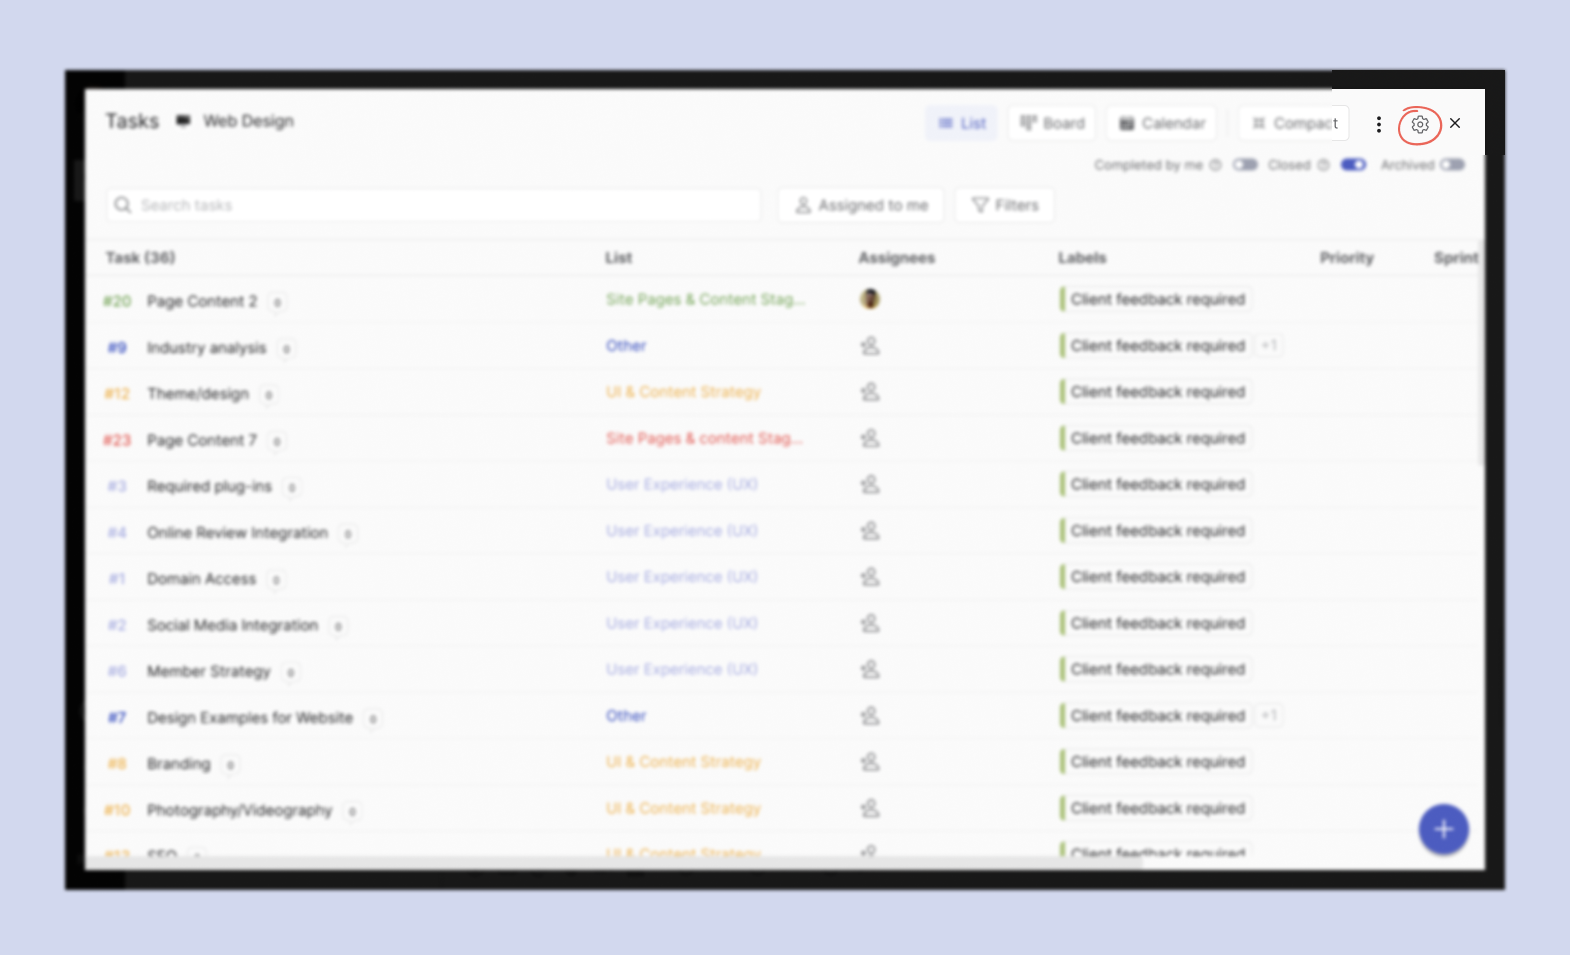
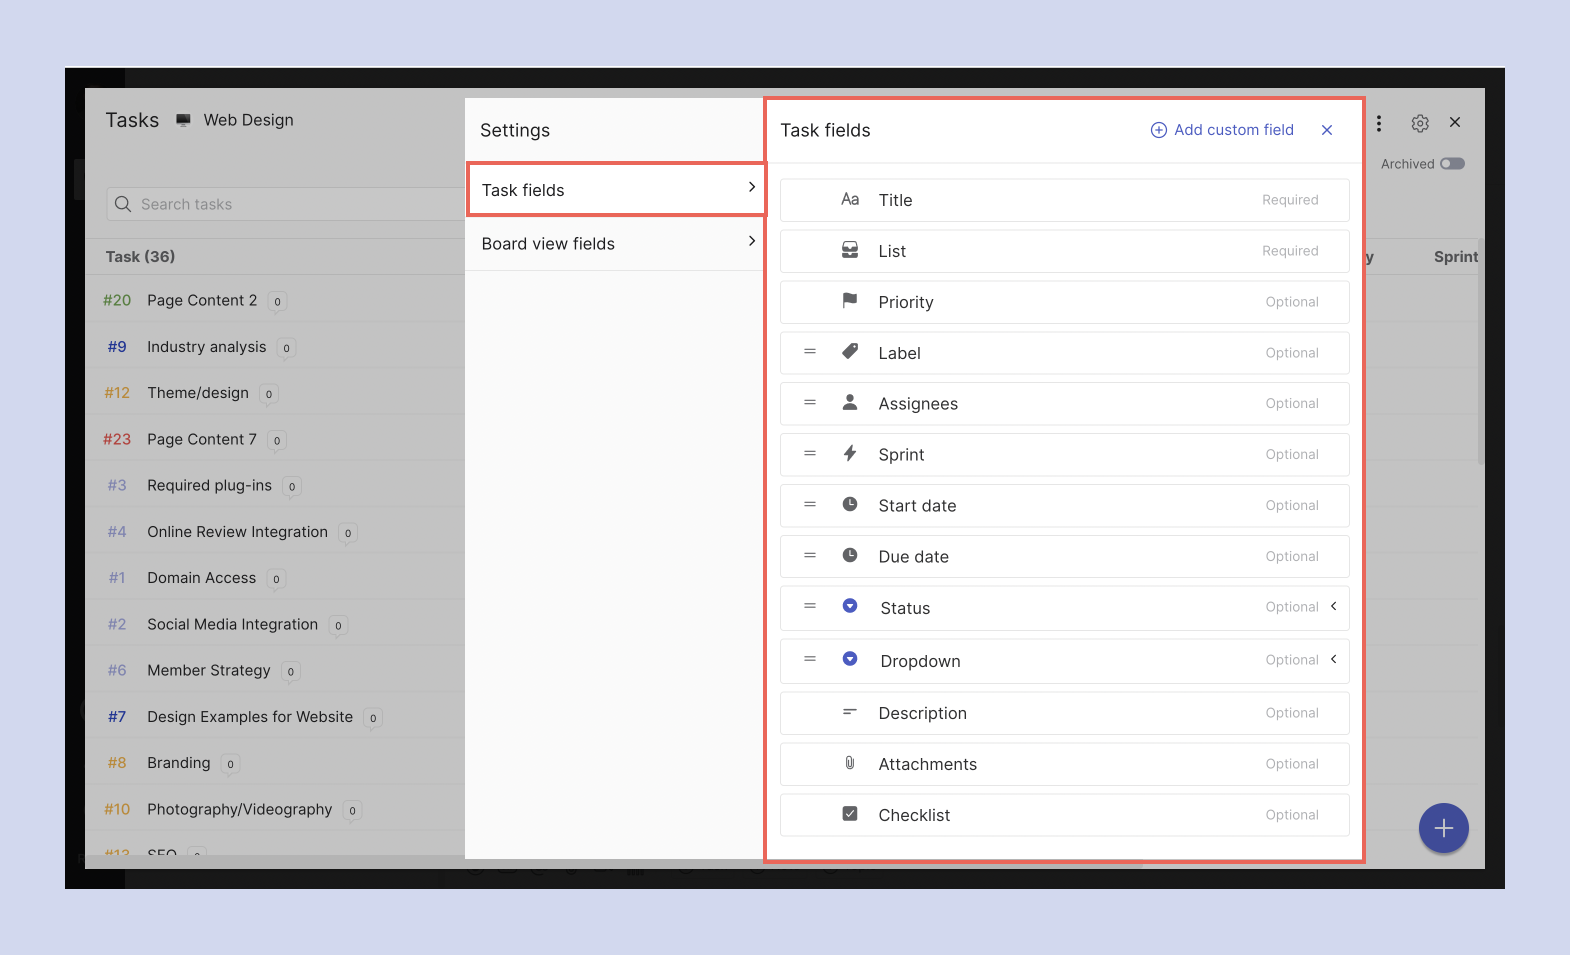
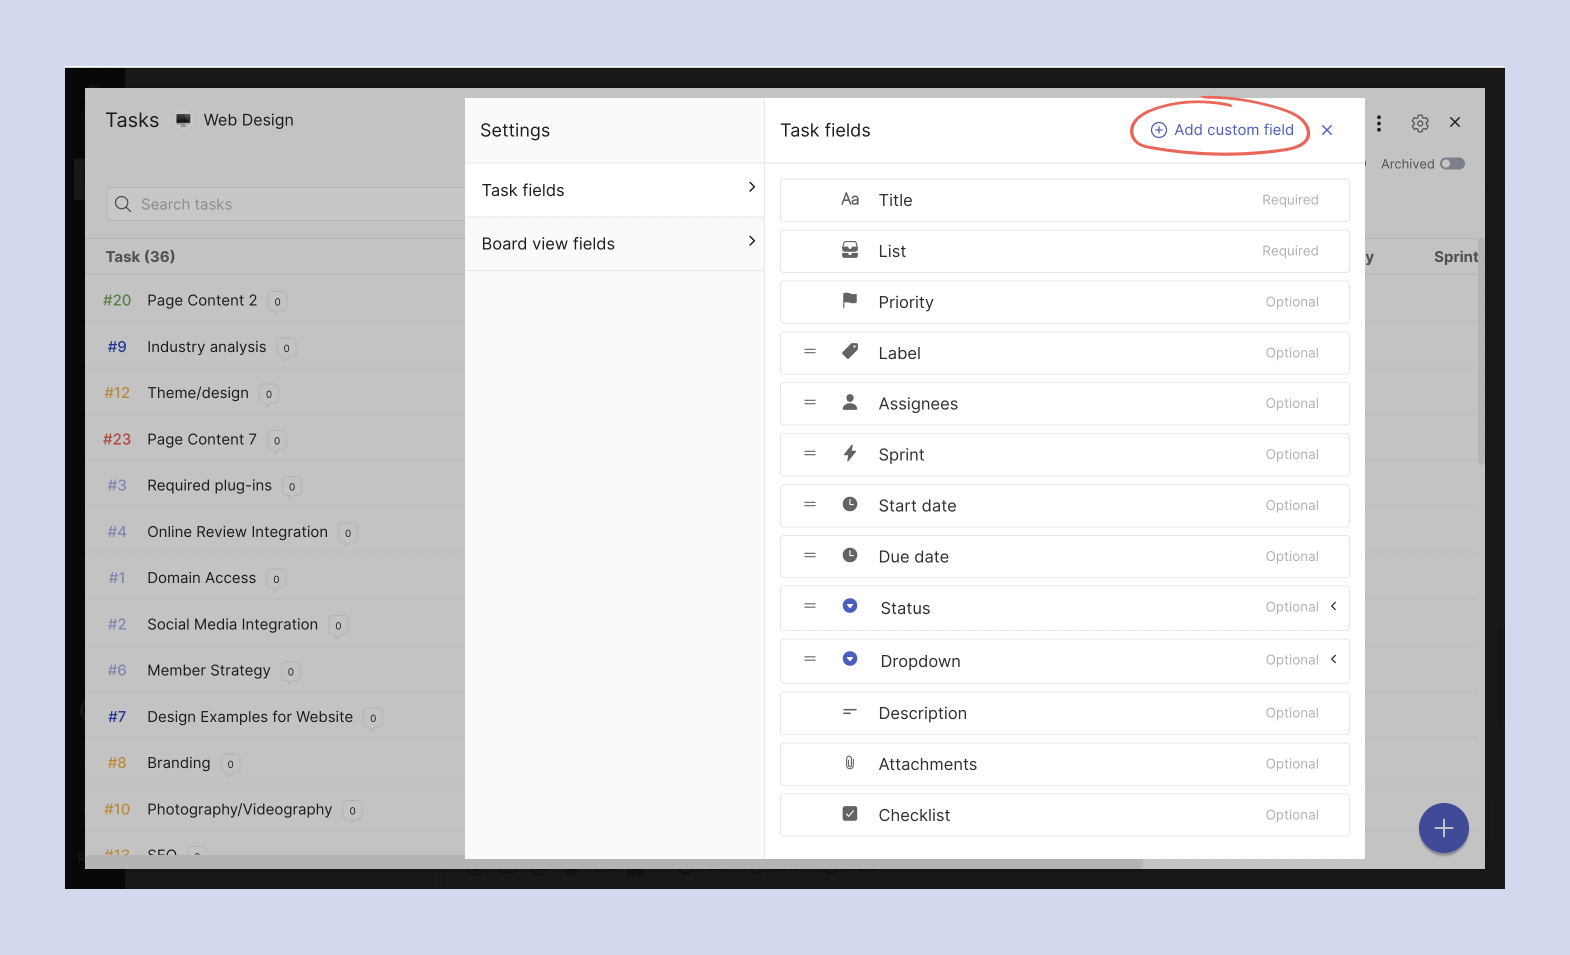
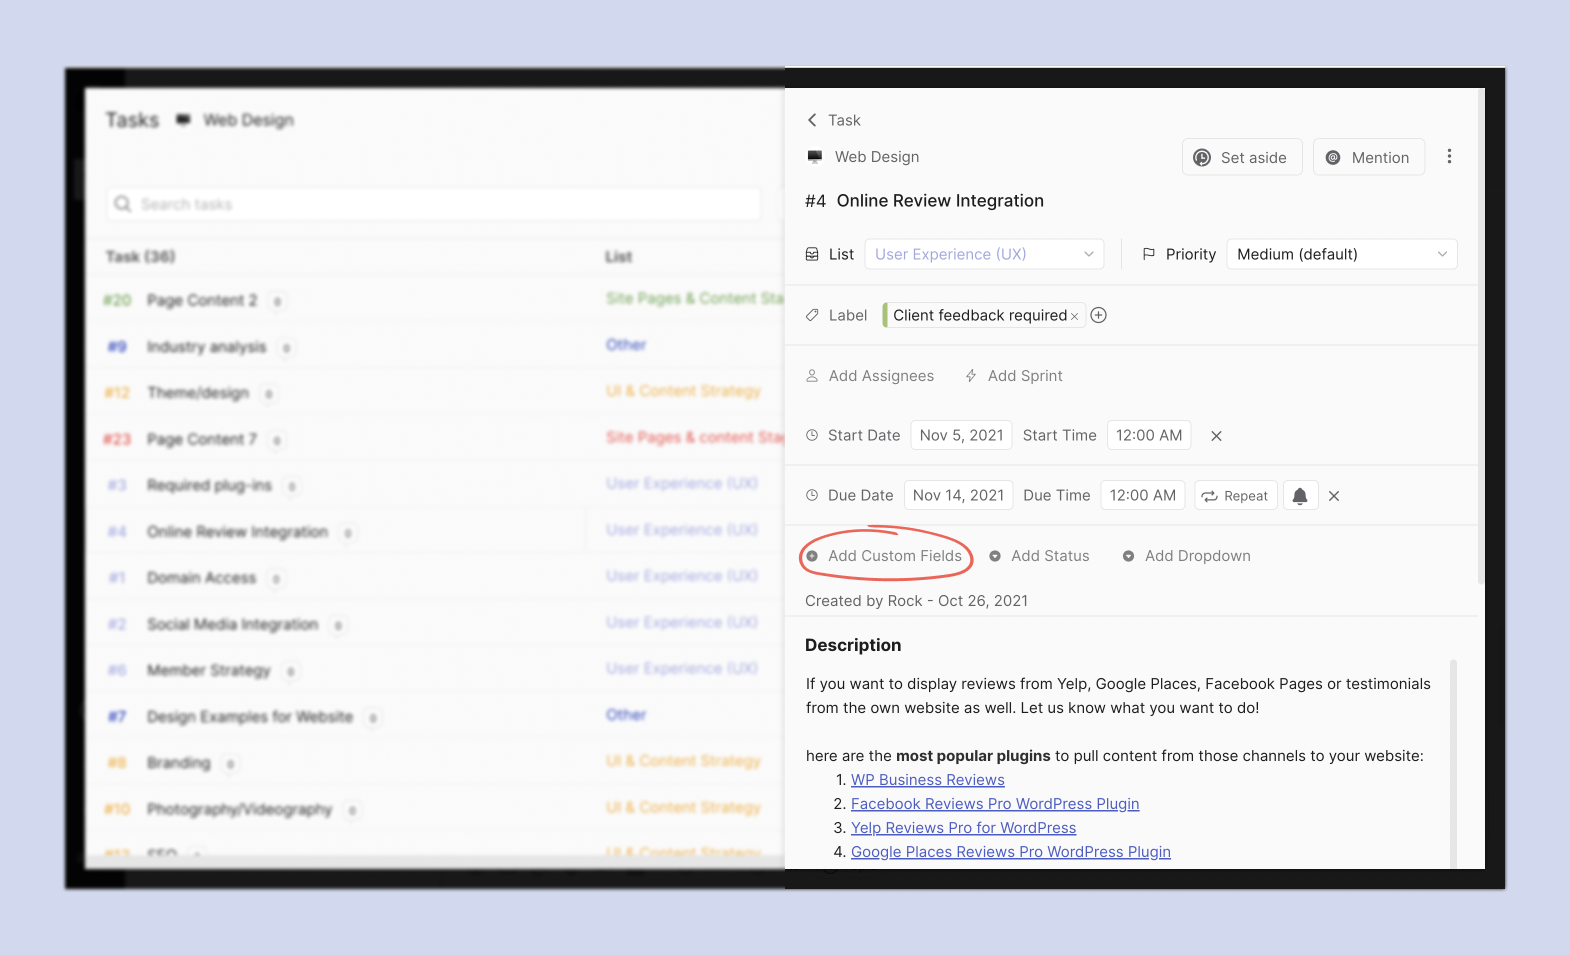
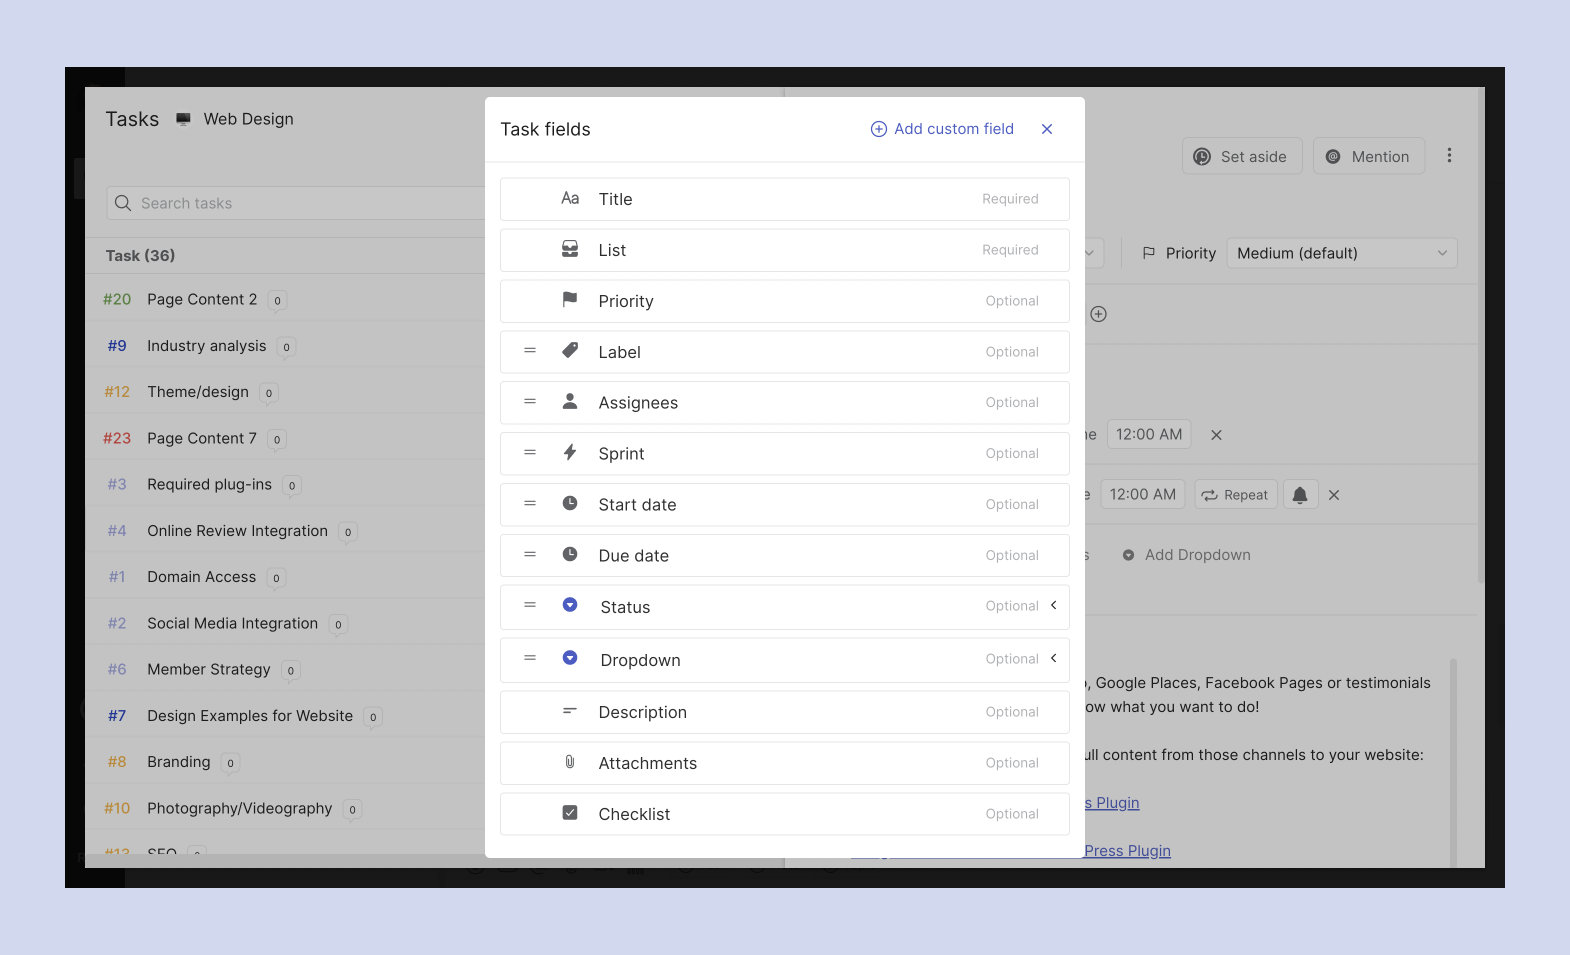
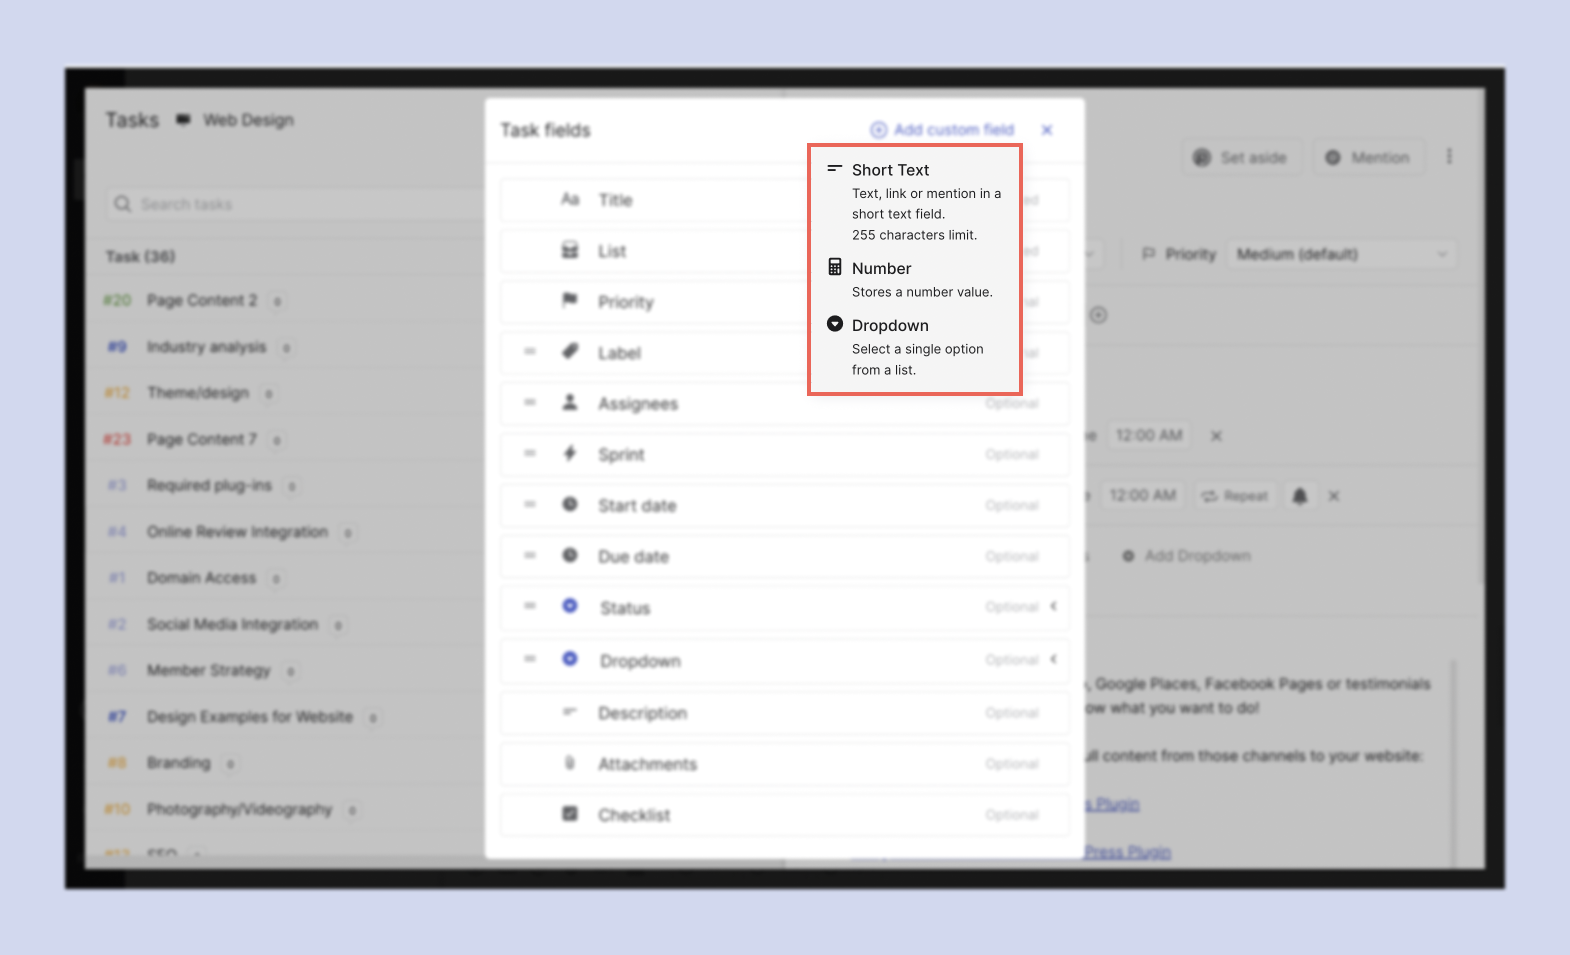
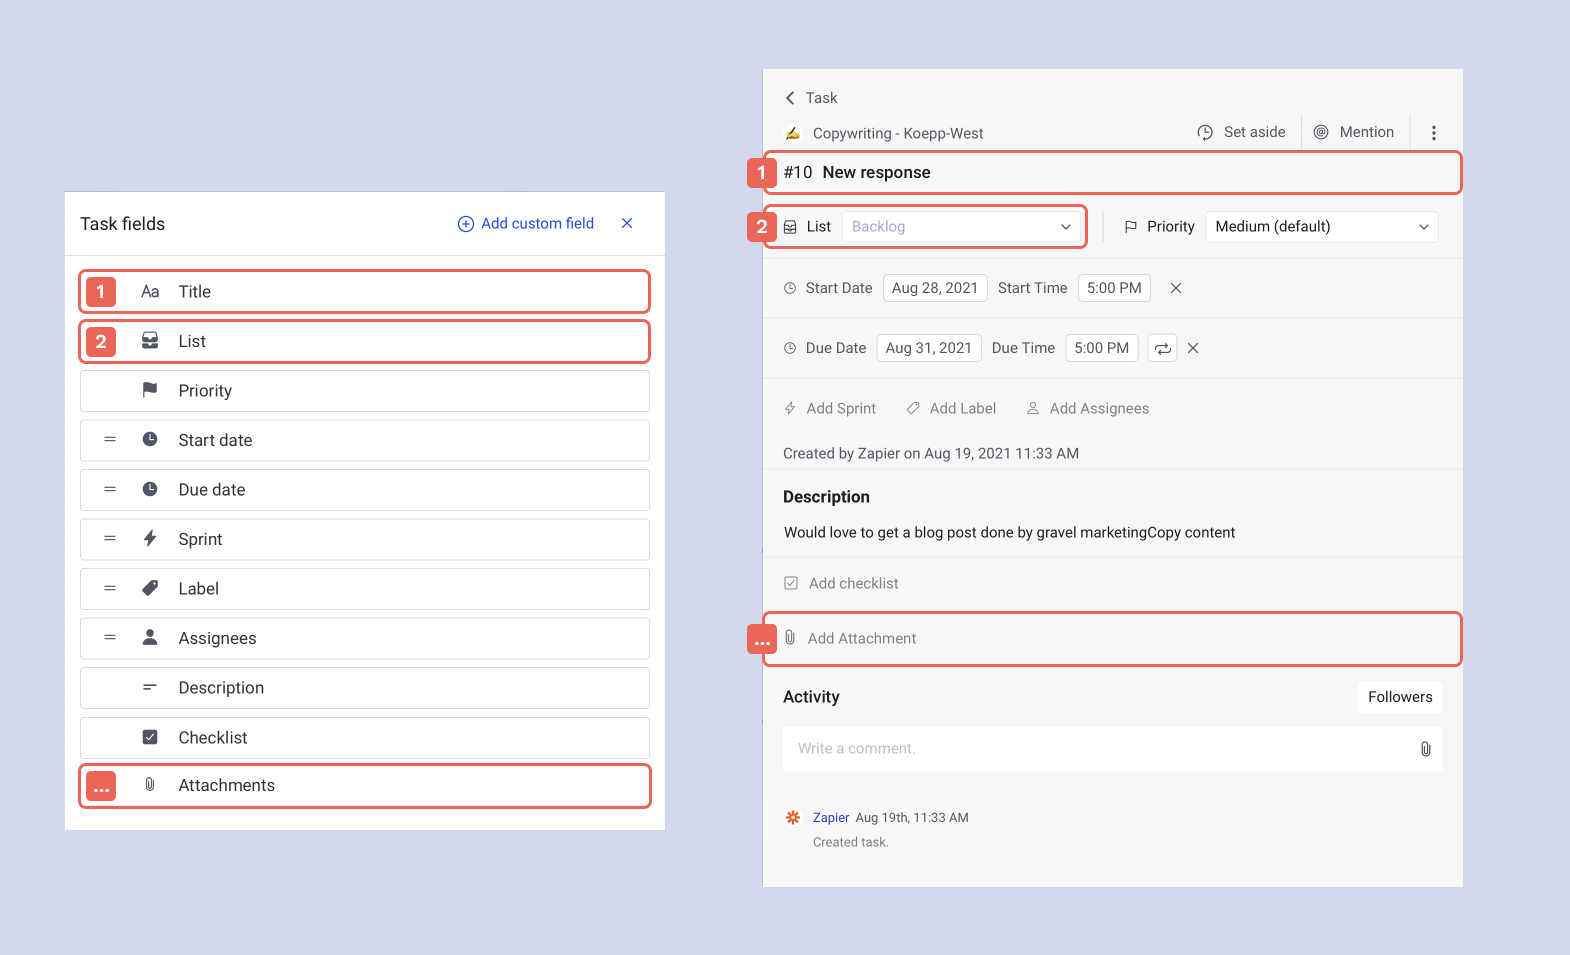
Custom fields allow you to customize task fields by adding or removing fields. The feature includes two main capabilities:
Adding new fields: You can add up to 3 new fields to tasks, such as short text, long text, and dropdown, to capture additional information.
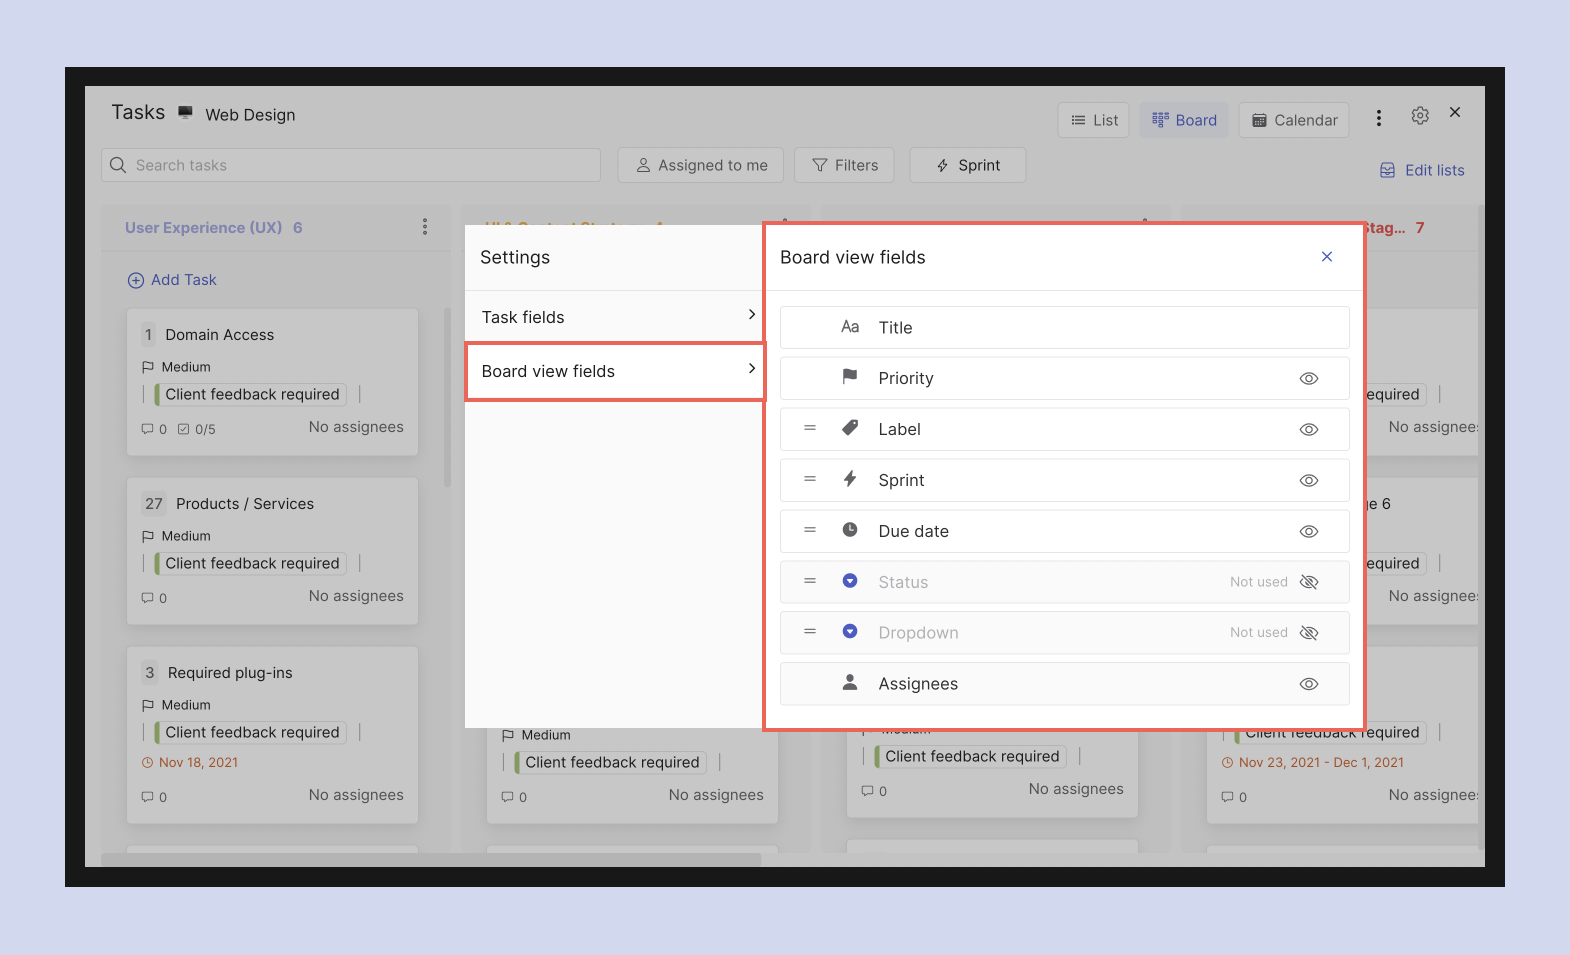
Customizing view: You can rearrange the location of task fields to fit your preferred layout on board or list view. You can also remove fields if you don’t require complex information or configuration of your tasks.
This feature helps streamline information and can be particularly useful when working with clients or external stakeholders.
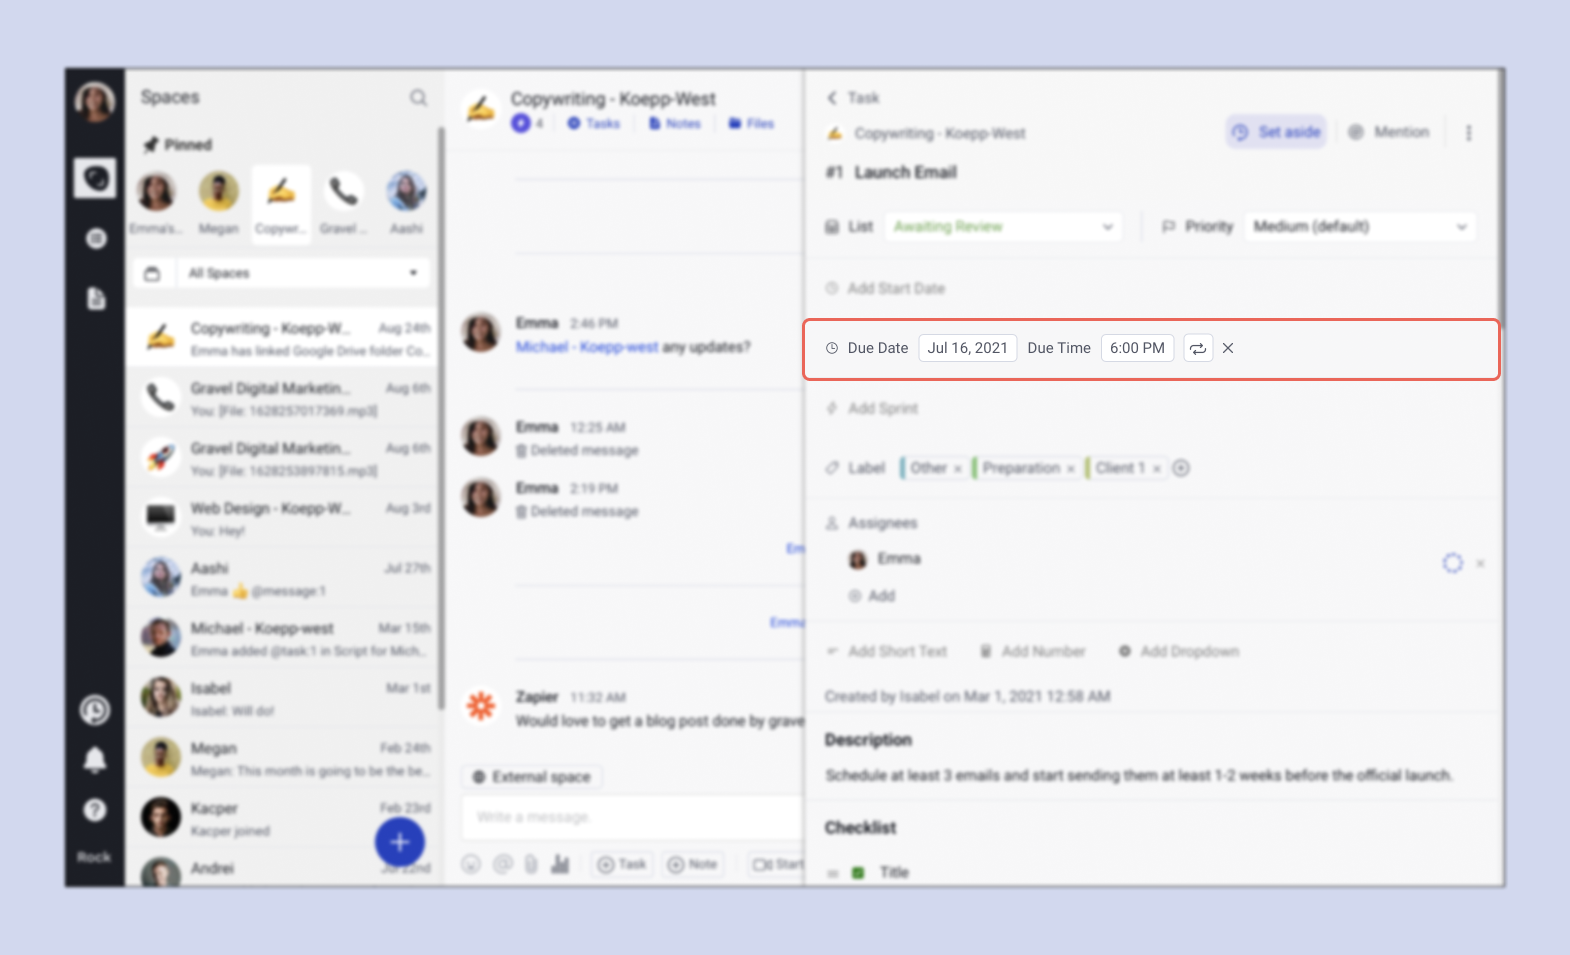
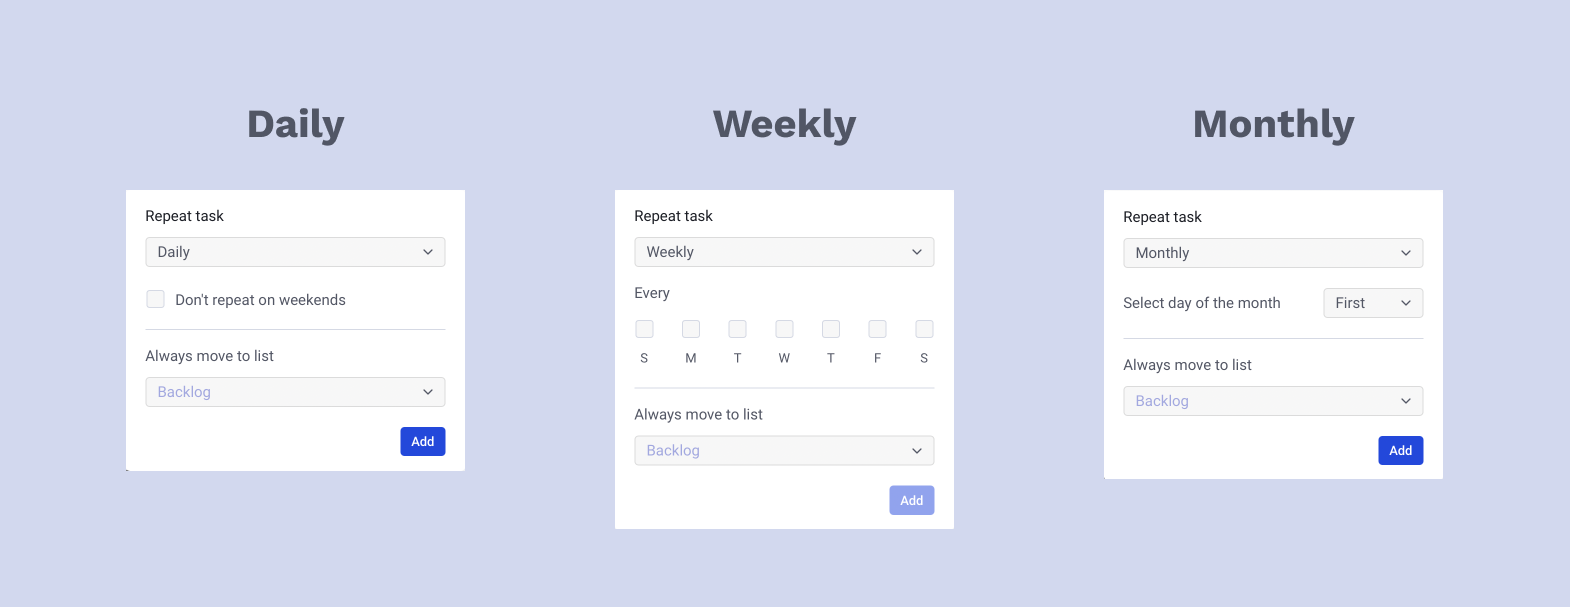
Efficient management of daily check-ins, weekly reports, monthly invoices, or any other repeating tasks is made possible with recurring tasks.
No need for manual reminders to create new tasks, as they automatically reset to a new due date after completion. For more information, refer to this comprehensive guide on recurring tasks.
Task exports in CSV or Excel
PRO spaces enable you to export task boards as CSV or Excel files, making it easier to document information and manipulate space data in different ways.
The time tracking functionality on Rock allows you to gain a better understanding of the time team members spend on tasks in PRO spaces. The time tracking functionality is often used for:
Monitoring priorities: The time tracker facilitates monitoring the priorities of your team, providing insight into how much time team members spend on various project activities. This helps ensure that time is effectively utilized by your team.
Billing purposes: For freelancers charging hourly rates, the time tracker provides an easy way to share the number of hours worked on various activities with clients. No need for third-party platforms or manual discussions about hours invested. Accurate timekeeping for deliverables simplifies the process for both freelancer and the client.
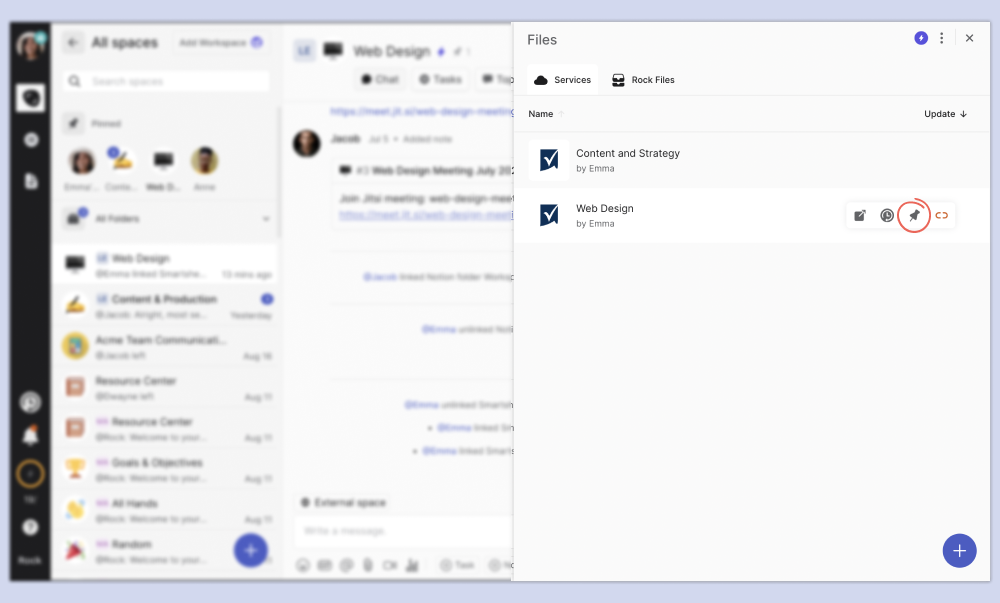
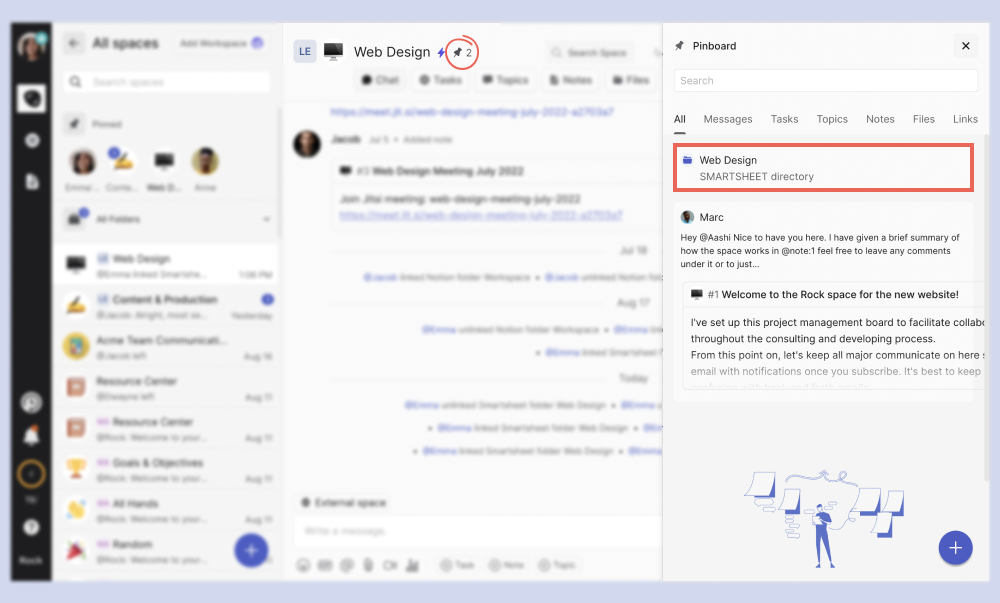
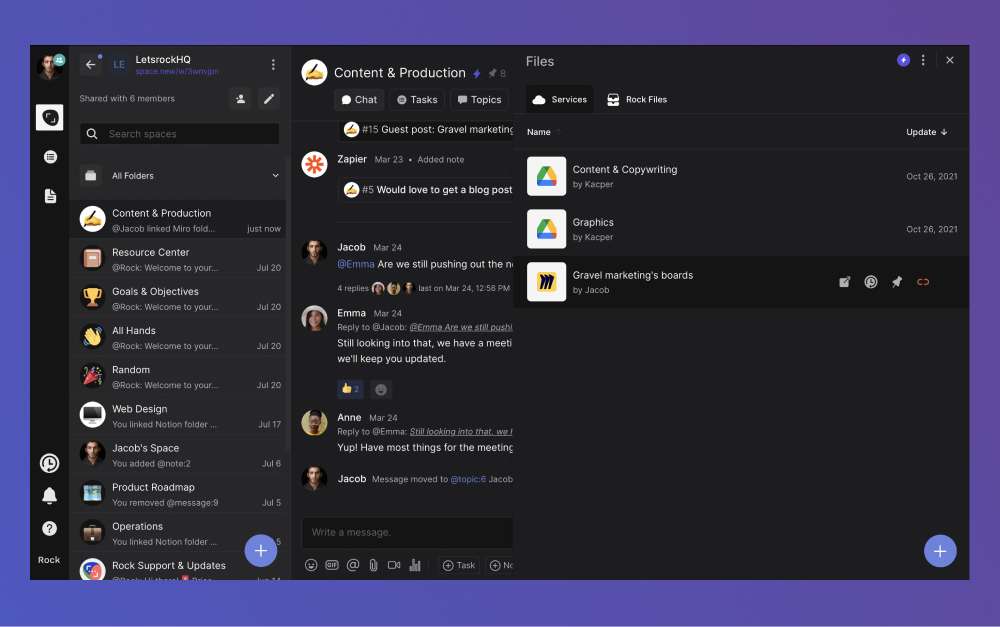
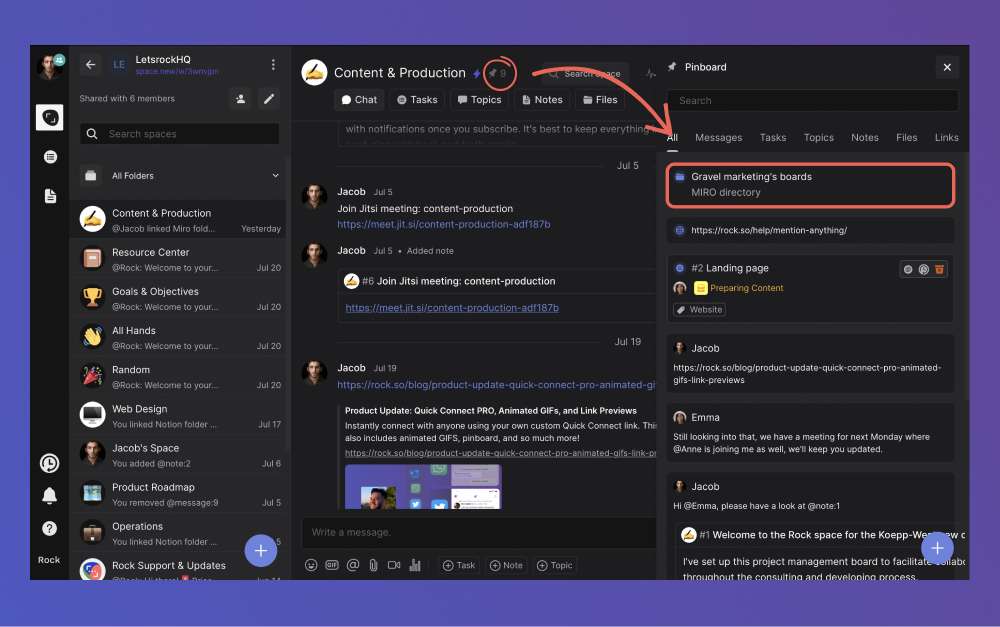
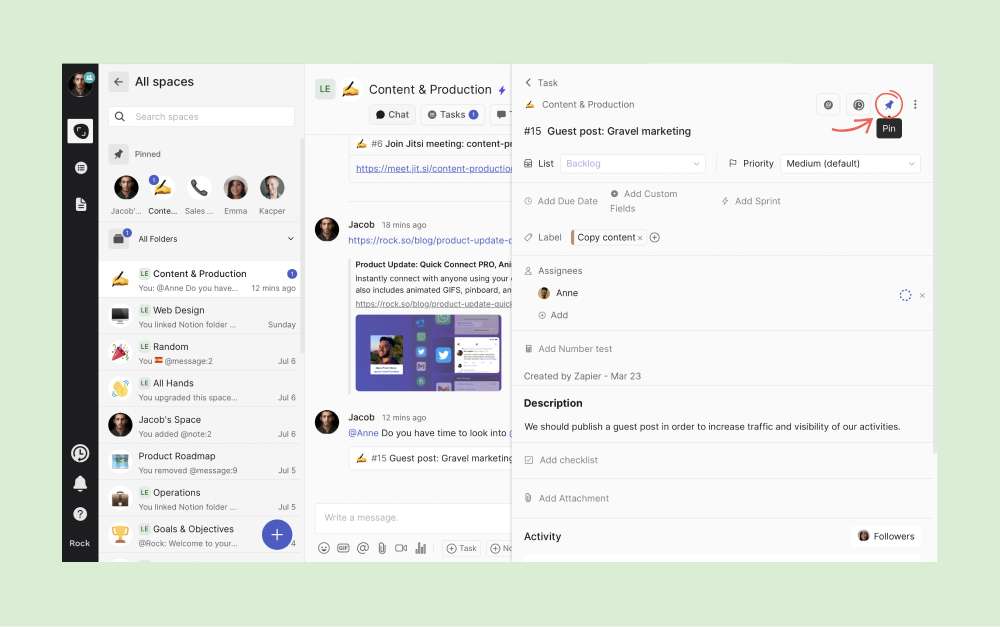
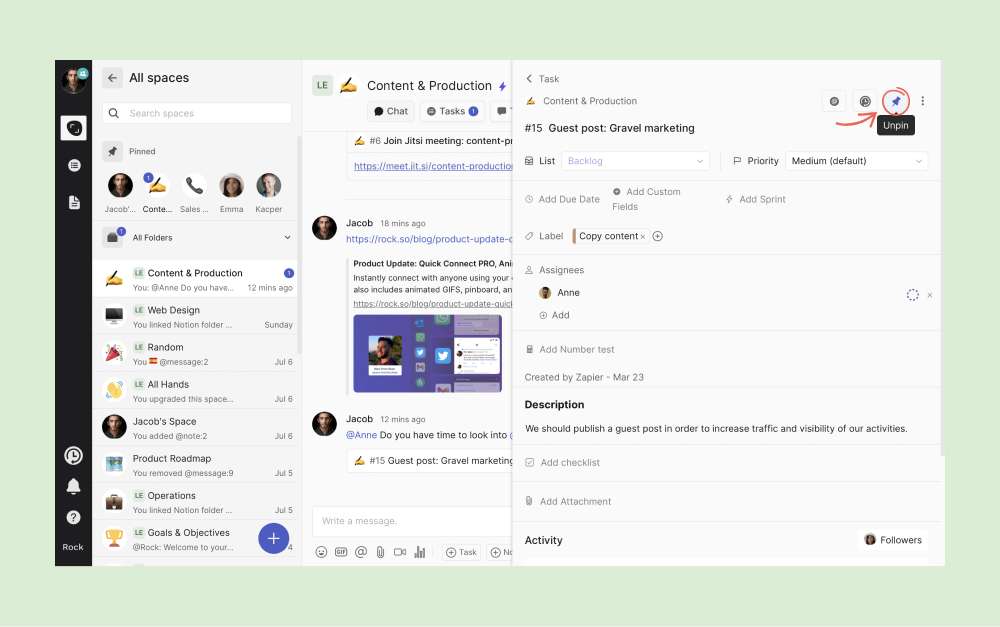
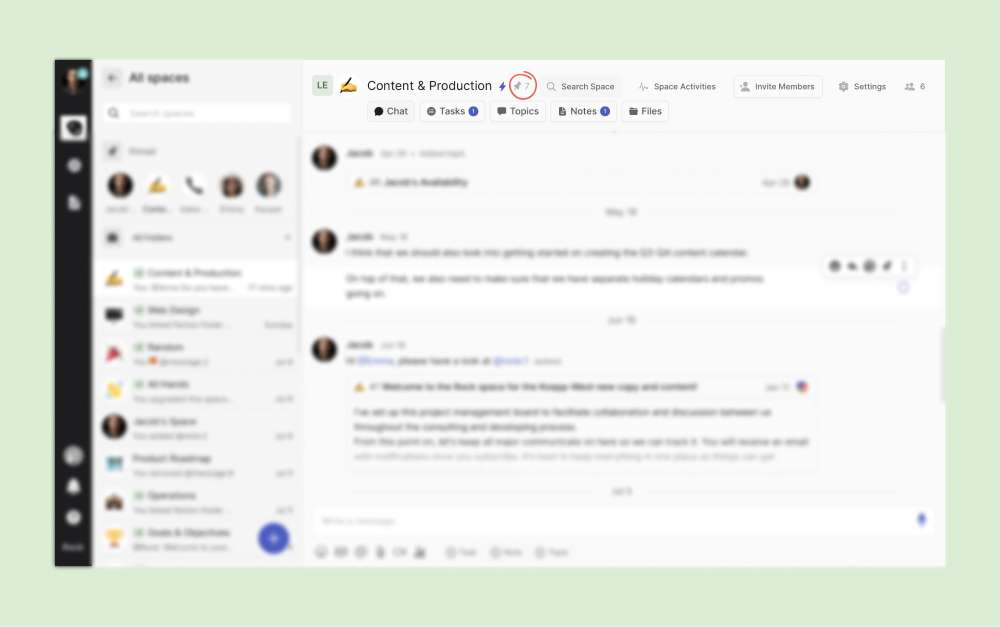
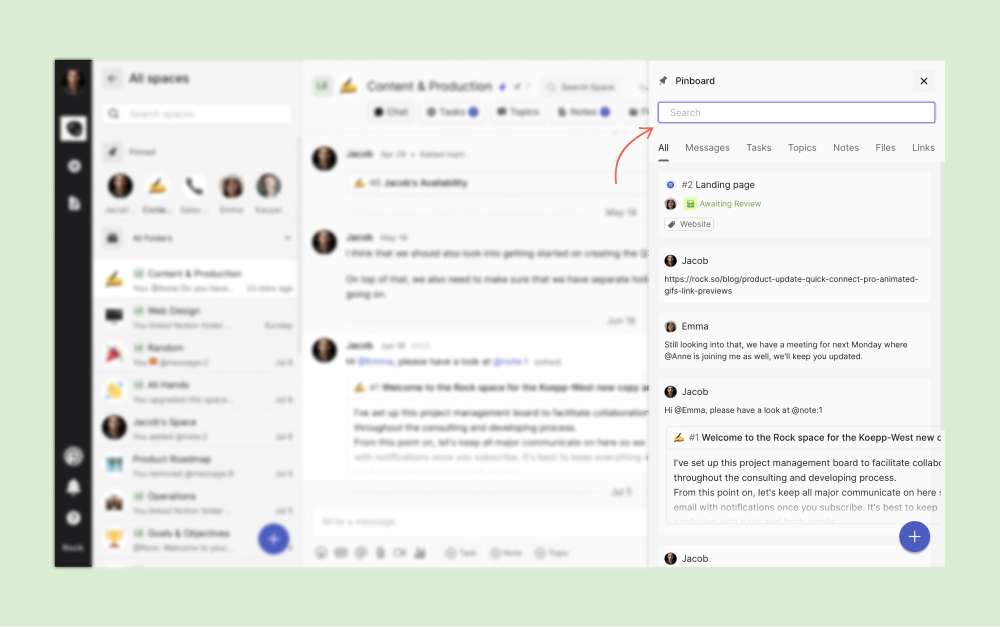
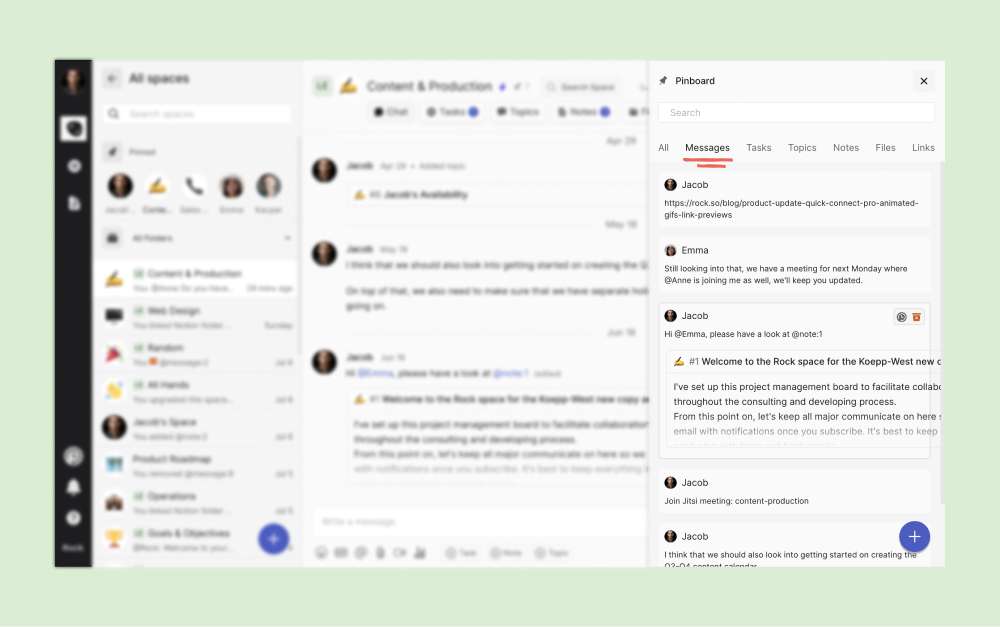
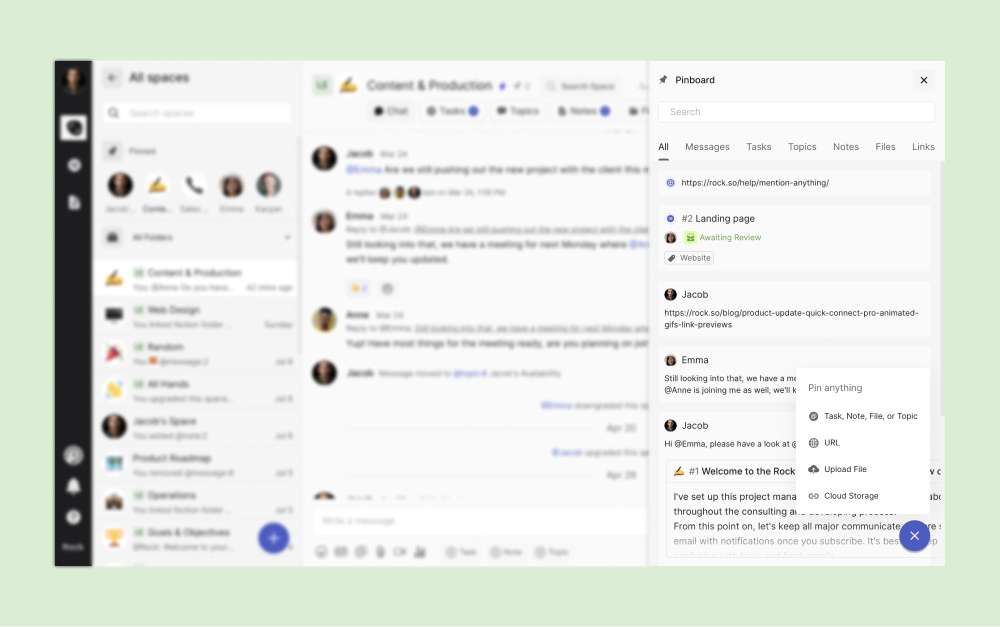
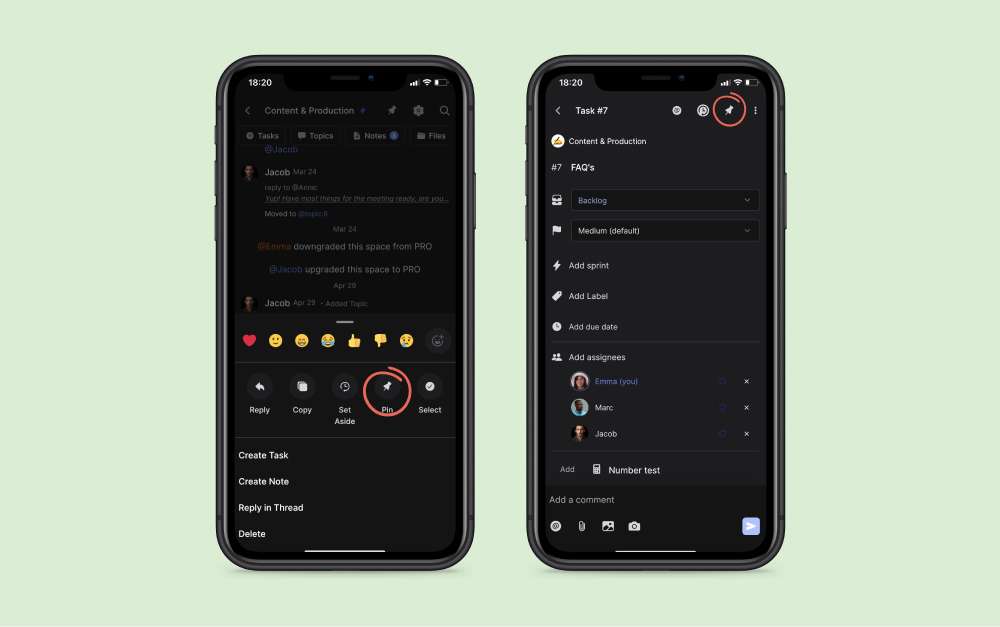
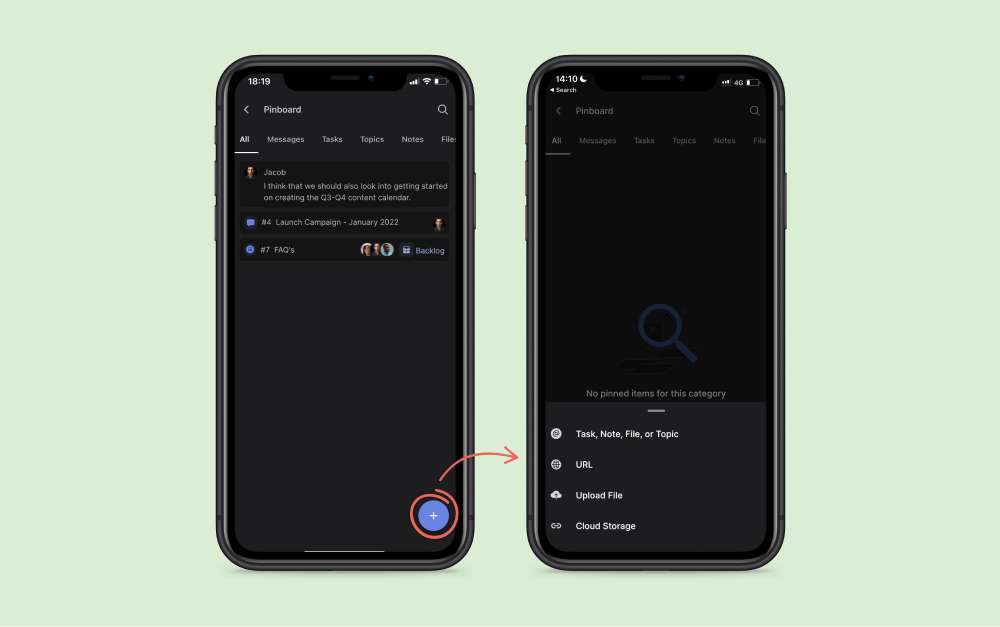
Keep crucial information within reach through a dedicated pinboard in every PRO space. Quickly locate important tasks, discussions, notes, files, and messages without having to search through multiple mini-apps.
The pinboard can hold a range of information, such as a welcome message, strategic document, weekly update, website link, or any significant task or note you want to make easily accessible to all.
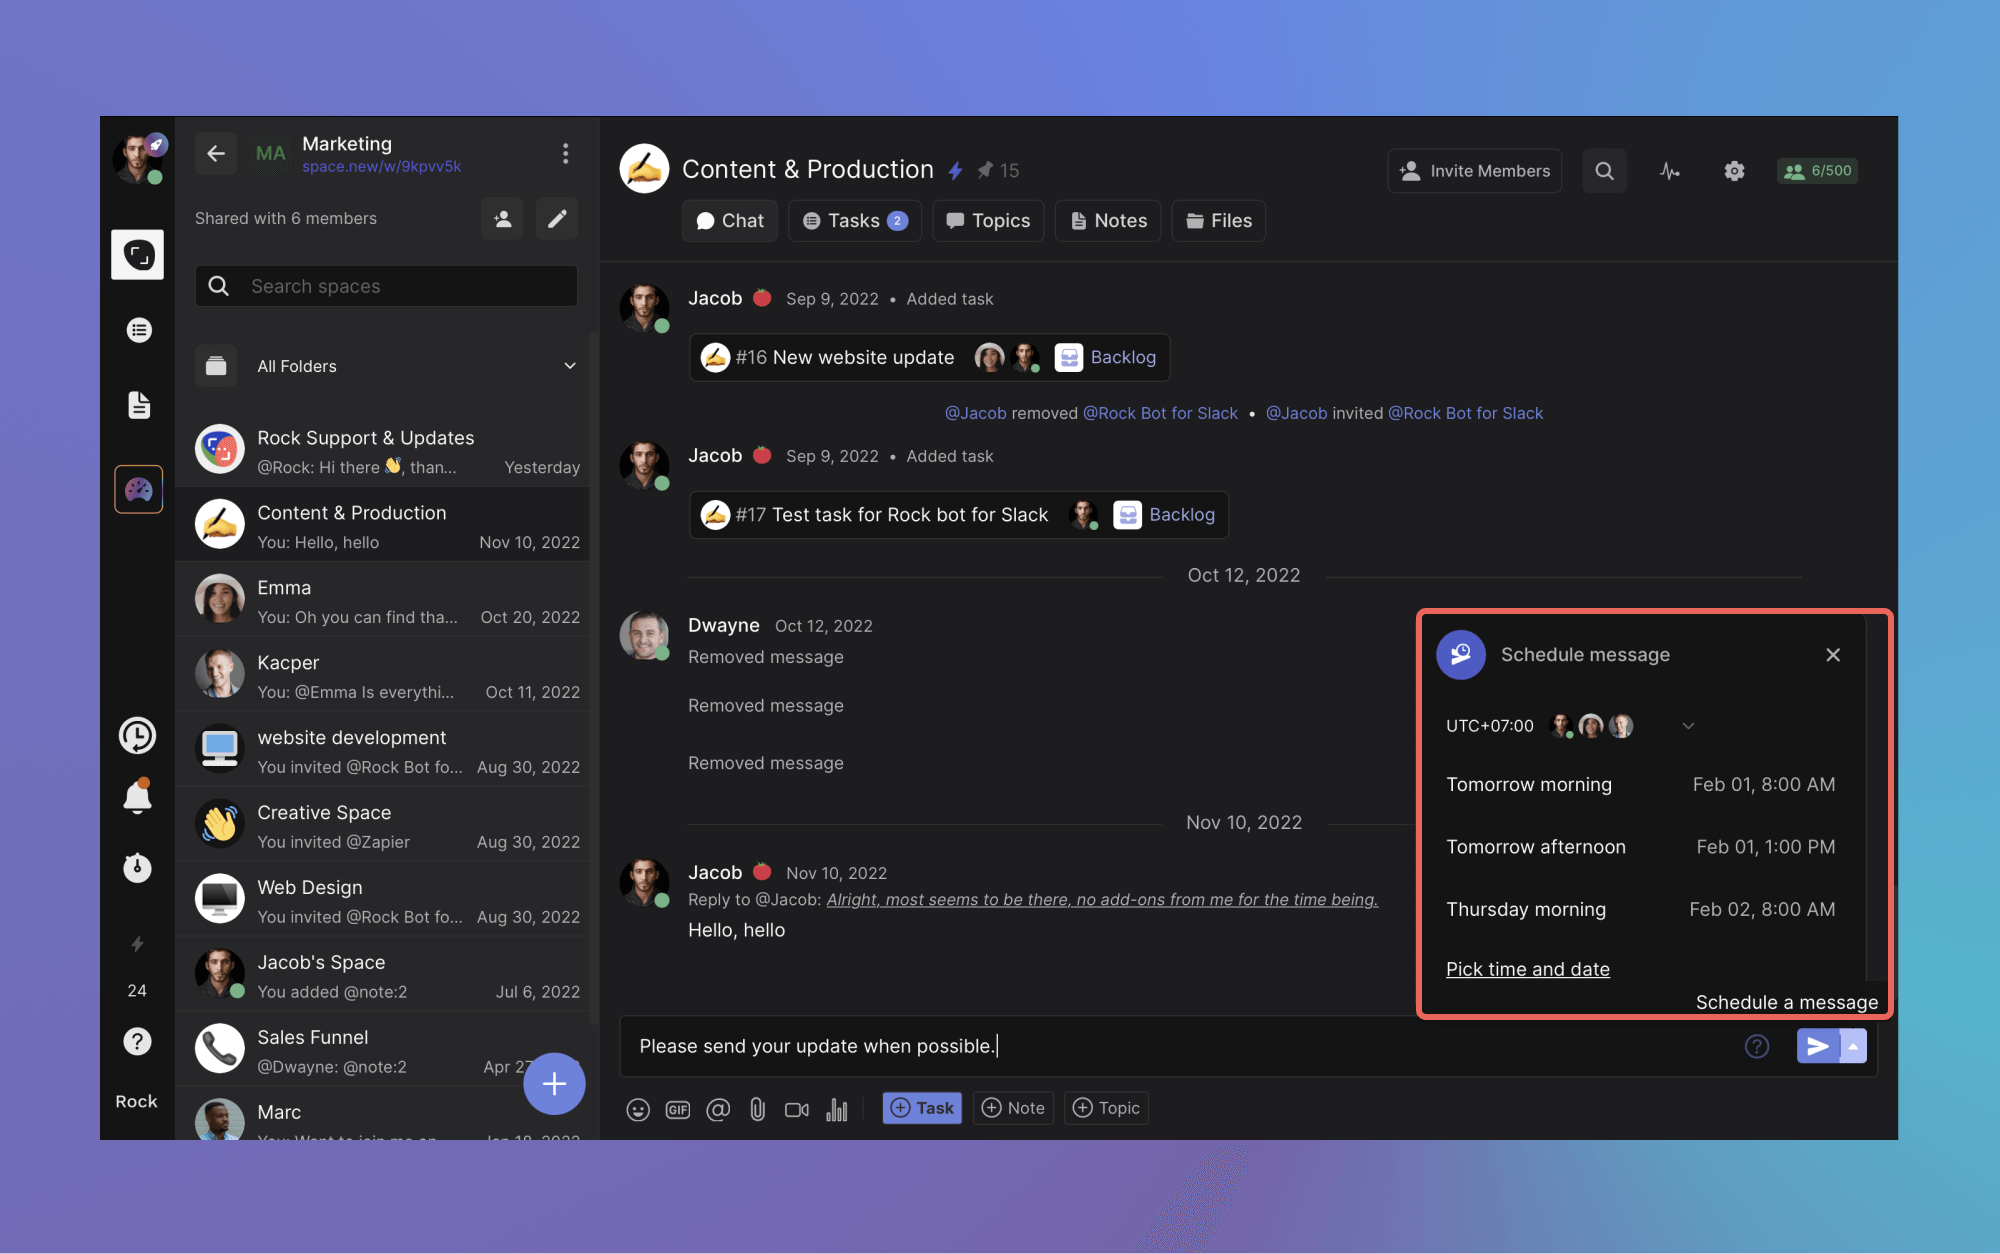
Schedule messages or polls to be sent on from your PRO space at a time that's convenient for you. This can be convenient when working across time zones, having status updates at certain times, or setting reminders for yourself or others.
To schedule your first message or poll, select the drop-down next to the send icon in the chat panel.
Questions about unlimited or PRO spaces? Reach out to us!
Still have any questions about PRO spaces? Reach out to us through this link!
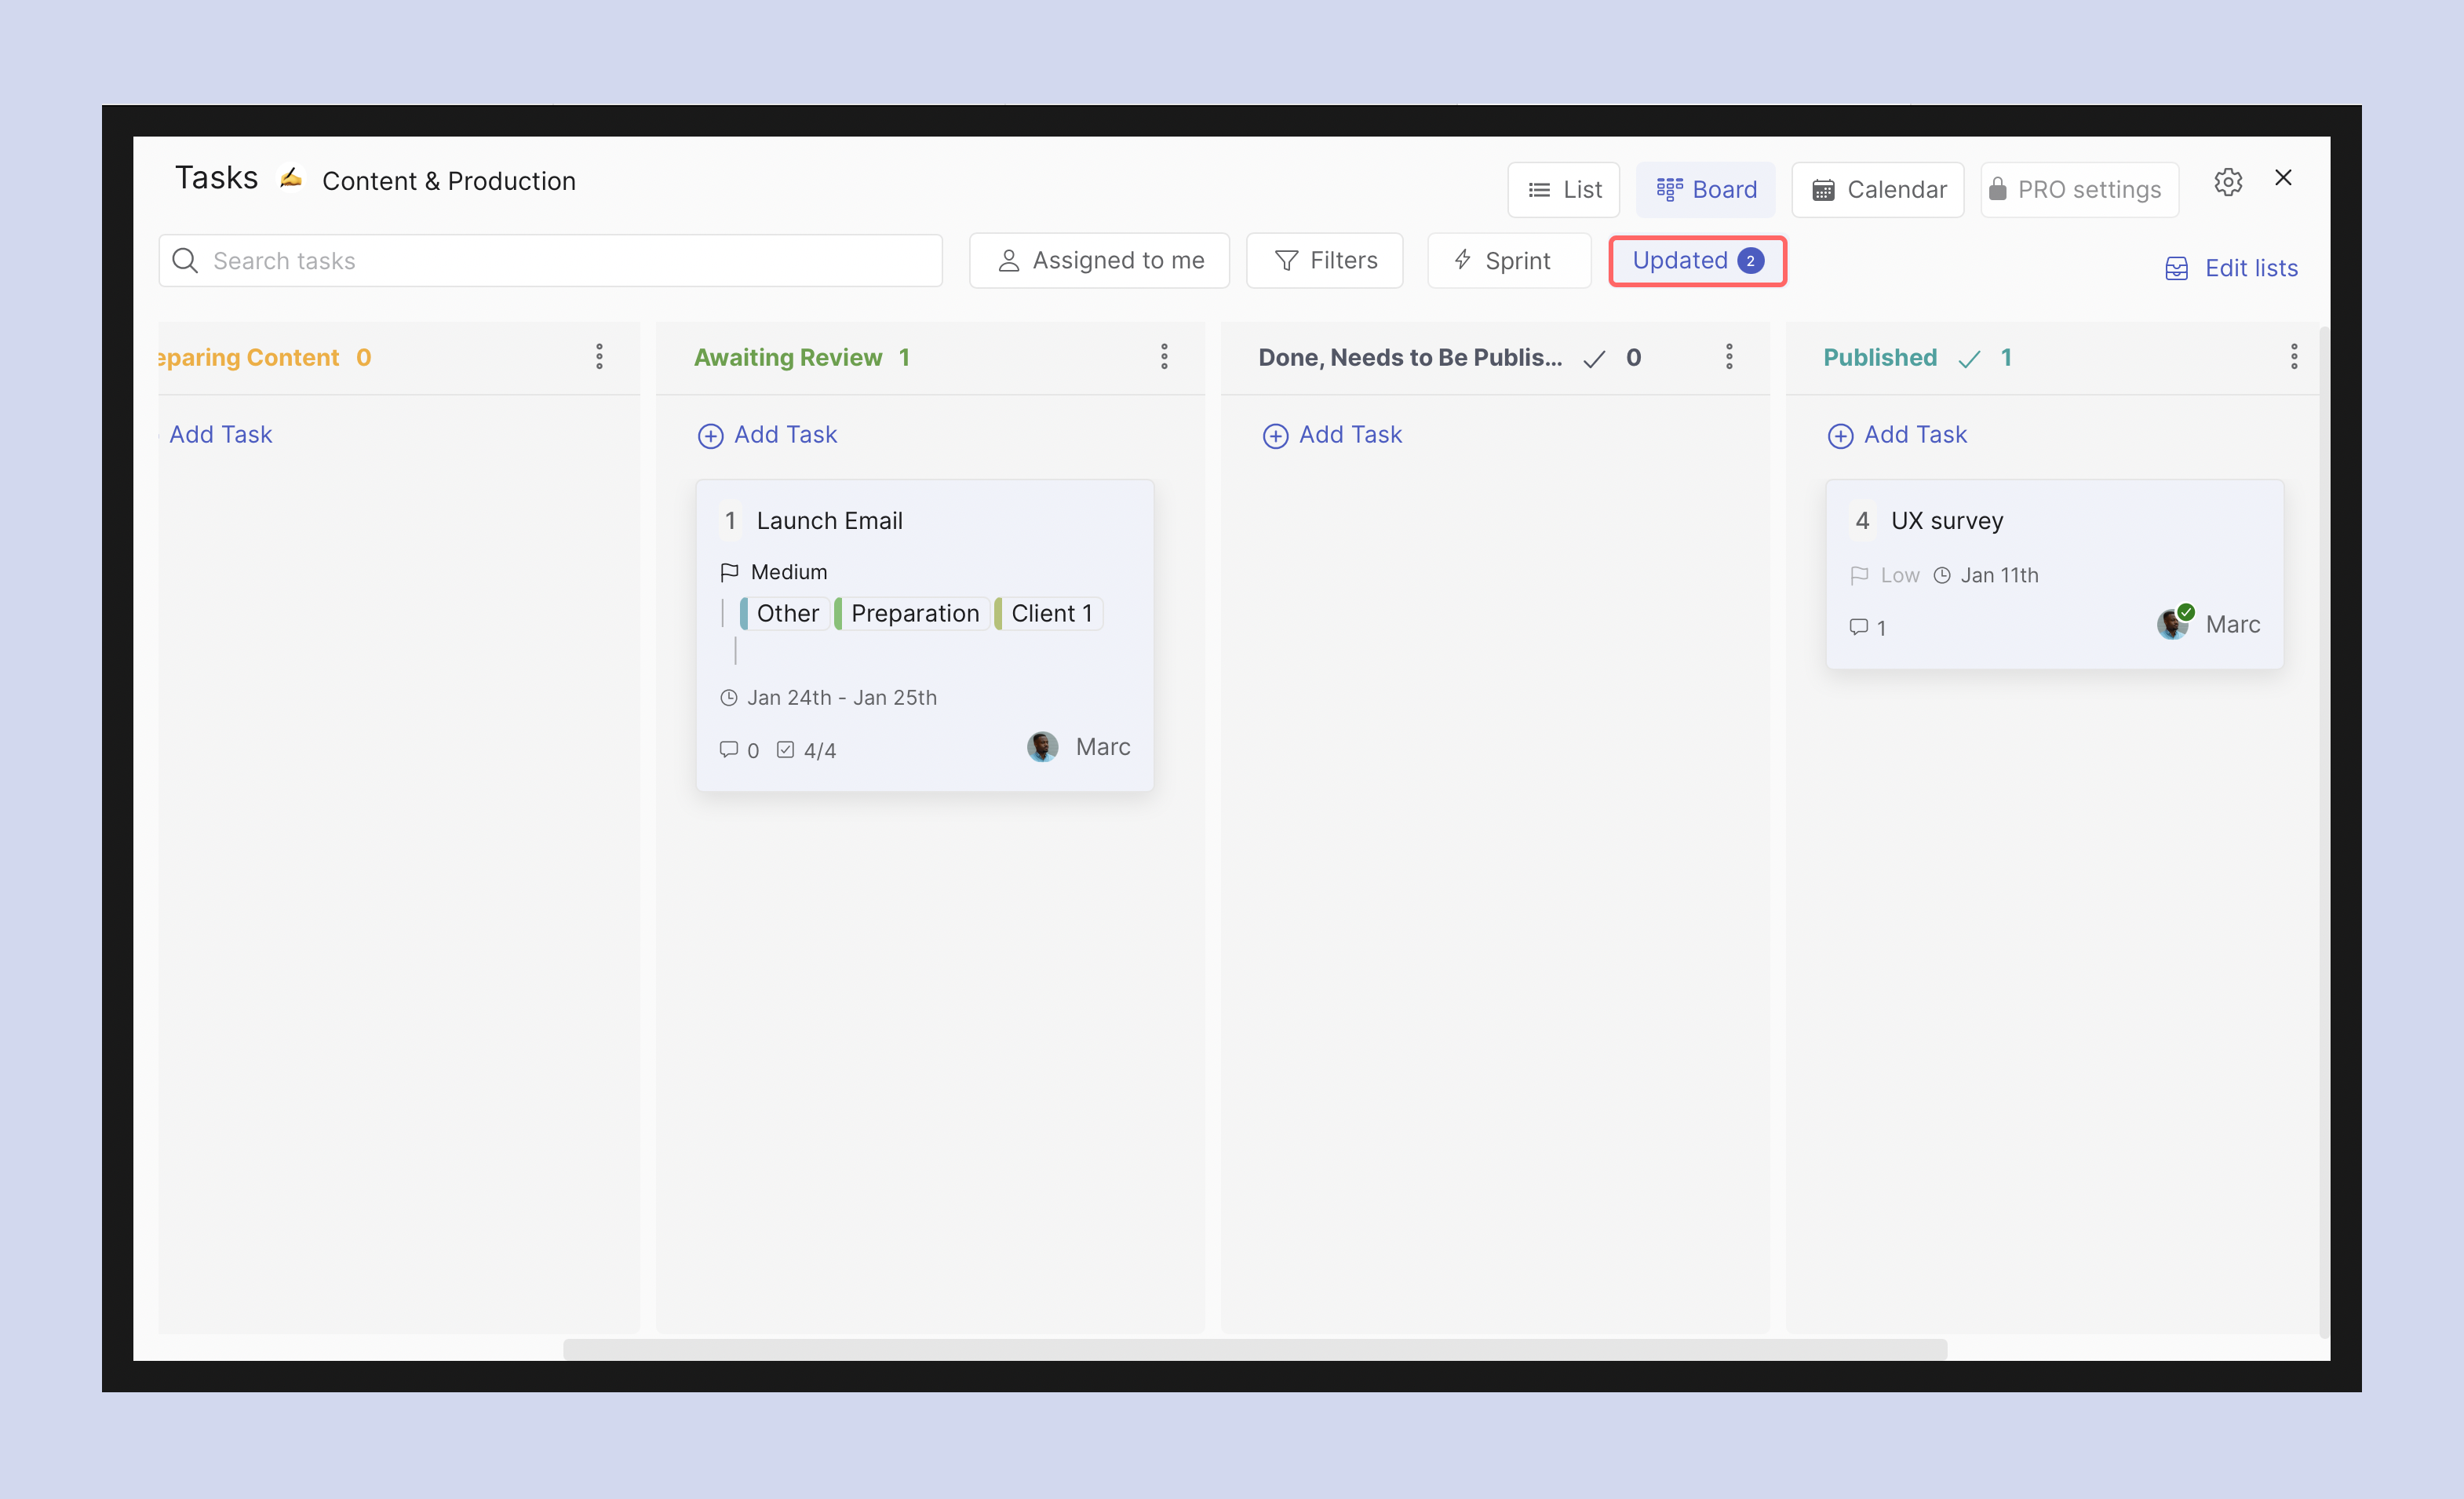
The management dashboard summarizes and displays tasks across PRO spaces. Full functionality is available for paid users. Free users face some limitations in terms of the tasks available and the spaces they can view.
Users should switch to the Unlimited plan to unlock all the functionality within the dashboard.
How to access the management dashboard
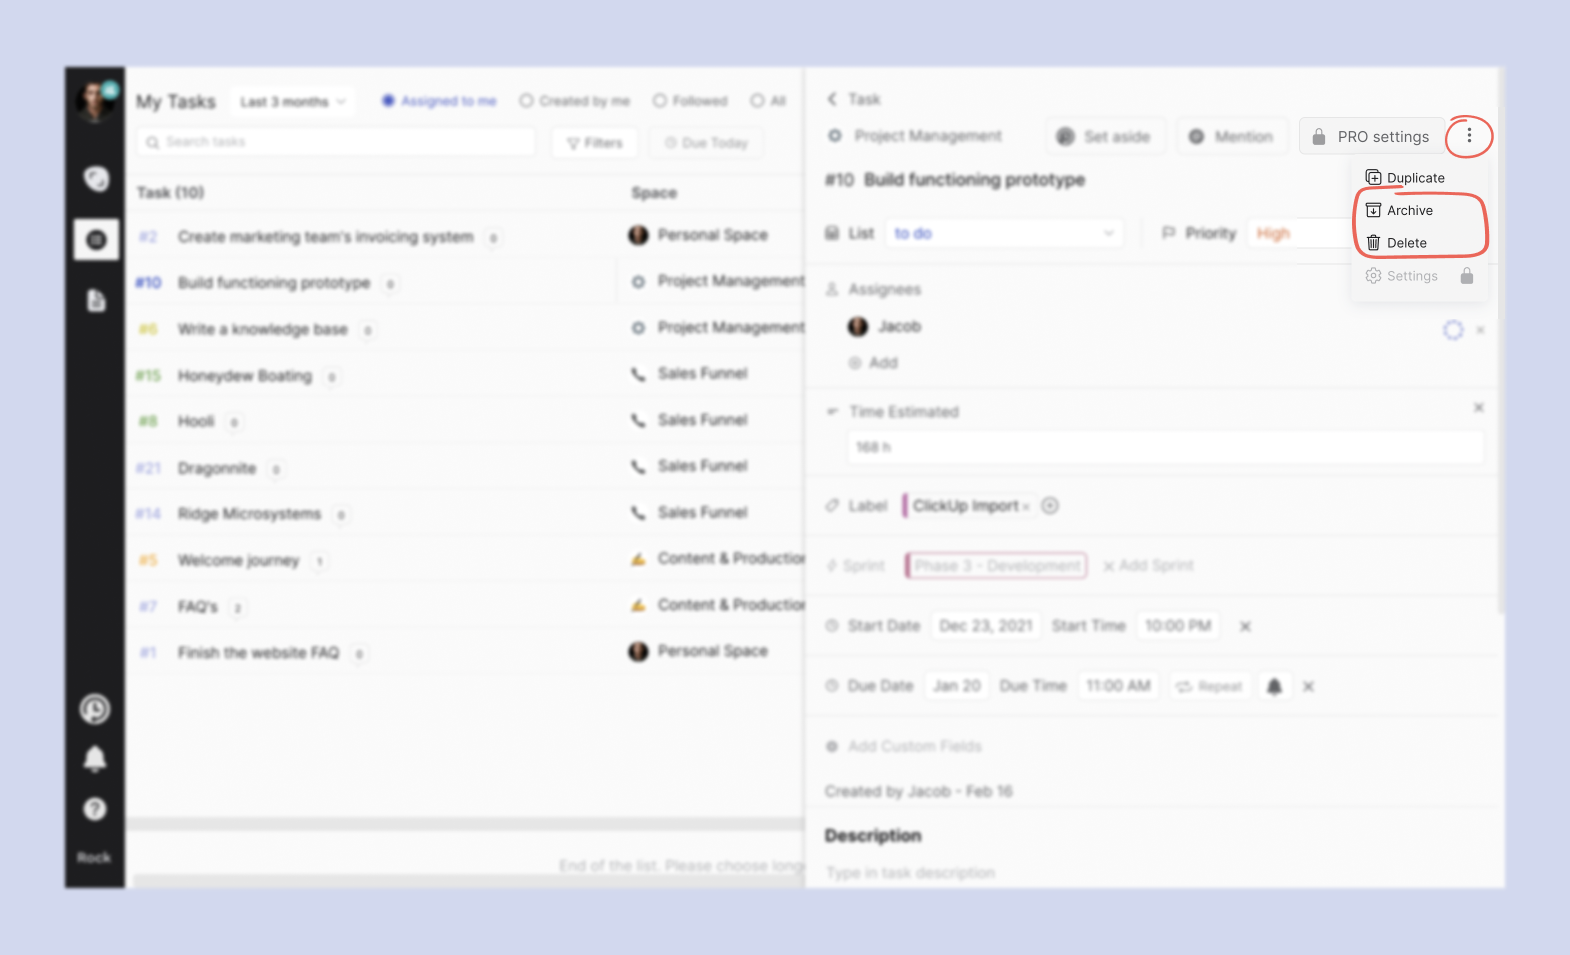
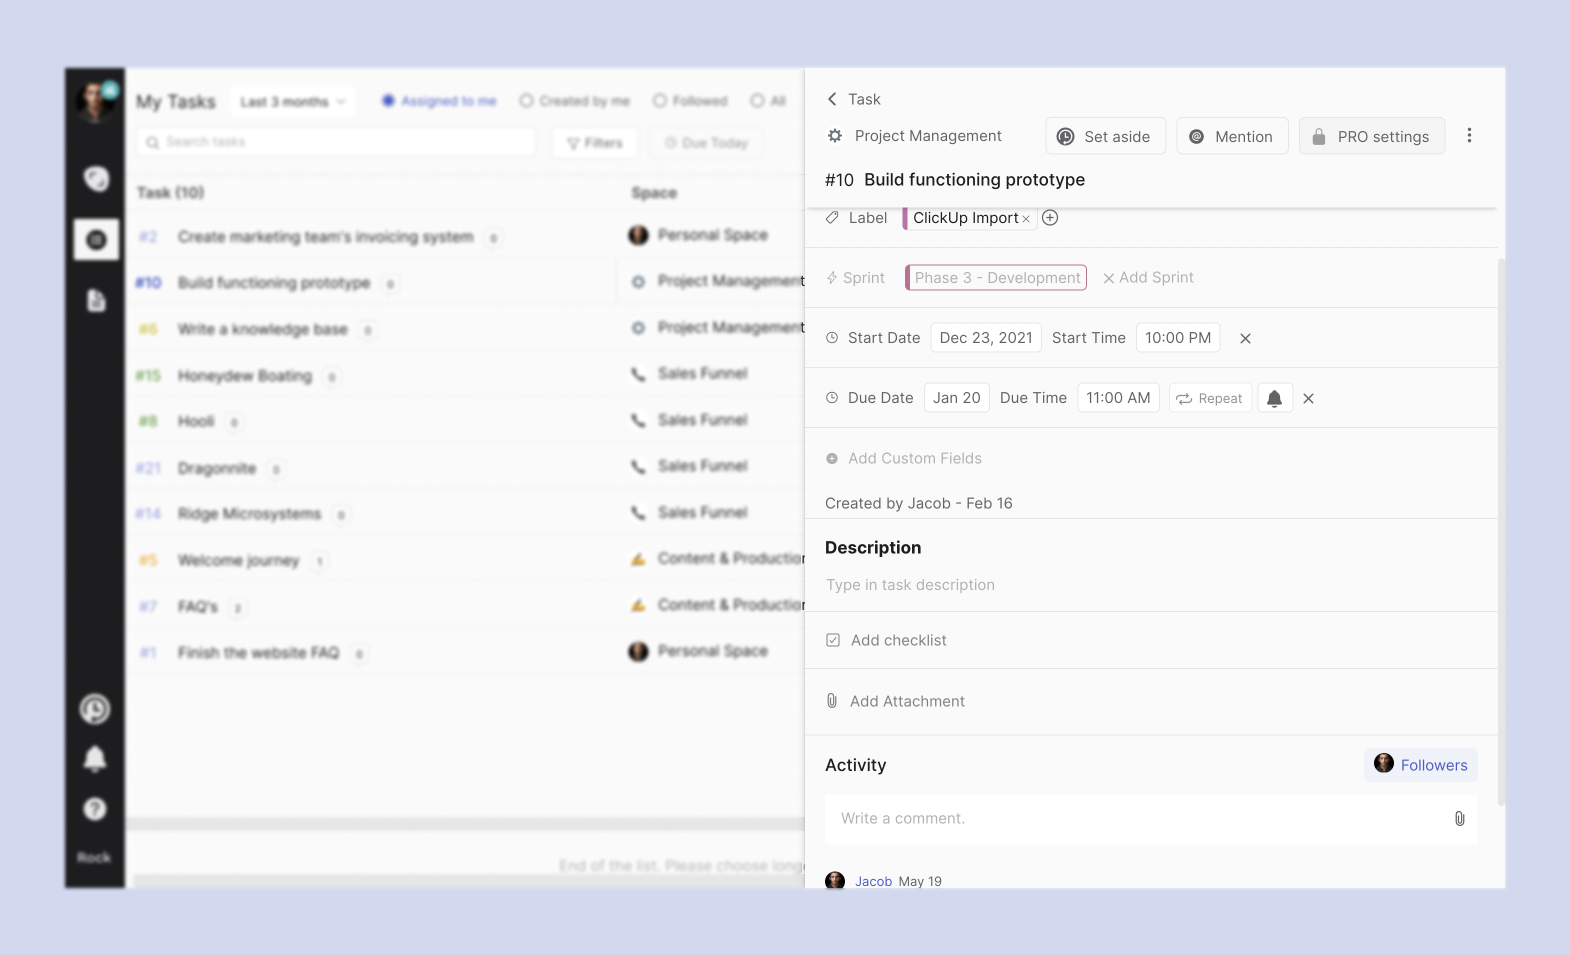
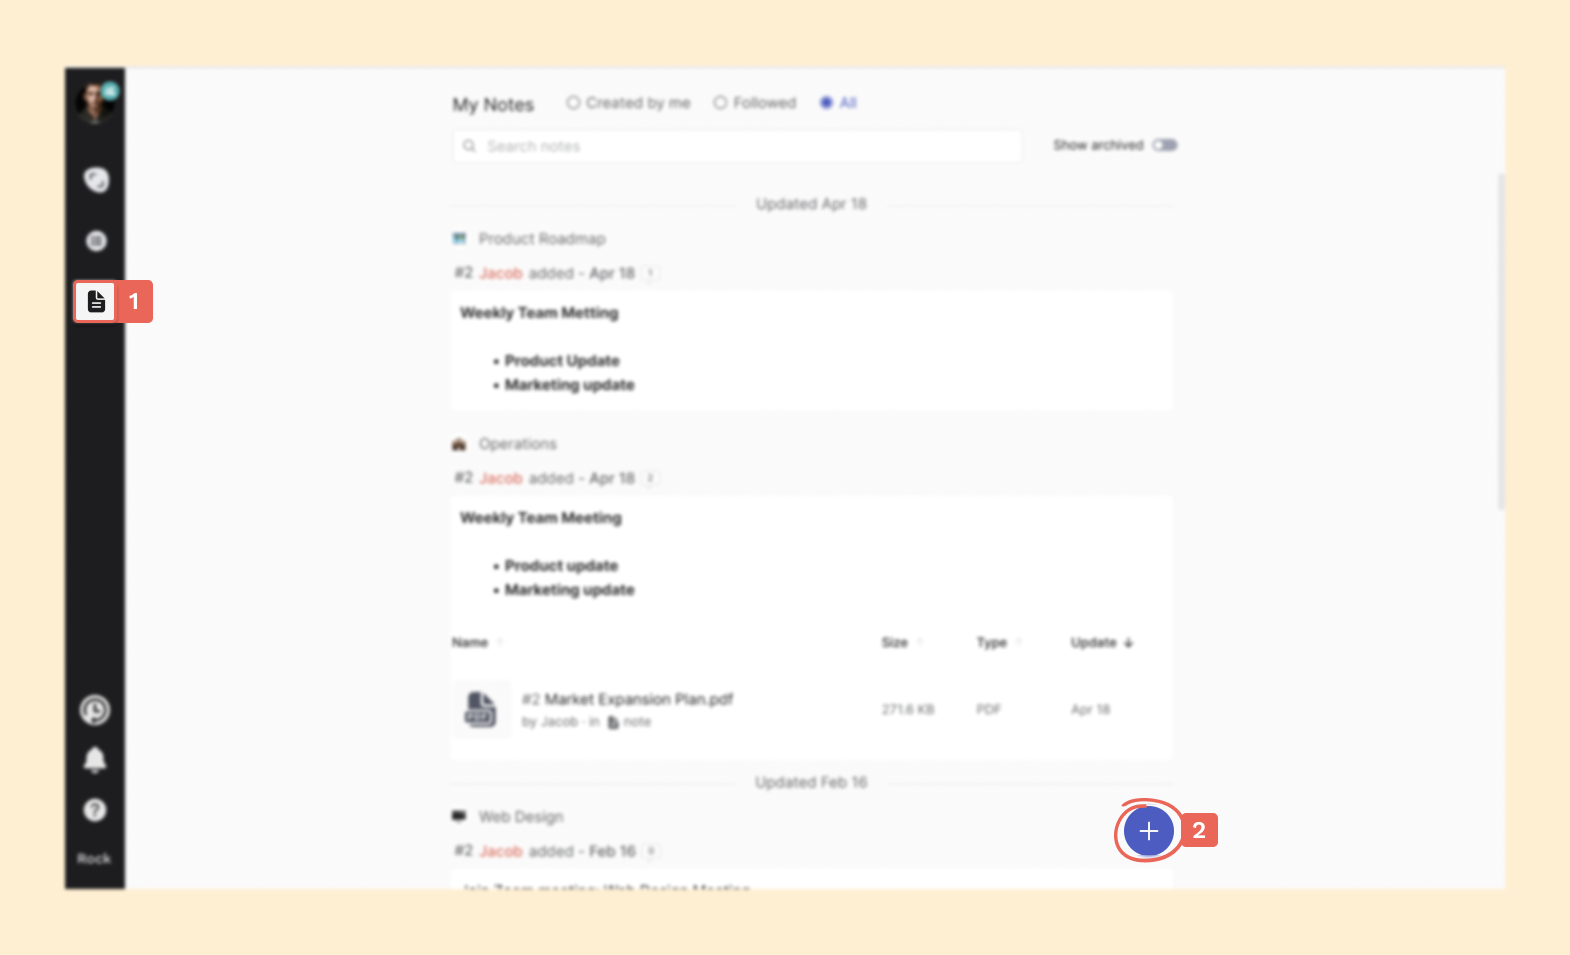
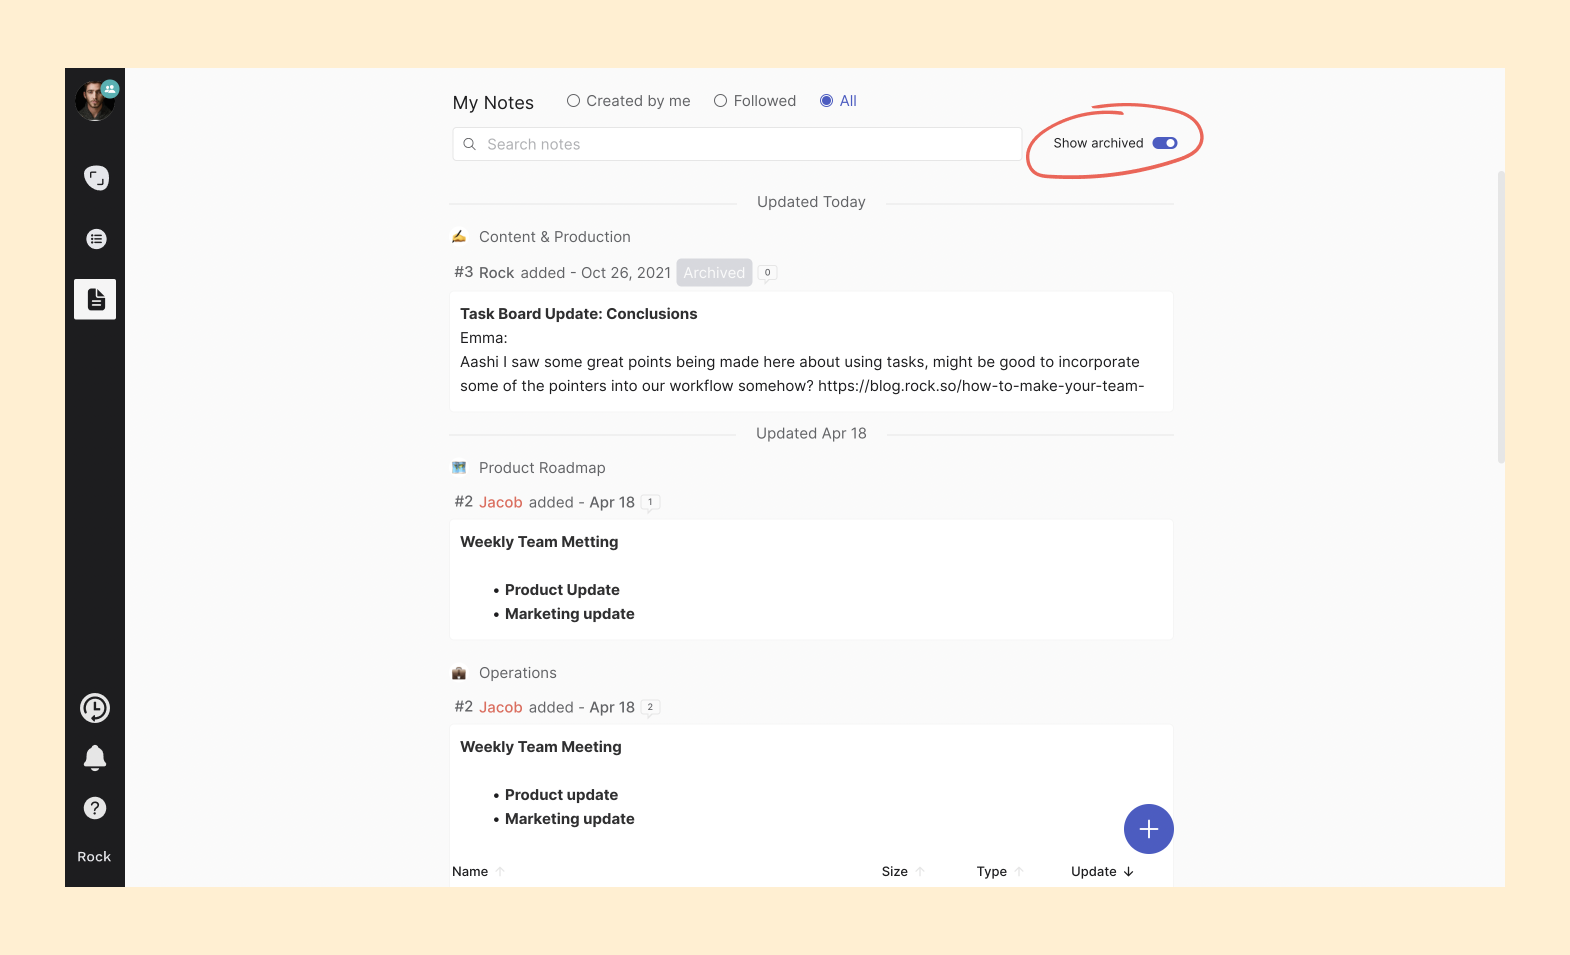
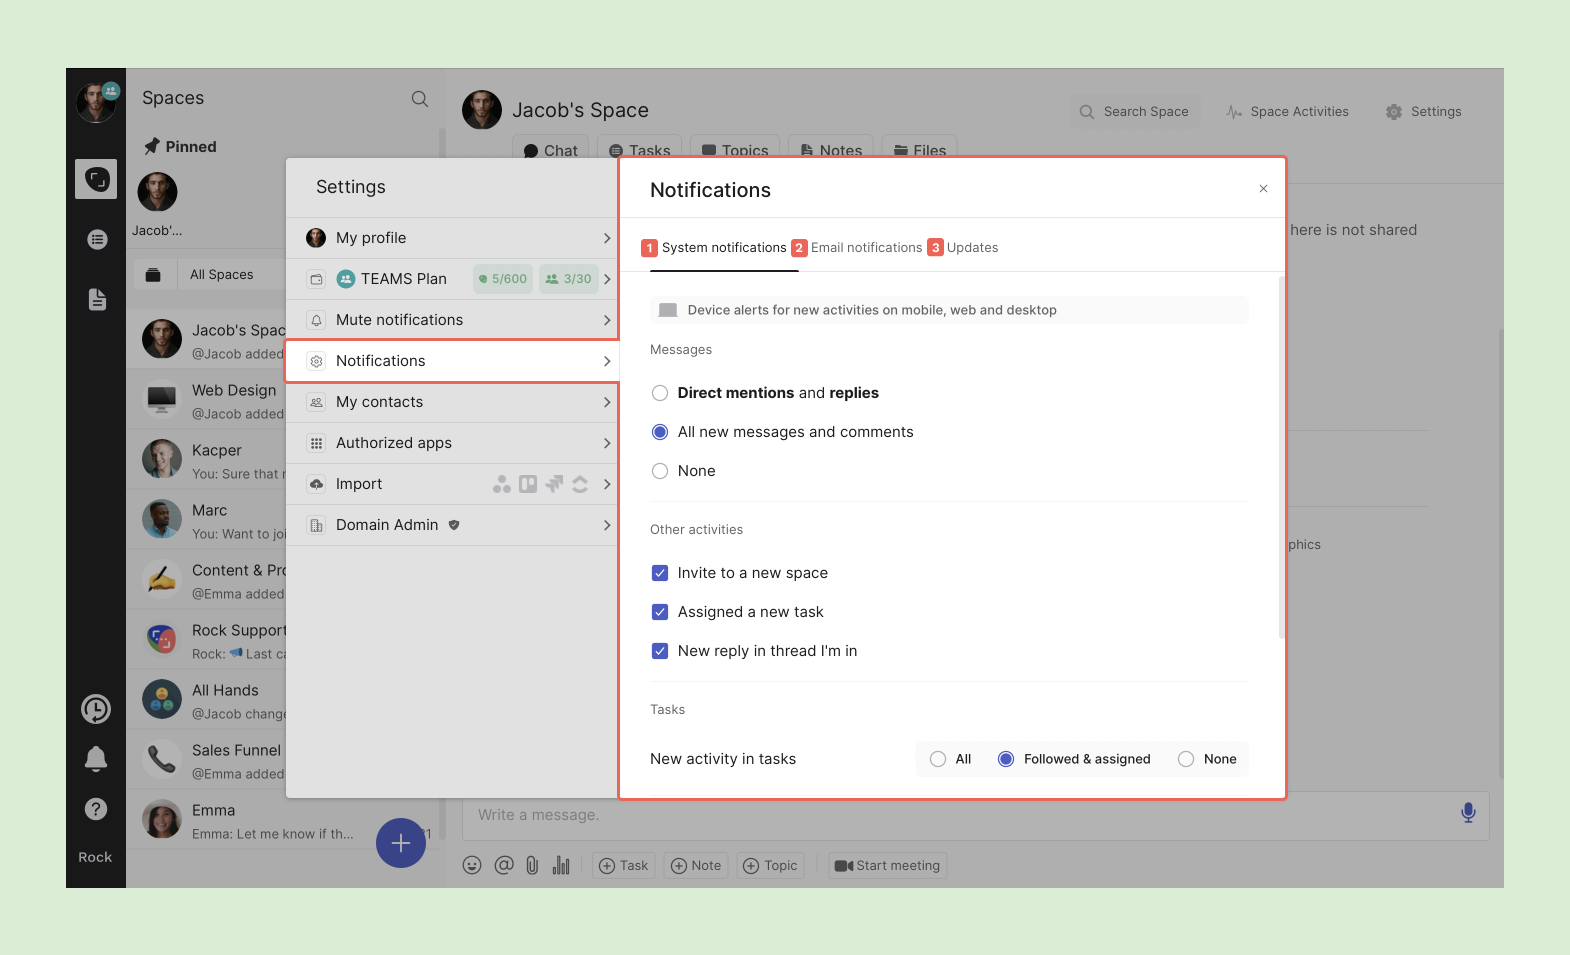
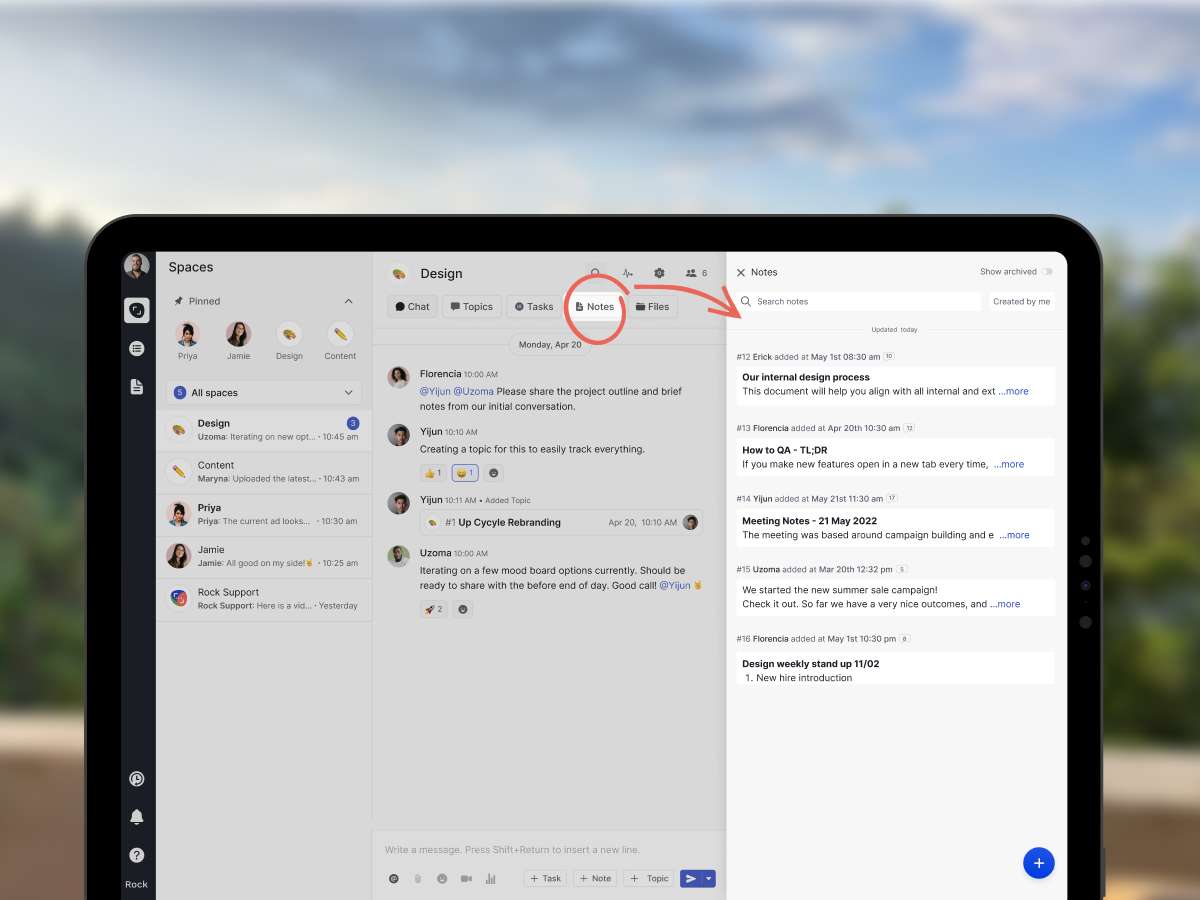
You can access the management dashboard by clicking on the dashboard icon in the left side panel, under ‘My Notes’.
The management dashboard is accessible to purchasers, admins and managers under the Unlimited plan. It is also available to free users that have been added to one or more PRO spaces.
You will also be able to access the dashboard if you have upgraded to Unlimited Starter under the credit program and changed 1 or more spaces to PRO.
📝 Note: Free users only see their own tasks on the dashboard (assigned, created & followed)The management dashboard summarizes tasks across two views: task board & summary.
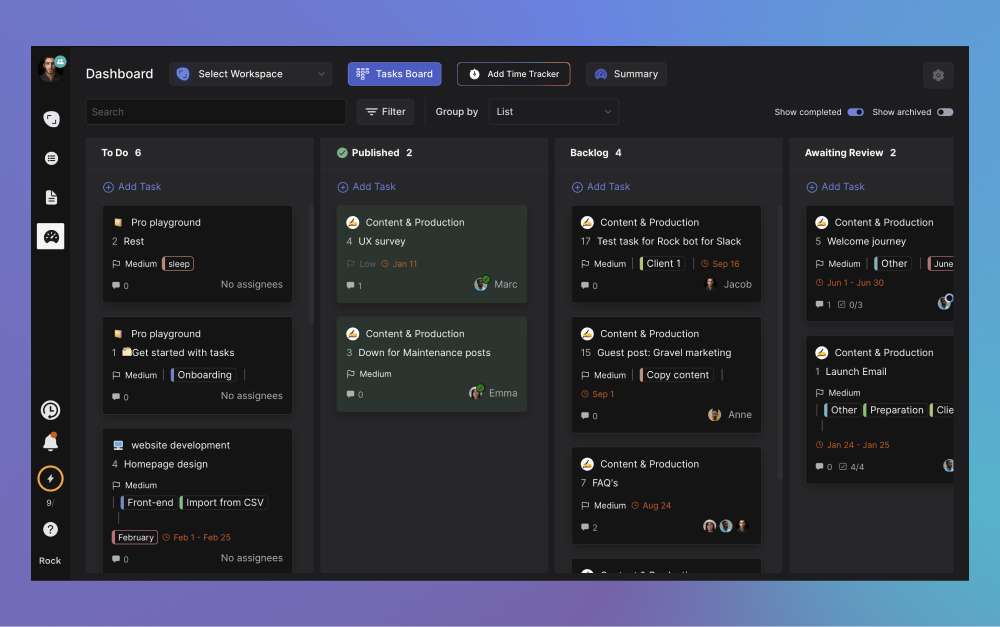
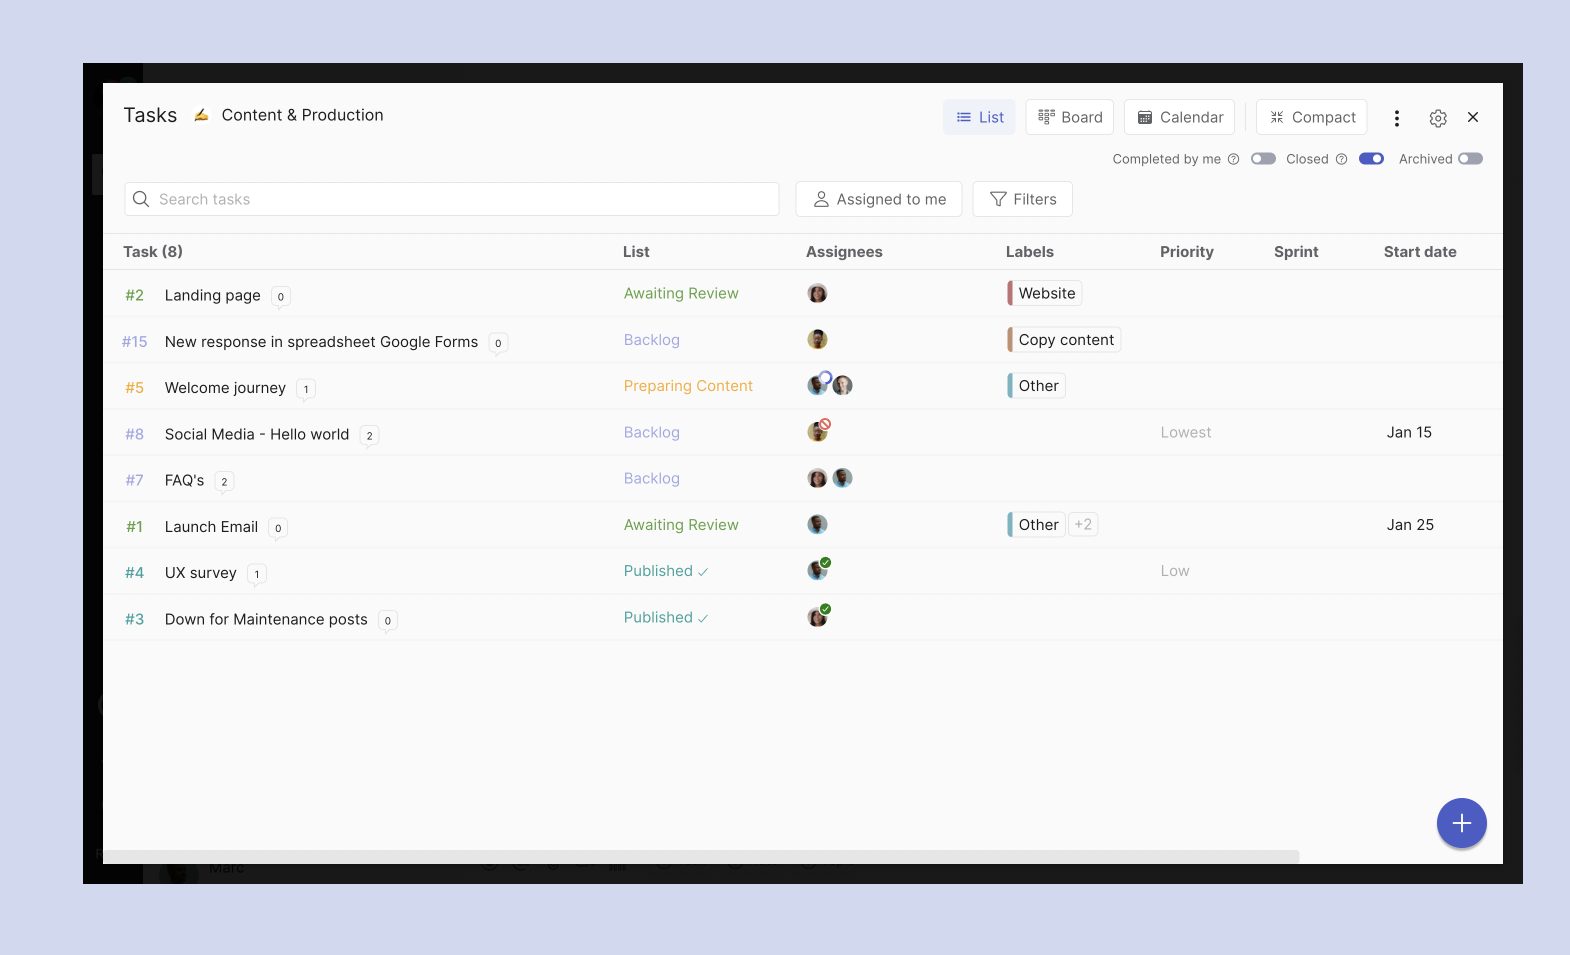
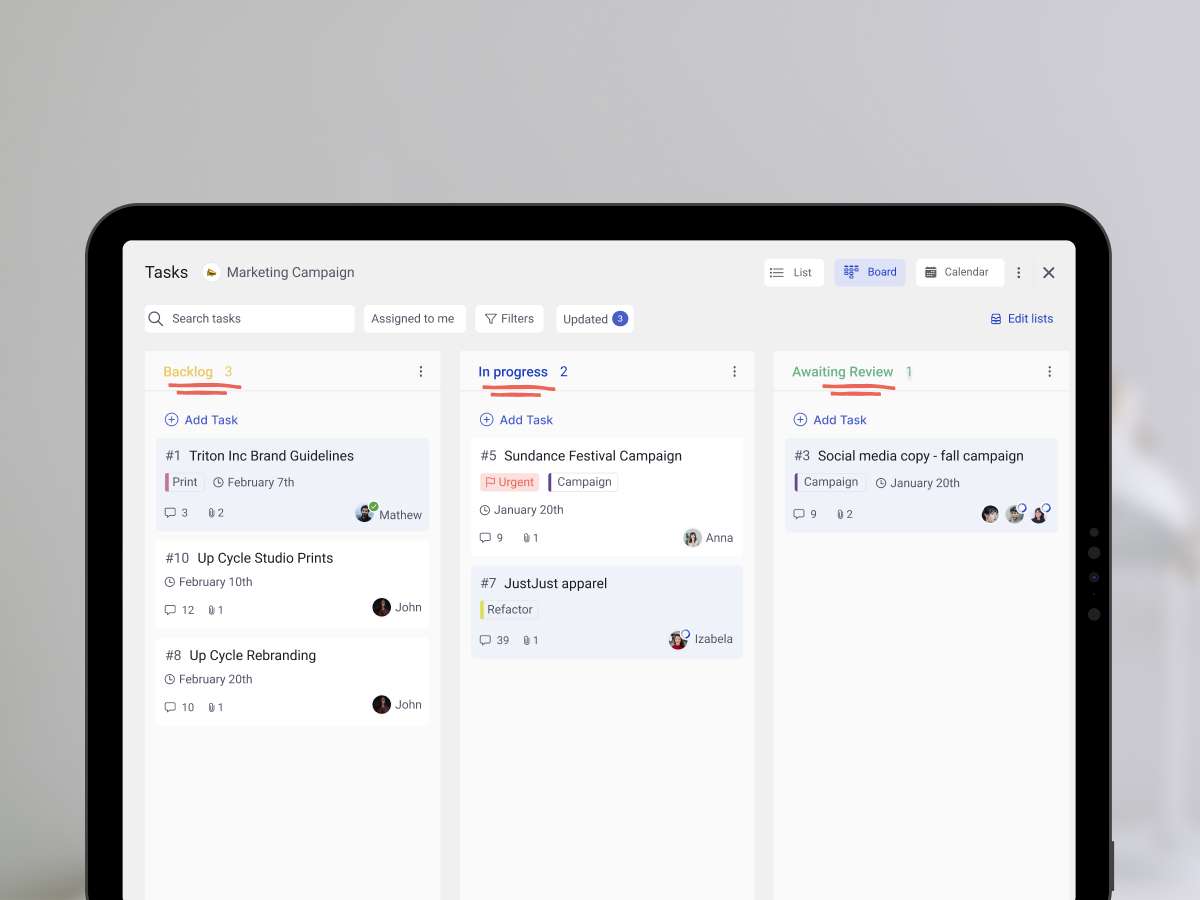
Task board view: This dashboard organizes tasks from different spaces in lists with advanced filtering options. The task board gives a great overview of tasks across PRO spaces.
Summary view: Quickly access a summary of newly started tasks, those that are not moving, recently finished work and time-tracked tasks.
Task board view
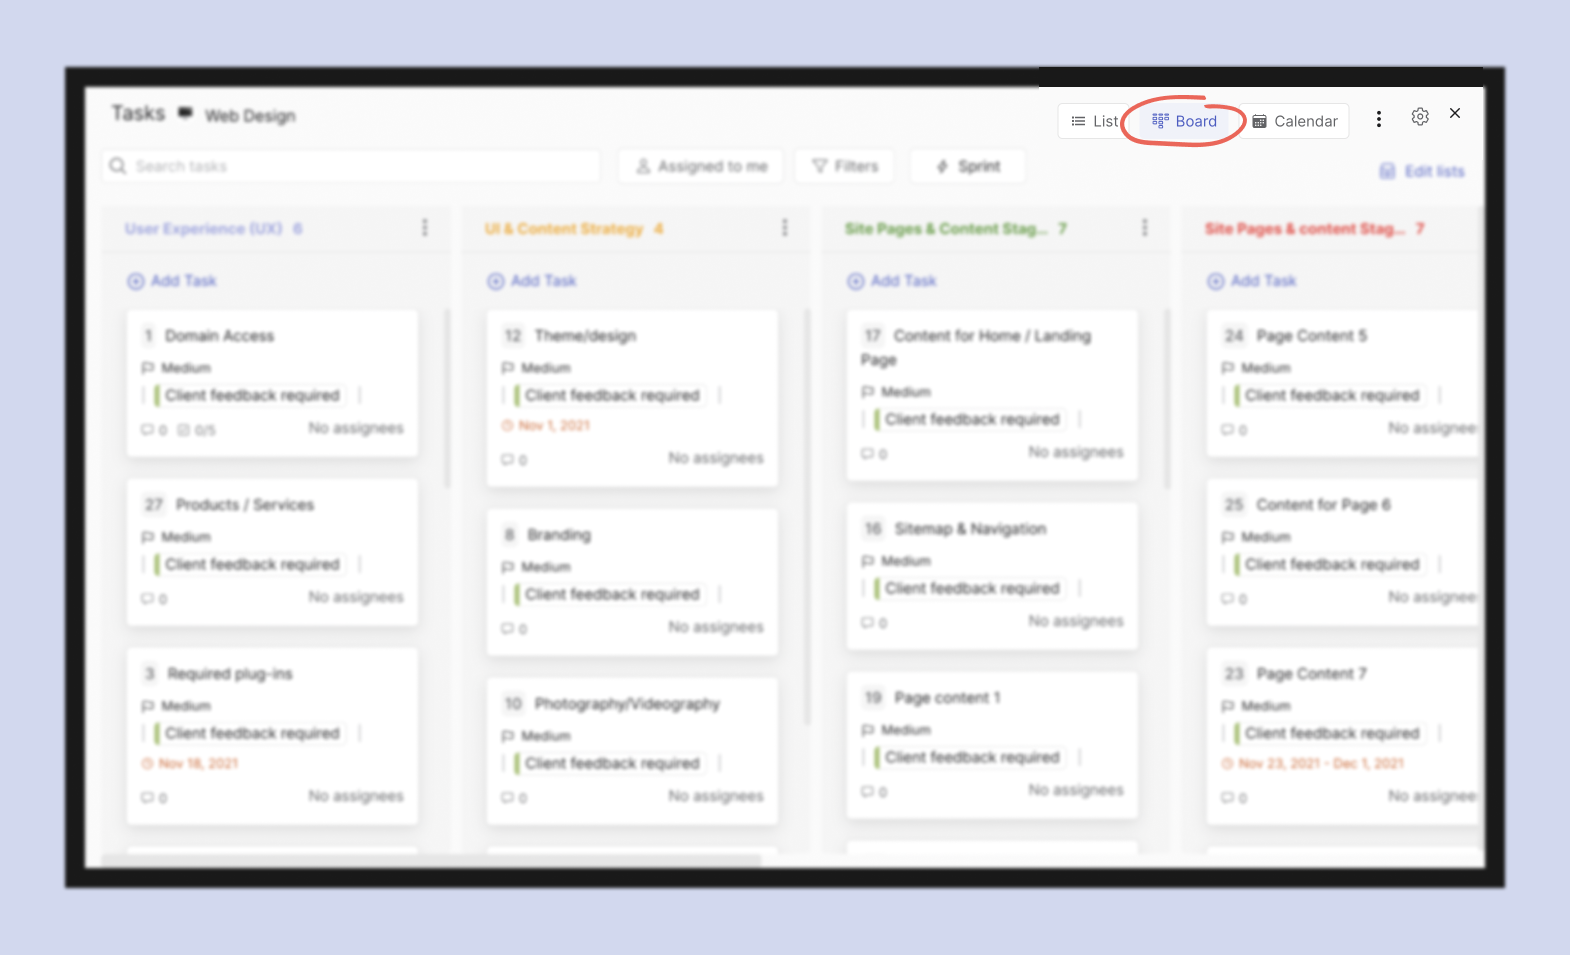
The view of tasks in this panel is comparable to board view in different spaces. You can change how the lists are organized, apply advanced filters and toggle for completed and archived tasks if needed.
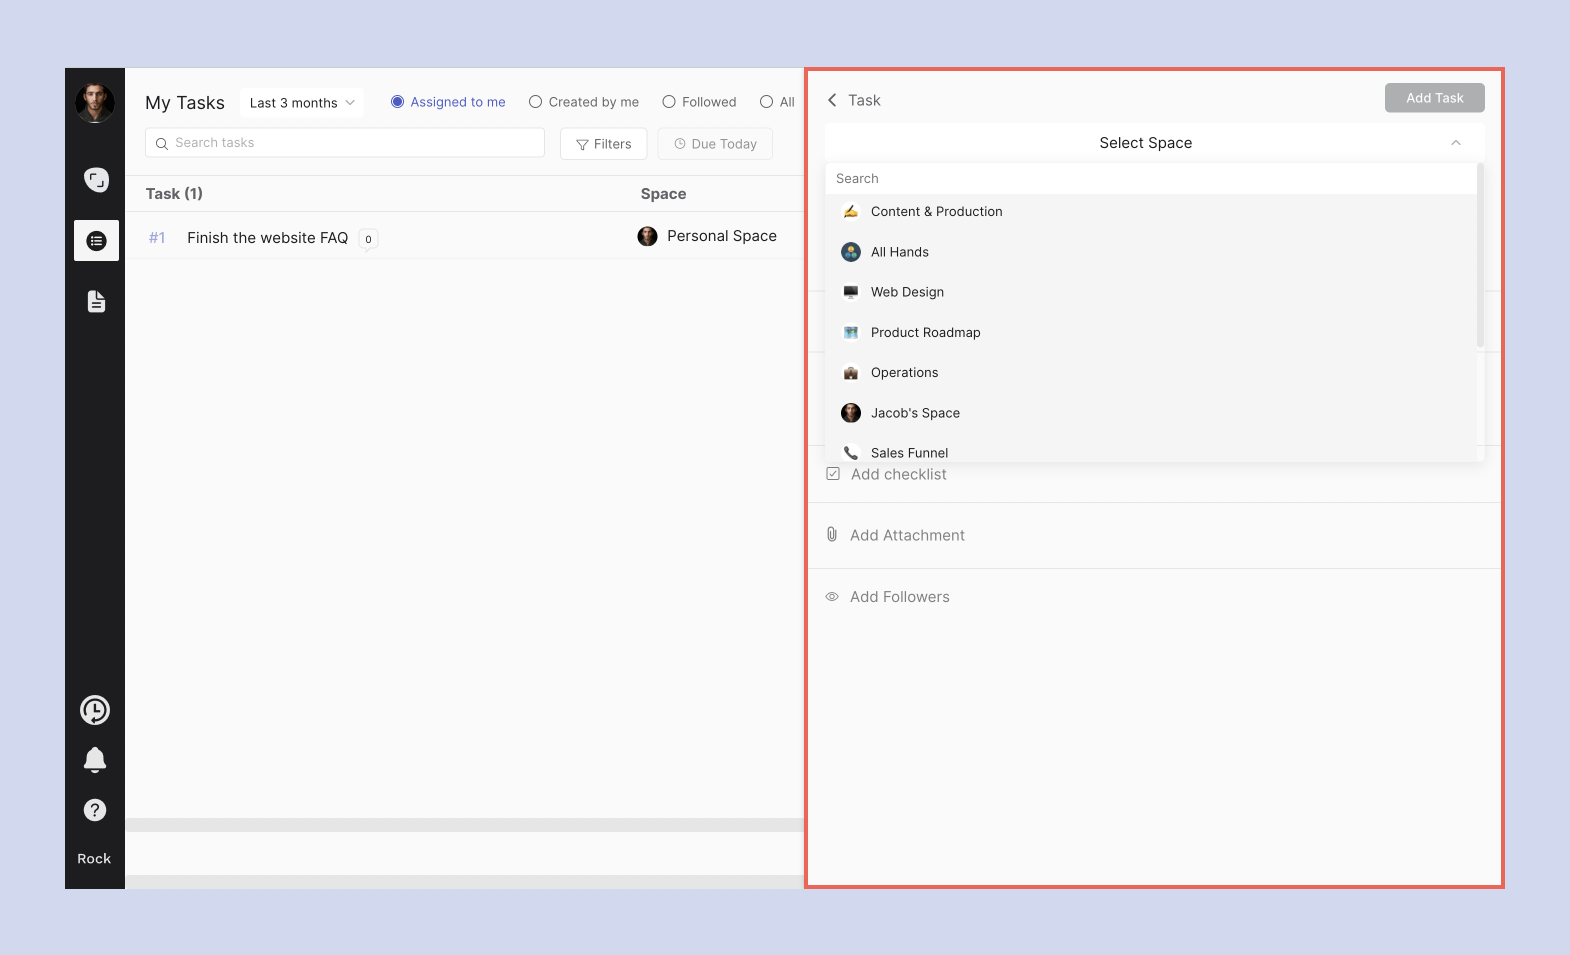
Selecting spaces
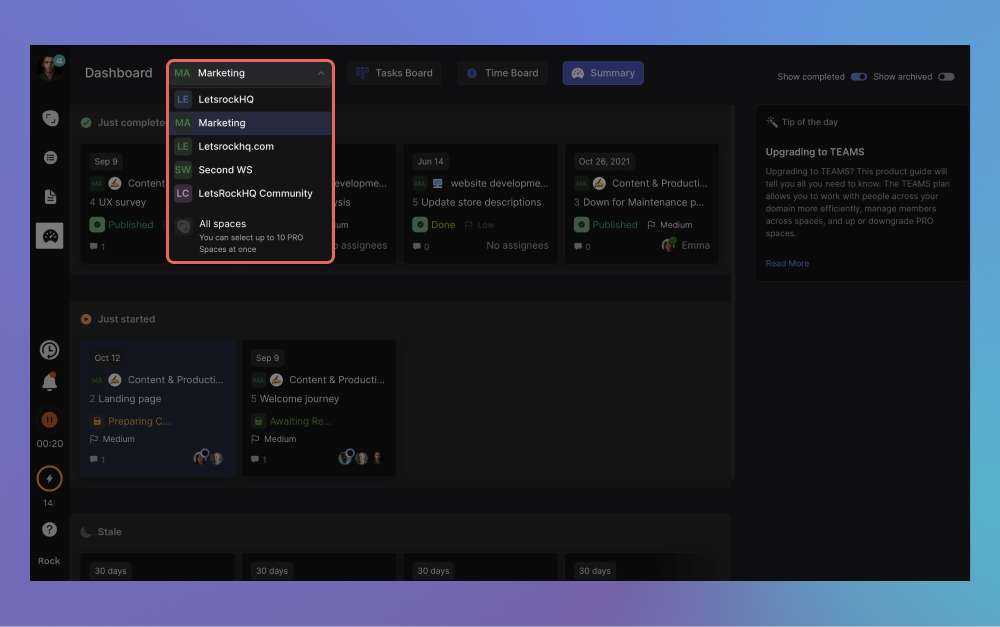
The panel currently holds up to 10 different PRO spaces at the same time when chosen manually. You can switch between workspaces to view more spaces at once by selecting the toggle in the top of the view.
Press ‘select workspace’ in the top of the dashboard and choose the workspace you want to see on the management dashboard. Selecting a workspace will display all PRO spaces that were added into it, even past the initial 10 limit from the manual selection.
📝 Note: Free users cannot select Workspaces to display tasks. Users can only display spaces through the individual selection functionality explained below which accommodates, up to 10 spaces.
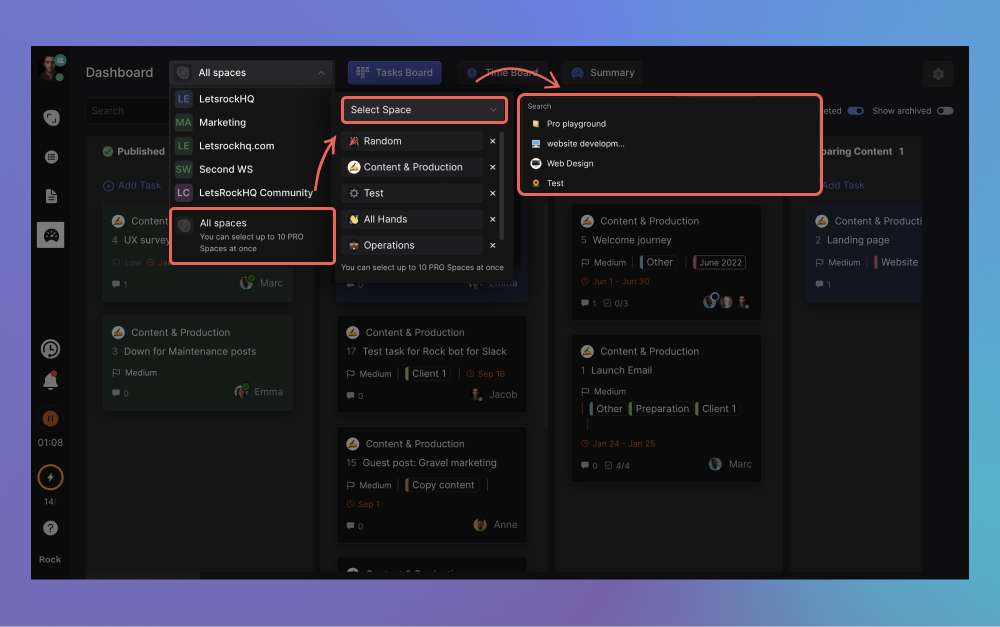
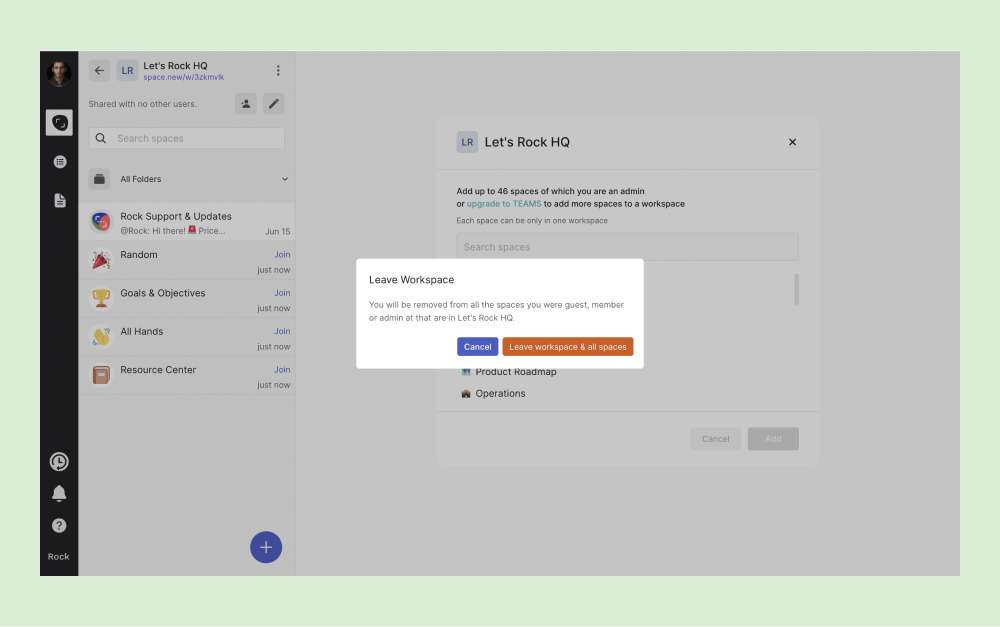
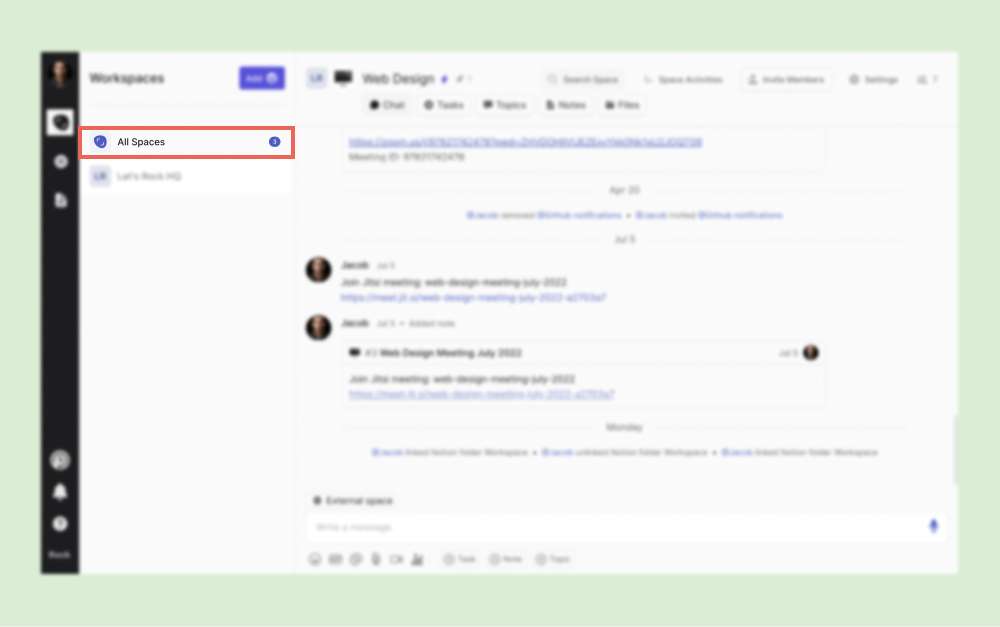
Besides workspaces, spaces can also be chosen through manual selection. Pick up to 10 PRO spaces across workspaces or outside of workspaces to add to the panel. Select ‘all spaces’ in the bottom of the panel and add the spaces you want to visualize.
You can also select fewer than 10 spaces and remove individual spaces to reduce the number of tasks you are looking at. Individually remove spaces by pressing the small x next to their name.
You can then add new spaces into the view by searching for your desired space in the select space panel.
Group by functionality
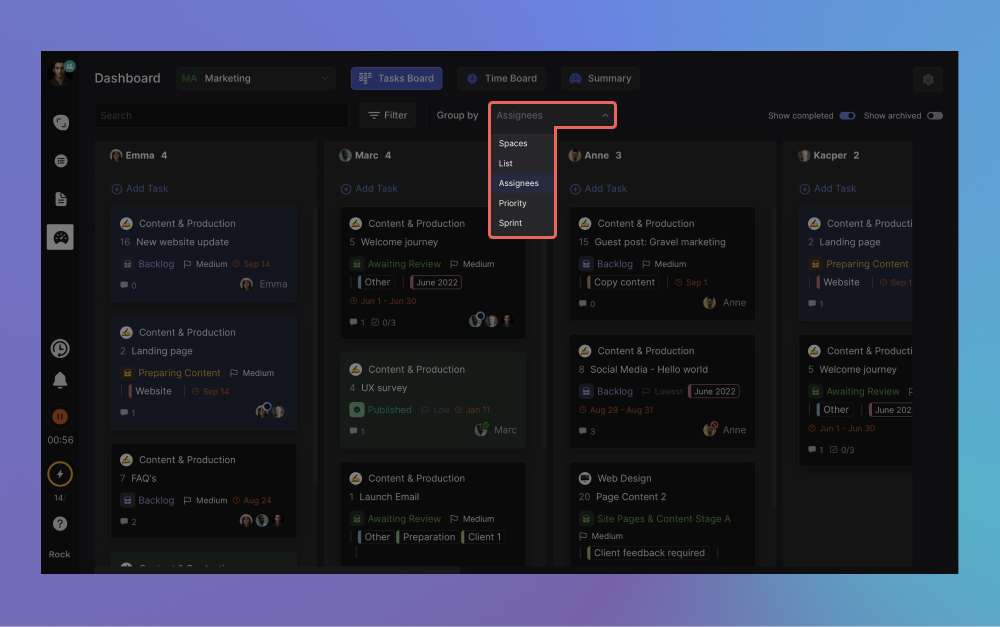
The main view can be grouped based on 5 different categories. Depending on the option you choose, lists will be configured in different ways. Currently, the available group by functionality allows you to organize tasks by:
Spaces: Tasks will be grouped by the selected PRO spaces.
List: Individually display all lists from selected PRO spaces.
Assignees: Organize the lists by assignees. Tasks will show across multiple lists if there are tasks that were assigned to two or more people.
Priority: This option will organize tasks based on the 5 categories in the ‘priority’ field.
Sprint: Display lists by sprints that have been created across your different spaces.
You can change the group by configuration by clicking on the dropdown menu. Next, select the group by category you want to use.
Available filters in the management dashboard
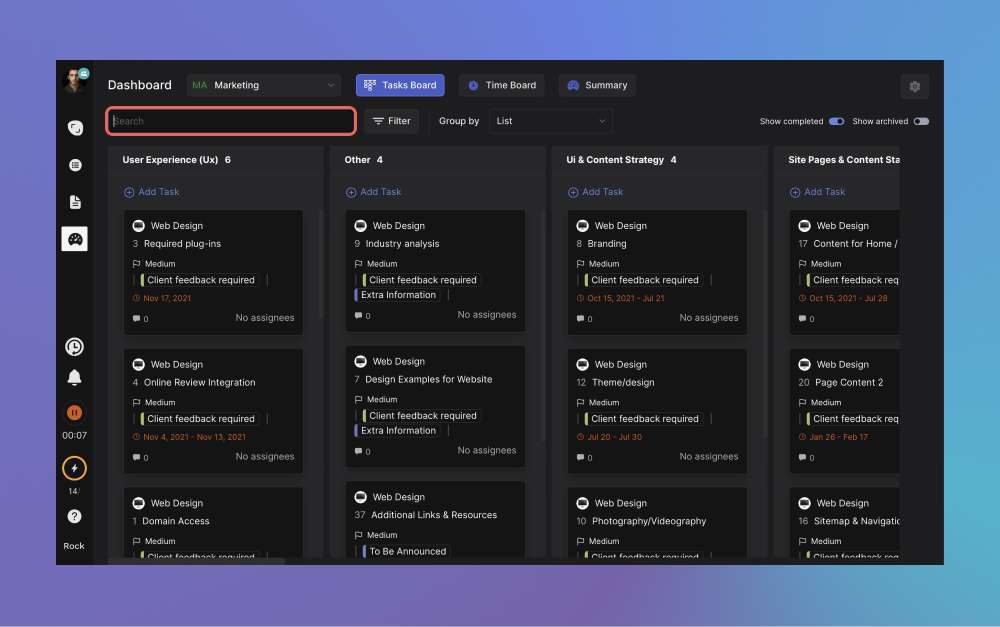
There are a variety of filtering options on the management task board: search bar, advanced filtering and task visibility toggles.
You can use the search bar to query for information based on words that are in the task title or description within that task. it just filters out tasks with results not matching the search word, and ranks queries with the term by most recently updated.
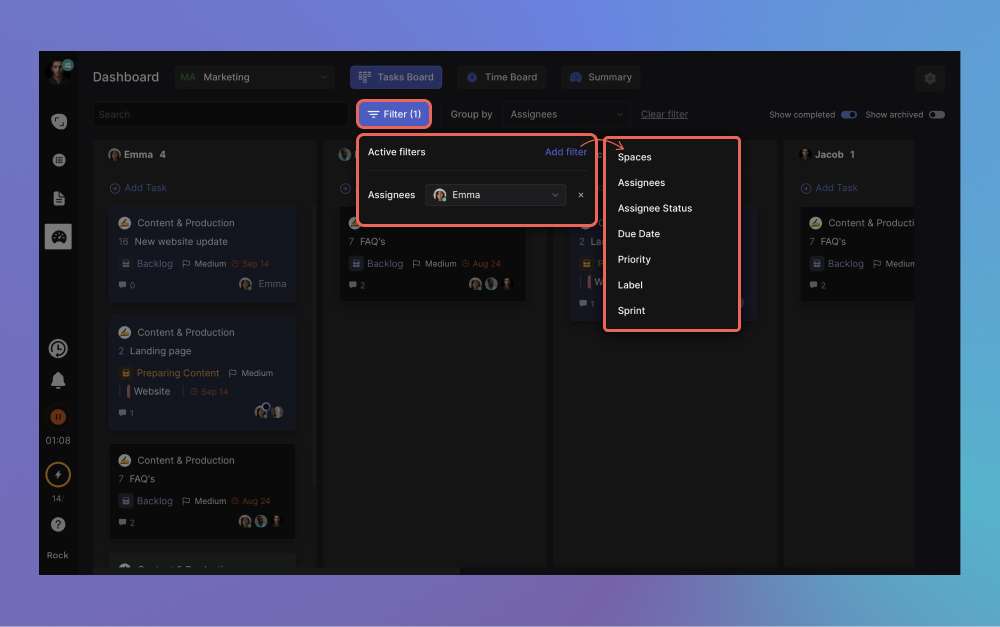
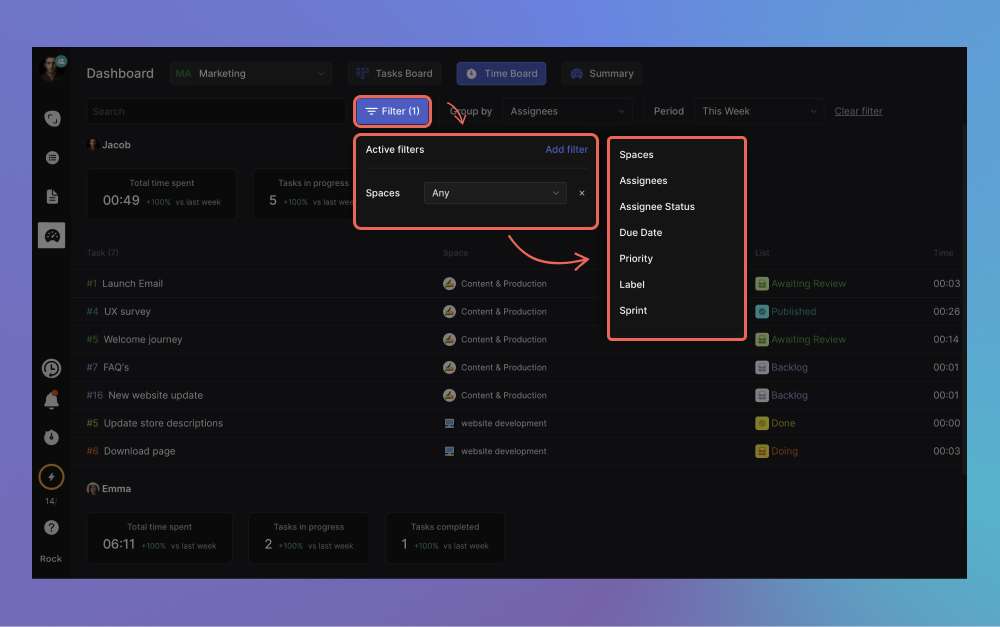
There is also an advanced filtering option available in the management dashboard. Press ‘Filter’ to access the functionality. If you don’t have any filters applied yet, then press ‘add filter’ in the right corner to add your first filter.
The functionality currently allows you to filter the management dashboard view with the following fields:
Spaces
Assignees
Assignee status
Due date
Priority
Label
Sprint
If you have manually selected spaces from All spaces, there is also "Workspace" filter option.
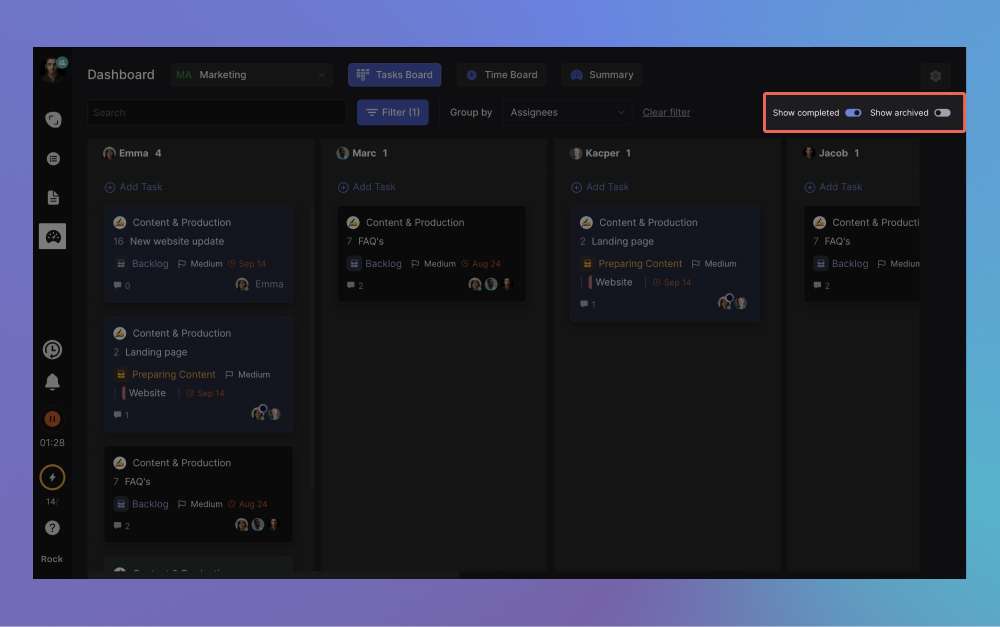
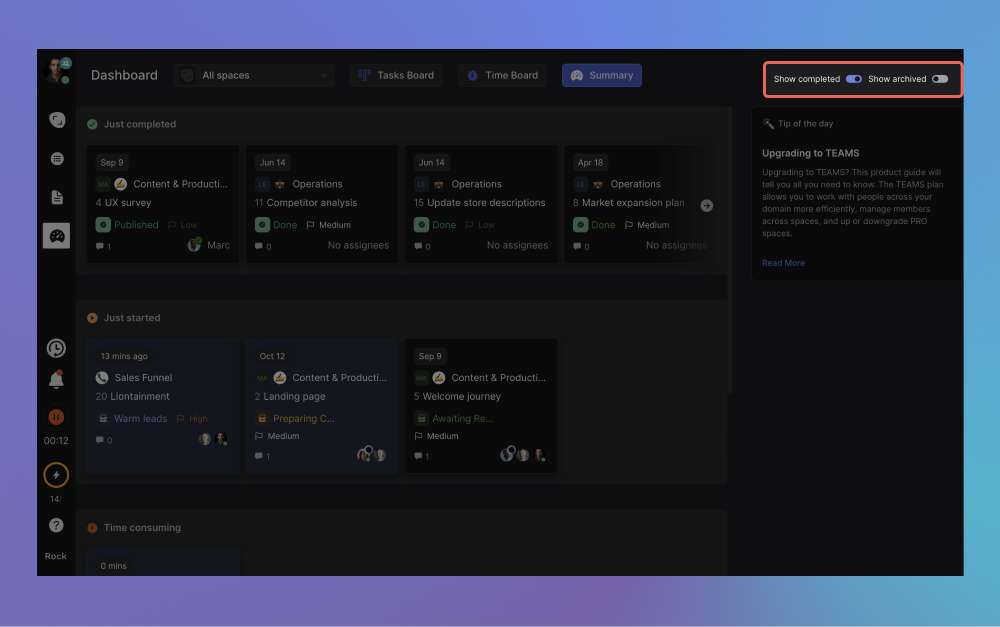
There are also two task toggles in the top right corner of the view: show completed and show archived.
Show completed: disabling this will remove all tasks that are currently under a list that has been configured with a checkmark.
Show archived: You can toggle whether you want archived tasks to be viewed from the task board or not.
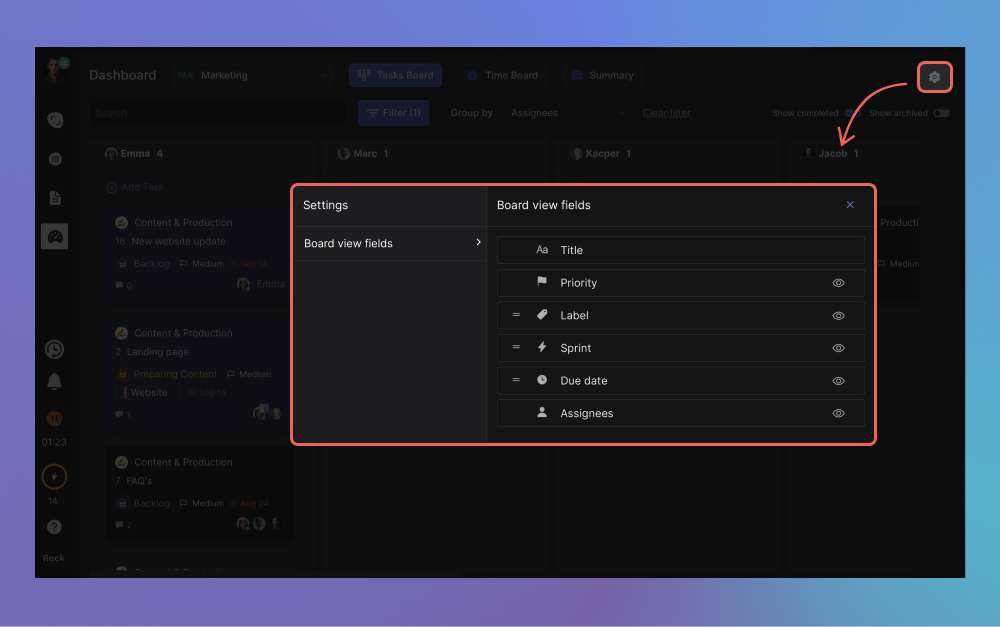
Hide & rearrange task fields
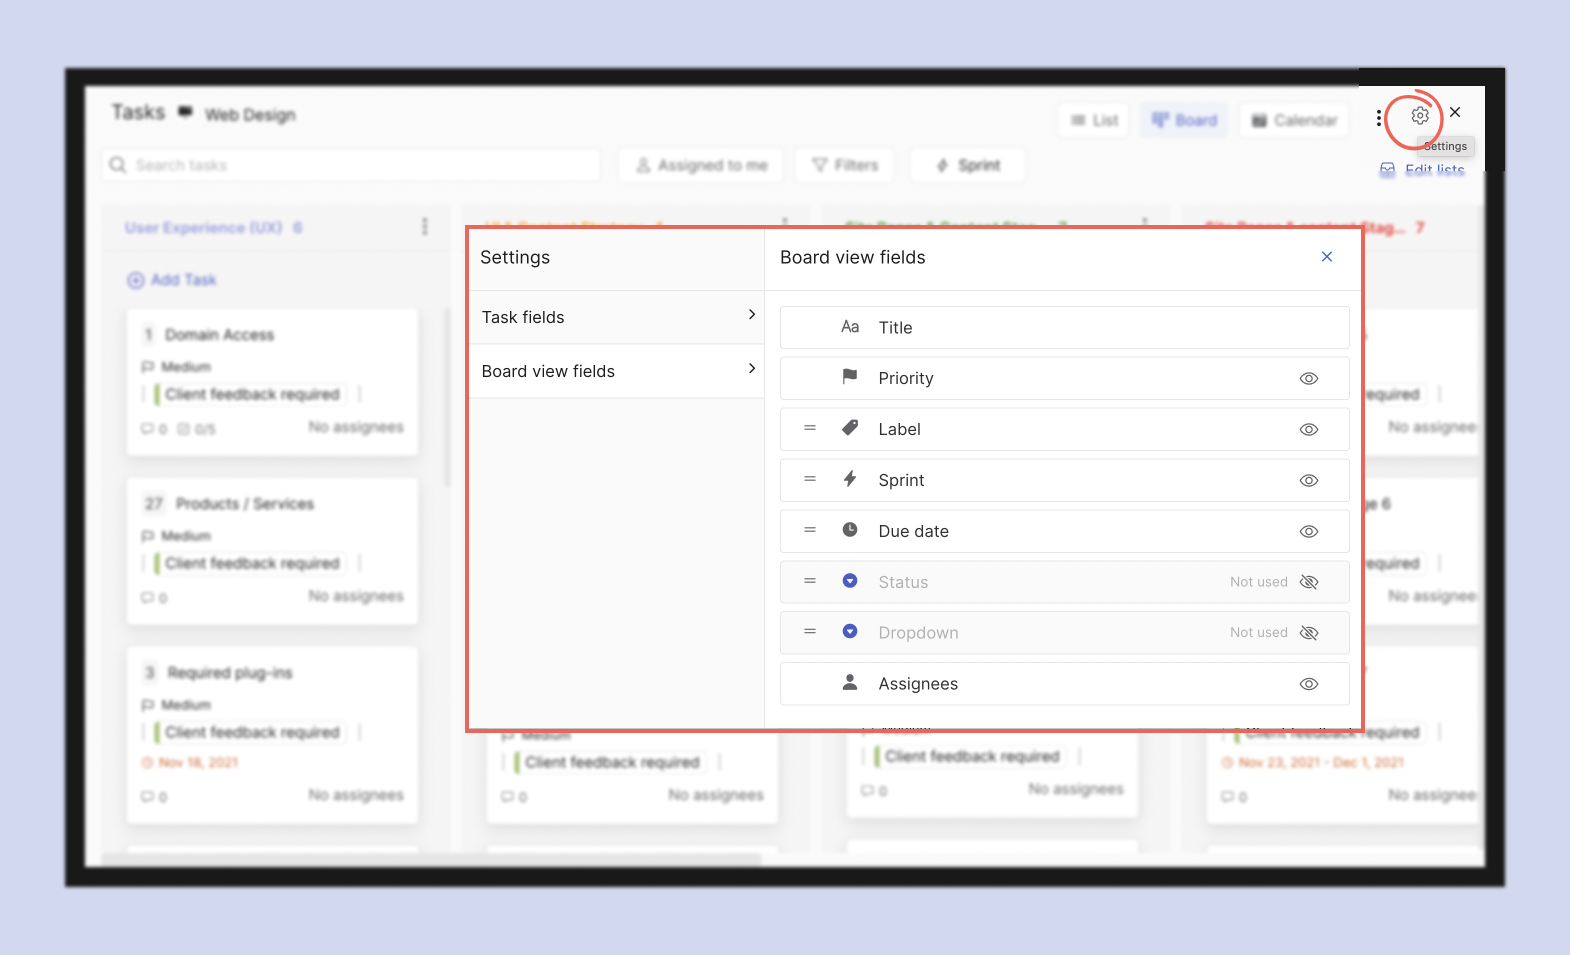
Hide or rearrange task fields from the view to simplify task information in the view. To access this functionality, press the gear icon in the top right corner of the management dashboard view:
Rearranging: Change the display order of the different fields. This is currently only available for labels, sprints and due dates. To rearrange, press the three lines and move the fields to your desired location.
Hiding: Press the eye icon to hide fields from the tasks in the management dashboard. You can currently hide: priority, label, sprint, due date & assignees. Press the icon again to make the icon reappear.
Rearranging or hiding fields does not affect active filters or your current workspace/ PRO space selection for the view. Tasks are also not edited or changed in their respective spaces.
This feature only changes how you view information within the management dashboard. Note that hiding fields will not automatically hide them in the Tasks mini-app view of the individual space.
You can manually configure this through the custom fields panel of individual spaces.
Summary view
There is a second view on the management dashboard. You can access this view by selecting ‘summary’ in the right corner of the view.
Tasks in this view are summarized based on different categories: just completed, just started, time-consuming and stale.
Just completed: This category highlights tasks from the "completed" list (those configured with a checkmark next to the list name). Task order depends on when the last update happened.
Just started: Just started summarizes tasks where the user started time tracking and/or changed status to "in progress". Tasks are displayed chronologically. The most recent updates displaying first.
Time-consuming[requires time tracker]: Highlight the tasks that have the highest amount of hours tracked for the for all time. In order to have this task displayed, it has to be updated in the current week. Saving changes or adding new information updates a task (field changes, new lists or deadline changes).
Stale: This is a list of the all-time not completed tasks. The longest time of inactivity defines the order in this list. Note that recently updated tasks are automatically filtered out of this view (updated in the last 7 days).
Filtering the summary view
There are a few available filters in summary view: workspaces, show completed and archived. Note that filters are based on your account and configuration. This means that your configuration will not automatically update the view of other people in the dashboard.
You can toggle which workspace you want to summarize with the dropdown list, exactly like the task board view. When you select a workspace, all tasks from PRO spaces within that workspace appear.
Pick up to 10 individual spaces by selecting ‘All spaces’ in the bottom of the channel.
There are also two task toggles in the top right corner of the view: show completed and show archived.
Show completed: disabling this will remove the ‘just completed’ category from your view. To mark a task as completed, make sure to move it to a list that has a checkmark.
Show archived: You can toggle whether you want archived tasks to be viewable and taken into account for the summary. Note that this will probably affect the stale field.
Frequently asked questions
Can free users access the management dashboard?
Free users can access the management dashboard if they are in one or more PRO spaces. They will be able to view and toggle tasks in the dashboard regardless. Additionally, there are two main limitations for free users:
Free users cannot select Workspaces to display tasks - they can still display spaces from WS, but have to pick the manually from all spaces (up to 10 spaces)
Free users can only see their own tasks on the dashboard (assigned, created & followed)
How is the management dashboard different from my tasks?
The My Tasks panel only displays tasks you created, are following or are assigned to. Meanwhile, the management dashboard displays all tasks in the space. There is also more functionality to view, filter and summarize information in more effective ways.
Can only space admins see tasks from a management dashboard?
No, all users within a PRO space can see their own tasks in the management dashboard.
Can I access the management dashboard if I’m on Unlimited Starter?
The management dashboard is available to any user who is in one or more PRO spaces. This means that the panel will become available to you when you change spaces to PRO under the starter plan.
Will guests be able to see tasks in their management dashboard if they are in one of my PRO spaces?
Yes, guests will be able to view the tasks. Nevertheless, they are not able to make edits to the tasks within the dashboard as they do not have the correct space permissions to save changes to tasks or create new ones.
Track hours spent on individual tasks by enabling the time tracker in PRO spaces. Keep an eye on priorities, work with freelancers, supervise team members and improve your overall productivity with this dedicated task feature.
Start a new time track right within tasks
The time tracking feature is available within every individual task view. Make sure that you're working in a PRO space. Note that the time tracker is an additional item you get with the Unlimited plan.
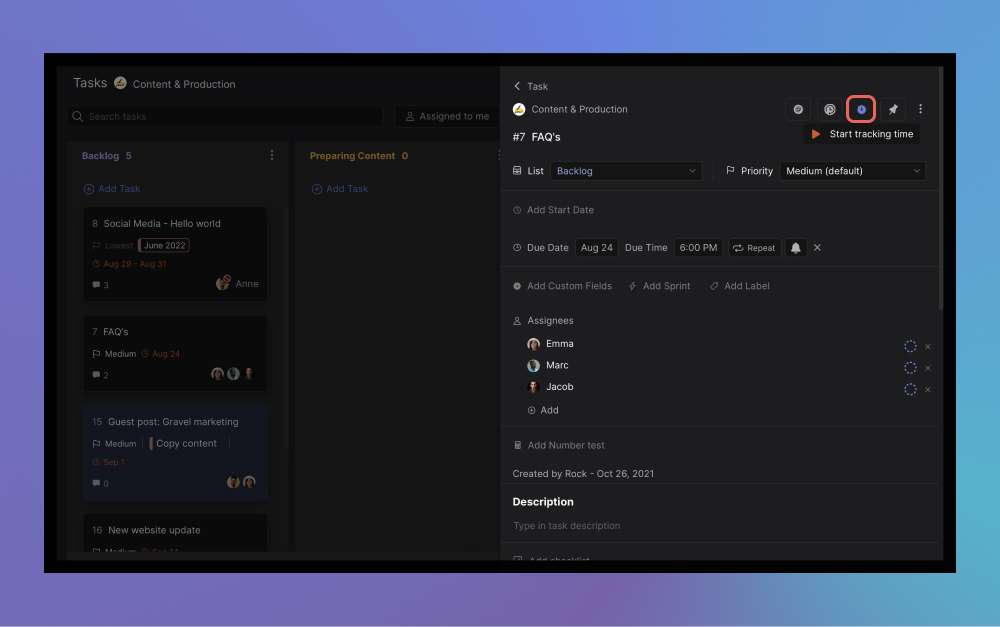
You can enable the tracking feature by pressing the time tracking icon in the top of the task description. Time tracking will automatically start once you select the icon for it.
You can end the session by clicking on the same icon again when you are done with tracking time for that task.
📝 Note: While you need to be a member to enable the time tracker, you can always remove yourself as an assignee after the time tracking has been completed.
It is not possible to track time on tasks where you are not an assignee. Clicking on the icon for a task you are not a member prompts a disclaimer which asks you to add yourself as an assignee or cancel the action.
Track time from the individual time tracker panel
Once time tracking is enabled, a new panel becomes available. This dedicated panel gives insight on the tasks you are tracking and activities that you tracked in the past.
Note that this panel will only highlight your own time tracking activities, not other users within your plan.
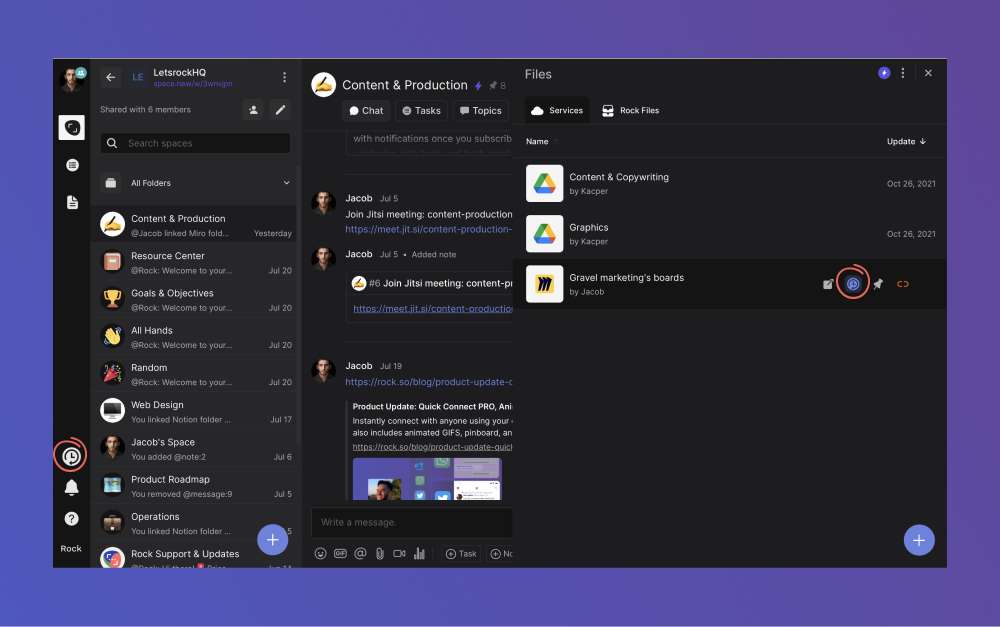
You can access this panel by clicking on the time tracker icon in the bottom left corner of your screen, right above the credit program.
📝 Note: the time tracker can still be accessed when you’re currently tracking time. Pressing on the button will bring you to the main panel and not stop your current timer.
General information displayed on the panel
The panel provides some additional information on the tasks you have tracked in that past. You can view the following metrics based on your activity in a chosen past time period:
Total time spent: This is a sum of the number of hours you have tracked in total across your different time tracking sessions.
Tasks in progress: This summarized the number of tasks you have worked on in a timeframe which are not yet in a list with a checkmark.
Tasks completed: Tasks are moved to completed once they are added to a list that has a checklist on it.
Managing tasks you are currently working on
You can use this panel to start tracking new tasks or manage a time track you enabled on the task level. There are two ways you can stop tracking time for active tasks:
Main listing: On the top of the panel there is a ‘now working on’ section. Click on the stop icon to the right of that entry if you want to stop tracking an item.
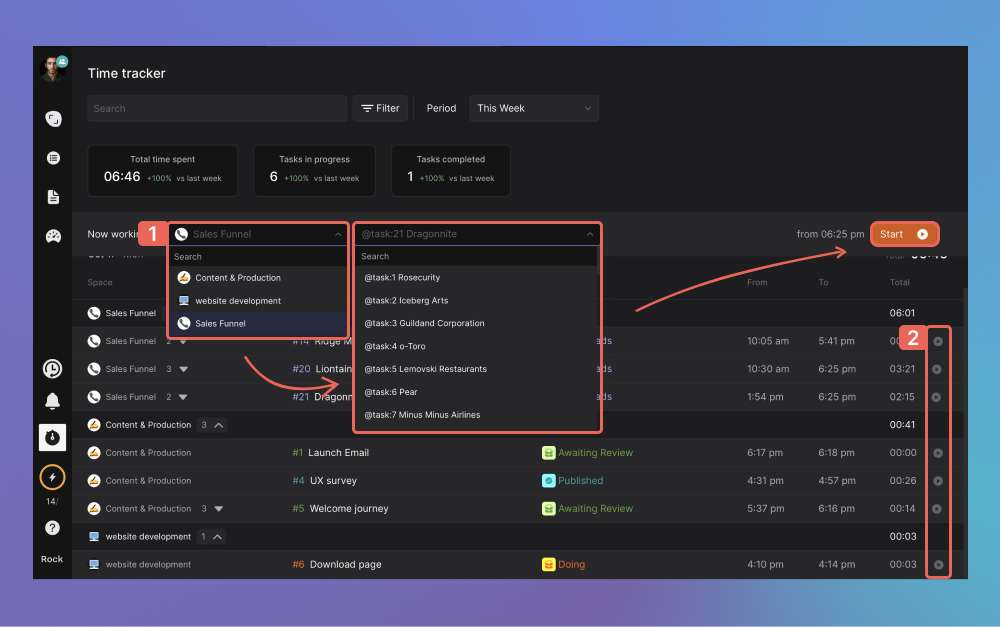
Spaces list: A red button will appear next to the task that is currently being tracked in the spaces list. If you wish to stop tracking time, you can do so by selecting the stop icon highlighted in the image below.
After stopping a time track you can start a new session for the same task or other activities in the same panel.
There are two ways to enable a new session: now working on or the icon next to recently tracked activities:
Now working on: Select a space and individual task you want to start working on in one of your spaces. Then click on ‘start’ to initiate the time tracker.
Recently tracked activities: If you were recently tracking a different activity, you can continue tracking it by pressing the start button to the right side of the view. This will continue the overall count for the task and start a new activity on the time tracker.
📝 Note: if a space is not appearing in the dropdown for option 1, please refresh your view on web or re-enter your account for desktop.
Filtering the time tracking panel
There are multiple available filters on the time tracking panel: time period and task filters.
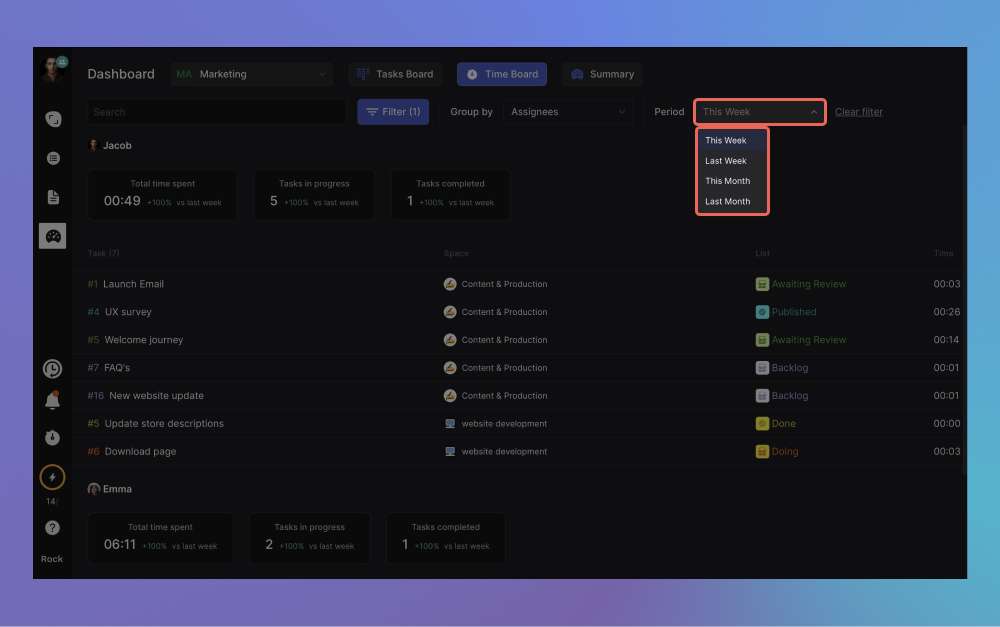
For the time period: Select the time period dropdown to highlight tasks tracked across different time intervals. Available options include: this week, last week, this month and last month.
For task filters: You can filter by spaces, assignees, assignee status, due date, priority, label, sprint. Filters are stackable, meaning that you can filter tracked tasks on more than one condition.
To add a new filter, press the filter button in the top of the view. From there select ‘add new’ to pick a category. Once the category is selected, a you can select an option from the dropdown menu.
Time Board in the management dashboard
The management dashboard provides access to a new panel once the time tracker has been enabled. Note that this panel is only accessible to paid plan purchasers and managers.
The time board can be accessed between ‘task board’ and ‘summary’.
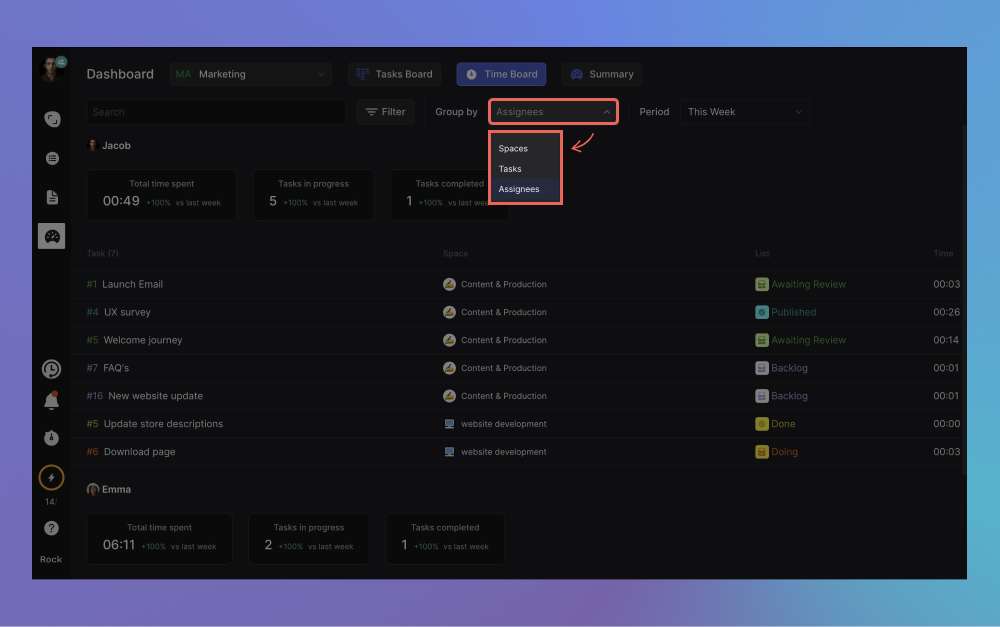
Group by views for the time board
There are three different group by filters on the task board: spaces, tasks and assignees.
Each one will slightly change the view of the panel based on time tracked in the different variables. Toggle between the different groups while keeping your filters enabled to review time spent on different activities.
Available filters in the time board
There are a variety of filtering options on the management task board: search bar, advanced filtering and task visibility toggles.
You can use the search bar to query for information based on words that are in the task title or description within that task. it just filters out tasks with results not matching the search word, and ranks queries with the term by most recently updated.
You can also add advanced filters to the time board. Press ‘Filter’ to access the functionality. If you don’t have any filters applied yet, then press ‘add filter’ in the right corner to add your first filter. Filter the time board view for the following fields:
Spaces
Assignees
Assignee status
Due date
Priority
Label
Sprint
If you have manually selected spaces from All spaces, there is also a "Workspace" filter option.
Additionally, you can also change the view depending on the time interval you want to view. Available options include: this week, last week, this month and last month.
You can edit the setting for it by clicking on the dropdown and selecting the correct option.
Exporting tracked time
If you want to work with your tracked time outside of Rock, you can easily export the time tracked from both the individual time tracker or time board. To do so, select "export" in the top right corner of the time tracker.
You can opt to export all tasks living in the time tracker or for the export to follow the filters you already applied. The following fields are exported in CSV format:
Date: When time was tracked for a certain task
Space: In which space time was tracked
Task: The title of a task
Member: The given name of a user in your team
List: The list in the tasks mini-app where the task is during export (i.e. To do or done)
Started: Timestamp when the user started tracking time
Stopped: Timestamp when the user stopped tracking time
Frequently asked questions
Can I buy a time tracker without purchasing the Unlimited plan?
No, for the time tracker to work you need PRO spaces. Without purchasing the Unlimited plan you would not have PRO spaces to use the time tracker in.
Can I track multiple tasks at the same time?
At the moment it is only possible to track one task at a time. If you track a task and start tracking the next one, previous tracking is automatically stopped. This can be convenient because you dont miss out on time between stopping one task and starting the next one.
Is it possible to track time without directly adding it to a task?
Time tracking activity is only available within the Tasks mini-app. It is currently not possible to track time without connecting it to a task.
Is it possible to track time for another user?
It is currently not possible to start a time track for another user. You can, nevertheless, see how much a user has tracked in the past if you have access to the time board in the management dashboard.
Can I use the time tracker on free spaces?
Free spaces do not have time tracker functionality enabled. You will not be able to access the functionality even if you’re under paid plan. Change the space to PRO to start the functionality.
What happens to tracked time in a space if I downgrade it to FREE?
You will be able to see past time tracking activities from that space in your individual time tracker and the time board in the management dashboard. Nevertheless, it will not be possible to continue tracking the tasks from that space until you change it to PRO again.Nevertheless, you can stop active trackers from a downgraded space.
Who has access to the time board in the management dashboard?
Purchasers or managers under the Unlimited plan will be able to view the summary of tracked items across team members and PRO spaces. Free users and team members not upgraded to manager under the Unlimited plan will not be able to access this functionality.
Can I track time on a note or topic?
It is currently not possible to track time on a note or topic.
Earn credits for inviting new people to Rock or mastering different features. You can use credits to gain access to the Unlimited starter or Unlimited plans for free.
What are the rewards of the Rock Credit Program?
The credit program allows you to make use of paid Rock functionality for free. The rewards you can redeem on the current Rock Credit Program depend on your subscription status: Free plan or Unlimited
Free plan: Upgrade to the Unlimited starter plan for 20 credits
Unlimited plan: Get one free month of Unlimited for 200 credits
Unlimited starter plan for a month
Redeem 20 credits to upgrade to the PRO starter plan when you're on the free plan or already on a PRO starter plan. The plan includes up to 5 spaces, 2 PRO spaces and one workspace. To get more out of your task management, PRO spaces unlock:
If you have enough credits to renew, you can extend your Unlimited starter plan for another month. There are no limits on the number of redemptions.
Unlimited users: Extend the Unlimited plan
If you are currently under the Unlimited plan, you can add 1 free month for 200 credits. The free month of unlimited will start at the end of your billing period. Once the month period ends, you will be automatically billed for your plan again.
How to earn credits
There are two main ways to earn credits on your account:
Referral program: Inviting new people to Rock
Getting started with a variety of features
How to earn credits by referring Rock to friends, clients, and colleagues
Invite clients, team members, friends, or corporate partners to Rock and receive credit rewards to access PRO starter and TEAMS starter functionality for free.There are a few ways to earn credits in the referral program. Activities include:
1 credit: Inviting a new user
10 credits: Inviting a new domain
50 credits: Invited user upgrades to PRO
300 credits: Invited user upgrades to TEAMS
Invite a new user - 1 credit
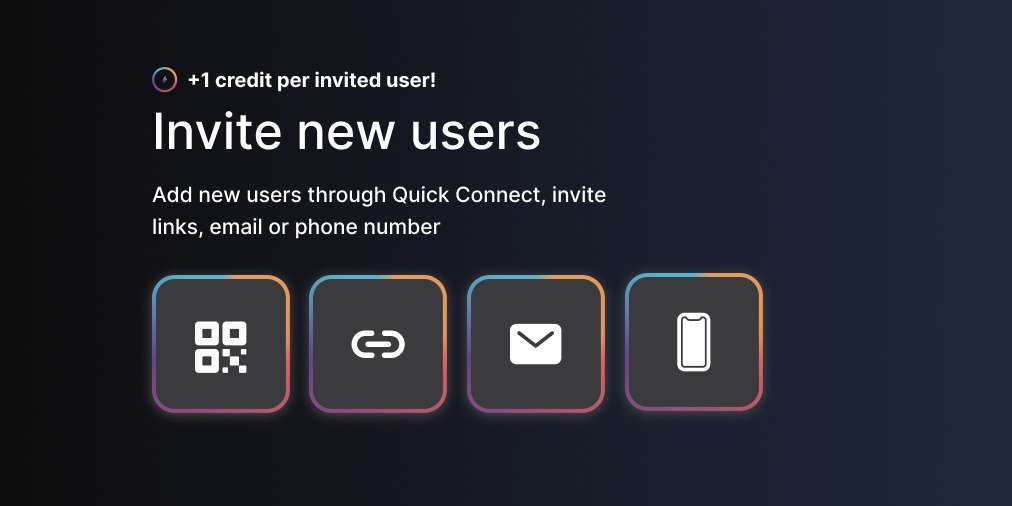
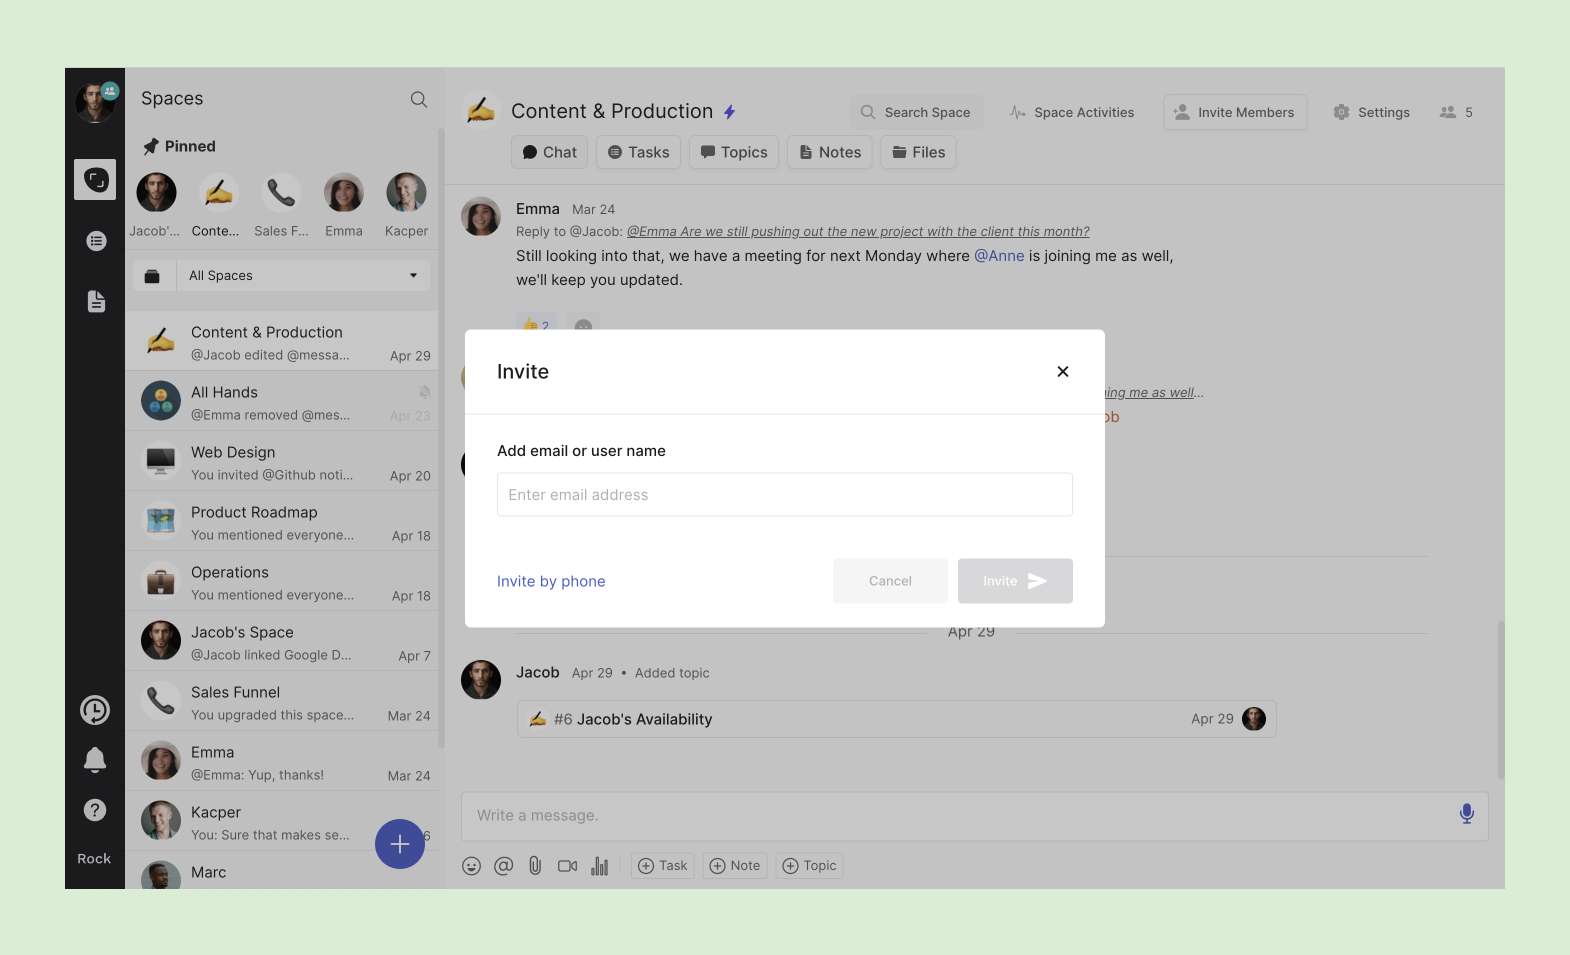
Invite anyone, either in or outside of your organization to Rock. Credits are automatically added to your account once your invite has successfully signed up. Here are a few ways through which you can invite new users:
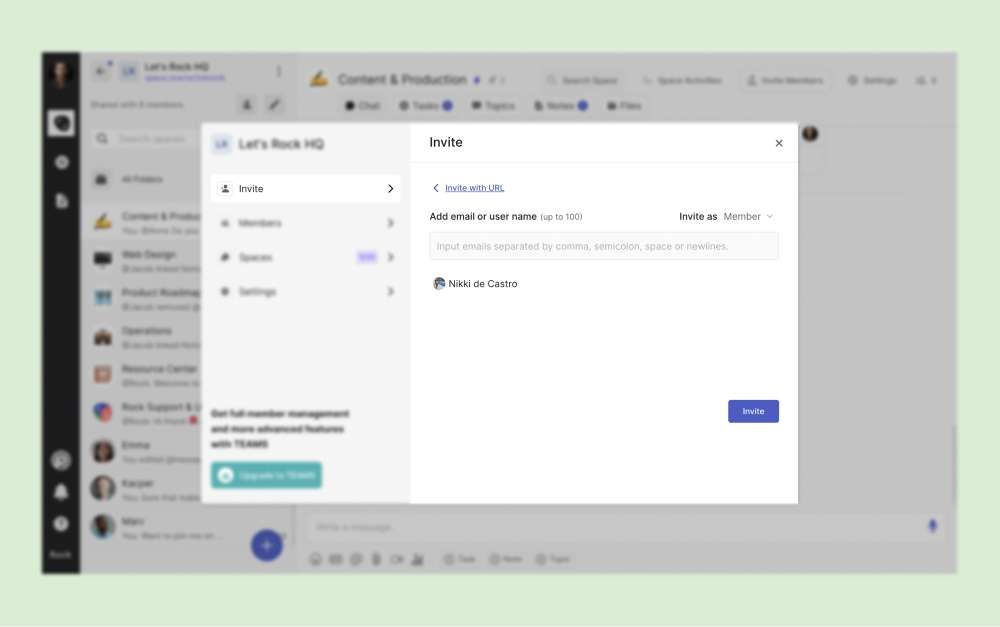
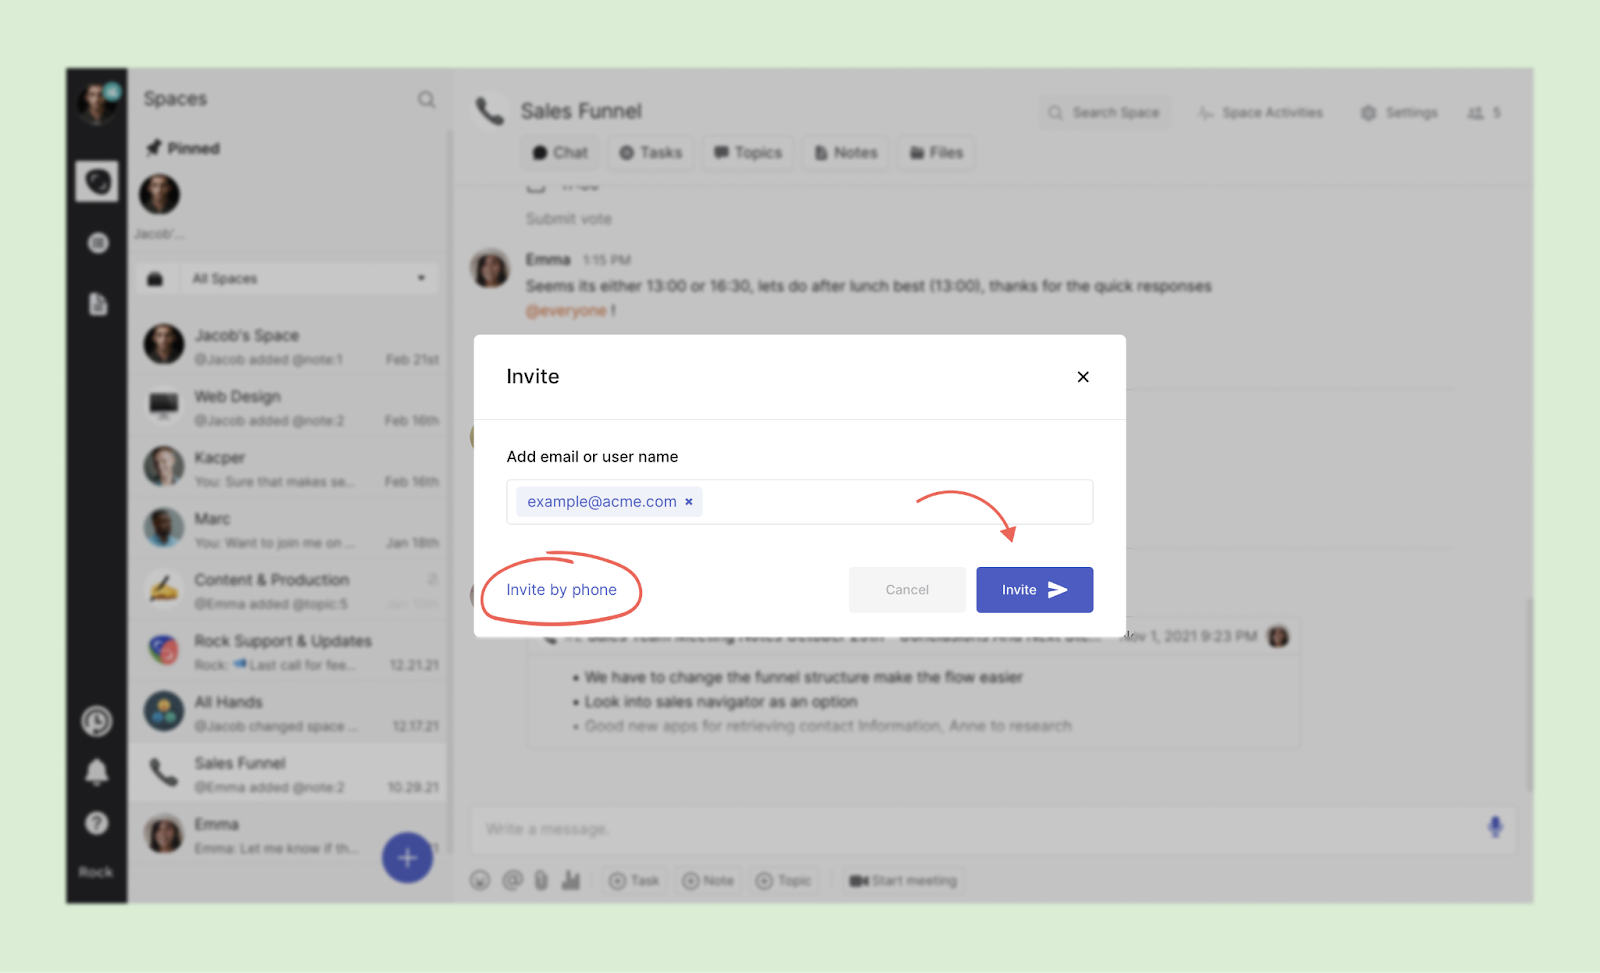
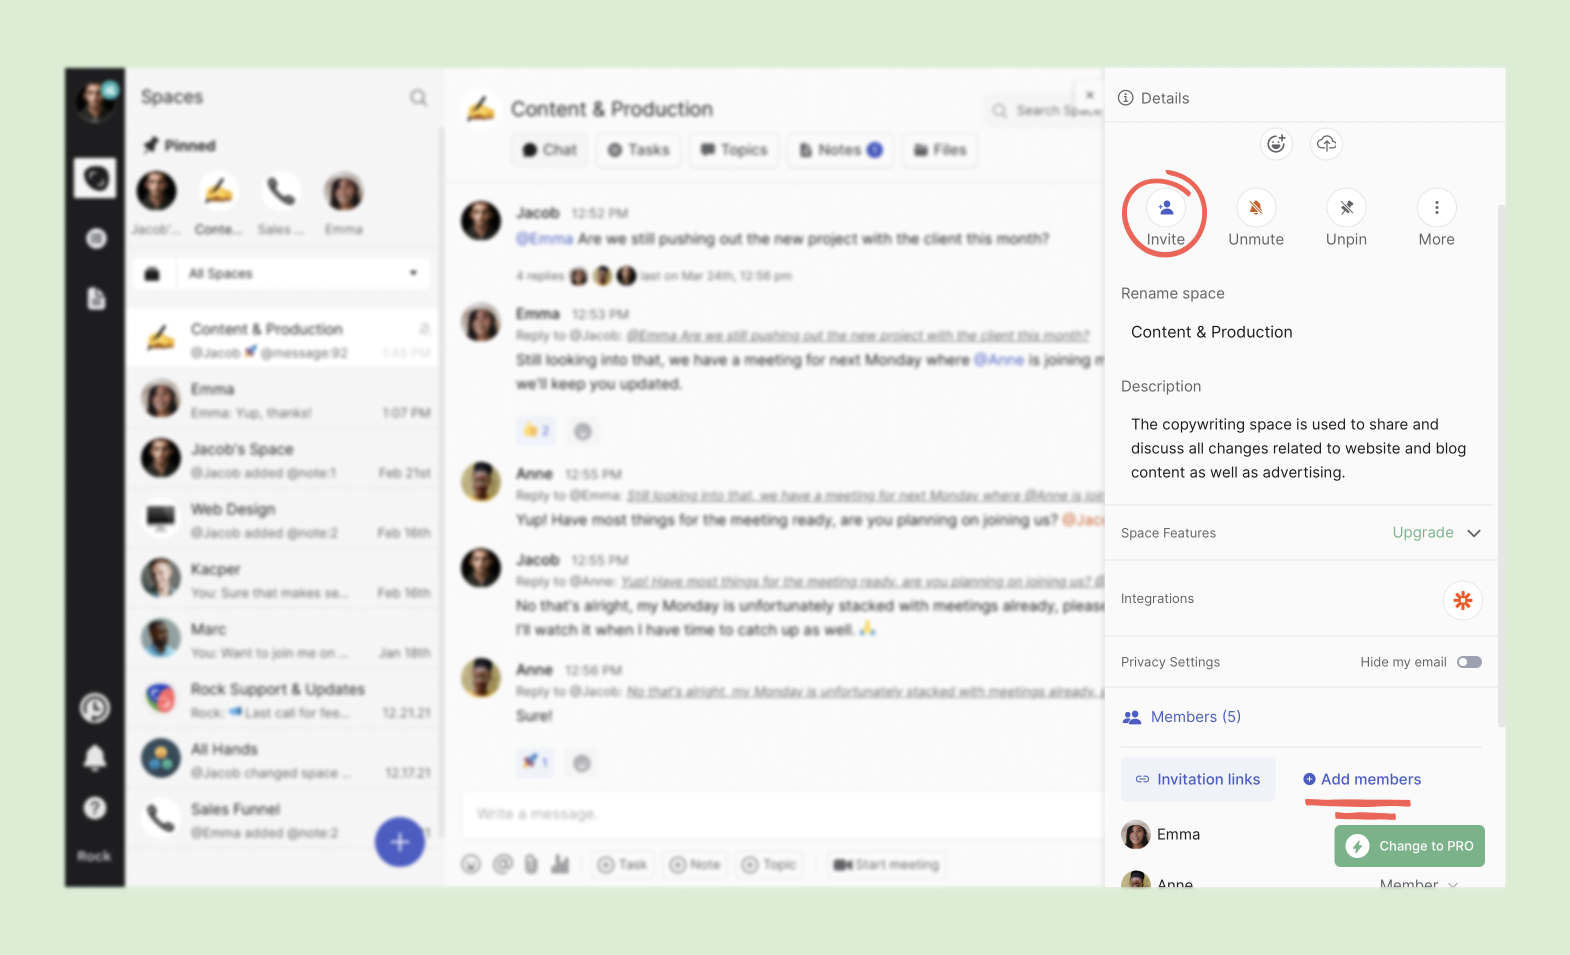
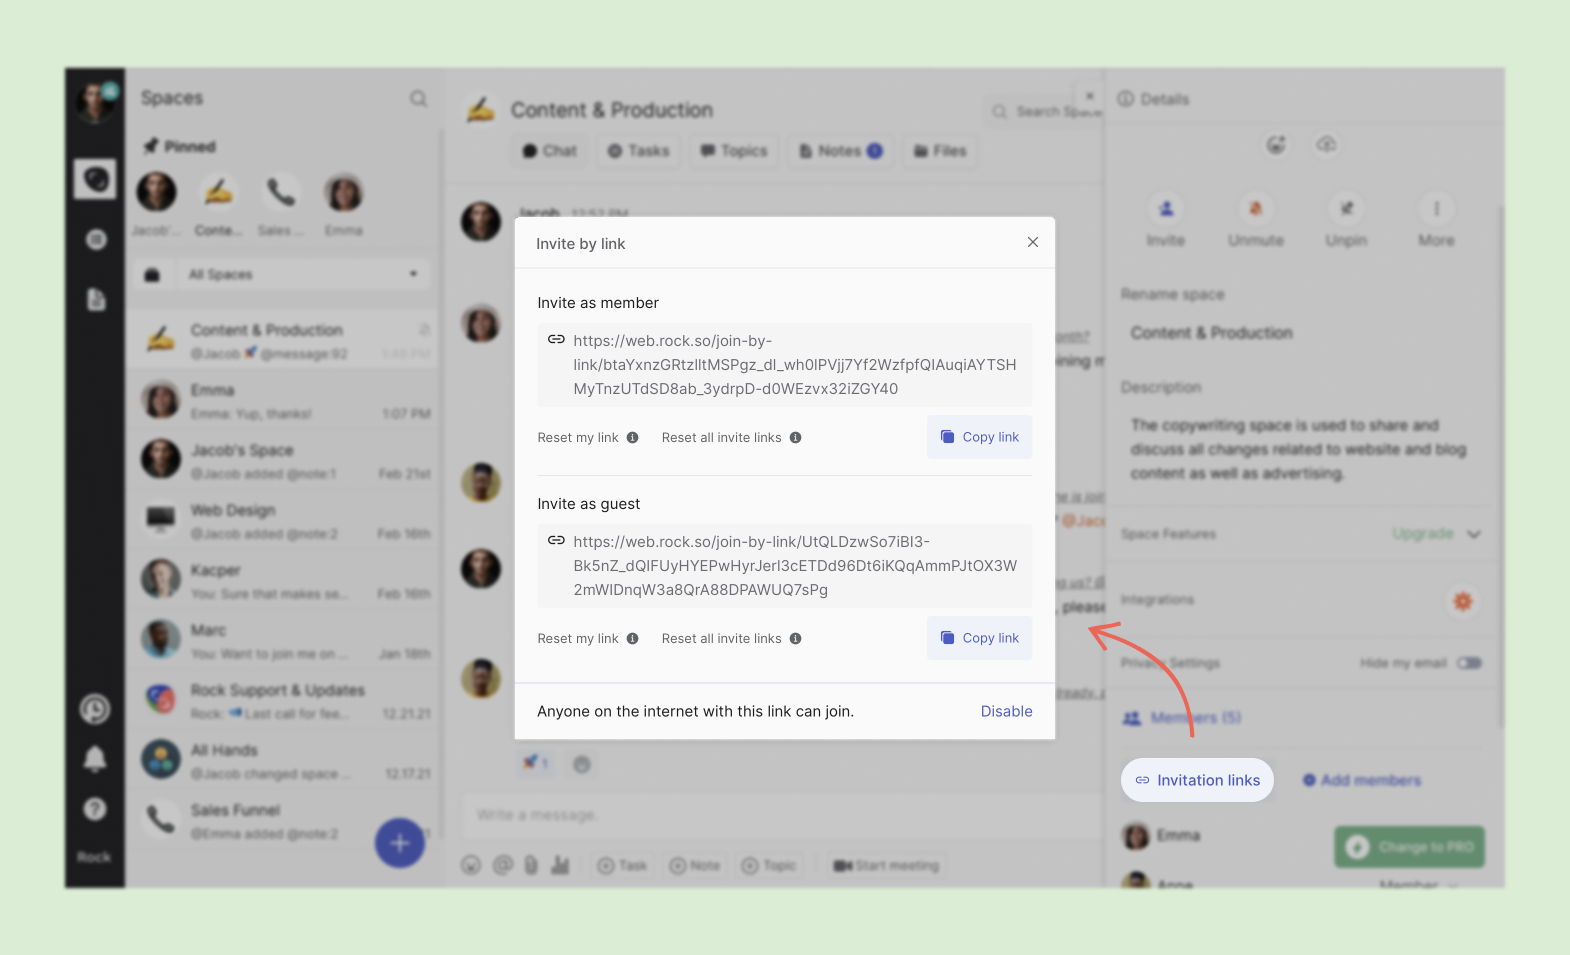
Email invite: Create a space or add new users through space settings by adding their phone number
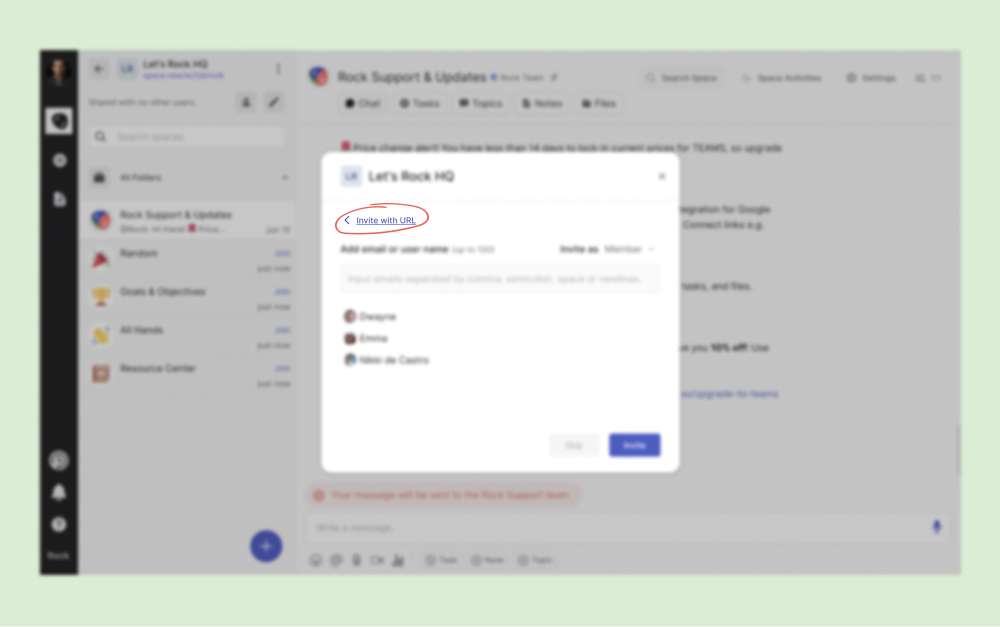
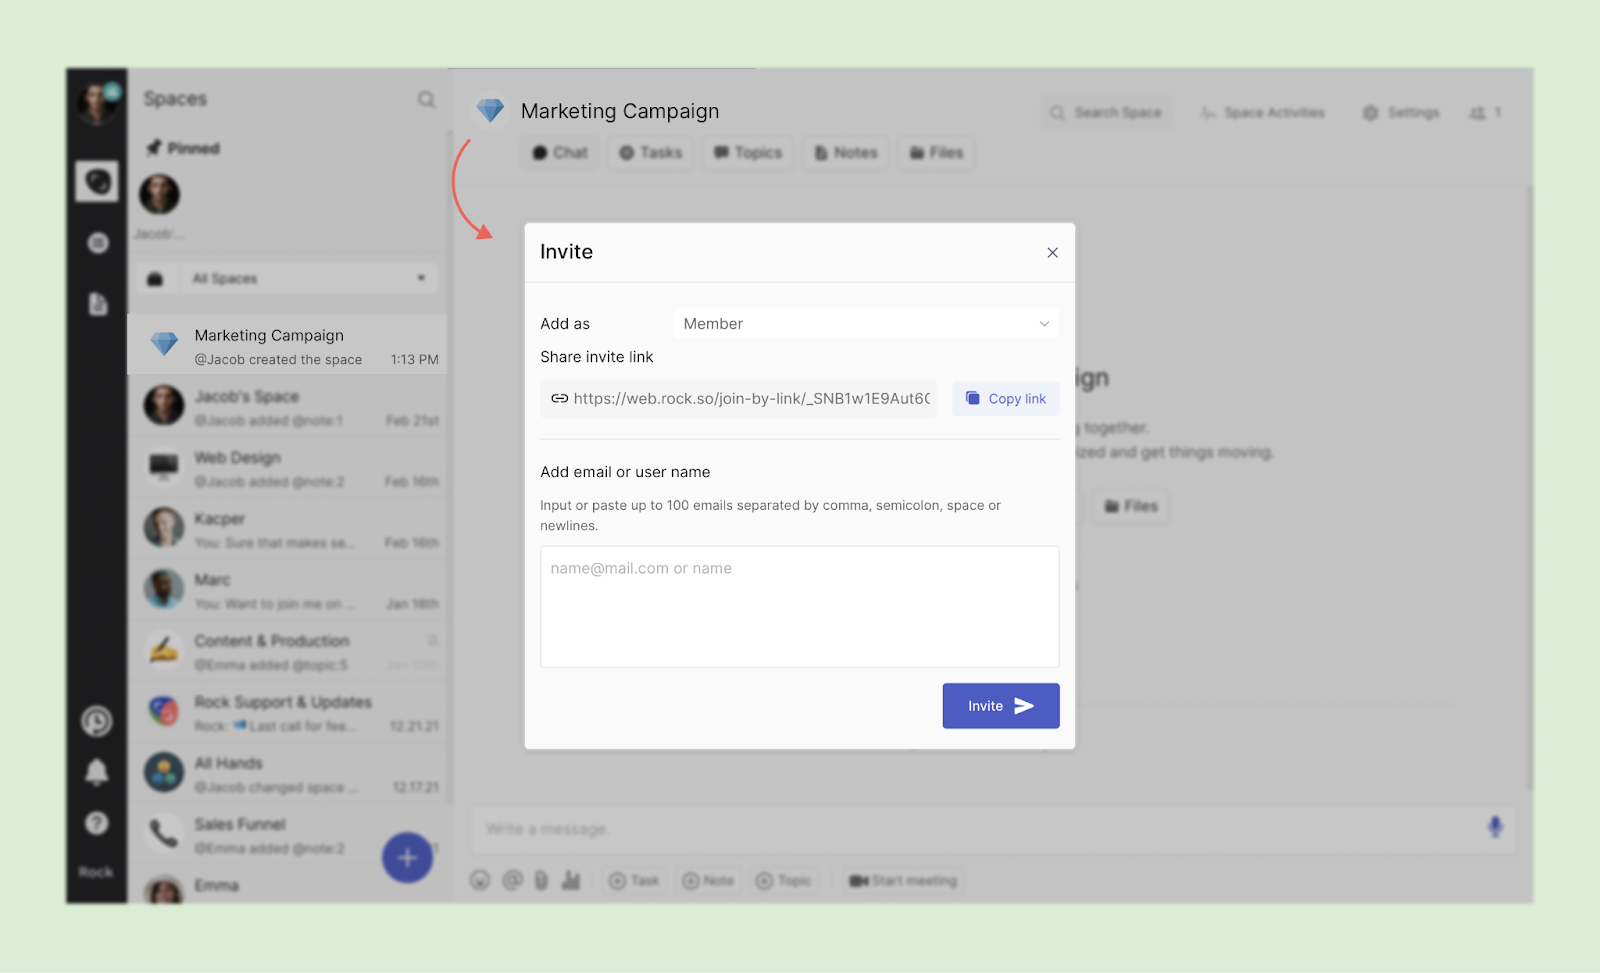
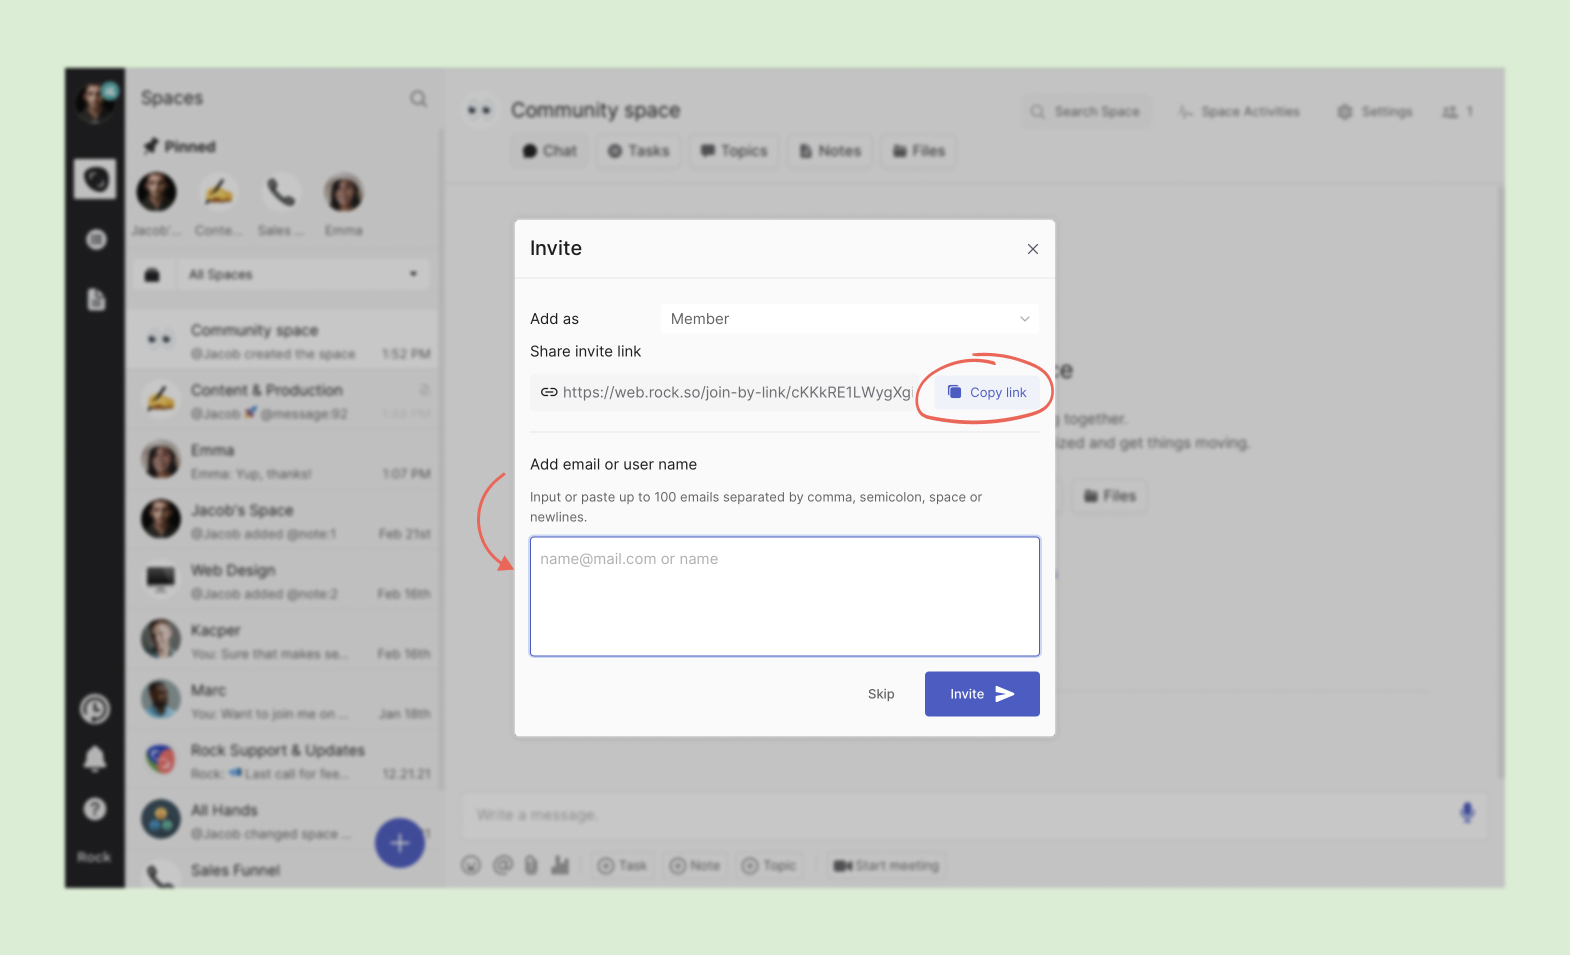
Invite by link: Enter space settings and select for invite links, you can share these anywhere for new people to directly join your space as a member or guest.
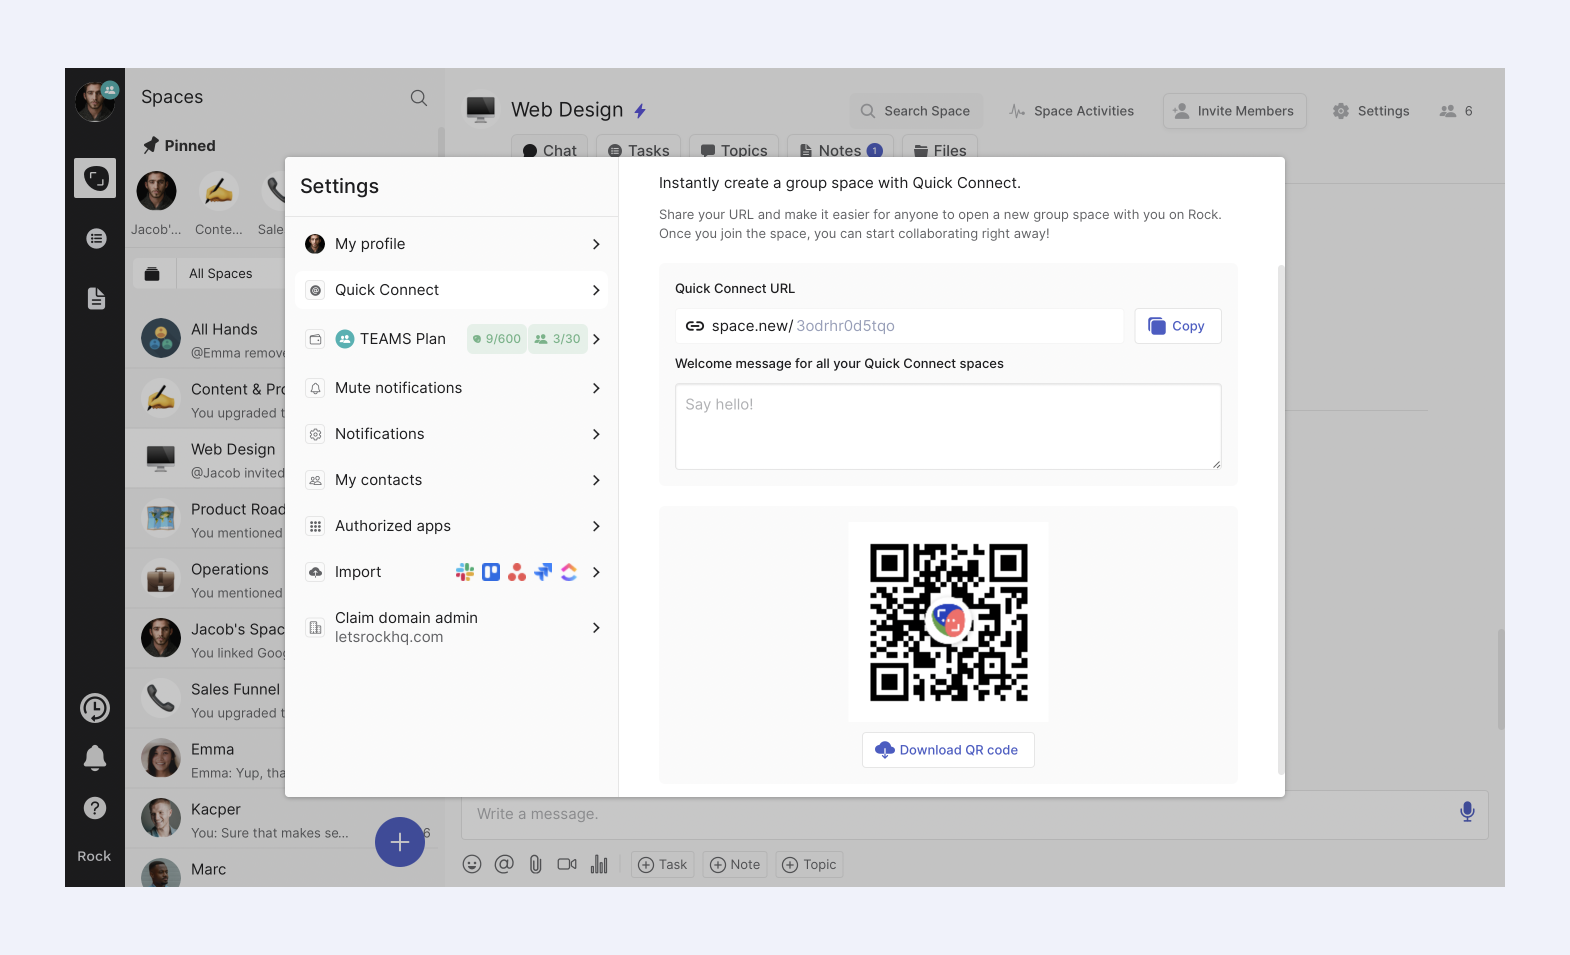
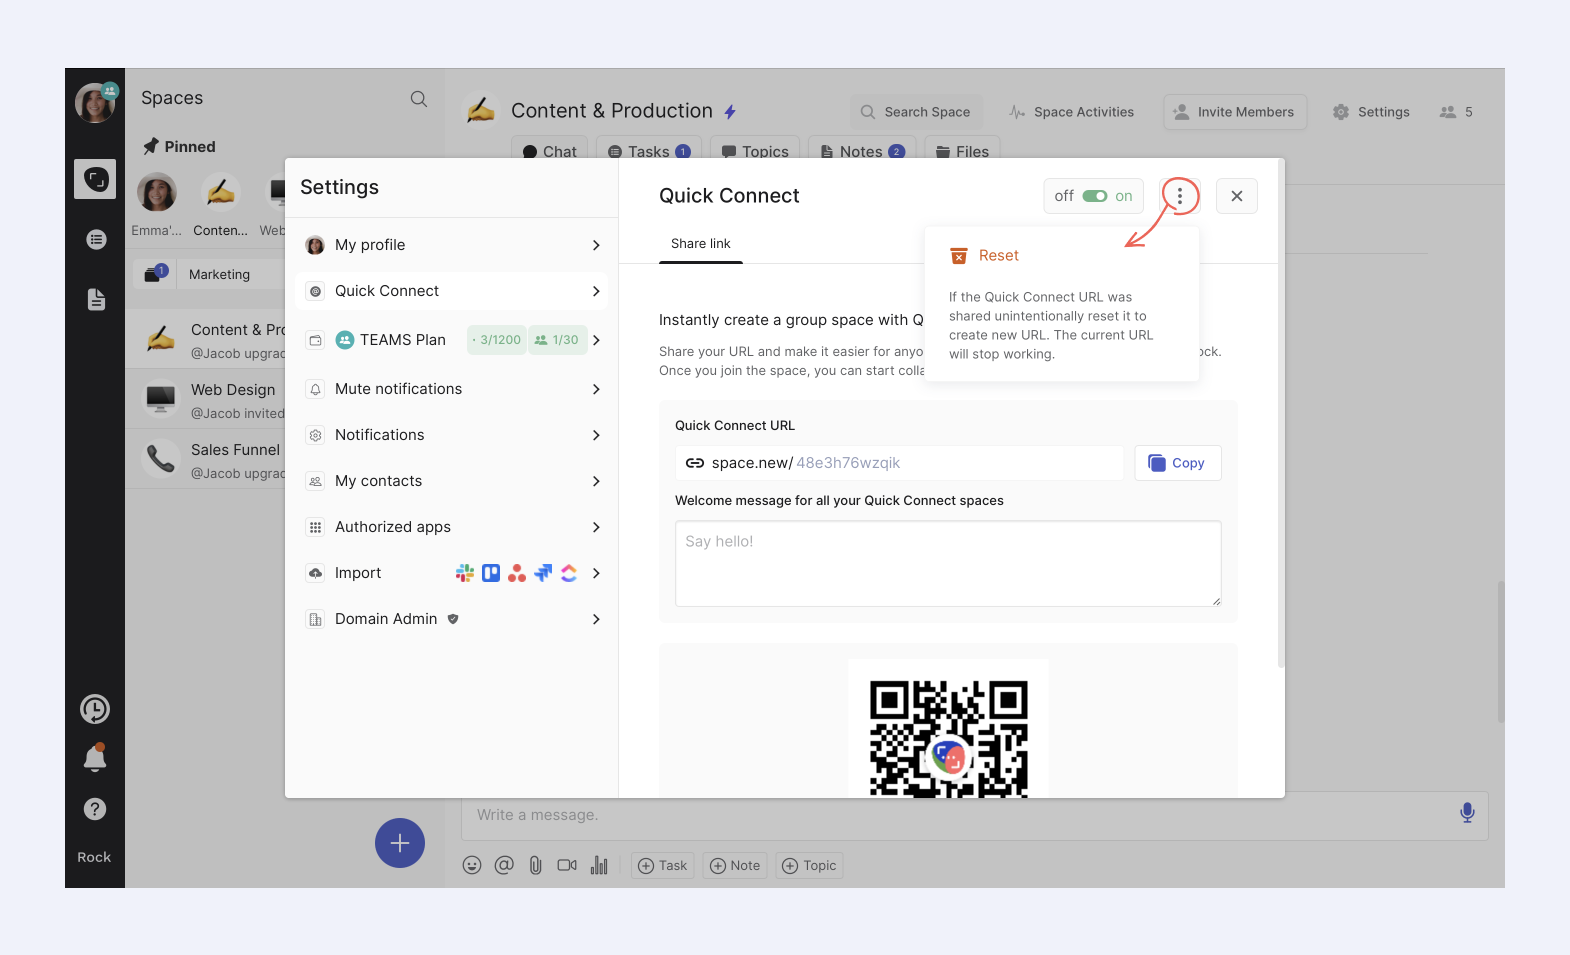
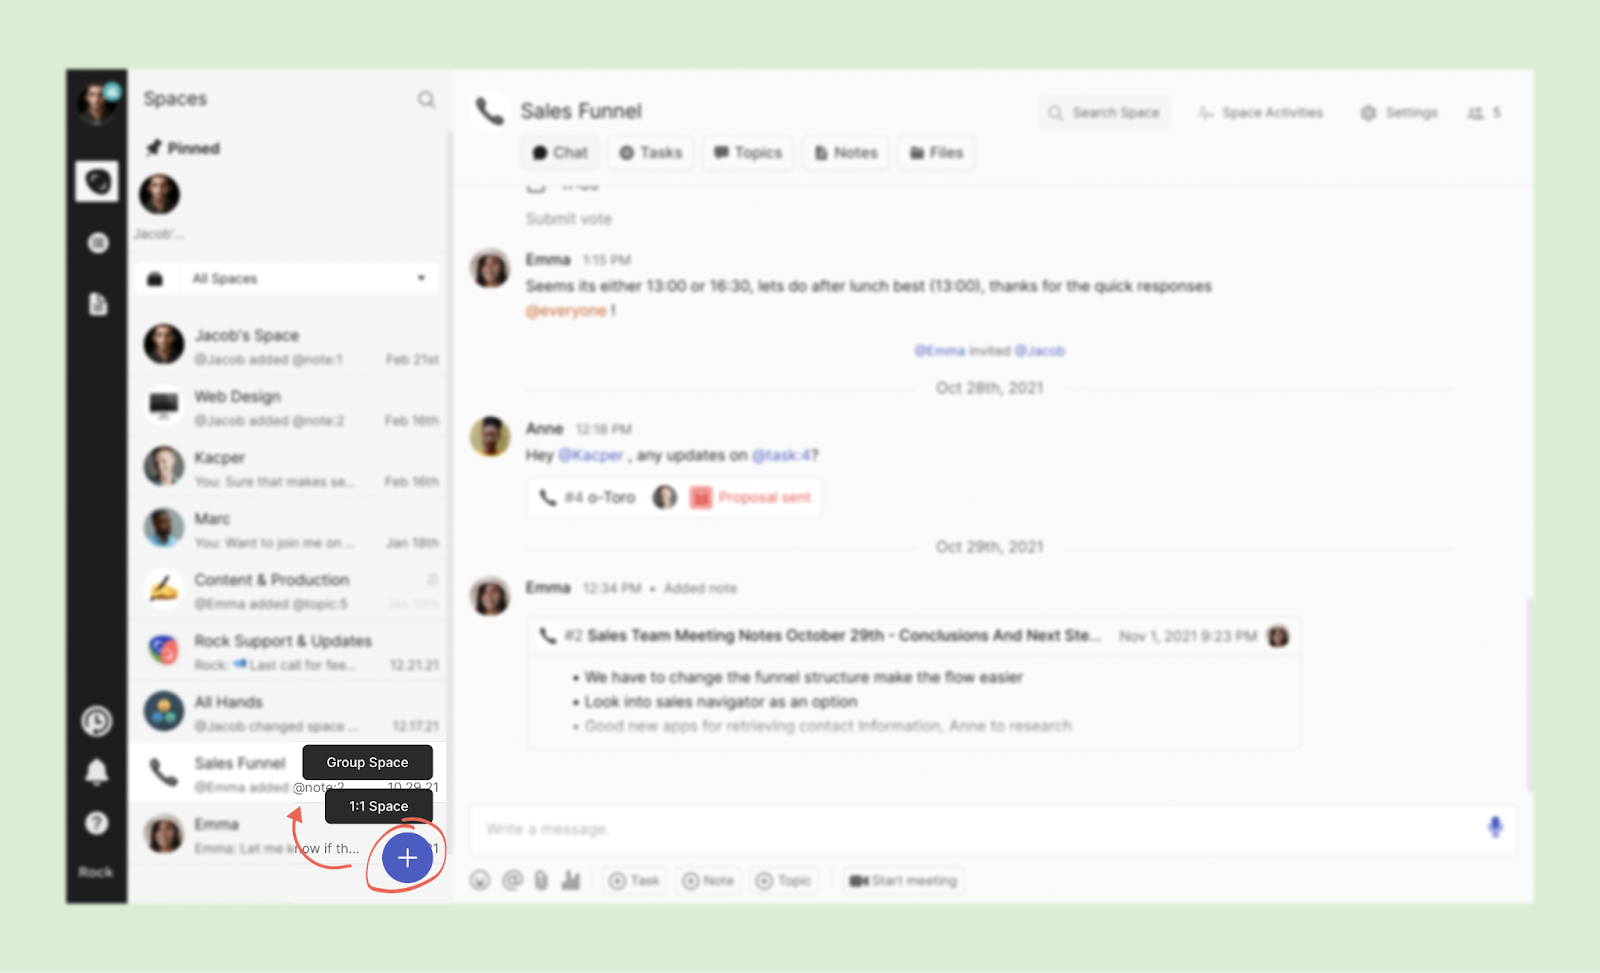
Quick Connect: Use your Quick Connect link or QR code and allow people to start a new group space with you within seconds! Once someone clicks on your dedicated link, they will be brought to Rock and a group space is created.
Phone number: Invite people to a 1:1 space by entering their phone number when creating a new space!
Invite a new corporate domain - 10 credits
Invite a new corporate domain to Rock and earn 10 credits. Invites for new corporate domains are offered additional credits when:
They are not signing up with a non-corporate domain (e.g. @gmail.com, @yahoo.com)
The corporate domain does not have any accounts on Rock already.
You will receive 10 credits once a new corporate domain has registered an account. You also receive an additional credit for inviting a new user. The reward for a new domain might be slightly delayed if not directly recognized in our system. Additional signups from the same domain that were directly invited by you will give 1 credit per signup.
Invited user upgrades to the Unlimited plan - 300 credits
You receive 300 credits if a user you invited through email, invite links, quick connect, or phone number upgrades to Unlimited. You only receive the reward if it’s the first time they upgrade to TEAMS. No recurring credits are received for plan renewals, billing period changes, or monthly payments.
You receive 300 credits for any invited user that upgrades to TEAMS, even if they’re within the same domain.
Switching from monthly to yearly memberships will not award additional credits.
Plan renewals will not award you additional credits.
If a user downgrades from TEAMS to PRO, you will receive 50 credits for a PRO upgrade (if the user has not had PRO yet).
You receive 300 credits for every individual user that you invited who upgrades to the TEAMS plan. TEAMS plan upgrade rewards are only given once per invited user.
How to earn credits while mastering Rock
Become a Rock expert and earn additional credits while mastering different features. The credit program rewards you once for a range of different starting activities. Available activities include:
5 credits: Download the desktop app
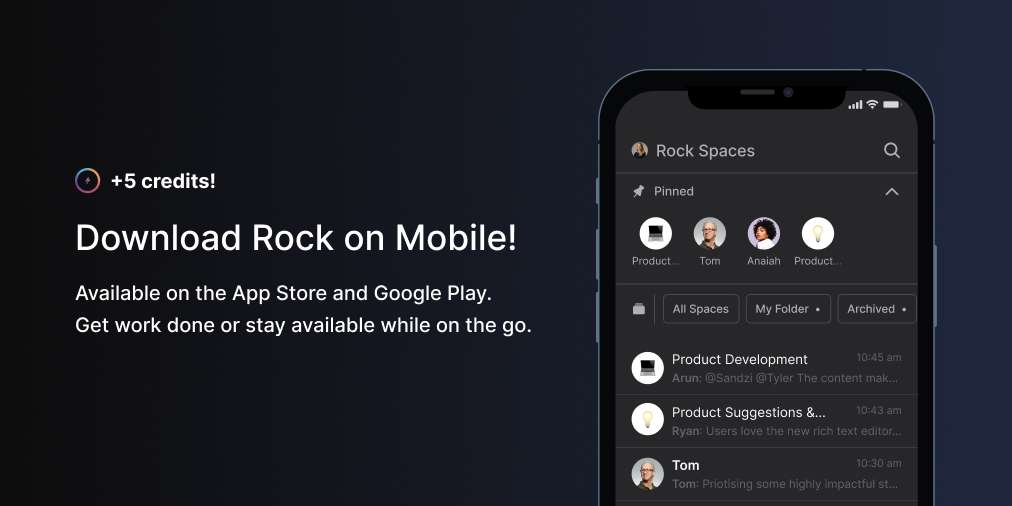
5 credits: Download the mobile app
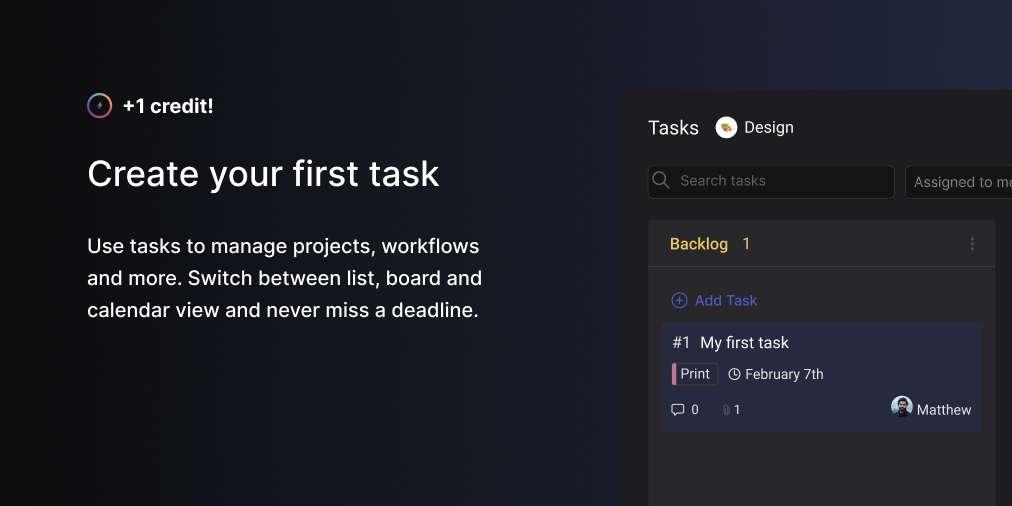
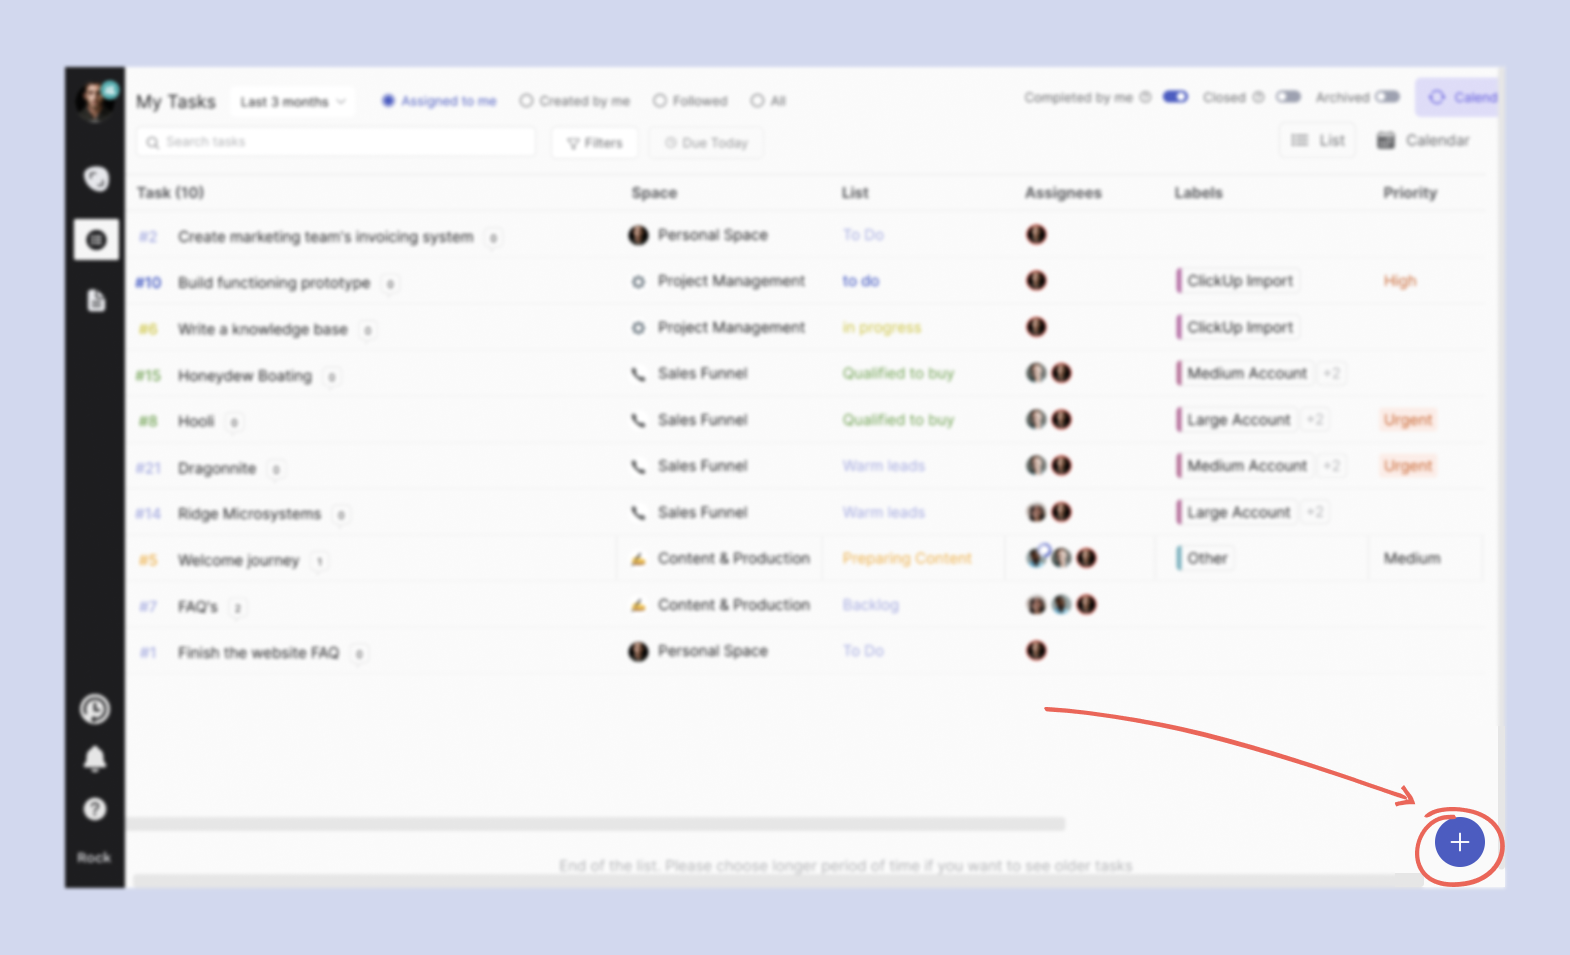
1 credit: Create your first task
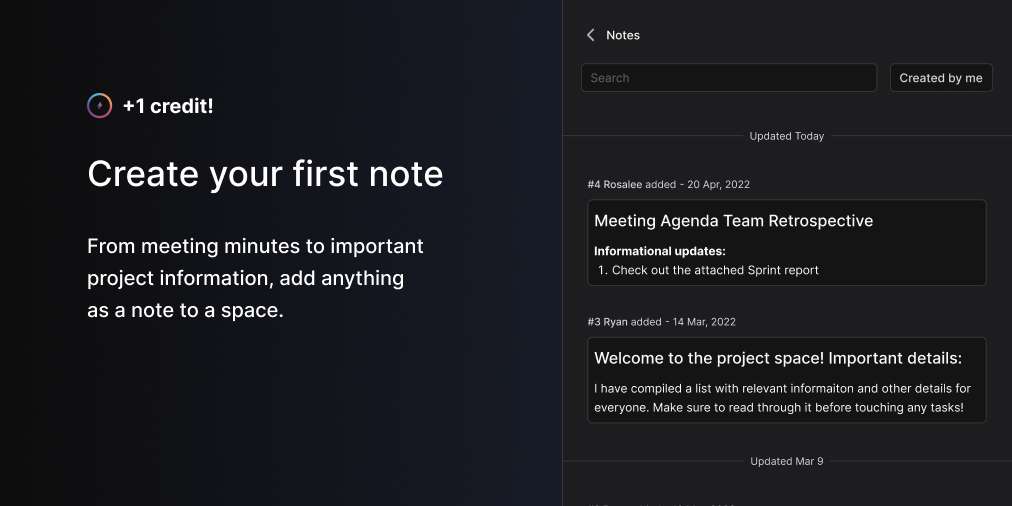
1 credit: Create your first note
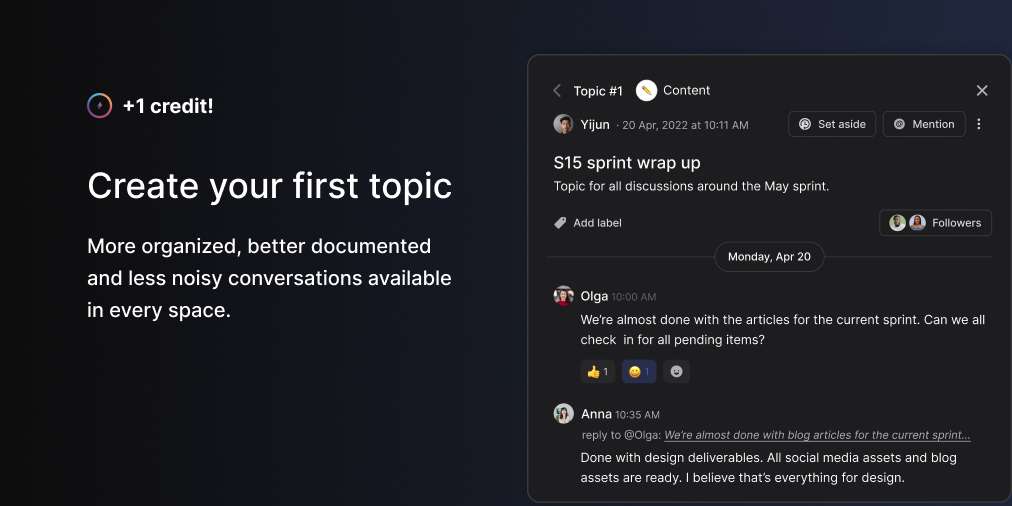
1 credit: Create your first topic
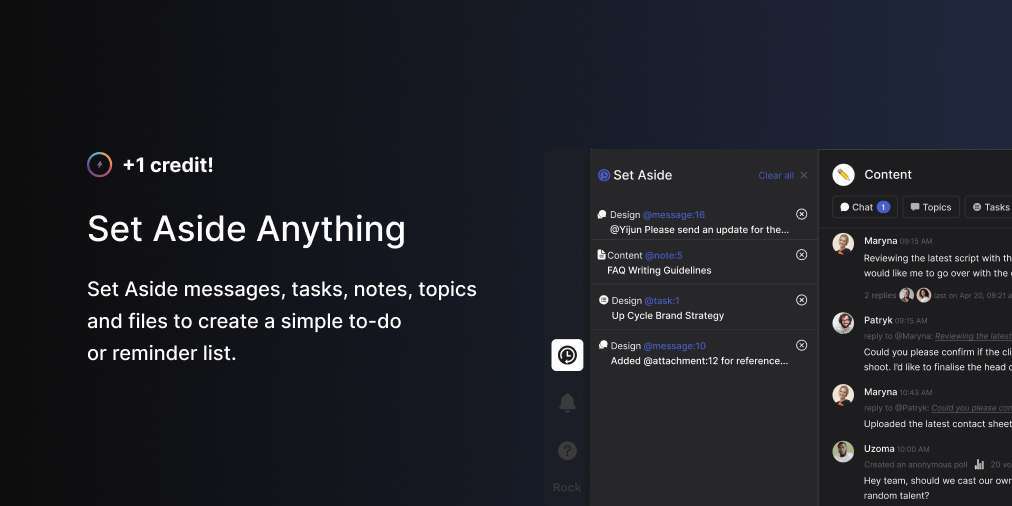
1 credit: Set Aside your first item
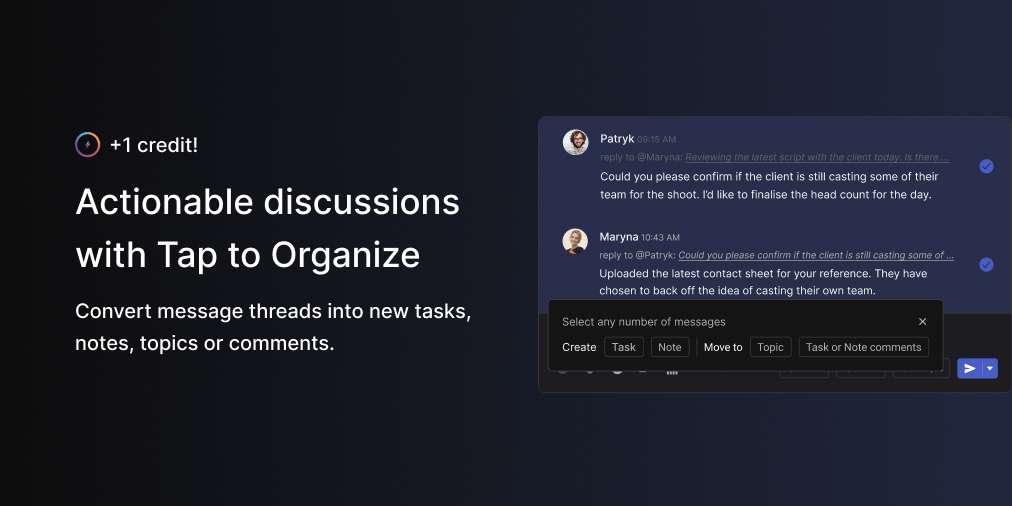
1 credit: Use Tap to Organize for the first time
2 credits: Create your first group space
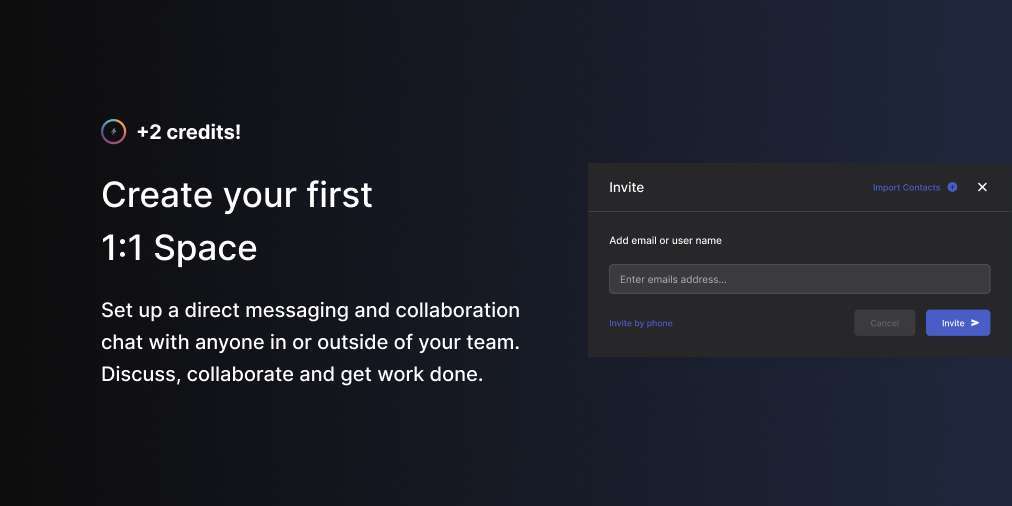
2 credits: Create your first 1:1 space
5 credits: Create your first workspace
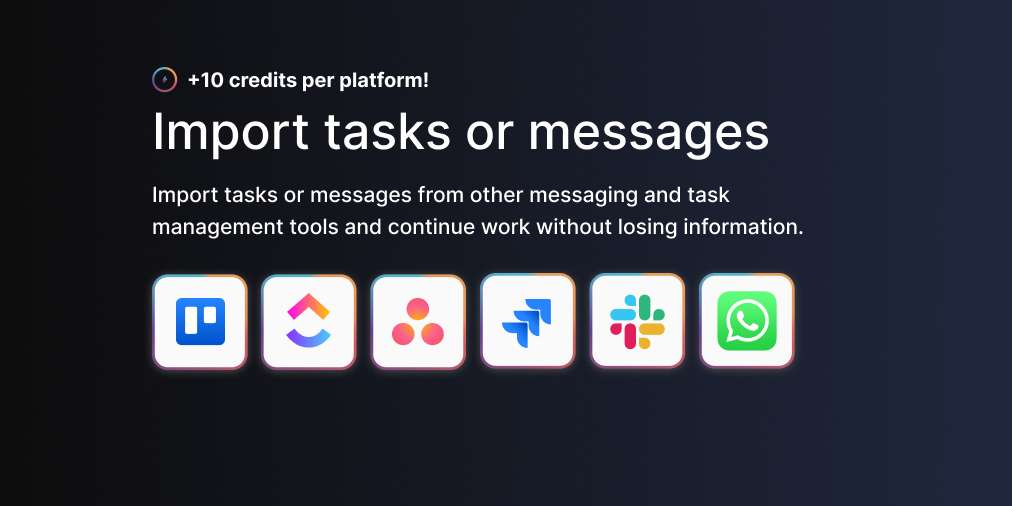
10 credits: Import tasks or messages to Rock
10 credits: Import your contact list on mobile
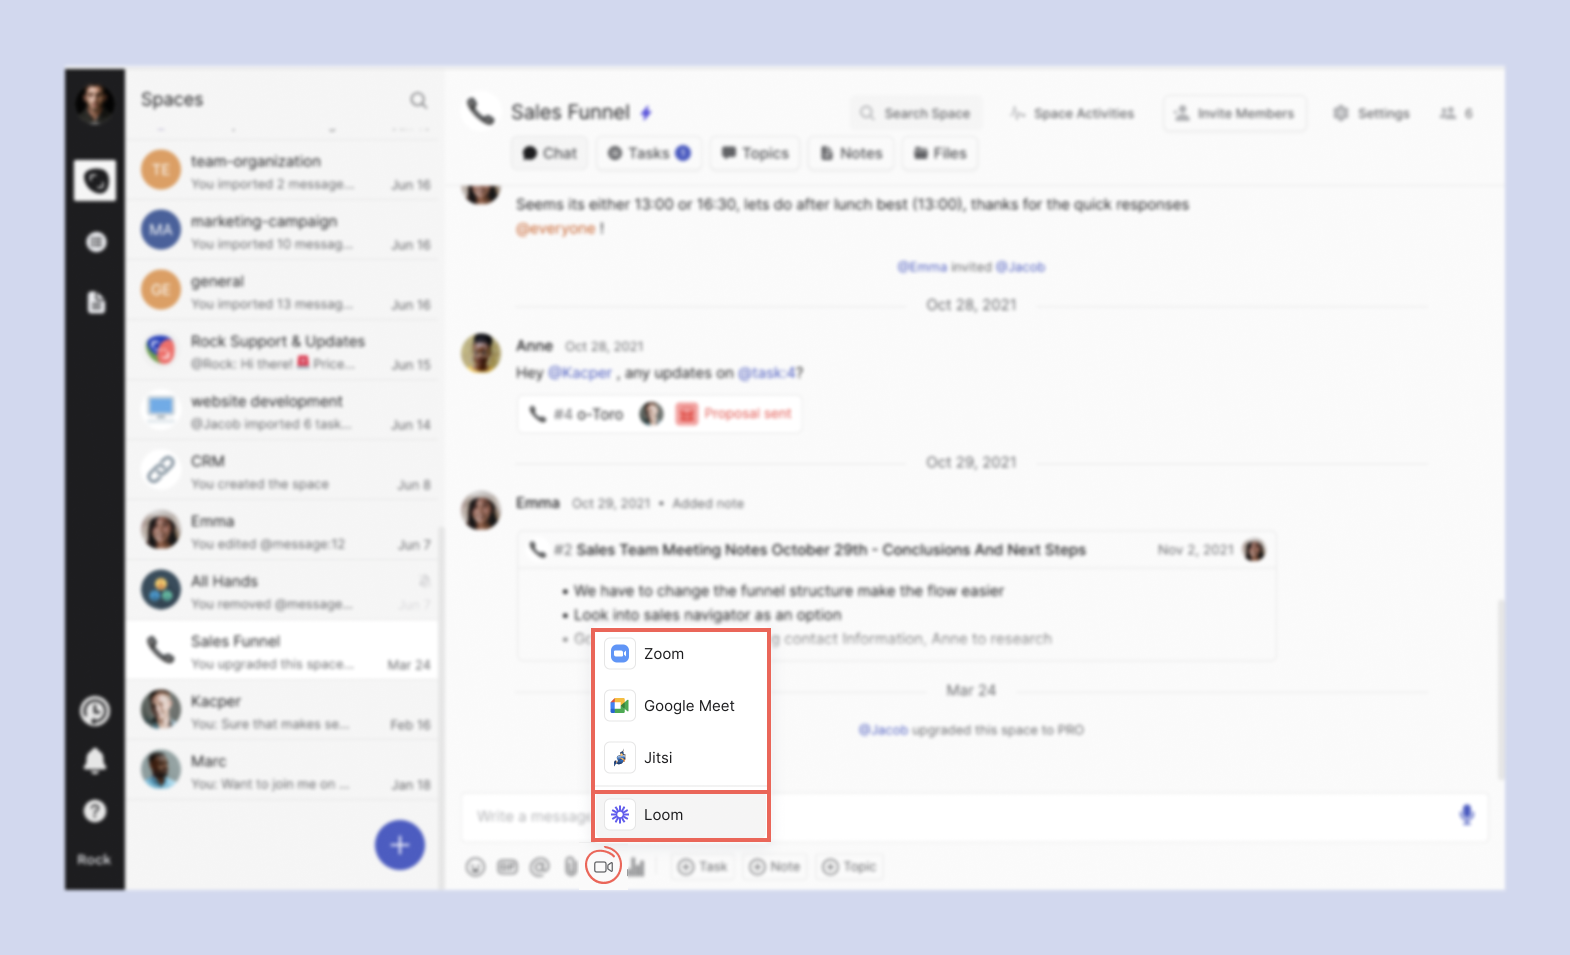
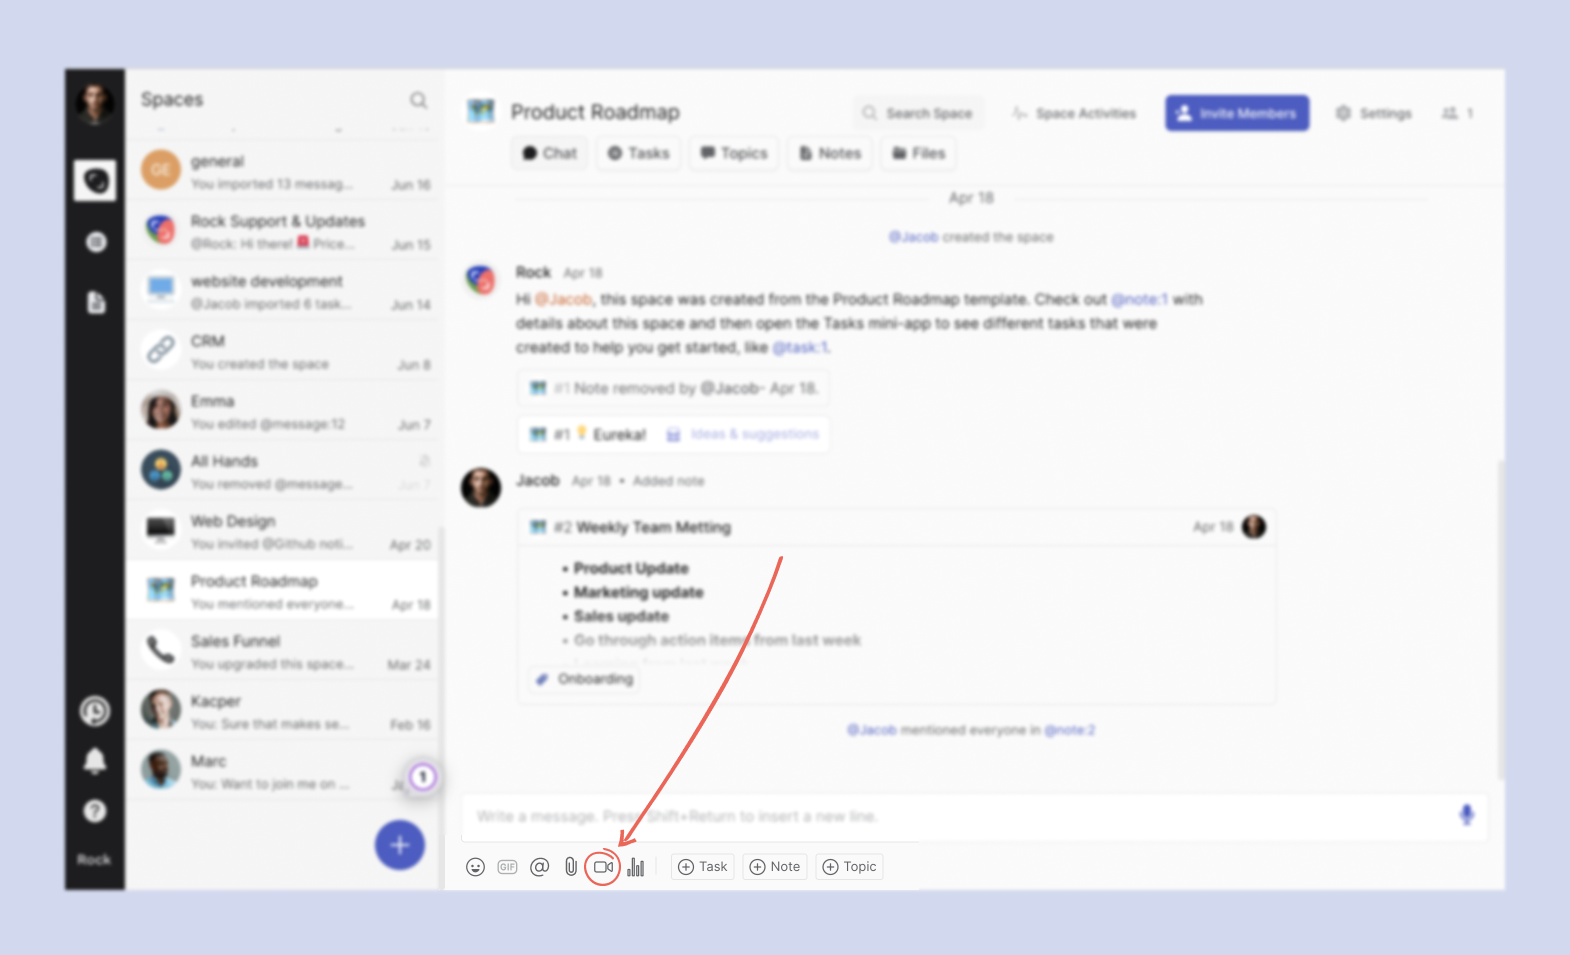
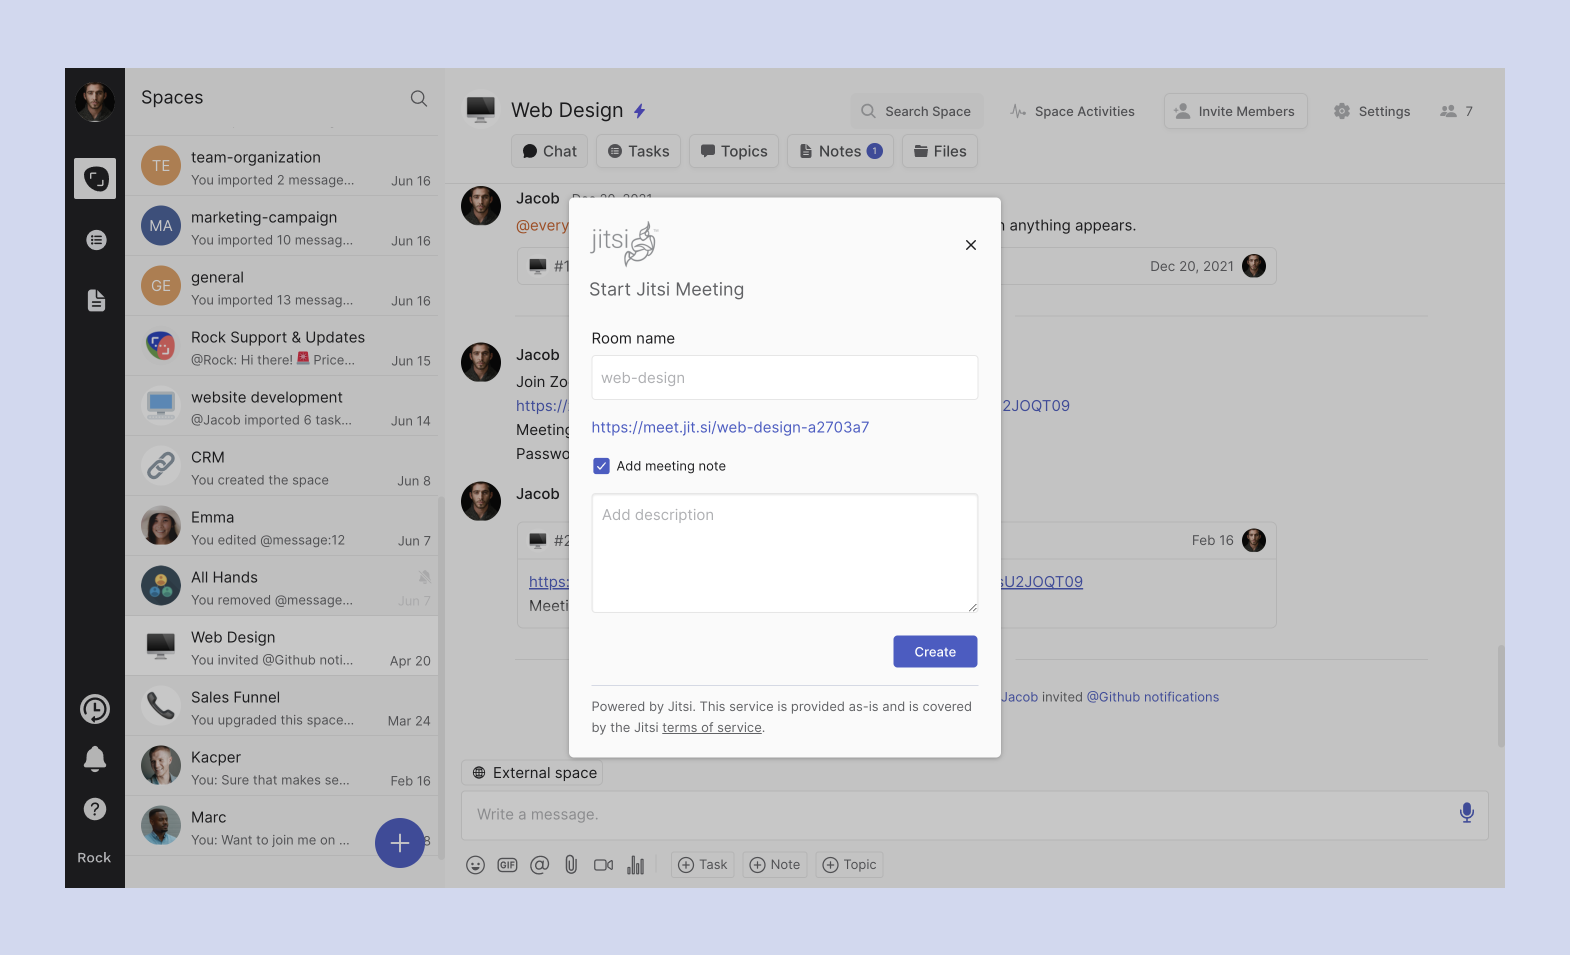
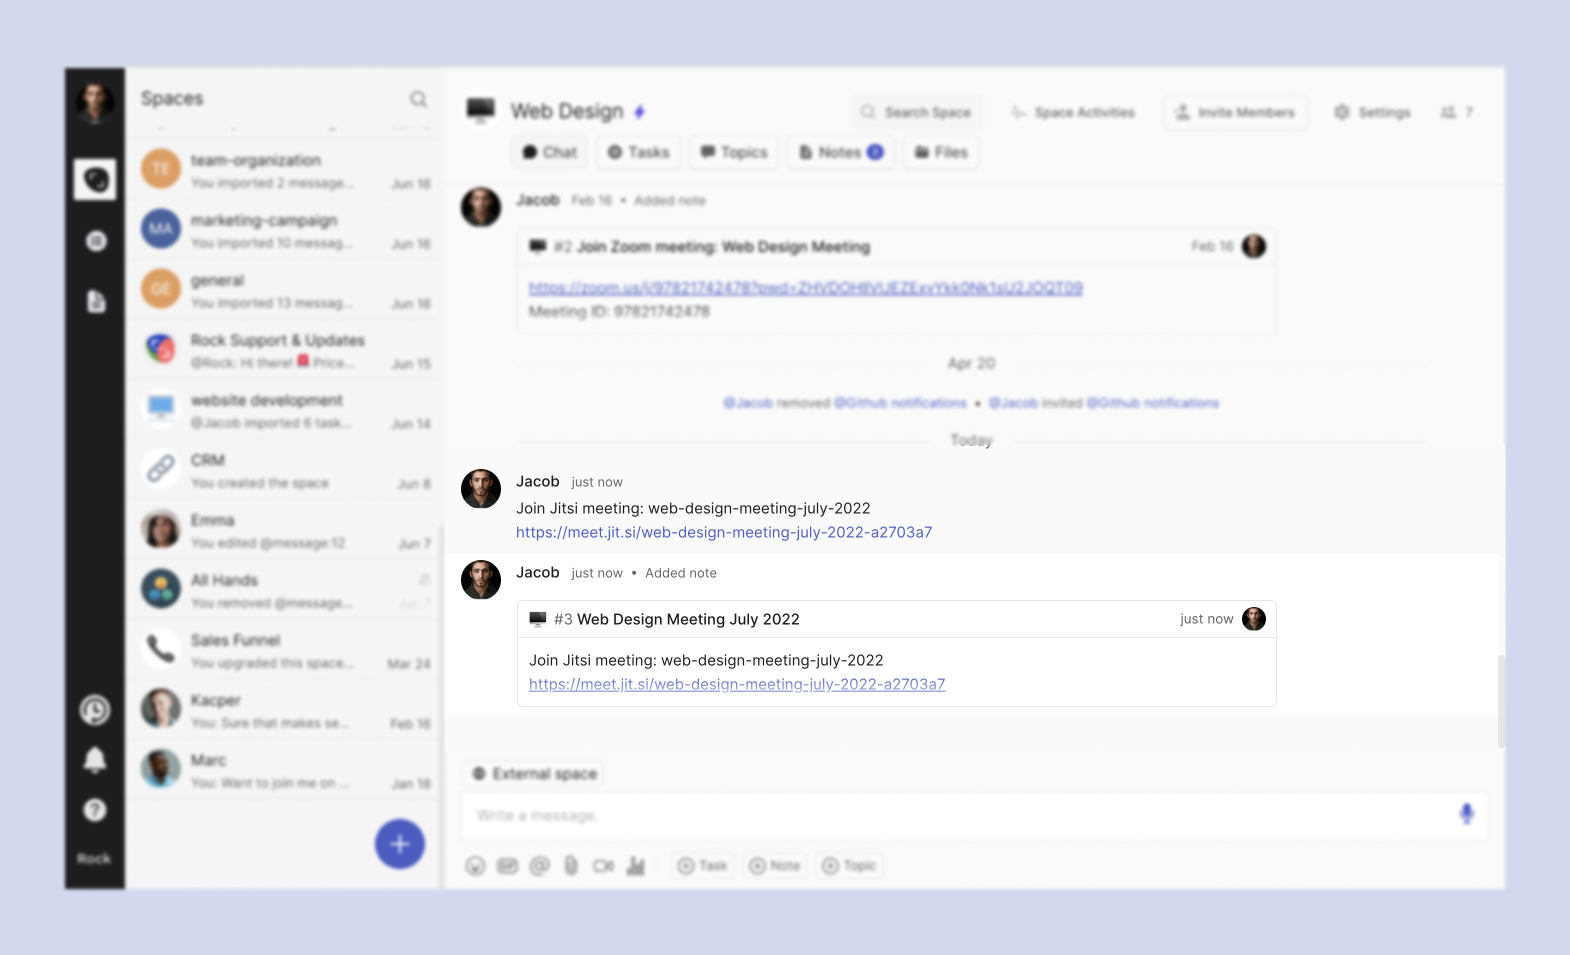
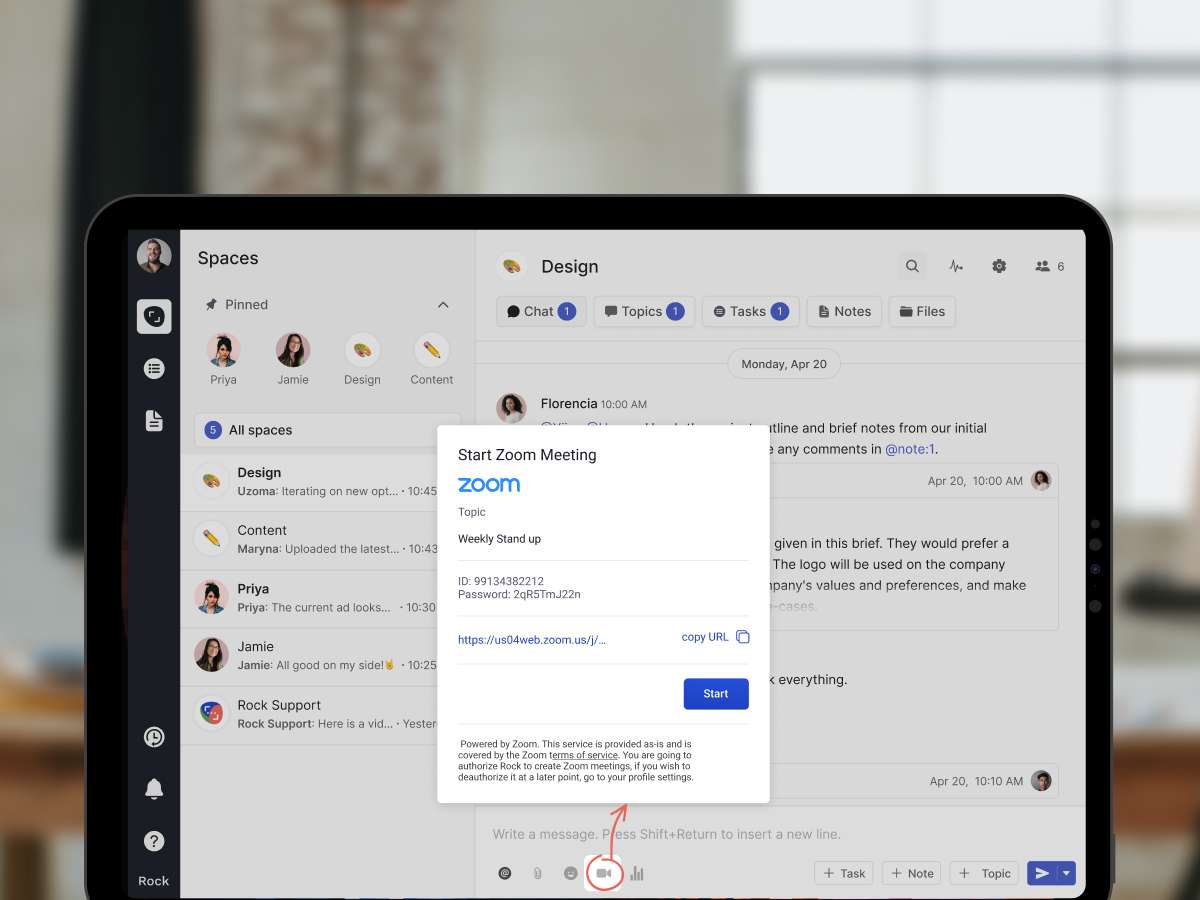
5 credits: Integrate Video Conferencing platforms: Google Meet, Zoom
Note: Some actions might not be credited to your account due to local regulations or your personal settings.
Download the desktop app - 5 credits
Take Rock out of your browser and onto your desktop with a desktop app for Windows, Mac, and Linux. You receive 5 credits for downloading the desktop app. The credits are only awarded once per account. Downloading a desktop application makes it easy to collaborate as you don’t have to shuffle between tabs. Instead, you can add the app to a dedicated part of your setup to quickly access your discussions and workflows.
Download the mobile app - 5 credits
Use Rock on the go with mobile apps for Google Play and the App Store. You receive 5 credits for downloading the Rock mobile app. The credits are only awarded once per account. Entering your account from different devices will not award new points. Mobile apps make it easier to communicate with your team while away from your computer. Stay flexible and available when really needed with a blazingly fast mobile app.
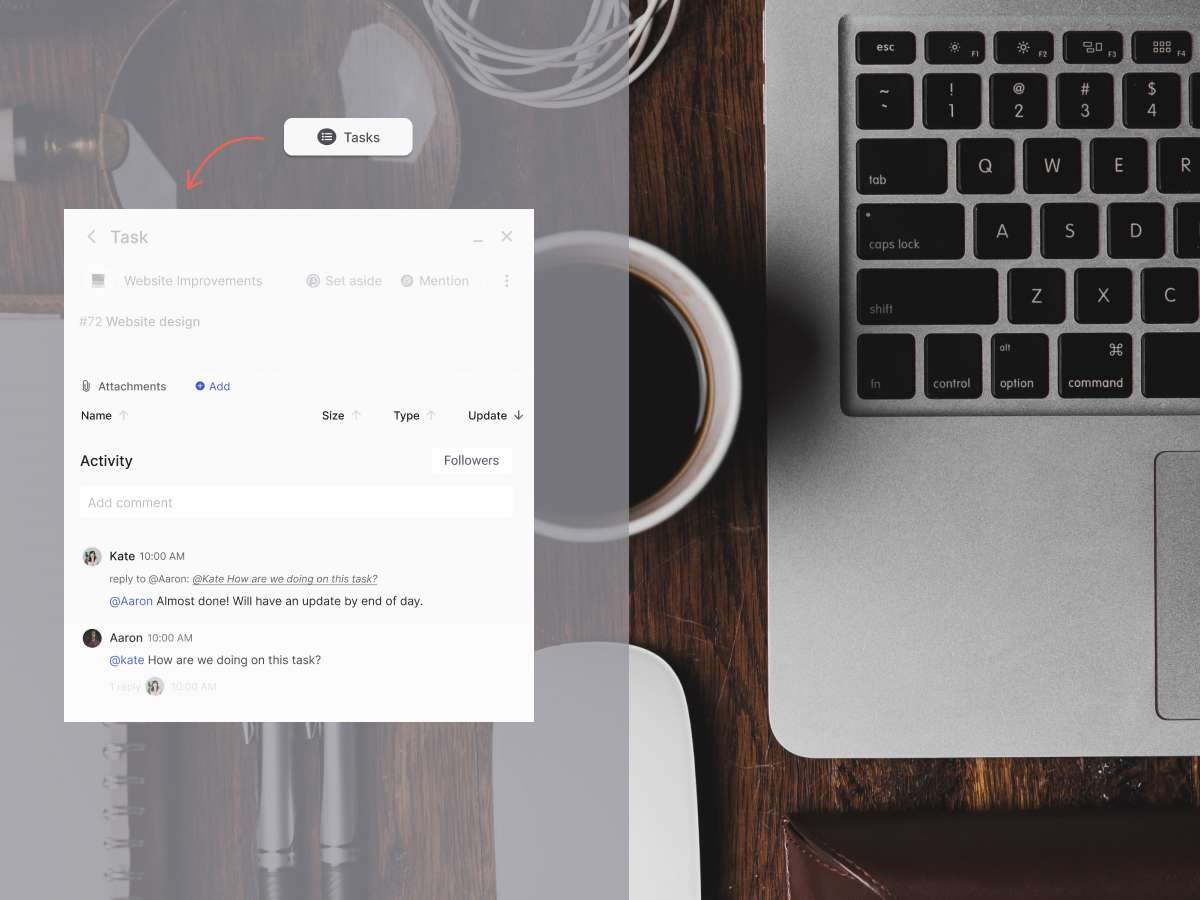
Create your first task - 1 credit
Create your first task and receive 1 credit! Task management allows you to collaborate with your team in more asynchronous ways. Describe an activity, timeline, and who needs to complete it to get started. You can then use comments, lists, or user status to provide updates on your progress. Credits are only awarded the first time you create a task, future new tasks will not lead to additional credits.
Create your first note - 1 credit
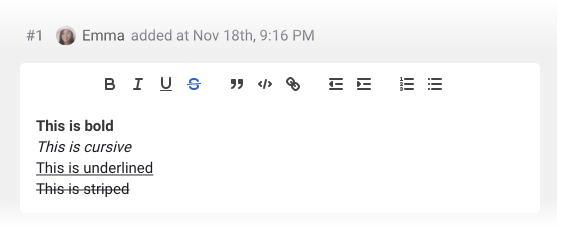
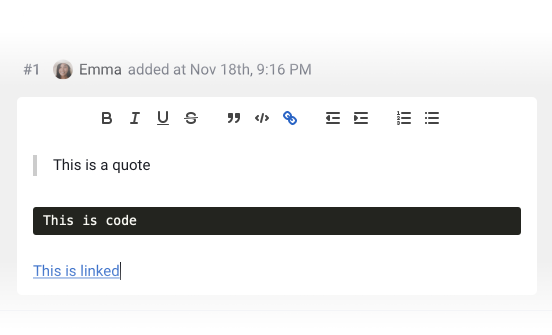
Receive 1 credit by creating your first note. Document critical information, such as meeting agendas, workflow descriptions, or important documents. Format your text with lists, links, text formatting, and much more. Only the first note you create is awarded 1 credit. Subsequent notes will not provide you with more credits.
Create your first topic - 1 credit
Start your first topic in a space and receive 1 new credit. Topics are more organized and documented discussions. Select the people involved in a conversation and add them as followers. Only those following the topic will receive a notification, making it a more effective way to discuss projects and workflows. You receive 1 credit for your first topic. Any topics you create after that will not be awarded additional credits.
Set Aside your first item - 1 credit
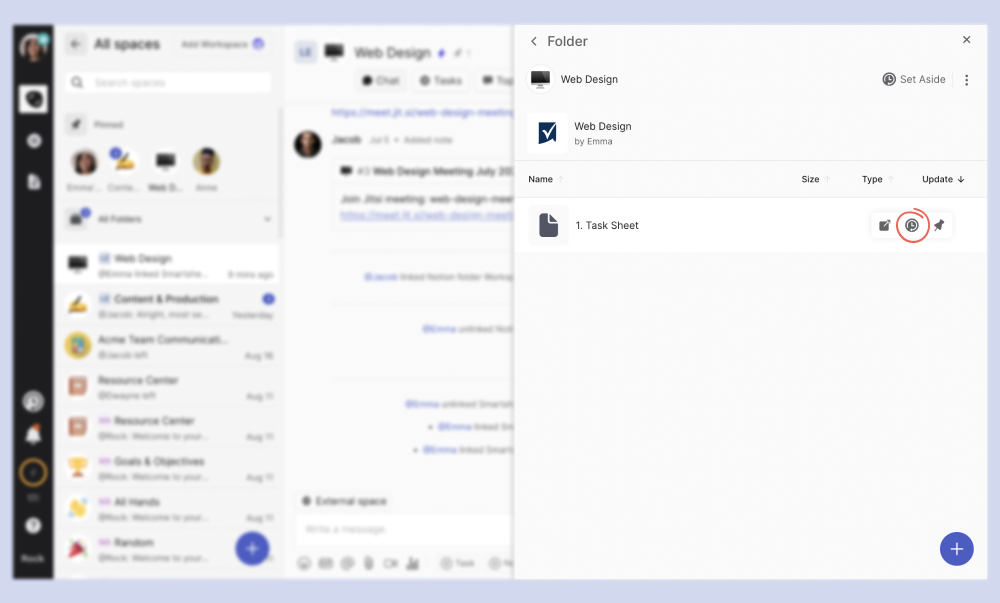
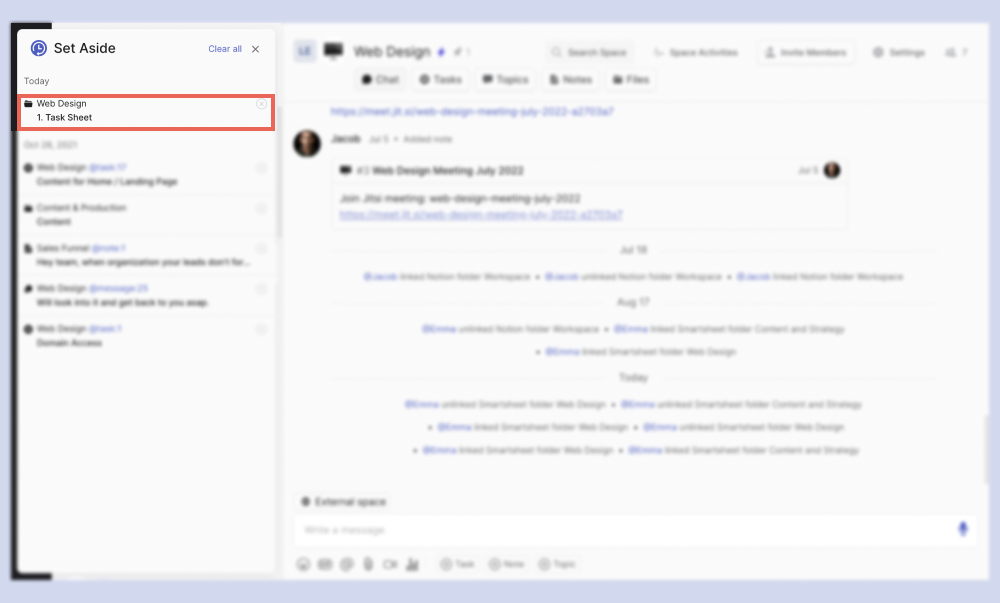
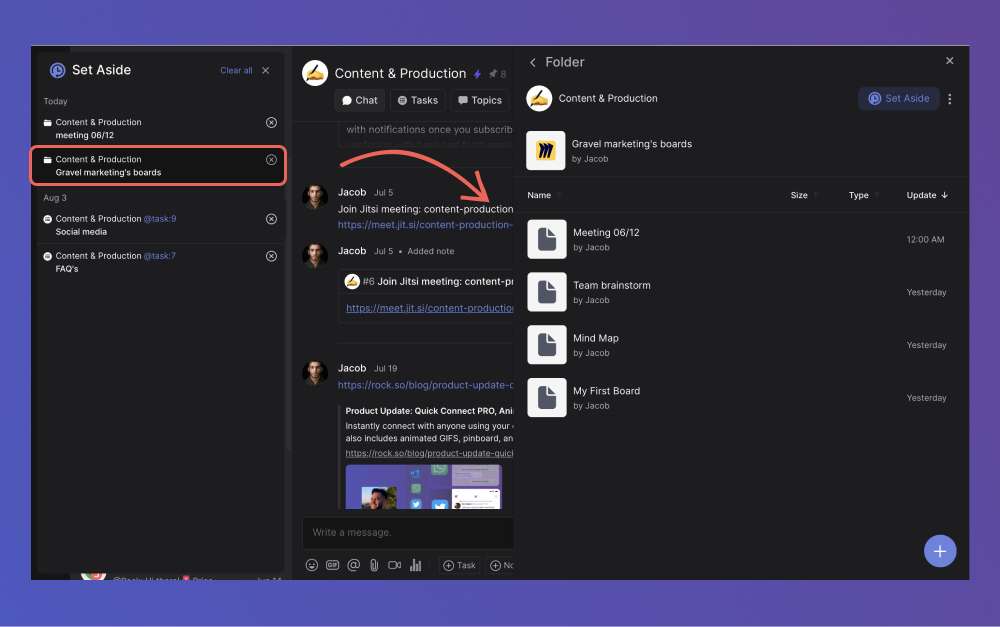
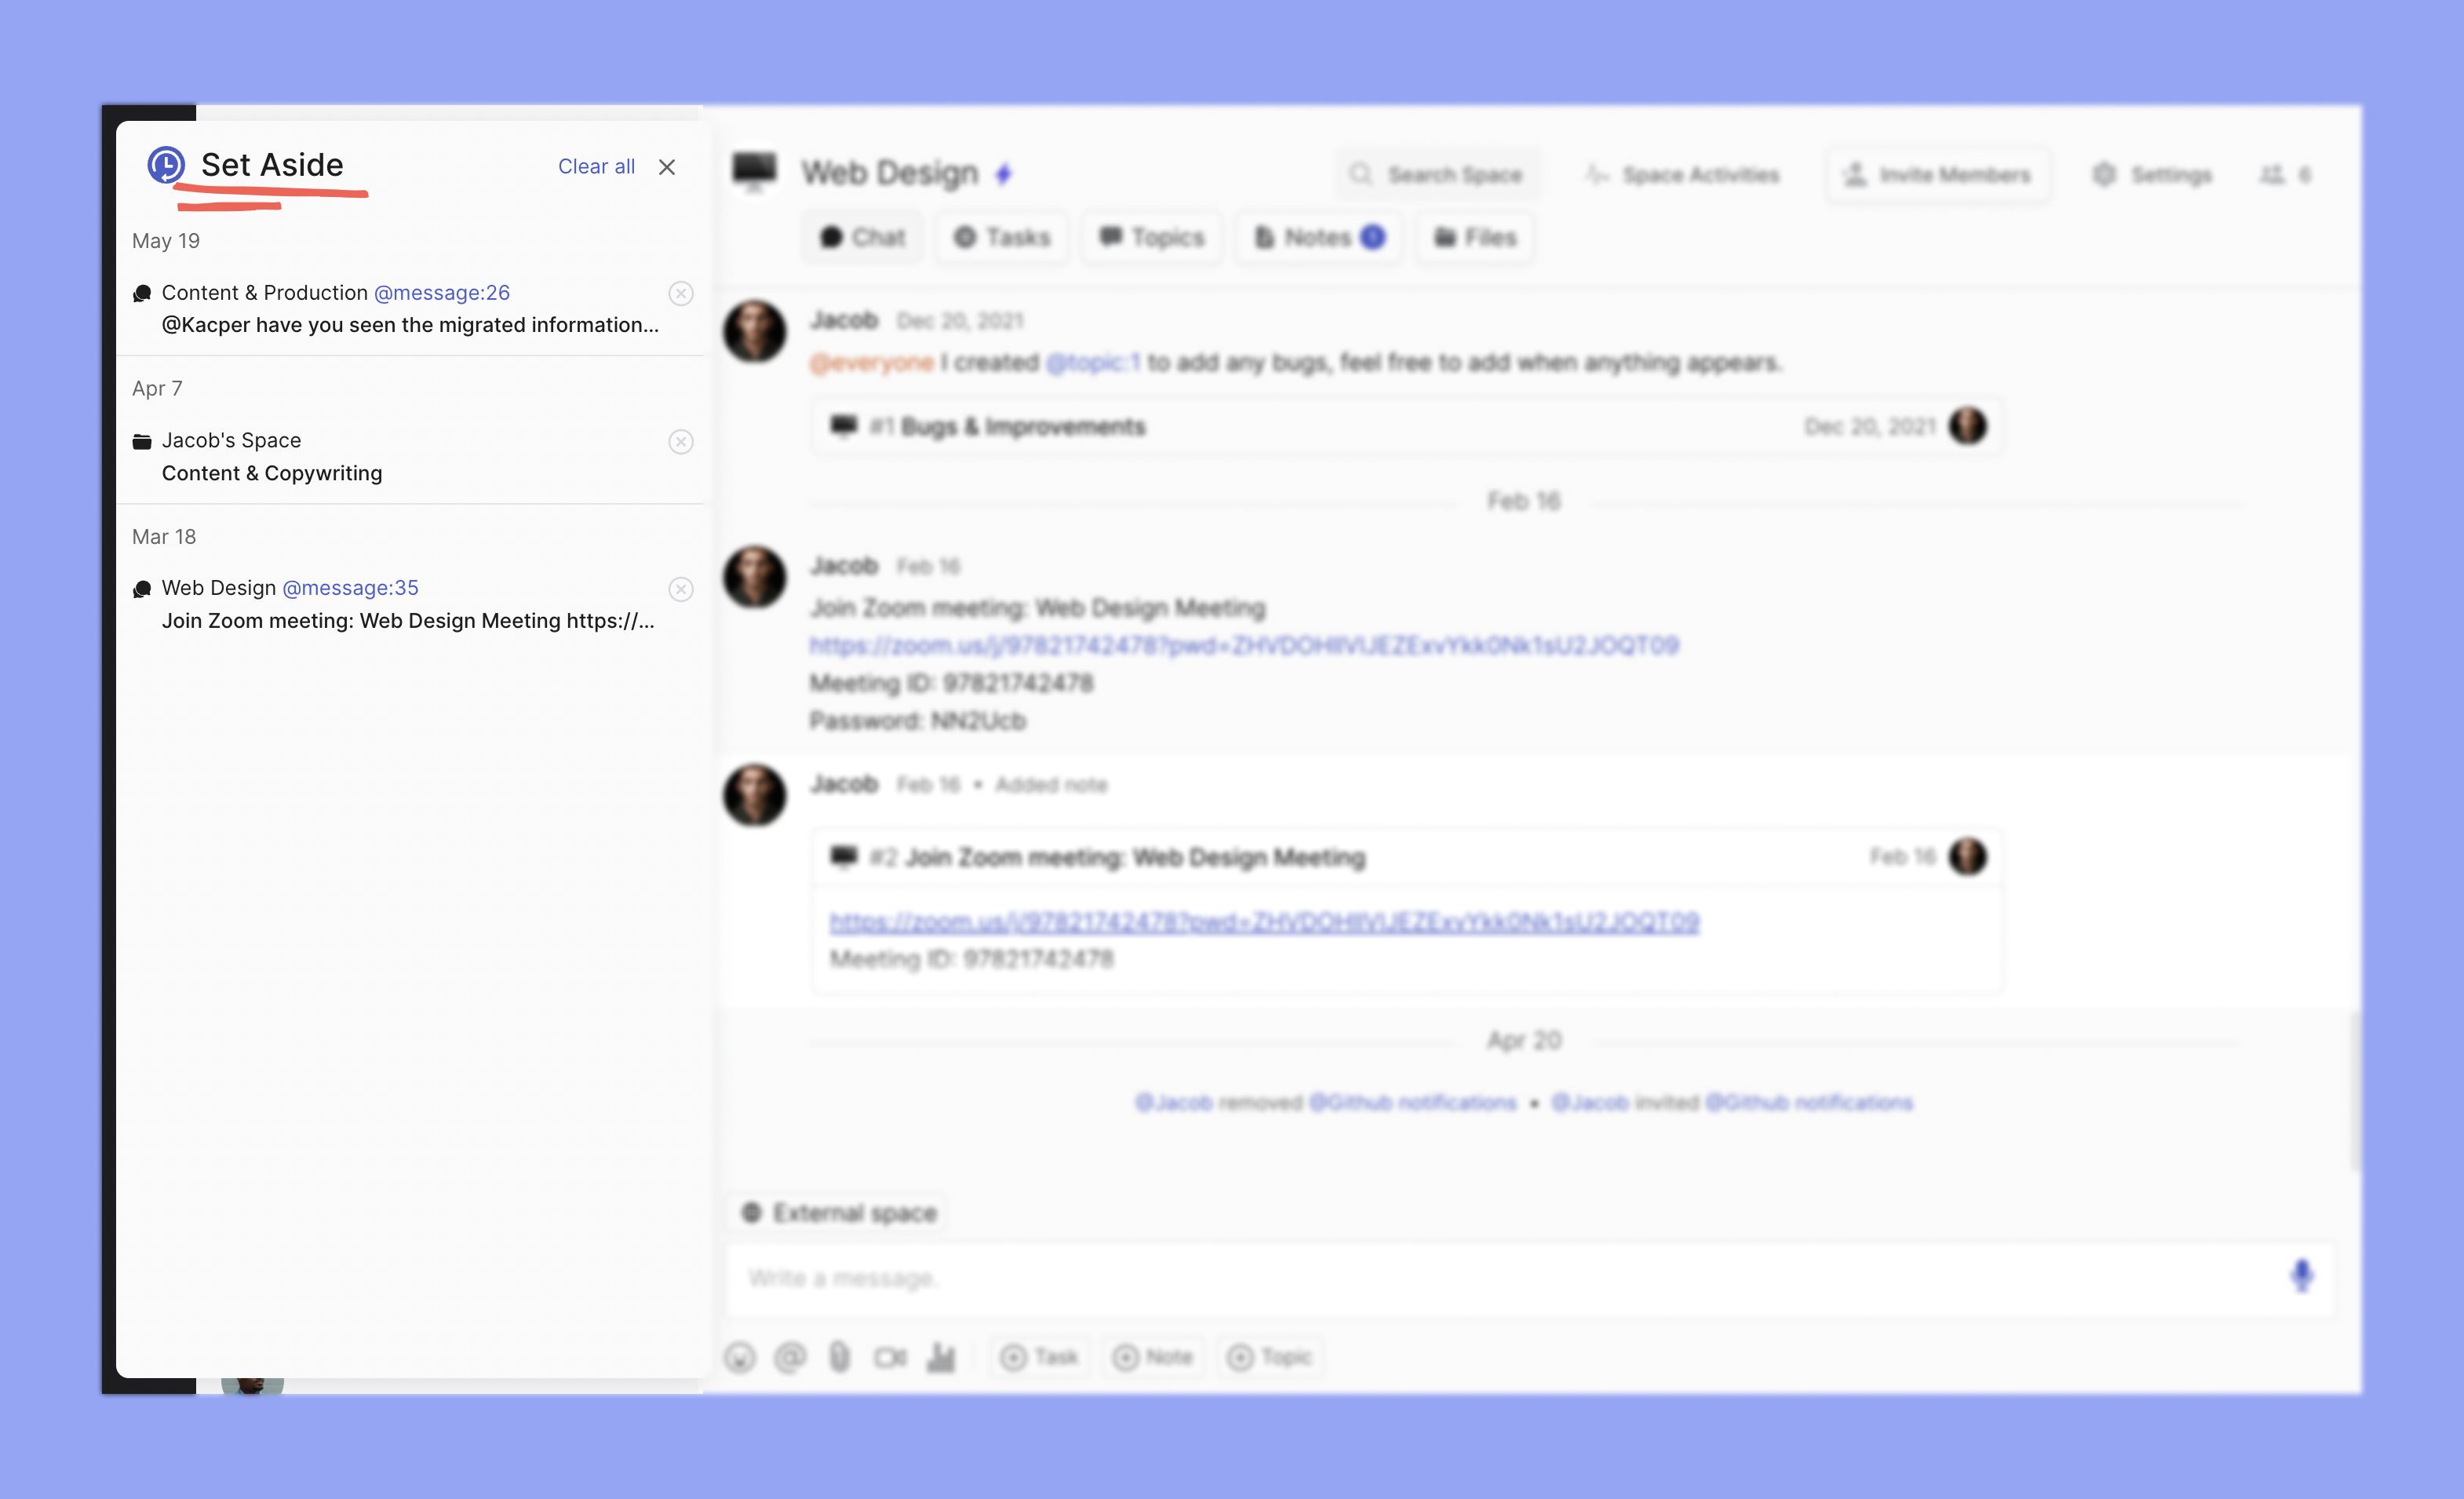
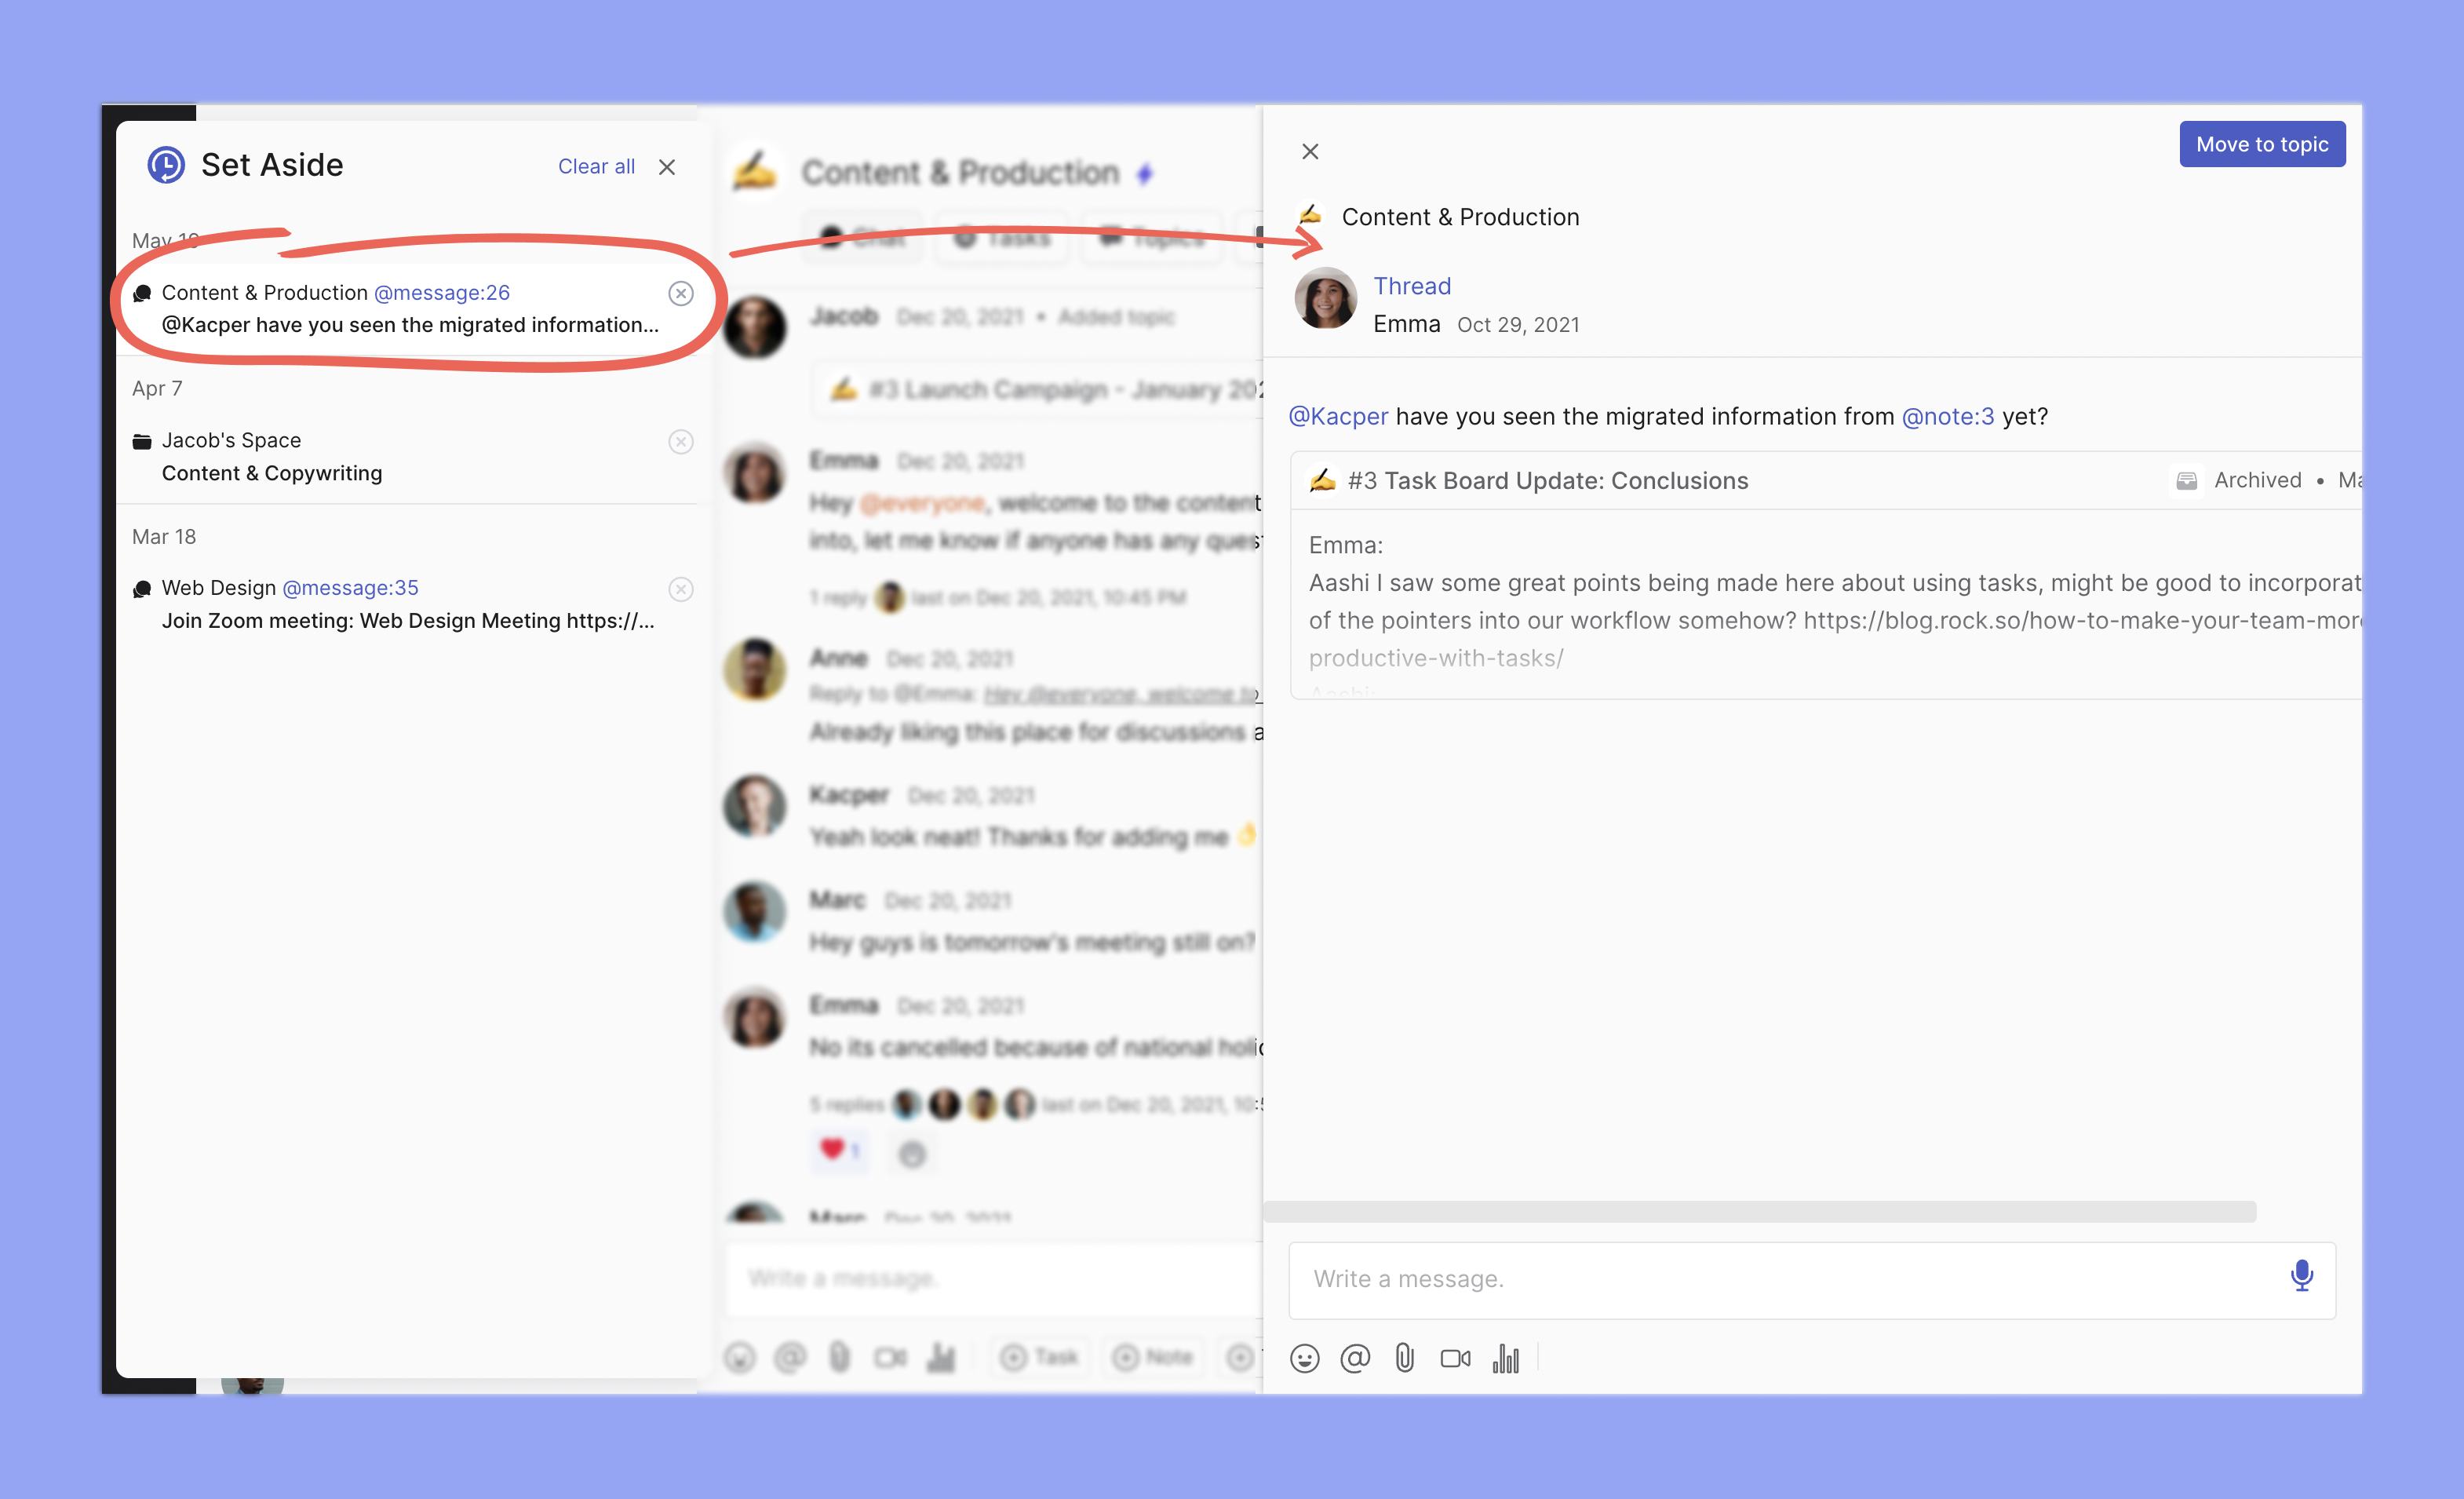
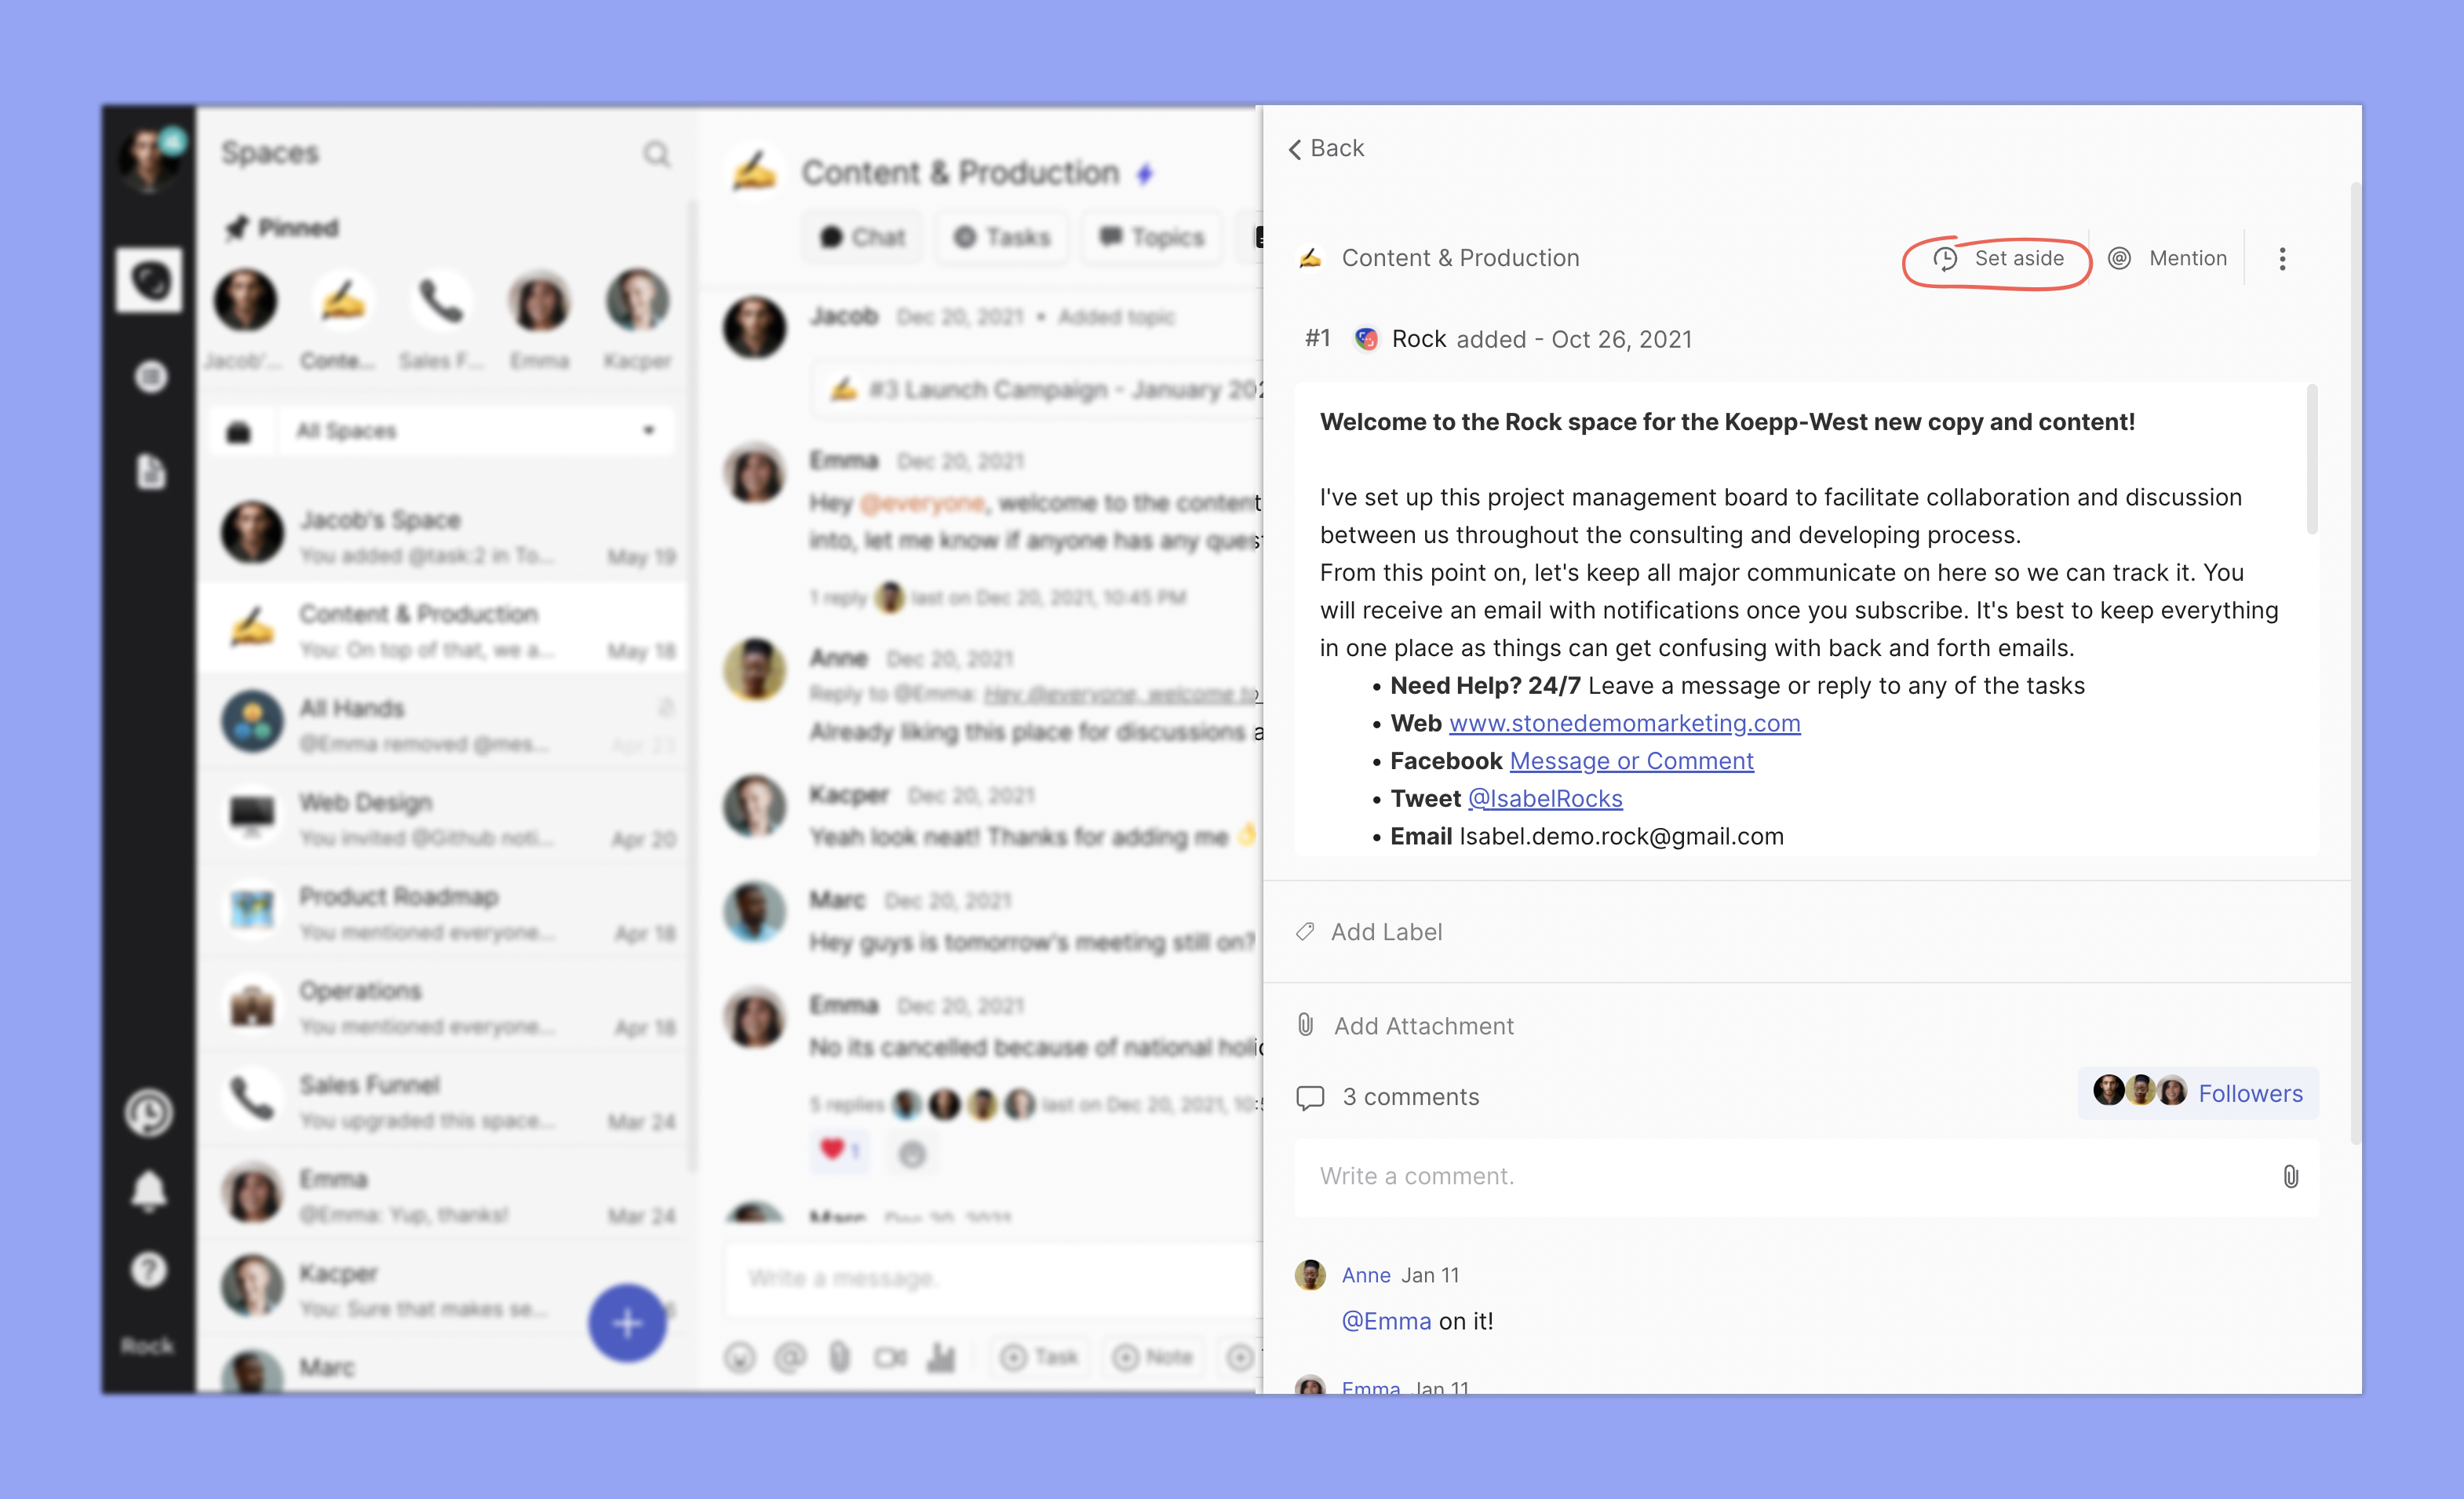
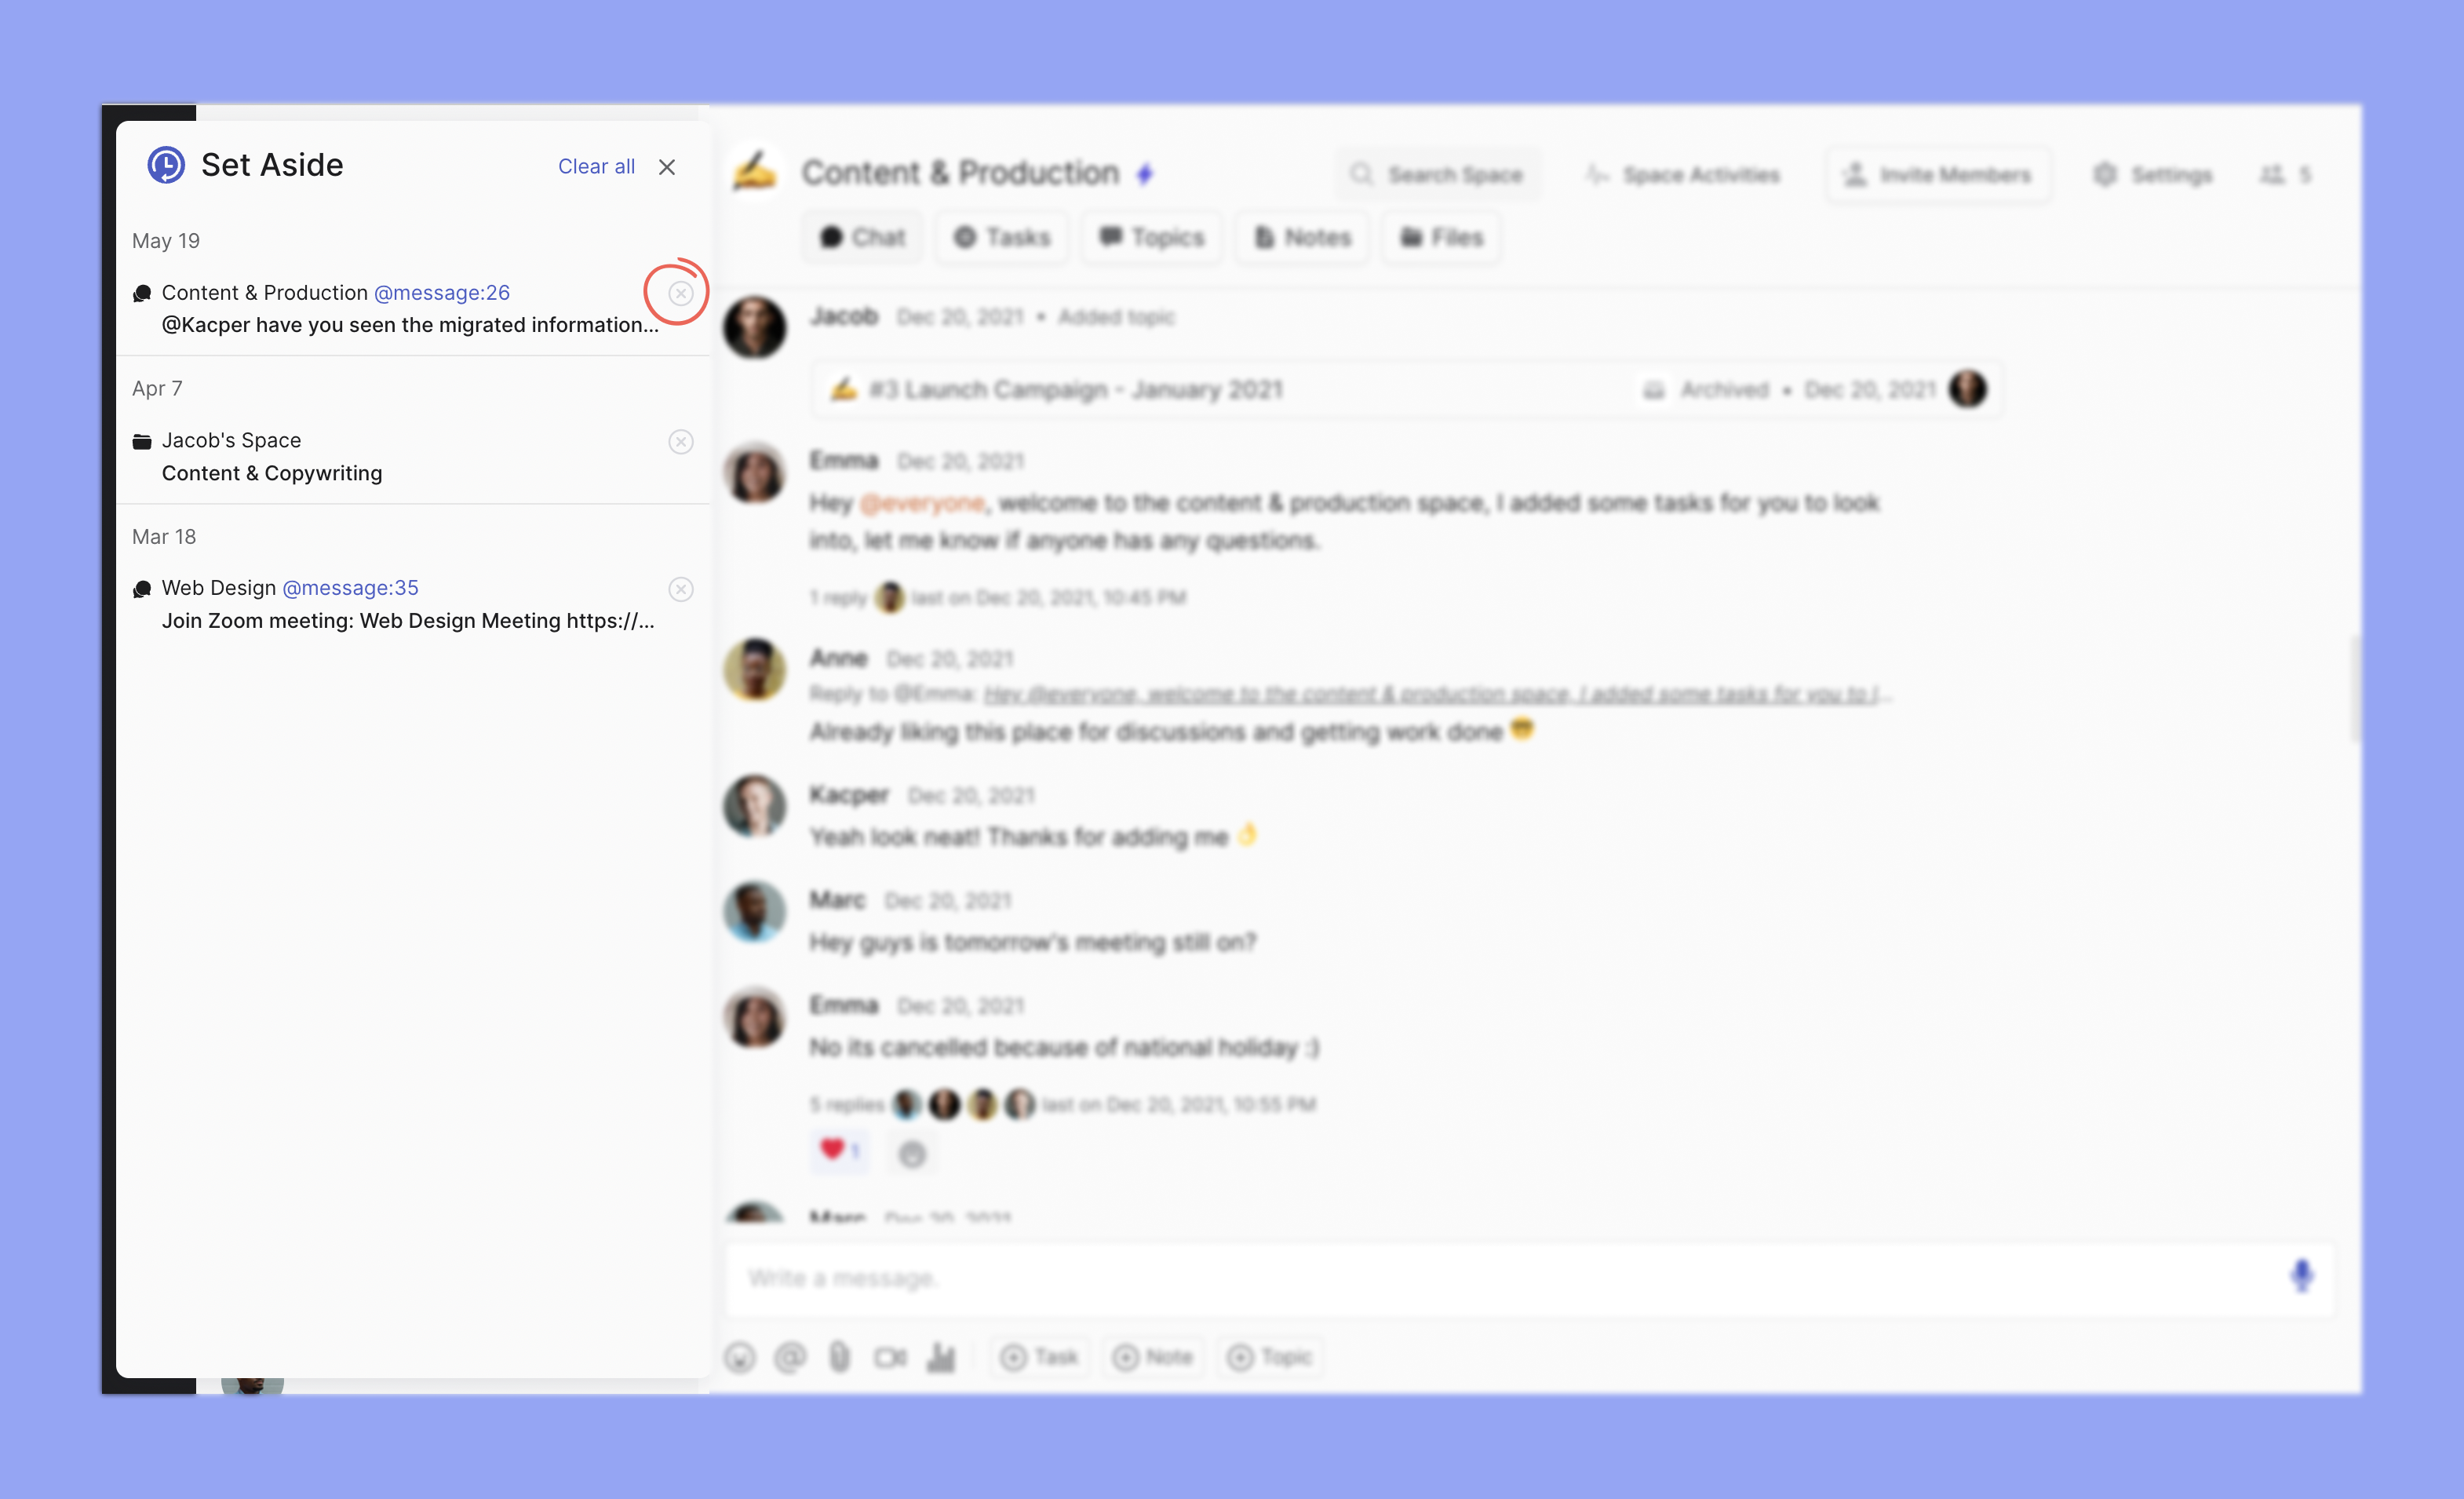
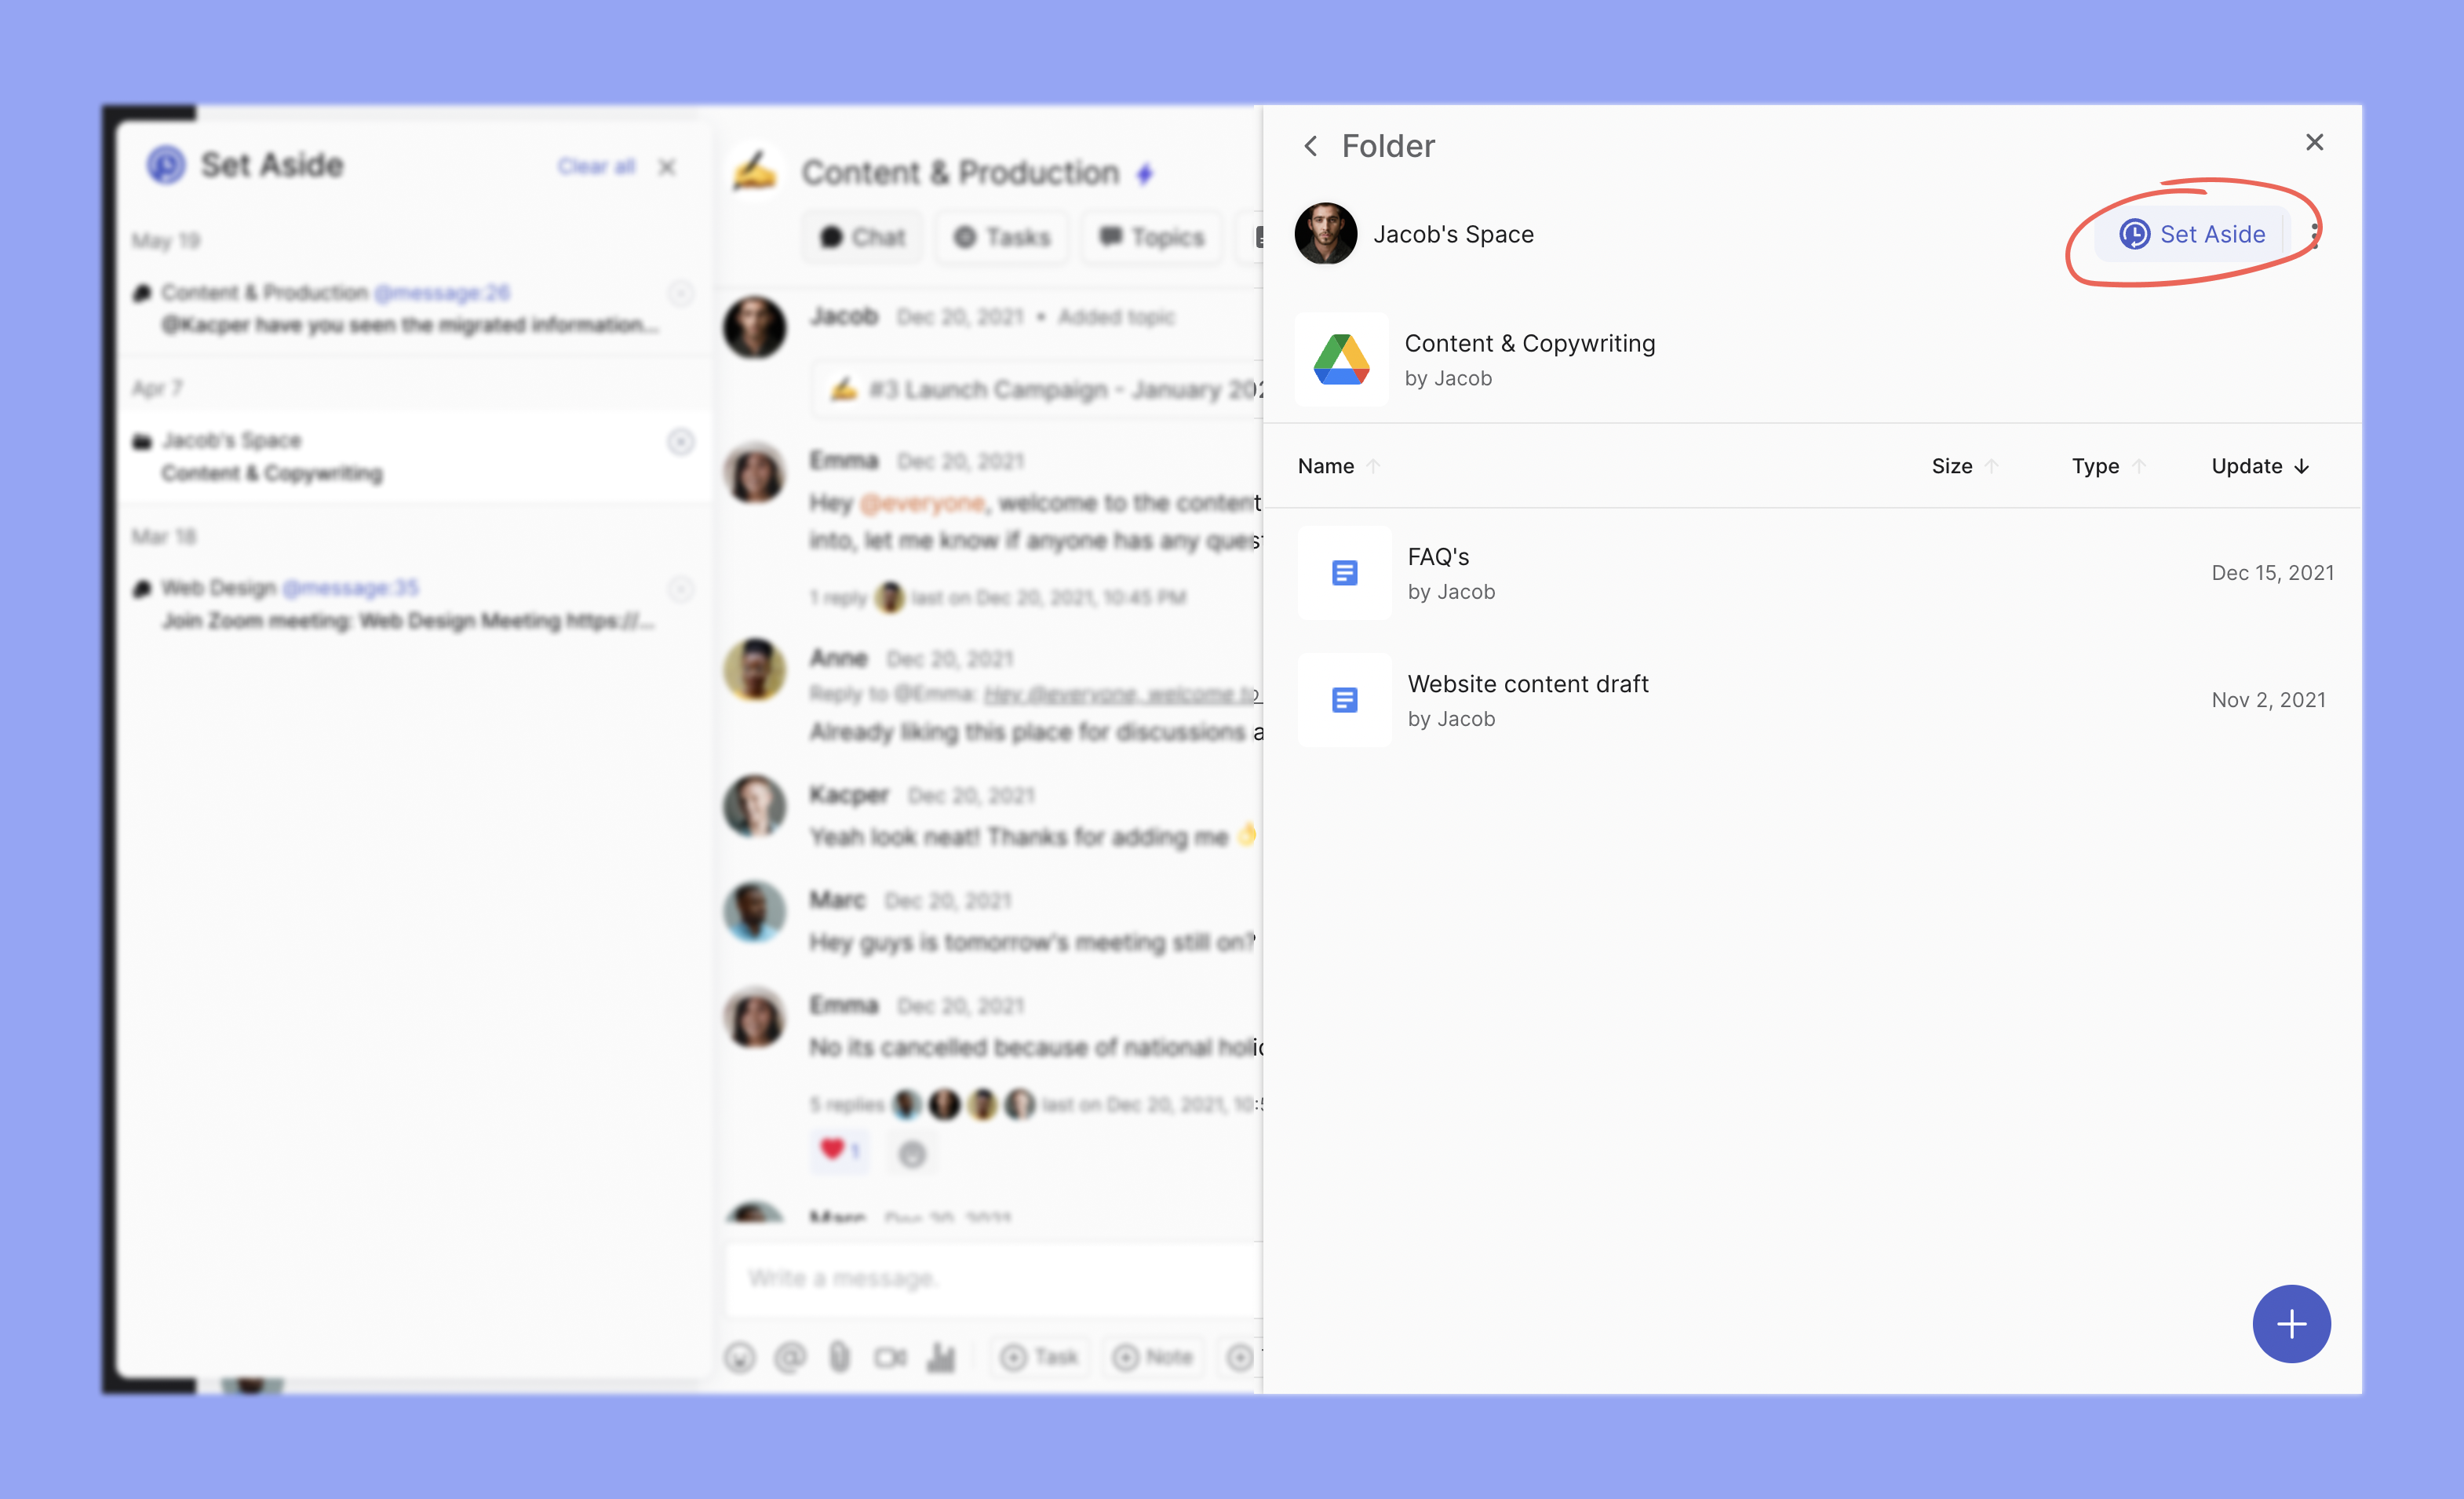
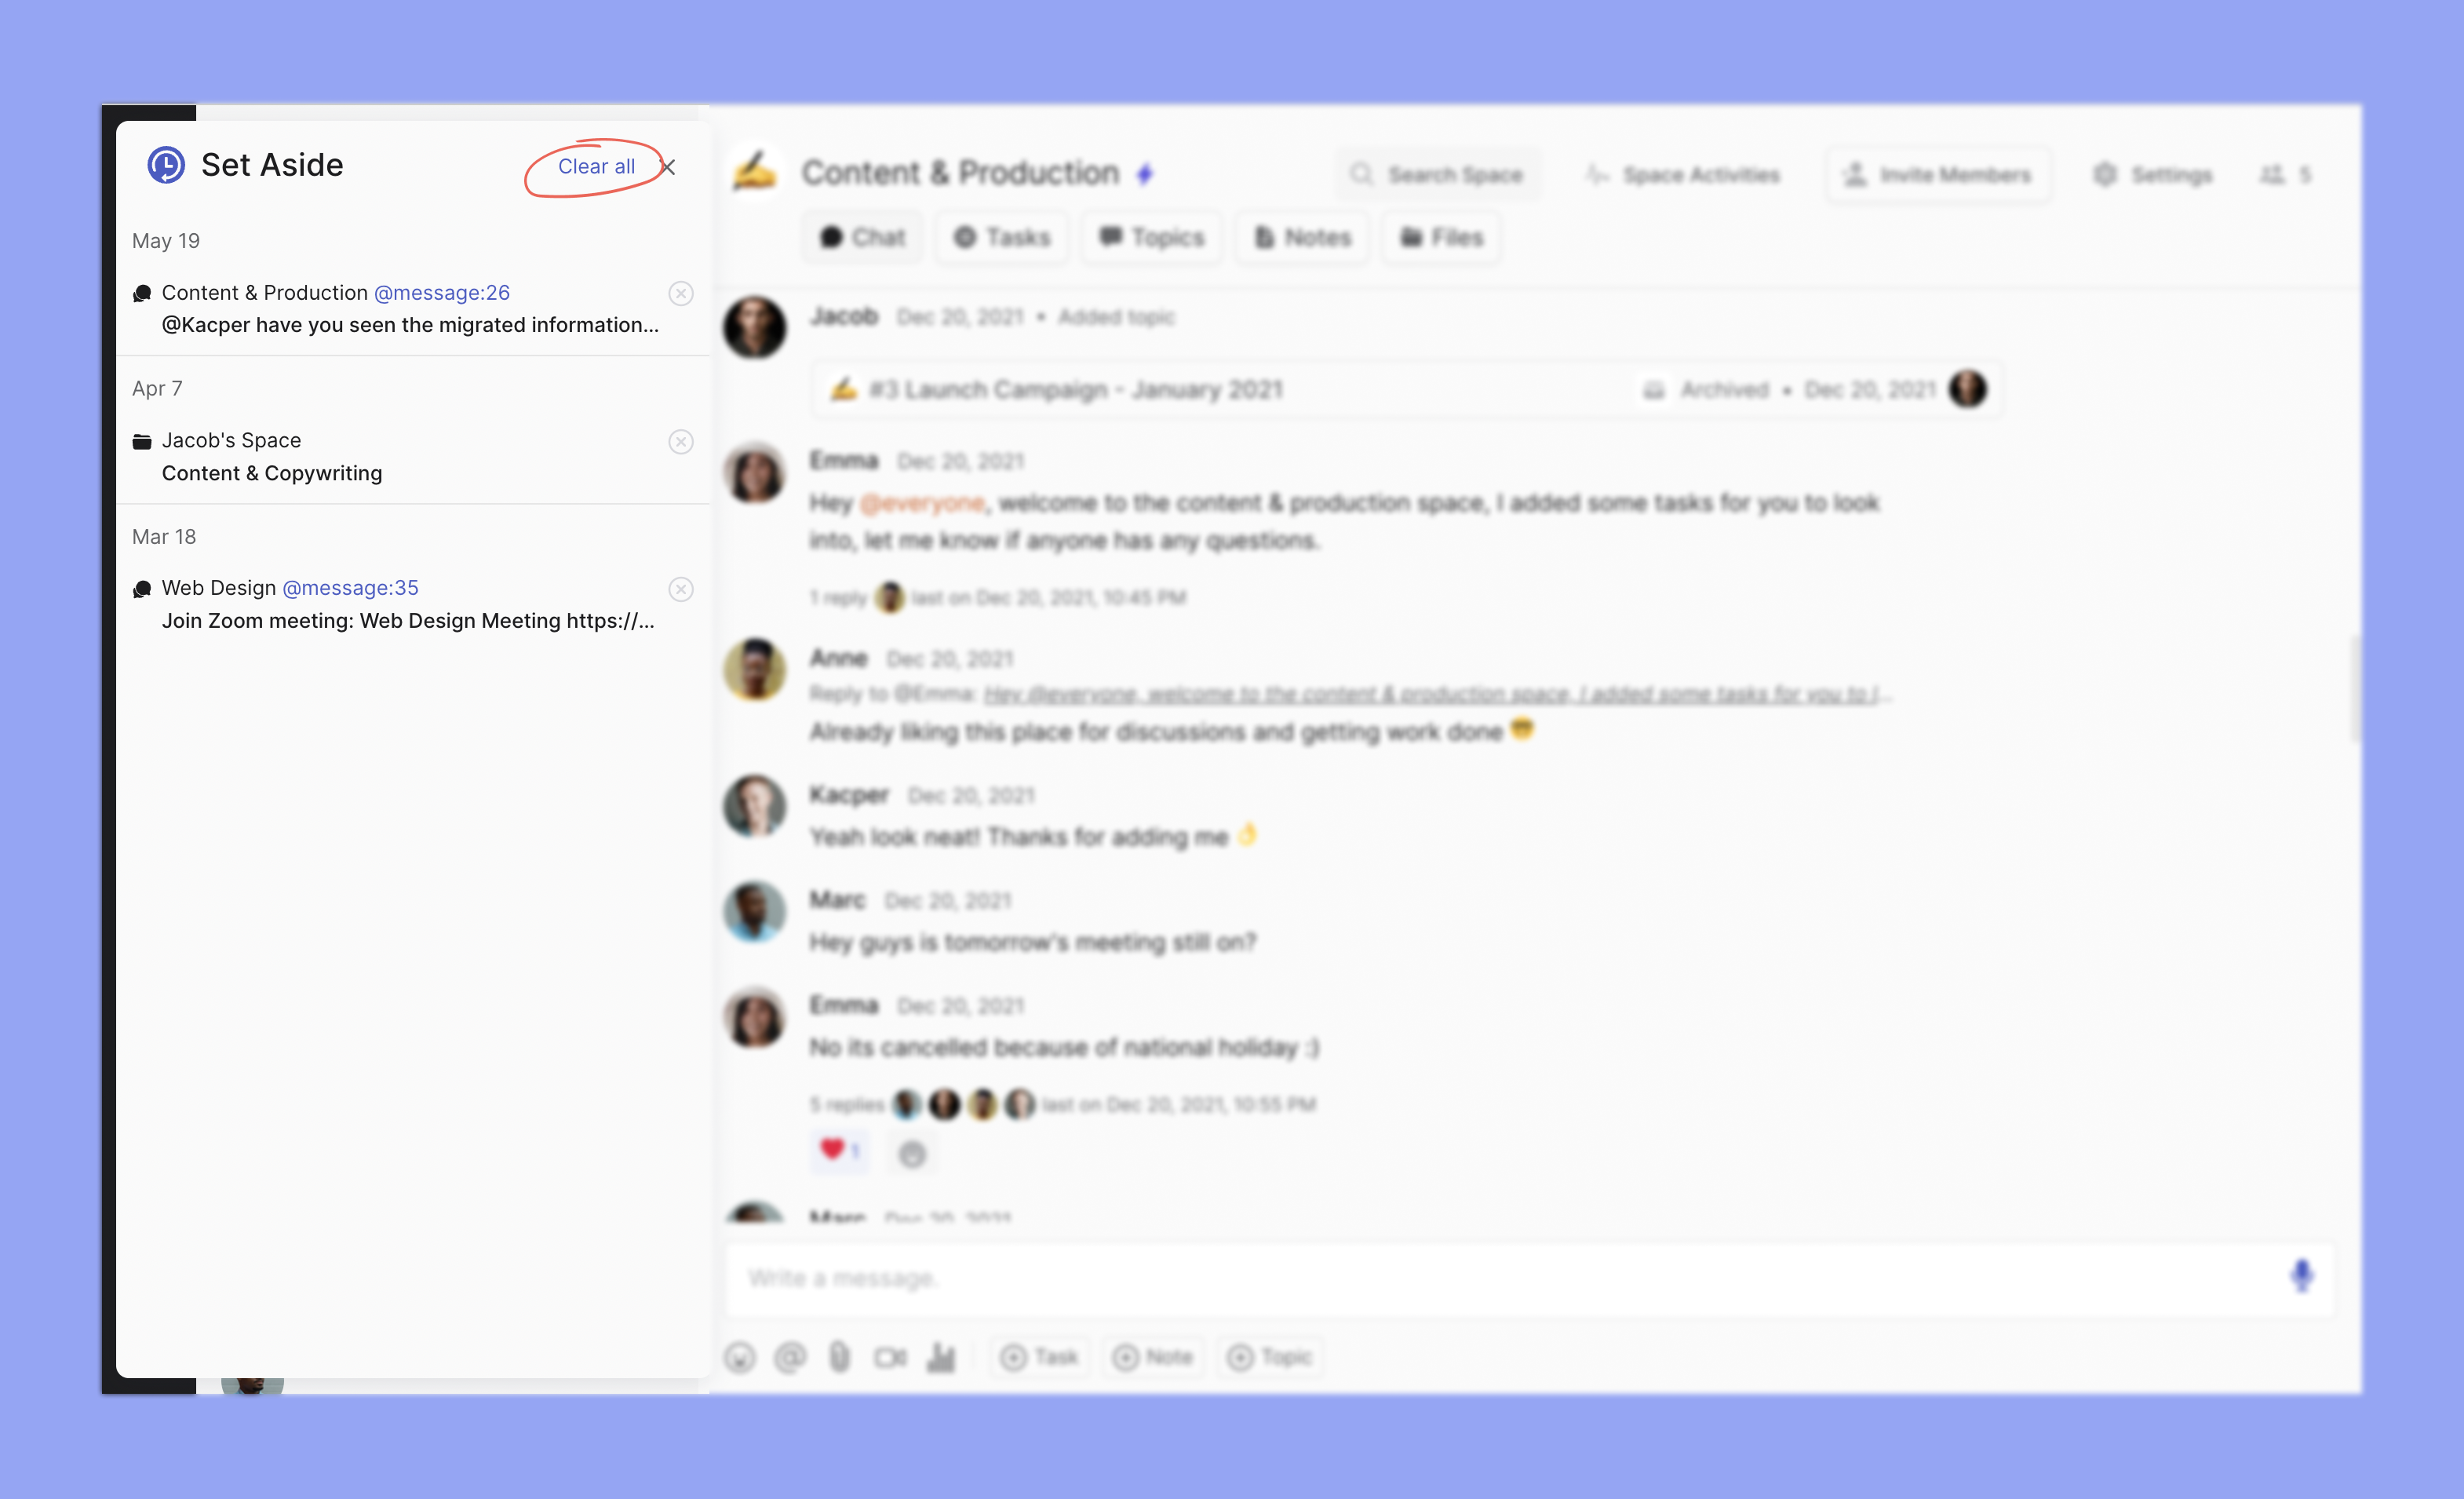
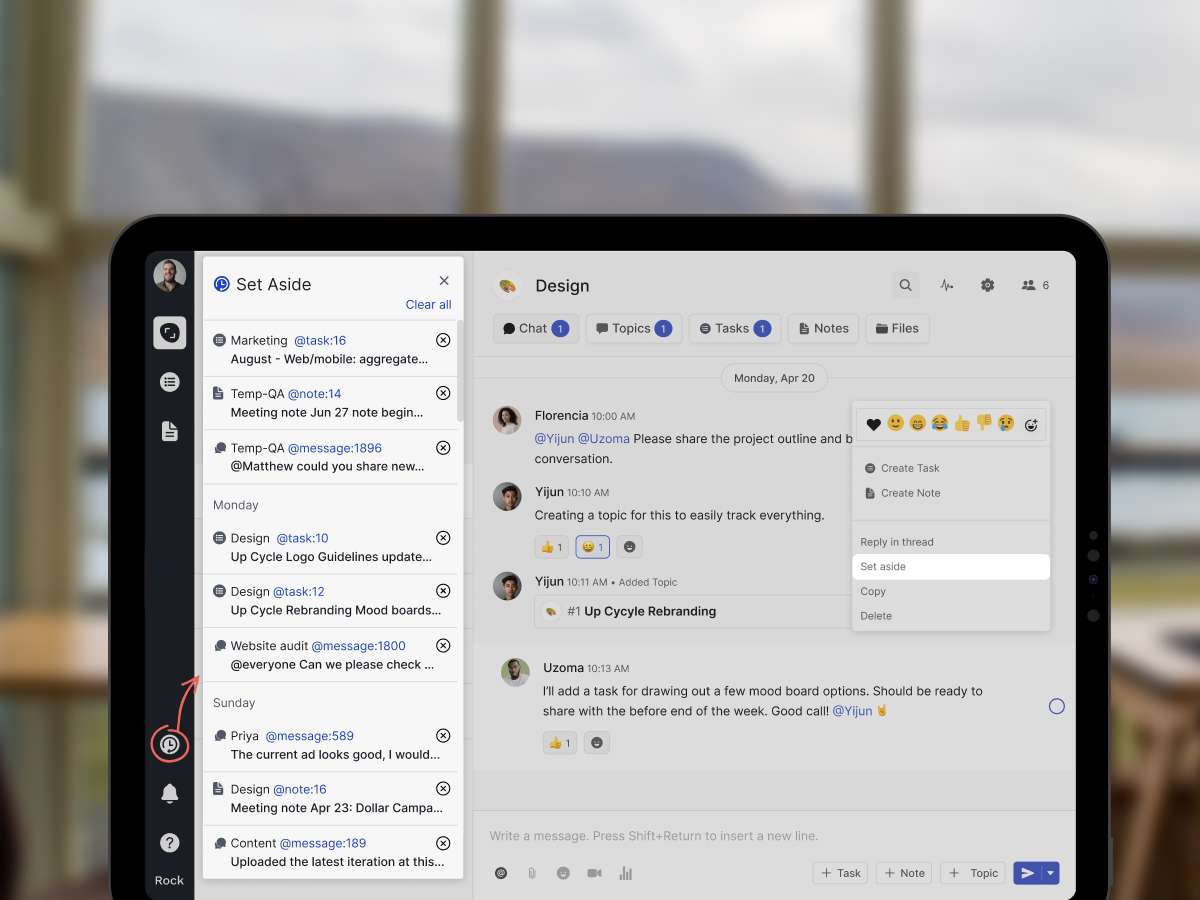
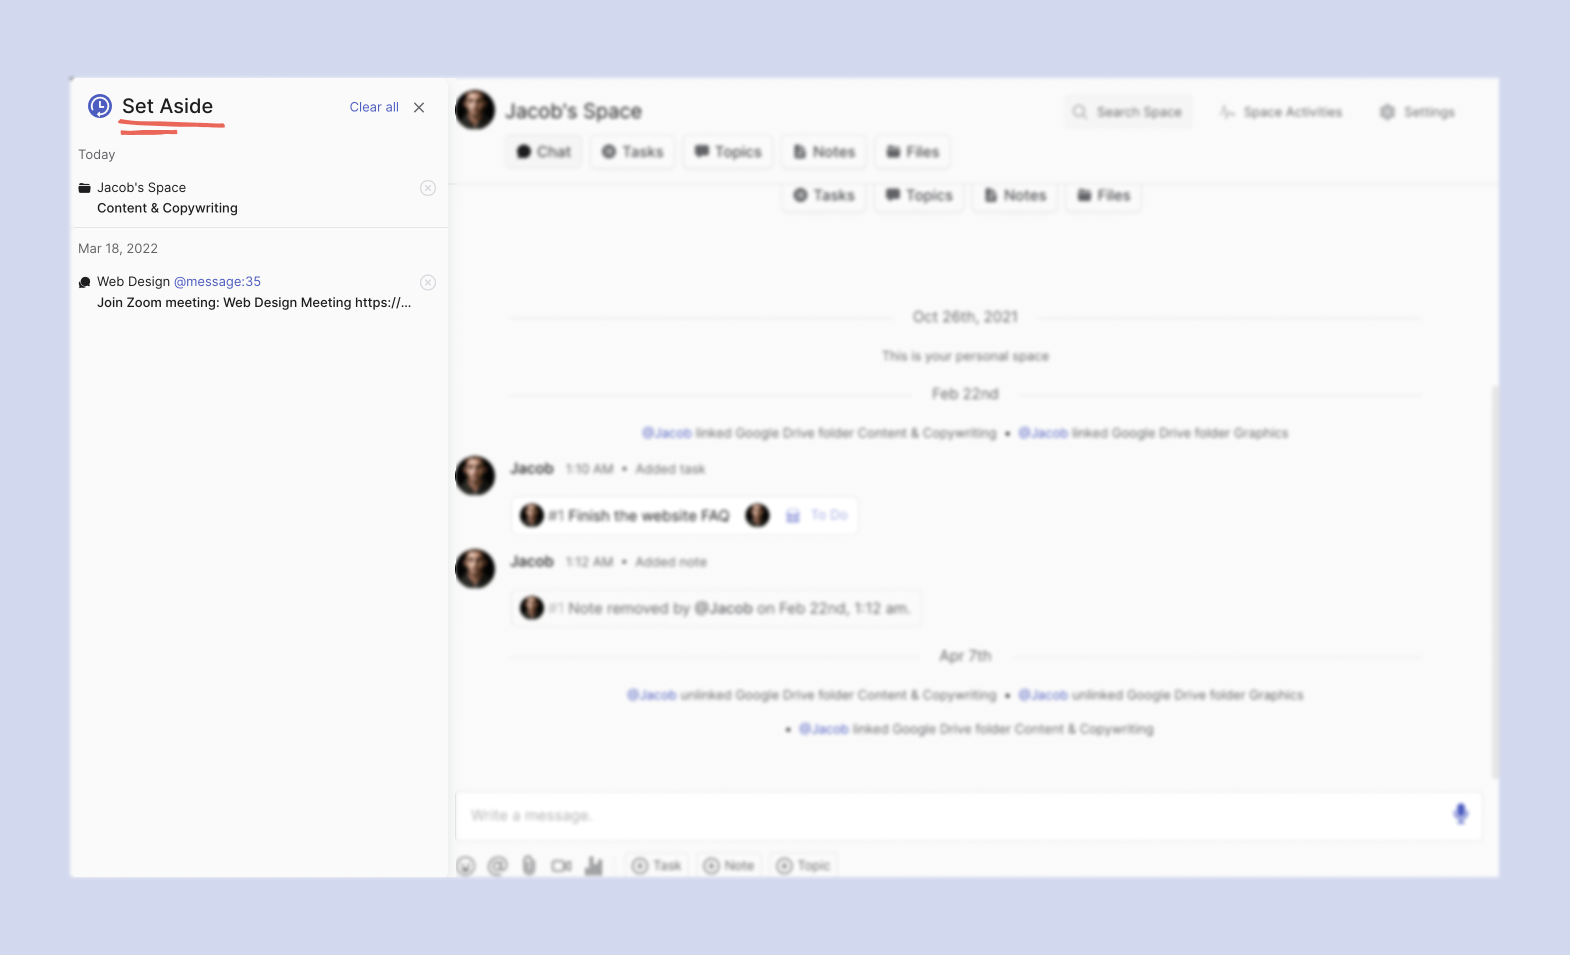
Set Aside is a unique Rock feature that allows you to move objects to a dedicated panel for future follow-up. You can set aside messages, tasks, notes, files, and topics by clicking on the Set Aside icon in the top right corner of each object. Information you Set Aside can be accessed by clicking on the Set Aside icon in the bottom left corner of your screen.
Use this panel as a to-do list, for reminders, or as a personal pinboard.1 credit is awarded for setting aside your first object. This can be a message, task, note, topic, or file. The reward is only awarded once. This means that additional objects you Set Aside are not rewarded with new credits.
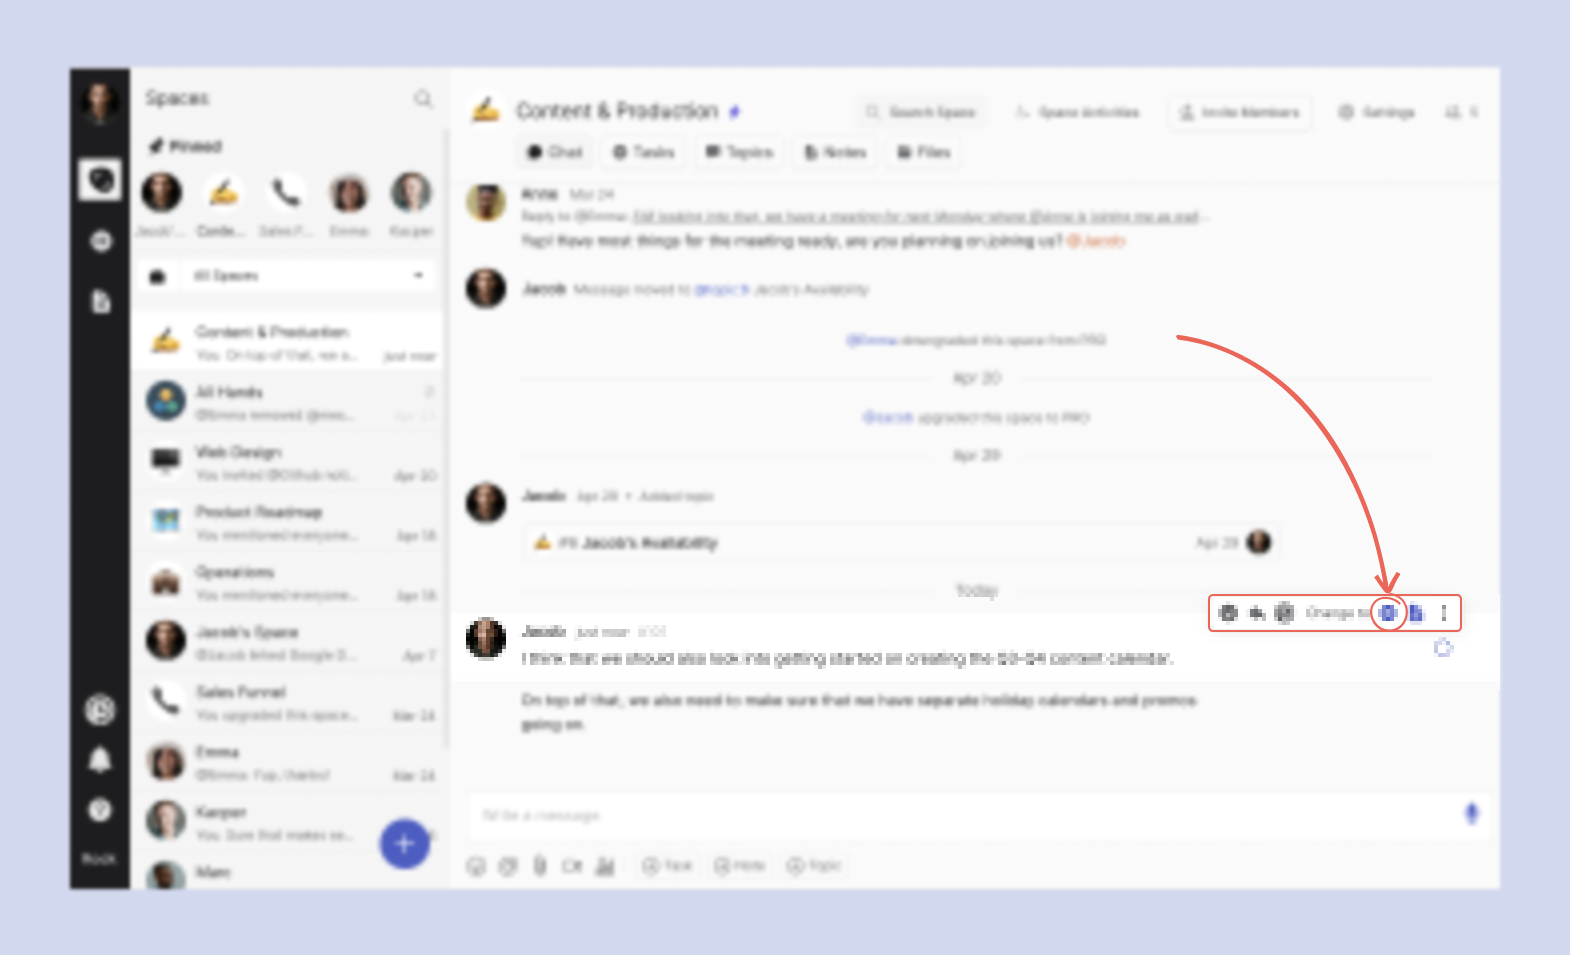
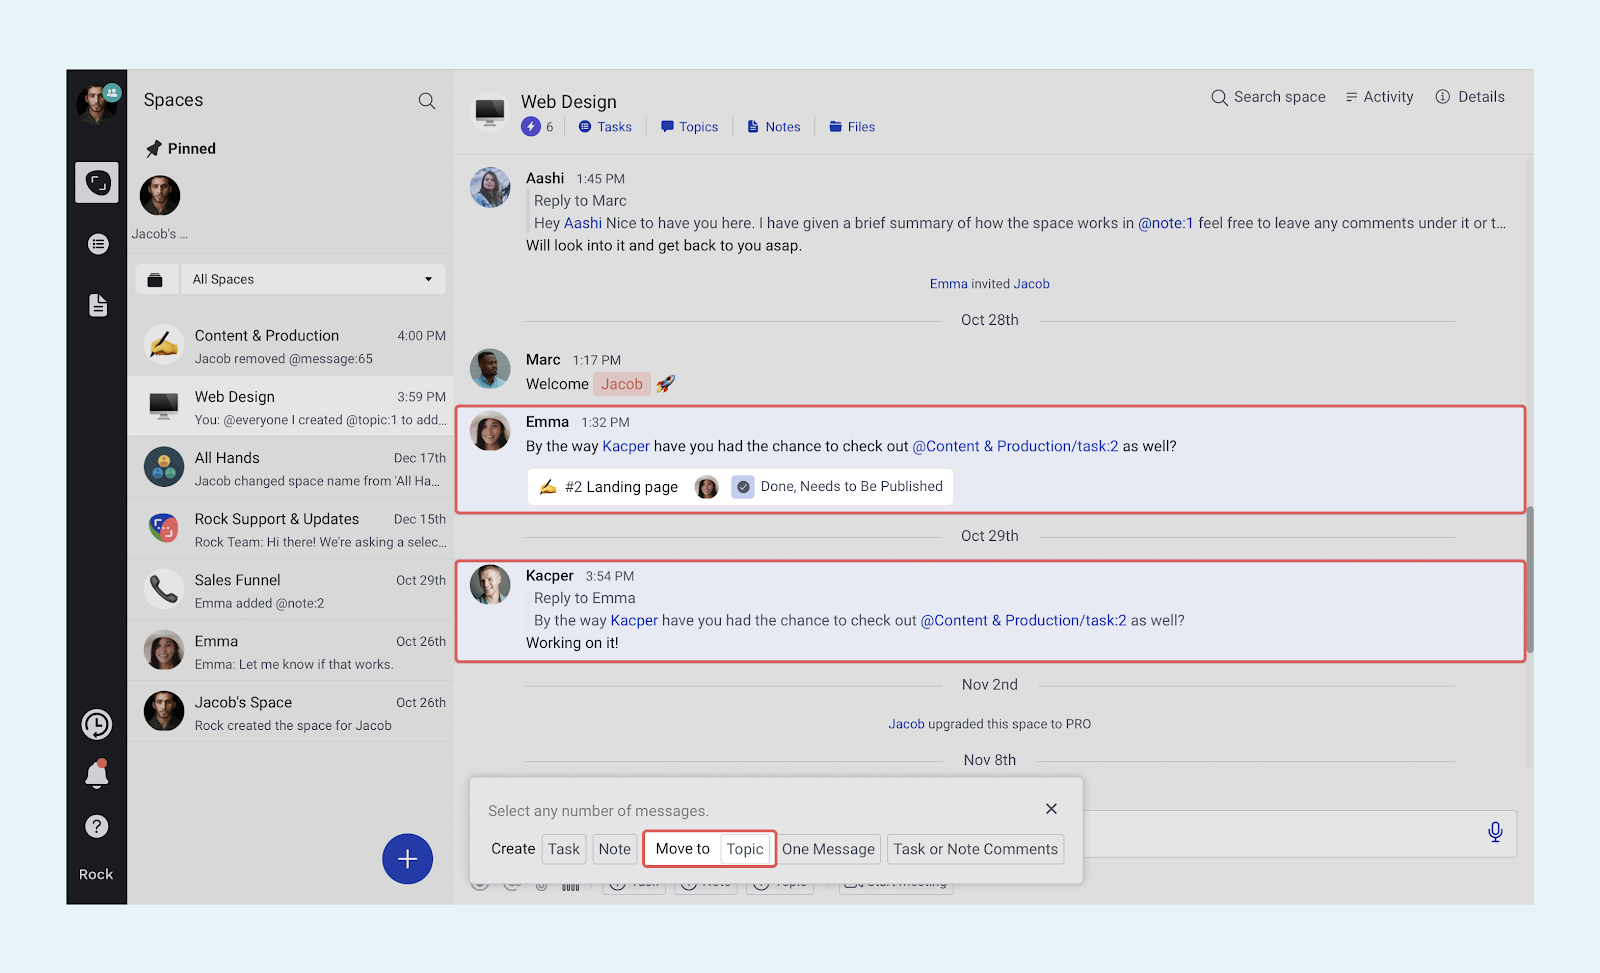
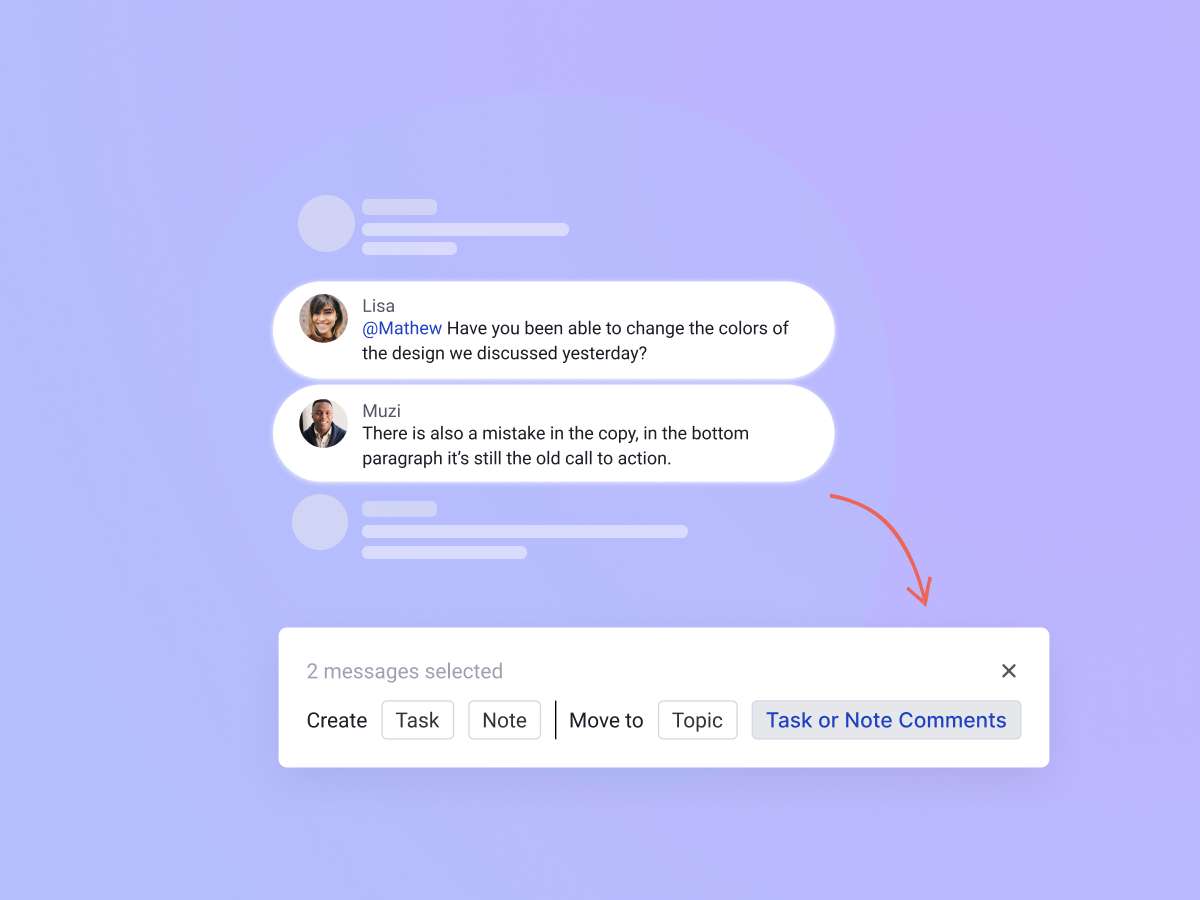
Tap to Organize your first messages - 1 credit
Tap to Organize is a unique Rock feature that nurtures asynchronous work by making your conversations more actionable. You receive 1 credit when using the feature for the first time.
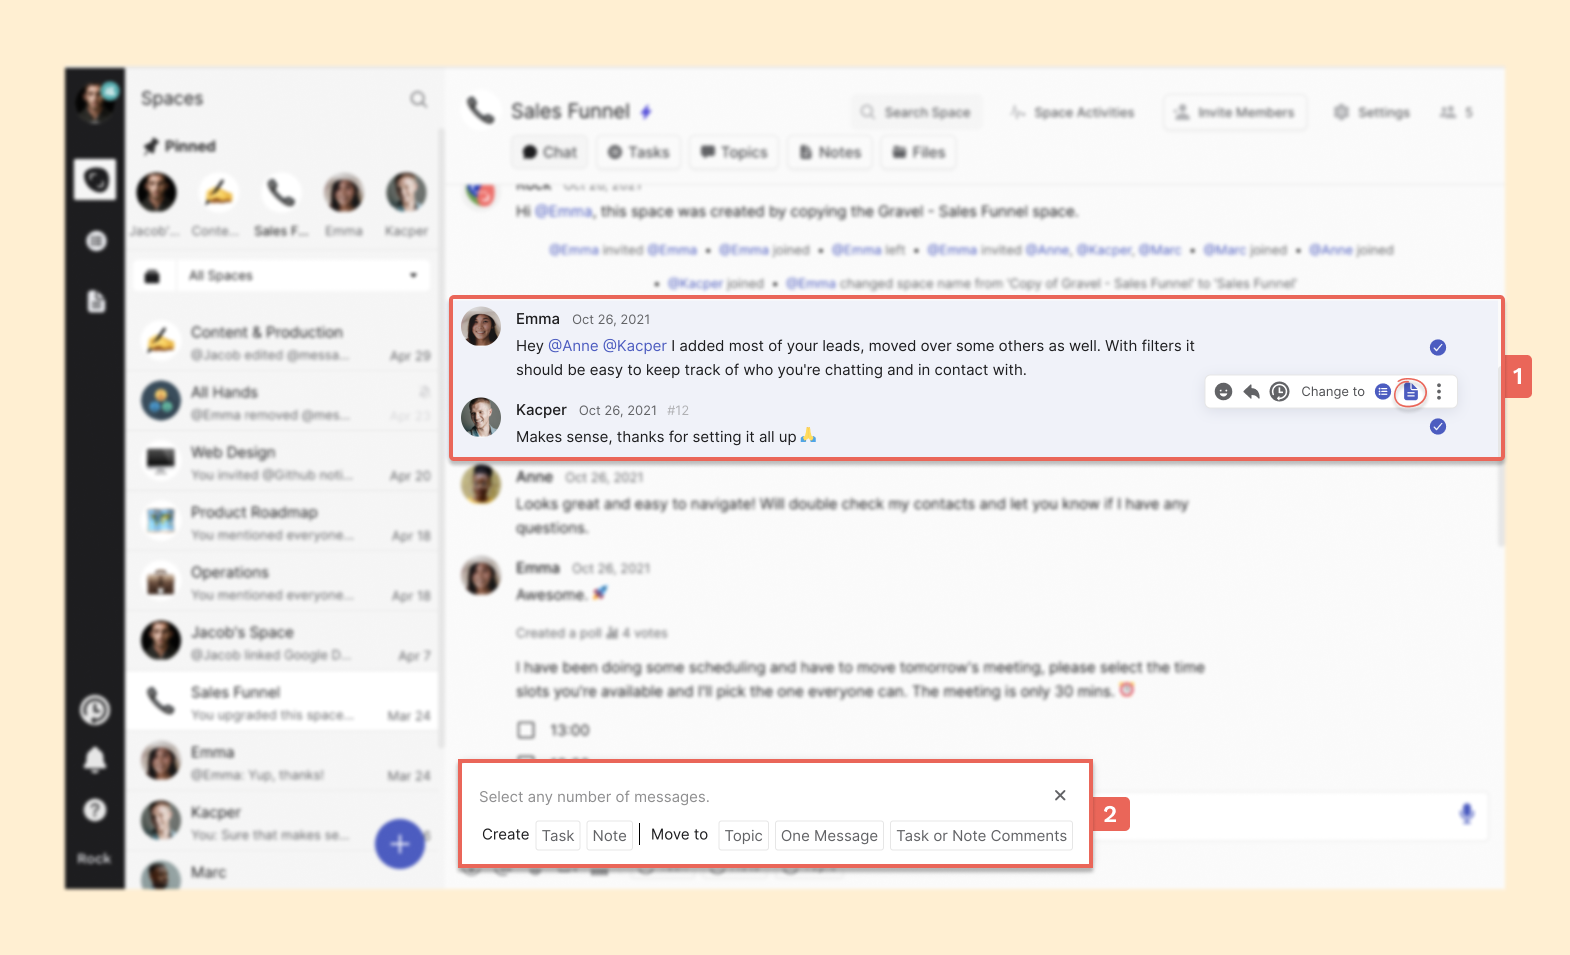
Click on the circle next to messages and move them into a new task, note, or topic. You can also convert messages into comments within a task or note. Tap to Organize makes your conversations more actionable and documented by allowing you to move important information to different mini-apps.
You only receive 1 credit for the first time using the functionality. There are no different rewards for creating tasks, notes, topics, or converting messages to comments. This means that you can receive at most 1 credit from this activity.
Create your first group space - 2 credits
Group spaces allow you to collaborate with anyone in and outside of your organization. Use messages, tasks, notes, files, and meetings to discuss anything and get work done. You receive 2 credits for the first group space you create. A new Quick Connect space does not count as a new group space, although you will still receive the rewards for a new user (1 credit) and if applicable, domain (10 credits).
The reward of 2 credits for this is only given for the first group space you create. When creating workspaces, there are a few automatically created group spaces, these will not reward you the 2 credits, but you will receive the create a workspace reward of 5 credits.
[...]
Note that if someone else invites you to a group space and you join, this will not be counted as you creating a group space.
Create your first 1:1 space - 2 credits
Create your first 1:1 space and receive 2 credits. 1:1 spaces are direct message spaces with one other person. This can be anyone in or outside of your team: team members, clients, partners, volunteers, etc.
You receive 2 credits for the first time you create a 1:1 space. Note that if someone else invites you to a 1:1 space, you will not receive the reward.
Create your first workspace - 5 credits
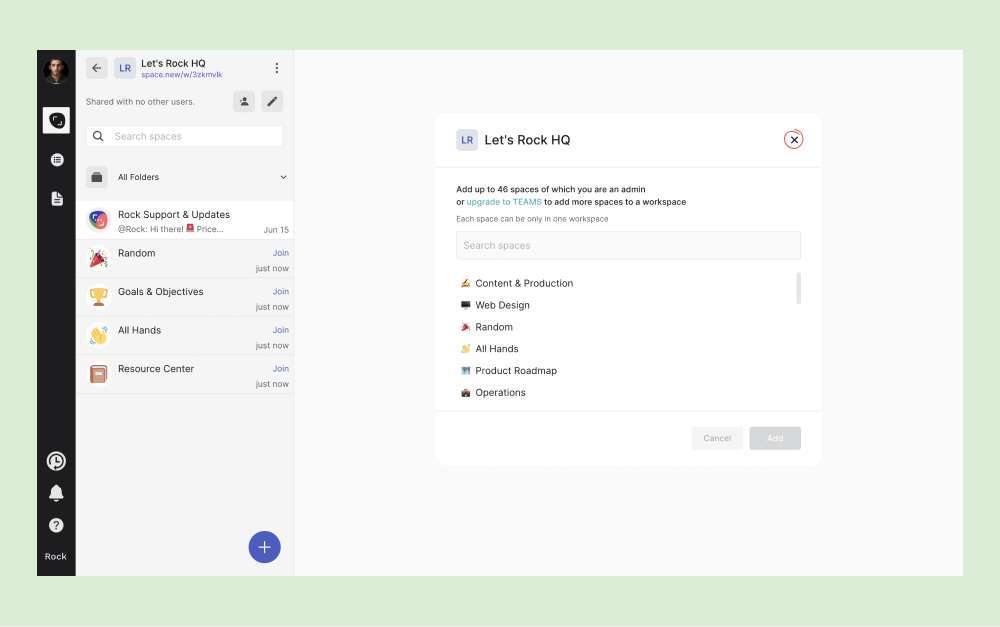
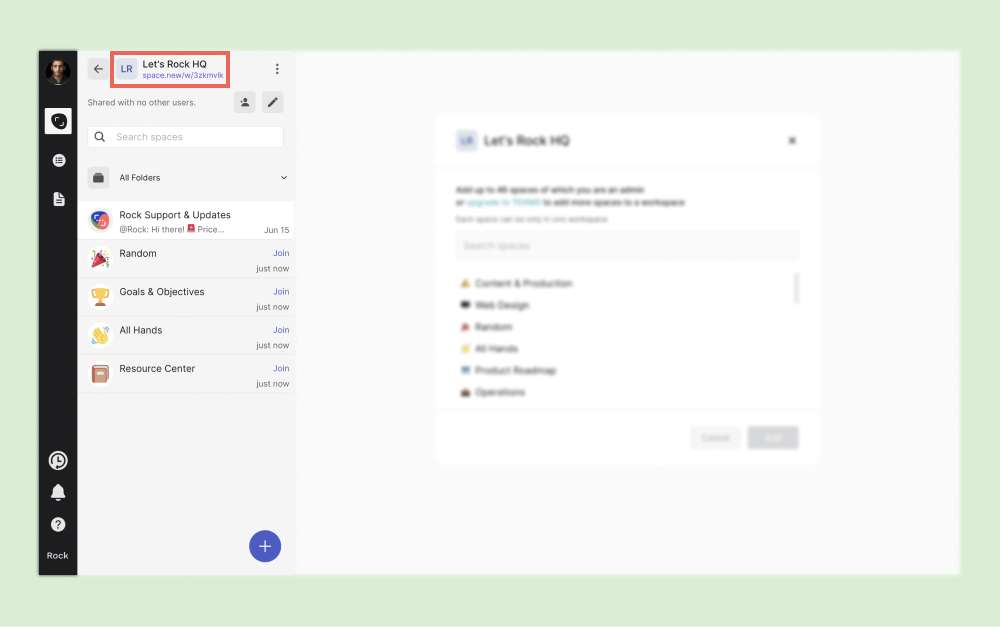
Workspaces allow you to manage multiple spaces and users at the same time. Send invites for multiple spaces and manage user permissions and overall access. You receive 5 credits when creating your first workspace.
You can leverage workspaces to organize your different projects, workflows, or teams in more organized ways. This reward can only be redeemed for your first workspace, new spaces you create within a workspace can be rewarded with creating your first 1:1 space or creating your first team space.
Auto-generated spaces within a workspace do not count towards space creation rewards. New user invites to workspaces only count towards your new user or new domain rewards if they are not yet on Rock.
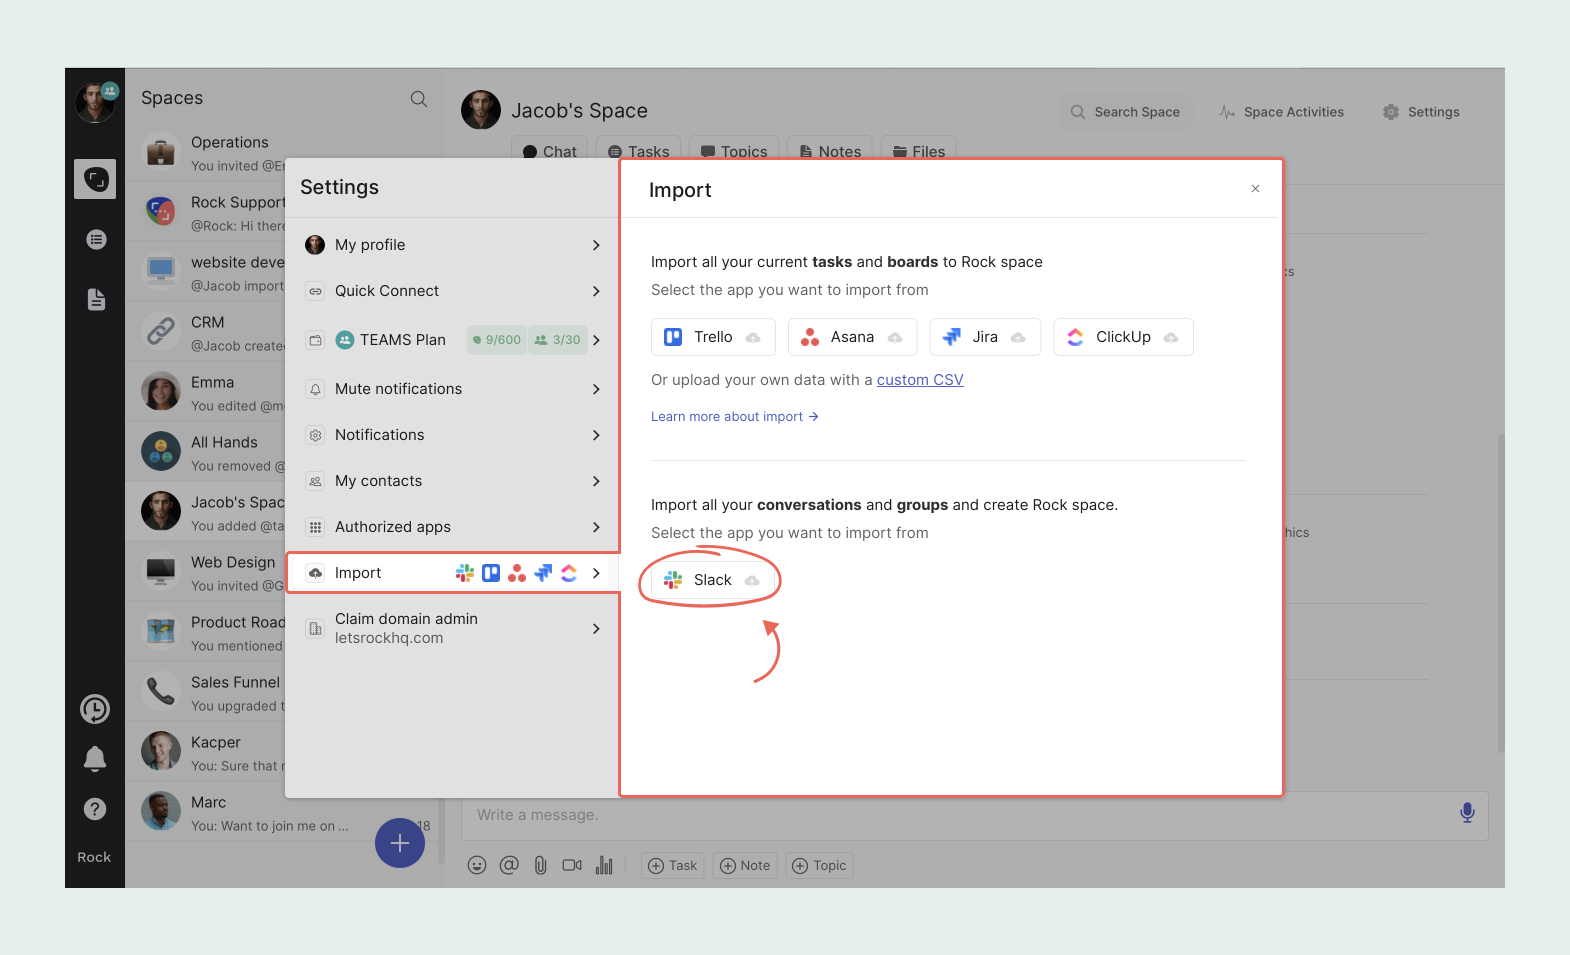
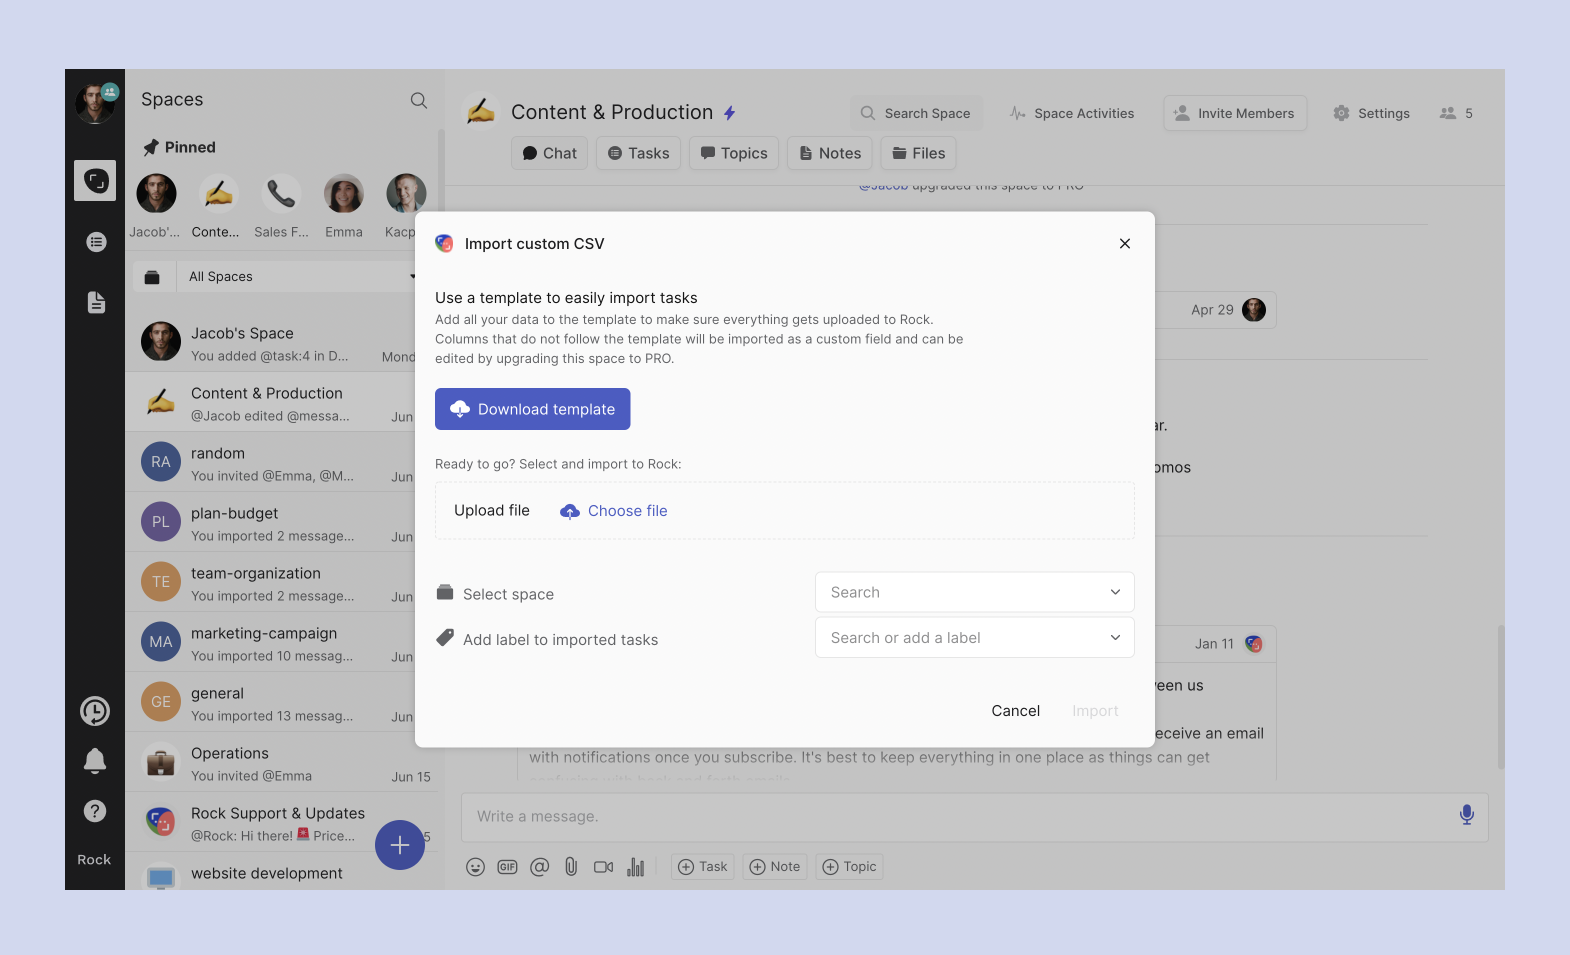
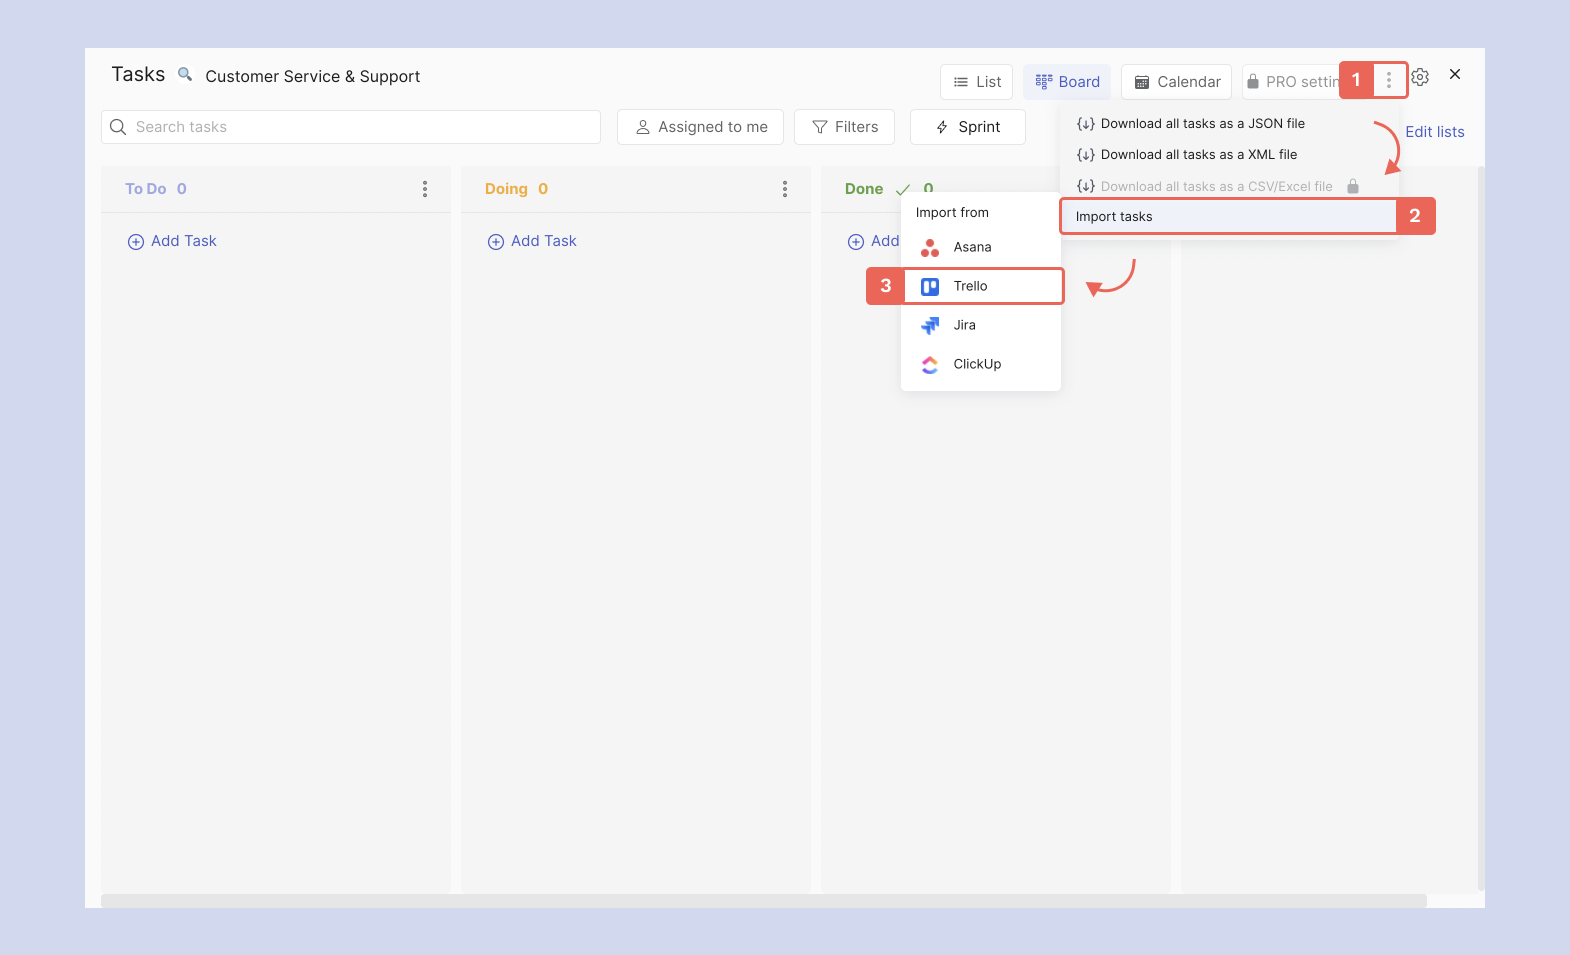
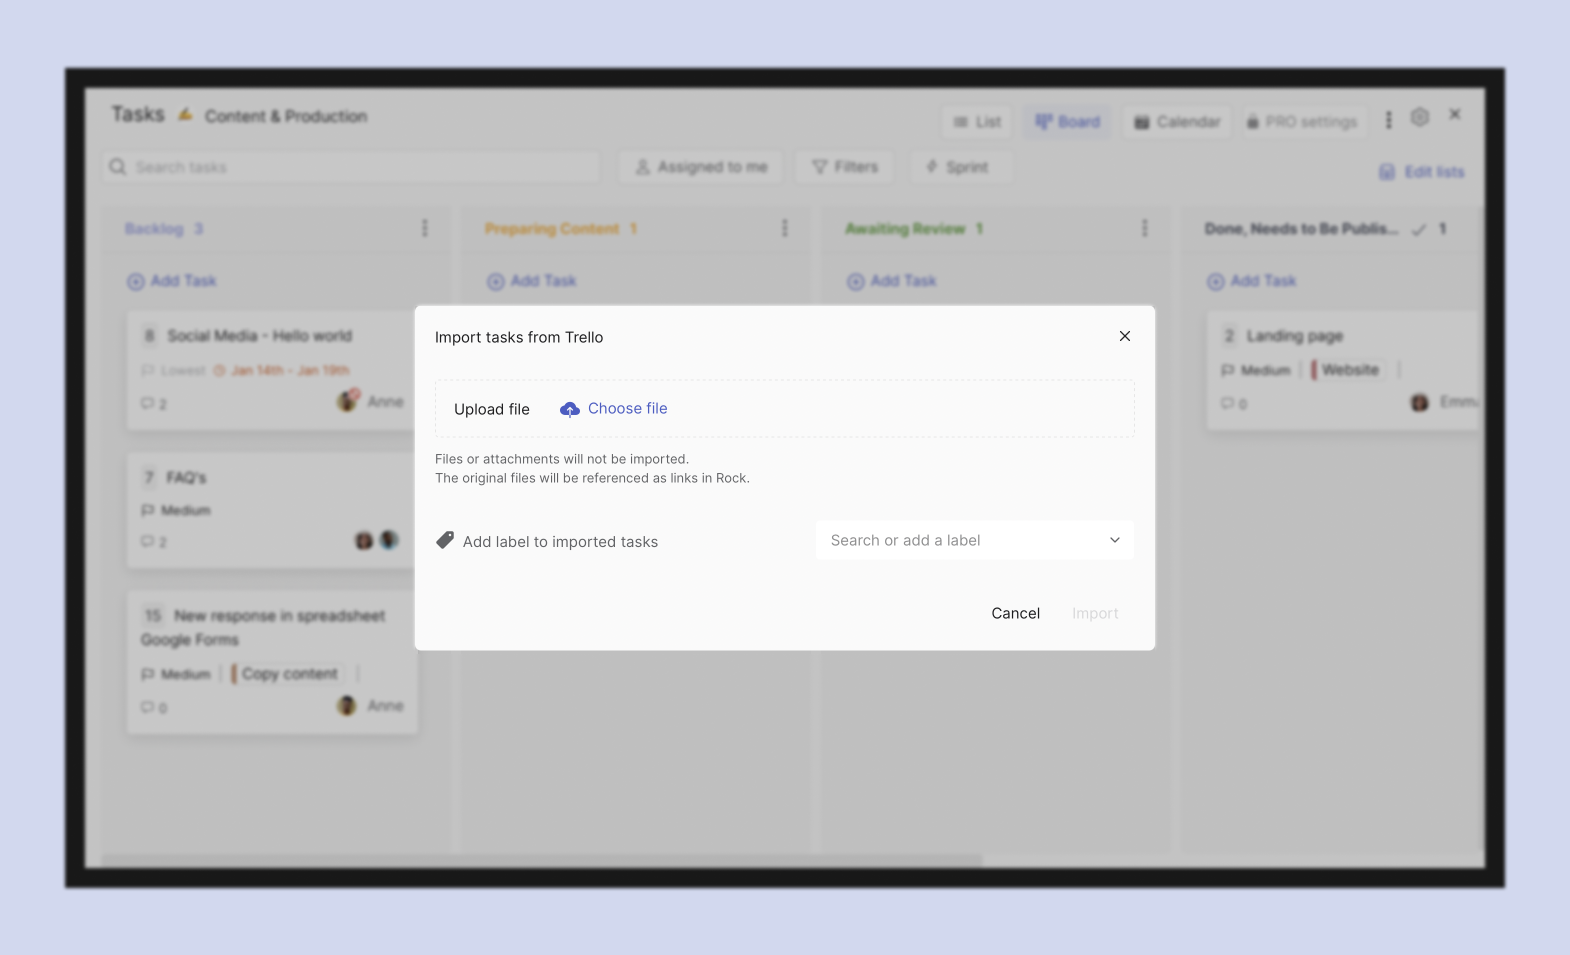
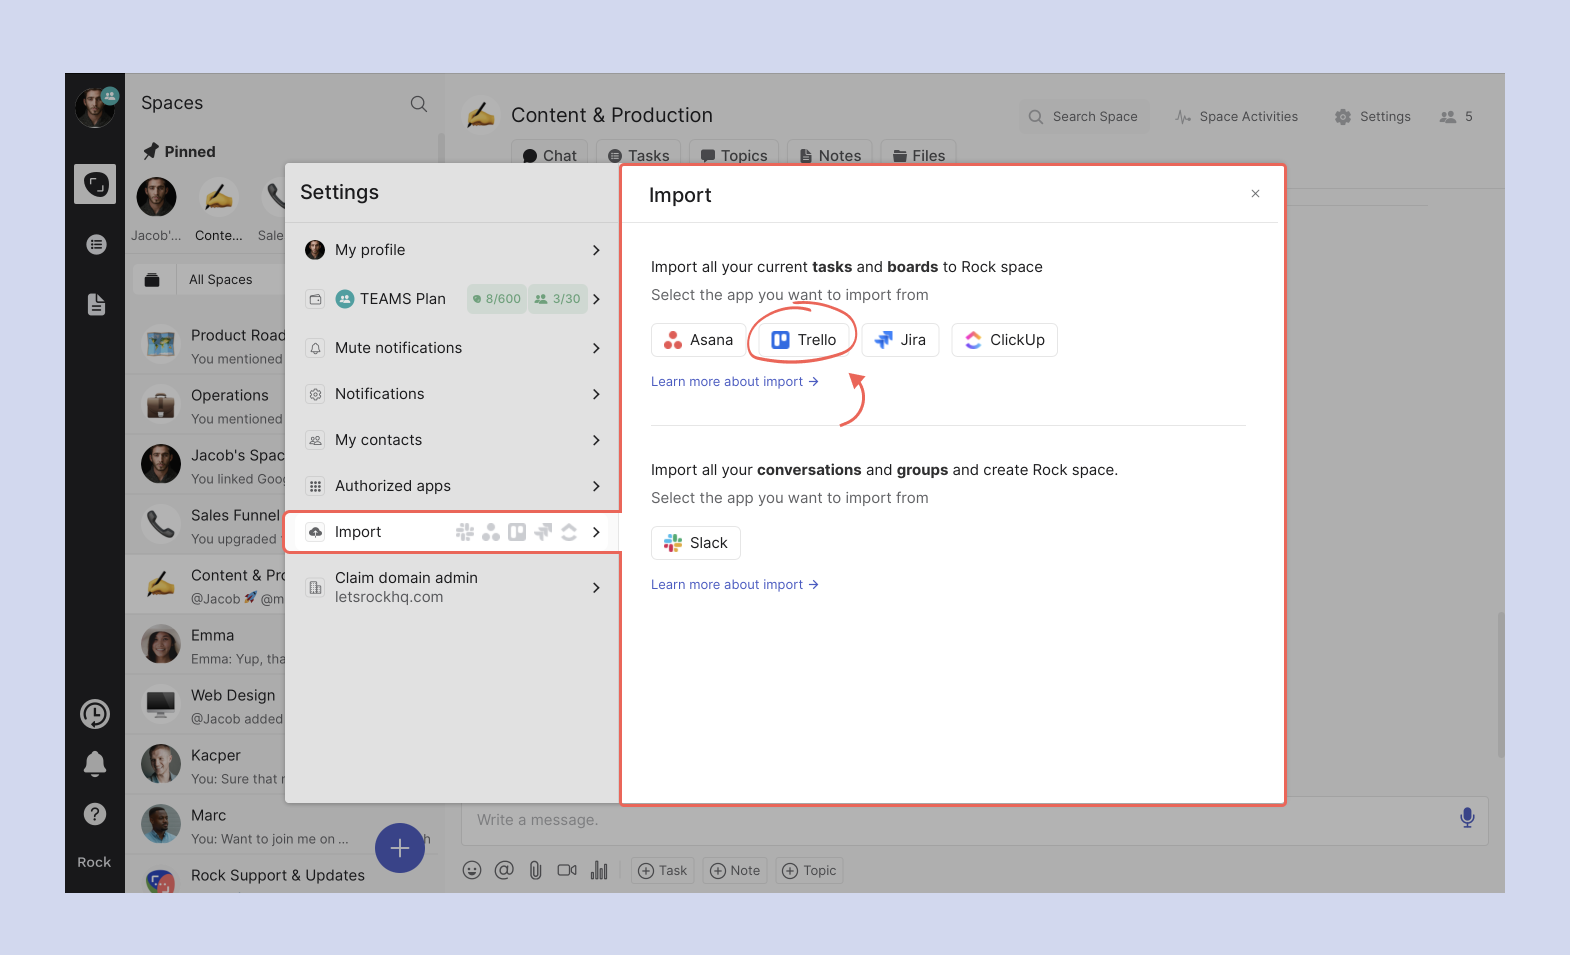
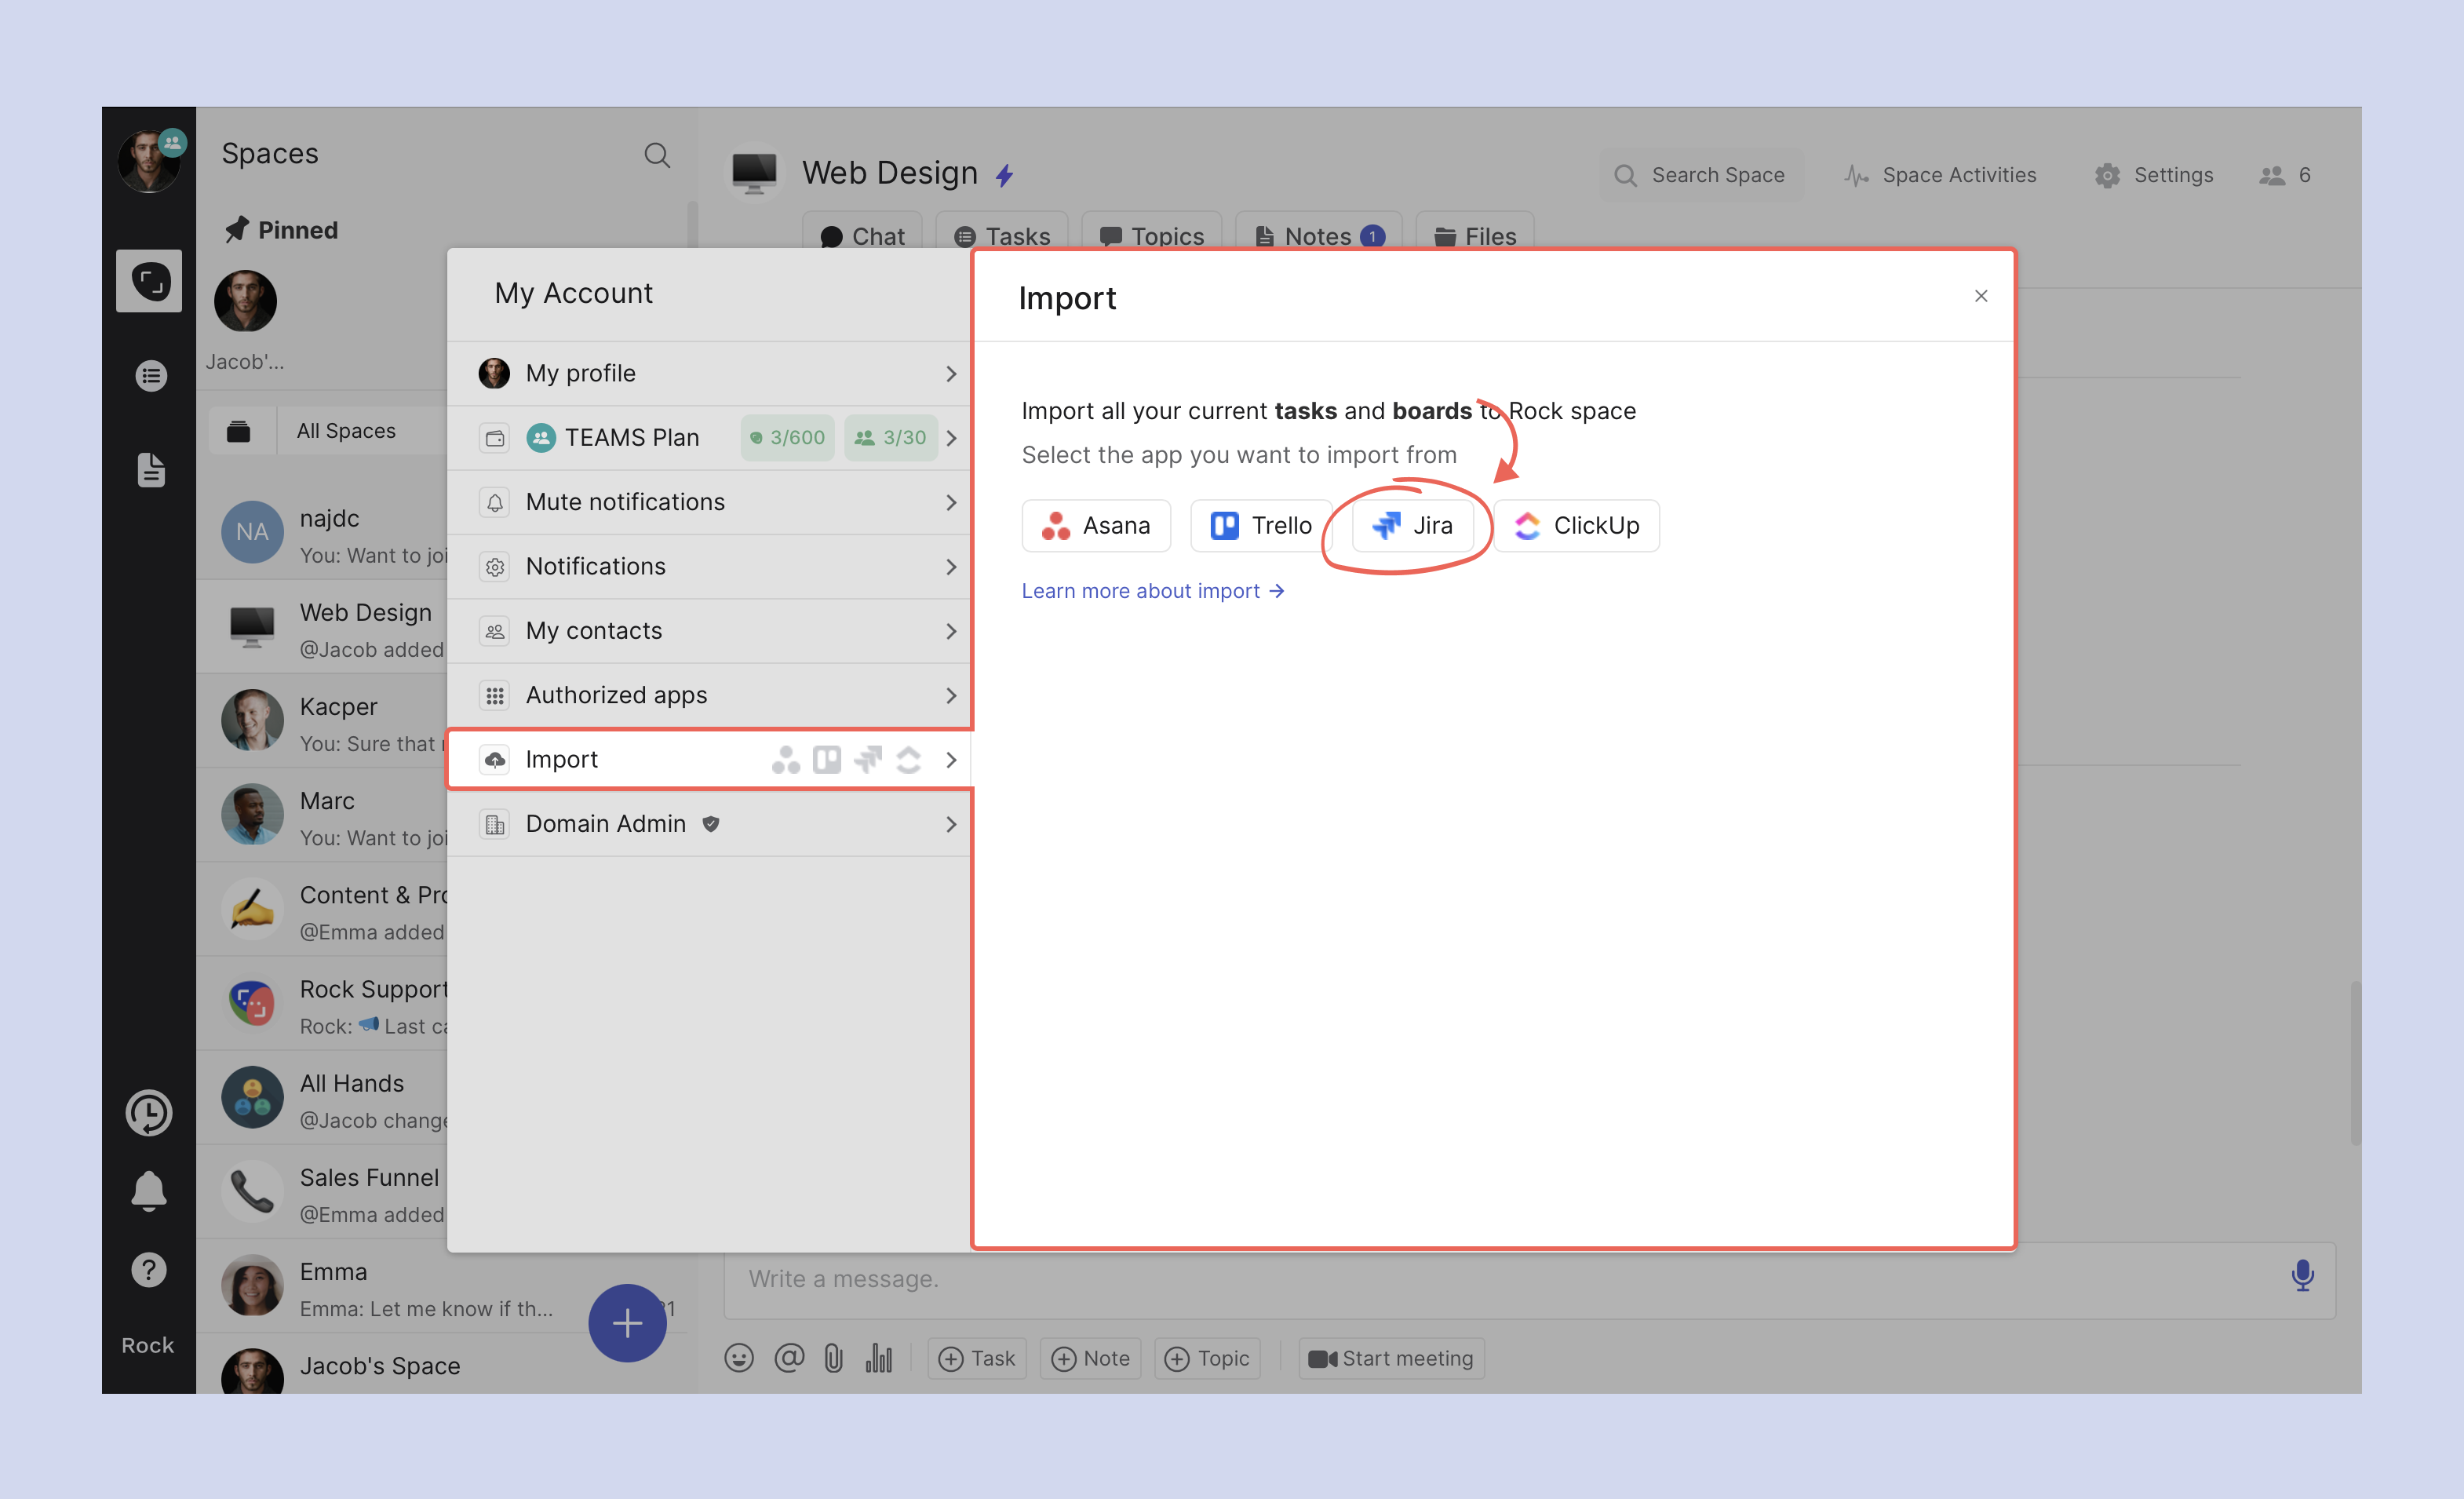
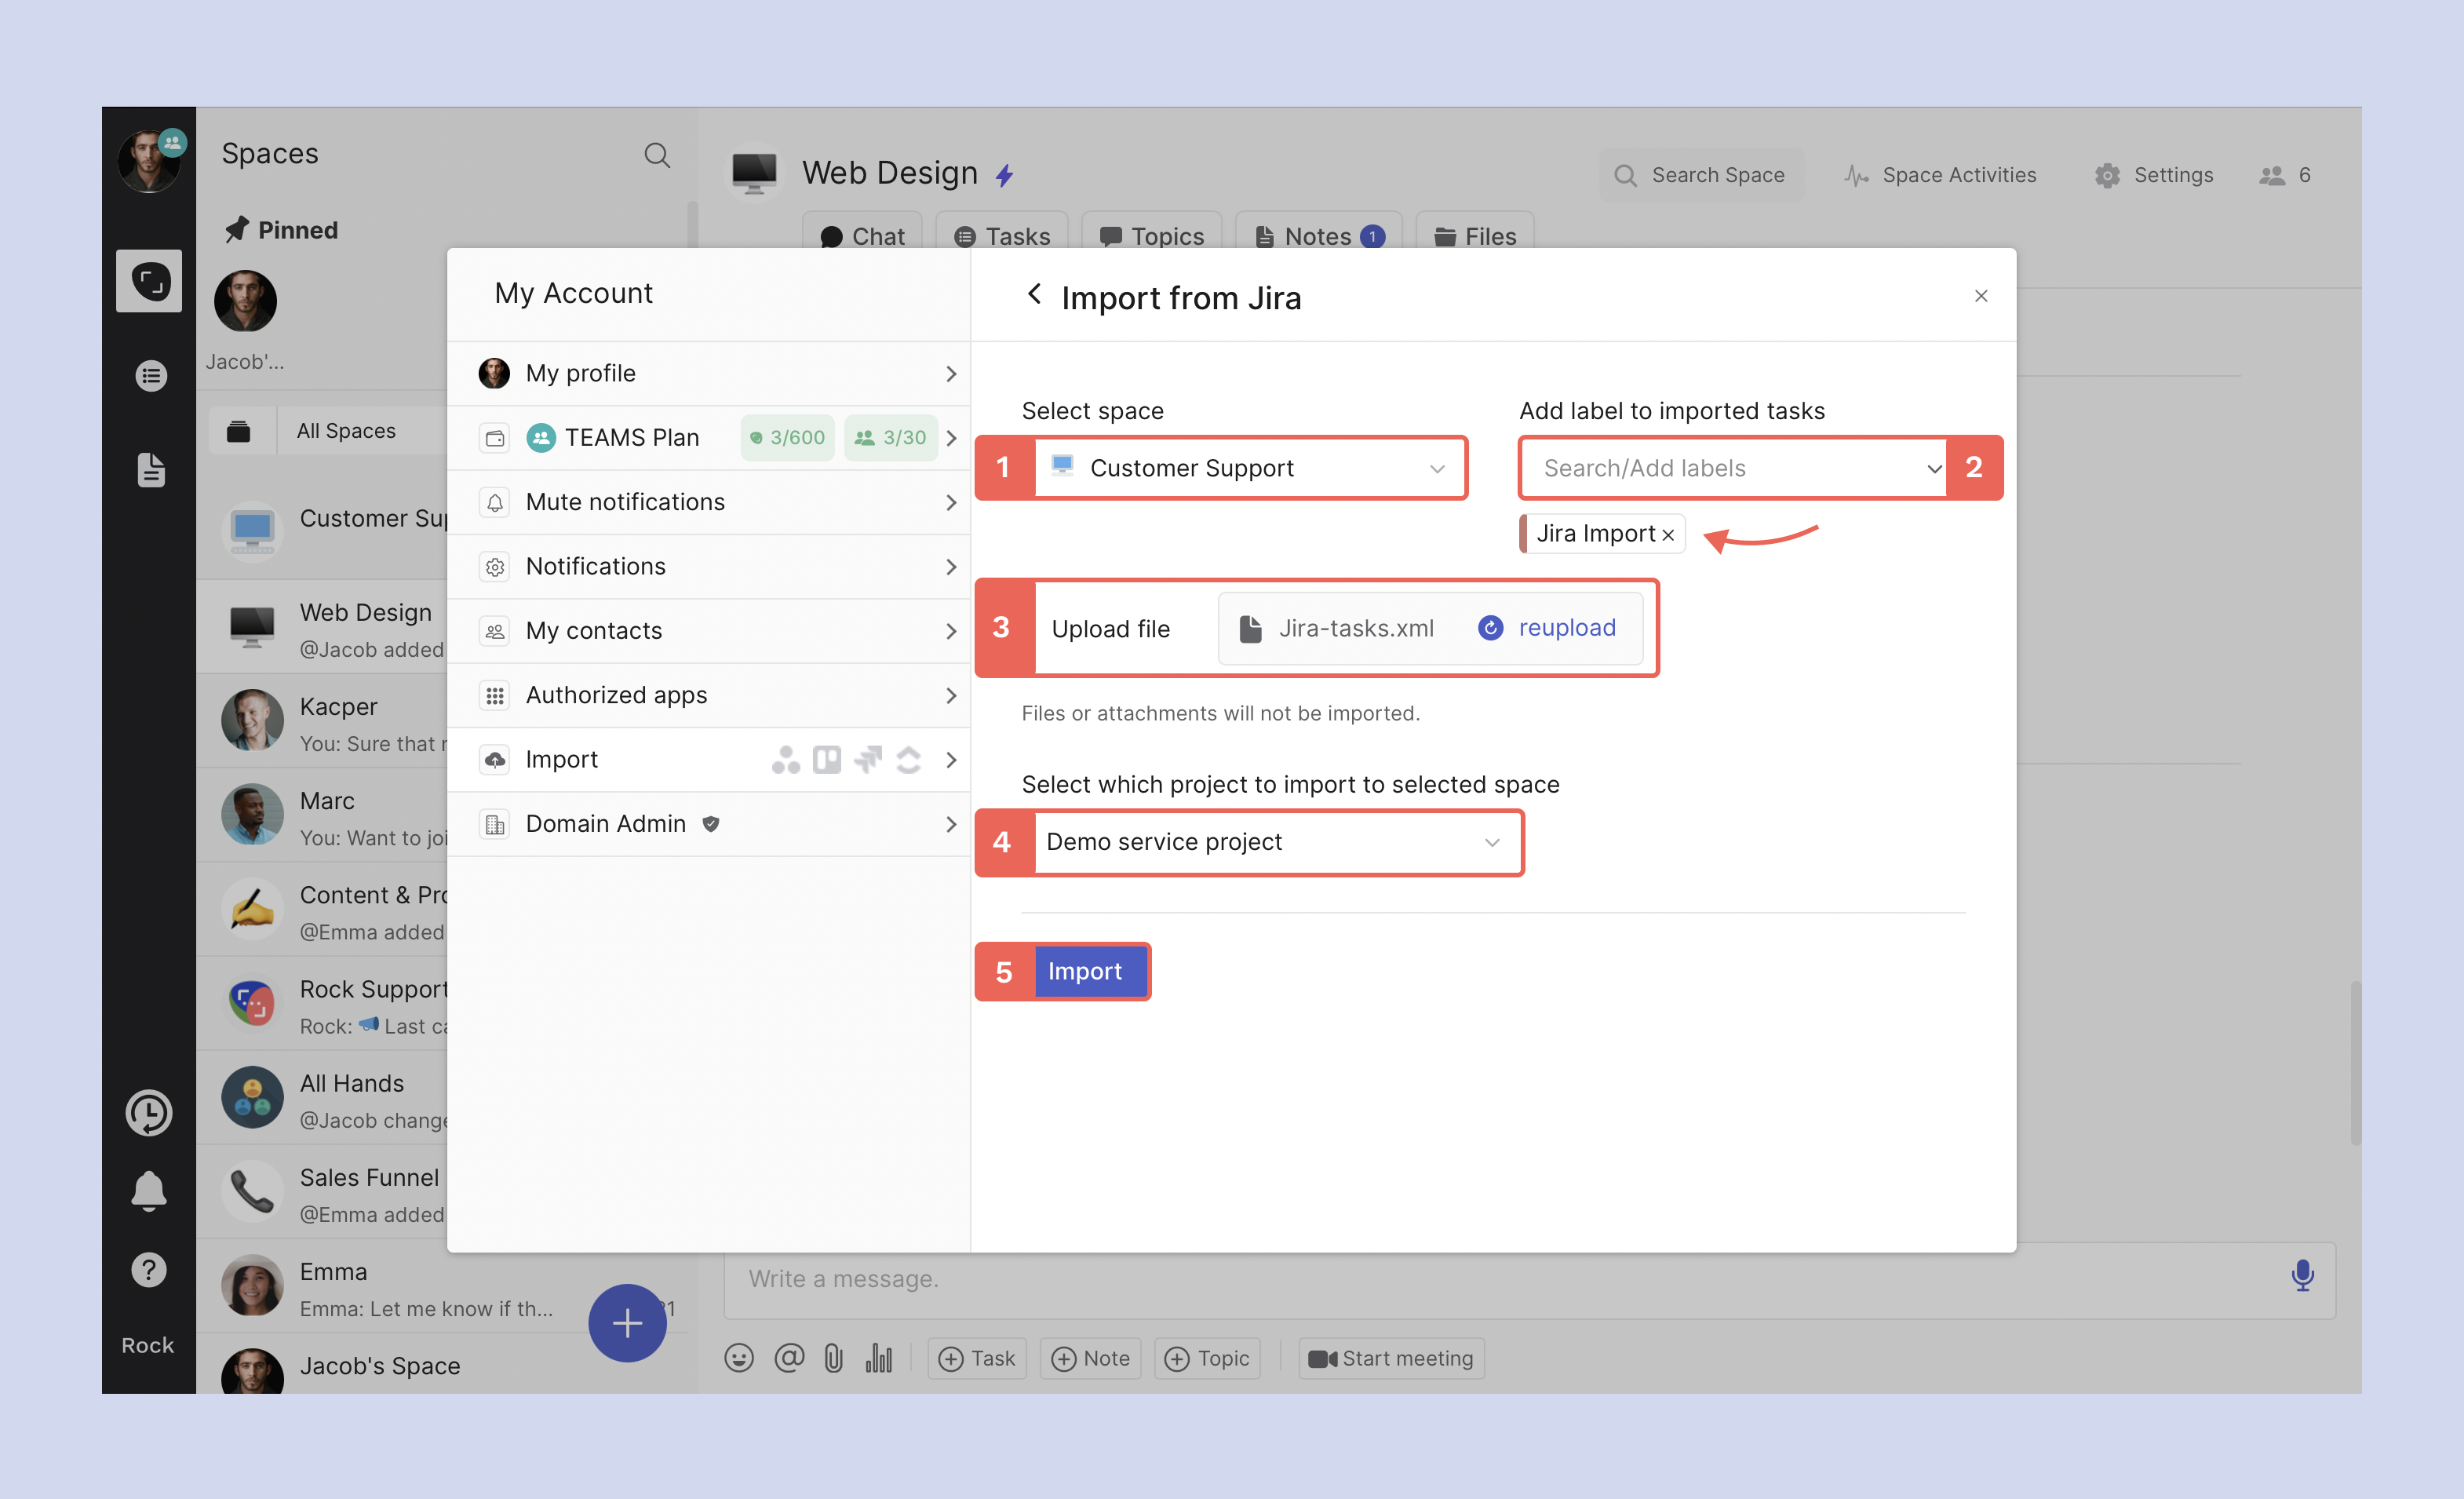
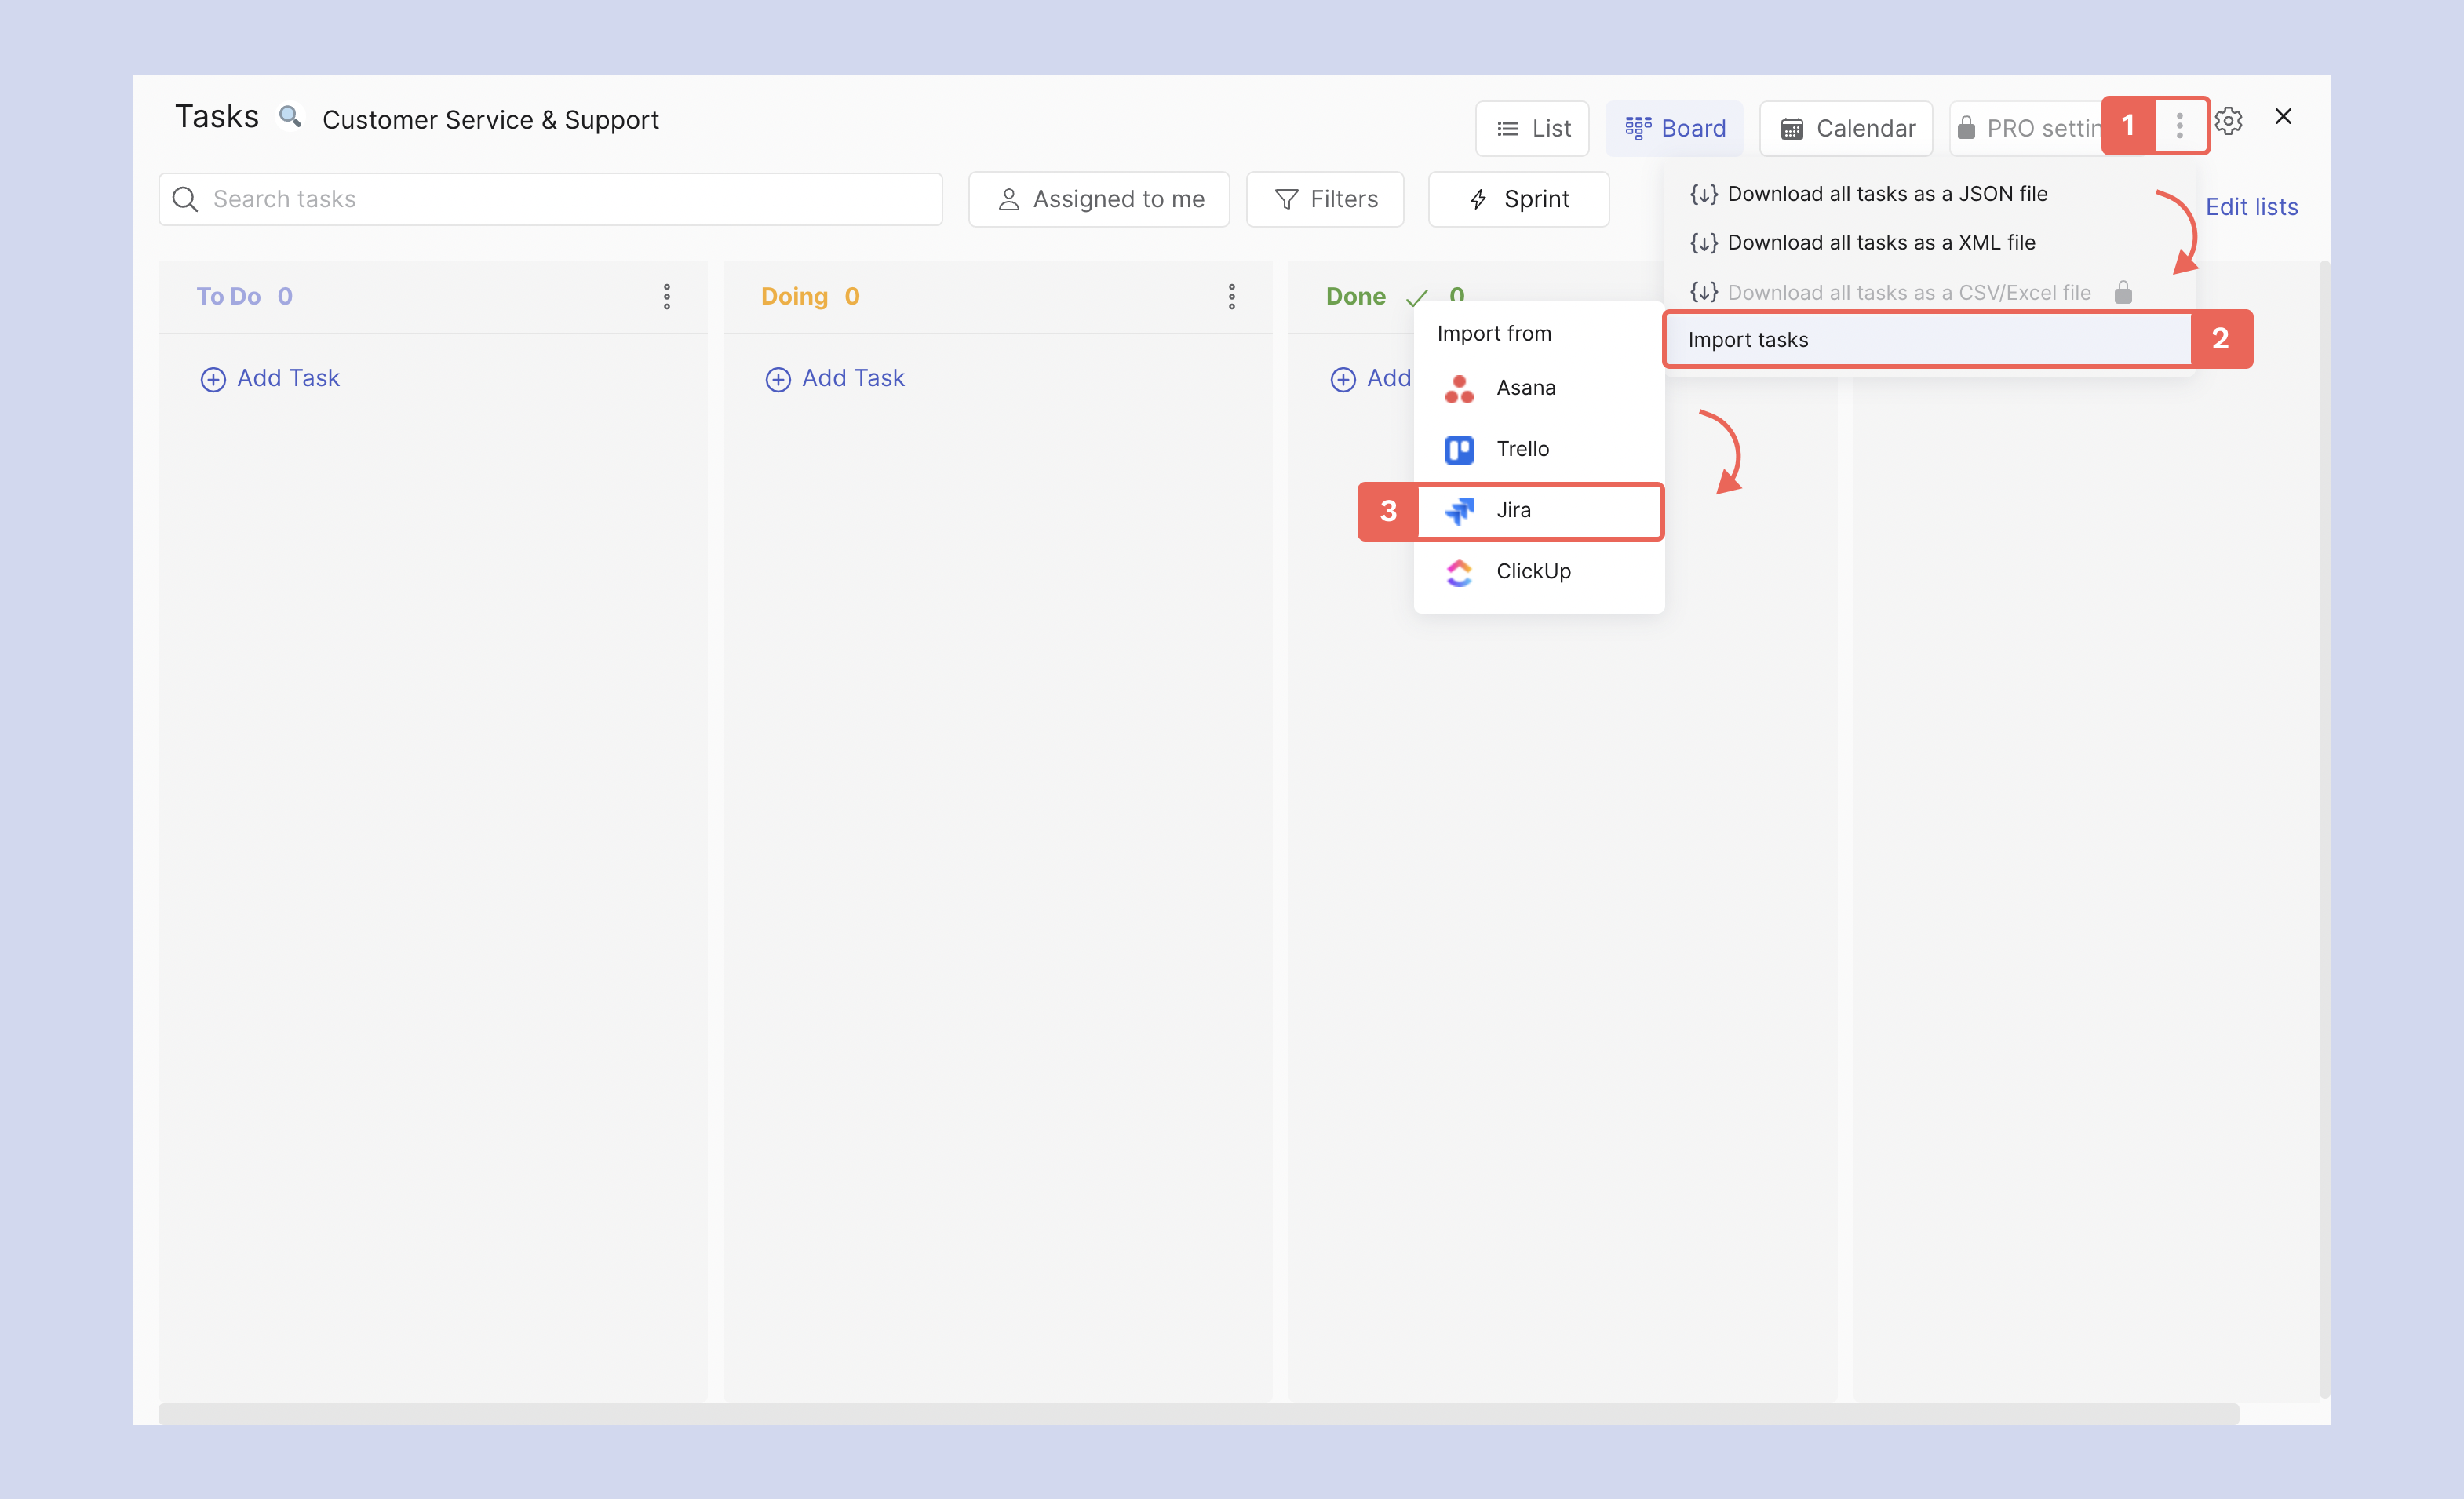
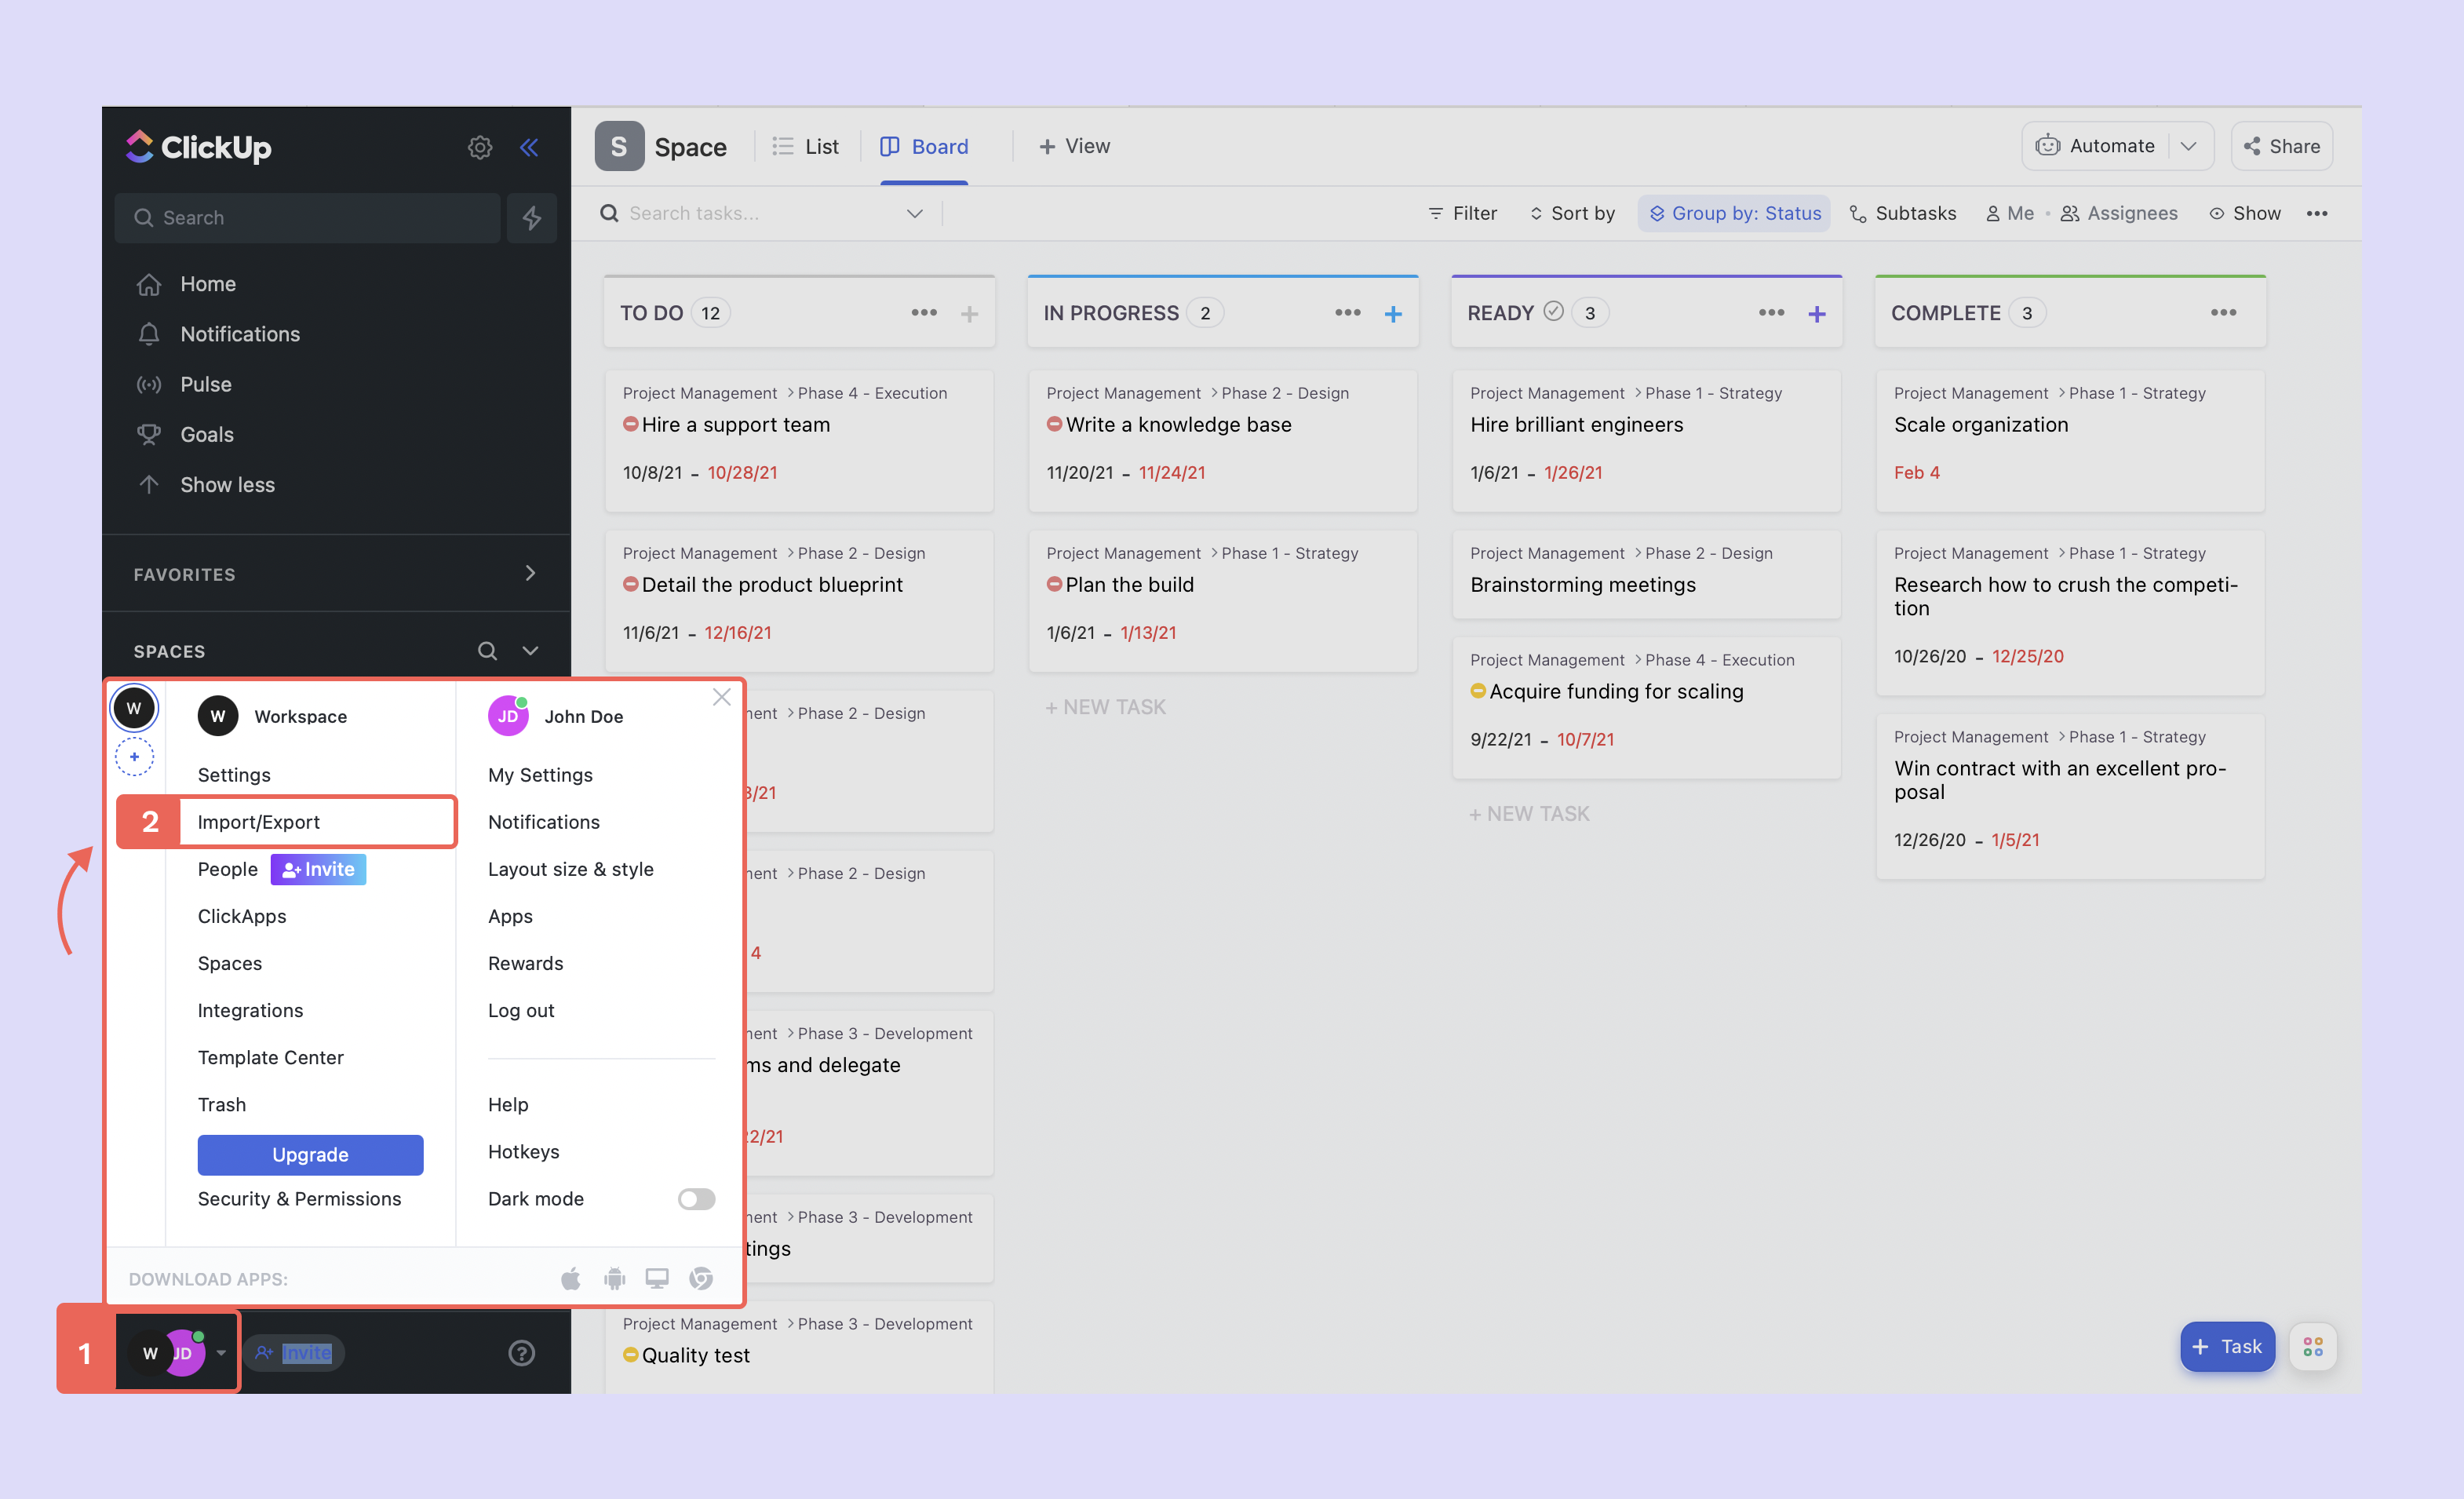
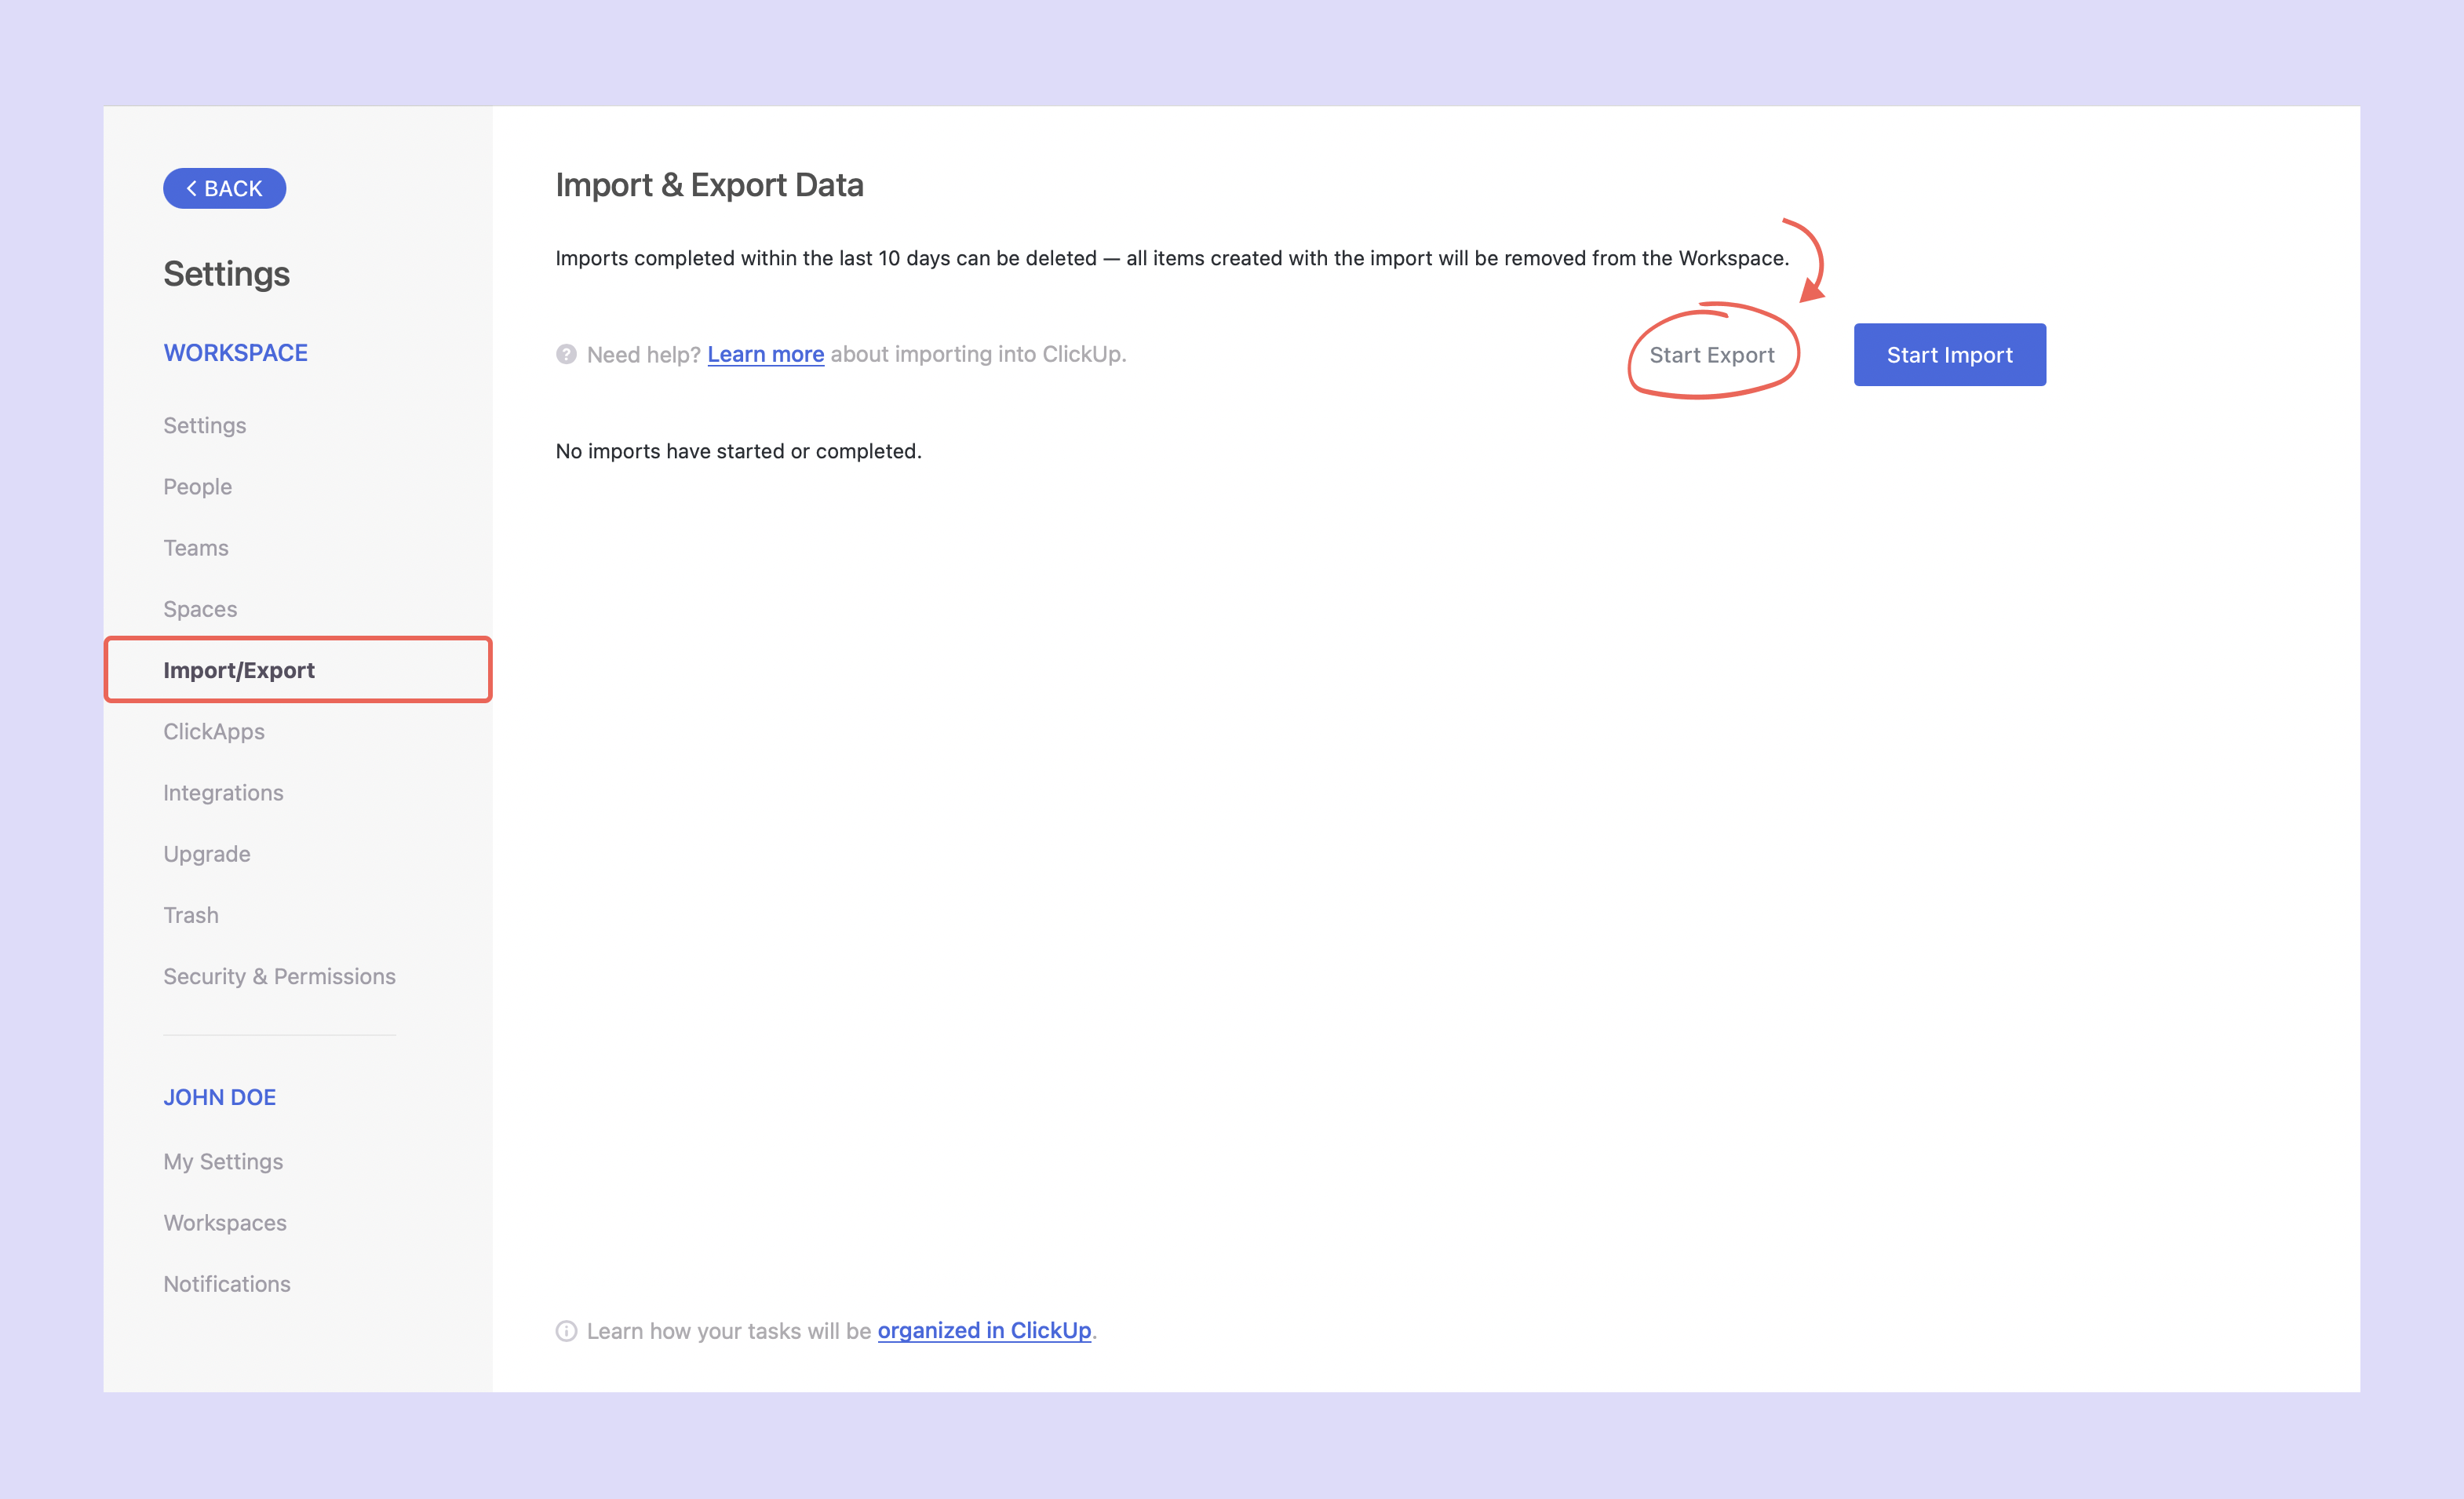
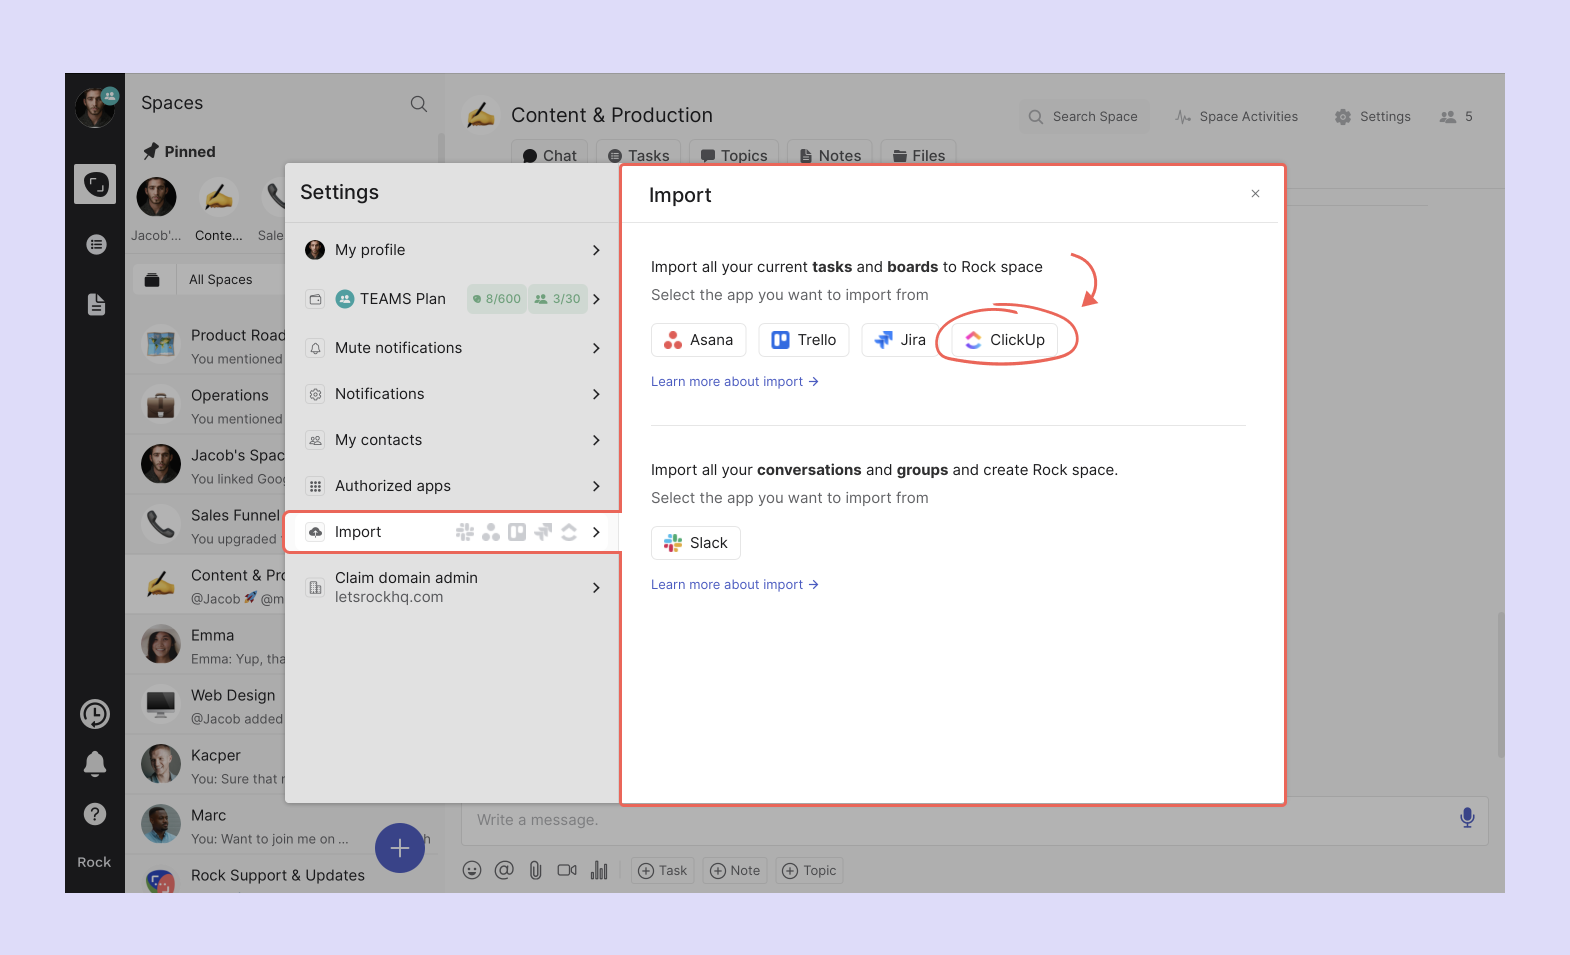
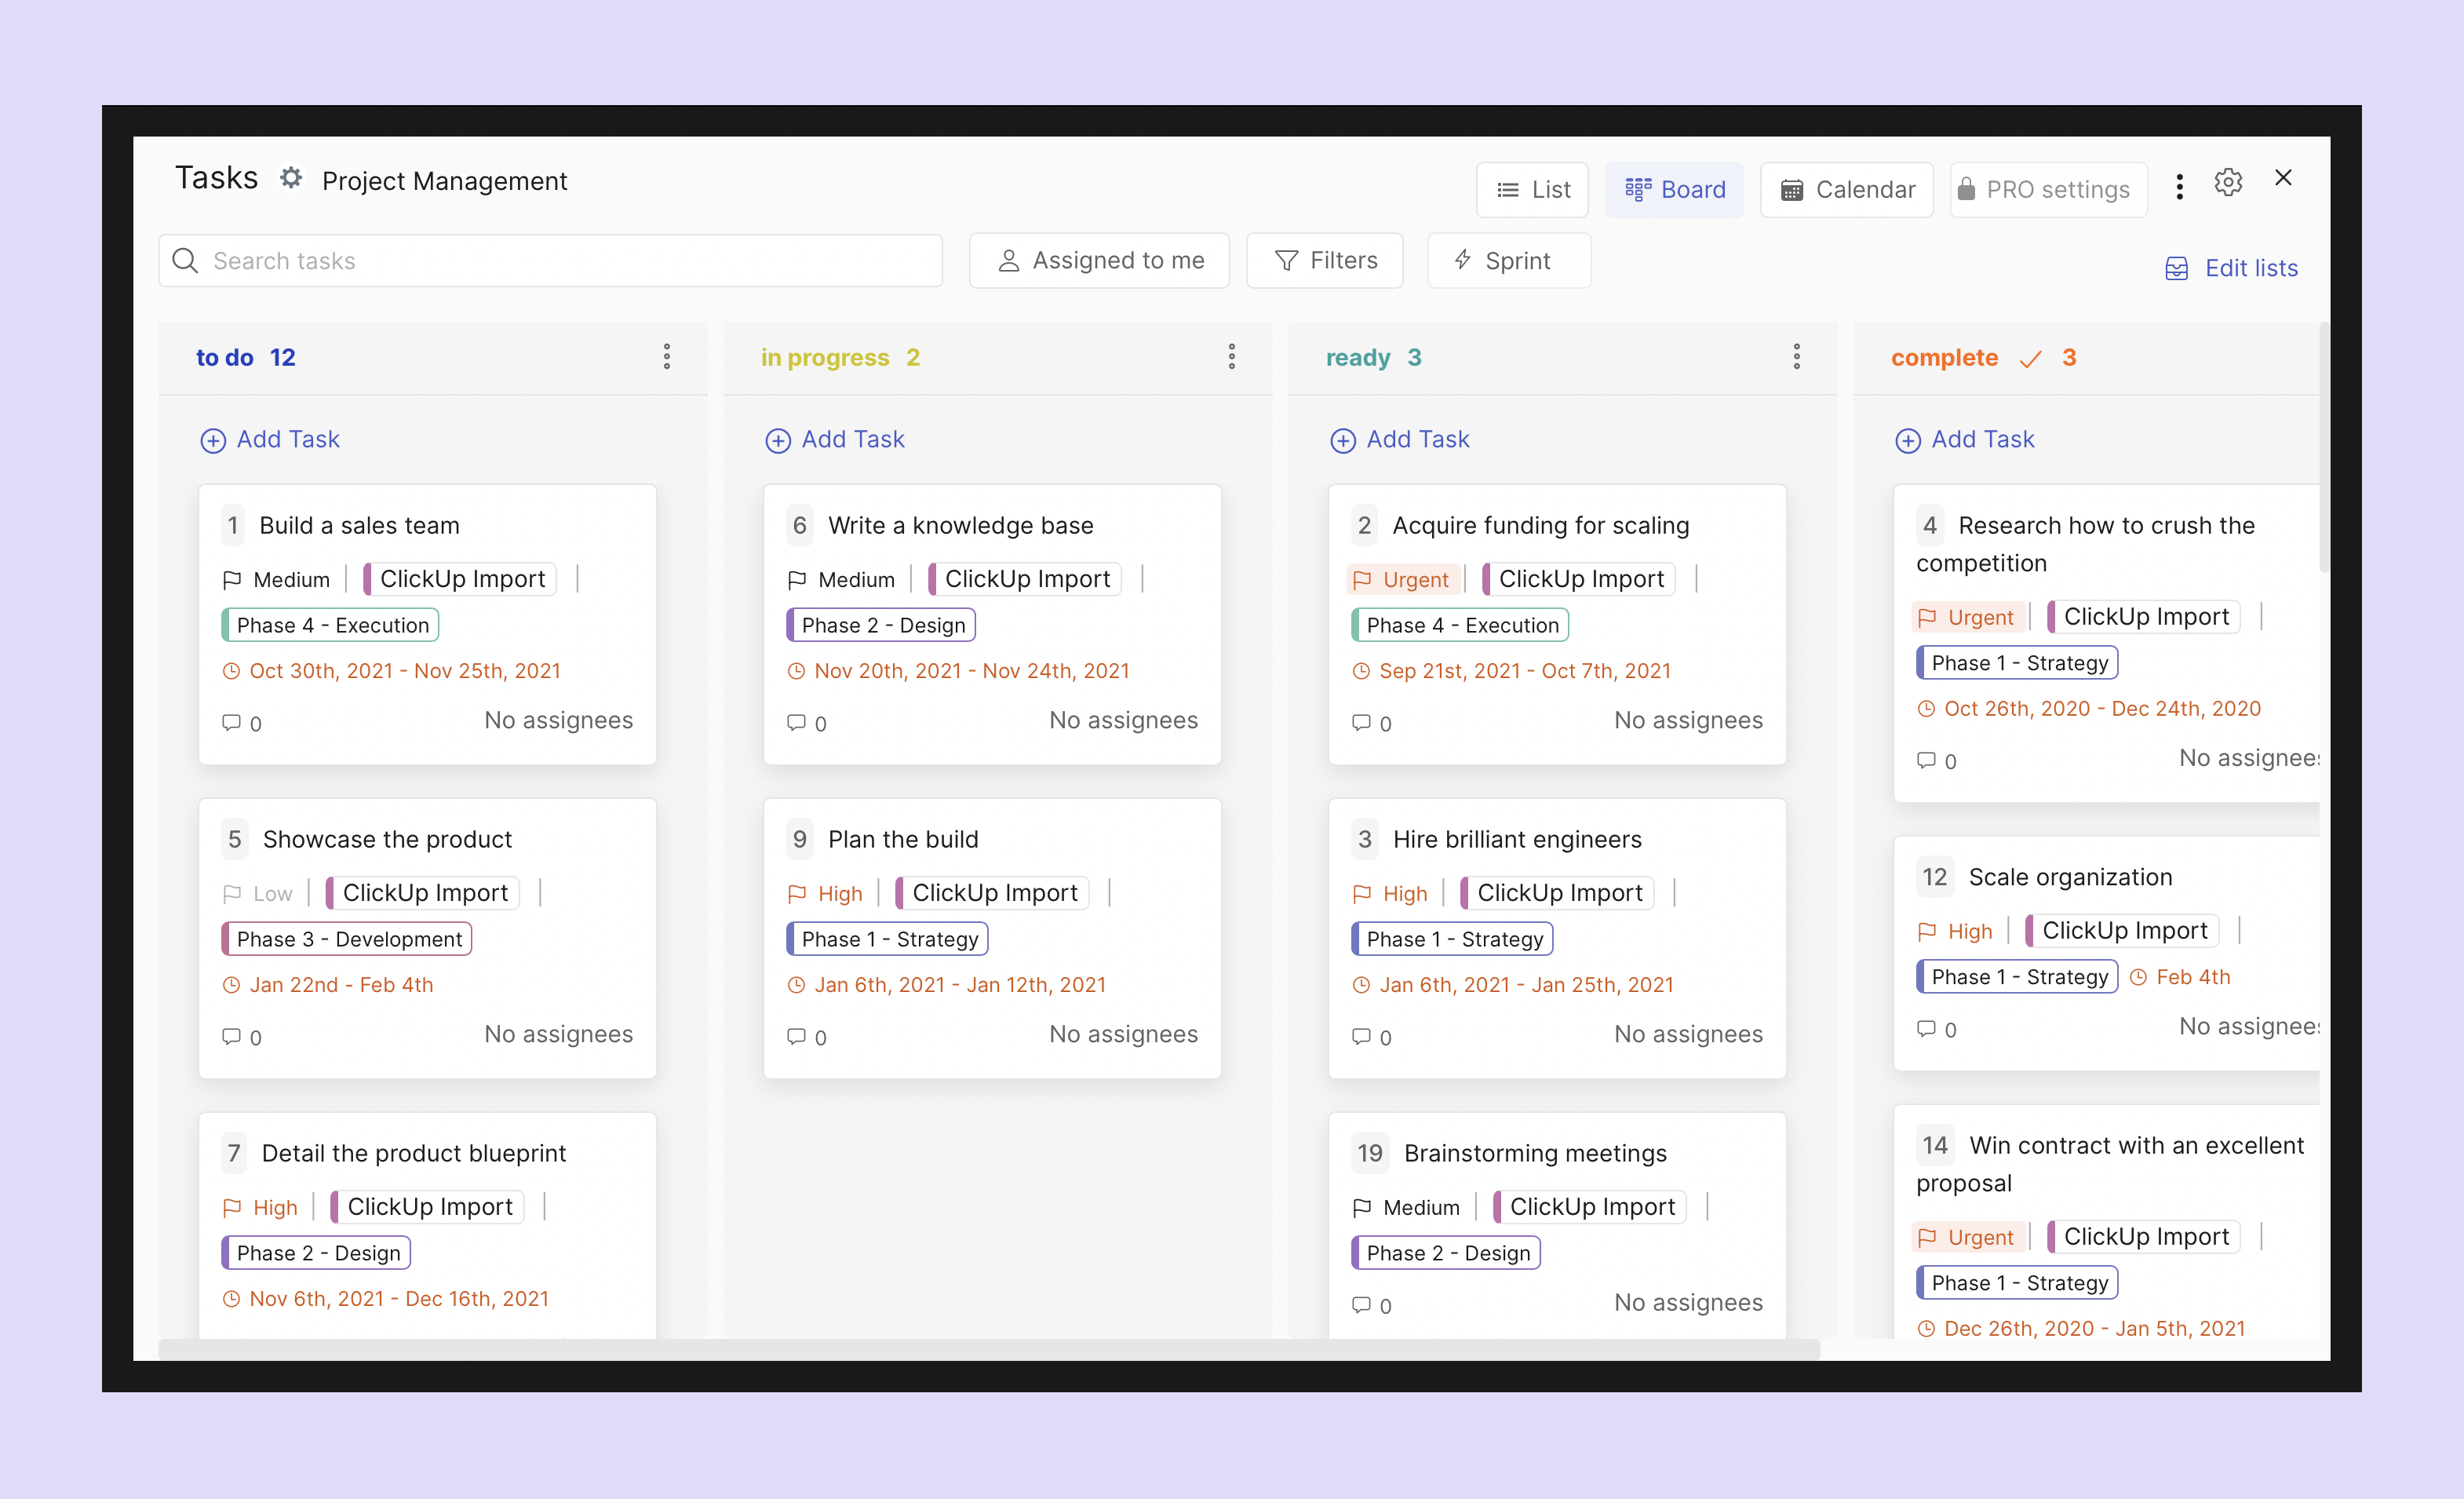
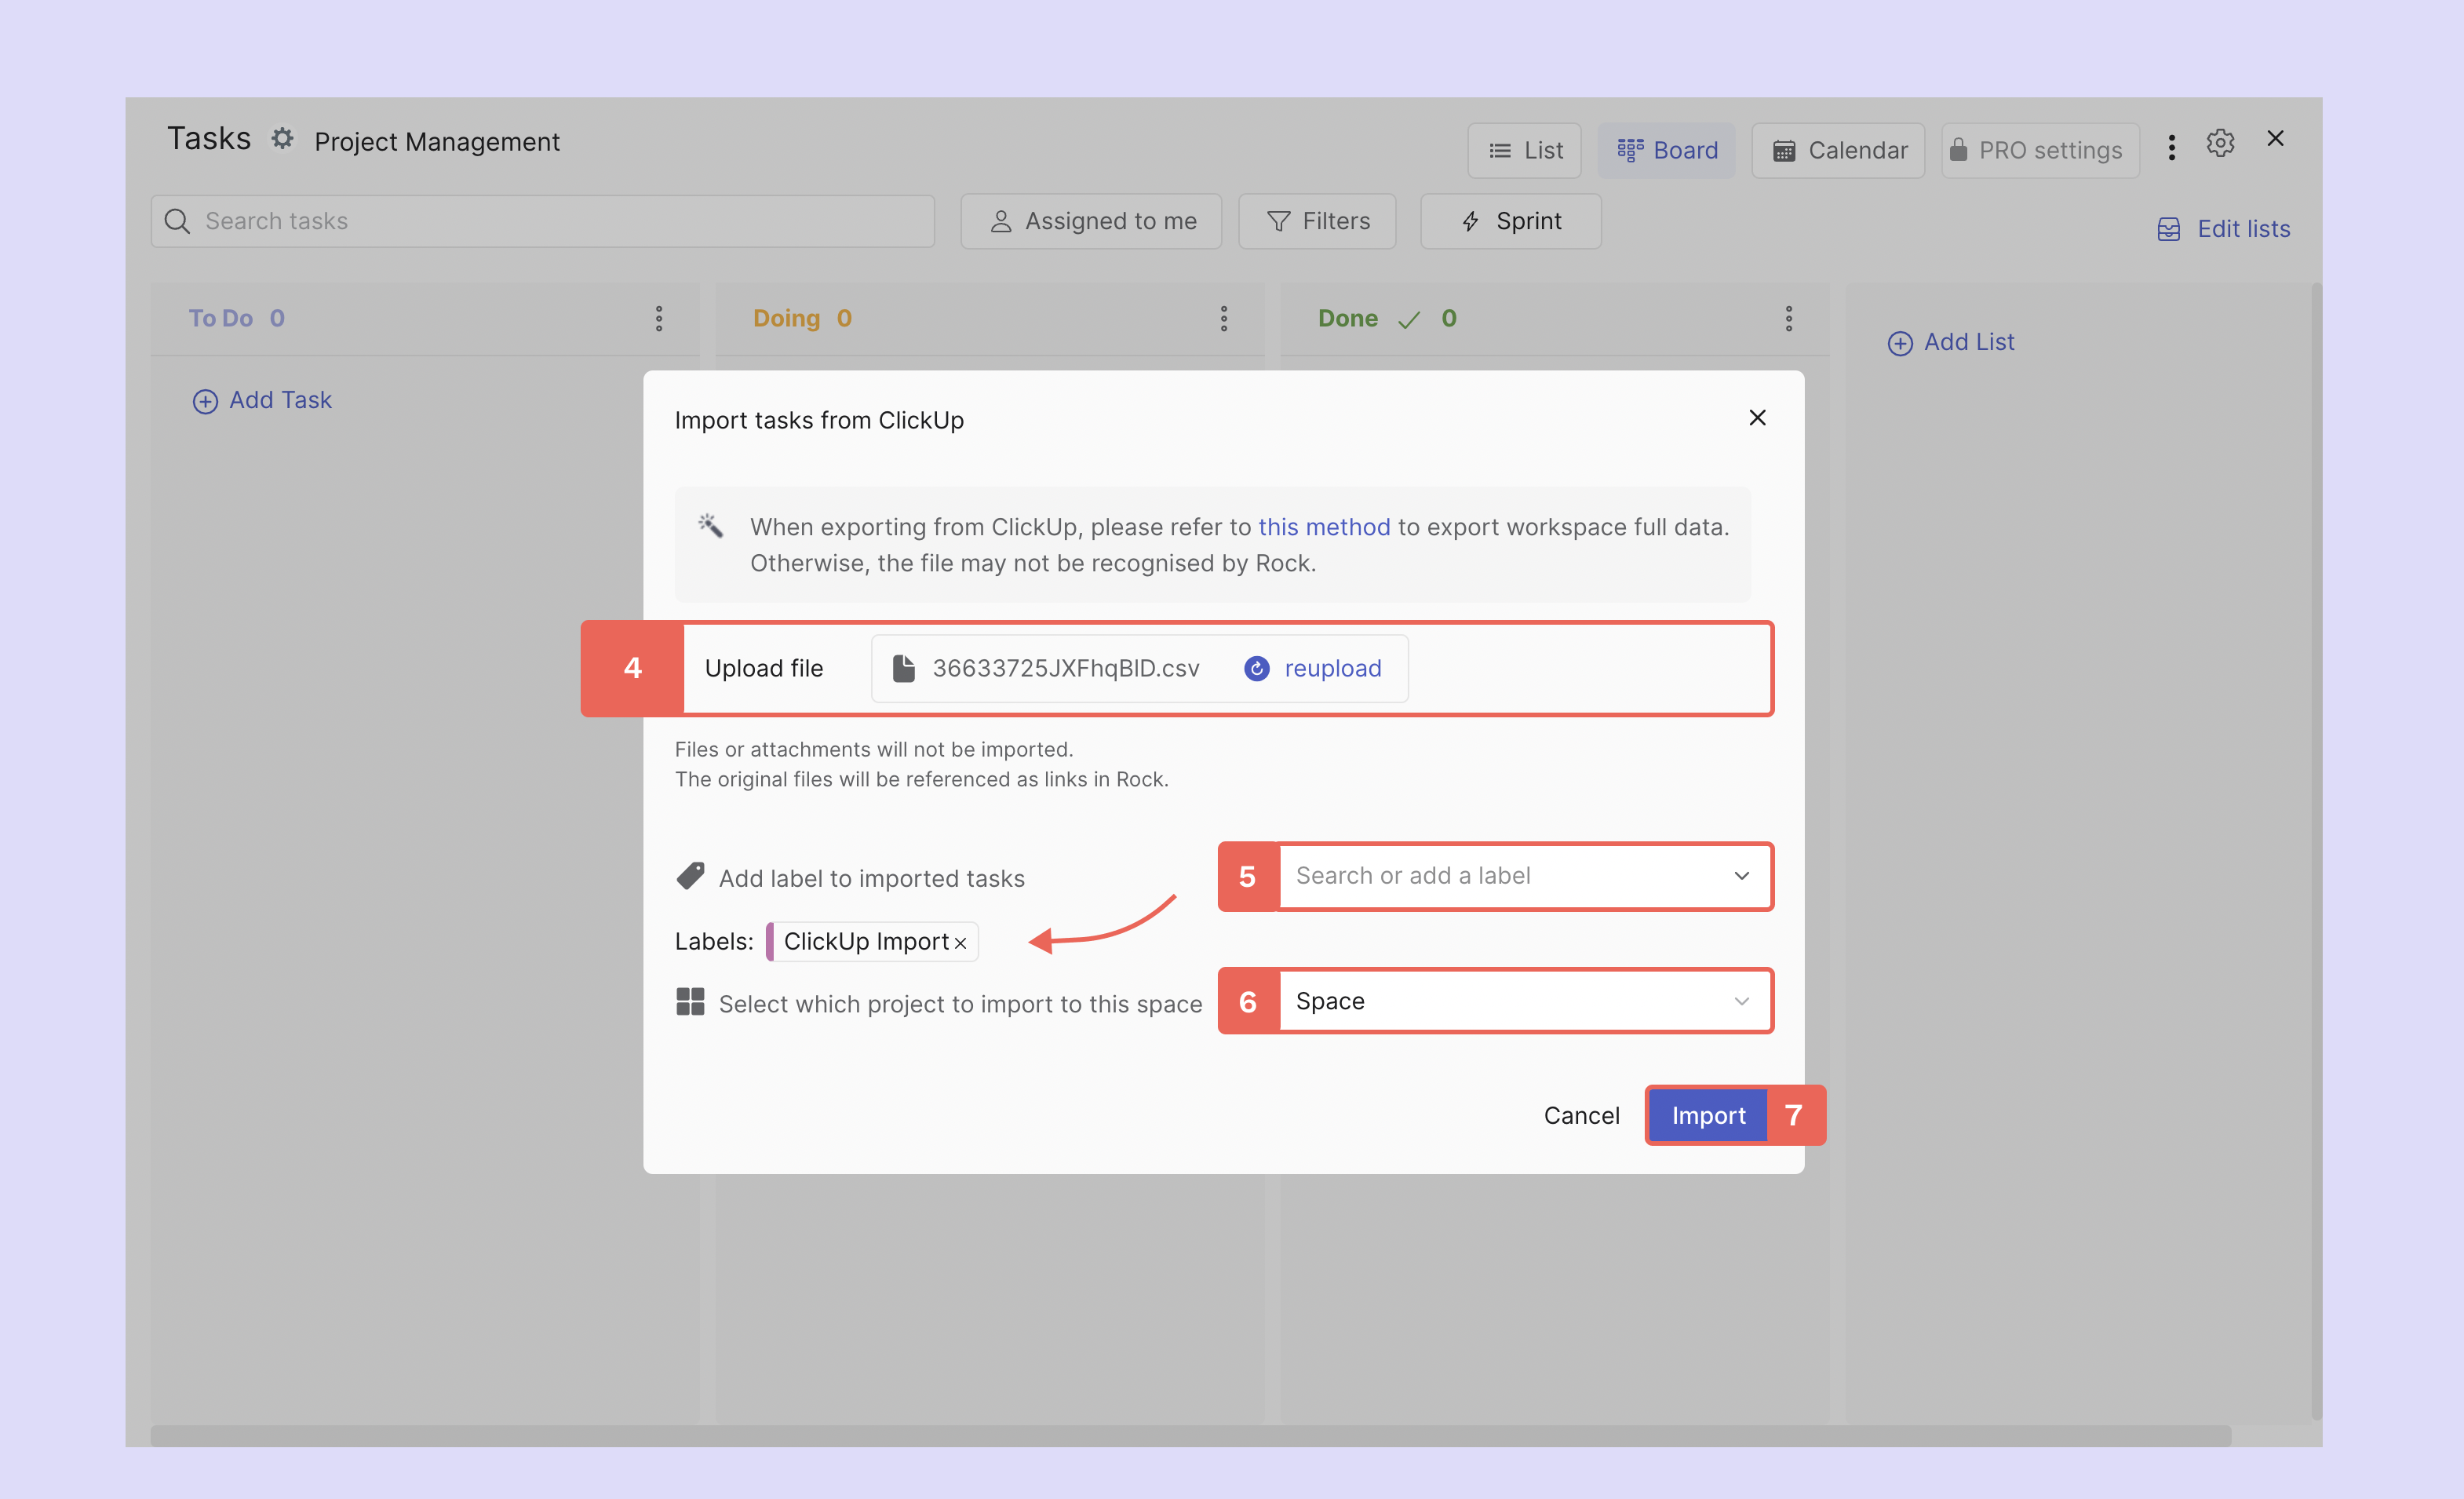
Import tasks or messages to Rock: 10 credits each
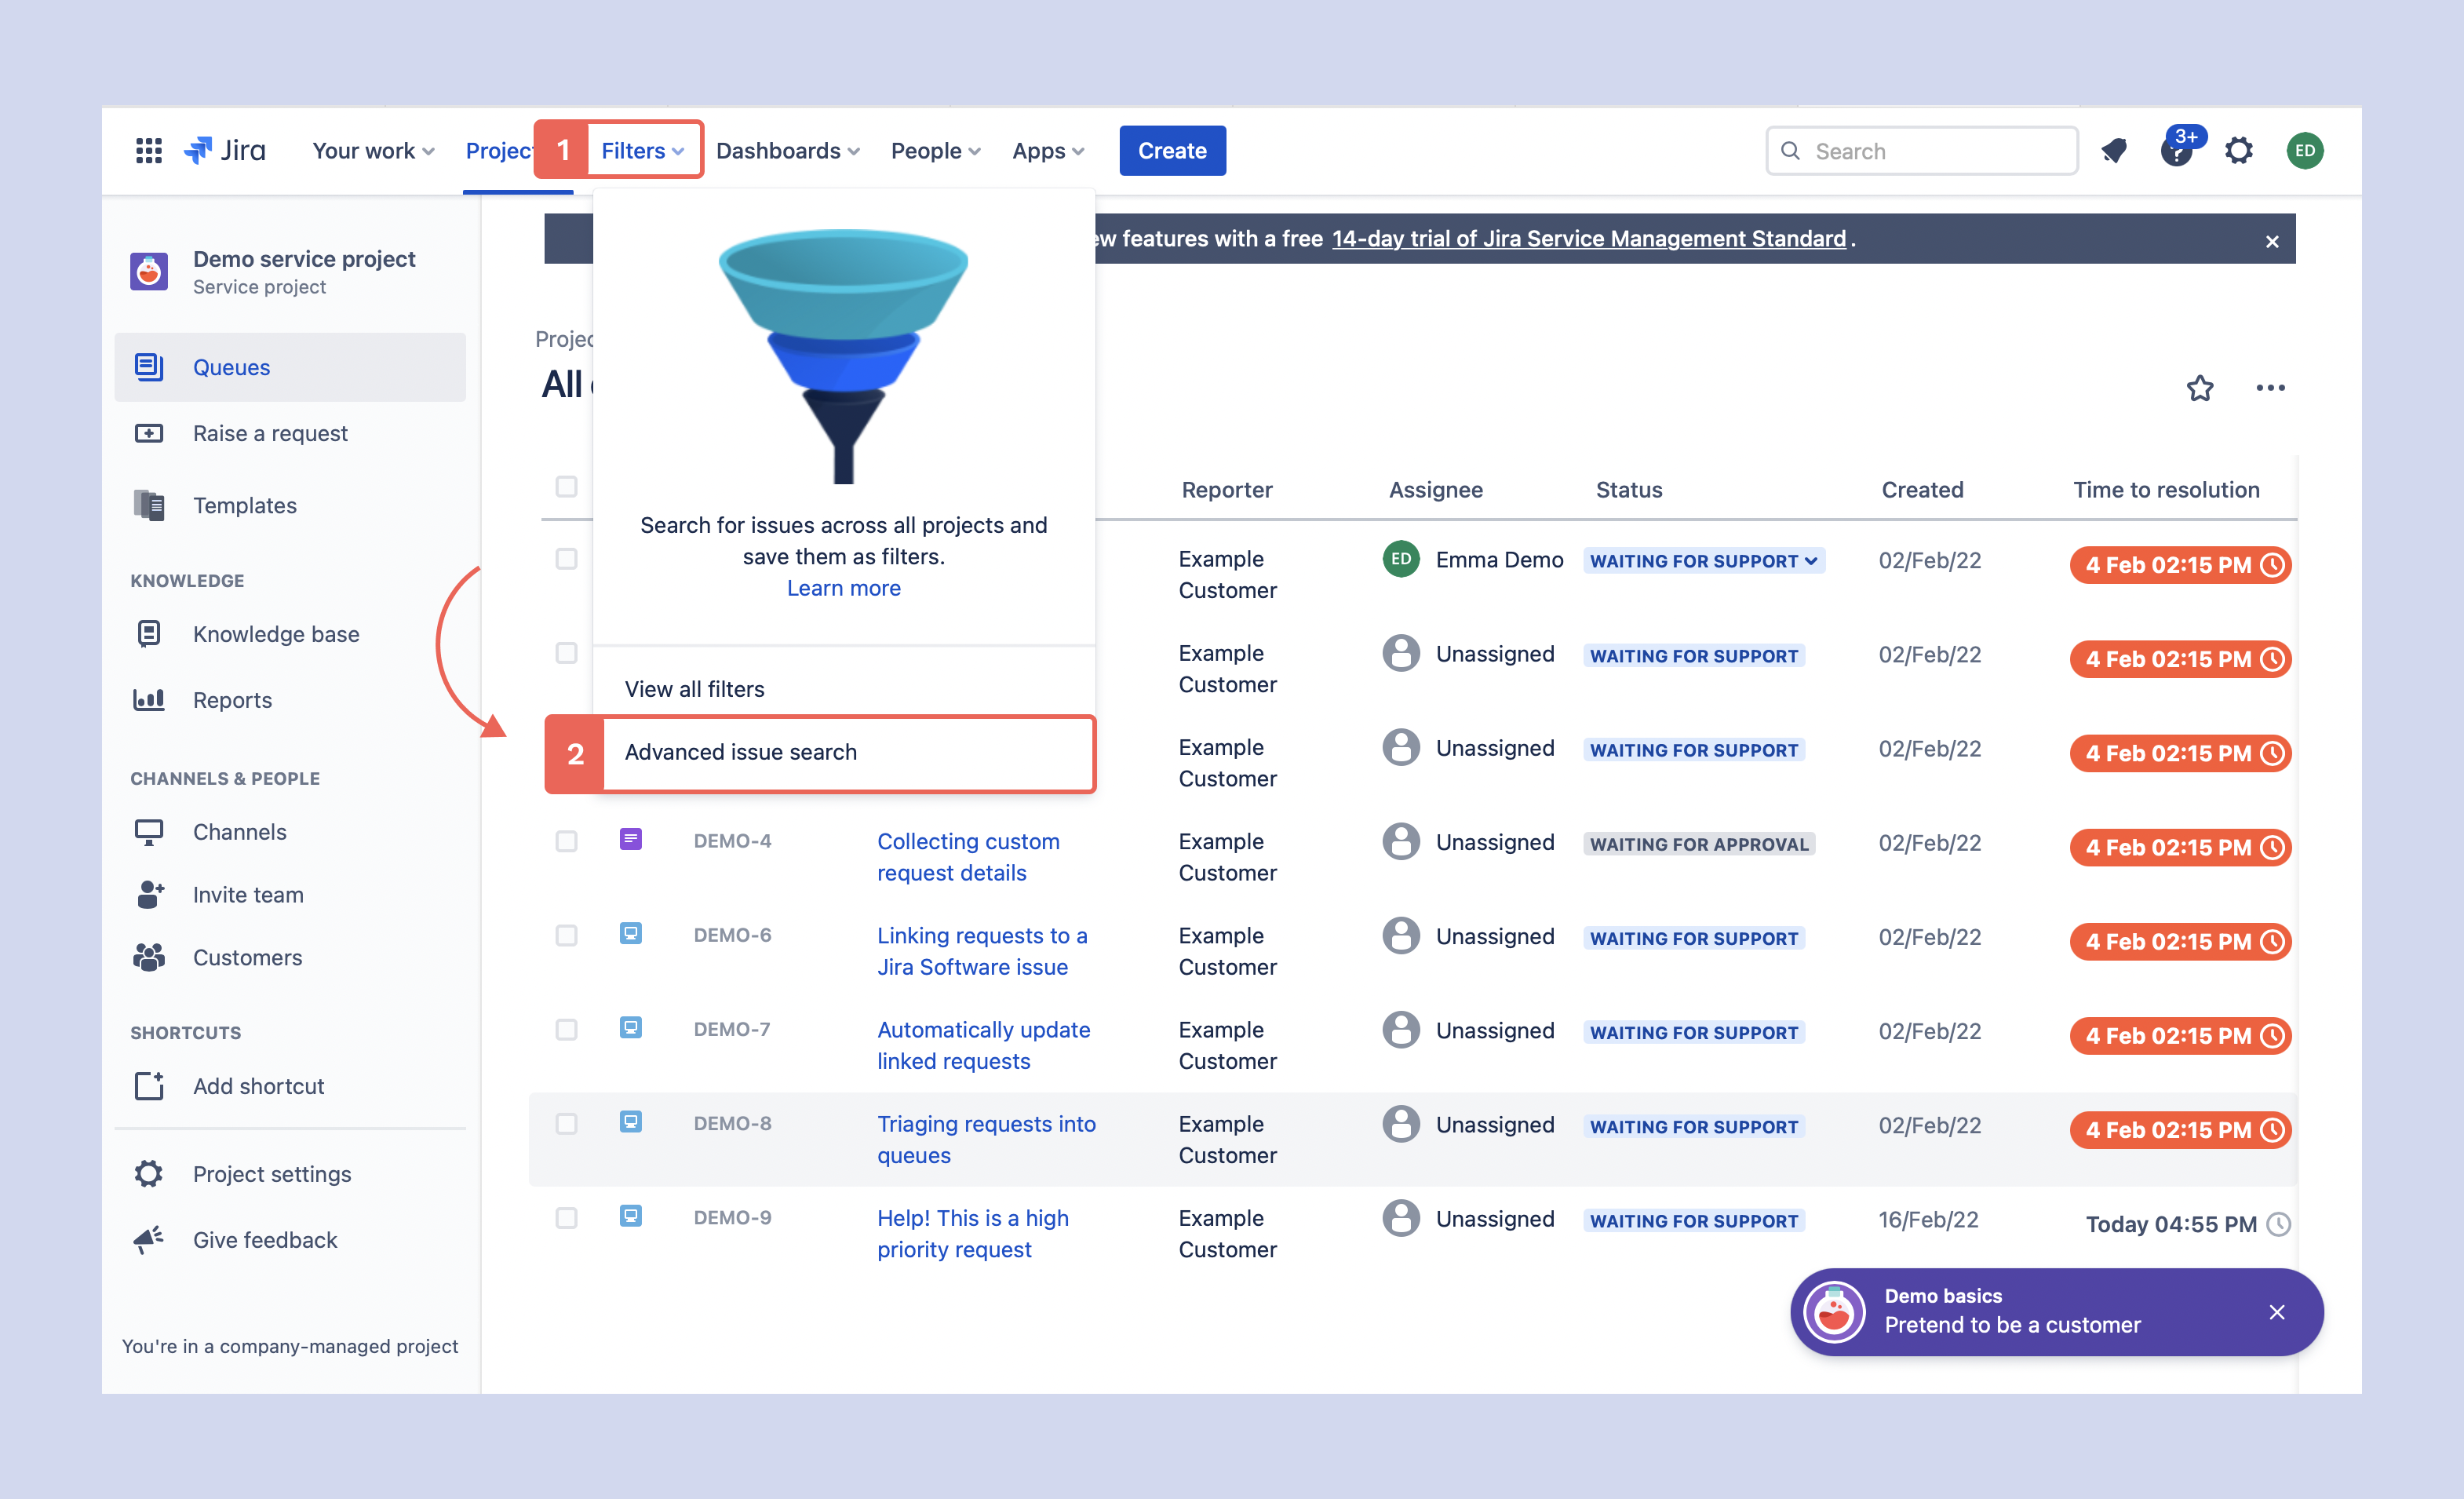
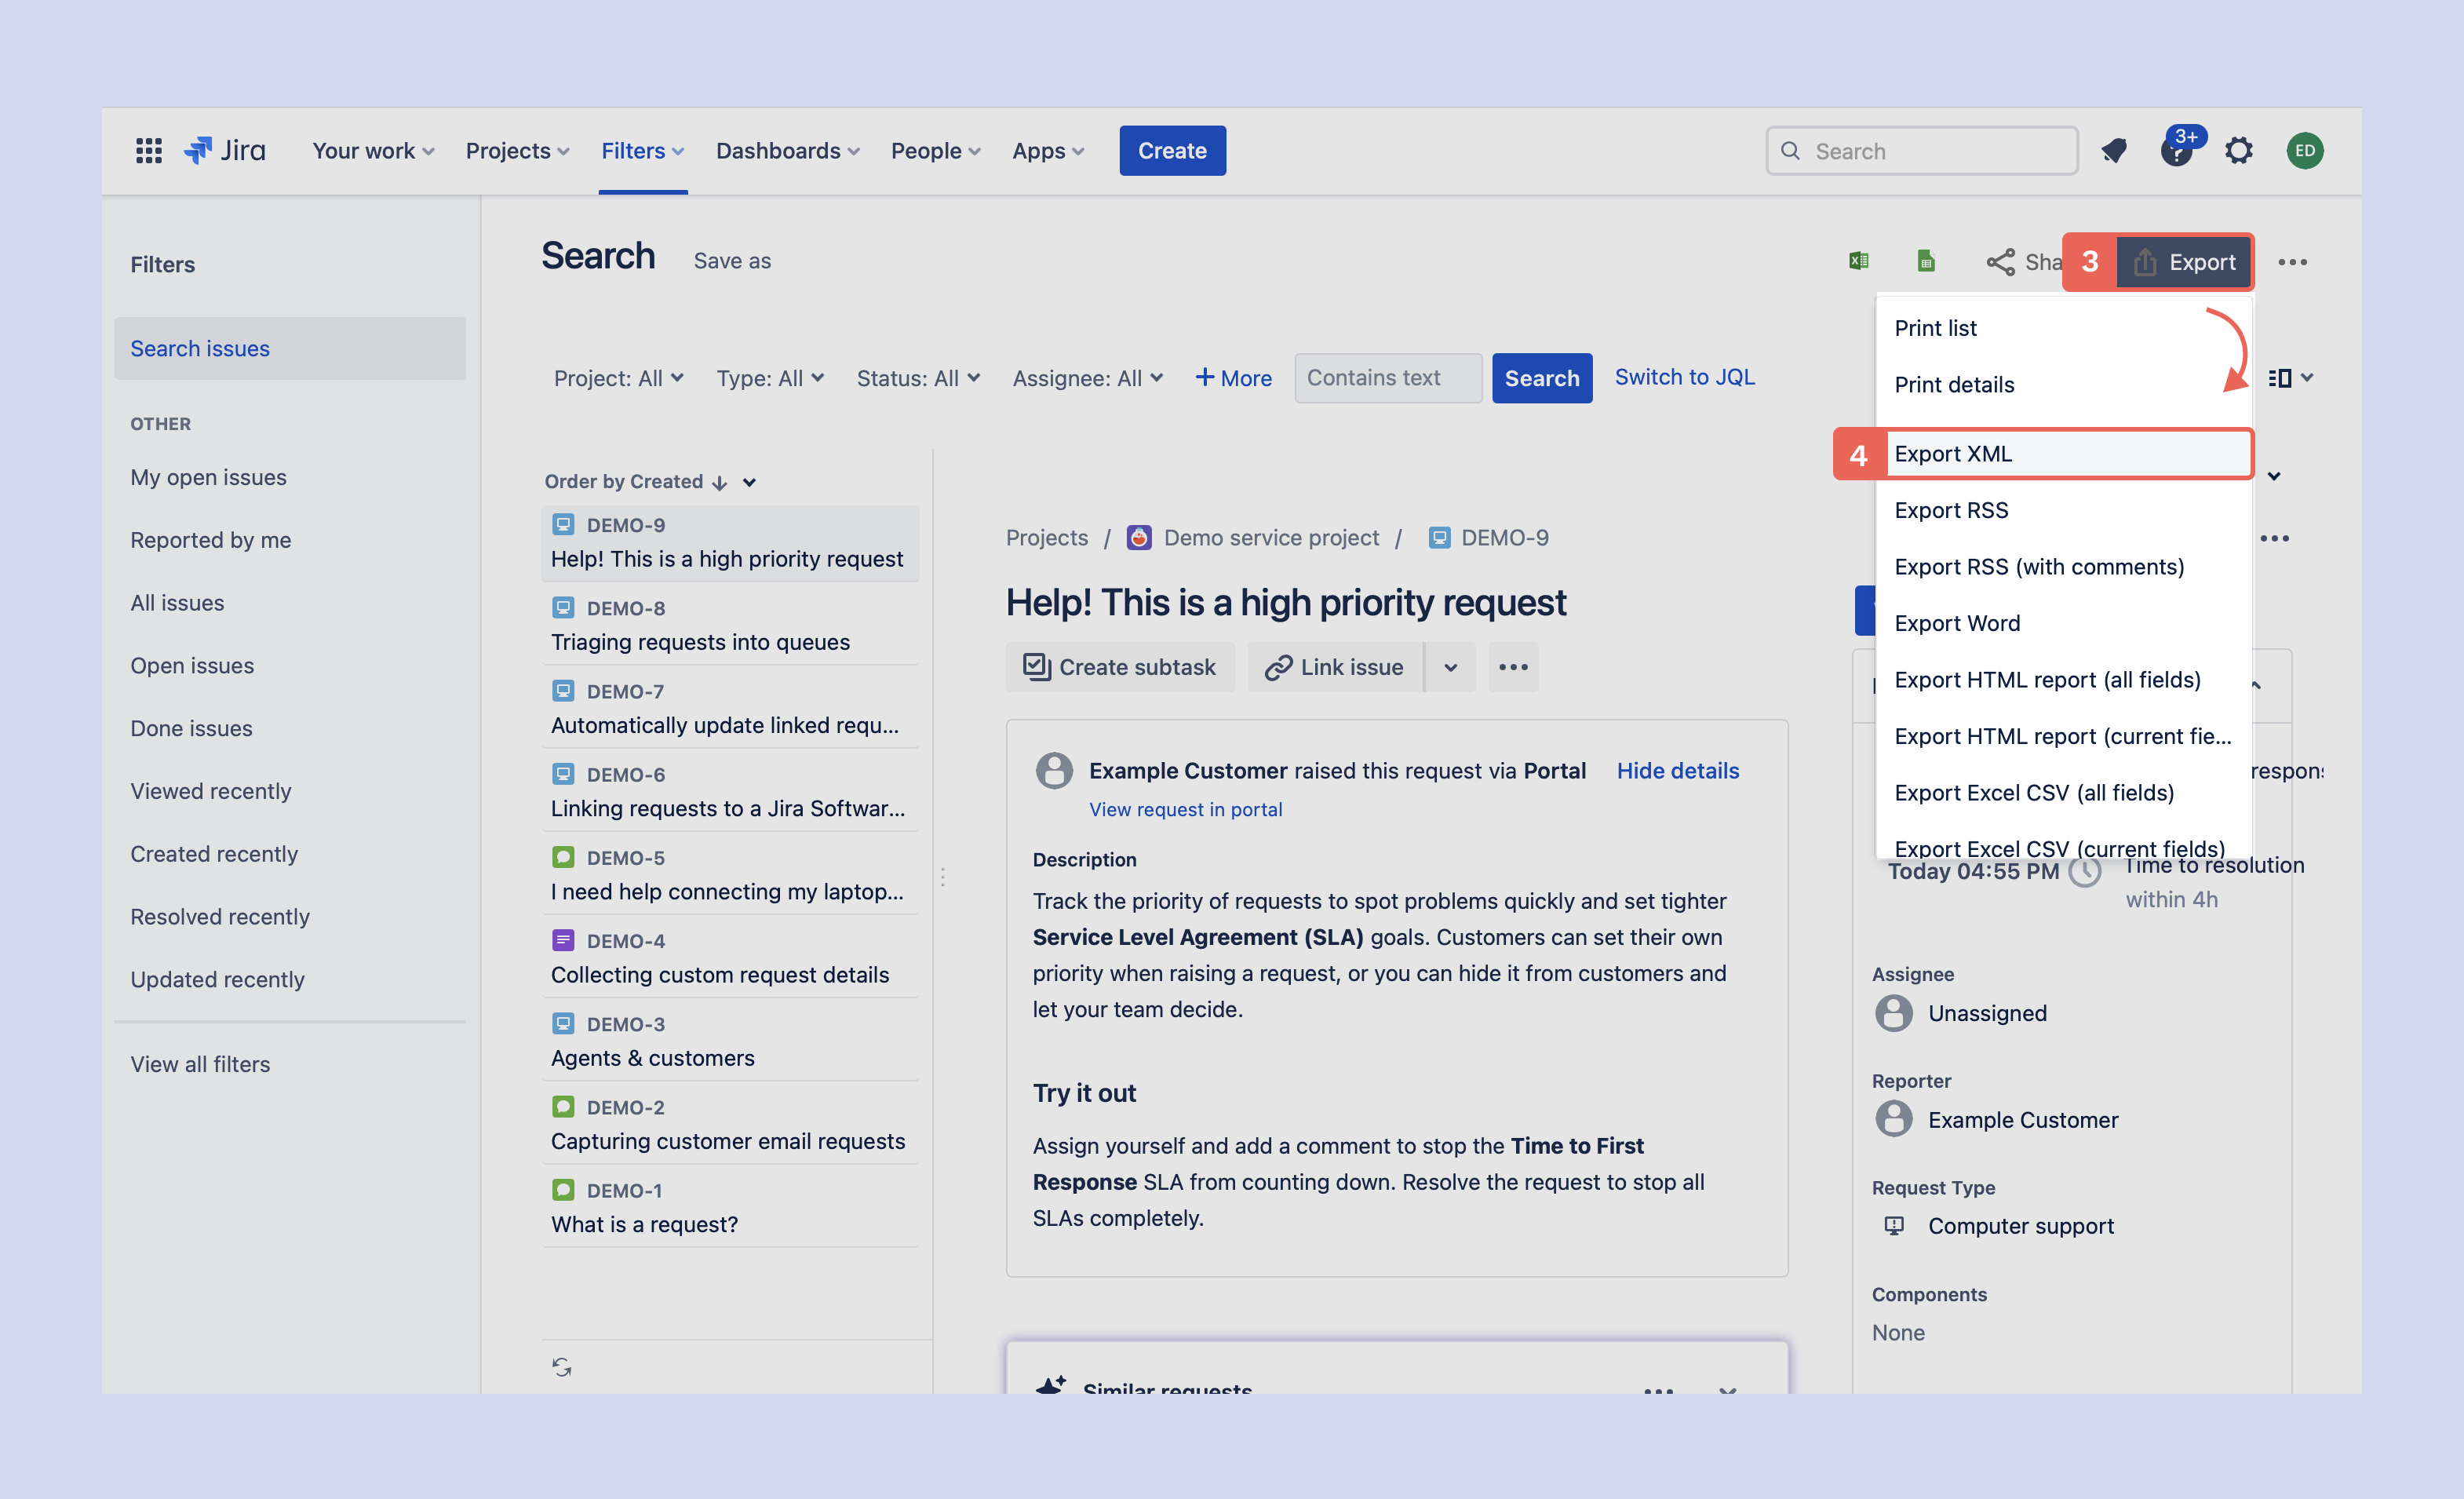
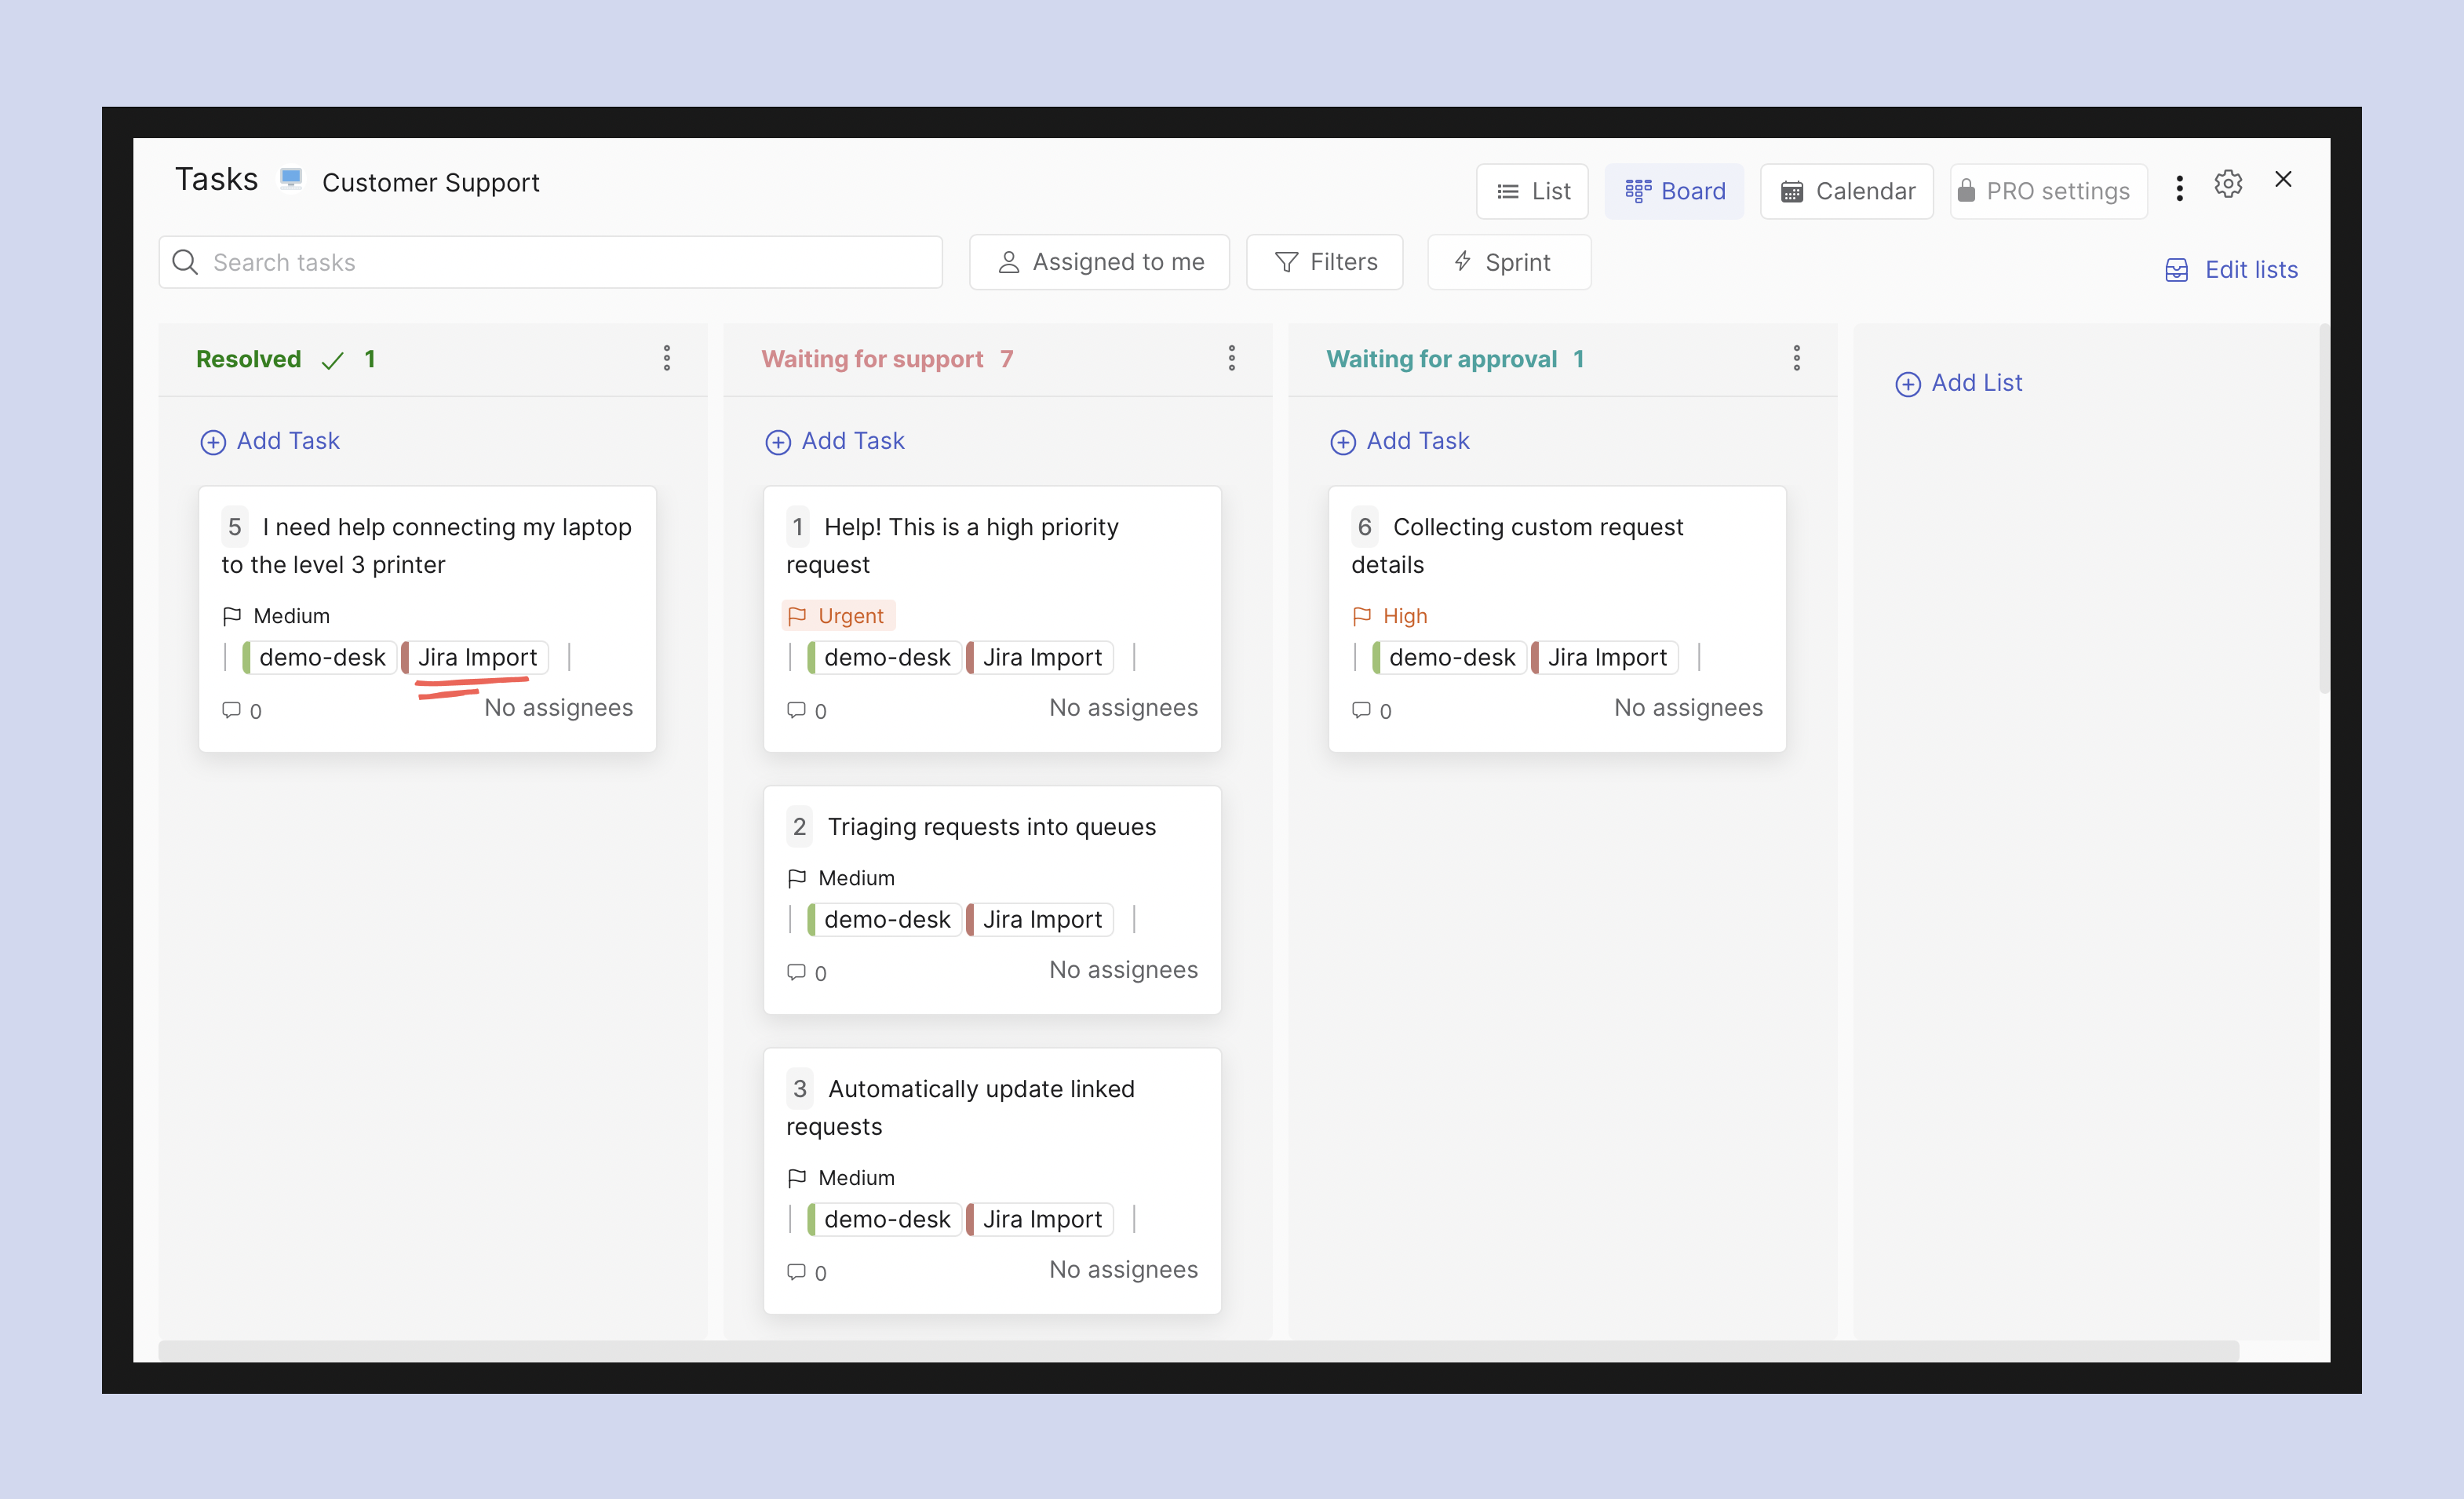
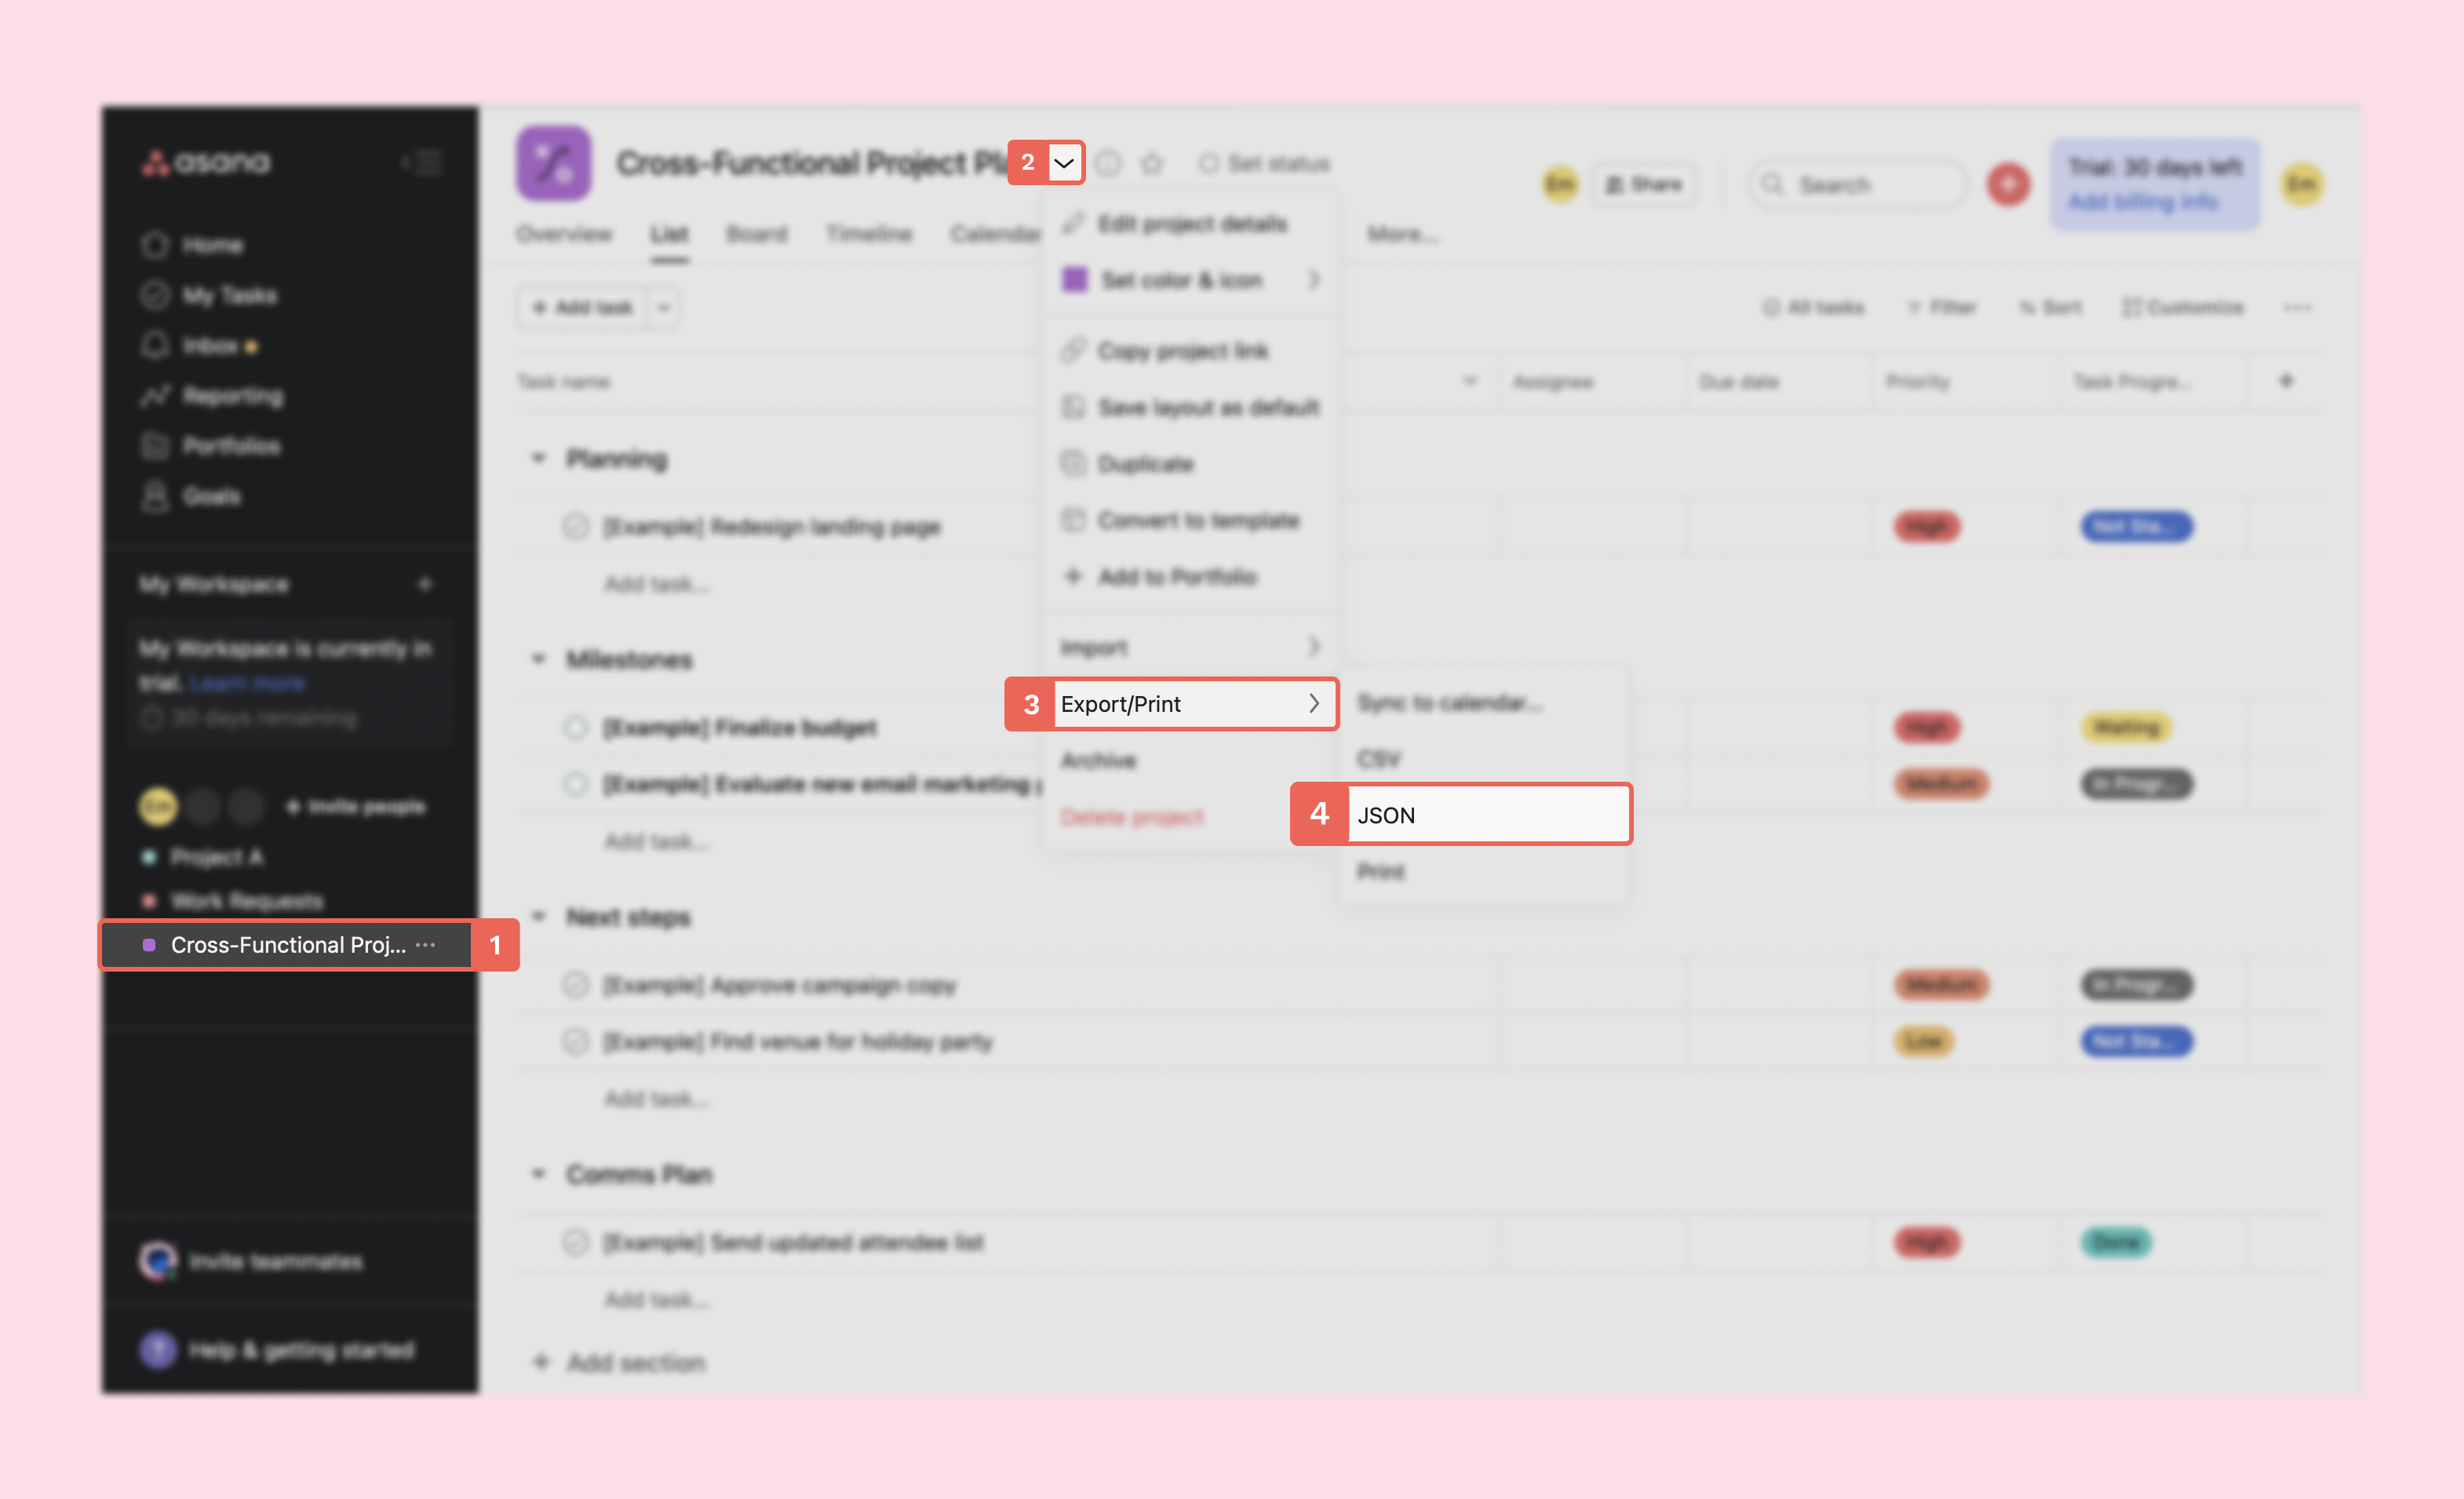
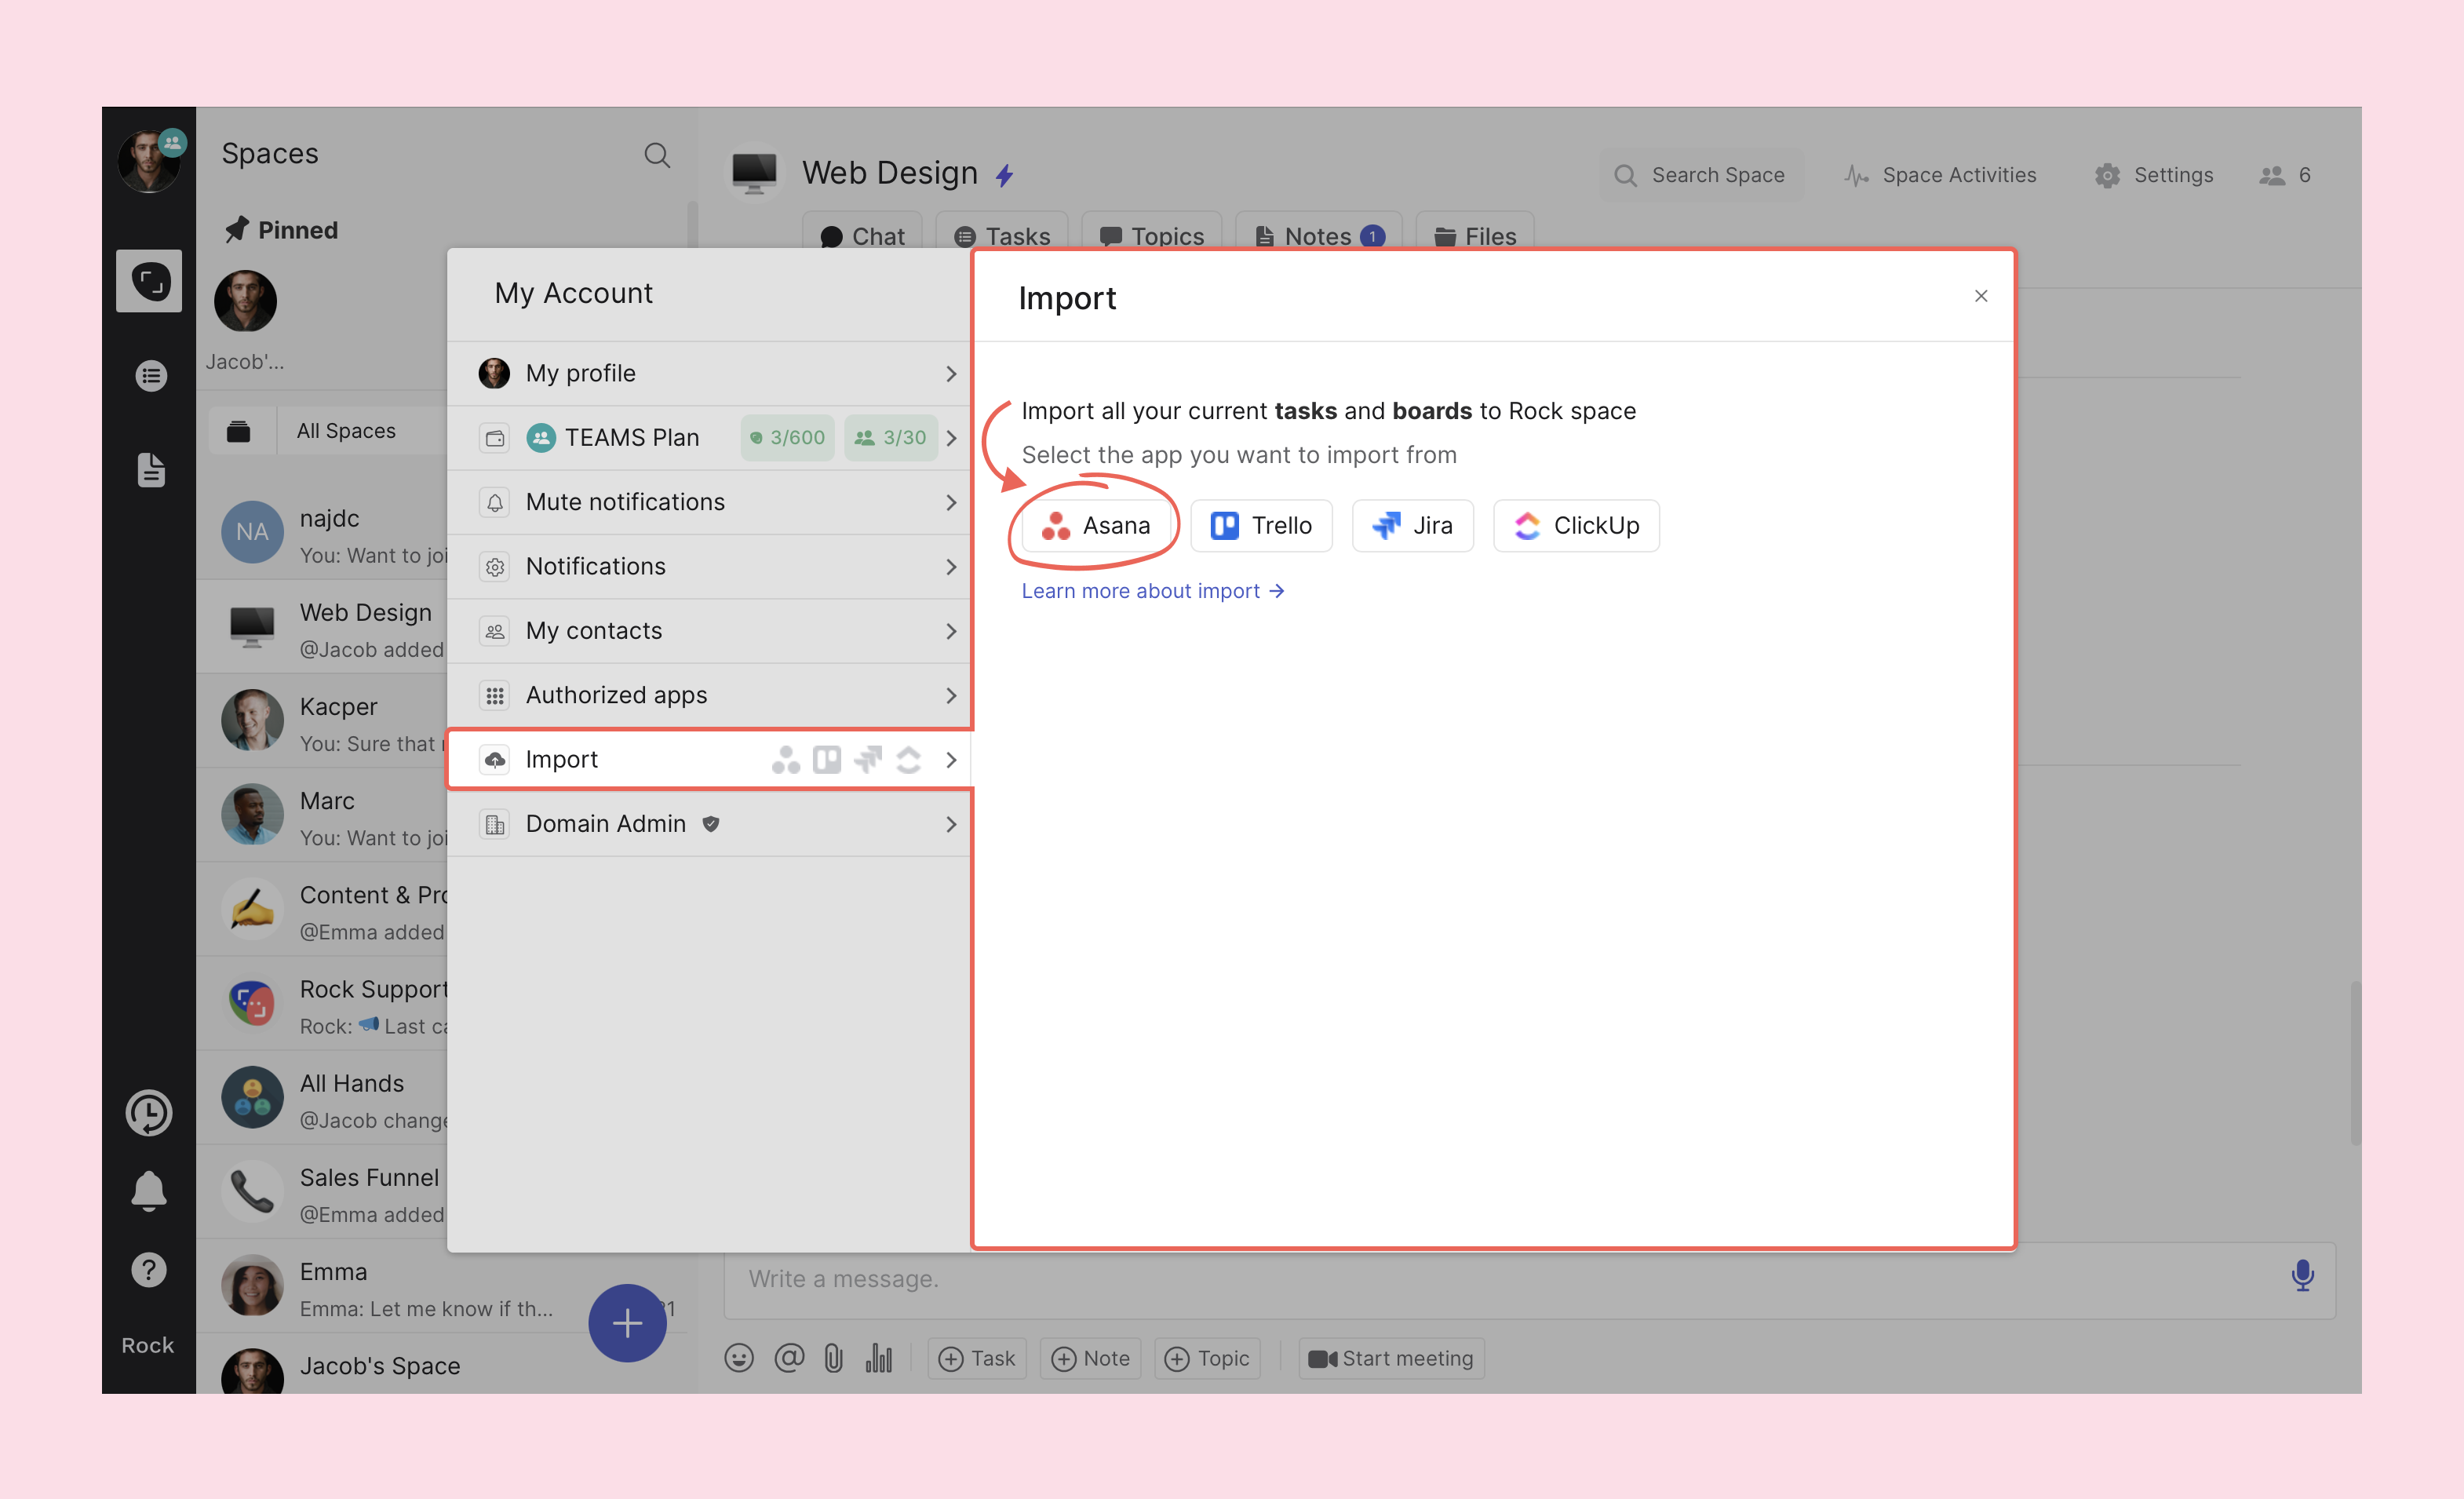
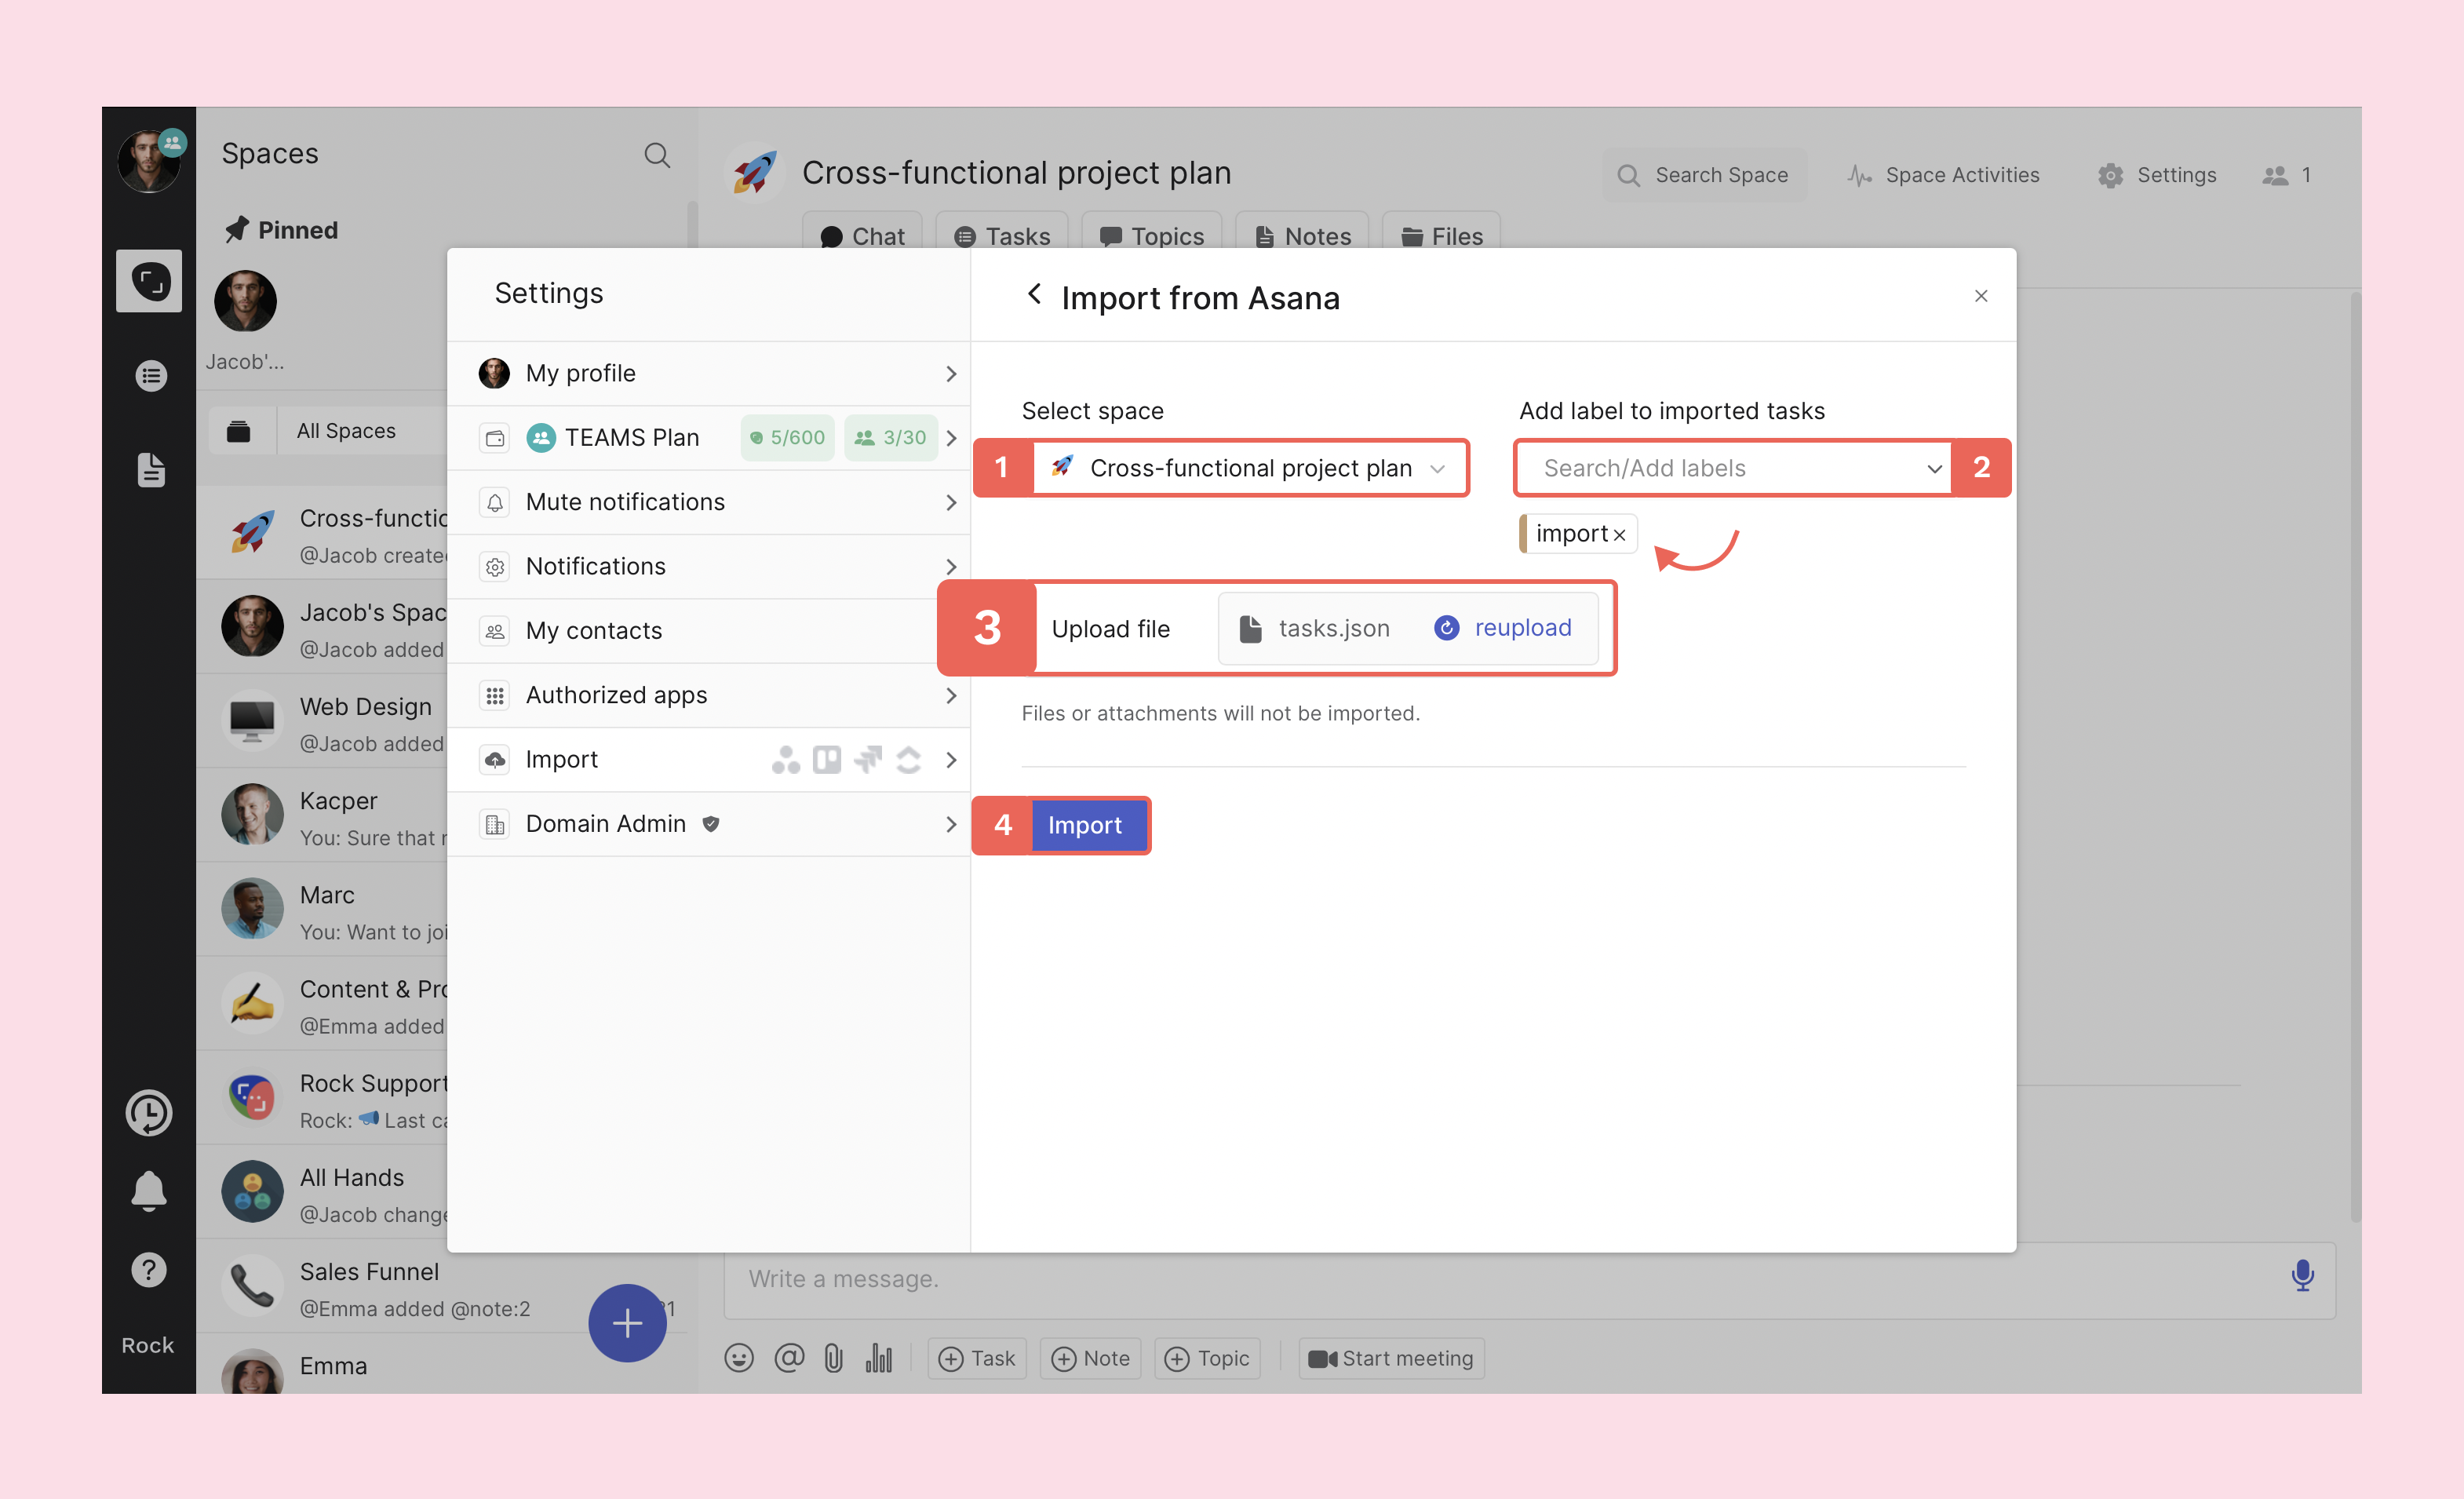
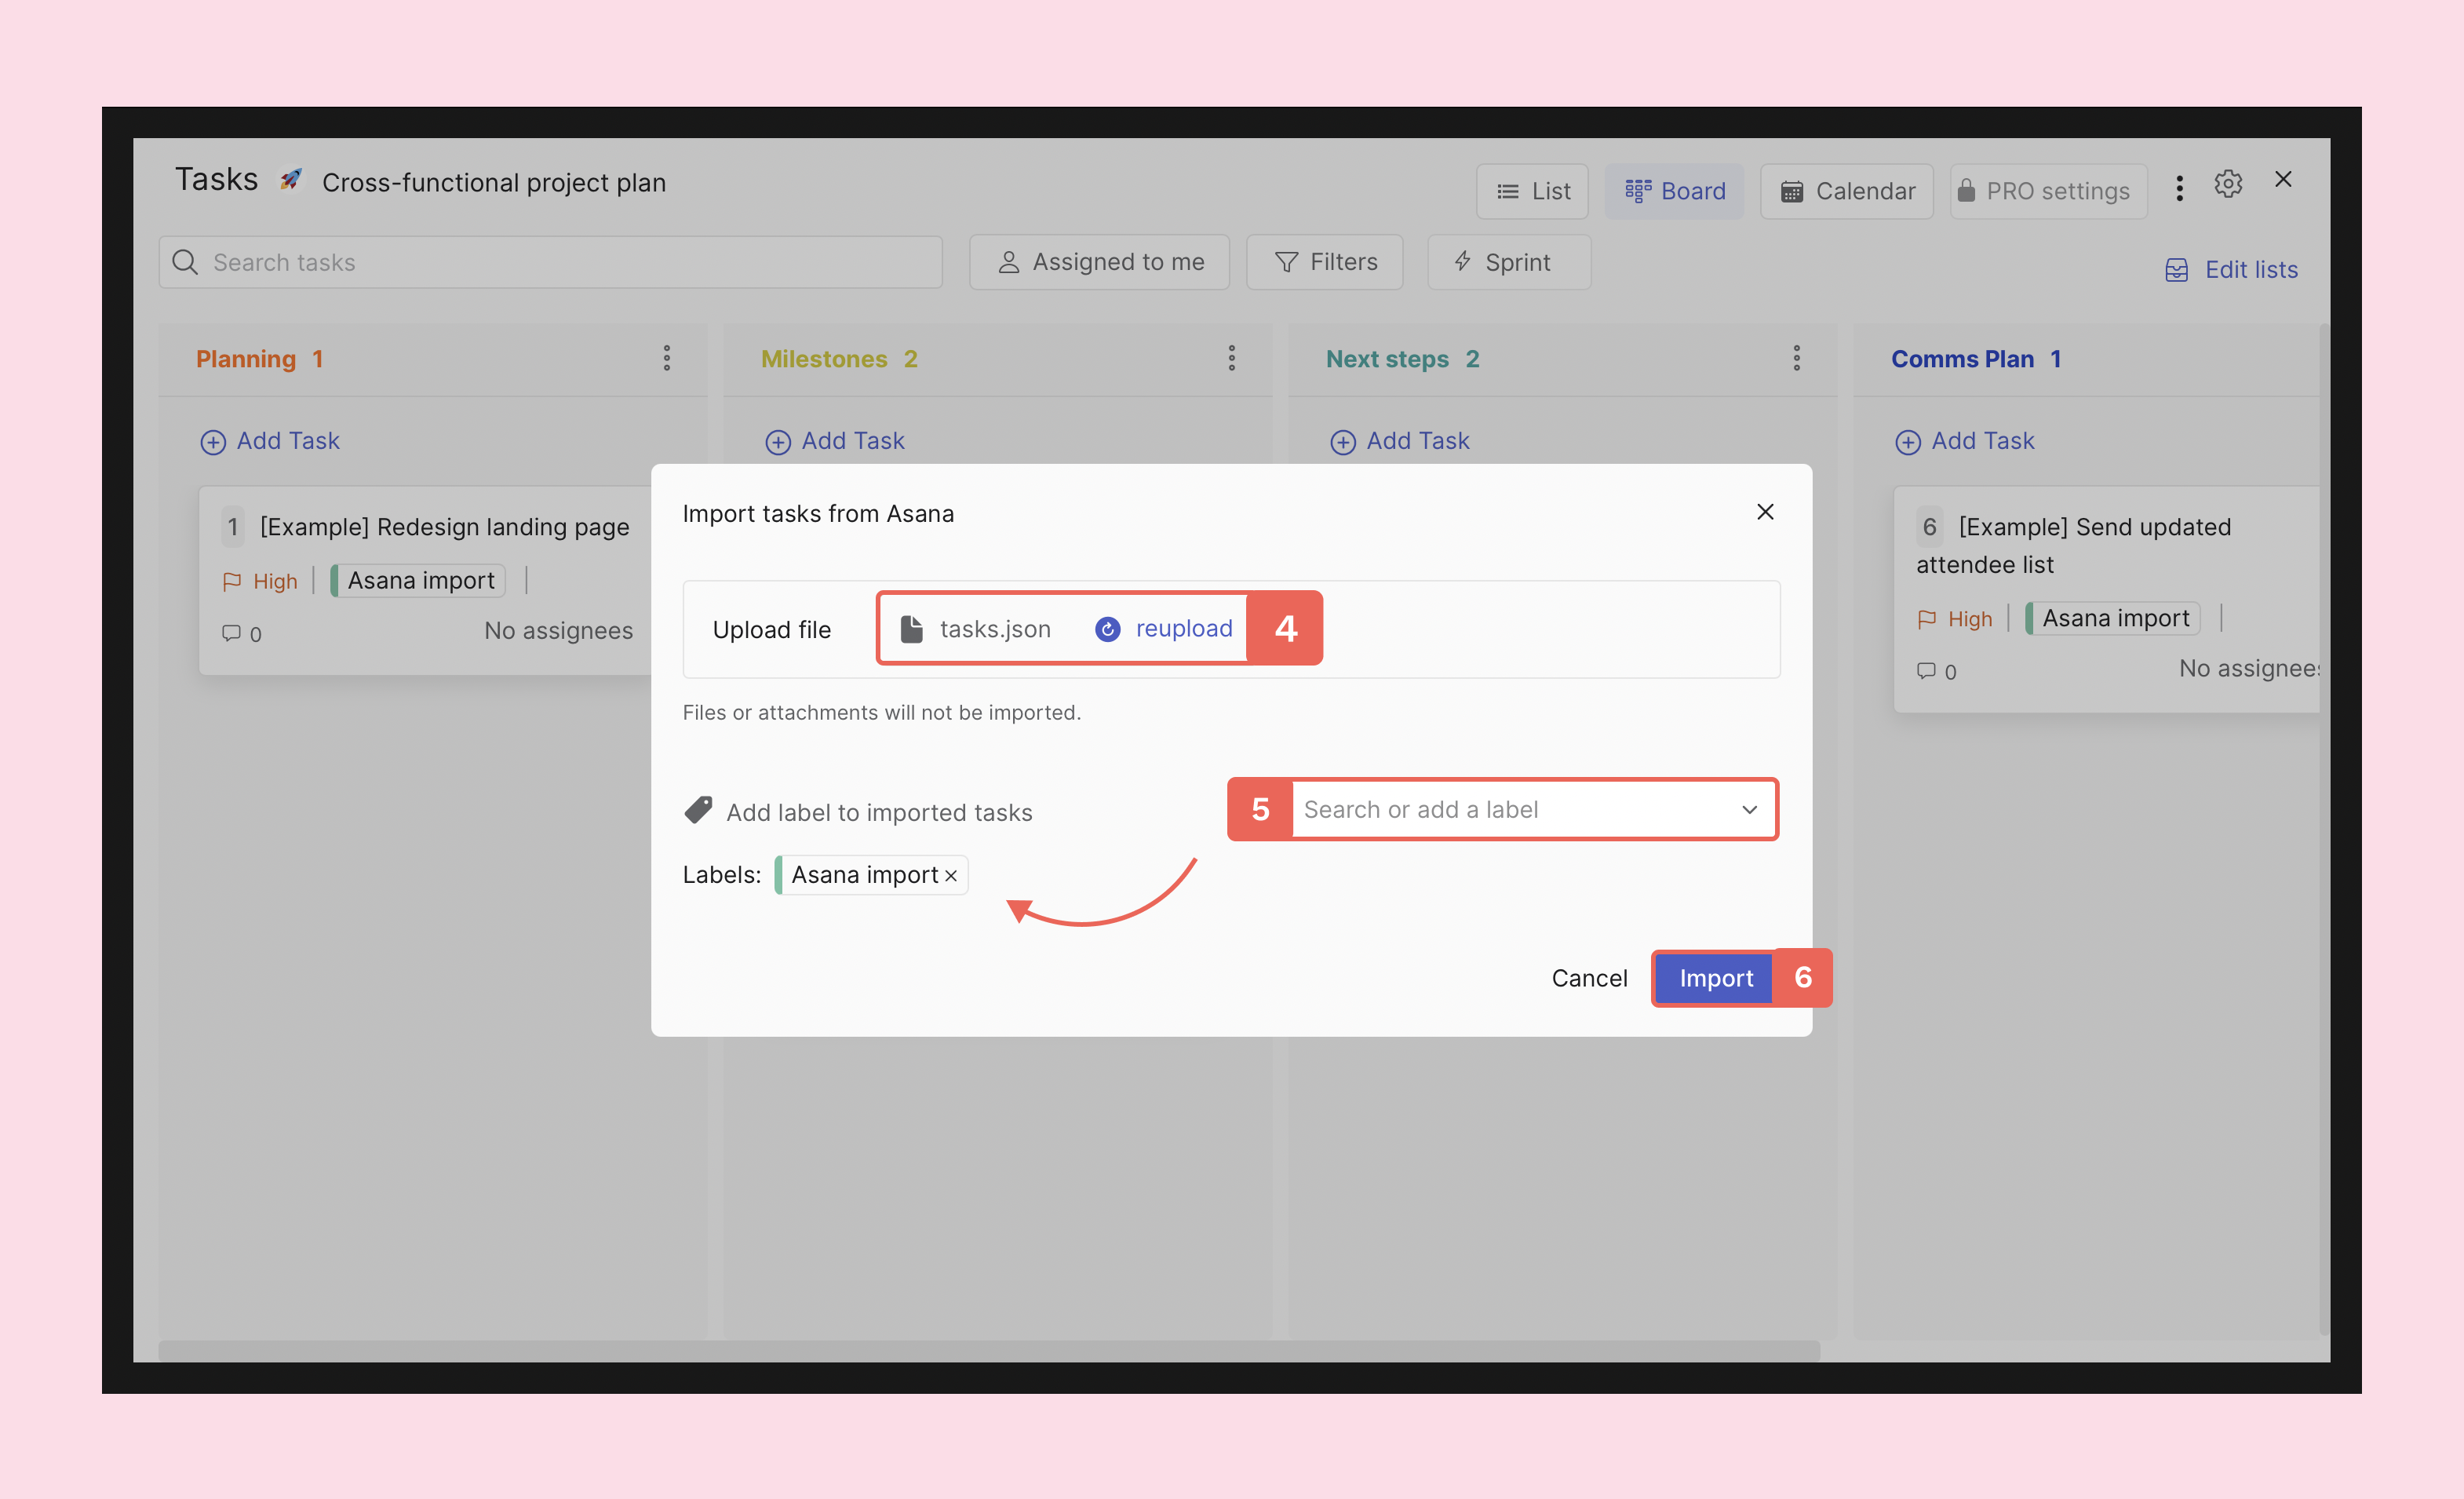
Import tasks from Trello, Asana, ClickUp, or Jira and receive 10 credits for the first import from every tool. Importing tasks allows you to continue your projects on Rock without friction. Keep task titles, descriptions, labels and so much more to seamlessly continue work.
You receive 10 credits for the first time you import tasks from each available importer. This means that you can receive a maximum of 40 credits for task imports.
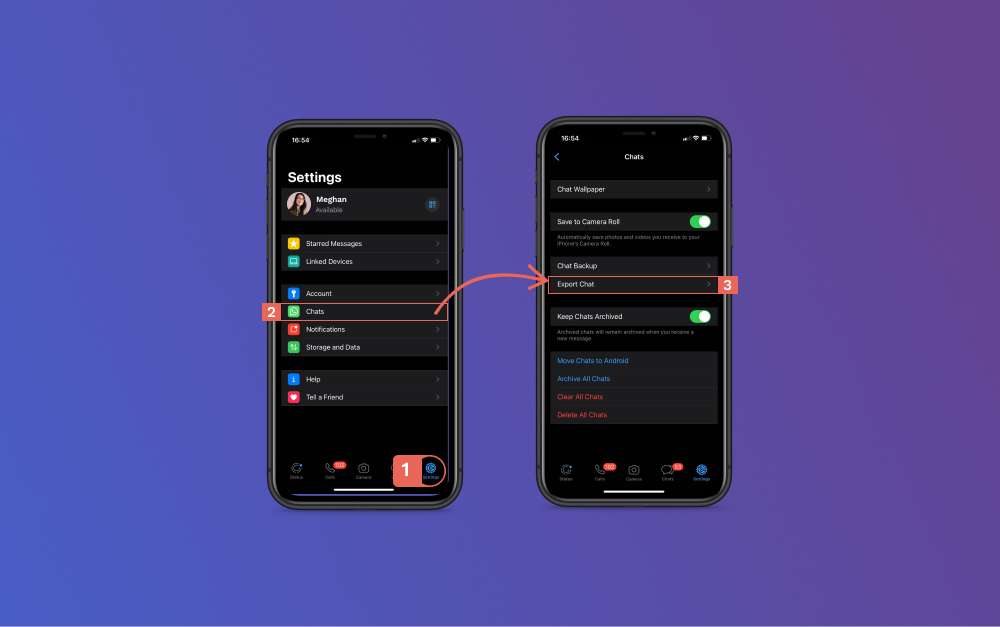
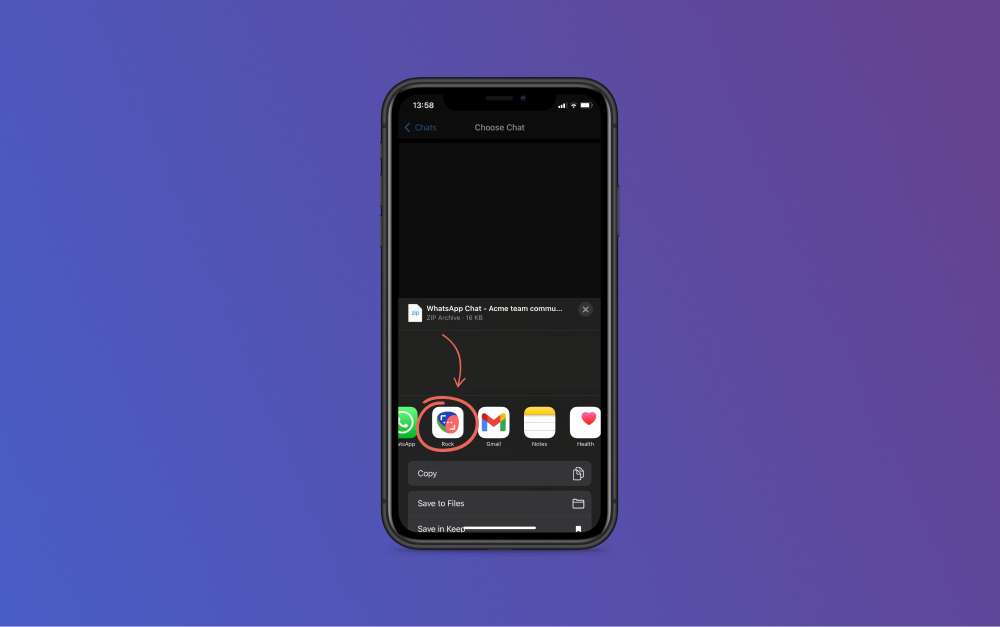
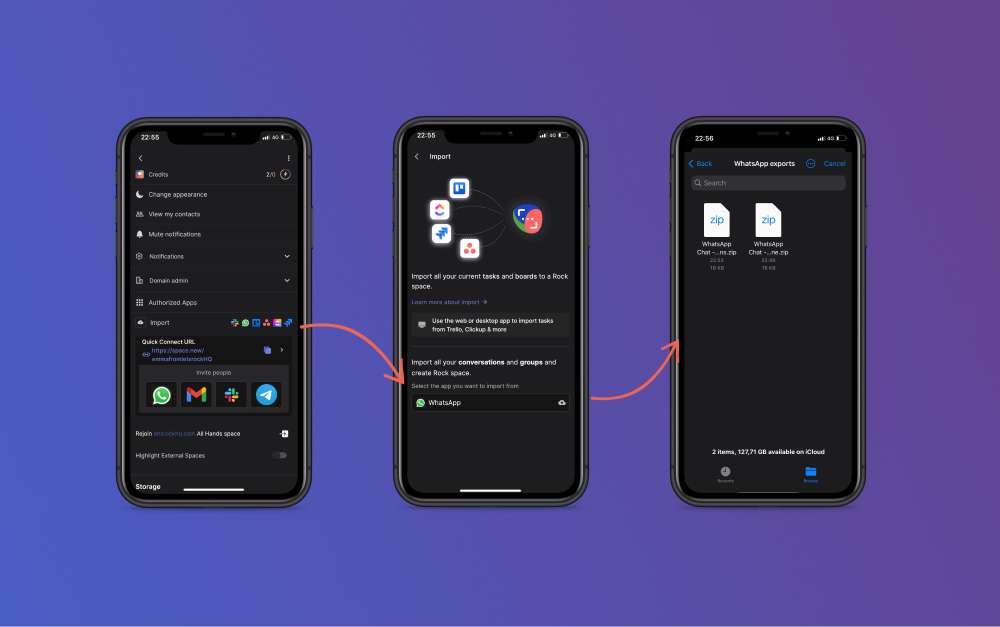
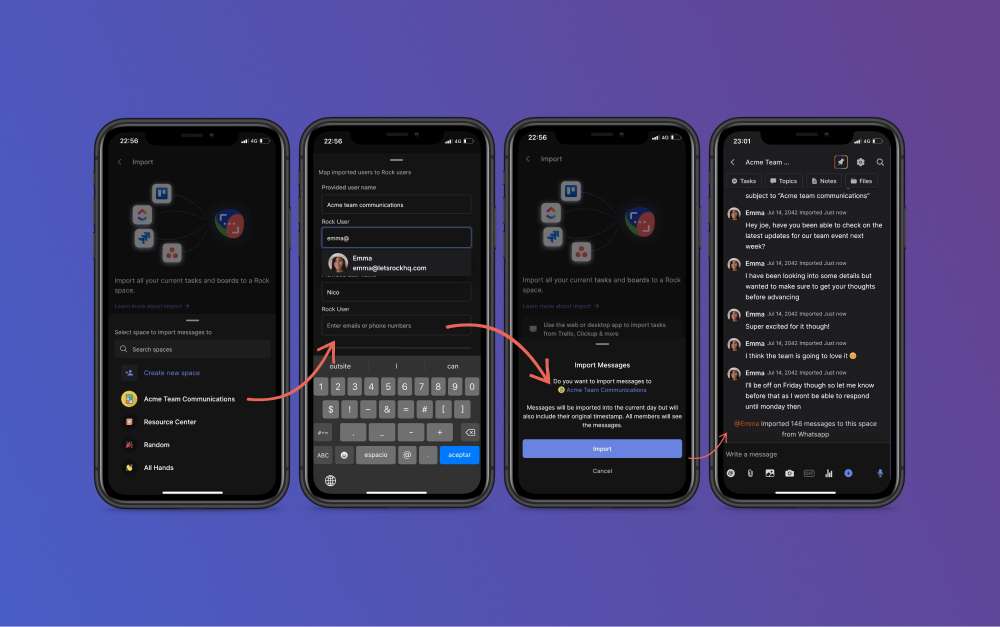
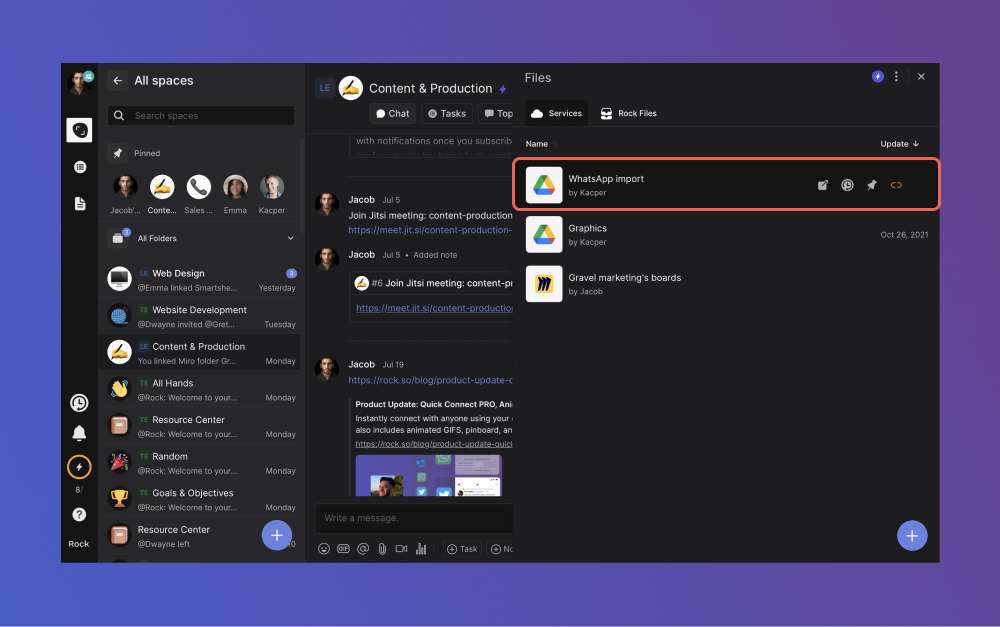
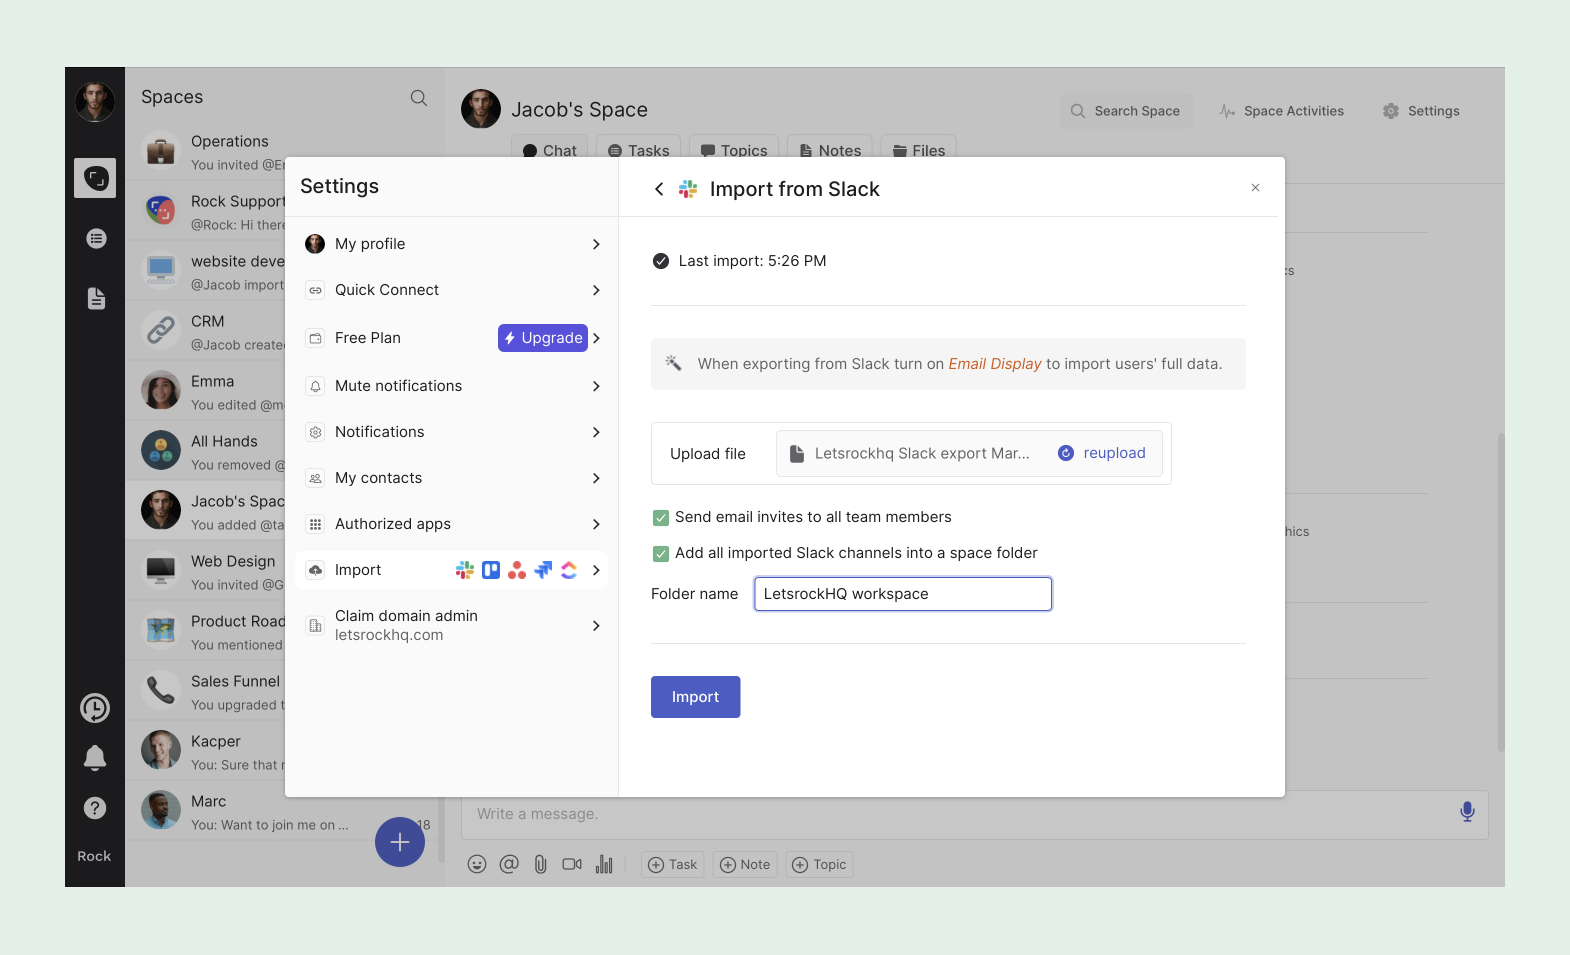
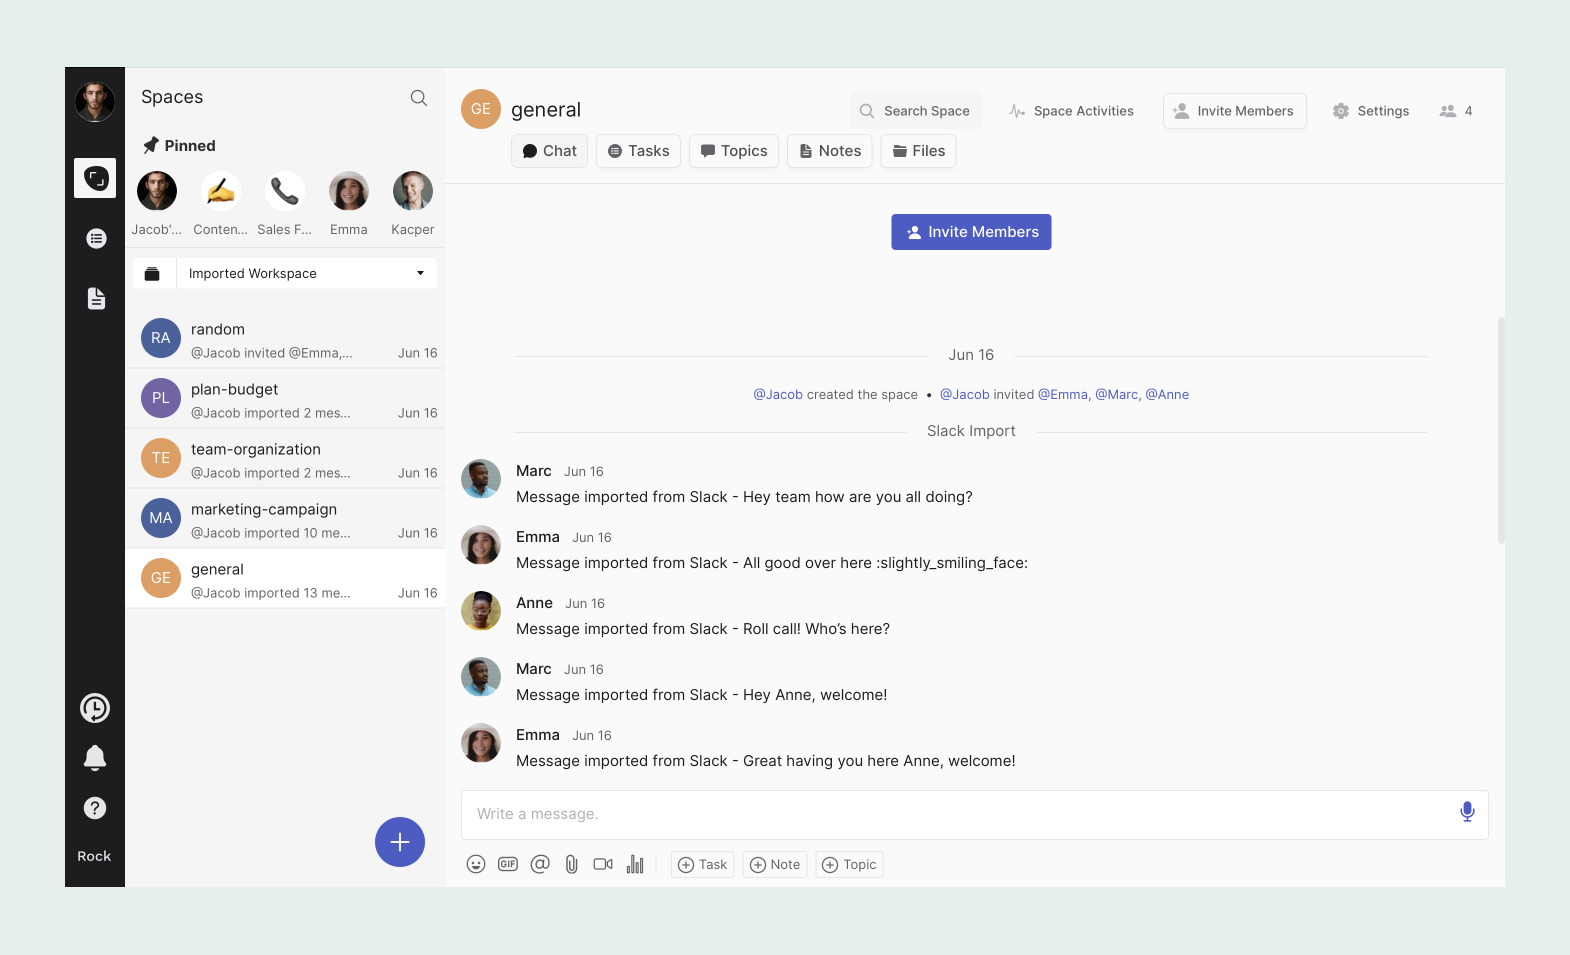
You can also import messages from Slack or from WhatsApp and receive 10 additional credits for each. The reward is only given out once, meaning that multiple Slack imports on the same account will not reward additional credits.
Import your contact list on mobile: 10 credits
Add your contact list from mobile to Rock. This allows you to connect with people on Rock and find them when creating new spaces. You can import your mobile contact list through: user settings -> view my contacts -> import -> press ok.
While you can import contacts multiple times, you can only receive the reward once. Adding the same contact list on multiple accounts will provide individual rewards on every account.
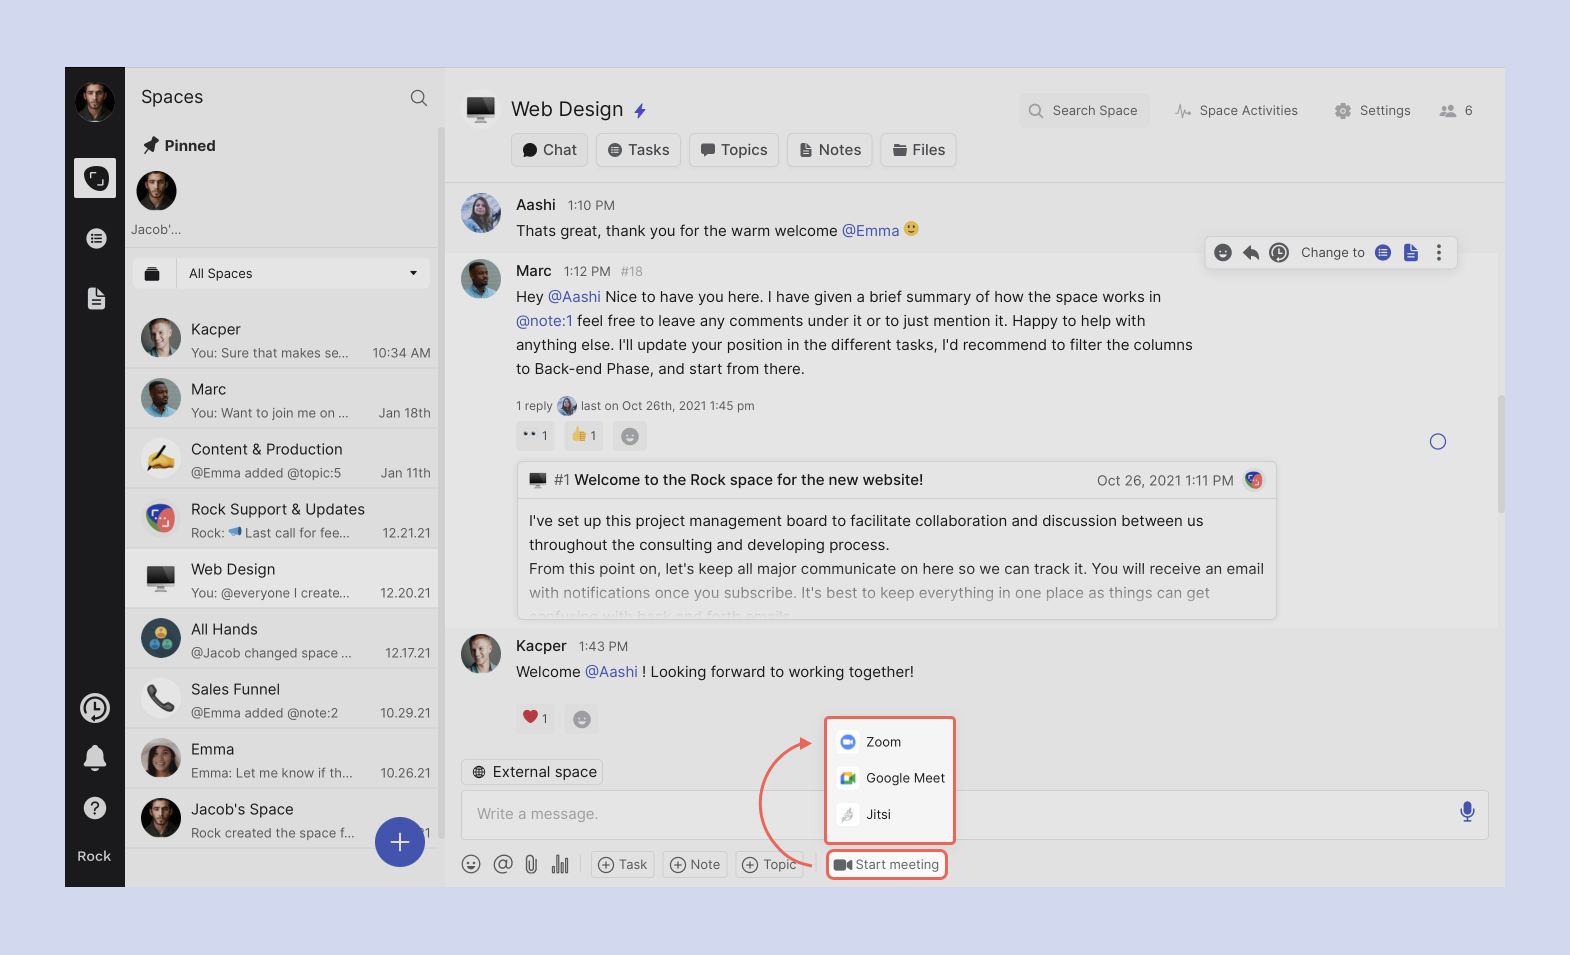
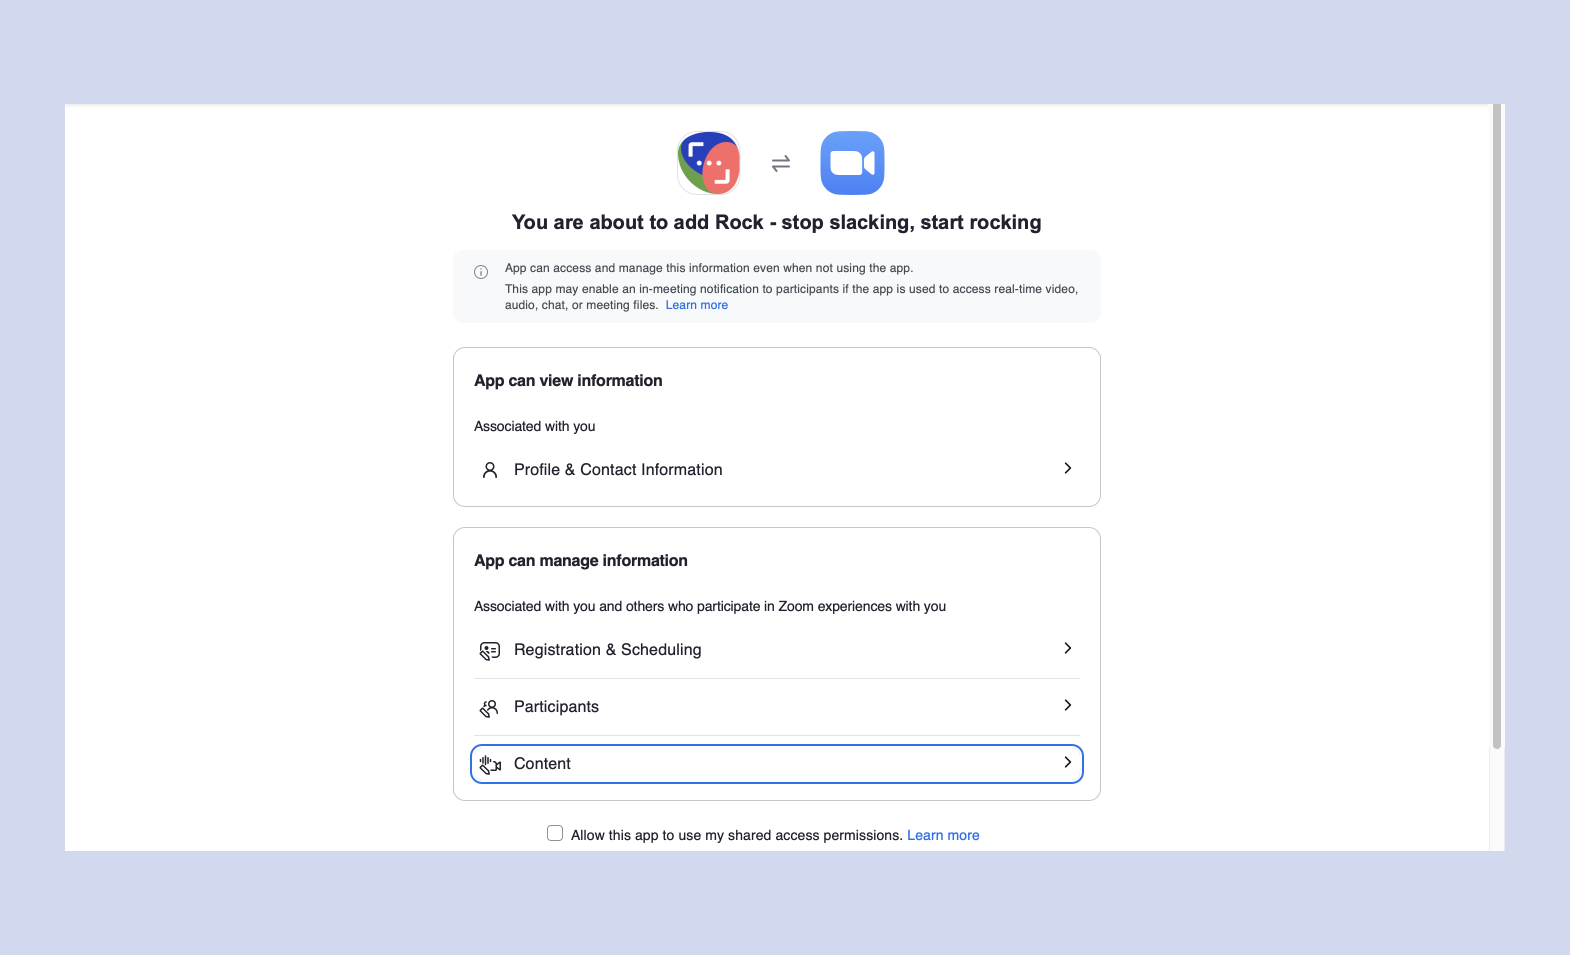
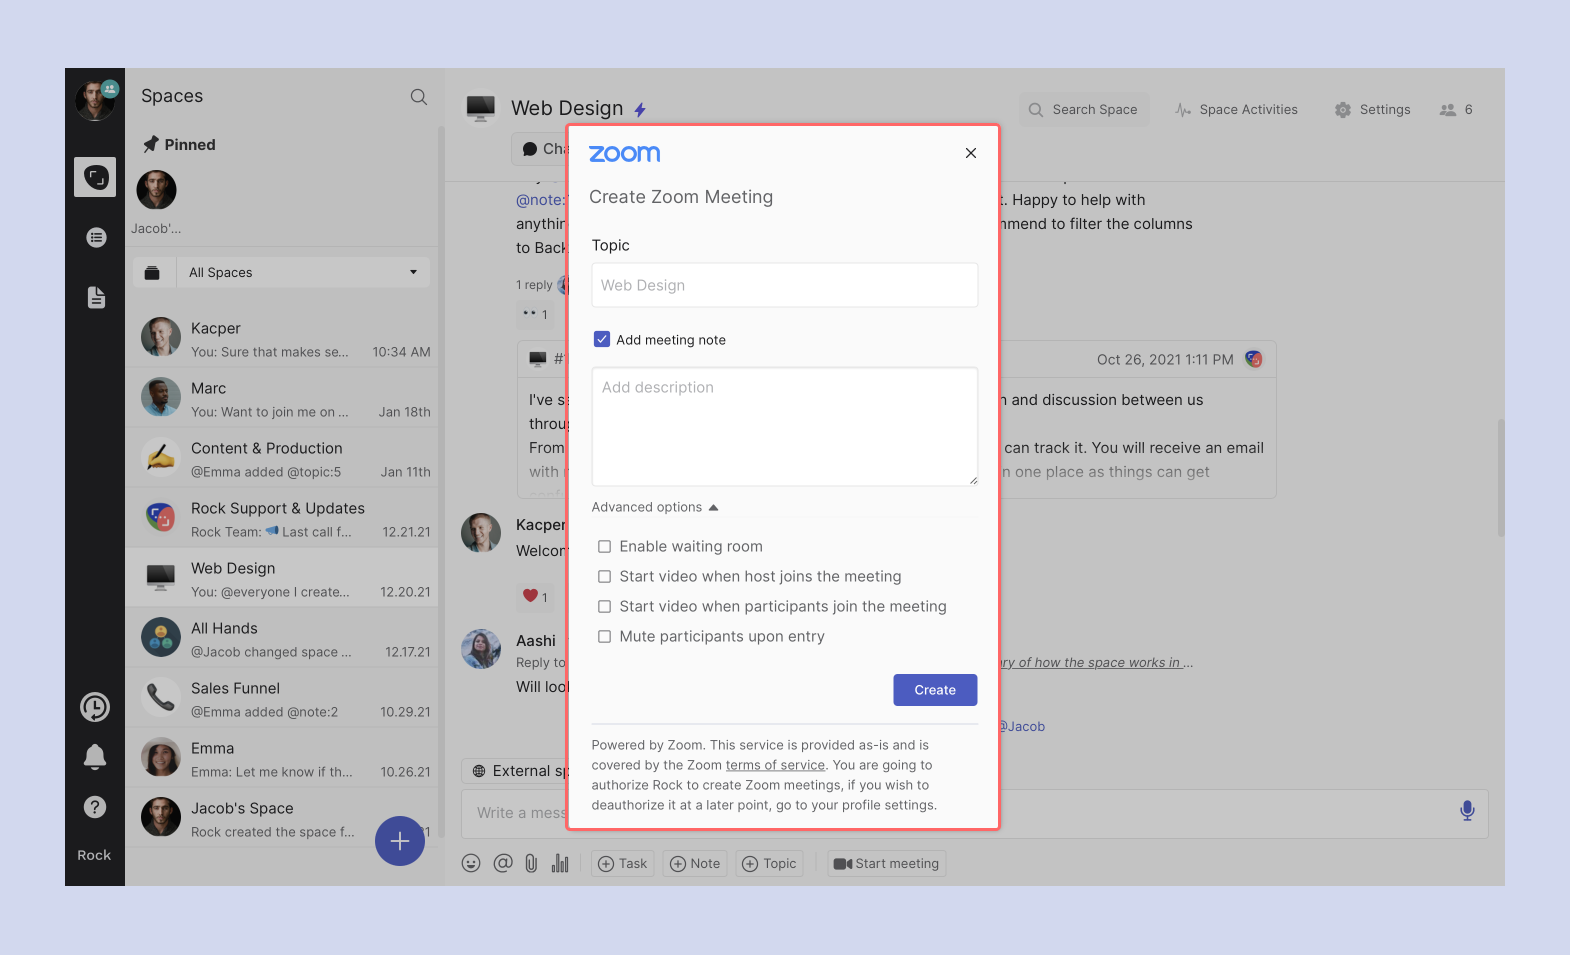
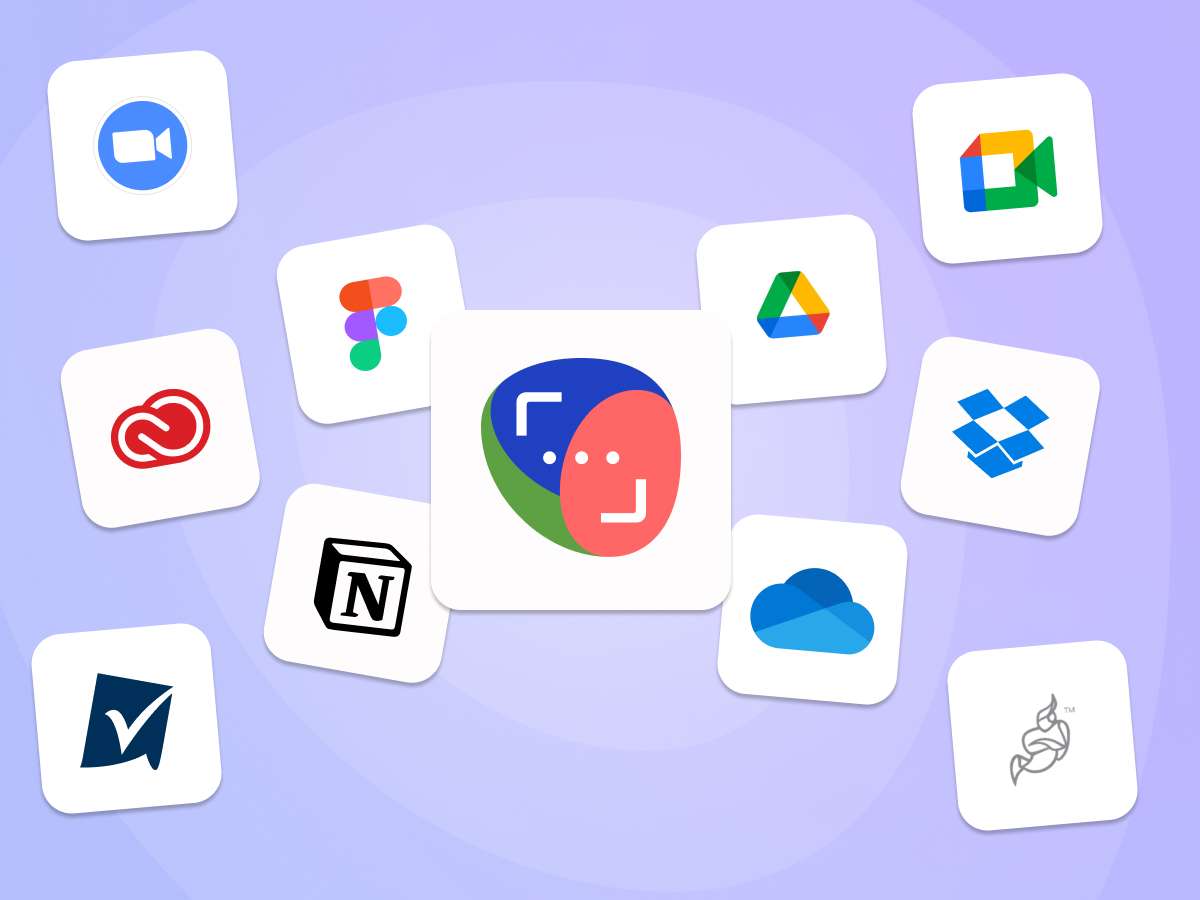
Integrate Video Conferencing tools: 5 credits each
Add your Zoom or Google Meet account to Rock and start meetings in any space within seconds! Once your account has been verified and connected, you receive 5 credits. Unauthorizing and re-authorizing the platform does not reward you with additional credits.
You can authorize both Zoom and Google Meet and receive 5 credits for each activity, meaning that you can receive up to 10 credits by authorizing video conferencing tools to your account. If you share a videoconferencing account, then multiple users can authorize the account to Rock. Each person will receive 5 credits for adding the video conferencing platform to their respective Rock account.
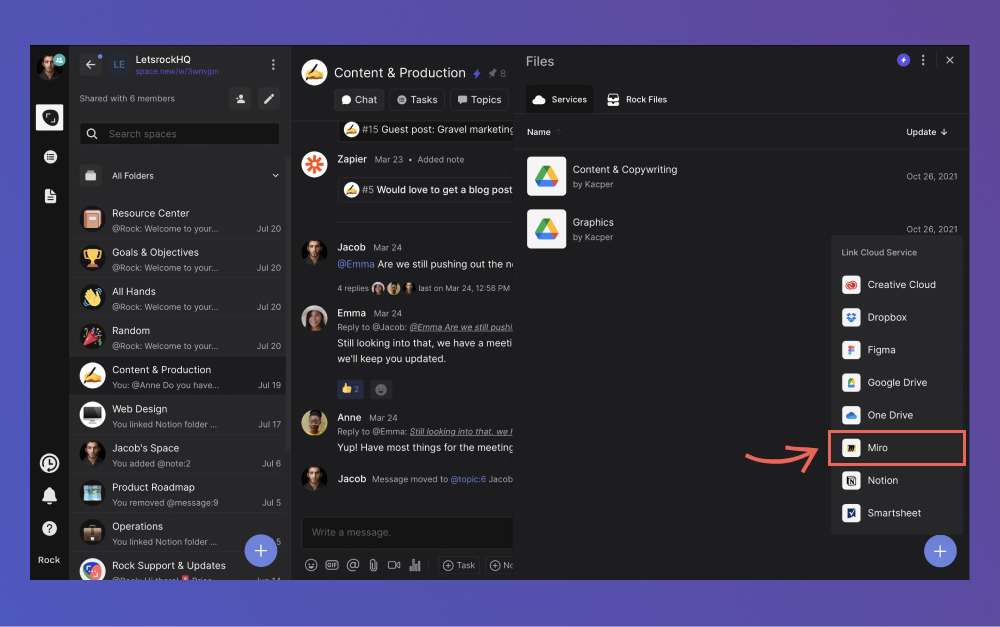
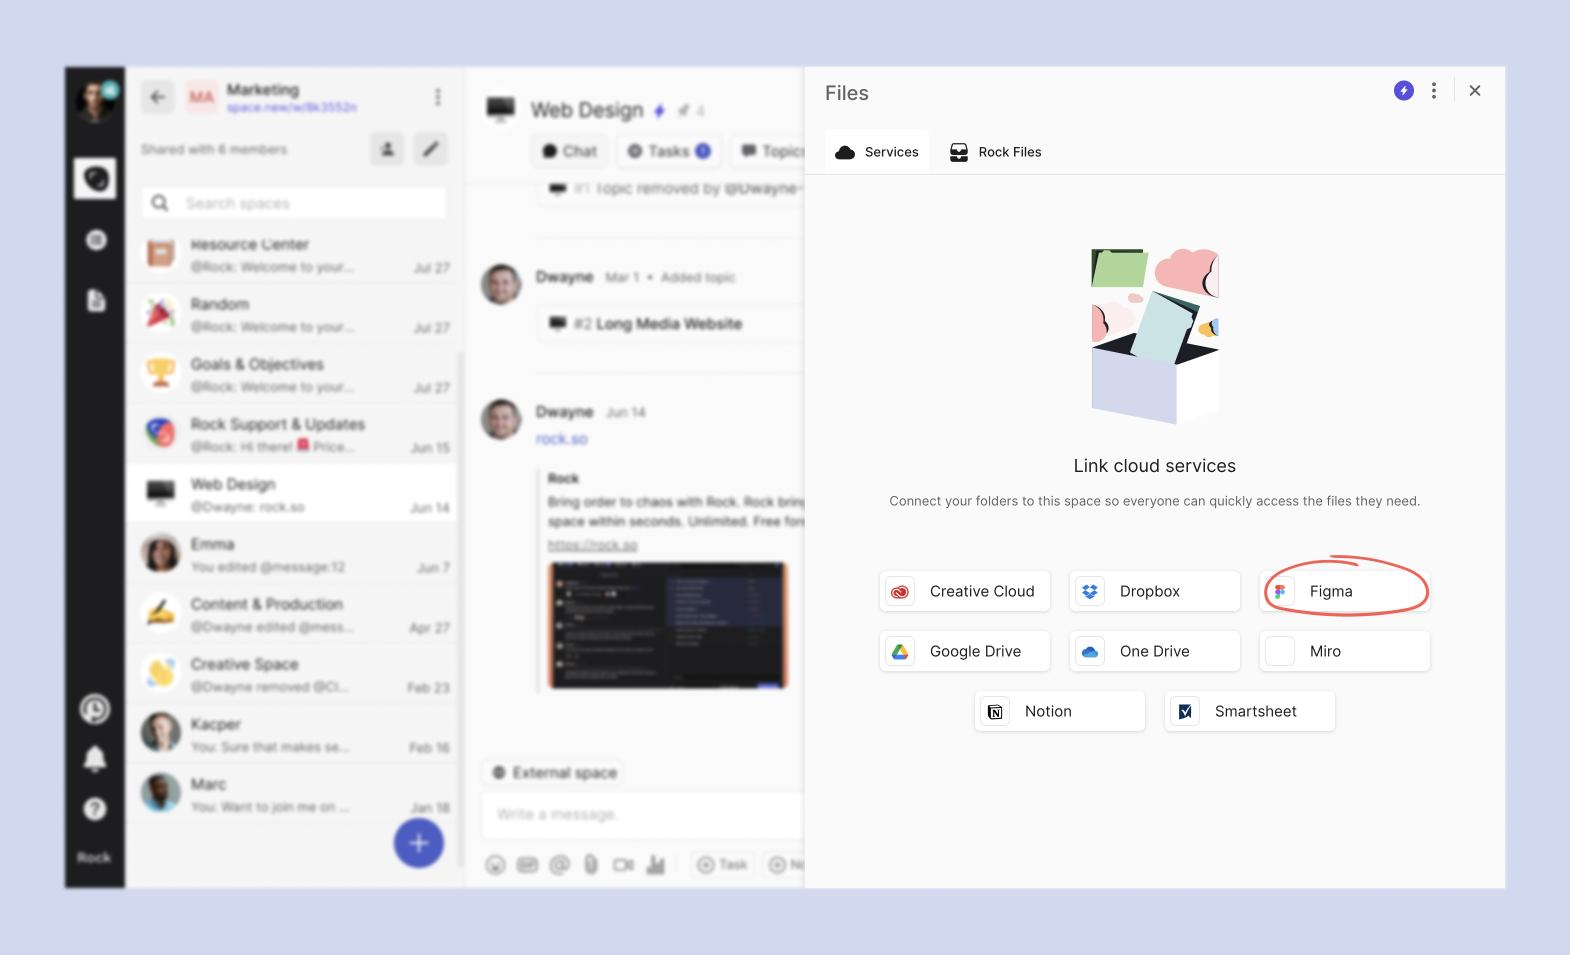
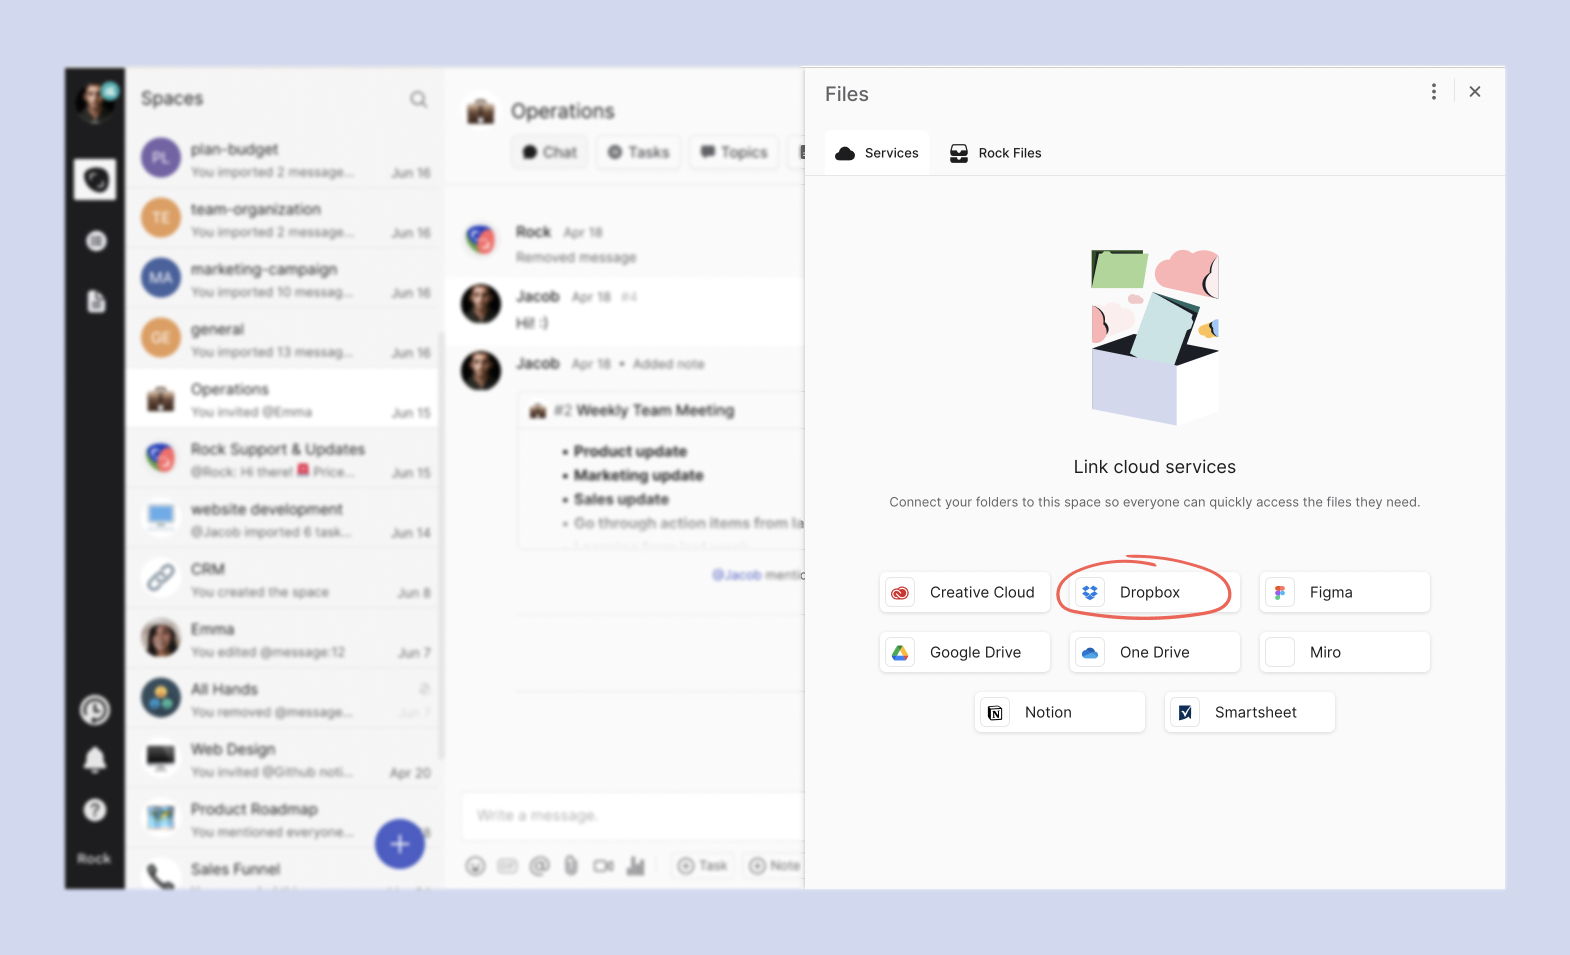
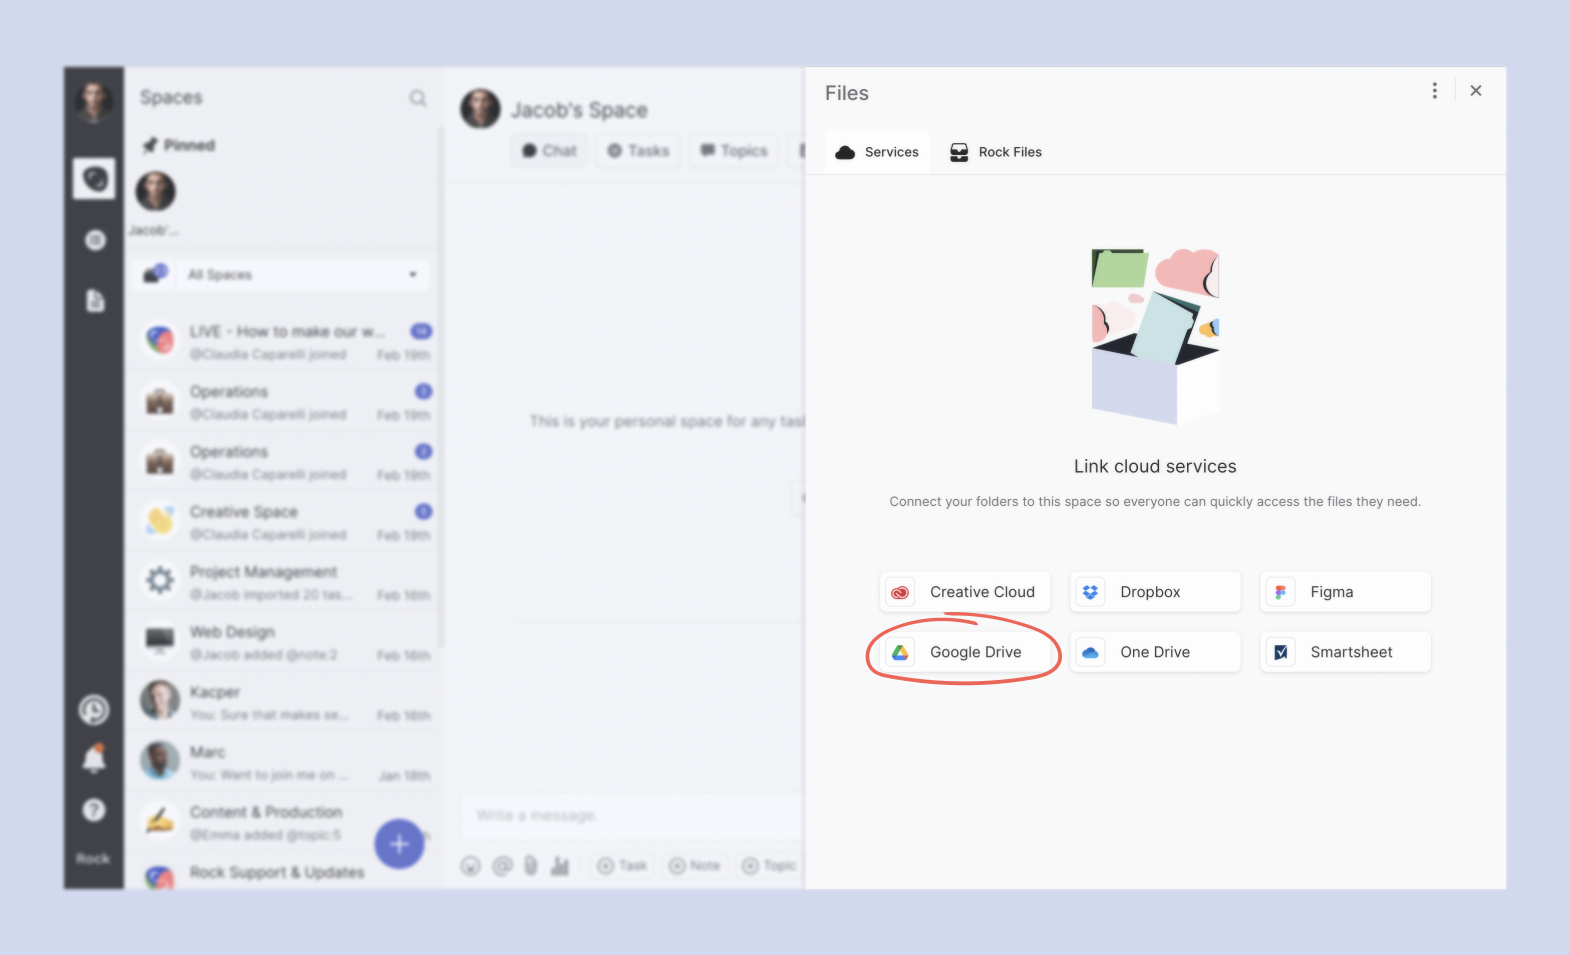
Integrate Cloud storage providers: 5 credits each
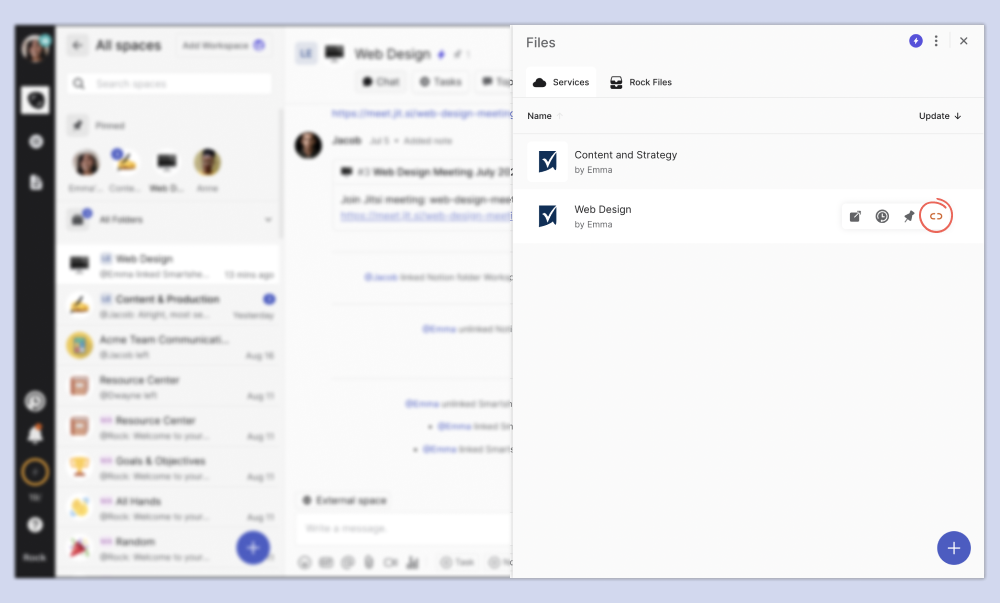
You can add cloud files from Google Drive, Dropbox, OneDrive, Figma, Adobe Creative Cloud, Notion, Miro, and Smartsheet to your different spaces. Cloud storage integrations allow you to quickly access relevant project information without leaving a space.You can also attach cloud files to tasks, notes, and topics in order to keep the information at hand. No more endless link sharing or folder searching with your cloud files in the Files mini-app.Credits can be redeemed once for every cloud storage provider you connect. This means that you can receive up to 40 credits from integrating different cloud storage providers. You will receive the credits once the tools have been officially authorized. You can always unauthorize the integration if you want to remove it from your Rock account.
Frequently asked questions on the credit program
Do credits expire?
No, your credits do not expire.
Can I send my credits to different users?
No, credits are not exchangeable among users.
Can I reset my credit program?
No, it is not possible to reset the credit program. The only activities with multiple rewards are activities with the referral program.
Is there a limit to the number of credits I can receive?
There is currently no limit to the number of credits you can receive on your account. Invite as many people as you want and master different Rock activities to accumulate credits and exchange them for free paid functionality.
Is there a limit to the number of times I can redeem a reward?
There is no limit on the number of times you can redeem a reward. You can extend your plan for another timeframe at any point in time. As long as you have enough credits. This means that after the initial timeframe of a reward passes you can have it automatically extended by selecting the reward beforehand.
Can I redeem both rewards at the same time?
Yes, but the functionality of the highest plan will be present only. It’s a better use of credits to redeem different reward types after they expire.
How does the referral program work with my current PRO plan billing cycle?
Rewards are currently given in parallel, for users to be able to use this reward, they would need to cancel the subscription & at the end of the PRO period use the reward.We will make some changes to this soon so it automatically aligns with your billing cycle on stripe, stay tuned to the Q&A of this article for updates on the topic.
Can I cancel a reward?
There is no way to cancel a reward, feel free to reach out to us in the ‘Rock Customer Support’ space or through this link if you want us to look into canceling your reward.
I’m having difficulties with the credit program, who in the team can I speak to?
Make sure you follow the guidelines in this article. Note that some actions might not be credited to your account due to local regulations and your personal settings.Struggling with the credit program? You can reach us in the ‘Rock Customer Support’ space or open a dedicated space with support through this link.
I did not receive credits for my activity, what should I do?
Make sure you follow the guidelines in this article. Note that some actions might not be credited to your account due to local regulations and your personal settings.If you believe you should have received a reward but did not receive credits then please reach out to us in the ‘Rock Customer Support’ space or open a dedicated space with support through this link.
I already had the mobile/desktop app before the credit program started, can I still receive credits?Y
es! To receive credits for a mobile/desktop download simply log out of your account and back in. New credits will automatically be rewarded for being on the mobile/desktop apps.
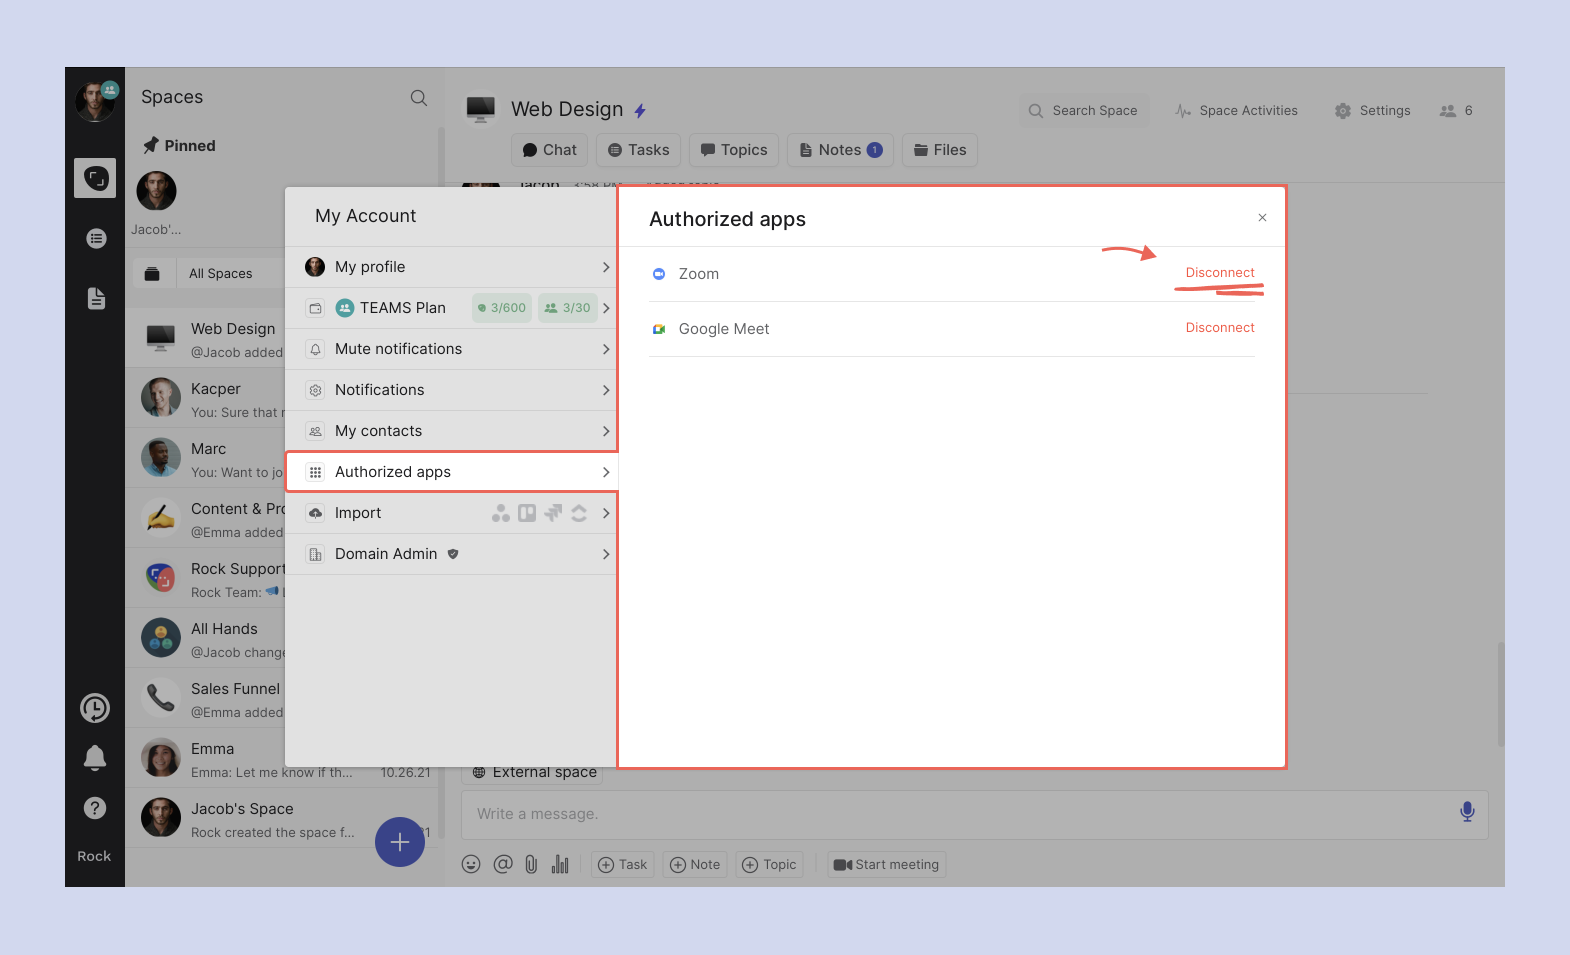
I already have a videoconferencing/files integration, can I still receive credits for it?
Yes, unauthorize and authorize the application again to receive the credits for the first time. Subsequent authorizations will not result in additional credits.
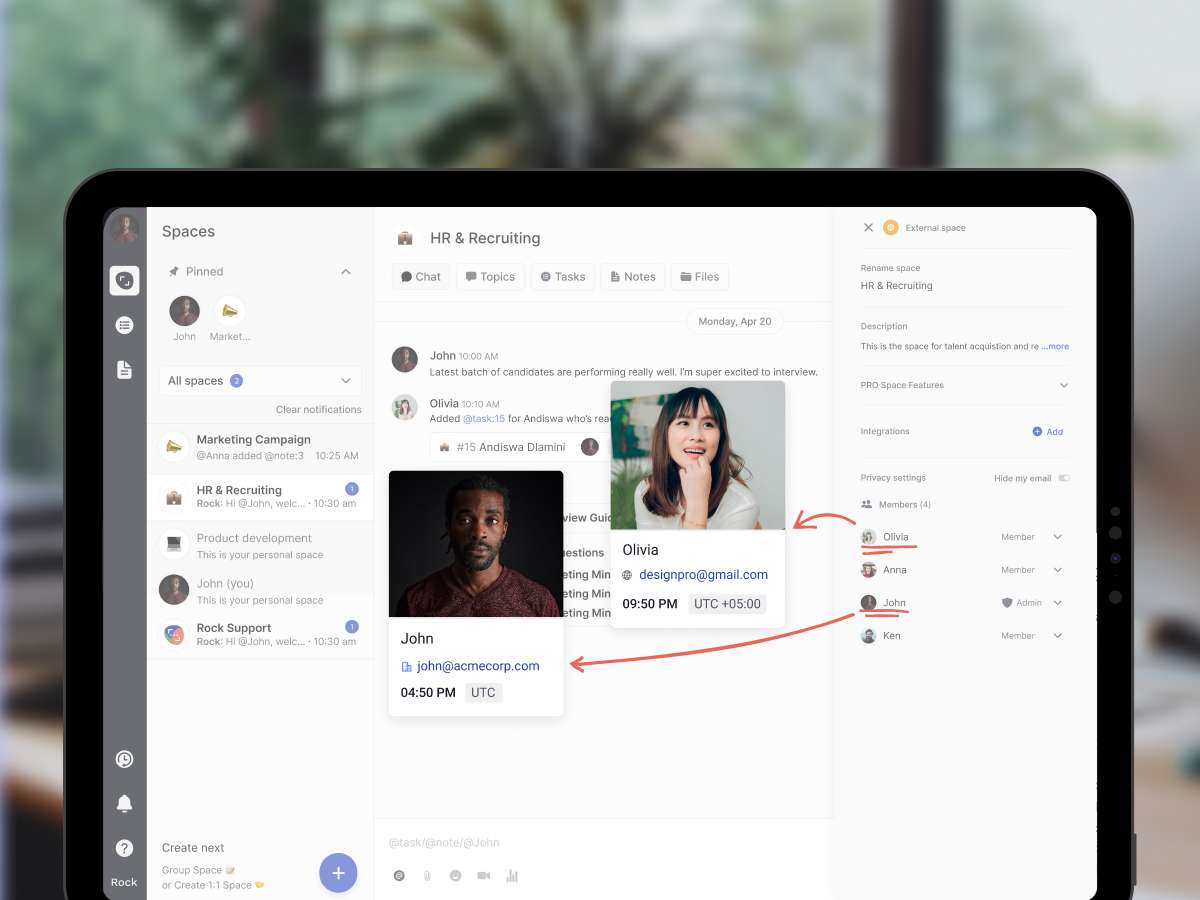
The user status panel allows you to provide insight into your availability in asynchronous work environments. The overall panel includes two main features:
Online status (Unlimited plan only): This is a custom highlight on your user profile across different spaces that represents whether you are currently online. This is represented with a green circle.
Custom status: This will add an emoji next to your profile image across spaces to share what you’re doing or feeling. Think of ‘busy’, ‘available to chat’, or ‘on holiday’ as relevant information you might want to display on your profile.
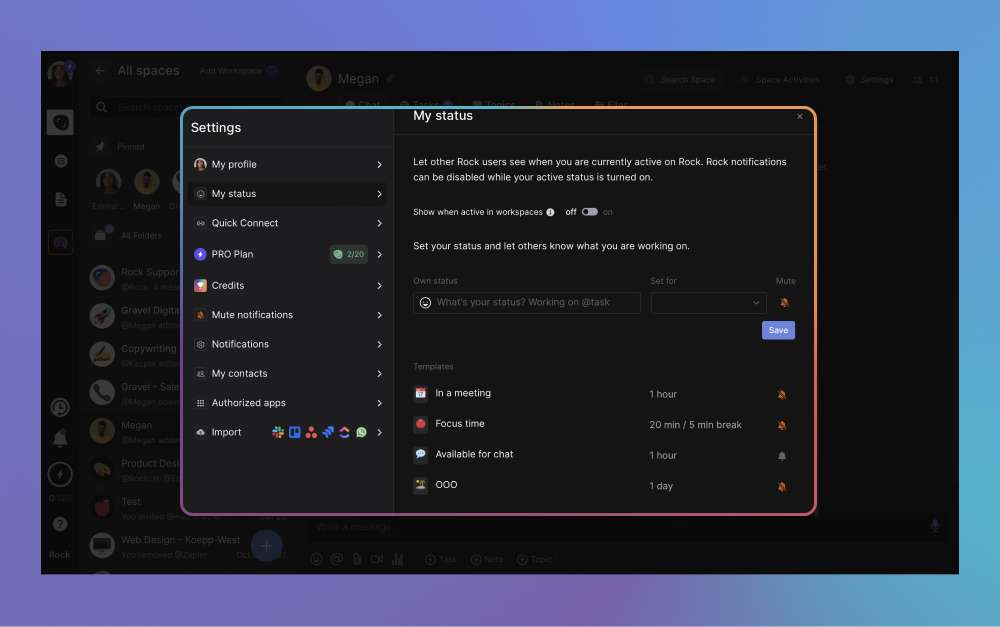
How to access the panel
You can access the user status panel by selecting your user image in the top left corner of your screen. From there, select ‘status’ or click on ‘settings’ -> user status.This should bring you to the panel below.
[Unlimited plan] Online status
Online status functionality is currently only available for users under the Unlimited plan.
If you would like to access the feature you have to either upgrade to Unlimited or collect enough points under the credit program to test the functionality out on Unlimited starter.
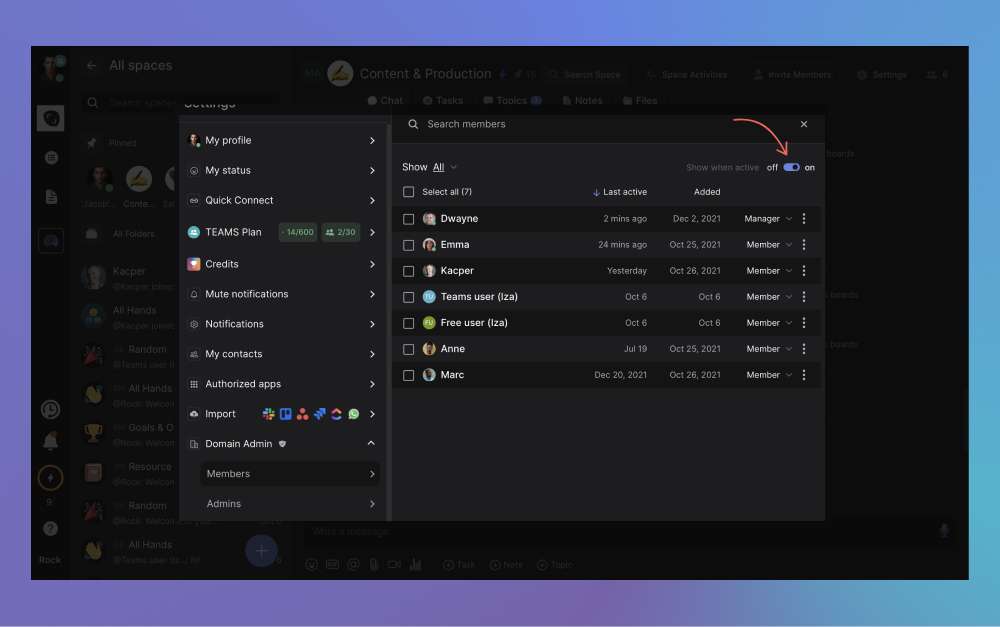
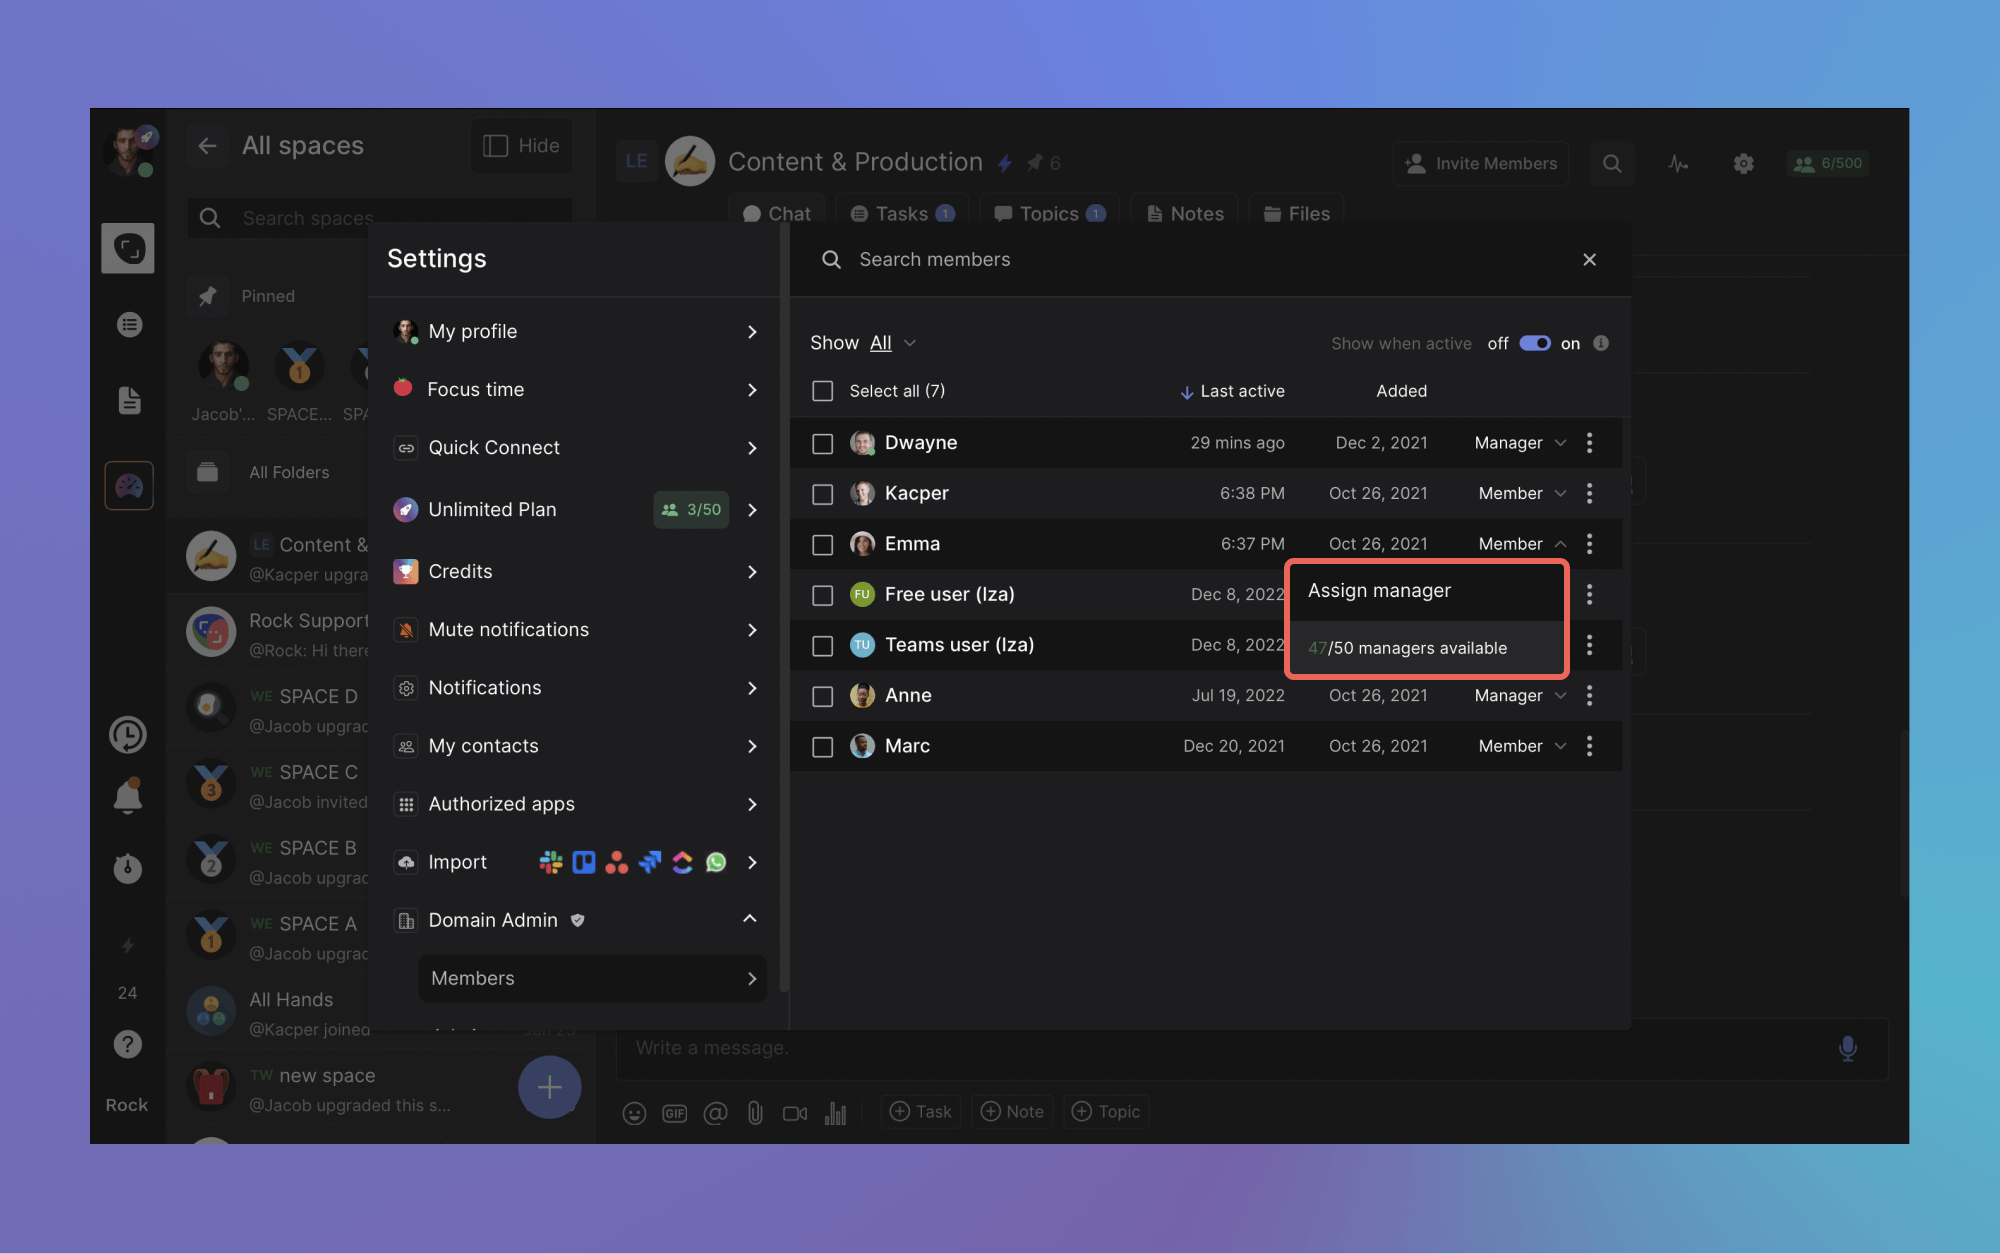
How to manage online status for your whole team
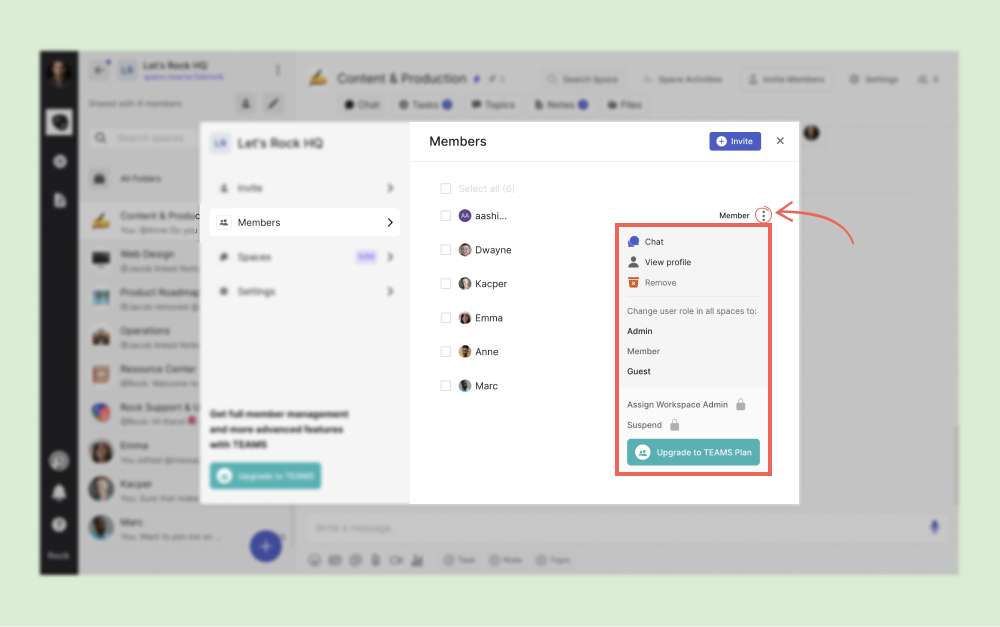
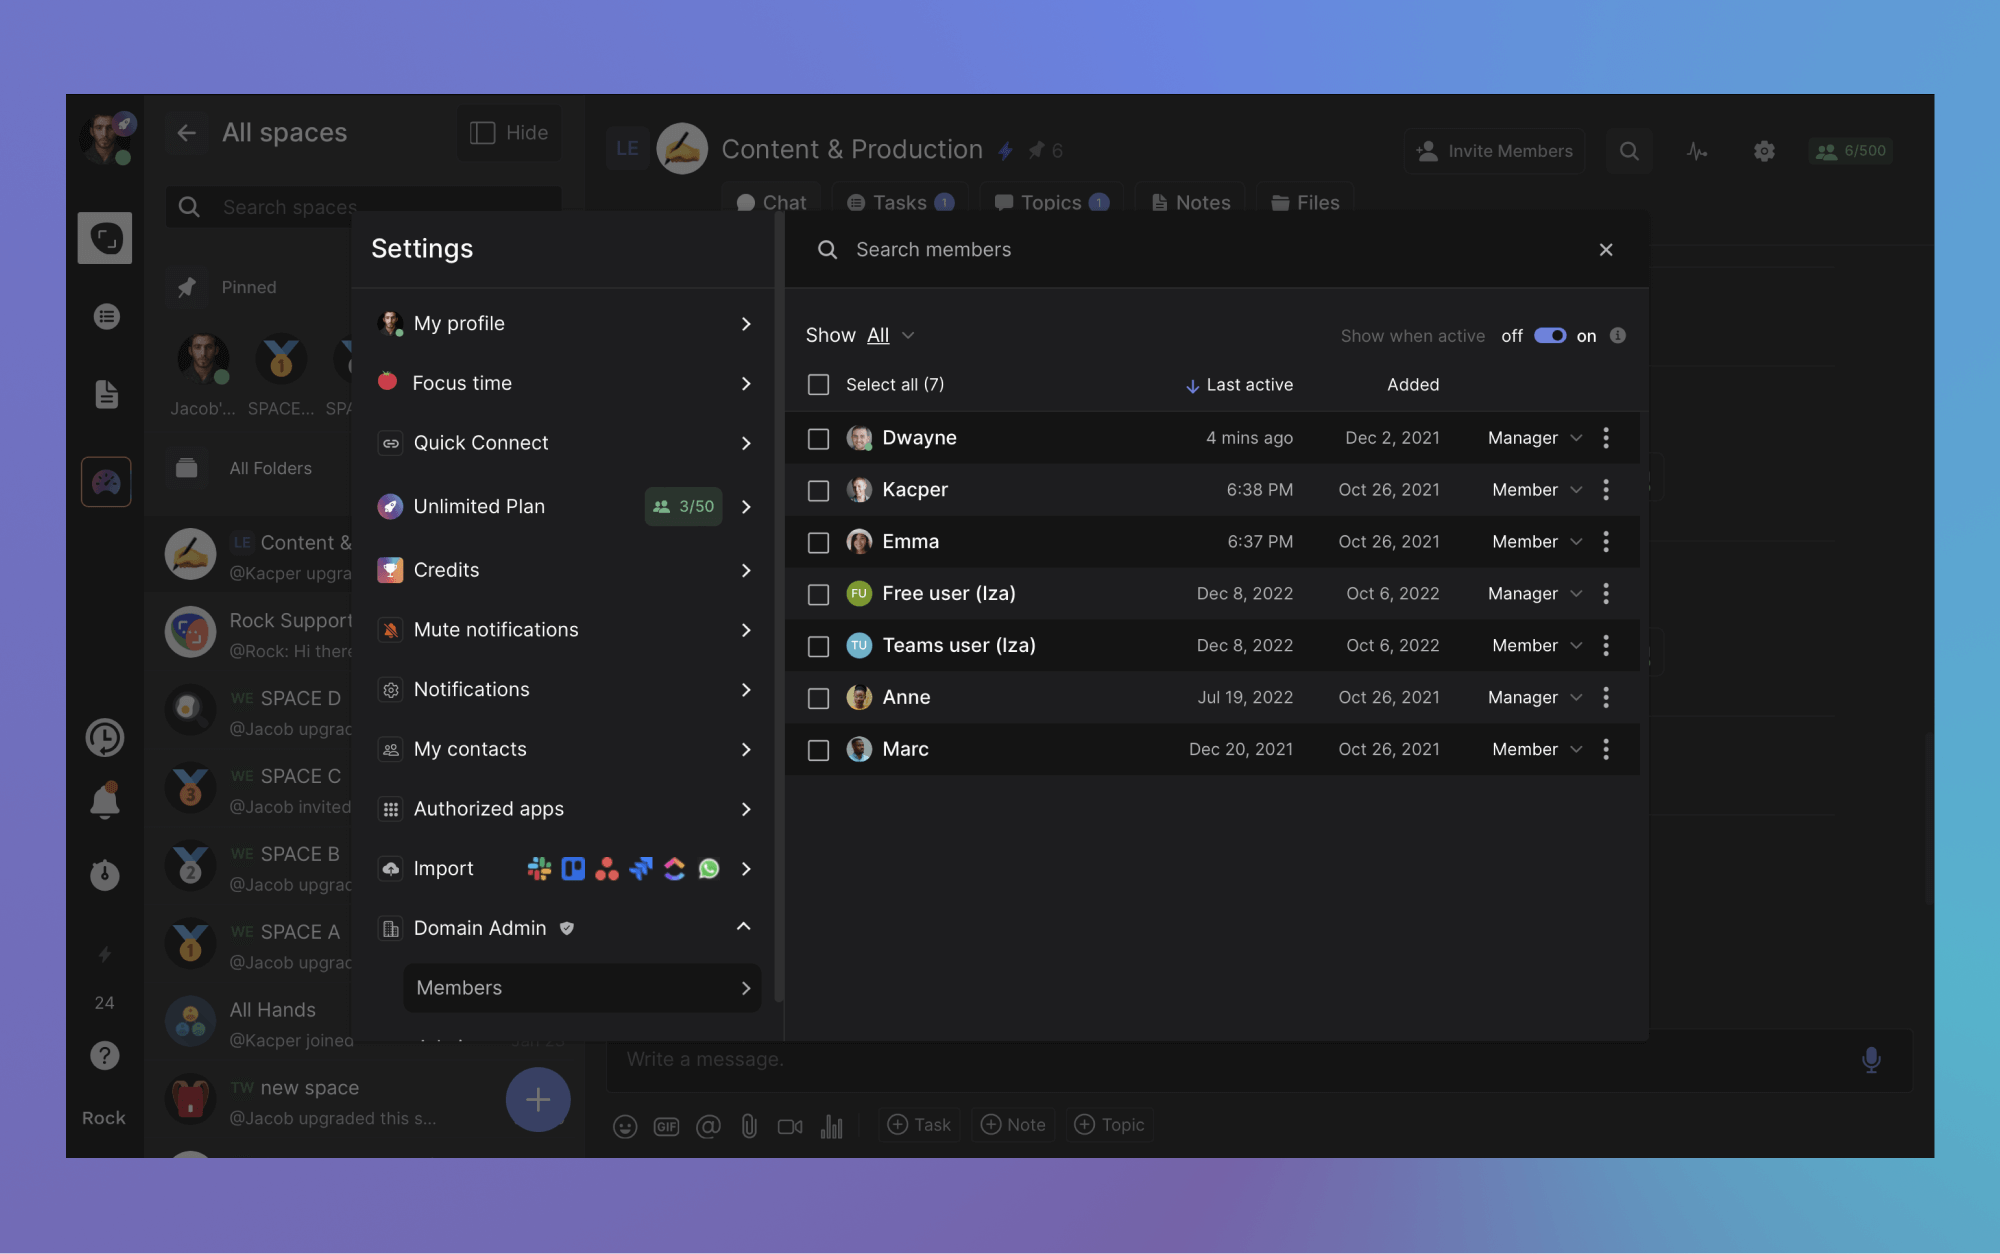
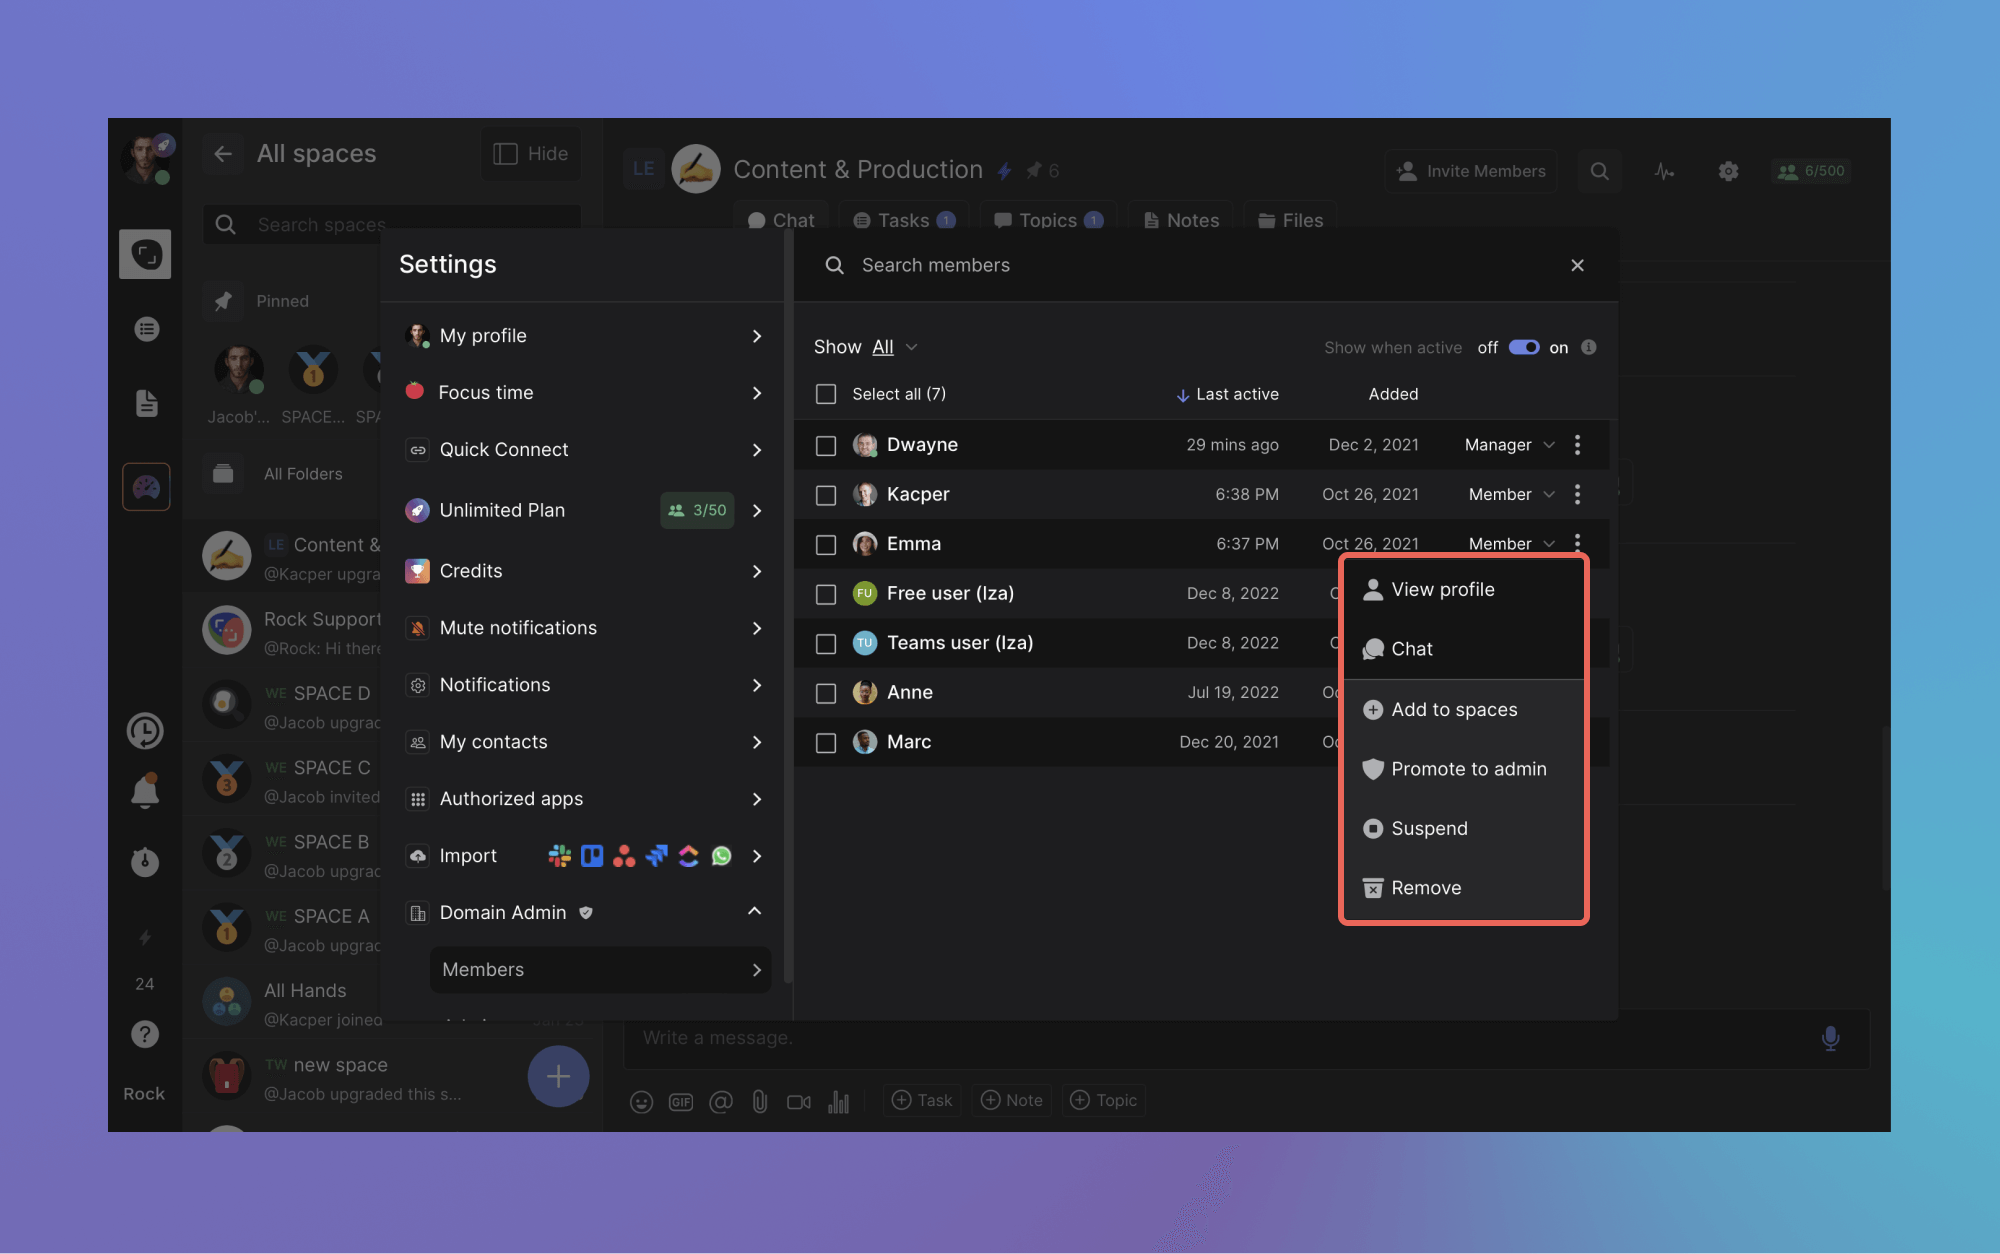
You can enable the online status of your whole team from the Unlimited panel. Access this panel by going to domain admin -> members.
You can toggle the online status “on” by clicking on the button in the top right corner of your screen.
In addition to the toggle, you can also see when users were added to your organization and when they were last active on Rock. Switching online status on or off for the whole domain is only possible if you claimed that domain.
Note that the functionality will be switched on by default for accounts that fall under the Unlimited plan.
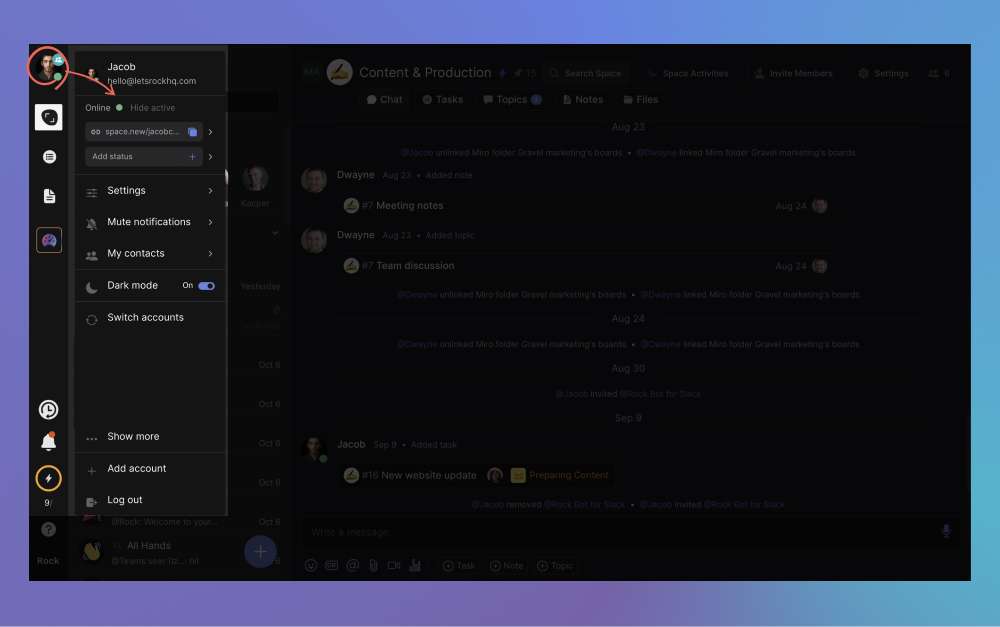
Managing your own online status
Toggle your online status by going to the quick settings panel. Click on your user image in the top left corner of your screen and toggle between ‘show online status’ and ‘hide active’.
Note that your preferences in this panel override workspace-wide settings for active status for not displaying the status. If workspace settings have this functionality turned off, then you won’t be able to turn it on for individual active status settings.
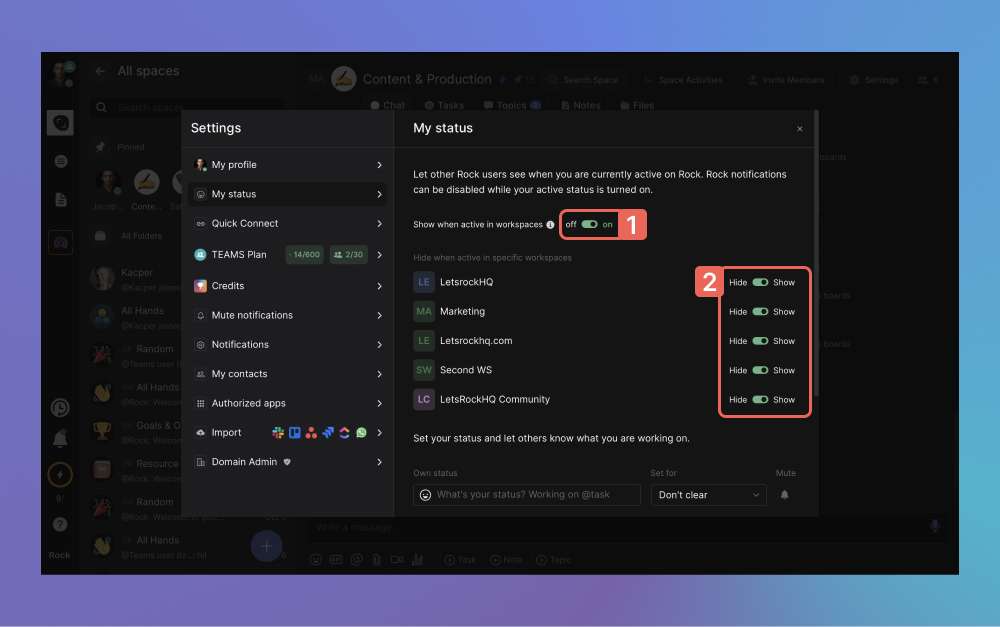
You can also manage account-wide online status or filter by workspaces from the user status panel.
Account-wide online status: Enable active status for all spaces by pressing the toggle in the top right corner of the panel. Preferences in this panel override the online status toggle in the user management panel.
Workspace online status: Besides managing your online status for every space, you can also select what workspaces display active status. Select the individual toggles next to each workspace to configure active status for them.
📝 Note: while within the workspaces your active status will not show, users will still be able to see it in their 1:1 spaces with you or group spaces you share outside of a workspace.
Once configured, the active status will display in the following places:
The space image of 1:1 spaces where other users have active status turned ON.
Messages the user has sent in 1:1 or shared spaces, next to the user’s profile picture.
The user image if they are assigned to tasks, notes, and topics.
Individual comments under tasks, notes, and topics will also highlight activity next to the user image.
Your personal space while you’re online.
Your profile details when someone clicks on your user image.
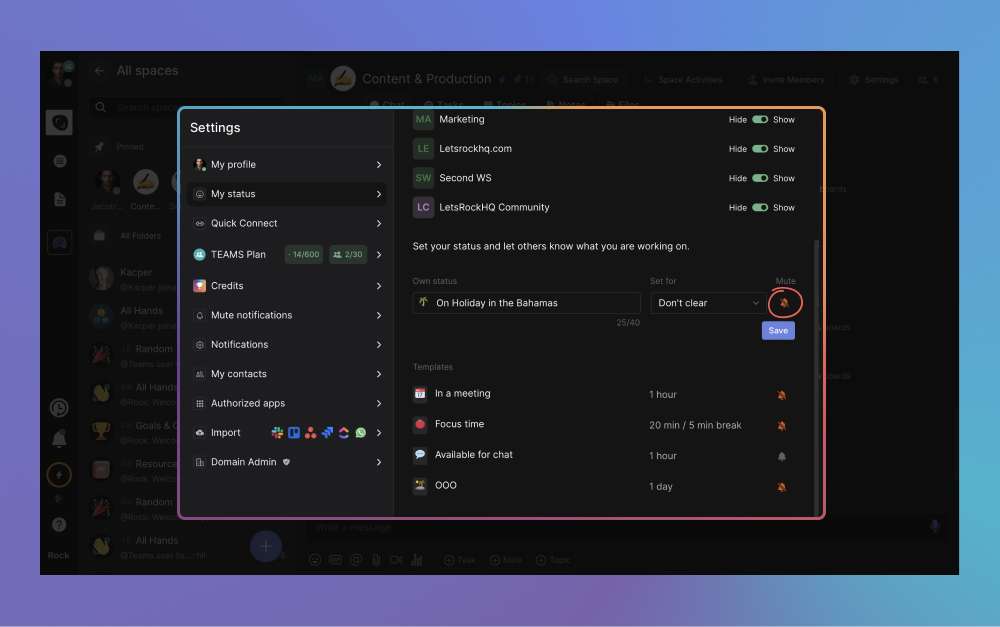
Custom status
The custom status functionality is available in all plans and allows you to add more information about your availability, mood, or other highlights next to your profile image.
How to configure the custom status
You can create a custom status by configuring the following fields:
Emoji
Name
Time frame
Mute notifications
Don’t forget to click on ‘save’ after filling out the different fields.
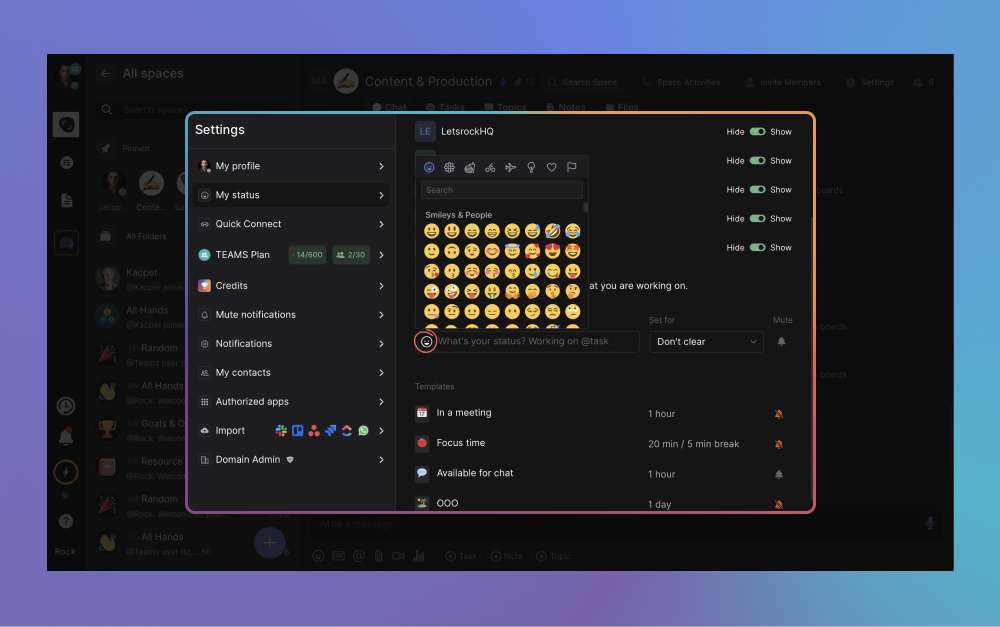
Pick an emoji
Configure an emoji that will appear next to your name across spaces. You can pick from hundreds of different emojis in the library. There is also a search field to more easily find the icon you’re looking for.
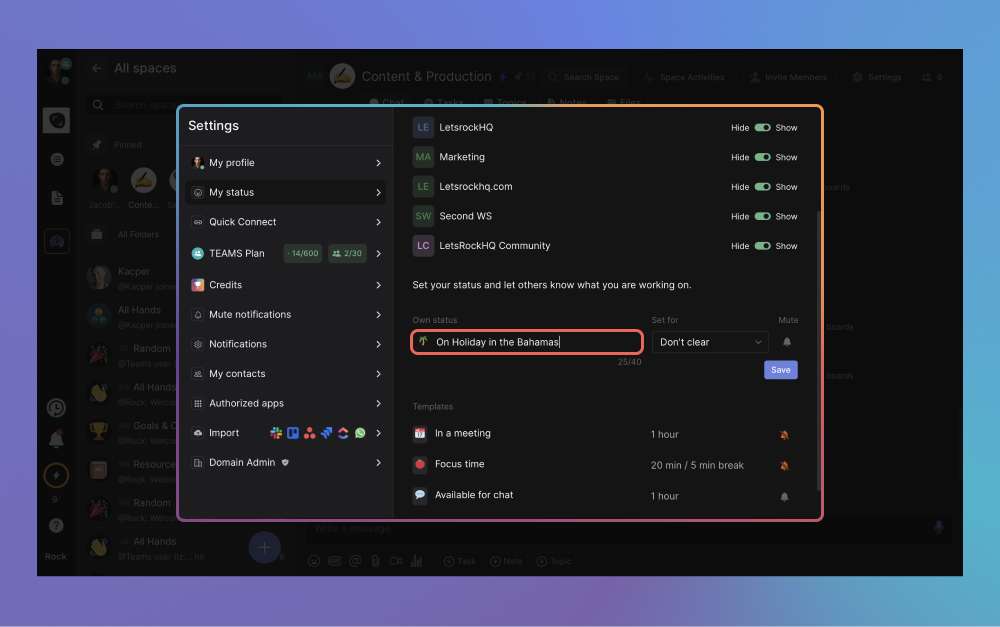
Name your status
Give your status a name, this will appear when other users hover over the emoji next to your name across spaces. This custom status name can have up to 40 characters.
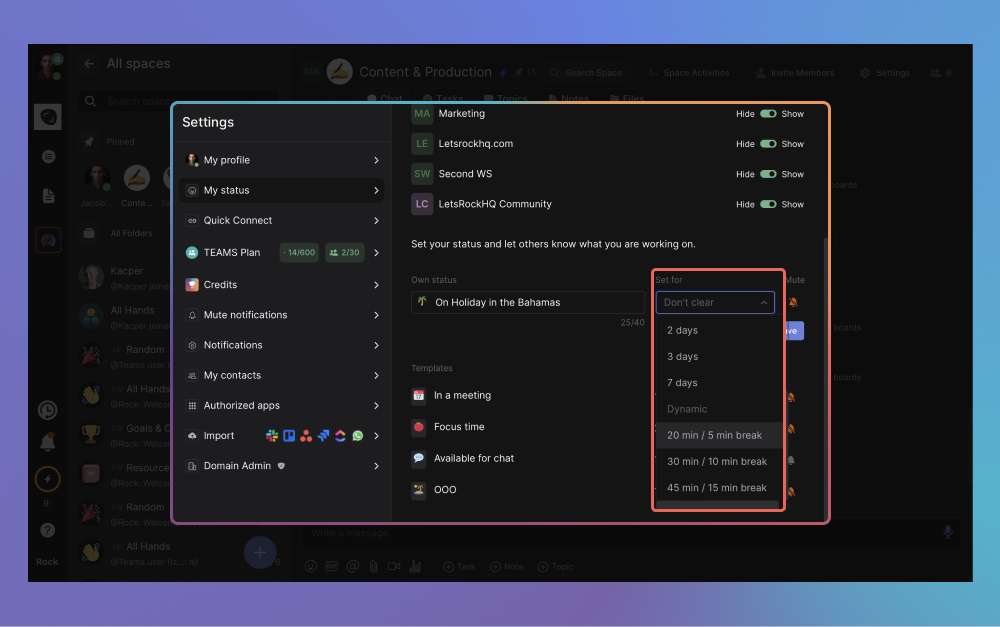
Set a timeframe
Select how long the custom status should be displayed on your profile. You can pick between fixed and dynamic time frames:
Fixed time slots: The status and its configuration will remain until changed (don’t clear) or automatically turn off after a chosen timeslot (30 min, 1 hour, 2 hours, 1 day, 2 days, 3 days, 7 days).
Dynamic time slots: Dynamic time slots by default run until changed (don’t clear). Notifications switch from muted to enabled within these slots. You can pick notifications to come in as:
- 20 minutes muted, 5 minutes enabled
- 30 minutes muted, 10 minutes enabled
- 45 minutes muted, 15 minutes enabled.
The emoji next to your user name will disappear after a selected timeslot is changed or if the status is removed. Muting settings will also go back to the default in your notification settings.
📝 Note: If you mute an individual space in space settings, then notifications will not be received even if you have notifications enabled for 5, 10, or 15 minutes. If you wish to enable notifications of that space you have to do it in space settings.
Mute notifications
Select the notification item to decide whether you want to receive notifications or mute them. You can enable or disable notifications by clicking on the bell.
Note that notification preferences in your user status panel will override those in the notifications panel.
📝 Note: If you have a dynamic time slot activated, then the mute button will not change the settings of your custom status. You will receive notifications in the selected timeslot and they will be muted for the remainder of it.
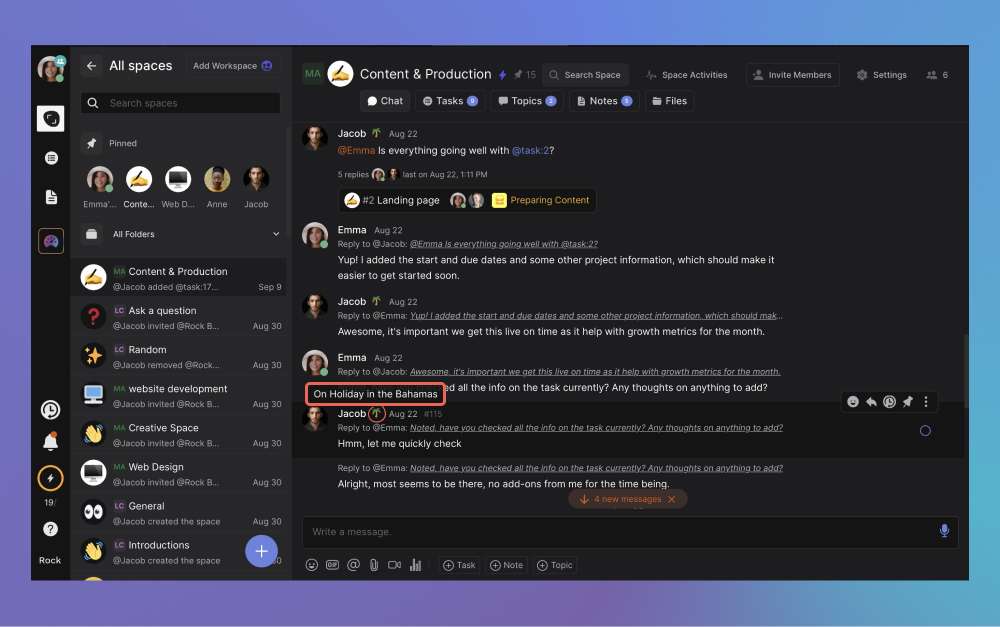
Don’t forget to click on save after updating all the fields. After that, the custom status will display in the following places:
Comments: The custom status will be displayed next to the user profile on comments under tasks, notes, and topics.
Messages: The custom status shows next to the user images on messages in the general chat.
Profile details: The status will also be displayed on the user profile summary people access by clicking on your image.
1:1 spaces: An icon will display next to the user image on 1:1 spaces in the spaces panel.
If you wish to remove the status you do so by going to the panel and selecting ‘clear status’.
Activating a Template
There are 4 templates available for custom statuses. After selecting one you can still adjust them to your preferences and work situation. To enable a template, click on it.
Once you have selected a template you can still modify all its elements with the steps provided in the previous section. The current panel includes 4 templates associated with common availability indicators:
In a meeting
Focus time
Available for chat
OOO
In a meeting
Turning notifications off during meetings allows you to focus on the discussions at hand. Configure the custom status to run for the scheduled meeting time and give your team full attention to focus on priorities.
Other users within your team also get more perspective on your response rate across mini-apps. They might also delay reaching out to you until your status changes to available/no status again.
Focus time
The focus time template is configured with inspiration from the Pomodoro Technique. Switch between focus time (no notifications) and available time (receive notifications) throughout your day.
It is best practice to take a longer break after 4 to 5 cycles. You can calibrate your focus time intervals with the different dynamic time slots to adjust this template to your personal preferences.
Available for chat
Provide your team with an indication that you are not in focus time and are available to chat. This can be at moments when you are not busy with a task, between meetings, ending or starting your day, or other moments where you want to highlight that you’re open to chatting.
OOO
Whether you’re on holiday, running some errands, or taking the afternoon off, you can now clearly display this on your profile. Highlighting availability aids in shifting expectations and encourage asynchronous work.
Team members are also more likely to reach out to other available team members speeding up progress while you’re out while reducing the number of notifications you receive on your day off.
Questions & answers
The following section highlights a selection of frequently asked questions regarding the user status functionality on Rock.
What defines being online
A user will show up as being online when they have the rock client open on the web, desktop, or mobile apps.
The status will be configured as offline once the user logs out, closes the window, or exits the application on the mobile or desktop app.
Can I toggle the online status functionality of users outside my Unlimited plan?
No, it is currently not possible to enable online status for users outside of the Unlimited plan.
Is it possible to block my team members from turning their online status OFF?
No, while you can turn on the online status for your whole team in the user administration panel, they can still decide to manually turn the functionality off for their own profile.
We enable individual users to manually toggle their online preferences and bypass team configurations for privacy reasons.
Will turning on active status in a workspace turn it on for everyone if I’m the workspace owner?
No, active status in the workspaces panel is connected to your individual preferences.
Can I change the custom status of another team member?
No, it is not possible to change the custom status of another team member.
OneDrive is a crucial cloud storage service provider, so we’ve made sure that you can integrate it to Rock, quickly allowing you and your team easy access to OneDrive content while collaborating and working.
How to add OneDrive to Rock
The OneDrive integration makes file access across your spaces easier because you’ll only need to connect the service once to be able to link documents across any space you’re a part of (and have permission to link documents out of!)To get started on working with OneDrive on Rock, follow the steps below:
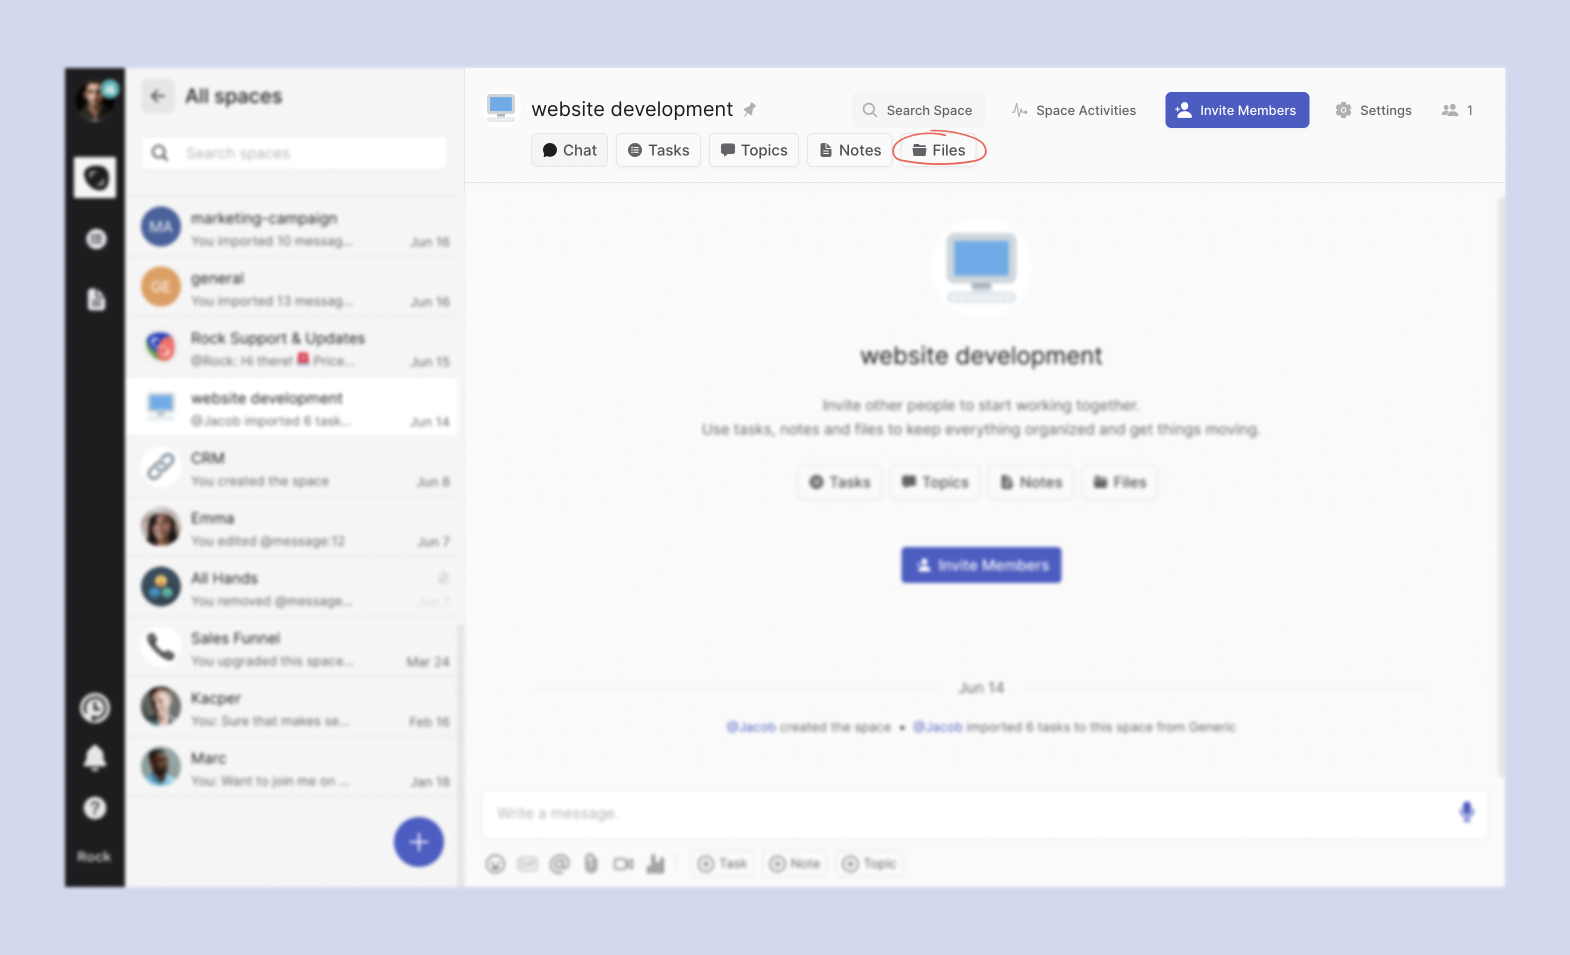
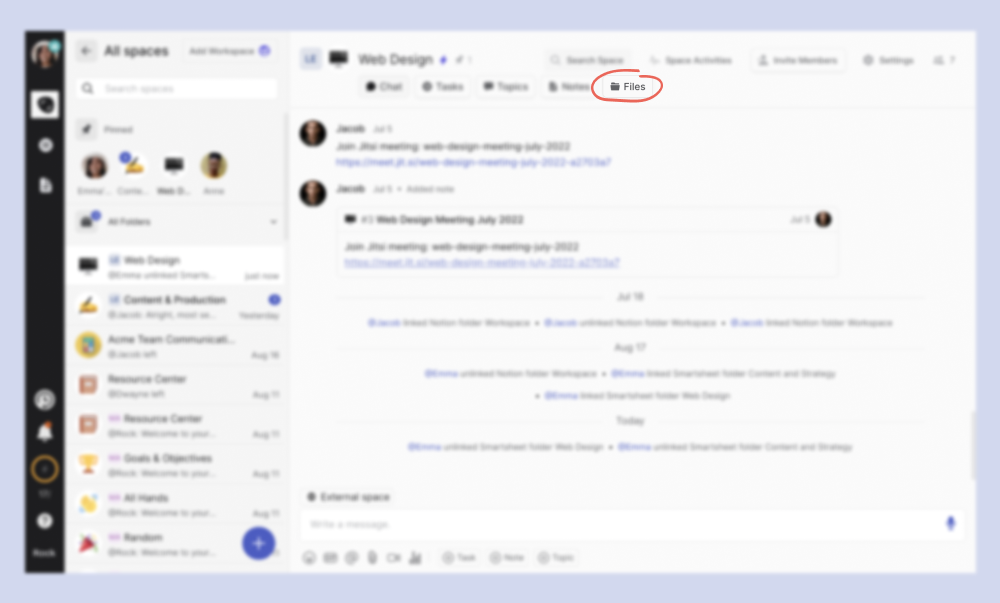
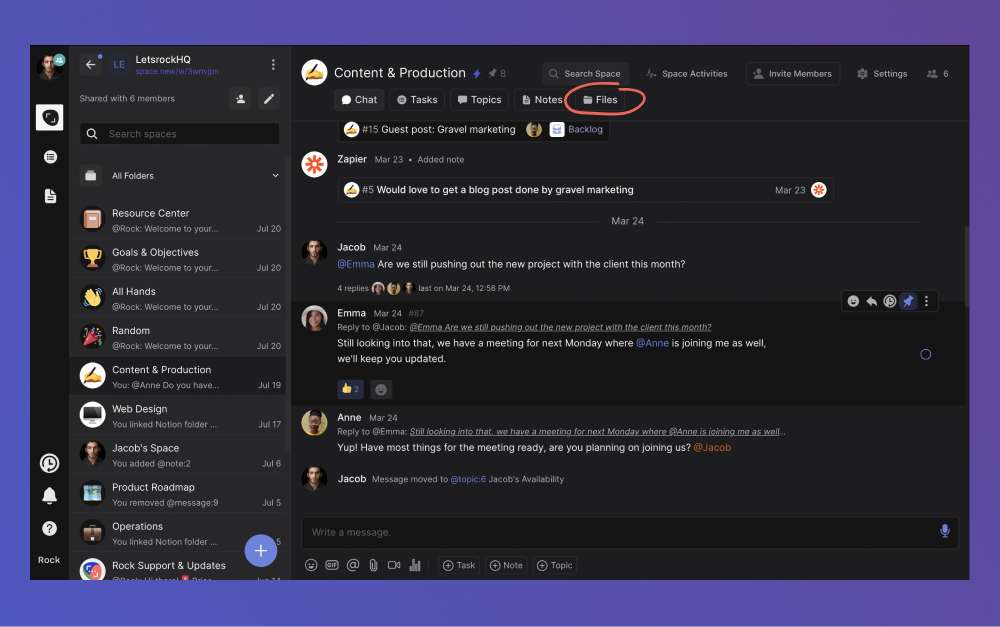
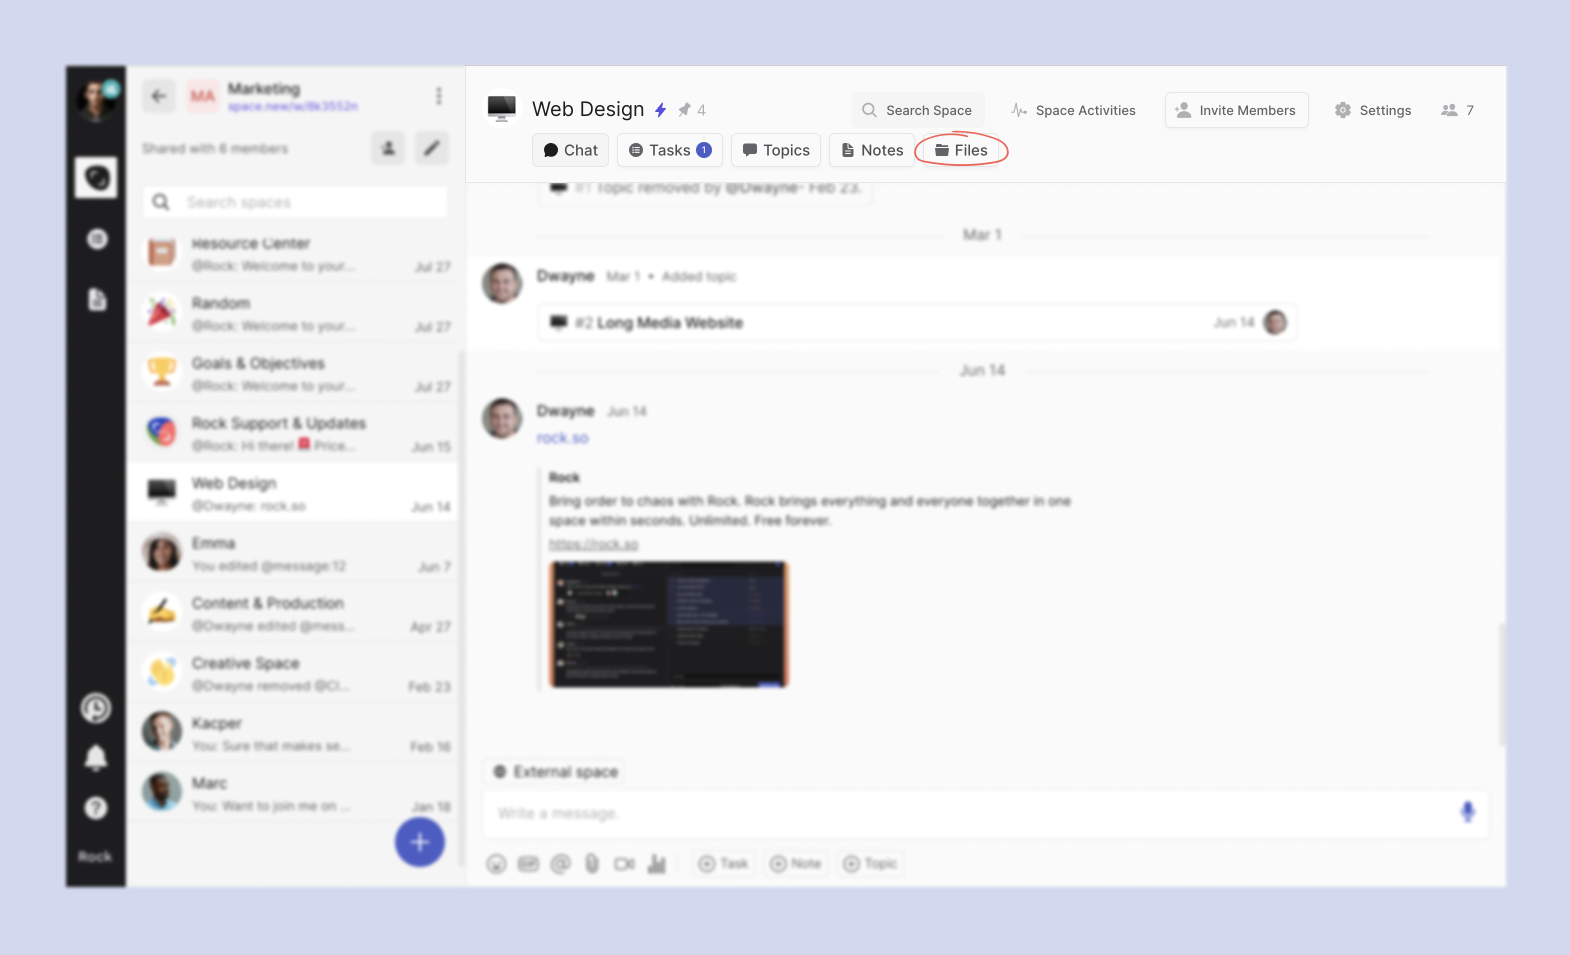
1. Click on the Files mini-app
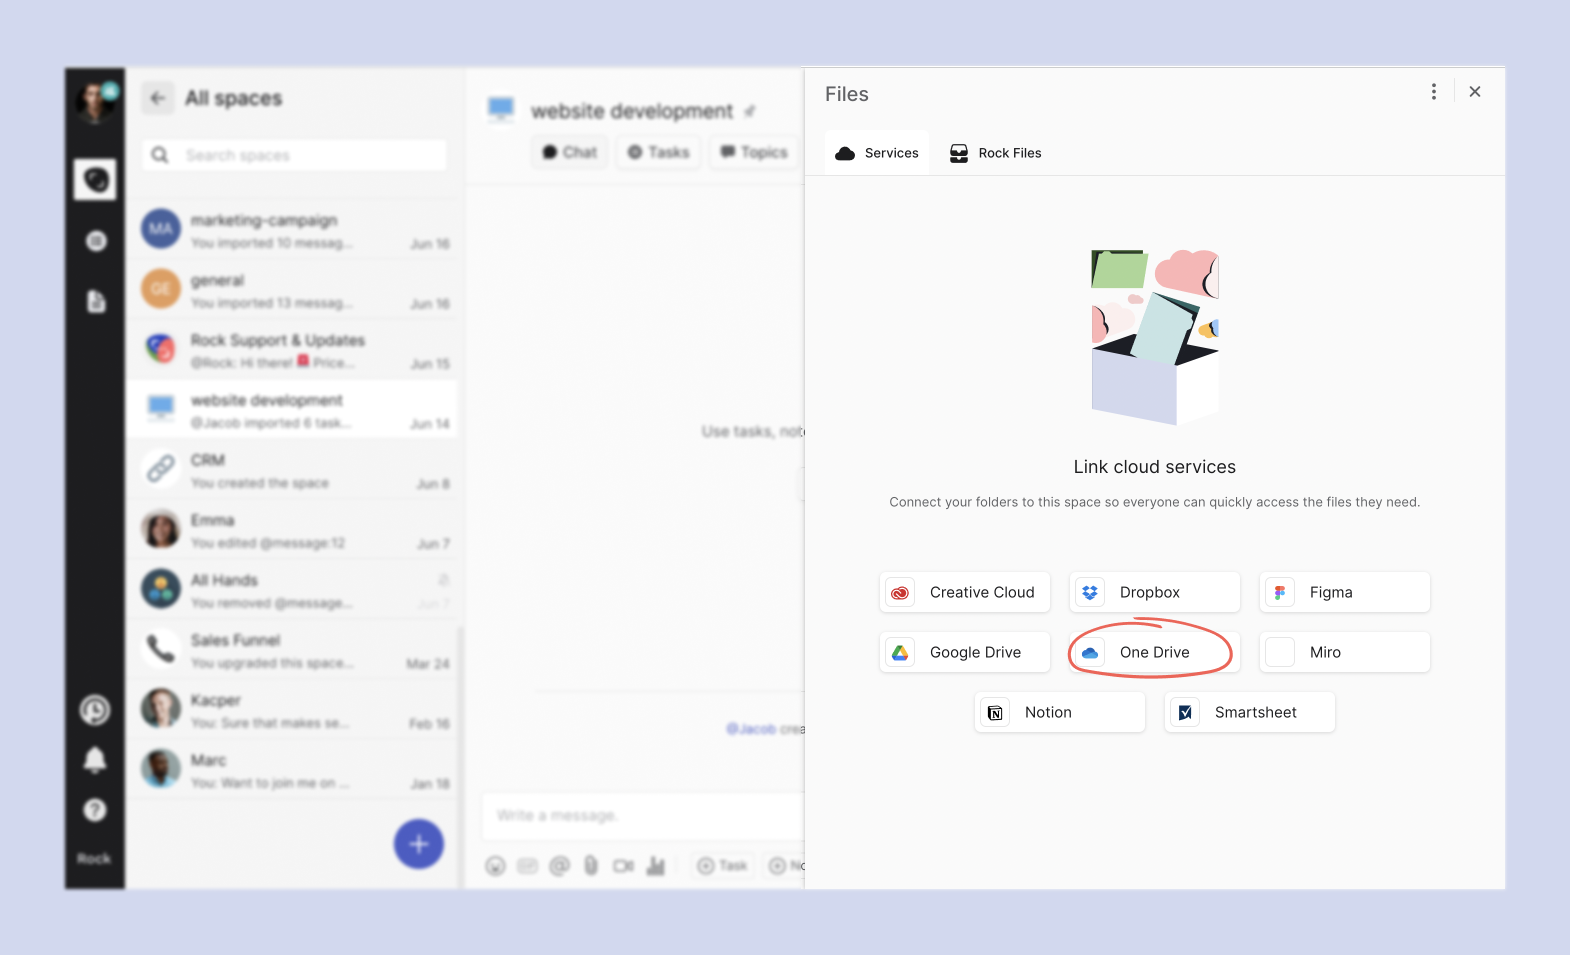
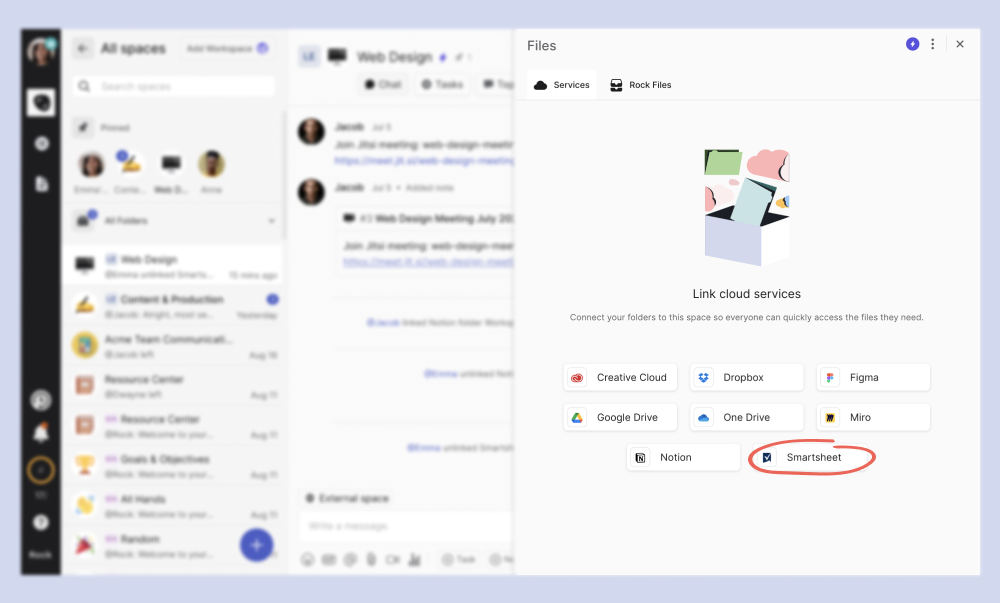
2. Then select OneDrive from the integration options
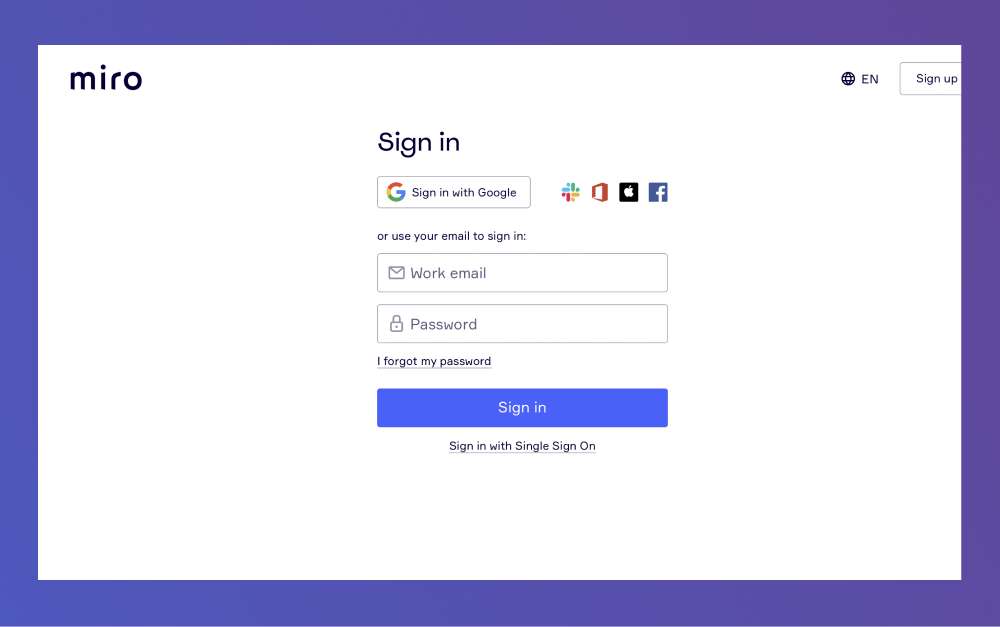
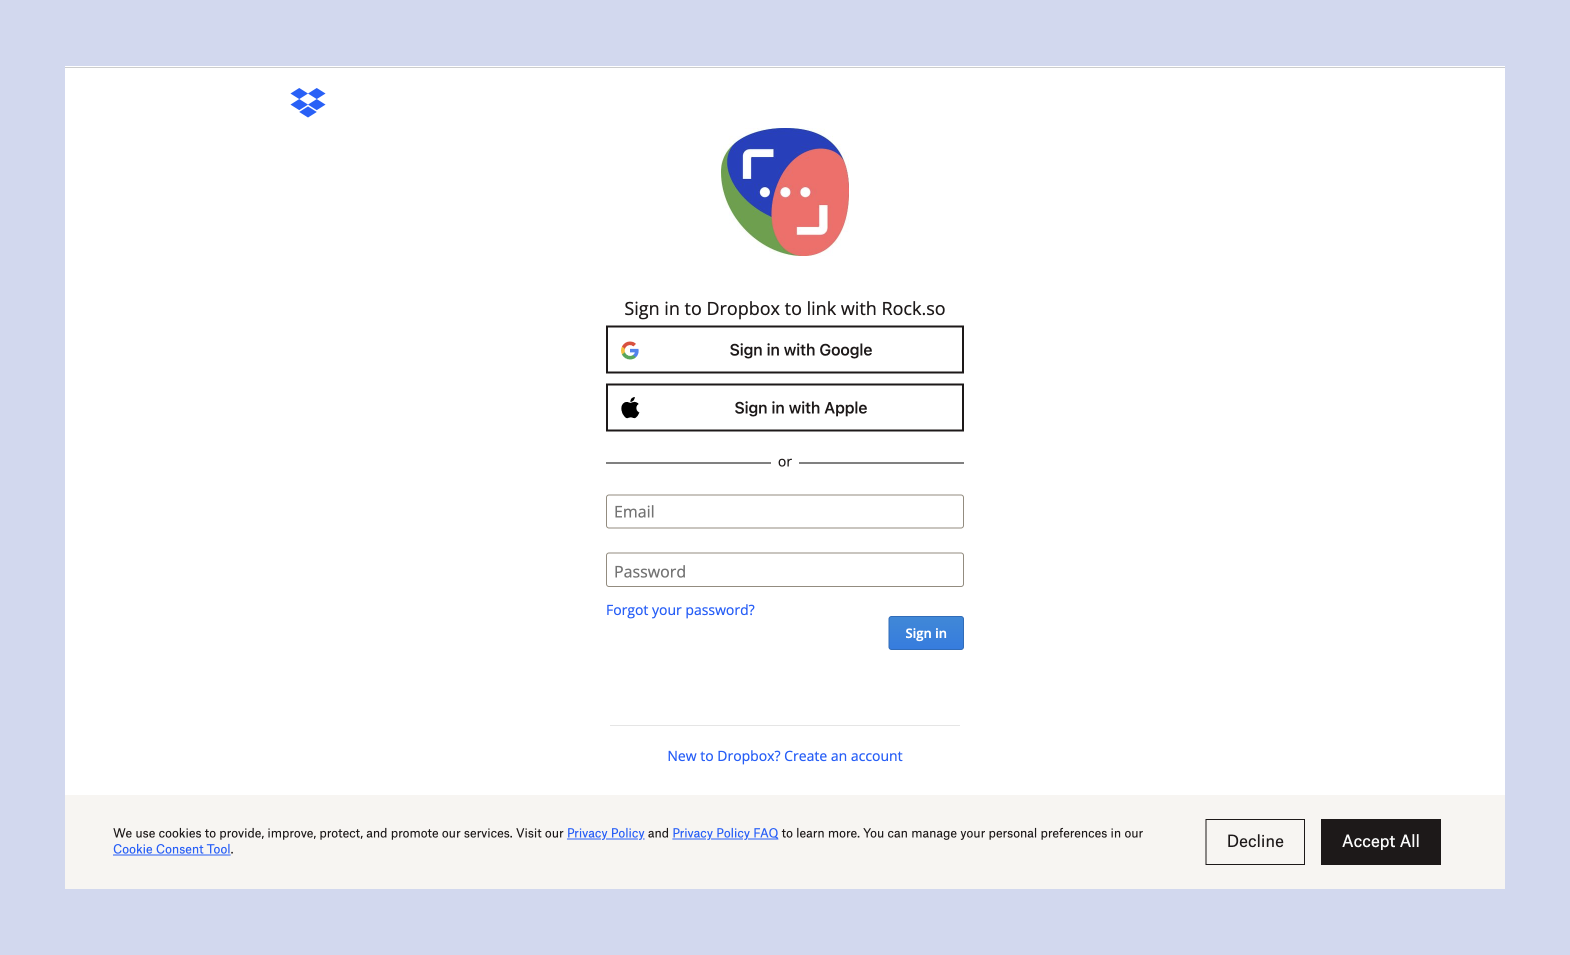
3. Once you click on OneDrive, a new tab or popup will open, asking you to sign in to your OneDrive account. If you are already logged into OneDrive, then skip to the next bullet.
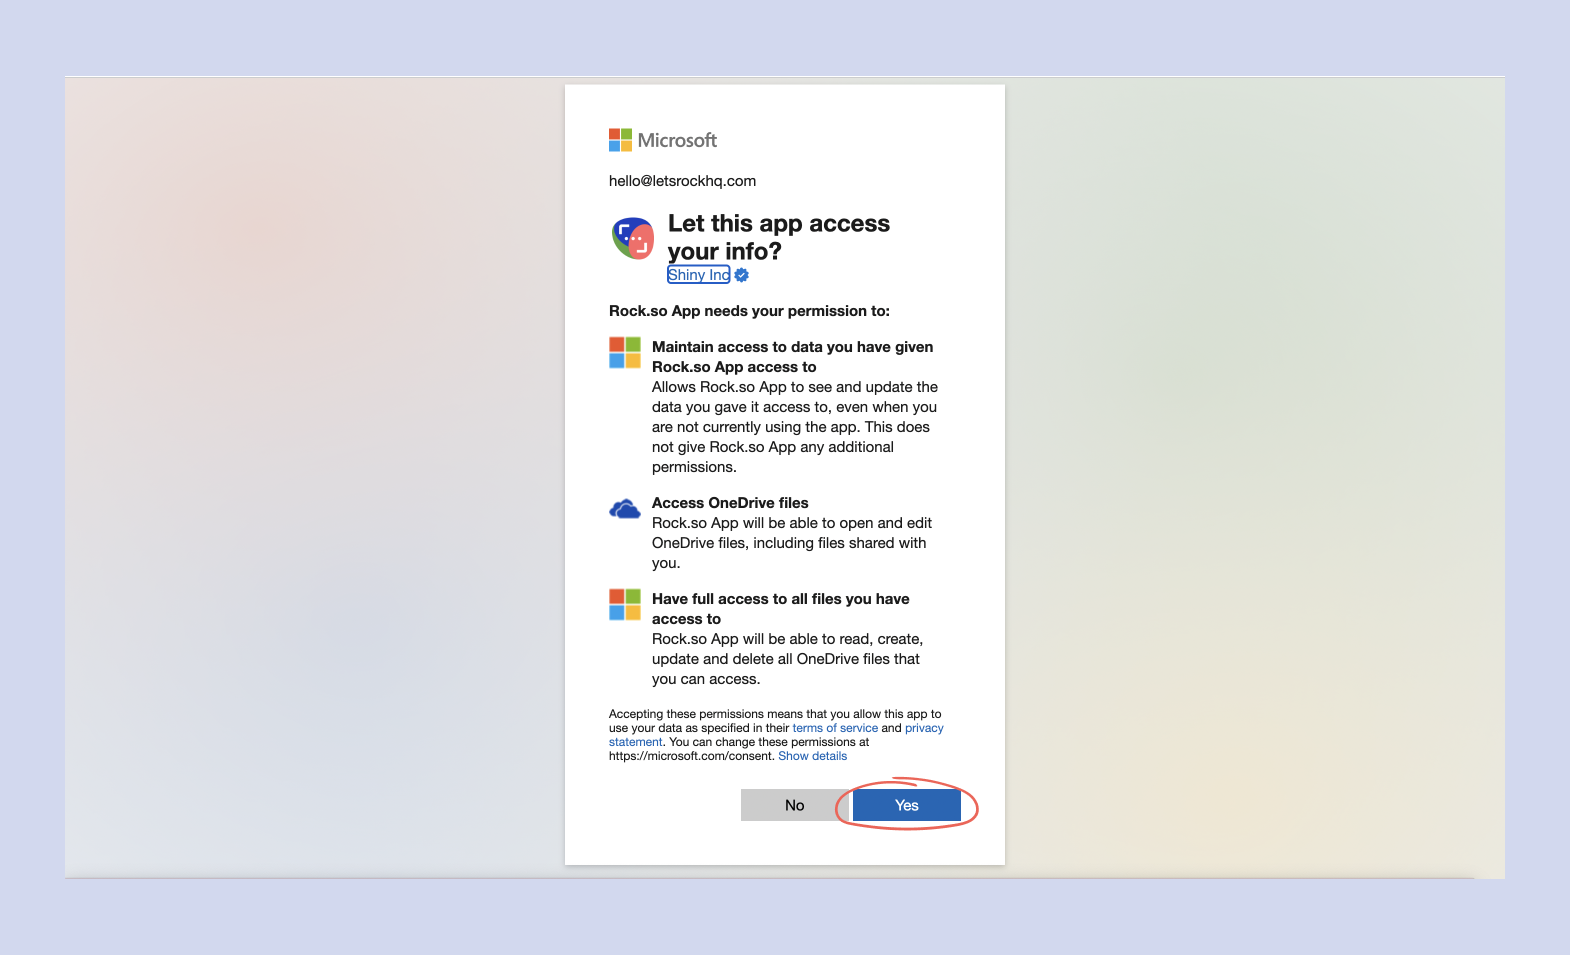
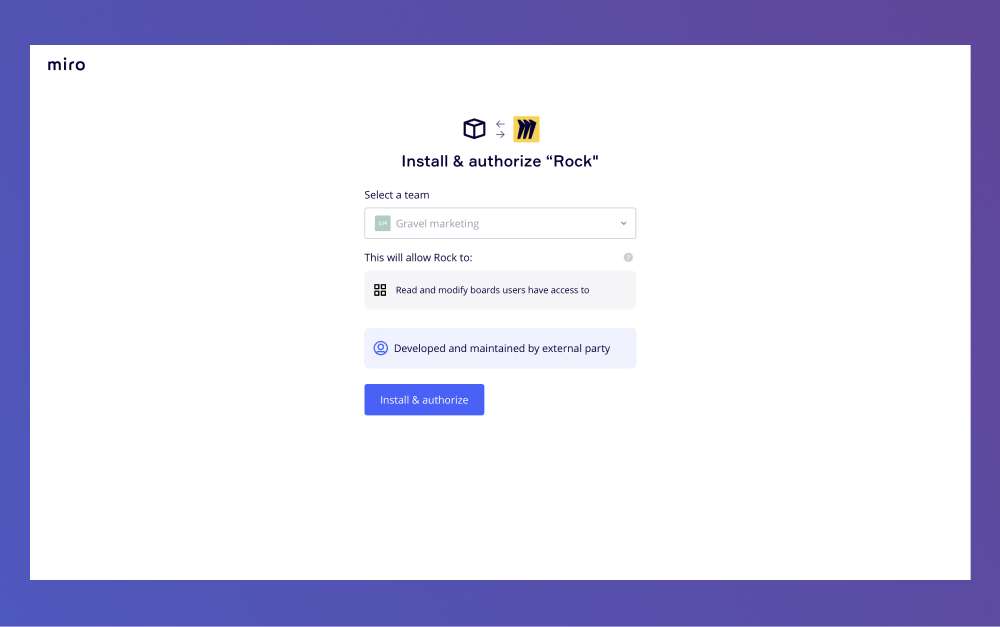
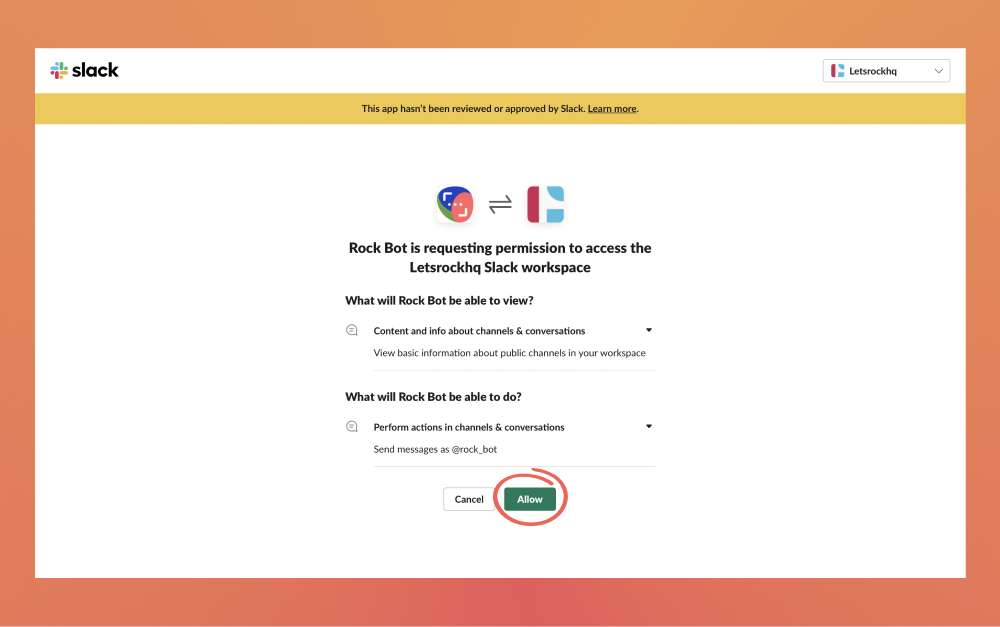
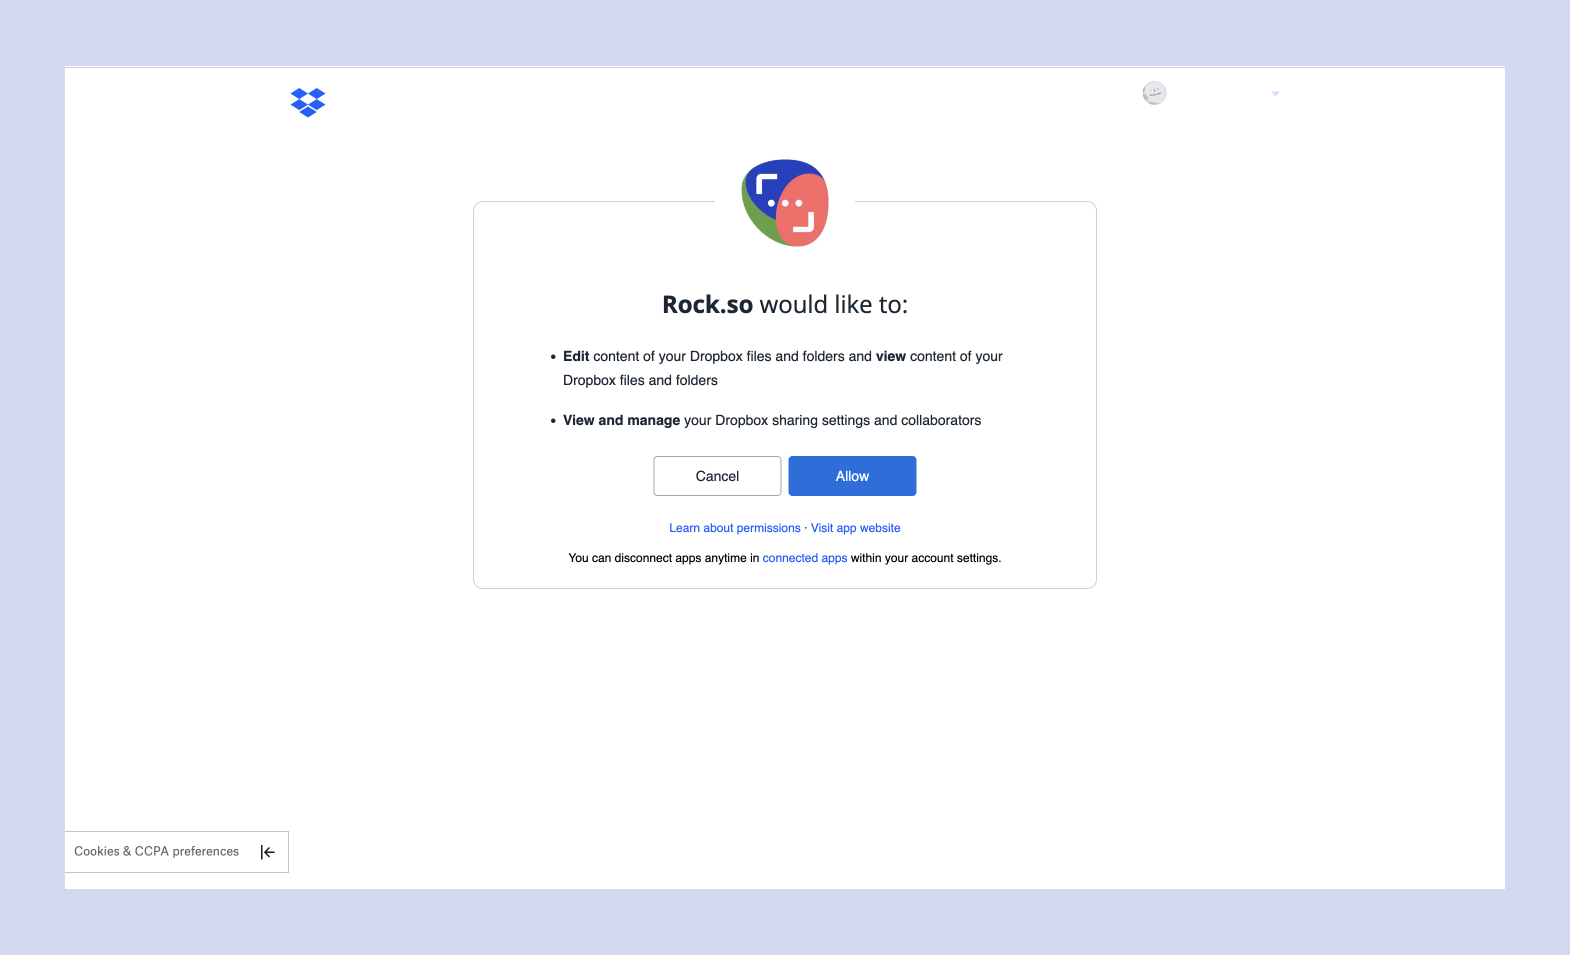
4. You’ll be asked to give Rock permission to your OneDrive account. Select 'Yes'
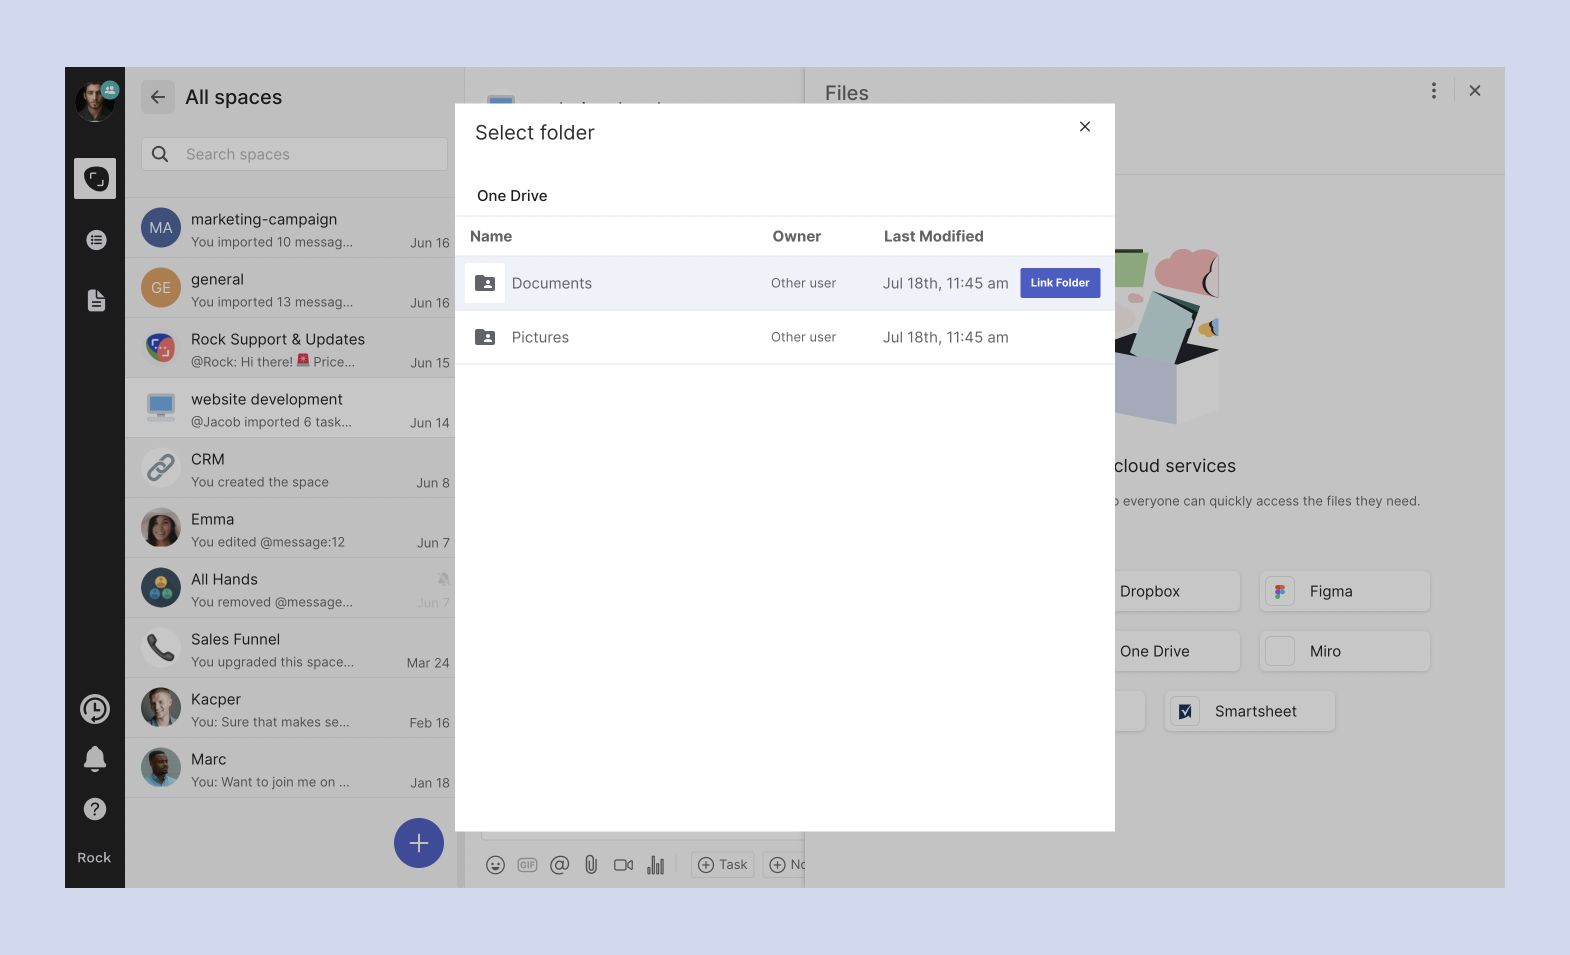
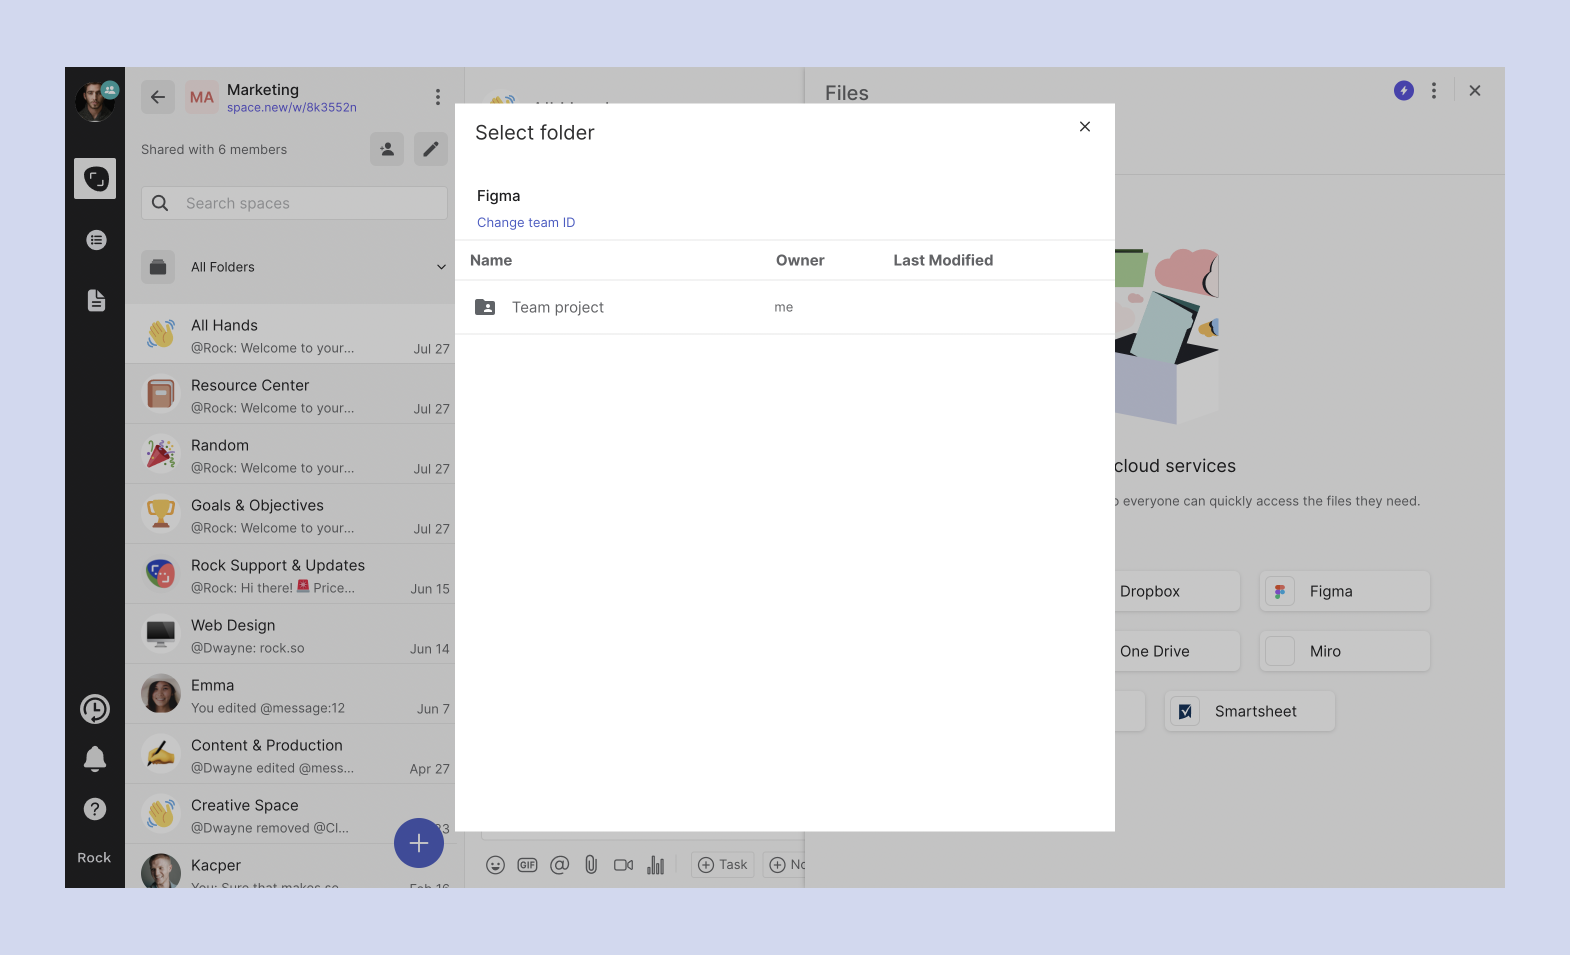
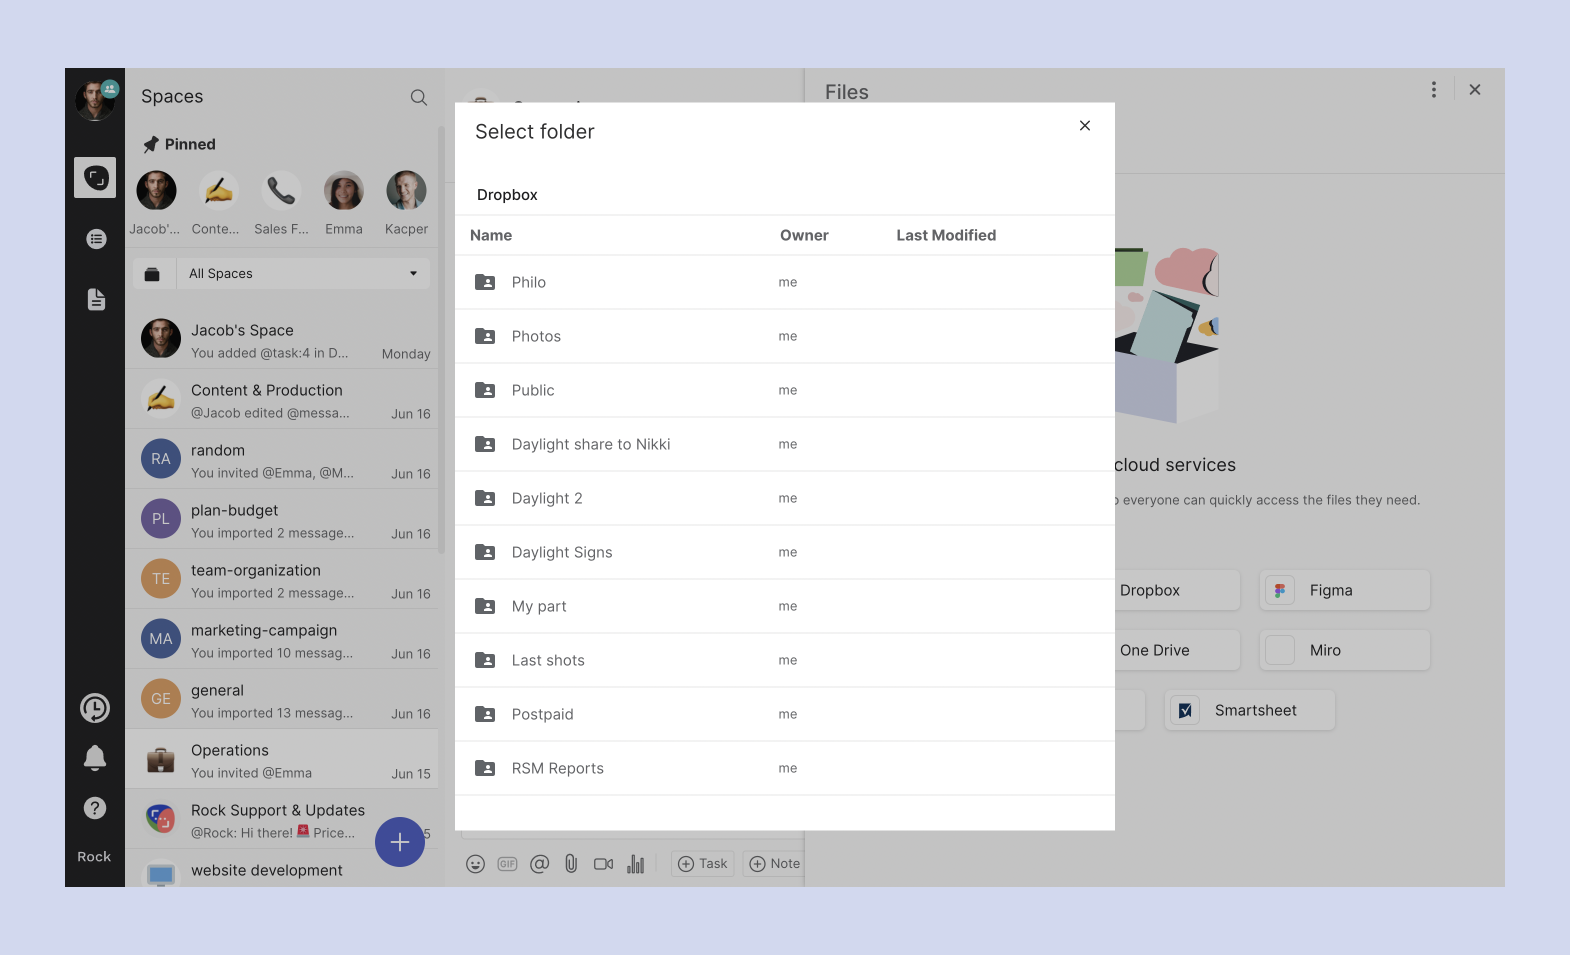
Next, you’ll be redirected to the space where you initially set up the integration.A window will appear that will list all folders in your OneDrive. Choose which folders you’d want to see on your Rock files. If you select a folder, all subfolders and files will be available in Rock’s Files mini-app. Note that linking individual files from OneDrive to Rock is not possible for the time being.
Adding OneDrive Folders to spaces
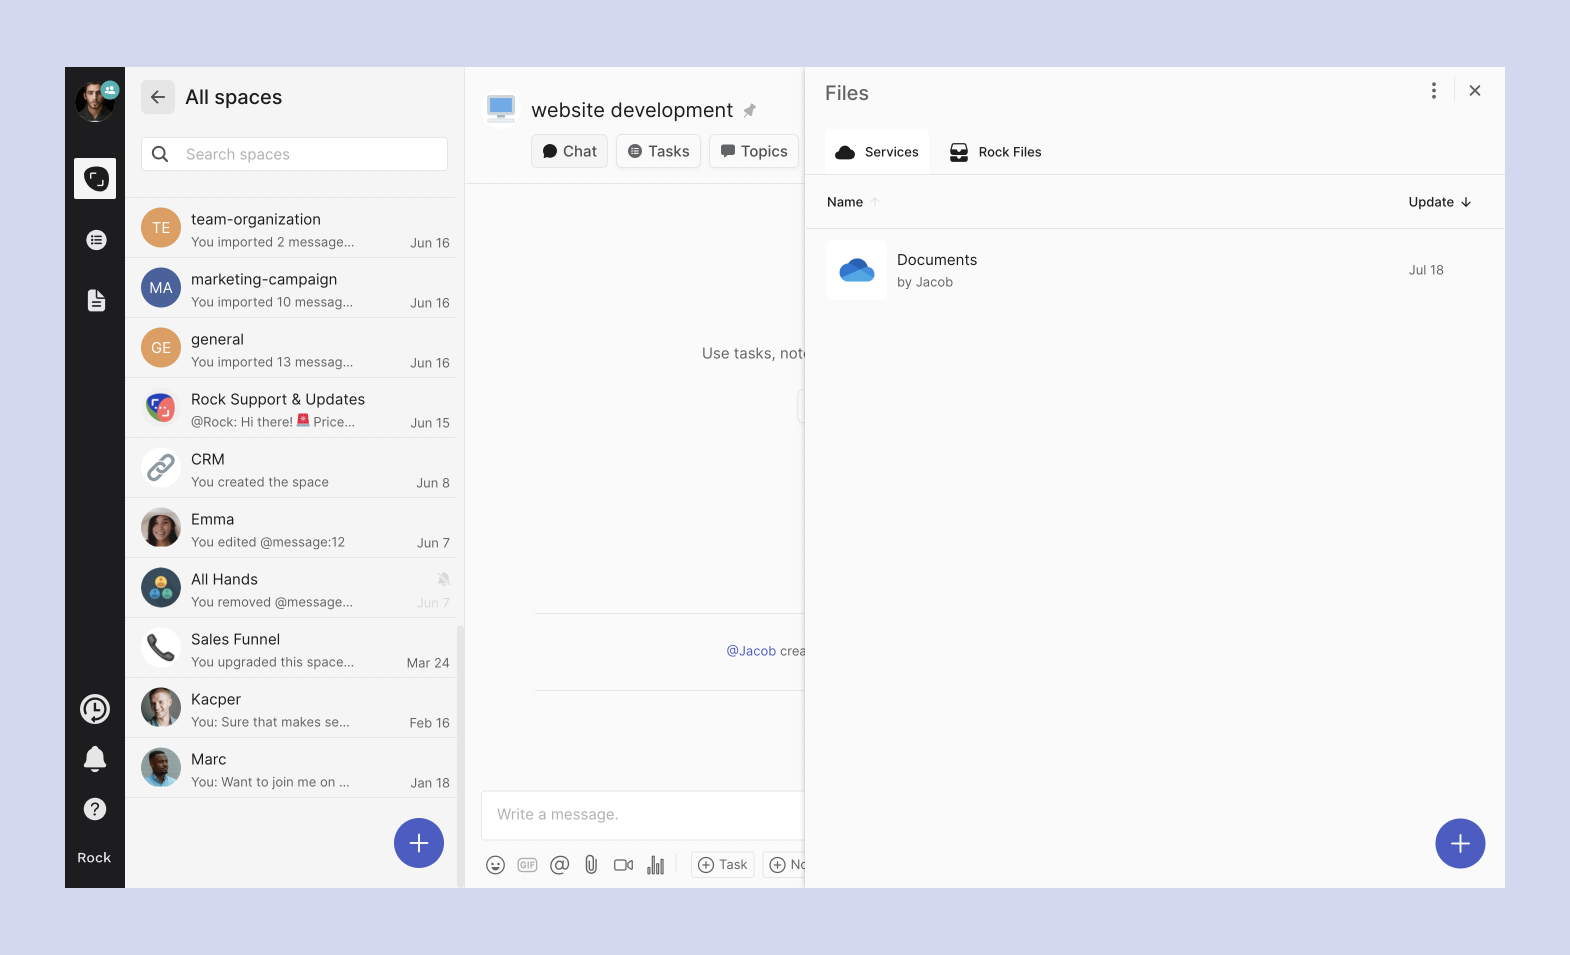
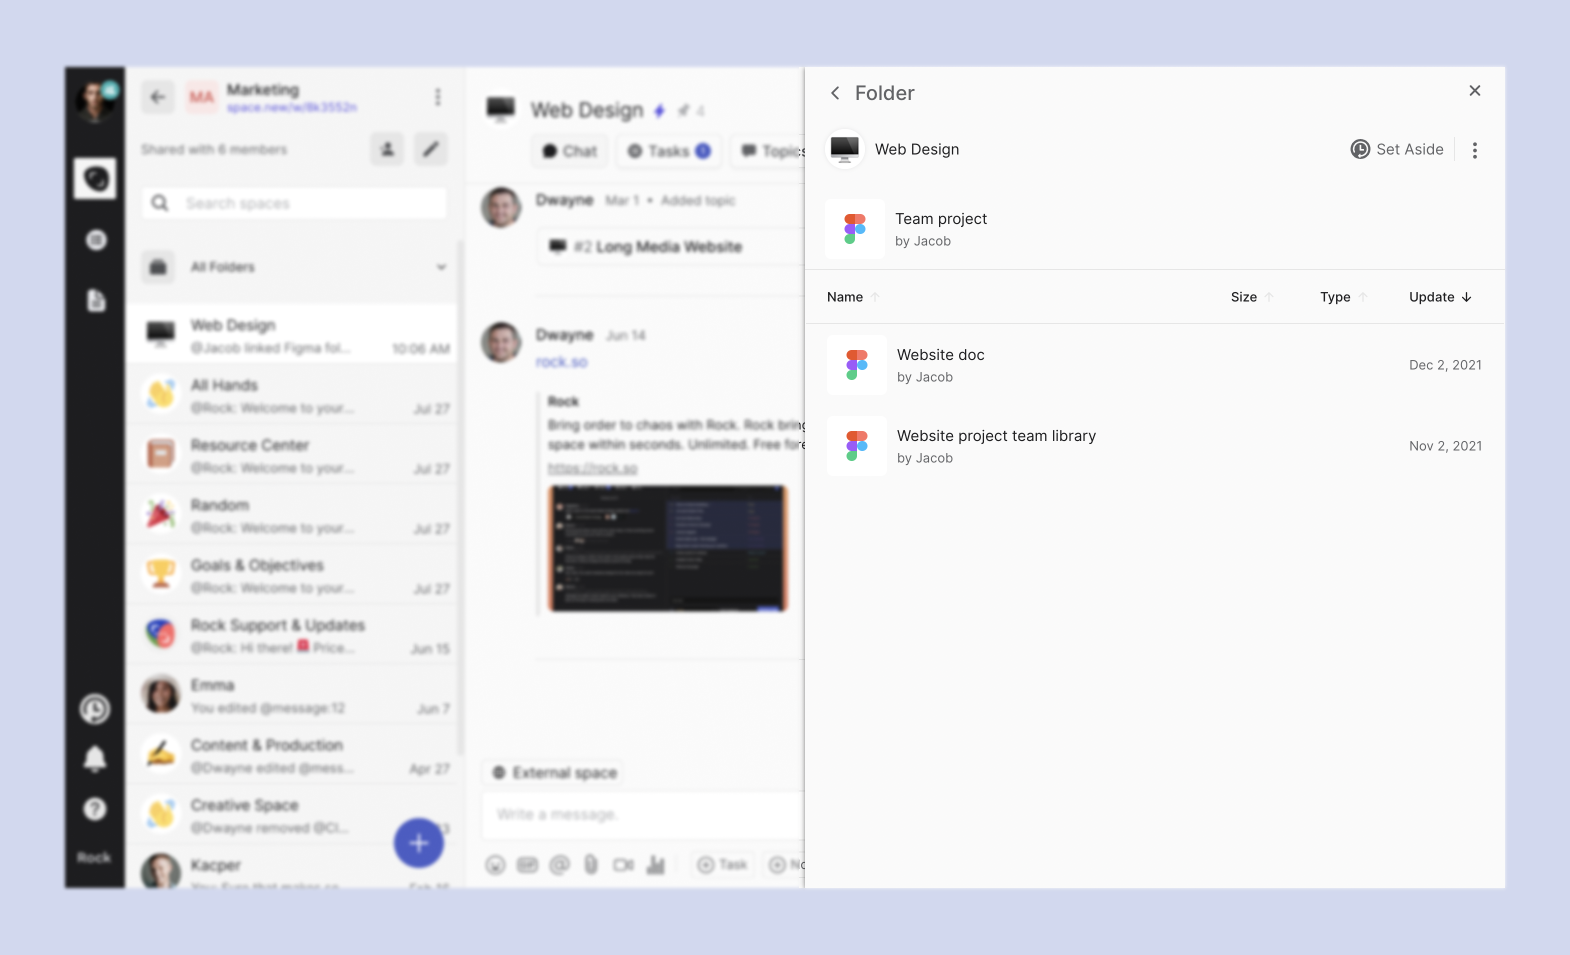
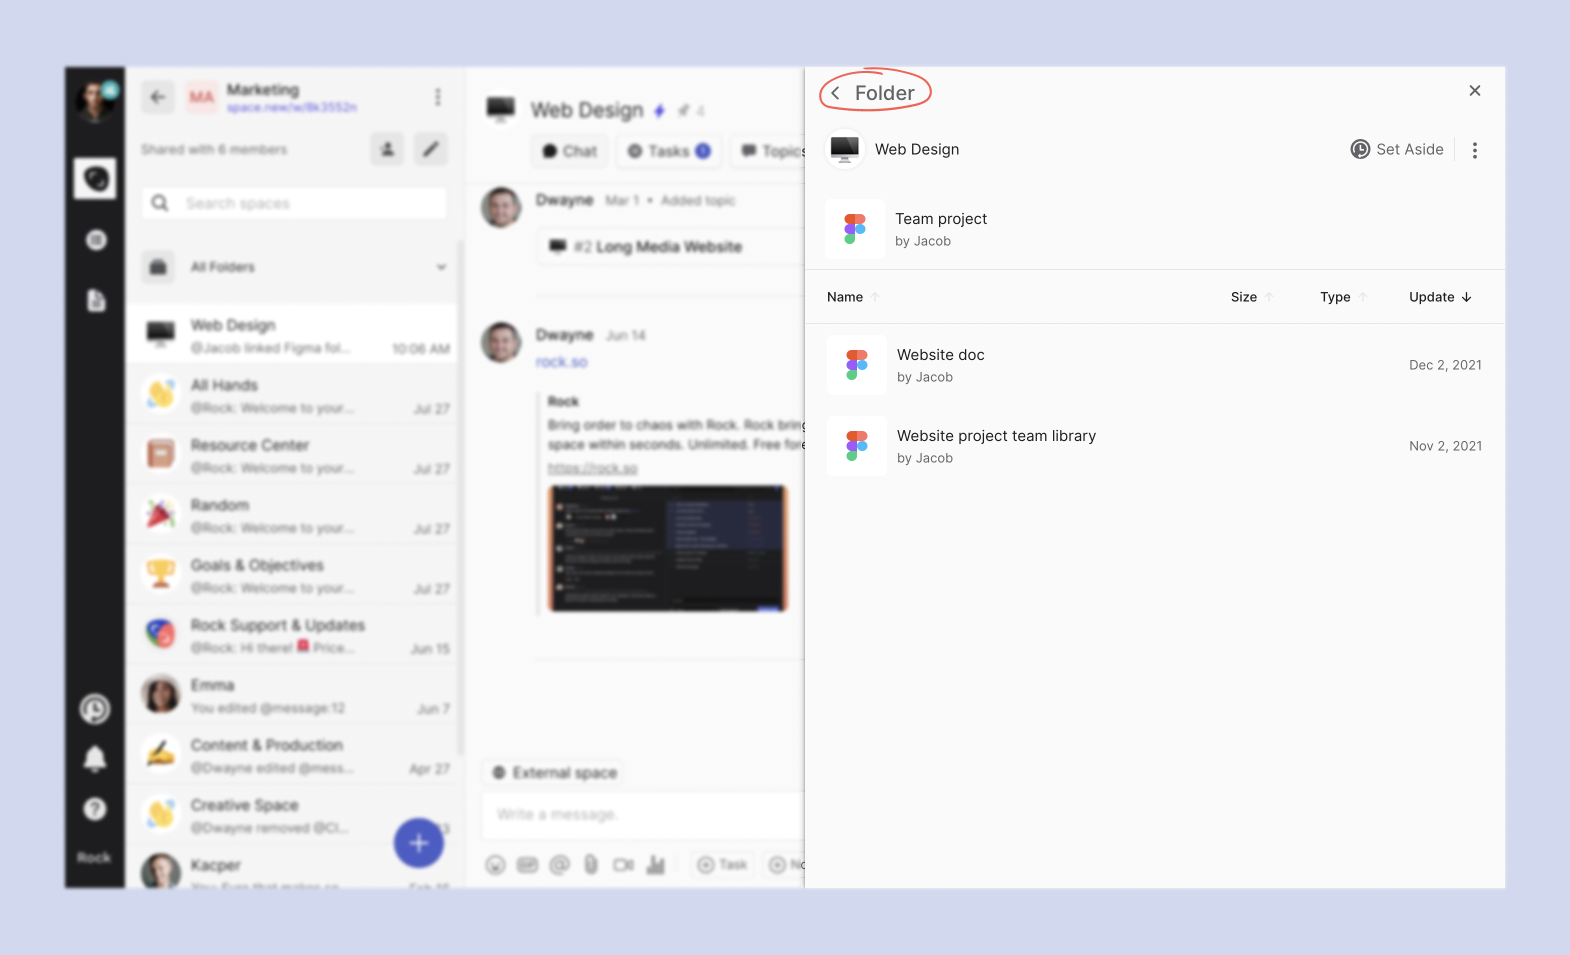
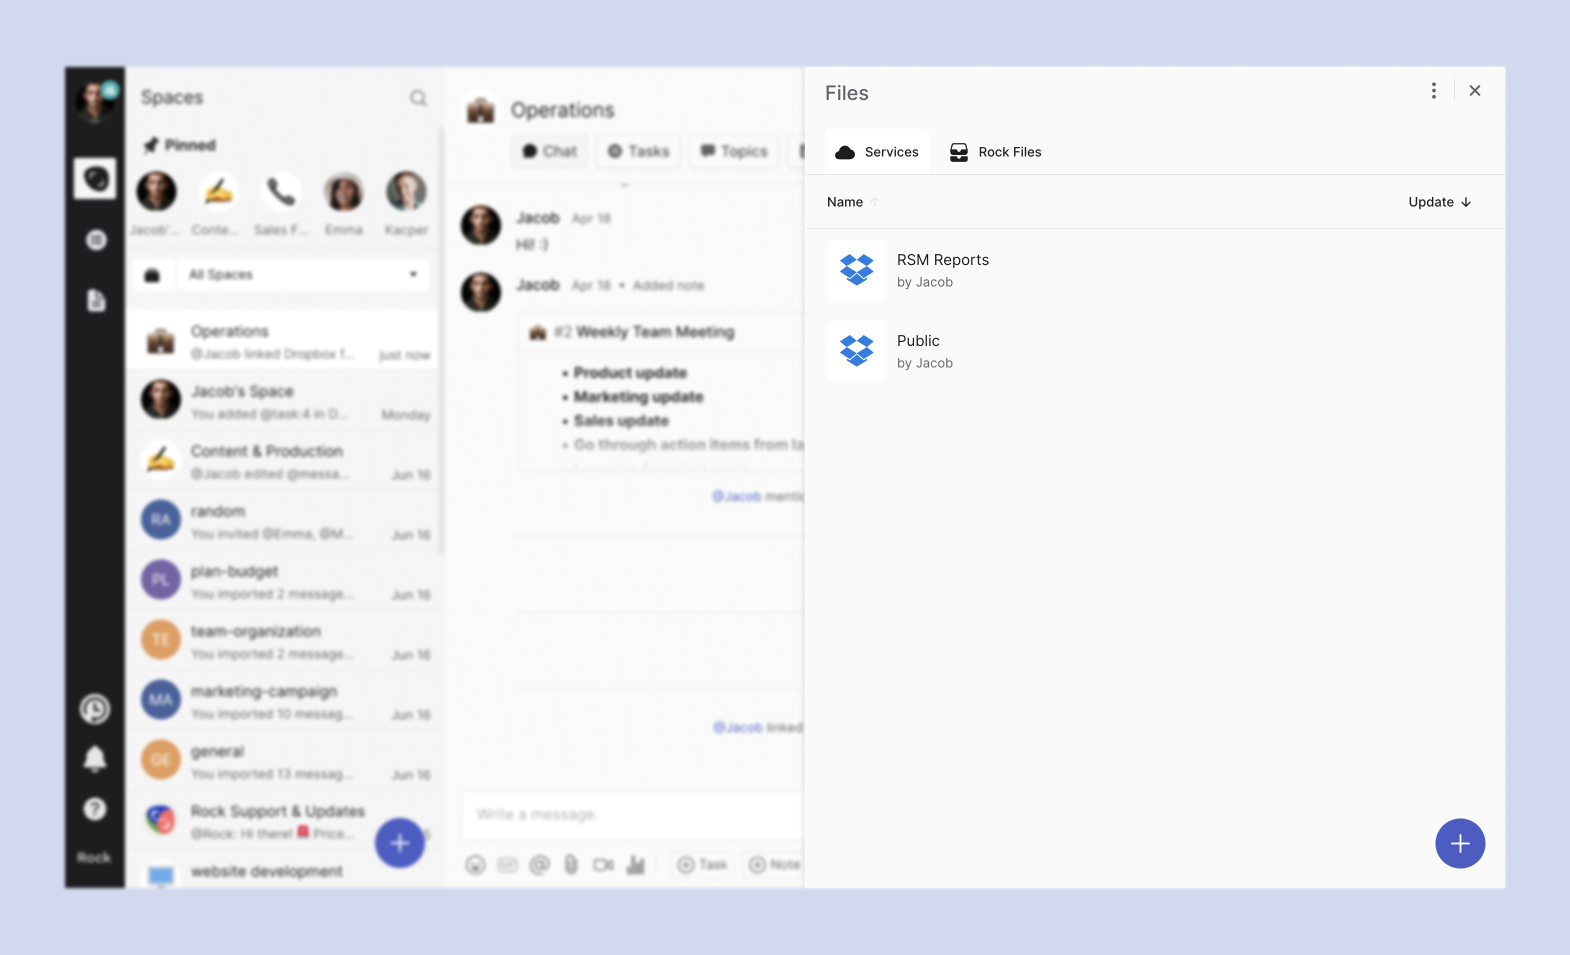
Once you’ve successfully integrated OneDrive to Rock, you’ll be able to access your linked folders and files in the Files mini-app of any space. However, you won’t be able to connect individual files within a folder in Rock. The files must be placed in a parent folder before they can be linked.
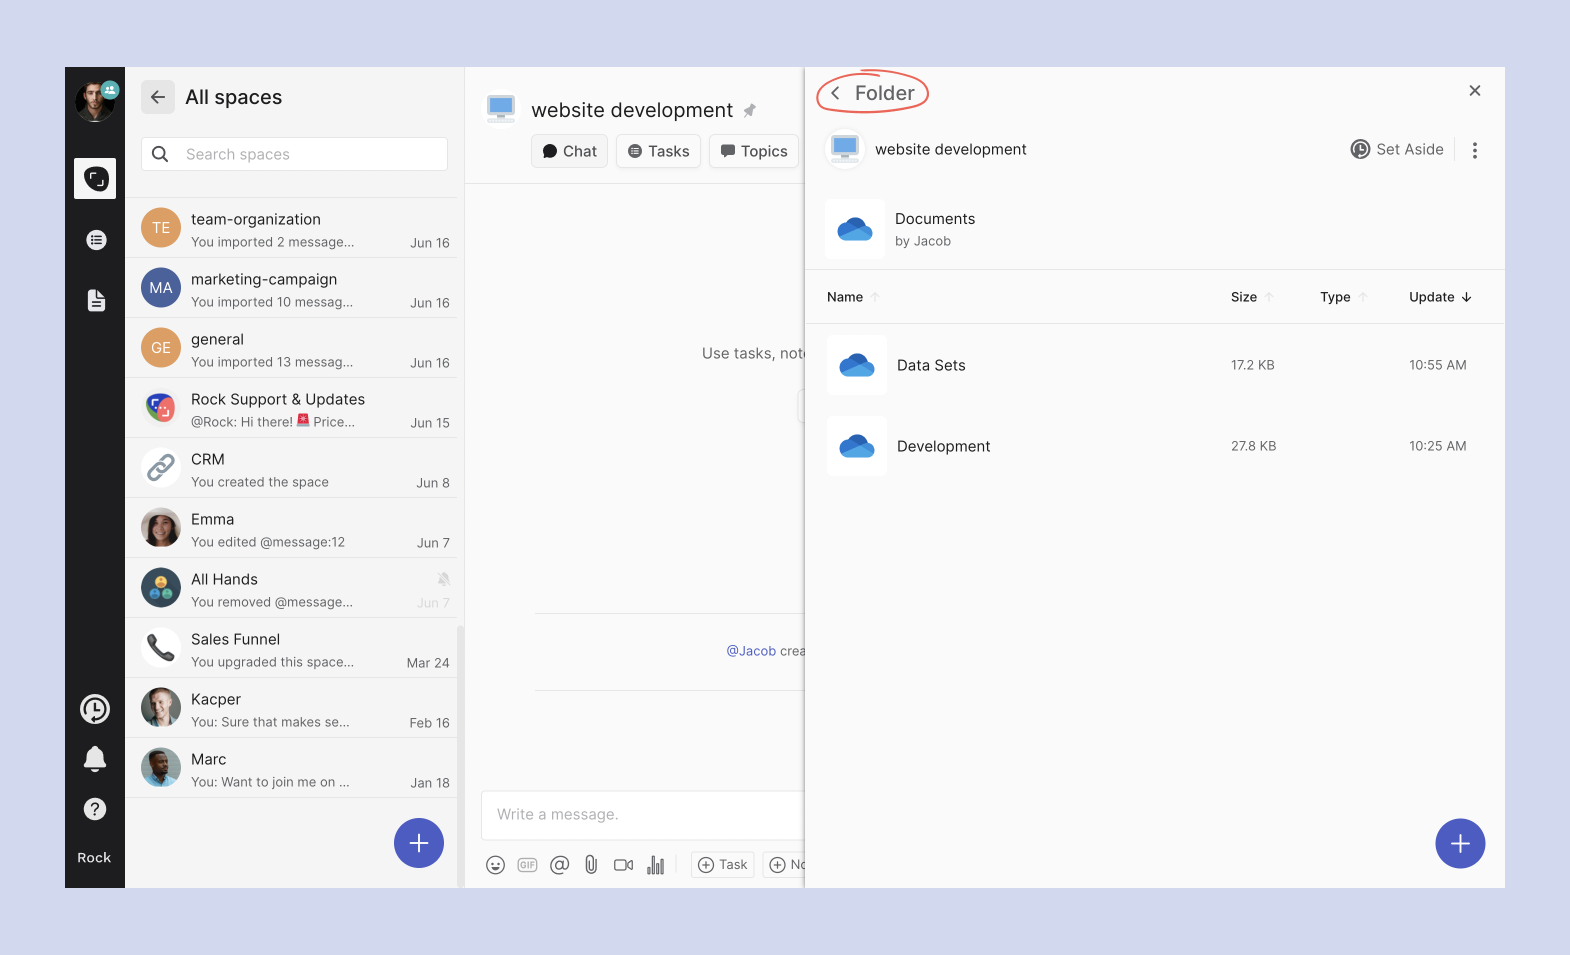
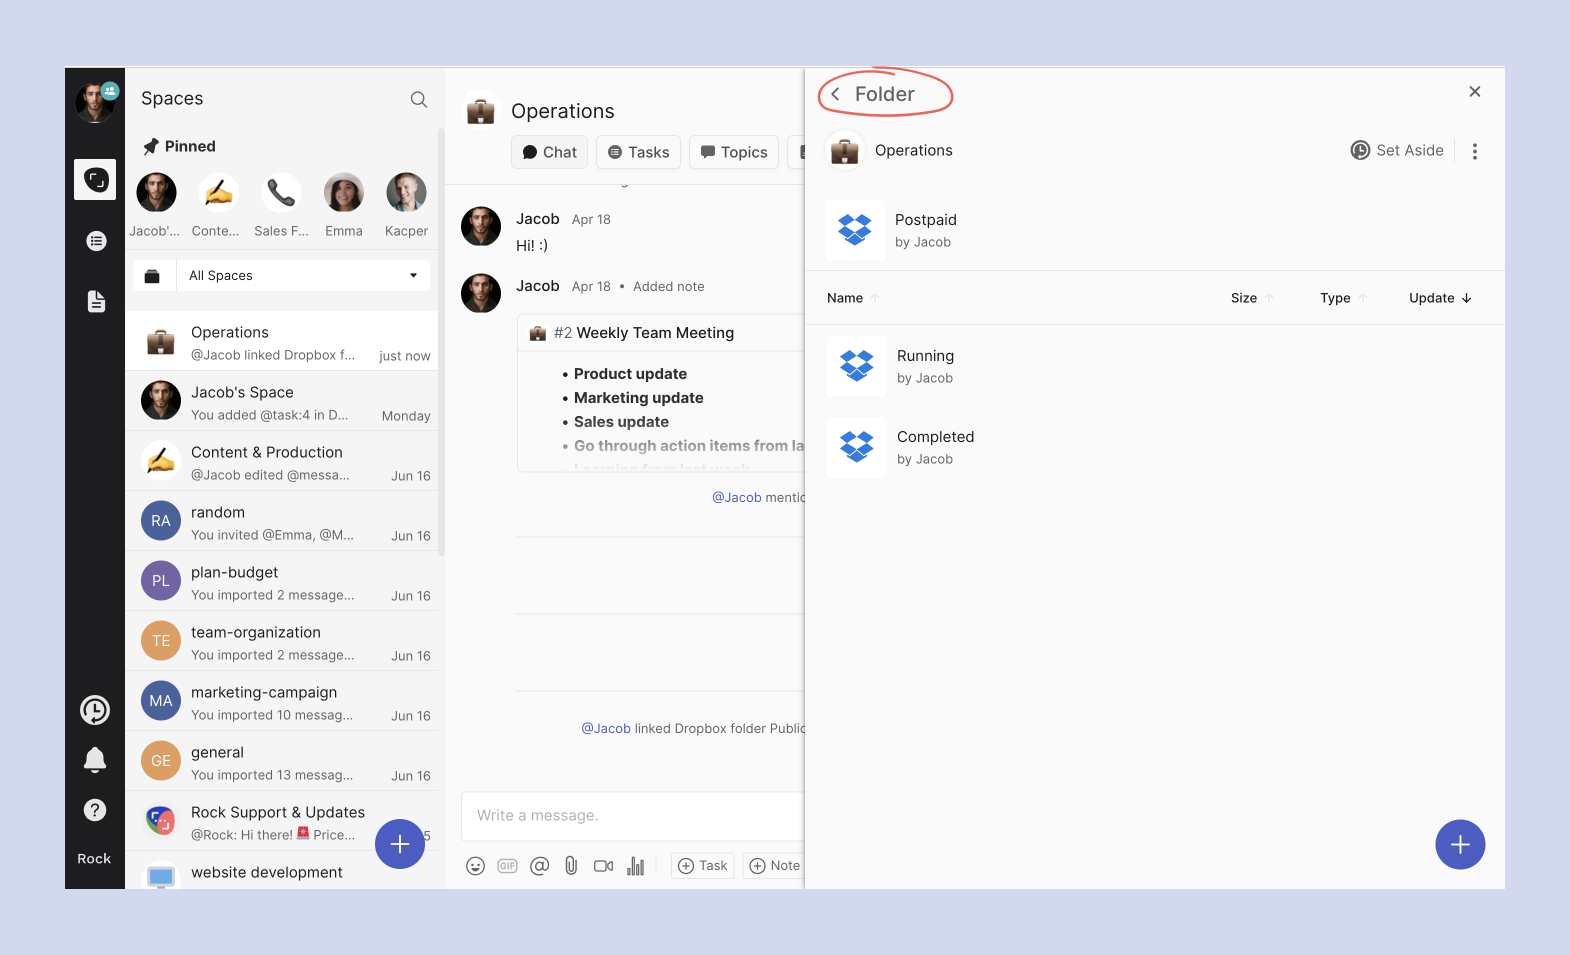
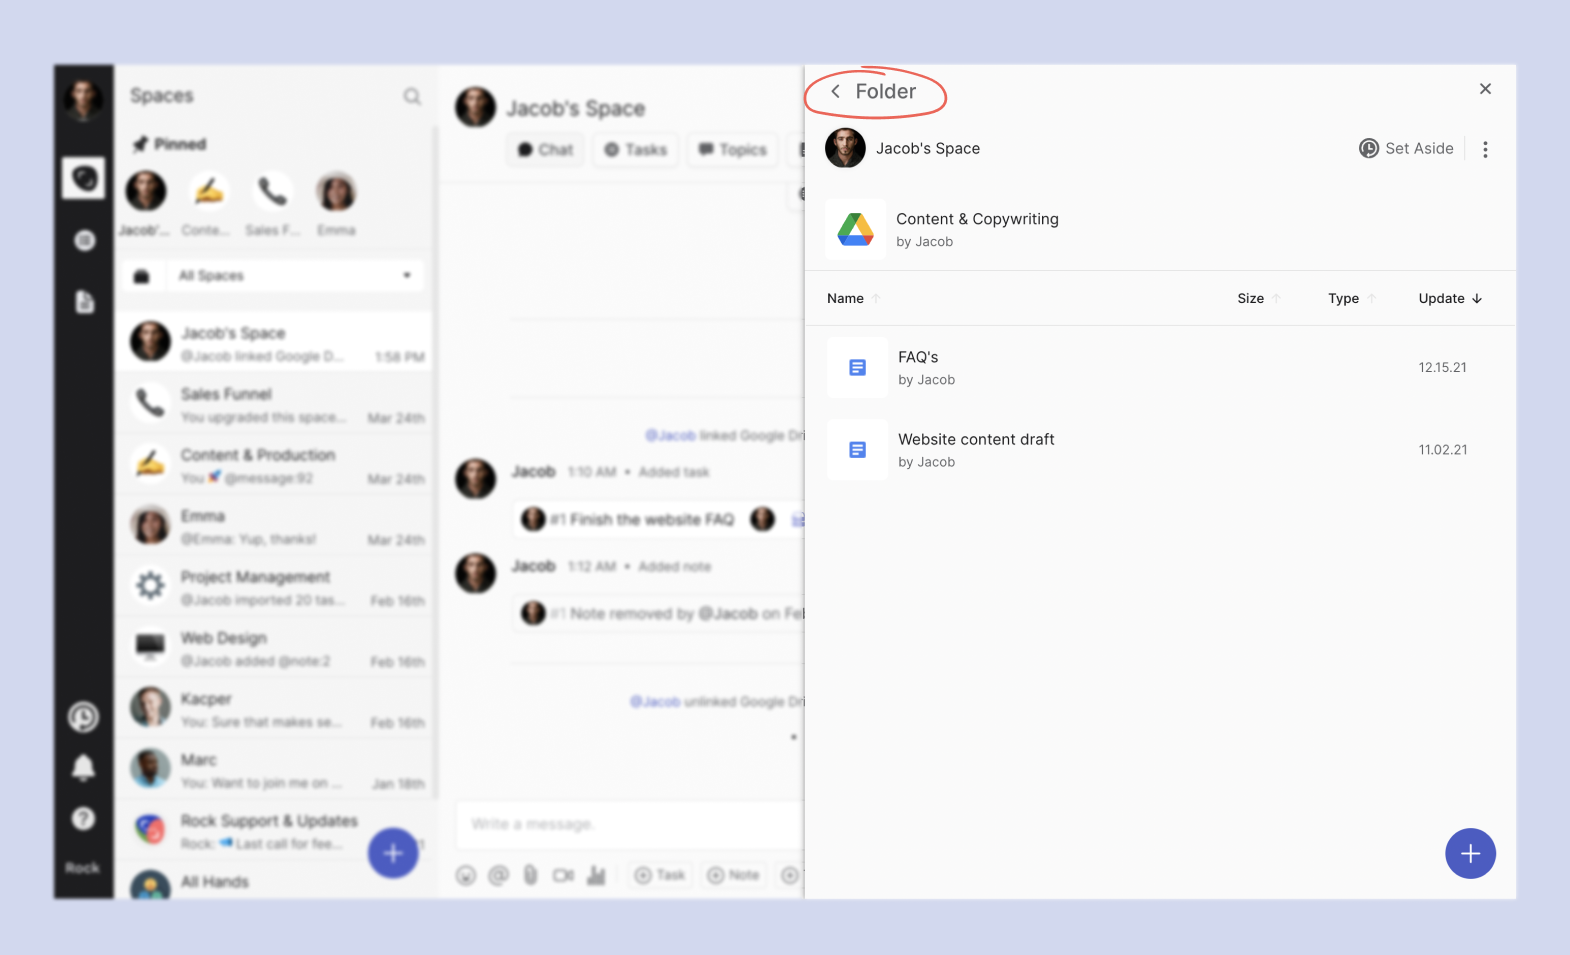
📝 Note: Users will not be able to access the folders and files in the spaces you have uploaded them to unless they have permission in OneDrive. You also need to ensure that users are part of the space that they need files access to. Even if a user has all the necessary drive permissions, they won’t be able to access the files within Rock if they are not part of the space.To go back to the Files mini-app panel or into a previous folder, press the < Folder on the top left corner of the panel.
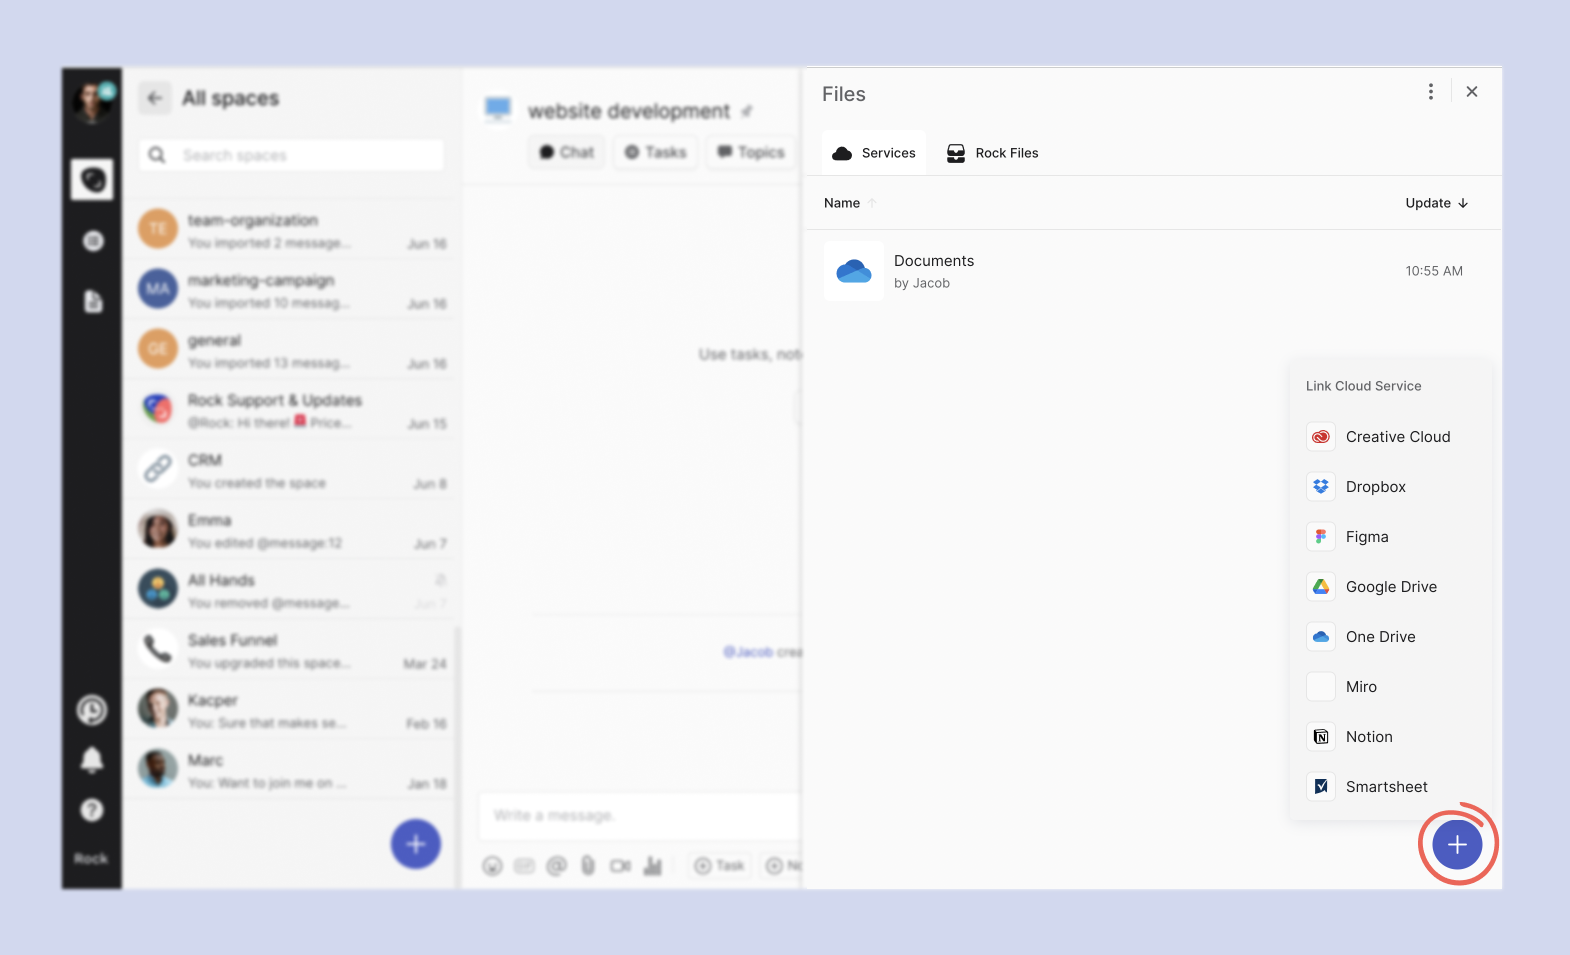
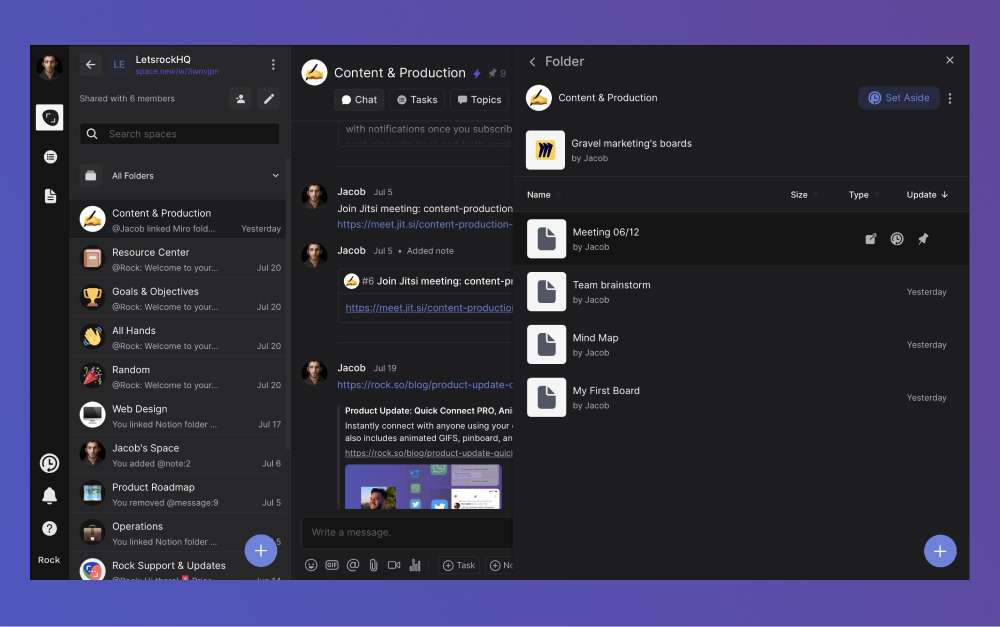
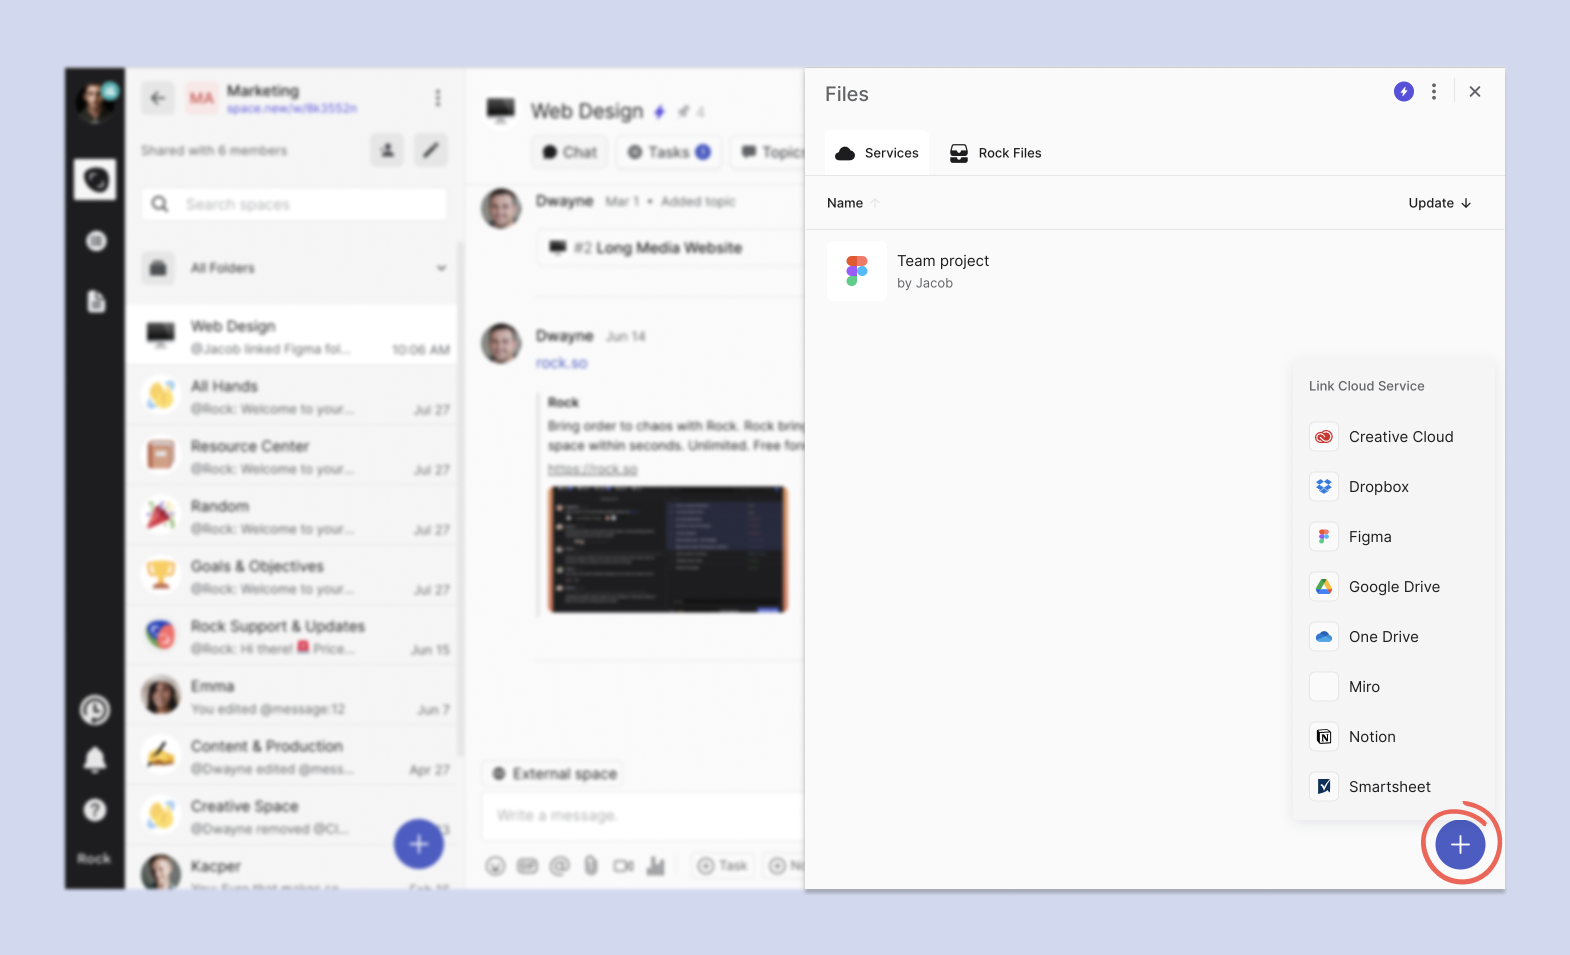
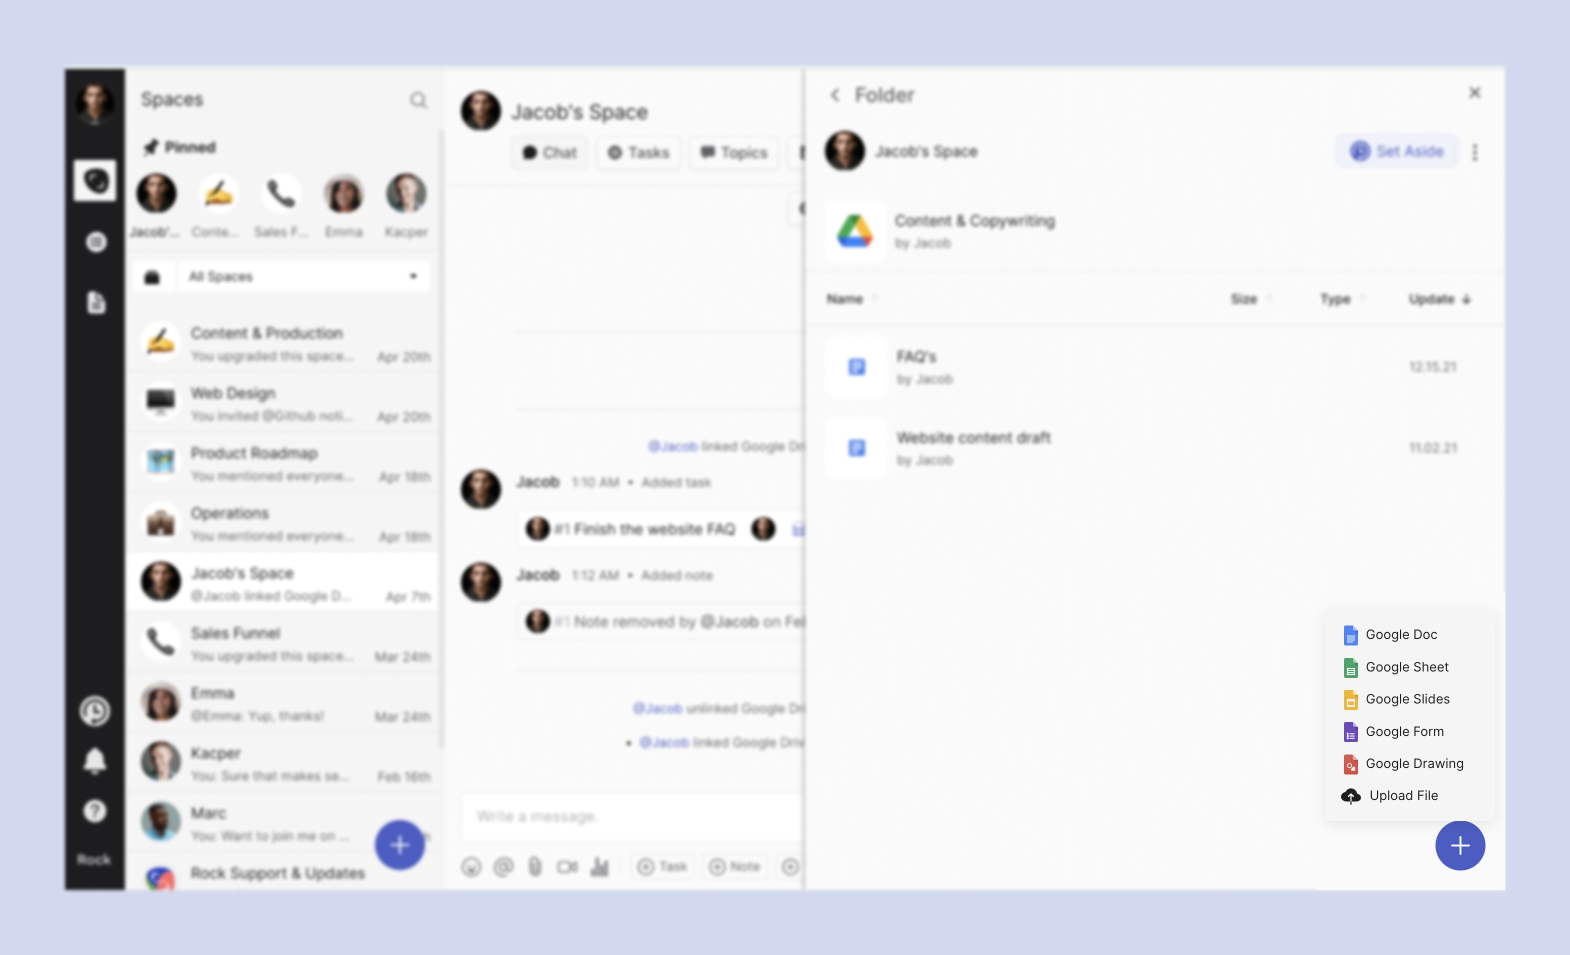
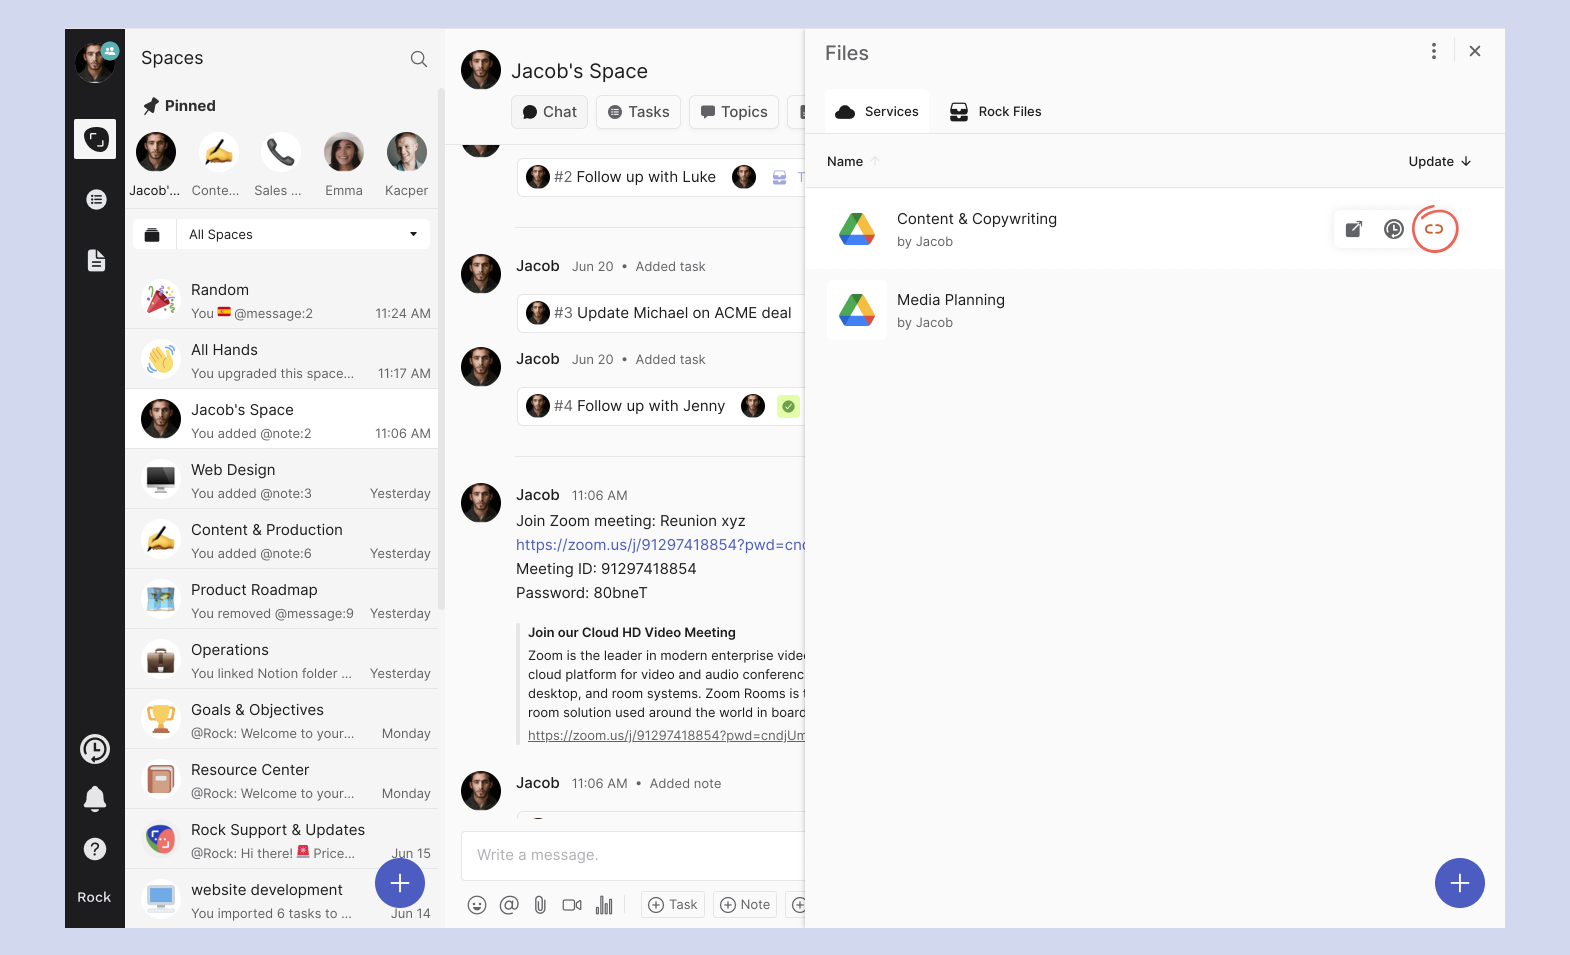
Once you’ve successfully linked a cloud storage service and have added files and folders to the Files mini-app in a Space, you can use the blue + button on the lower right-hand corner of the Files view to add more drive services.
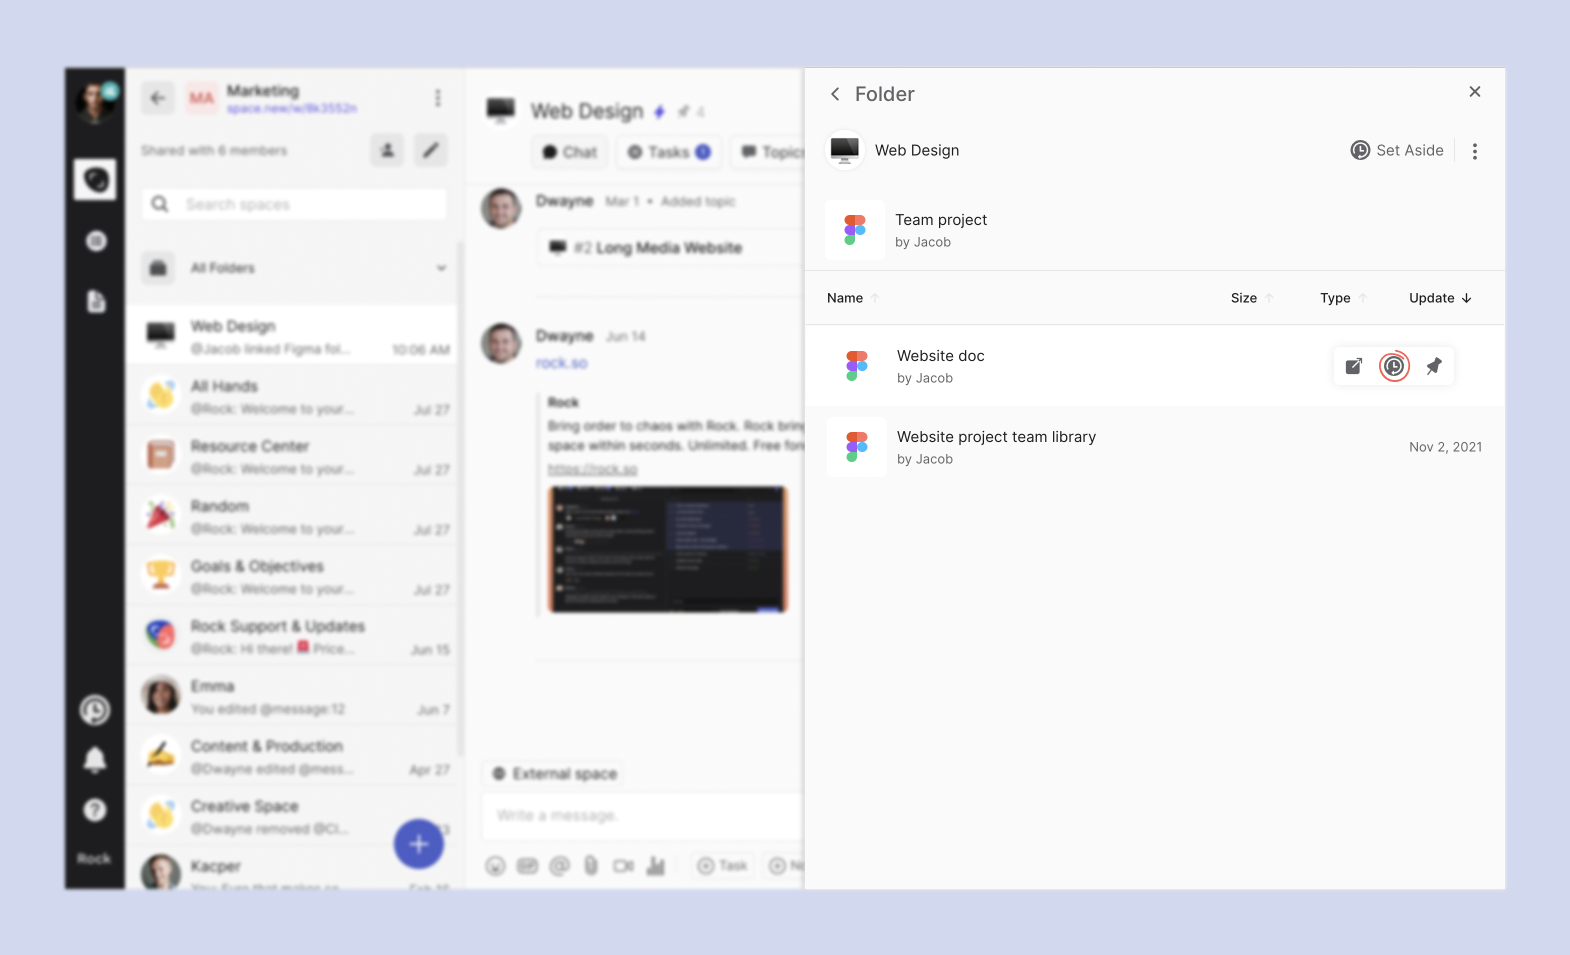
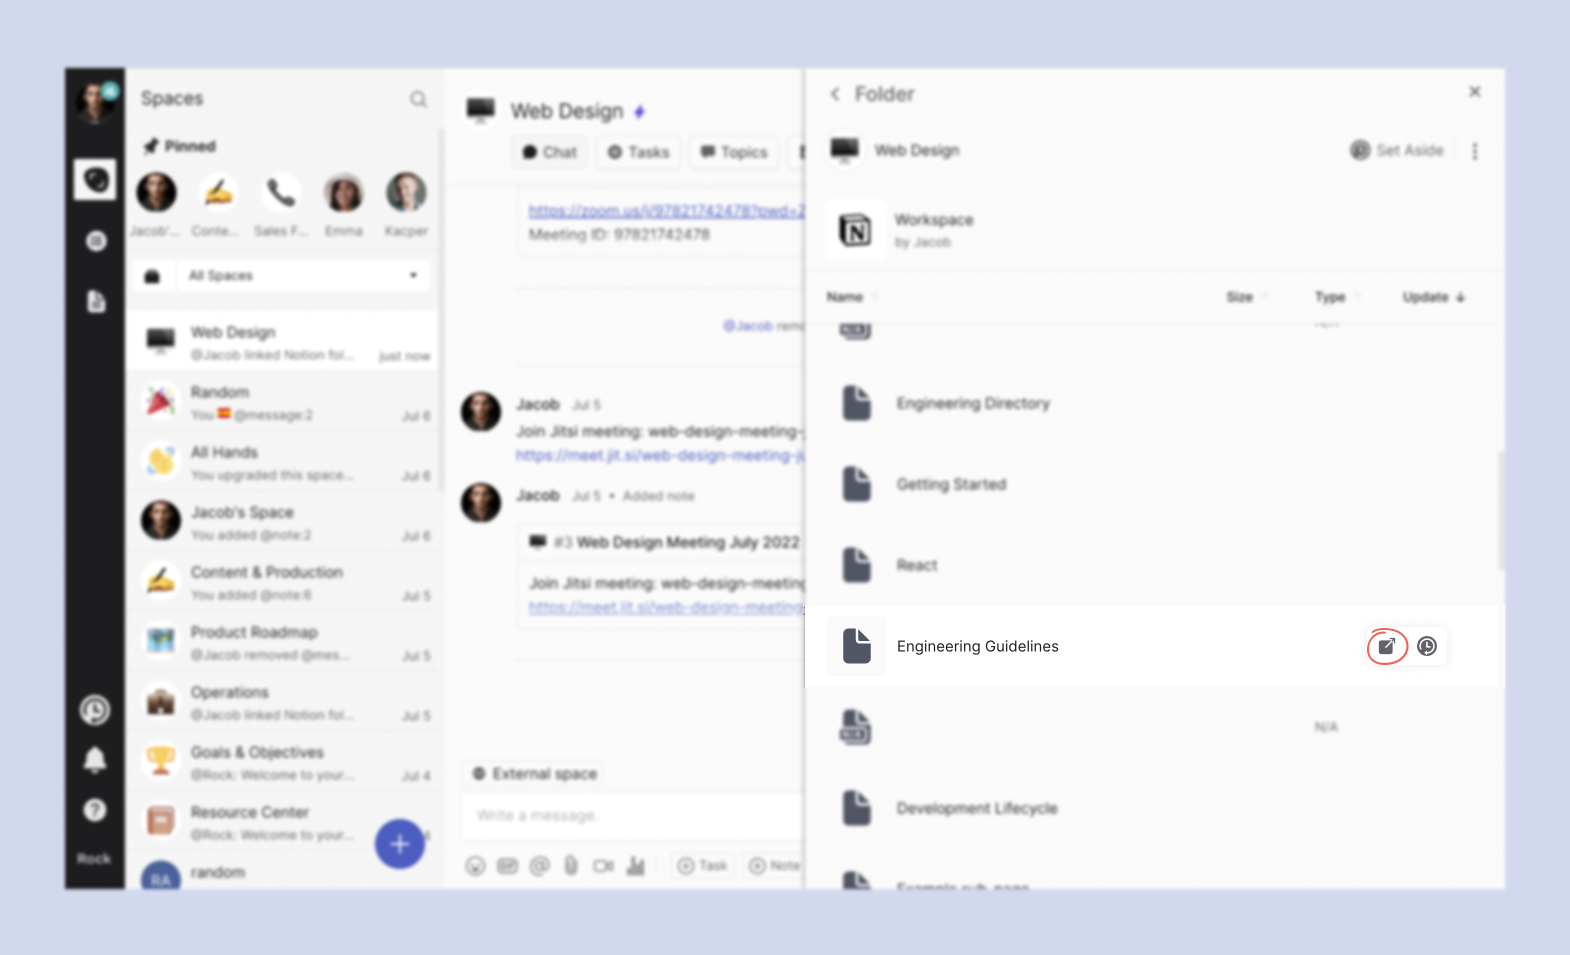
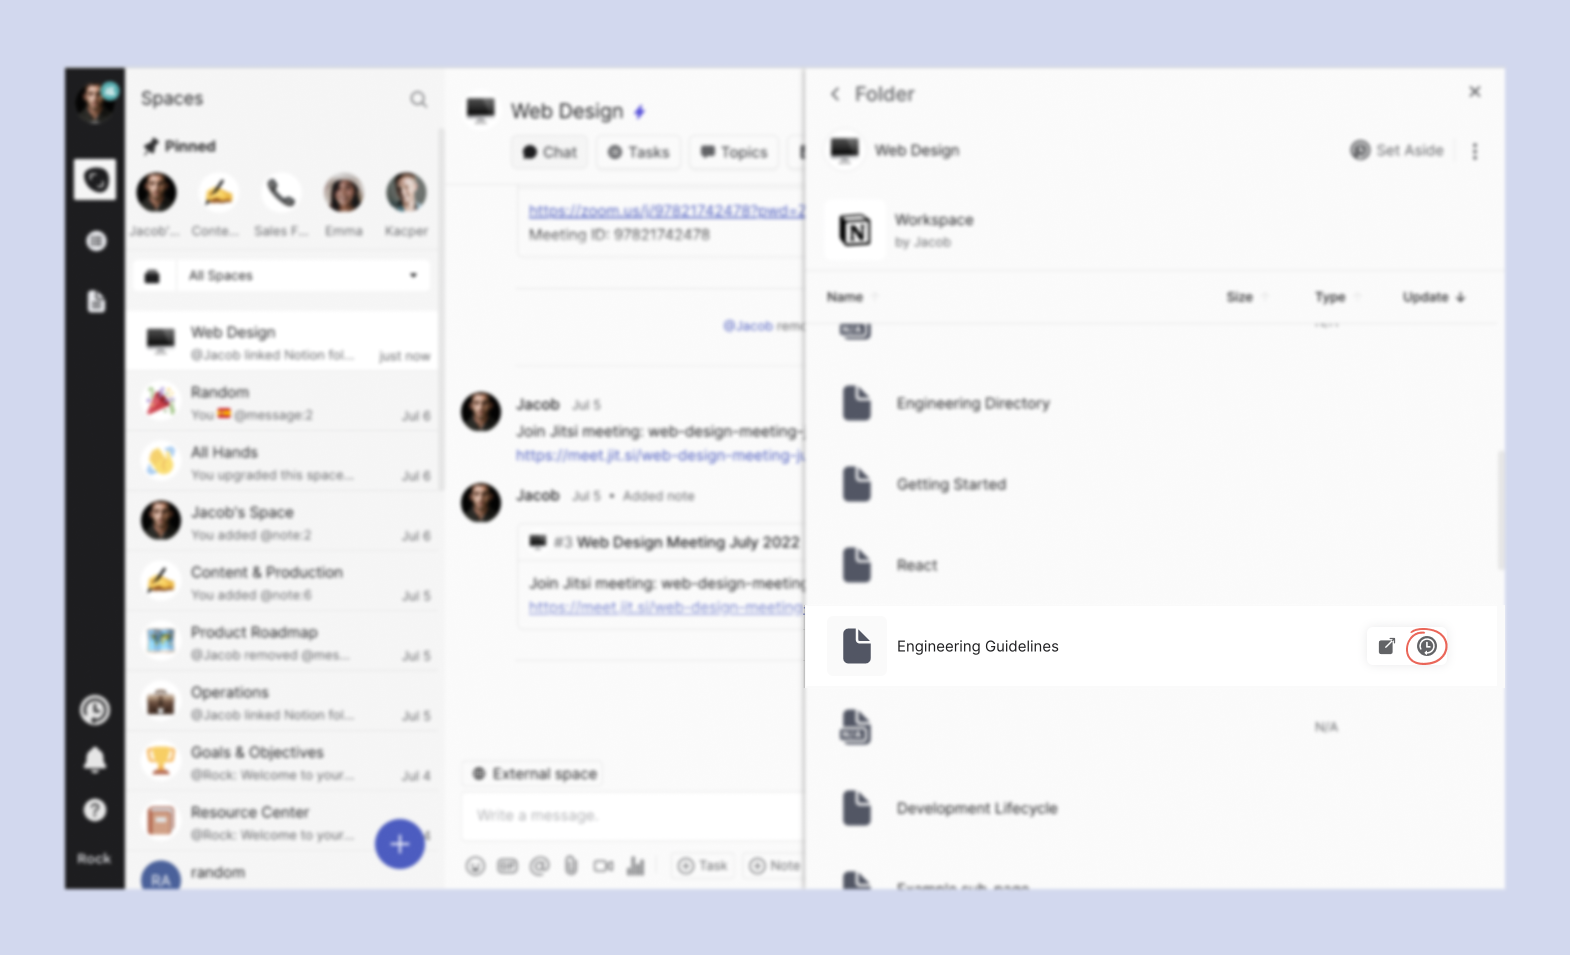
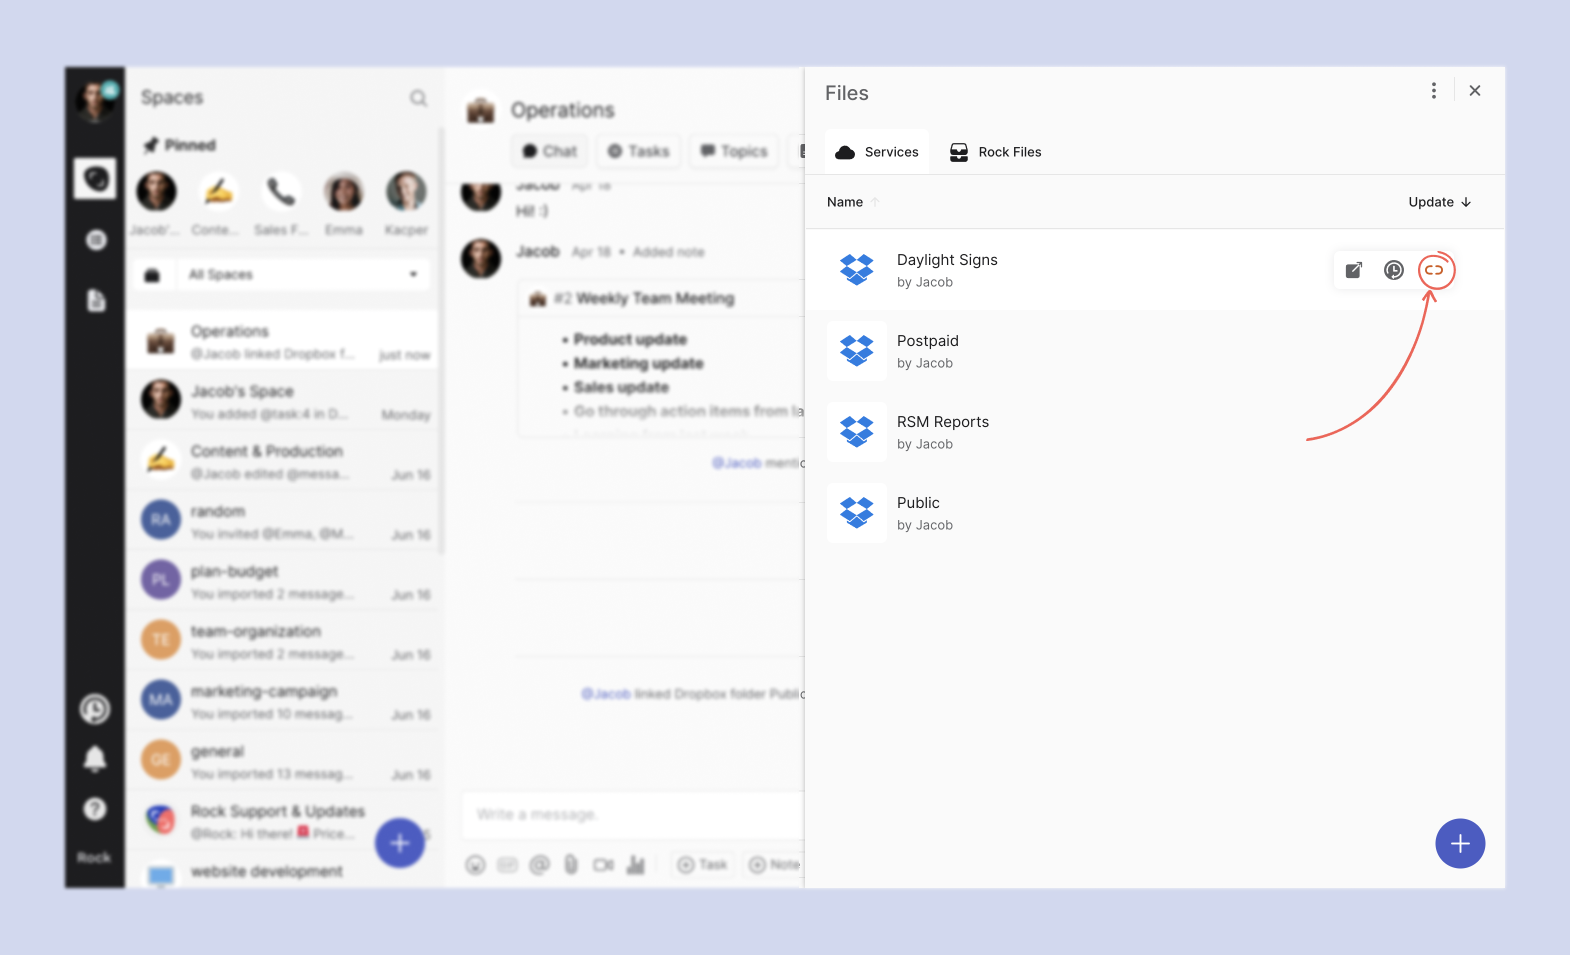
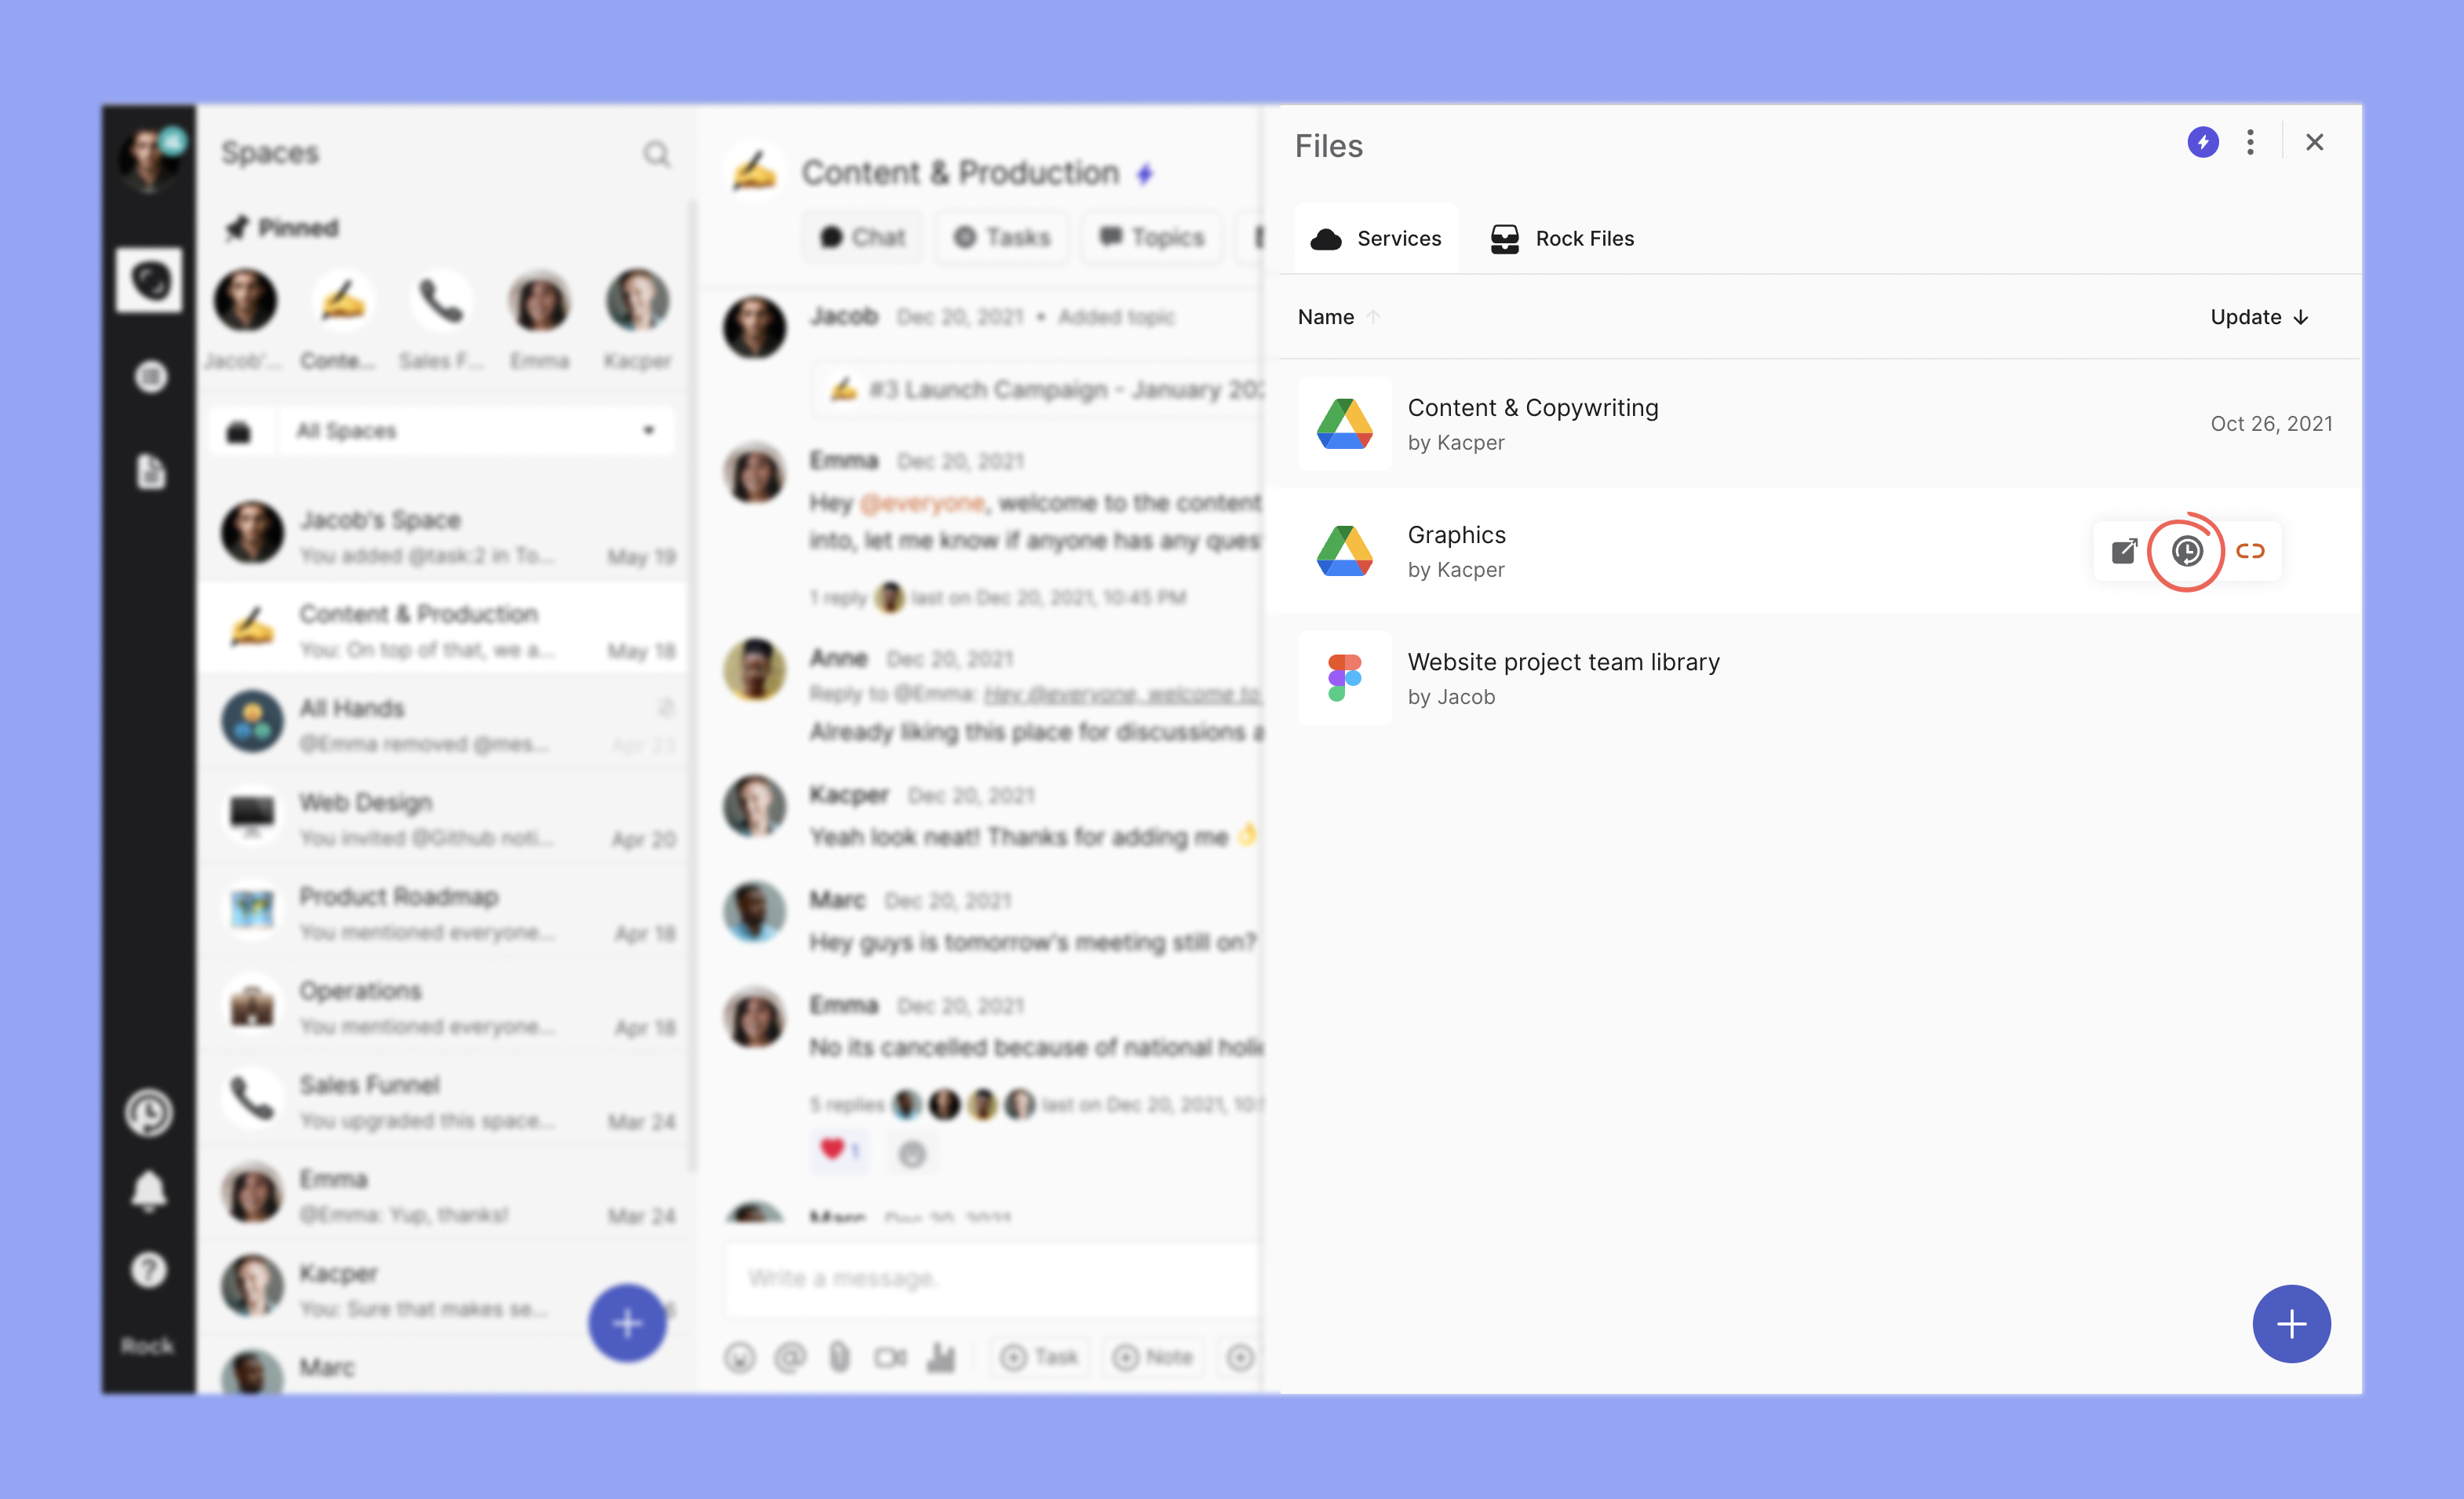
Files Hover Buttons
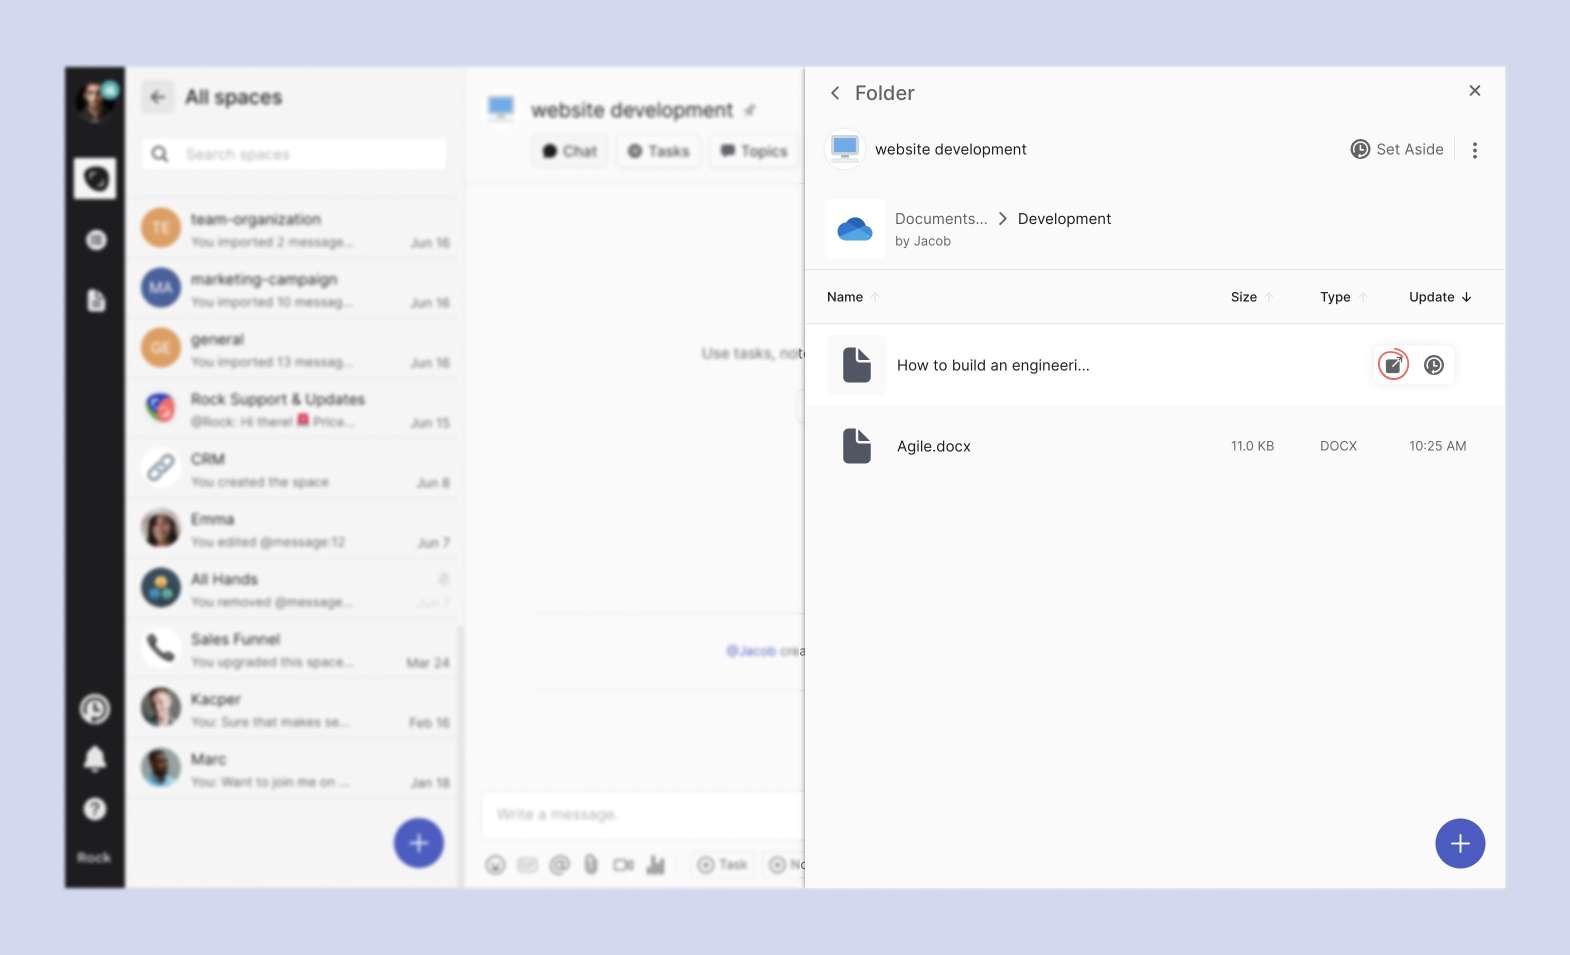
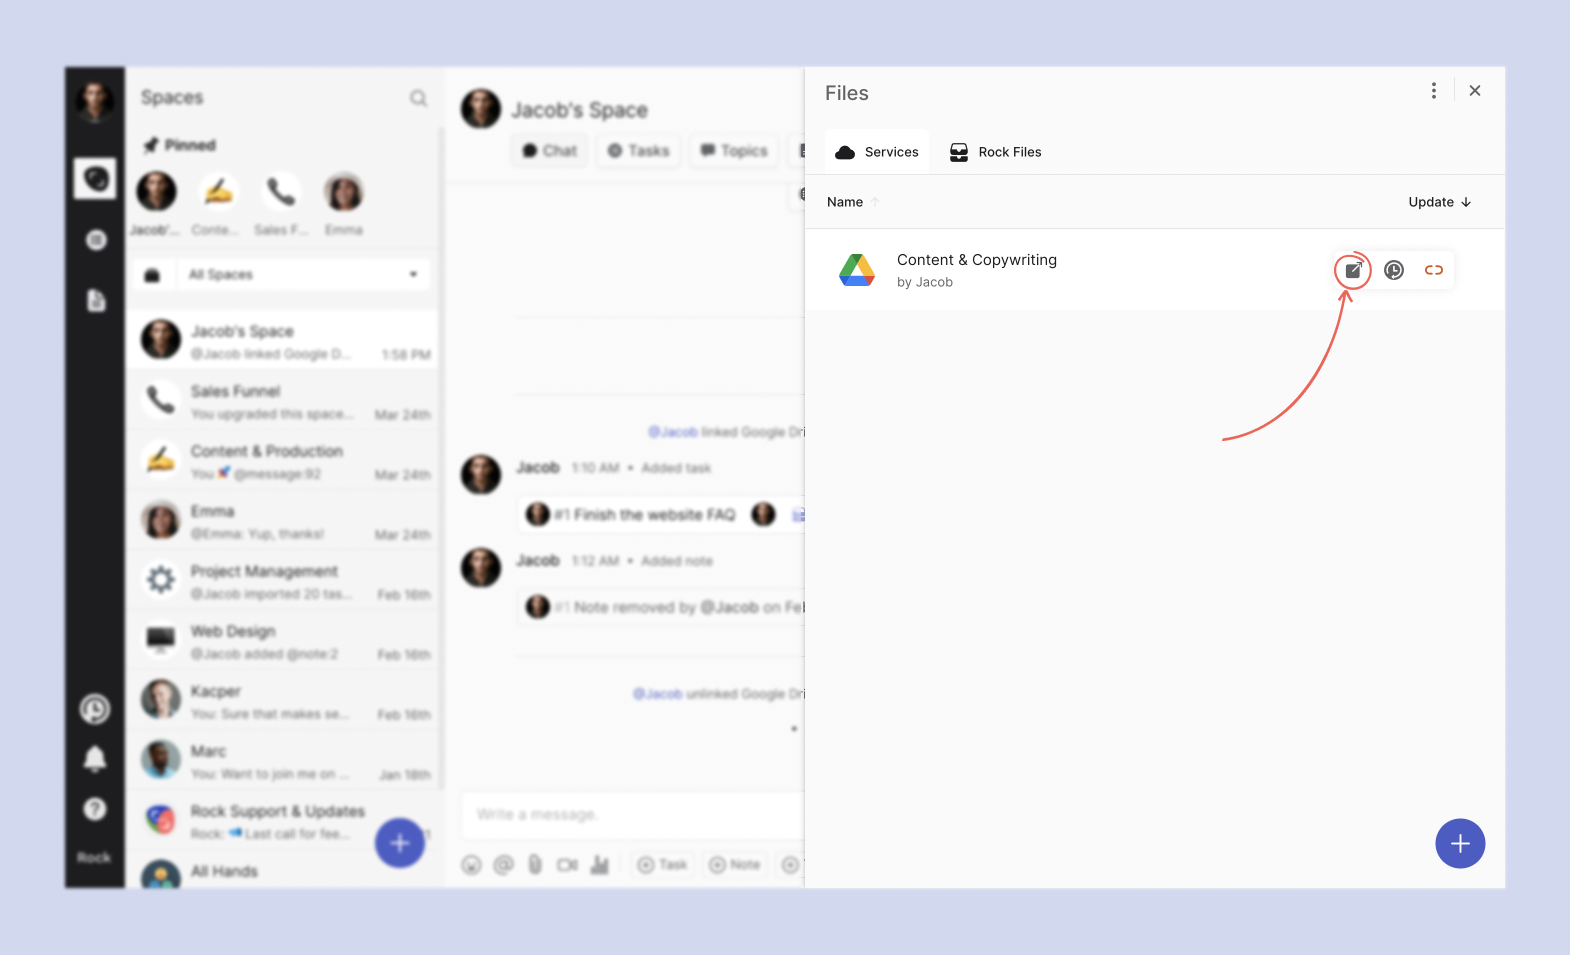
When hovering over a OneDrive file a few options become available. Press the button on the right if you want to open a OneDrive file or folder in a new tab.
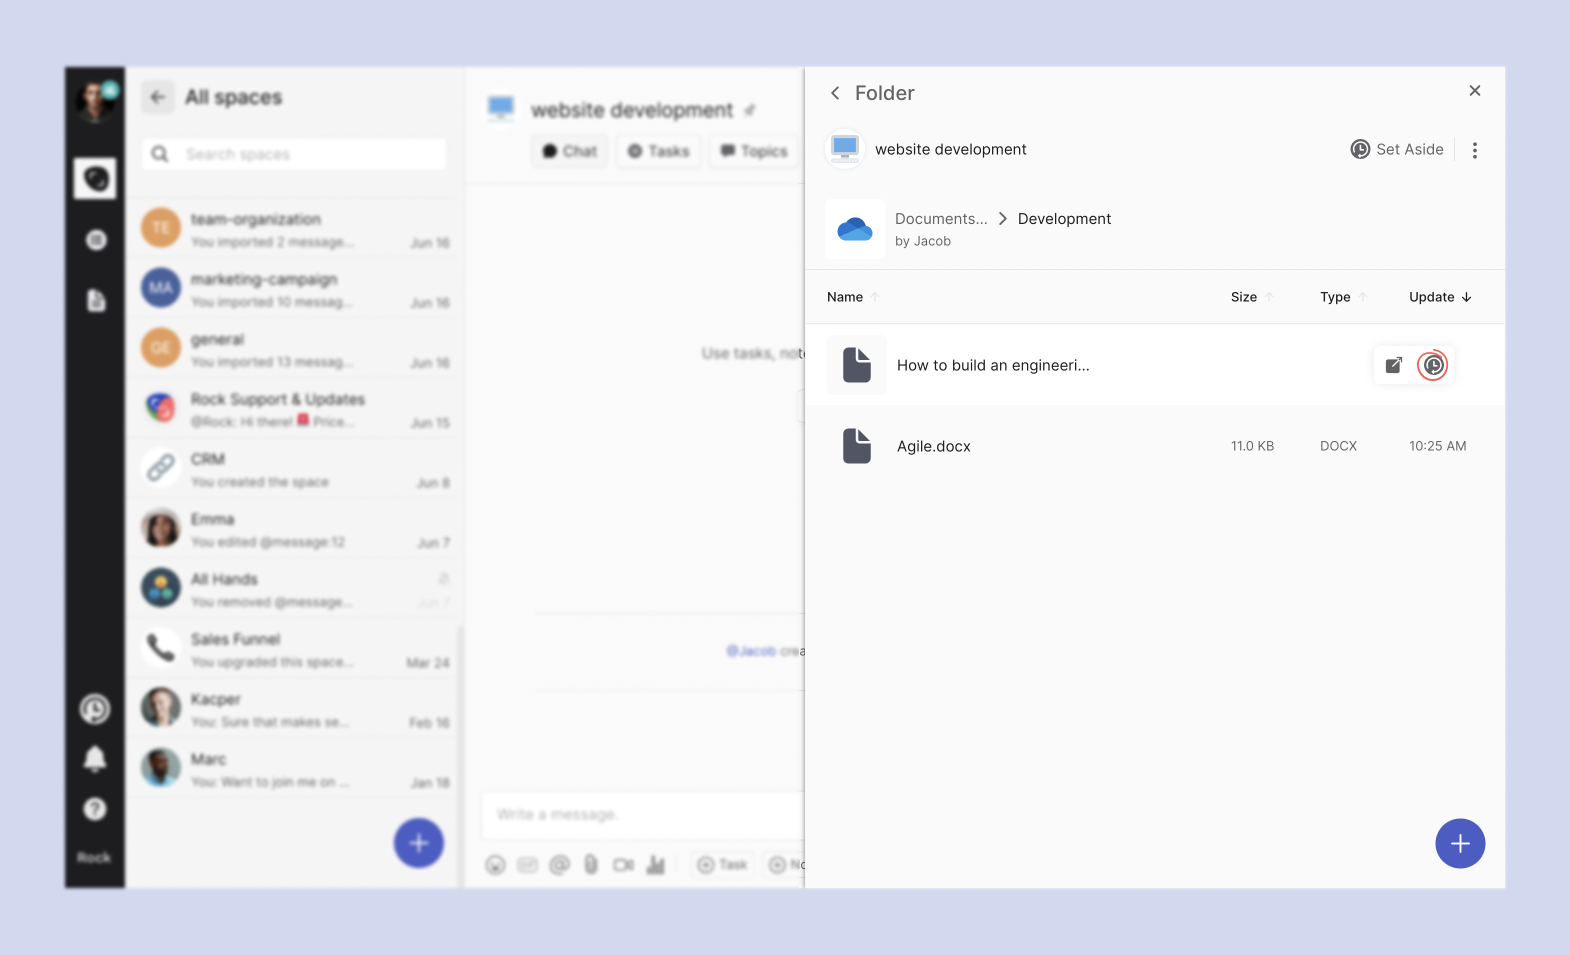
The second button is the Set Aside button, allowing you to Set Aside a folder or a specific file.
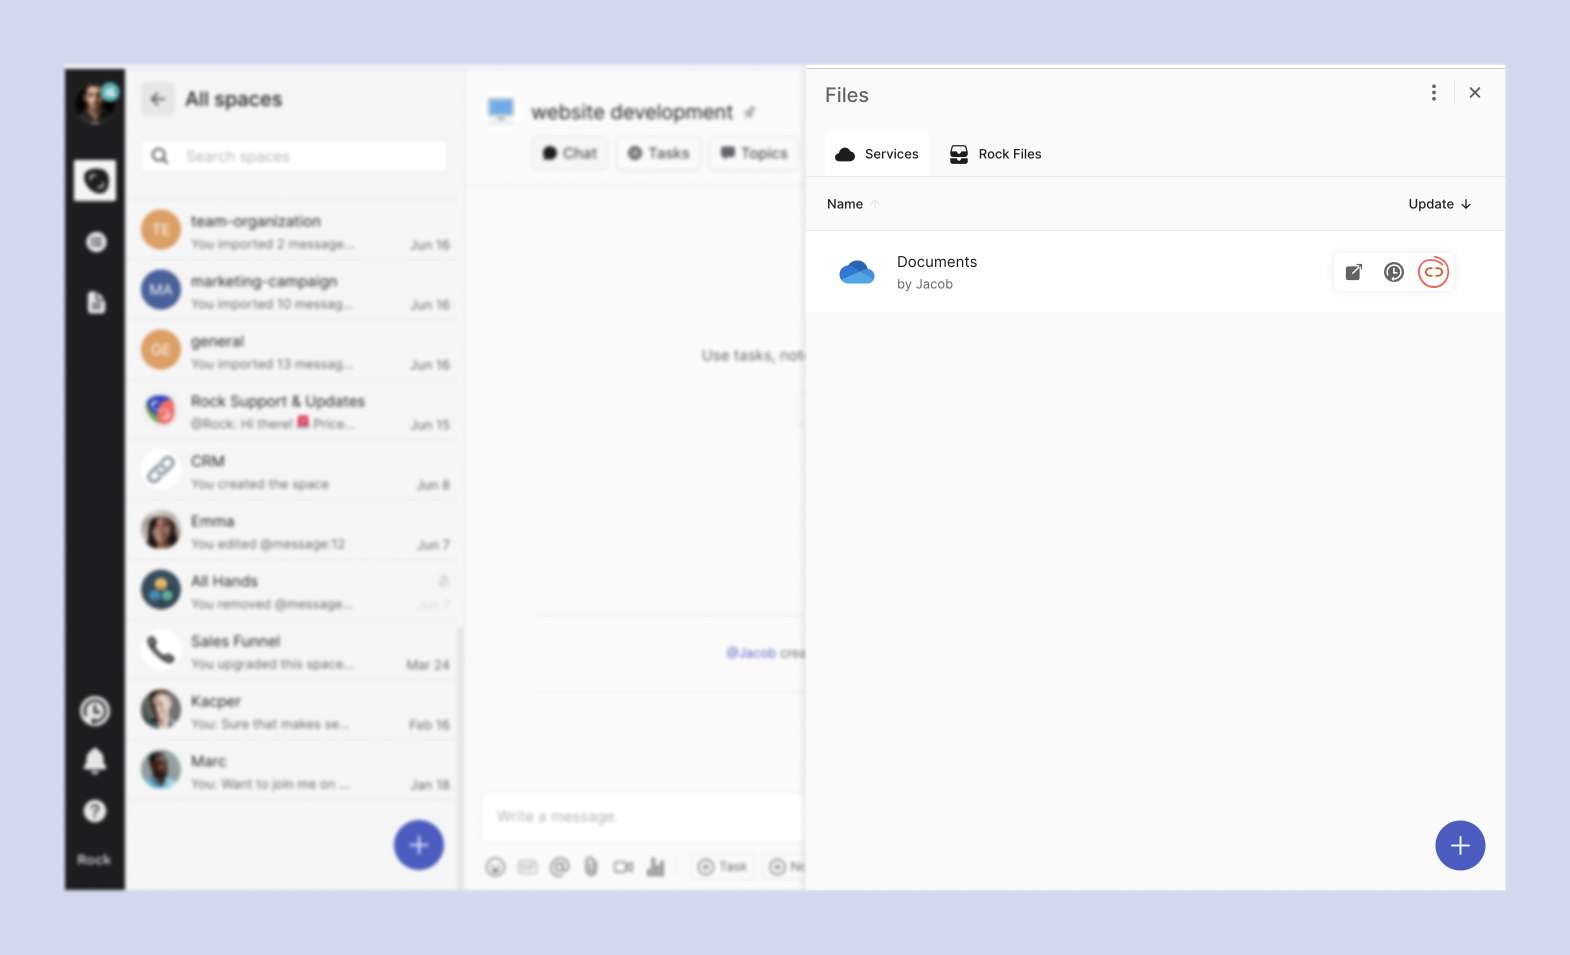
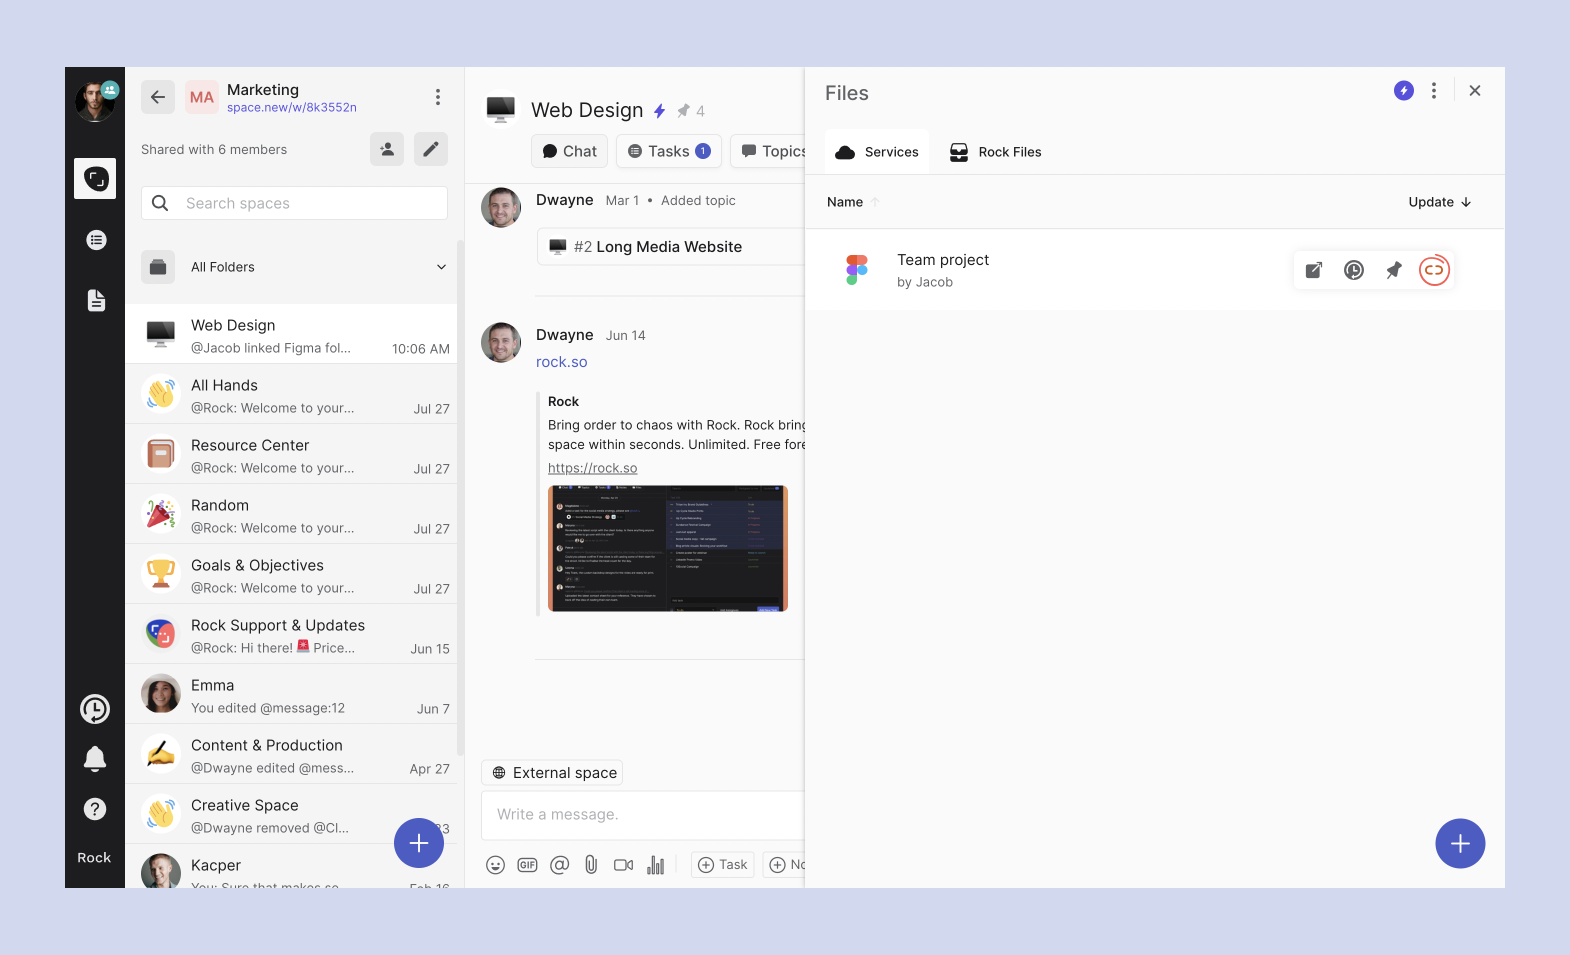
When hovering over a folder a third option will appear. Clicking on this option allows you to unlink the folder you initially linked to Rock. Unfortunately, you cannot unlink subfolders or files within the originally linked folder. This means you can only unlink the main folder you added to the space.
Using Your OneDrive files Across Your Rock Spaces
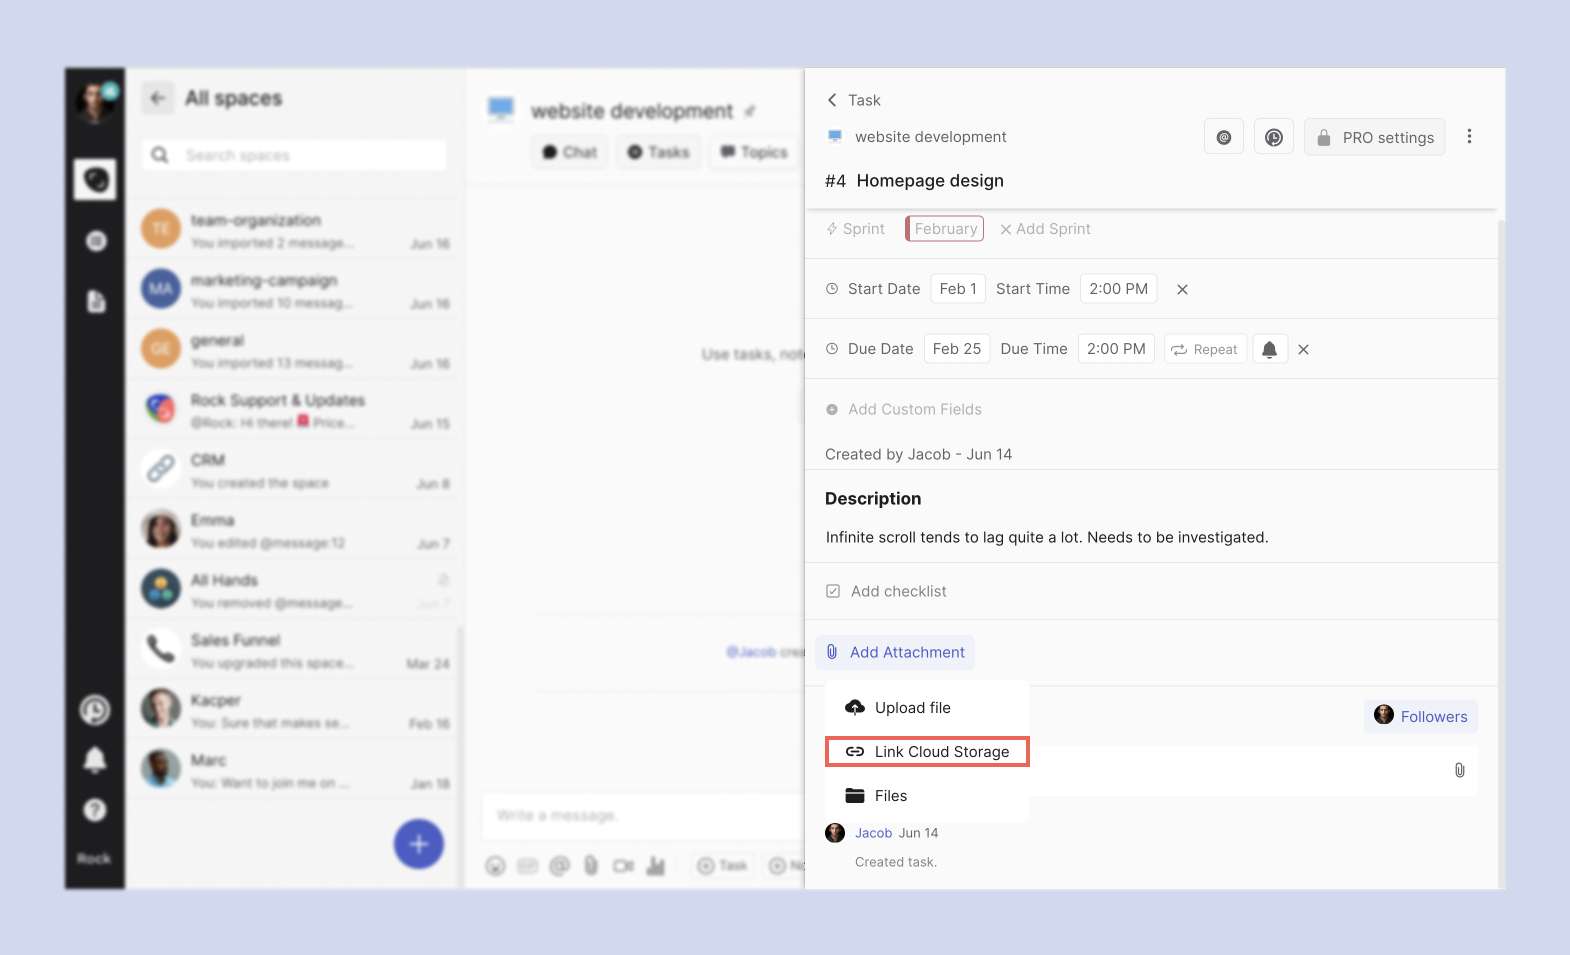
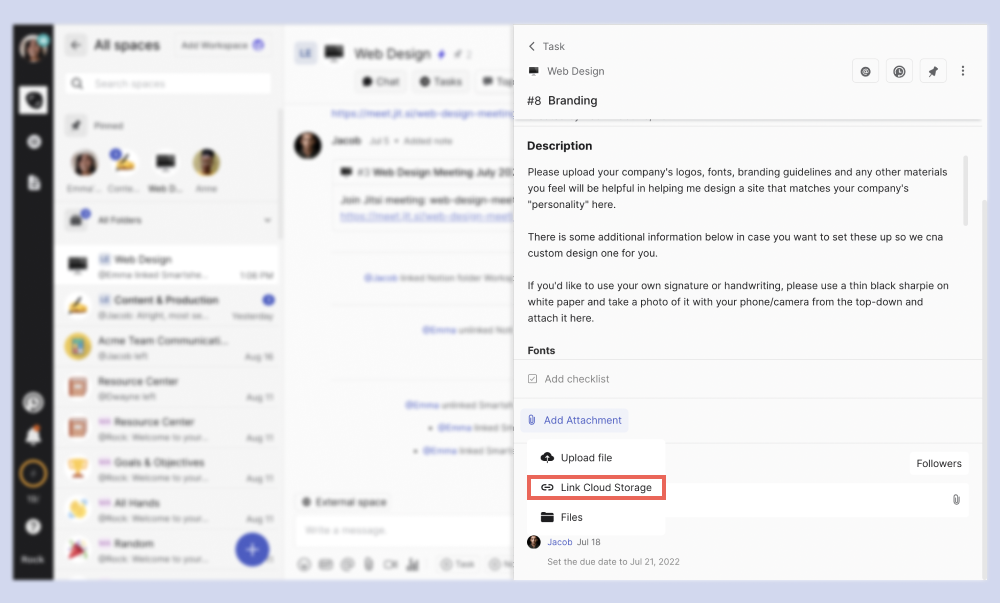
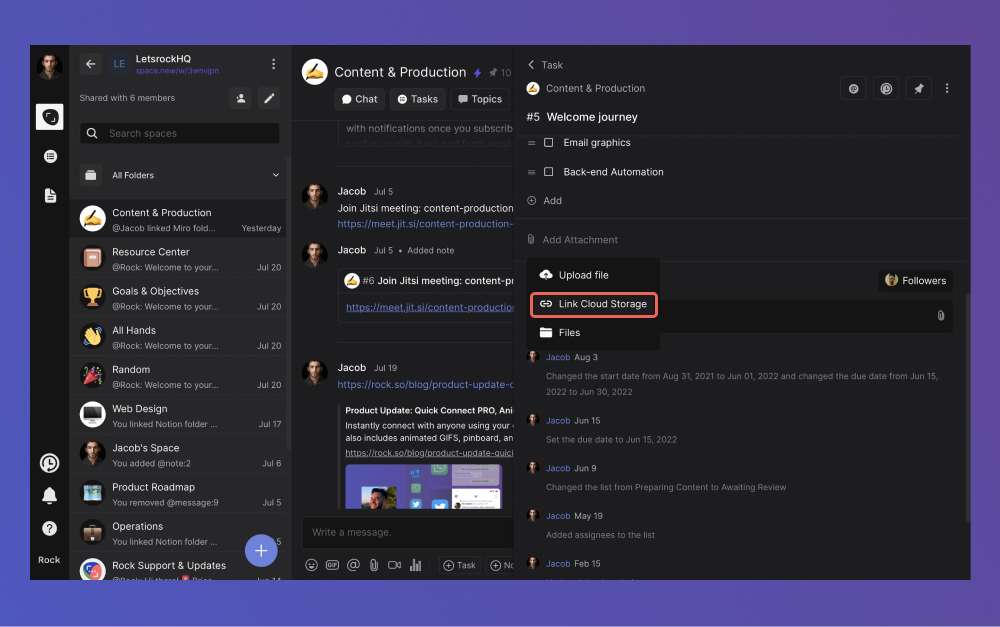
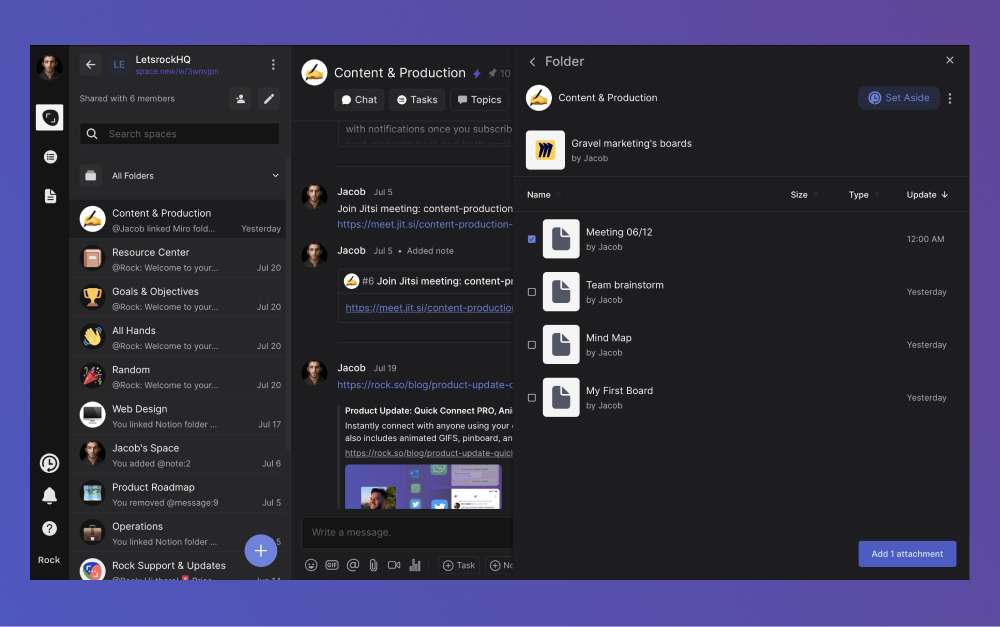
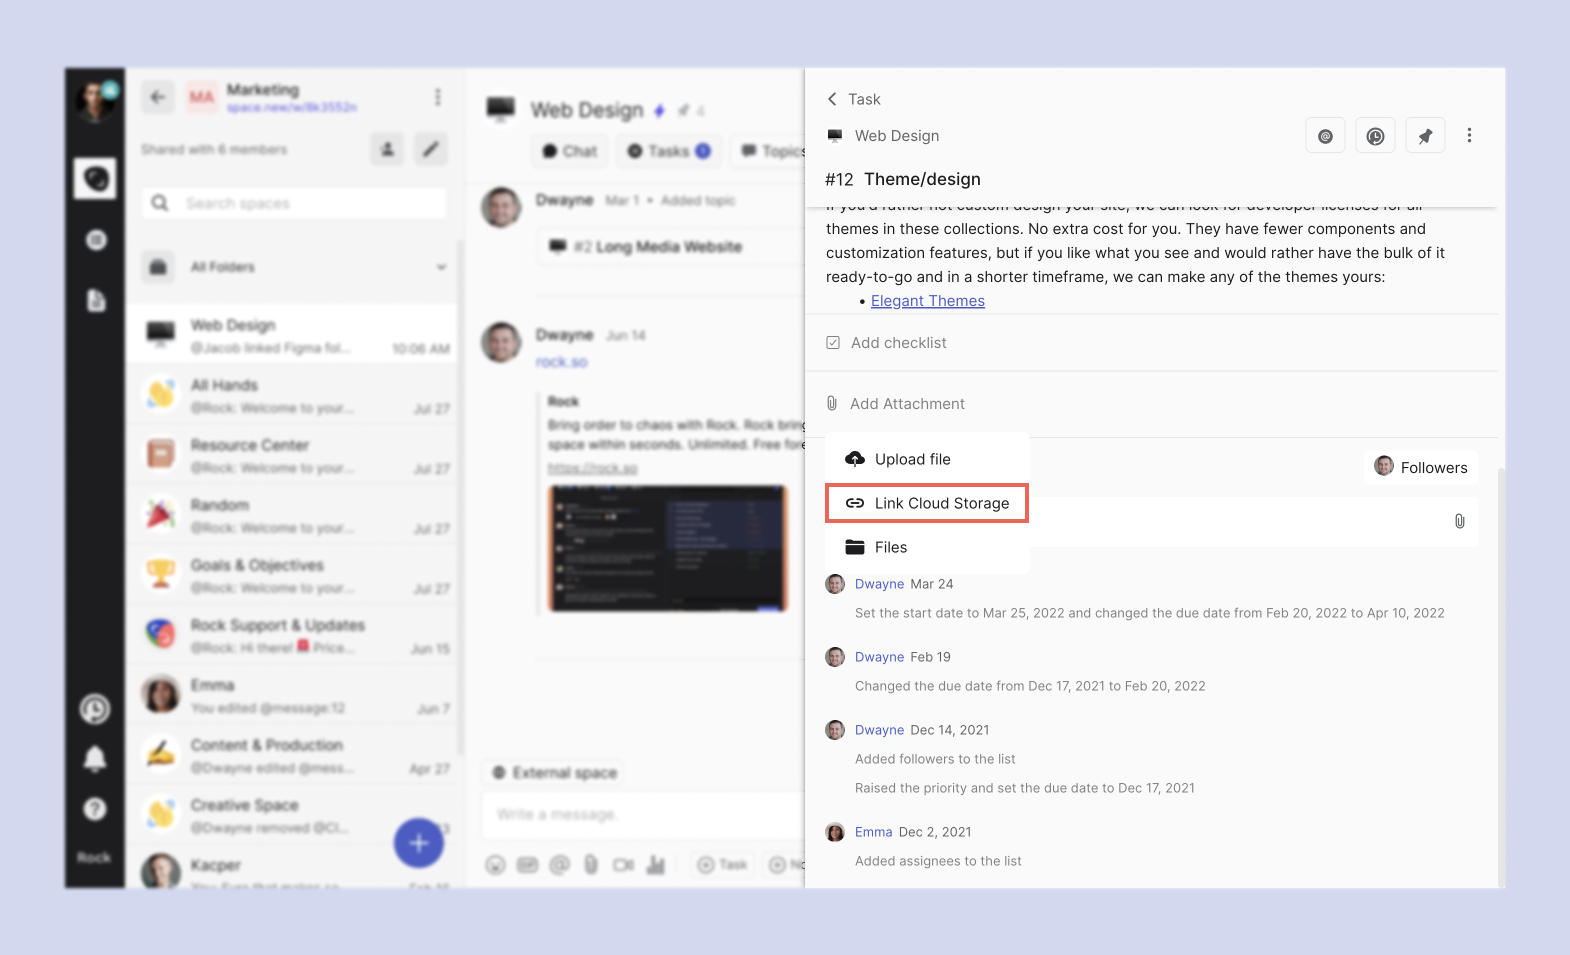
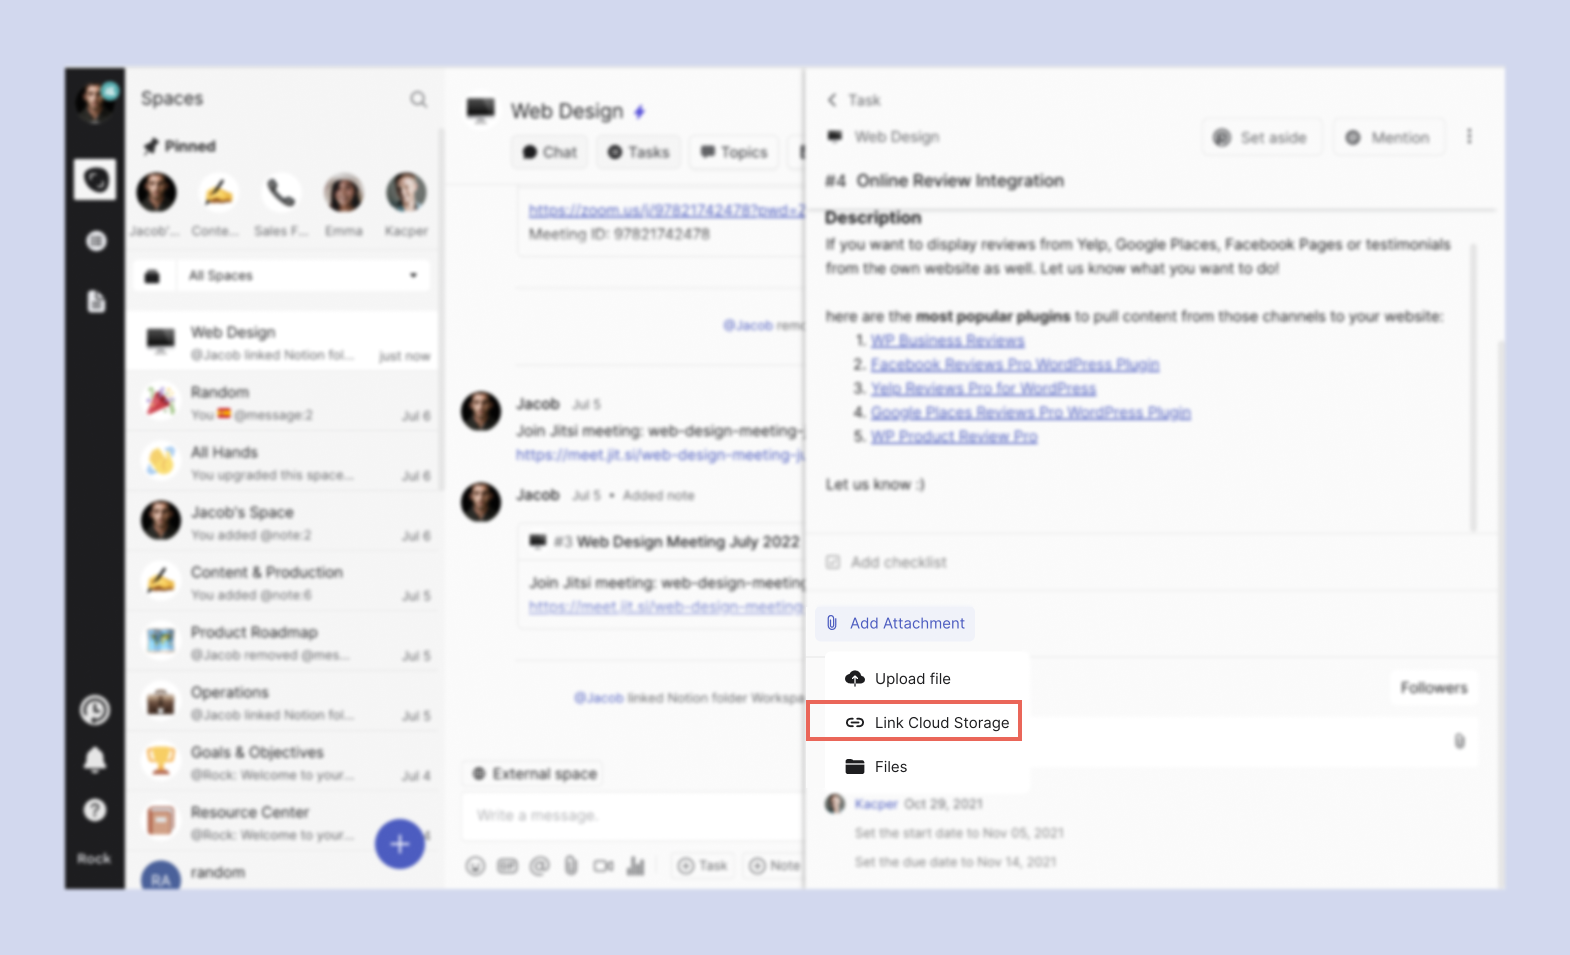
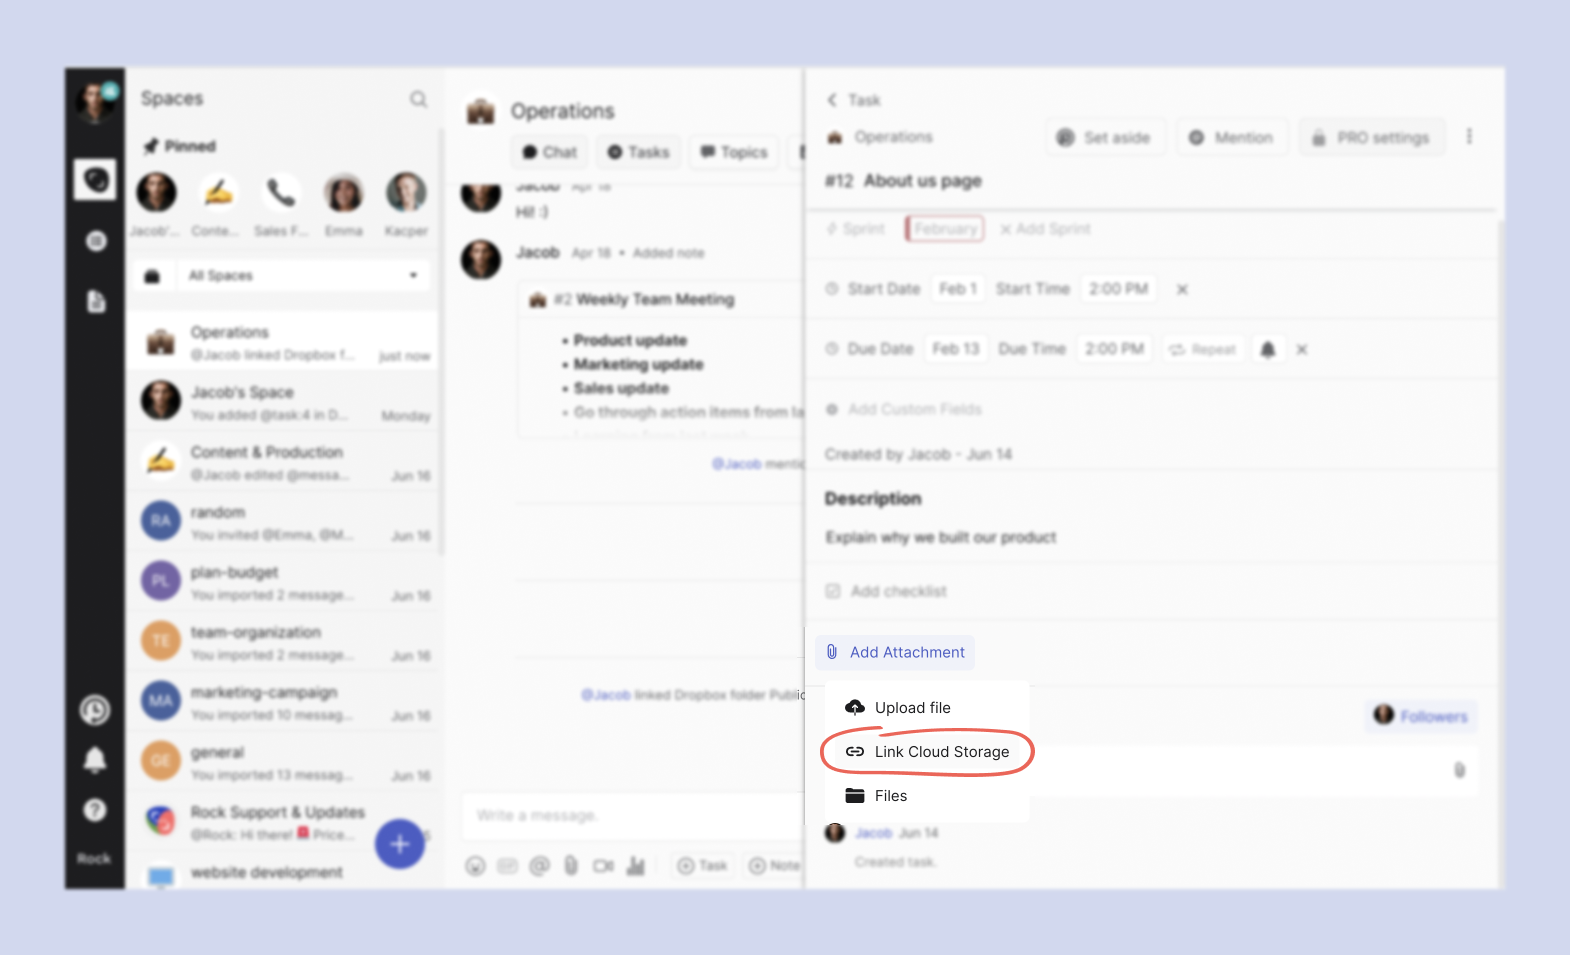
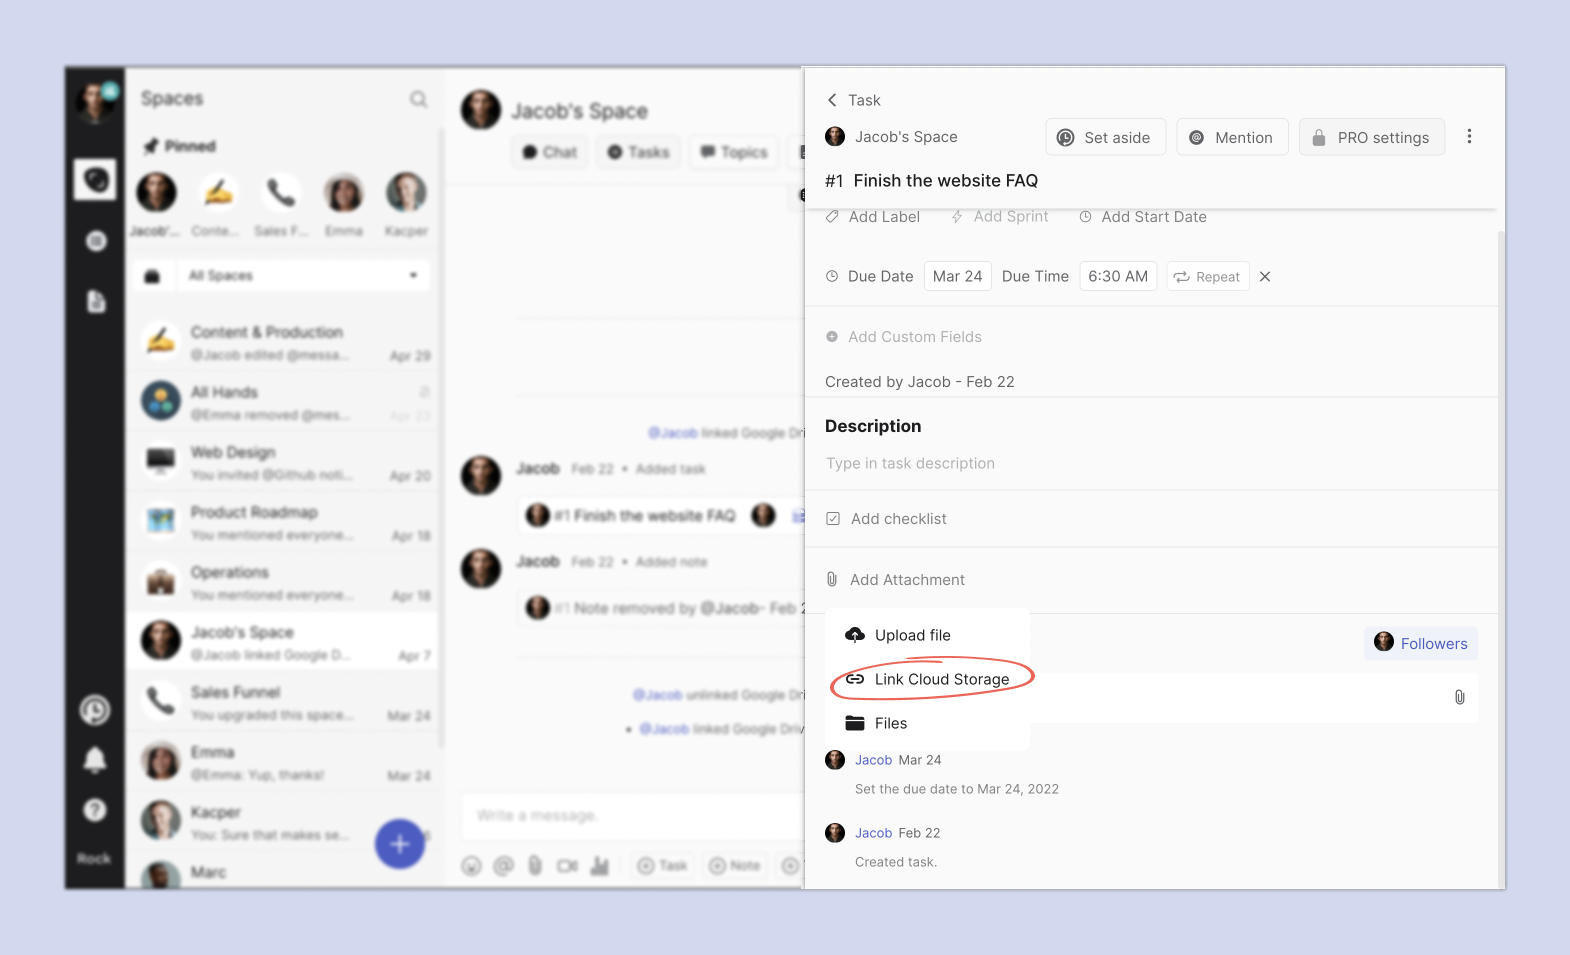
Once you can add your files to Rock, you can easily add these cloud-based files as attachments to your tasks and notes.
📝 Note: You can authorize cloud services via this feature if you don’t have anything authorized yet.You’ll need to click on the “Link Cloud Storage” option to link a folder or file to a specific task or note.
📝 Note: Linking files or folders to tasks doesn’t work when entering tasks in board view… for now.
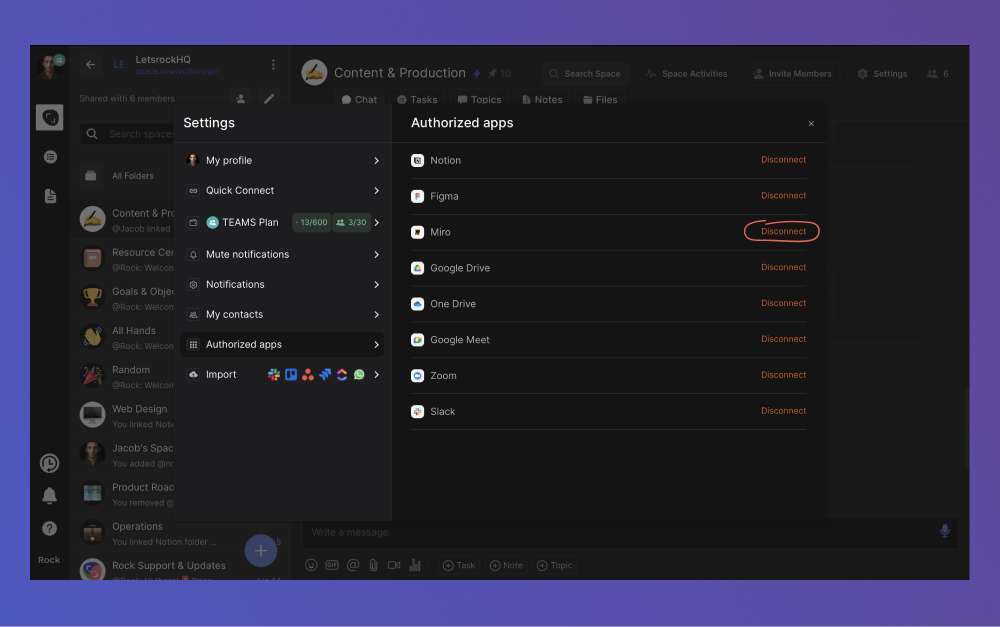
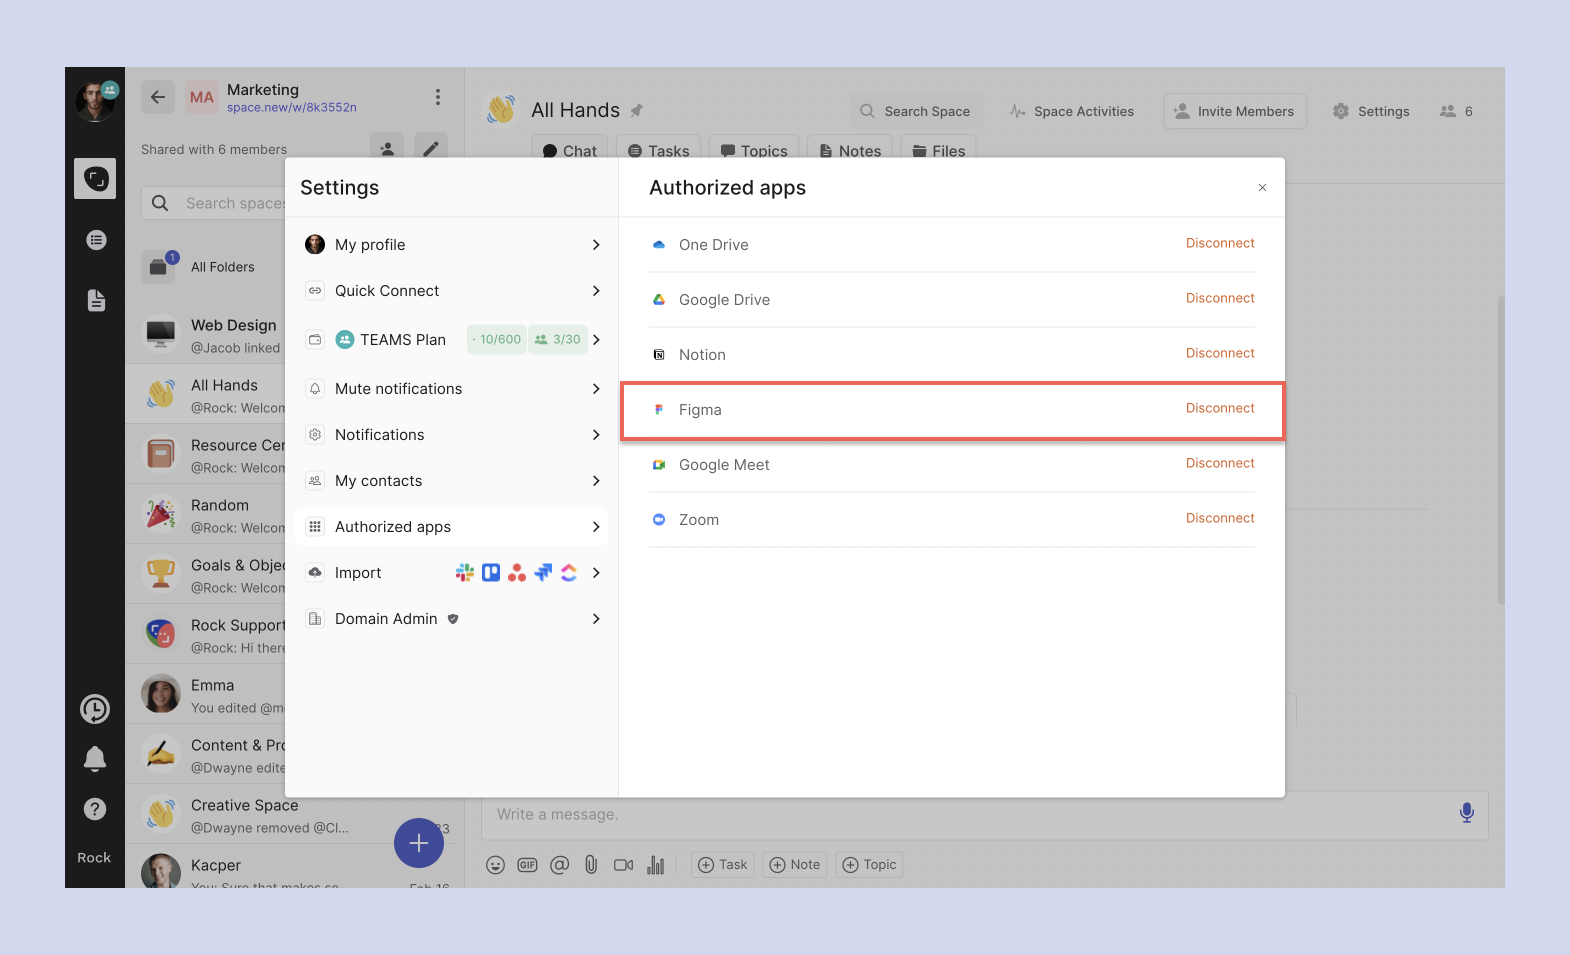
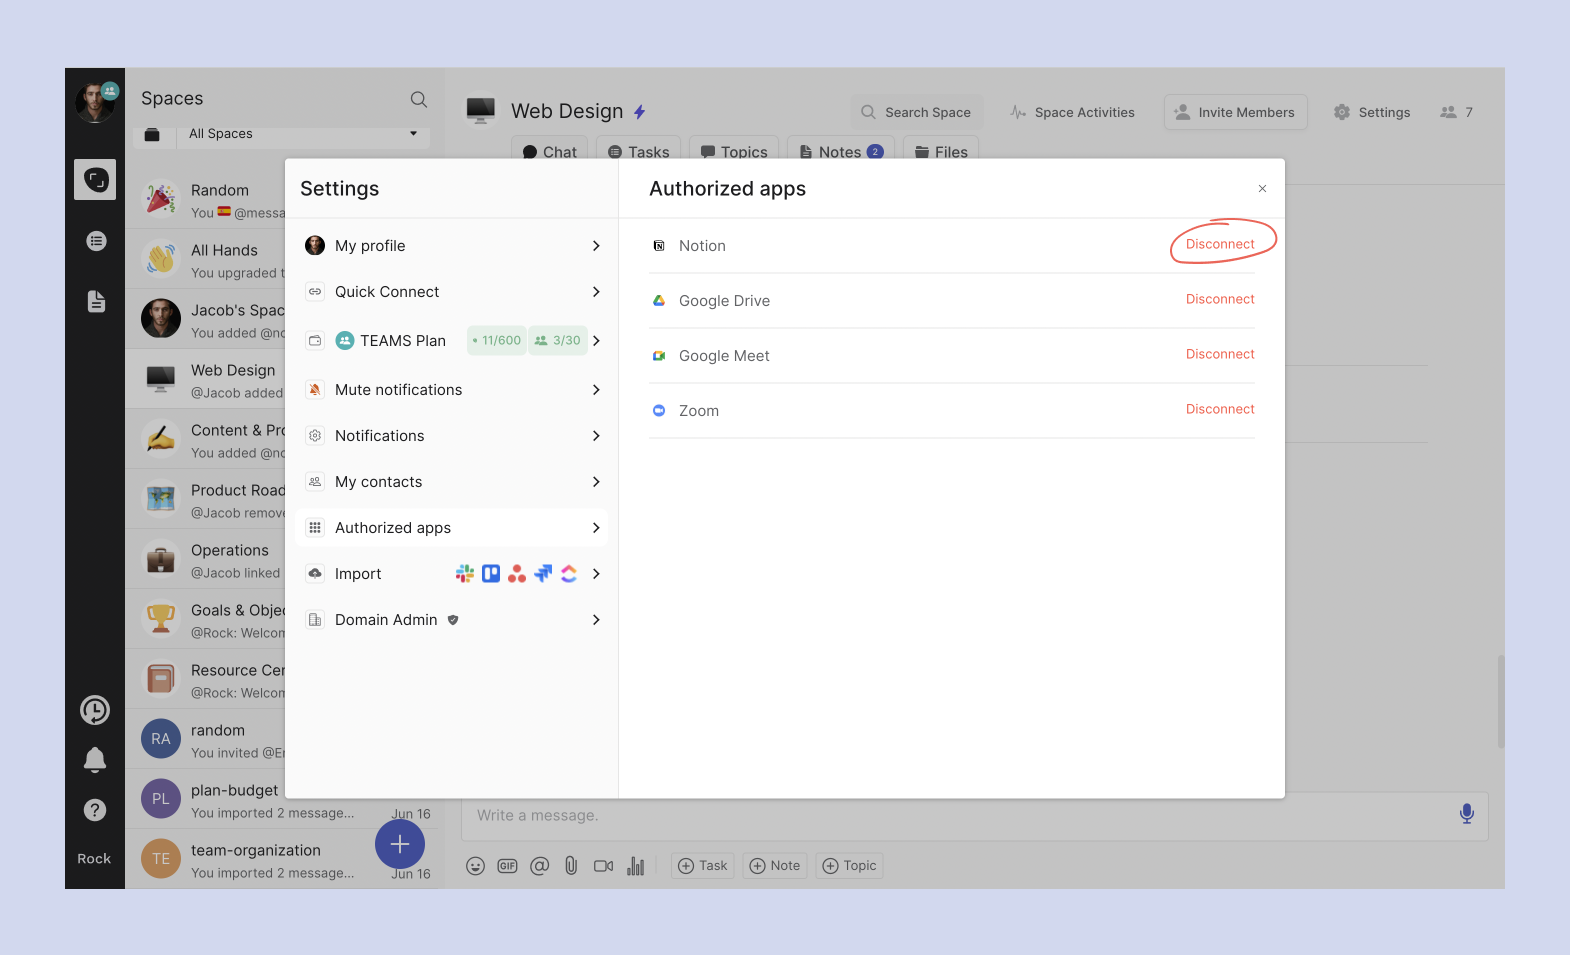
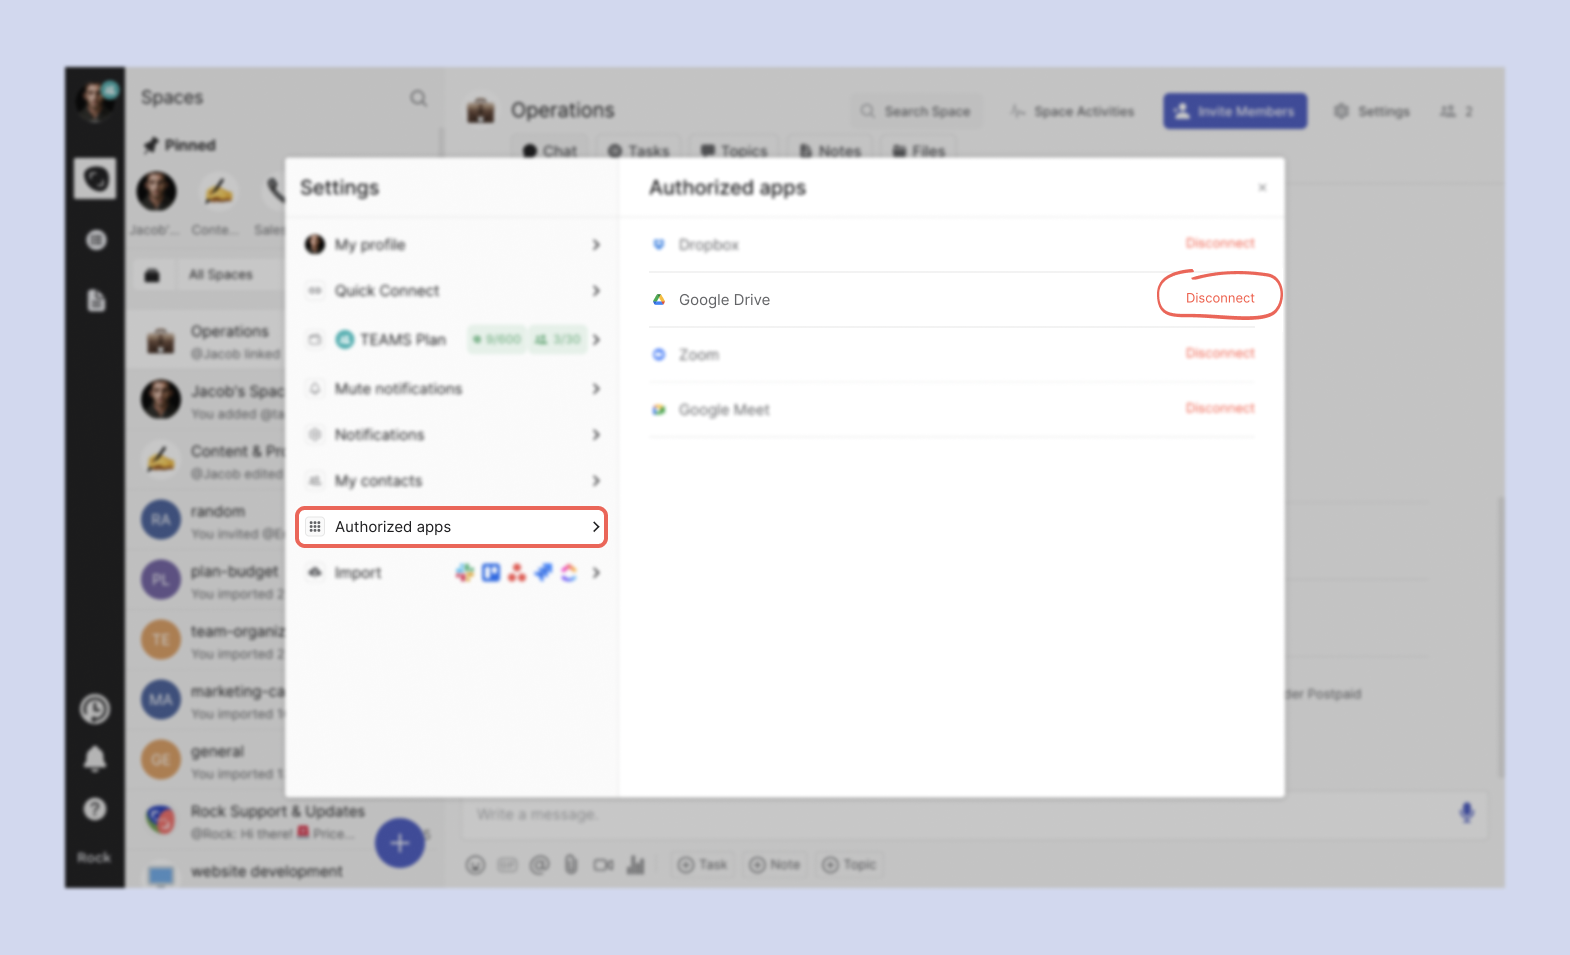
Removing the integration from a space
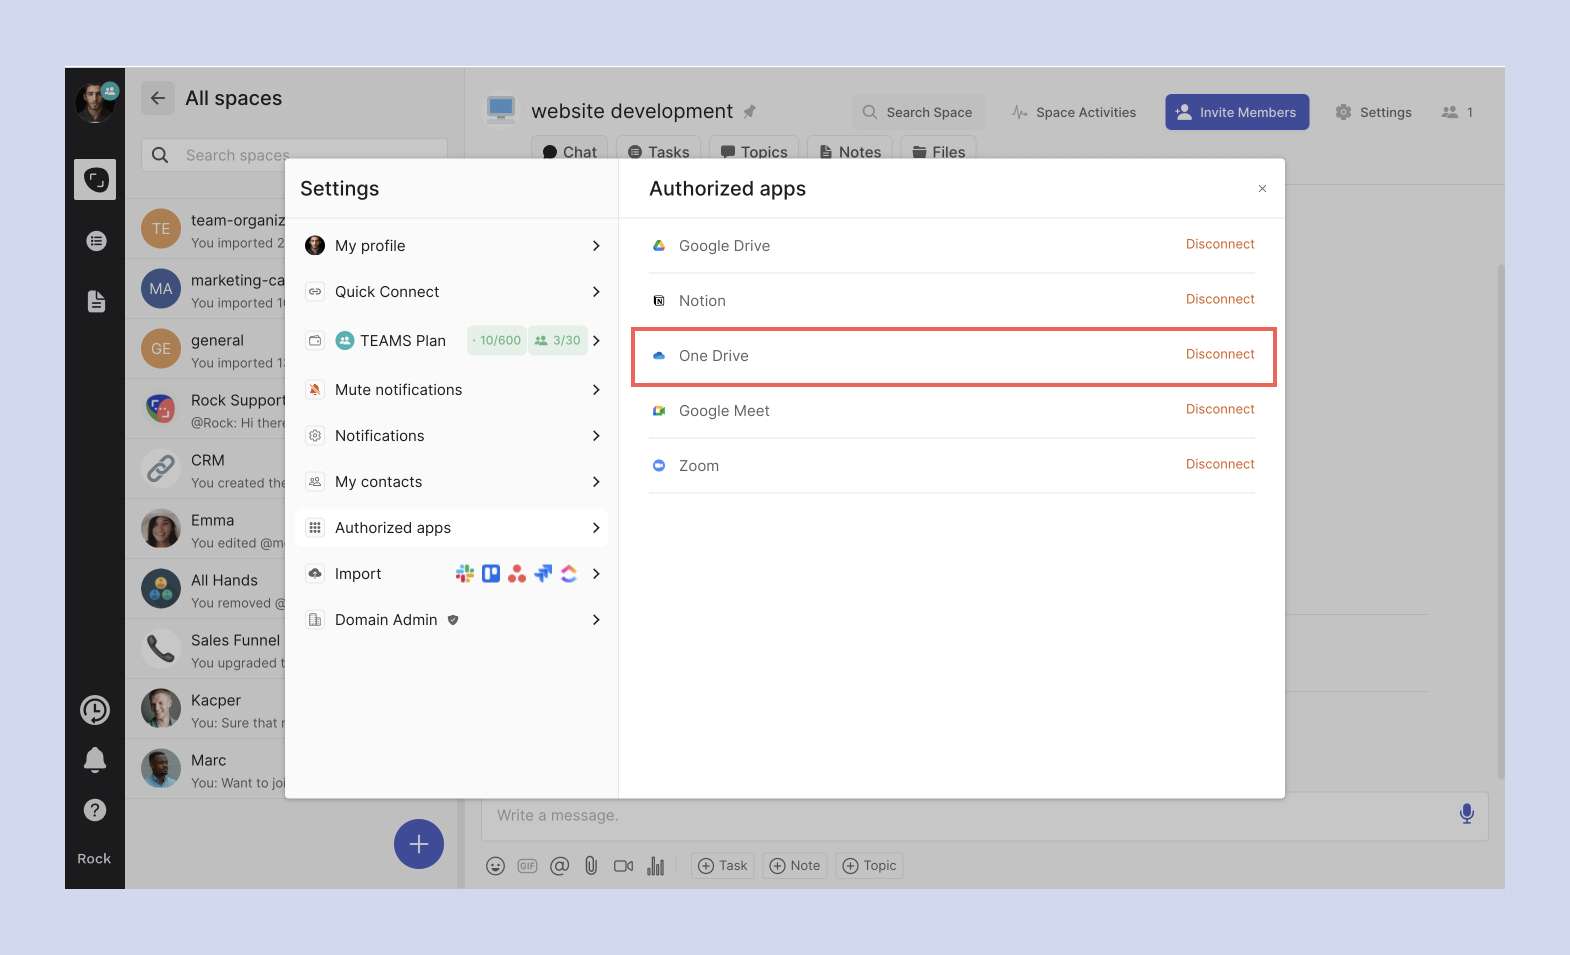
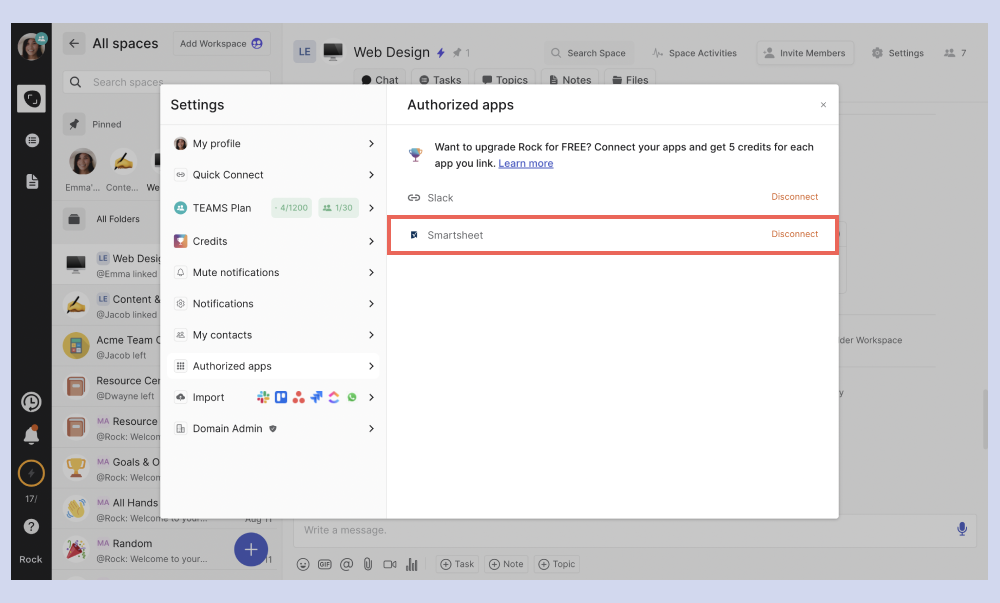
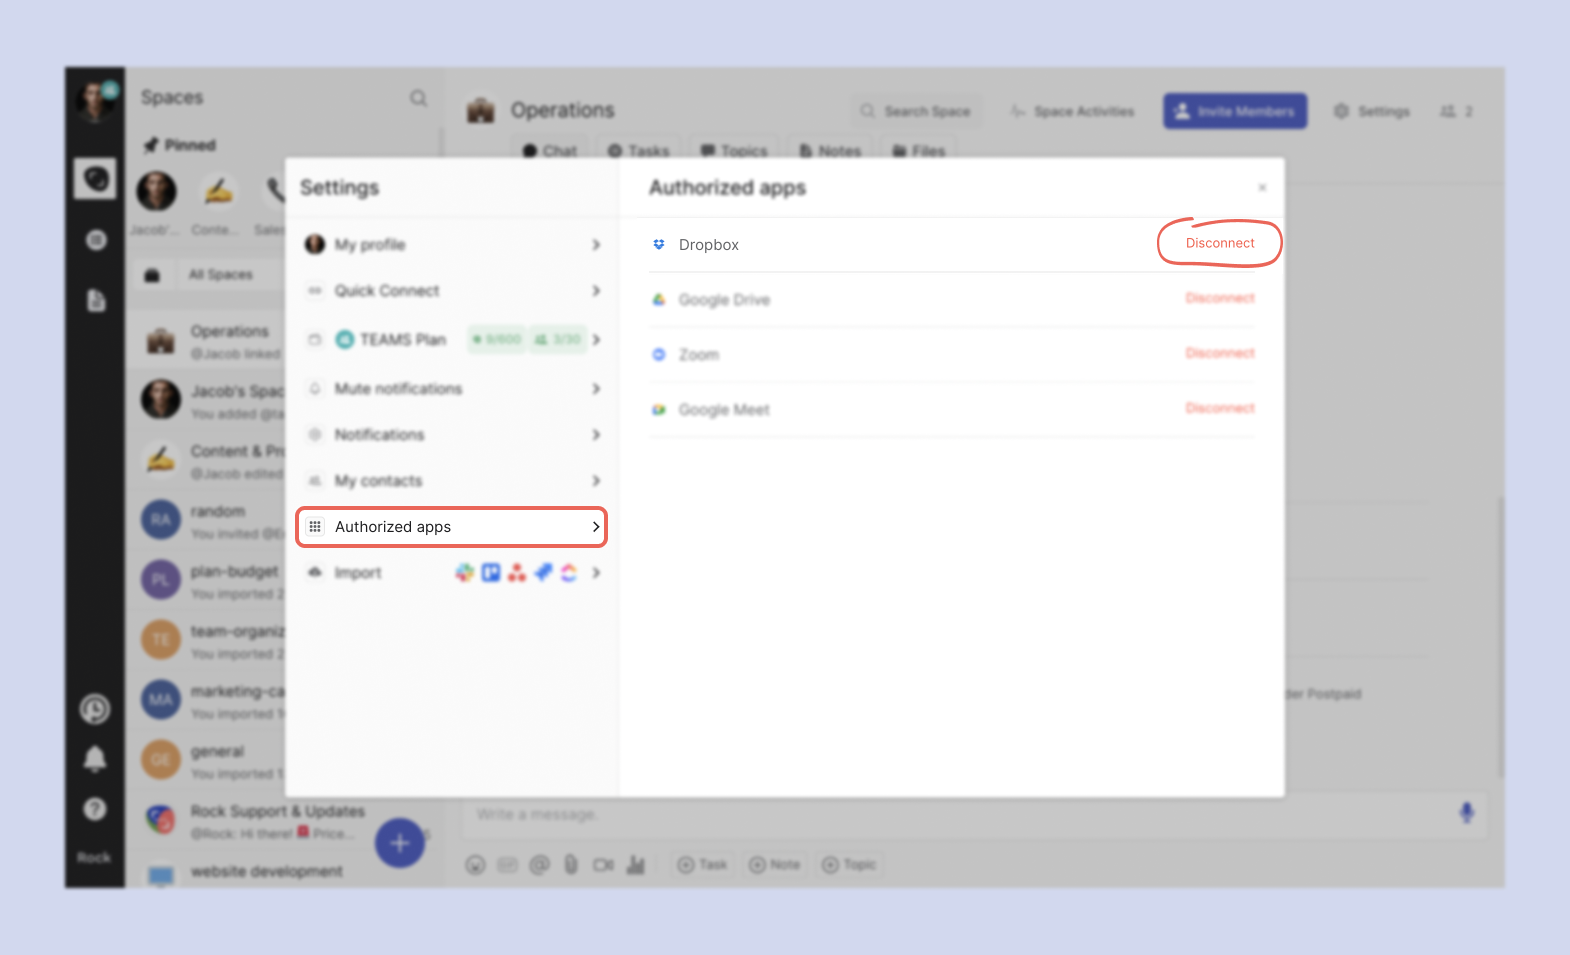
You can disconnect the OneDrive integration by going to user settings > Authorized Apps > press Disconnect.
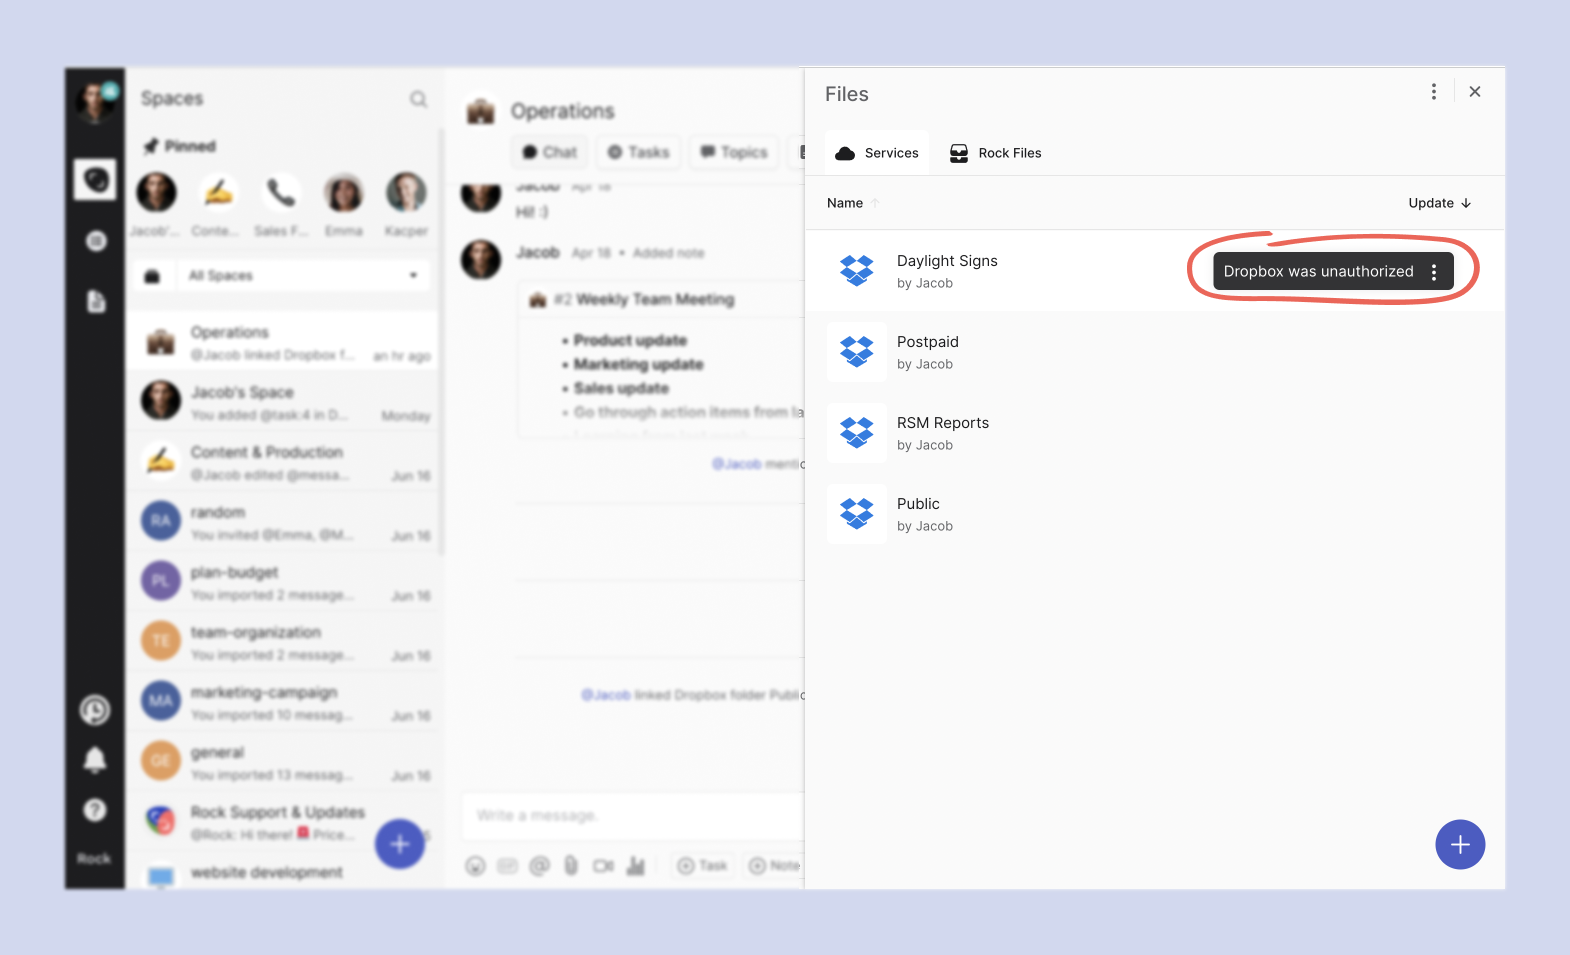
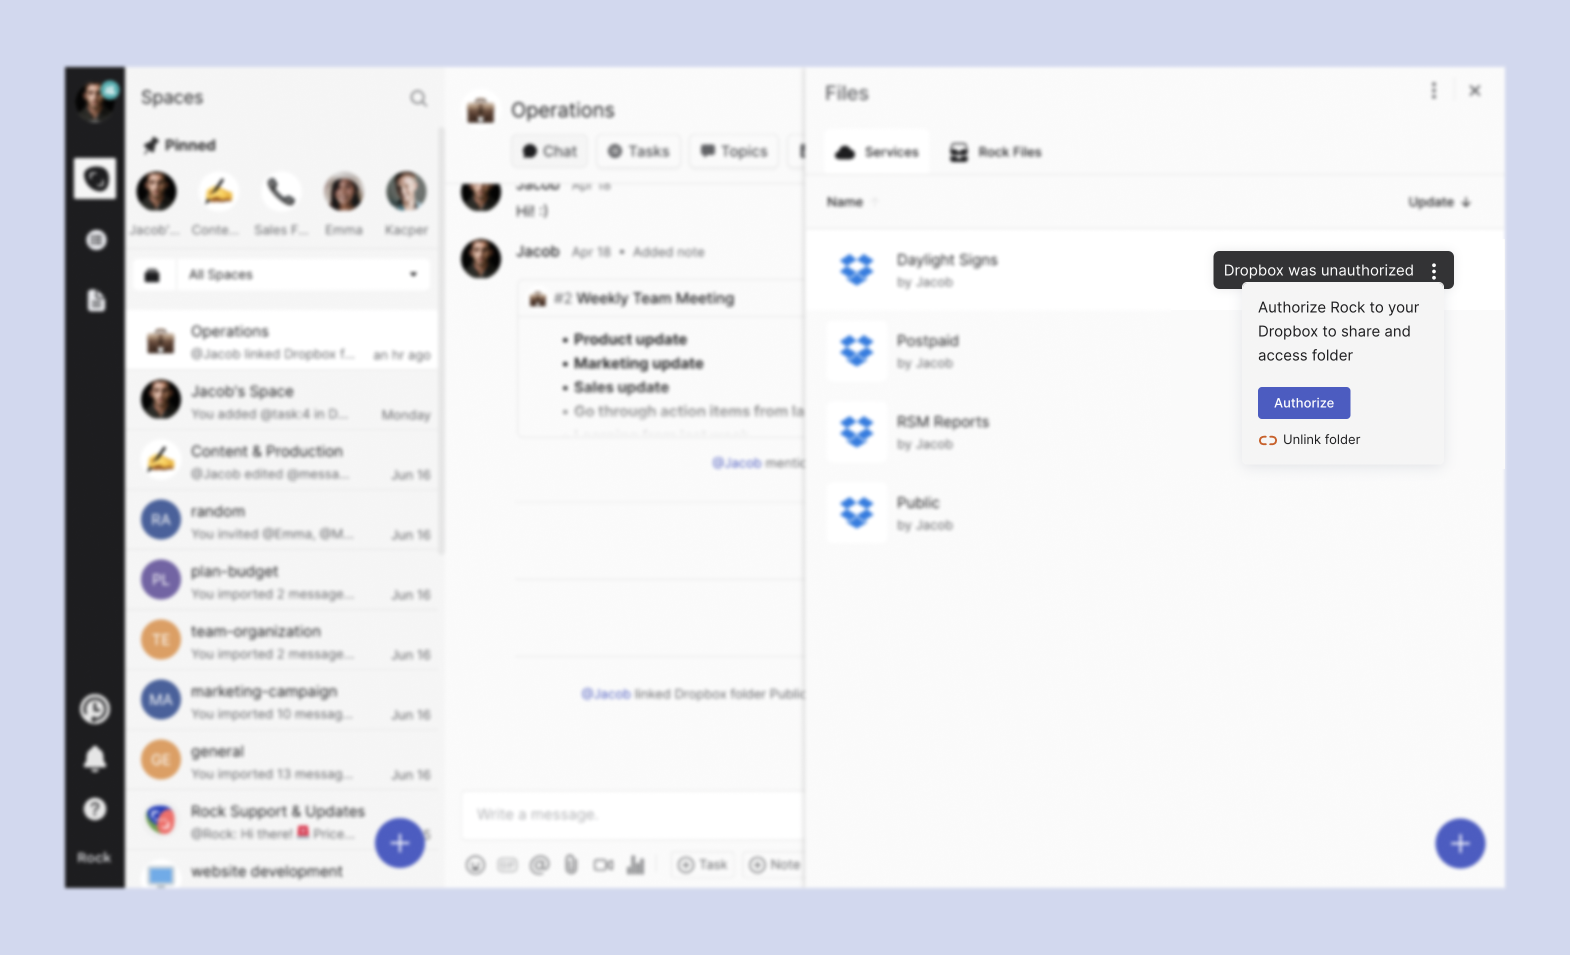
Once you remove the integration from your account, the connected pages and databases won’t be accessible in the linked spaces but will still exist in the Files mini-app. You can reauthorize access after disconnecting OneDrive on a previously linked file or folder. Once you re-integrate OneDrive, all files and folders in your different spaces will become available again.If you want folders and files not to be visible once you remove the integration, you will have to manually unlink the folders from your spaces. You can do this both before and after deauthorizing OneDrive.
Frequently Asked Questions on OneDrive
What happens to folders in the Files mini-app when someone leaves/is removed from a space?
When you leave or are removed from a space, your folders will be automatically disconnected from the Files mini-app. If you re-enter the space, you must manually add the folders.
What would happen to my folders and files if I were to delete my account?
When you leave a space, all folders you linked in that space will get unlinked. All files (attachments) uploaded to that space will remain accessible to other space members. The files and folders are fully erased if all members leave the space.
What happens to folders and files from suspended accounts?
Folders from suspended accounts will still be available for access in the space unless they are deleted or removed from the spaces where the files exist.
What happens if I move my folder to a different location on OneDrive? Will I have to add it again?
The folder will still be accessible in a space, but user permissions might change. Some users might gain or lose access depending on changes to the folder or the permissions available in the new destination.
What happens to folders in a space if they are deleted from OneDrive?
It will appear that we cannot find the folder, and no one will be able to access the information. Folders and files that are contents will disappear when reopened. You can unlink the deleted folder to remove it from your Files mini-app.
Can I give a user permission to access a folder from Rock?
No, you’ll need to grant access permissions to the user through OneDrive.
Can the Rock Team see what is inside the folders I connect to my spaces?
No, the integration adds the information to your space. We are not able to see what documents you have in your folder. Additionally, if users in space don’t have permissions, they won’t be able to access information, either.
Is there an upload limit to my folders in OneDrive?
Your linked files and folders do not take up space in your Rock account, so check your storage limits on OneDrive.
What happens to folders and files if everyone leaves a group space?
As soon as all members leave the space, all file storage information and integrations are removed.
Here at Rock, we look to make work more accessible and productive for teams across the board. Through Rock’s Smartsheet integration, you can easily access processes and project-related information that will allow you to collaborate better.
How to add Smartsheet to Rock ?
The Smartsheet integration on the Files mini-app is nifty because you’ll only need to integrate the service once, and you’ll be able to link sheets in any space you’re a part of and have the rights to edit tasks, notes, and topics.
Here are the steps to integrate Smartsheet to Rock:
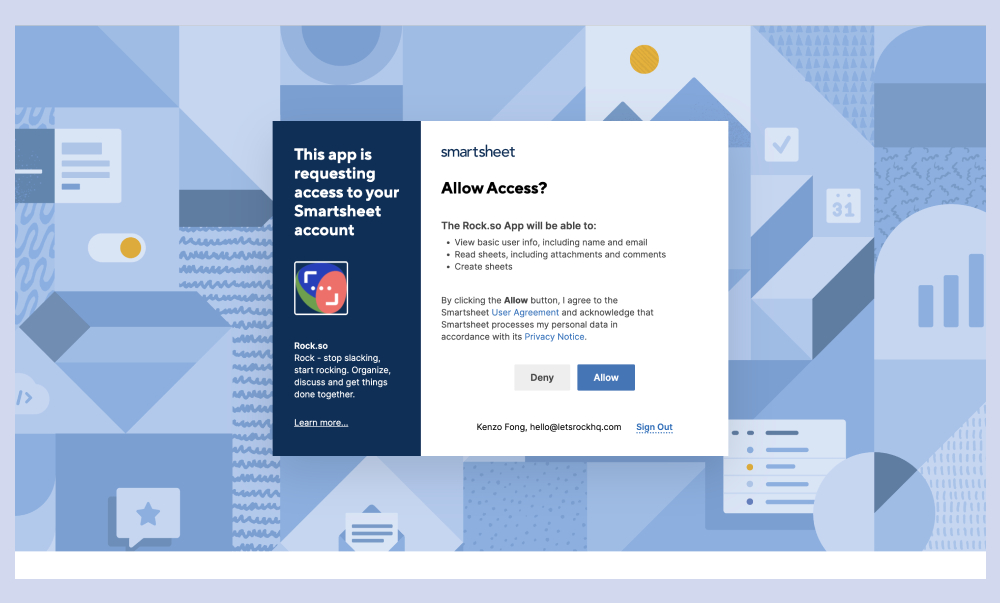
Step 1: Click on the Files mini-app in the main space window
Step 2: Click on Smartsheet in the storage selection.
A new tab or popup will open asking you to sign in to your Smartsheet account if you’re not logged in.
Step 3: You’ll be asked to allow Rock access to your Smartsheet account. If you cancel, the integration process will be aborted, and you won’t be able to link your sheets to Rock.
If you allow Rock access to your Smartsheet account, the integration will be successful, and you’ll be redirected to the space where you initially set up the integration.
A window listing all your Smartsheet Workspaces will allow you to choose which Workspaces you want to link to Rock. Workspaces are the “folder” equivalent of Smartsheet.
Adding SmartSheet Sheets to spaces?️
Once you’ve finished the integration of Smartsheet into Rock, you can add your Workspaces into the Files mini-app of a space. You won’t be able to add individual sheets into Rock, so ensure that all the sheets you want to add are nested under a Smartsheet Workspace.
When you link a workspace into Rock, all the sheets in that workspace will be accessible from the Files mini-app in your space. Click the Workspace name to view and access the sheets you can link.
📝 Note: Remember that Rock will only display sheets (grid, task list, projects, cards, etc.) but not reports and dashboards in the workspace.
📝 Note: Users will not be able to access the sheets in the spaces you have uploaded them into unless they have permission in Smartsheet. You also need to ensure that users are part of the space that they need files access to. Even if a user has all the necessary drive permissions, they won’t be able to access the files within Rock if they are not part of the space.
To go back to the Files mini-app panel or into a previous folder, press the < Folder on the top left corner of the panel.
Since you’ve already successfully integrated a cloud storage service and have added folders to the Files mini-app, you can use the blue + button on the lower right-hand corner of the Files view to add more drive services.
Files Hover Buttons?️
If you want to open a Smartsheet workspace or sheet in a new tab, you can press this button to open the database or sheet on Smartsheet.
The second button is the Set Aside button, allowing you to Set Aside a folder or a specific file.
The sheet or workspace will then appear on the set aside panel.
The third button is the pin button. Pressing this button adds the workspace or sheet to your space’s pinboard.
Clicking the pinboard button will open the pinboard, where you’ll see your pinned workspace or sheet.
The fourth button is the unlink button, which allows you to unlink the workspace you initially linked to Rock. You cannot unlink the individual sheets within the linked workspace.
Using Your Smartsheet Sheets Across Your Rock Spaces?
Since you’ve integrated your Smartsheet workspaces and sheets onto Rock, you can easily add these cloud-based files as attachments to your tasks and notes by clicking on "Add Attachment" and then "Link Cloud Storage." By the way, you can also authorize cloud services via this feature if you don’t have anything authorized yet.
📝 Note: Linking files or folders to tasks doesn’t work when entering tasks in board view…for now.
Removing Documents or the Integration from a Space ✂️
Removing workspaces or sheets
You can remove workspaces uploaded to a space by pressing the red unlink button.
Everything inside the workspaces or sheets won’t be accessible in the space but will still exist in its owners’ Smartsheet account. Don’t worry. You can always link a workspace to the space if needed.
You’ll need to have admin permission in the space to remove others’ workspace. However, anyone can remove their uploaded workspace, even those former members or admins who have been downgraded to a guest role.
You can only remove the workspace. You can’t remove the individual sheets nested within the workspace. If you want to remove access to a particular sheet, you can either:
Remove the information from the workspace in Smartsheet.
Or unlink the workspace and manually add the sheets you want to add, except for the ones you don’t want to be visible in the space.
Removing the integration
You can remove the SmartSsheet integration by going to user settings > Authorized Apps > pressing Disconnect.
Once you remove the integration from your account, the connected pages and databases won’t be accessible in the linked spaces but will still exist in the Files mini-app.You can reauthorize access after disconnecting Smartsheet on a previously connected sheet. Once you re-integrate Smartsheet, all linked workspaces in your different spaces will become available again.
If you want your pages and databases not to be visible once you remove the integration, you will have to unlink the folders from your spaces manually. You can do this both before and after deauthorizing Smartsheet.
Frequently Asked Questions About the Smartsheet Integration ?
What happens to workspaces and sheets that I linked in the Files mini-app if I leave/am removed from a space?
When you leave or are removed from a space, your linked workspaces and sheets will be unlinked from the Files mini-app. If you re-enter the space, you will have to link the items again.
What would happen to my workspaces and sheets if I were to delete my account?
When you delete your Rock account, all cloud services you integrated will be disconnected, and all items you linked will be unlinked.
What happens to workspaces and sheets from suspended accounts?
Workspaces and sheets from suspended accounts will still be available for access in the space unless they are unlinked or are deleted from their drive services.
What happens if I move my pages to a different location on Smartsheet? Will I have to add it again?
The items will still be accessible in a space, but user permissions might change. Some users might gain or lose access depending on your changes or the permissions available in the new destination.
What happens to items in a space if they are deleted from Smartsheet?
It will appear that Rock cannot find the item, and no one will be able to access the information. Workspaces and sheets that are contents will disappear when reopened. You can unlink the deleted folder to remove it from your Files mini-app.
Can I give a user permission to access an item from Rock?
No, you’ll need to grant access permissions or send invites to the user through Smartsheet.
Can the Rock Team see what is inside the folders I connect to my spaces?
No, the integration adds the information to your space. We cannot see what documents you have in your database or workspace. Additionally, if users in space don’t have permission, they won’t be able to access information.
Is there an upload limit to my folders in Dropbox?
Upload limits are irrespective of Rock. Storage limits are dependent on the storage quota of the cloud service.
What happens to the Files items if everyone leaves a group space?
As soon as all members leave the space, all files, mini-app storage information, and integrations are removed.
Import your chats from WhatsApp to different 1:1 or group spaces on Rock. This makes it easier for anyone to migrate their conversations from WhatsApp to Rock without losing the chat history.
Continue exchanging messages with the same team members while also getting access to tasks, notes, files, and meetings in every space on Rock. Rock is a WhatsApp alternative that allows you to do so much more than just messaging.
How can I export a chat out of WhatsApp?
You can export any chat from WhatsApp within seconds. Follow these simple steps to export any group or 1:1 chat from WhatsApp:
Enter WhatsApp and enter your user settings by clicking on the gear icon.
Select ‘chats’ from the option menu.
Select ‘Export Chat’ from the option menu
Select the chat you would like to export from the menu
5. You can select either ‘Attach media’ or ‘Do not attach media’. Note that when media is attached the actual files are currently not yet uploaded, only their names.
6. Export the chat and save the zip file on your device (make sure not to unzip it before uploading it to Rock in the next section) or directly select Rock from the apps menu.
How to import a WhatsApp Chat to Rock
1. Import a chat directly after export
You can directly export a chat to Rock when saving. When looking at the different available apps to share it to, select Rock. This will directly start the import process.
After that, you can continue the import process by following the section below from step 4.
2. Import a chat manually from Rock
You can import a chat within Rock within a few simple steps:
Go to user settings and scroll down to the ‘importers’ section
Select import from WhatsApp in the panel
Select the zip file of the WhatsApp chat that you would like to add.
Select the Rock space you want to import your WhatsApp chat to or create a new space to host the messages.
5. [Optional] Map the users you are importing: Directly invite WhatsApp users to Rock so messages are assigned to the correct sender. You can add team members through email or phone number and set their messages to be directly associated with them. Mapping automatically invites users to a space, if you don’t map, then messages cannot be connected to users in the future.
📝 Note: If users are not yet on Rock they will receive an email invite to the space you imported, make sure to add their email.
6. Confirm the import.
7. Success! Your messages and users will now be added to a Rock space. You will see a notification and an ‘imported’ tag to imported messages. New messages will not have this tag.
Add your WhatsApp files to Rock with a Google Drive integration
While the original import does not directly import your files, you can still make all WhatsApp files accessible in your Rock space with a Google Drive integration.
1. After exporting your chat, import it to Google Drive or another location.
2. Download the zip on a device and unzip it to view all the files.
3. Upload all files from your zip folder to a Google Drive, Dropbox, or OneDrive account.
5. Success! You can now access all your WhatsApp files right from within the Files mini-app.
Accepted locales for importing chats to Rock
The import from WhatsApp functionality currently supports the following locales:
- English/Australia
- English/Canada
- English/India
- English/UK
- English/USA
- French/Canada
- French/France
- German/Germany
- Hindi/India
- Italian/Italy
- Japanese/Japan
- Korean/Korea
- Polish/Poland
- Portuguese/Brazil
- Portuguese/Portugal
- Russian/Russia
- Russian/Ukraine
- Spanish/Mexico
- Spanish/Spain
- Ukrainian/Ukraine
Other locales might work but have not been tested. If you are trying to import from WhatsApp and your locale is not accepted, first check whether you exported the chat without files.
If your import is still not working after that, please reach out to us in the Rock Customer Support Space or through this link.
Questions and answers
Can I import multiple chats into one space?
It is possible to import multiple chats into one space. Note that it might become harder to find back information as you import large amounts of information from different WhatsApp chats.
Can I import the same chat into multiple spaces?
You can import the same chat into as many spaces as you want. Both 1:1 and group.
Does the import directly invite my team members?
Yes, team members are directly added to spaces or invited upon adding their email or phone number.
Can I not assign any messages to anyone?
Sure, you can choose not to map any of the importers.
Can I import 1:1 conversations to 1:1 spaces on Rock?
Yes, you can import your 1:1 conversations to as many 1:1 or group spaces as you want.
Does the import from WhatsApp feature on Rock support file uploads?
No, the feature does currently not support file uploads, so make sure to tick ‘export without files’ for the time being.
Is import from WhatsApp completely free?
Yes! Import from WhatsApp as many times as you want for free.
Why should I import my chat from WhatsApp to Rock?
Importing your chats to Rock makes it easier for team members to get used to the functionality. As you can continue conversations nothing is lost but you can now start creating tasks, notes, topics and send unlimited messages for free.
Why is Rock better than WhatsApp?
Besides sending messages, you can create unlimited tasks, notes, and topics with anyone in and outside of your team. Learn more about why Rock is better than WhatsApp here.
I invited someone and they did not accept, will their messages disappear?
No, their messages will not disappear if they fail to accept your invitation.
I want to map a user differently after an import, can I still do that?
No, it’s currently not possible to map a user differently after you have imported your messages, so make sure to map all correct user emails in a space. Alternatively, you can create a new space and do the import there. This would allow you to assign the correct people to their respective messages while importing the chat again.
Integrate your collaborative whiteboards from Miro to the Files mini-app, available in every Rock space. Use the Miro integration to quickly access retrospectives, brainstorming docs, or other important information.
How to integrate your Miro to Rock
Integrate Miro to your Rock account by following these simple steps:
1. Select the Files Mini-app in a space
2. Select Miro from the available options (you can directly select the cloud storage provider if you have not yet added any cloud storage providers)
3. Log in to your Miro account
4. Click on ‘install and authorize’ in the pop-up panel to connect your team to your Rock account.
5. Select the Miro team or individual project folder that you would like to add to a space
6. Success! Your Miro integration is complete and your folder is now accessible from the Files mini-app.
You can directly add new Miro files to spaces without authorizing your account again. This way you can update the Files mini-app across other spaces with new Miro integrations if relevant.
Managing the Miro files from your integration
There are a few different features you can use once your Miro folder has been integrated into the Files mini-app: navigate to the folder, Set Aside, Pinboard, unlink the folder, manage individual files, create new drawings.
Navigate to the folder
Click on this icon to directly visit your Miro whiteboard. Everyone in the space has access to the files mini-app and can navigate to the files on Miro as long as they have the correct Miro permissions.
📝 Note: You need to grant space users permission on Miro for files to become fully accessible to them. If not, they can view the file name on Rock but not access them on Miro.
Set Aside project folders for later review
Set Aside is a unique Rock feature that allows you to add objects such as messages, tasks, notes, and cloud files to a dedicated panel. This is useful if you want to keep information from your Miro integration at hand while browsing through different spaces, or setting a small to-do list for yourself.
The icon will turn blue when the folder is added to Set Aside. Click on the same icon again to remove it from the panel.
Once added to the Set Aside panel, you can access your information by clicking on the ‘Set Aside’ button in the bottom left corner of your screen (see screenshot above).
Directly enter the folder on Rock by clicking on it in the panel.
You can remove the folder from within the panel by clicking on the (x).
Access Miro files directly from the Pinboard
The Pinboard is a PRO feature available at the top of the space. Pin messages, tasks, notes, topics and even cloud files to your pinboard for seamless information access.
This can be useful if any information is particularly relevant to the team, announcements, or a task that everyone needs to complete or check out. When you click on the pin icon, it will be added to a dedicated panel with pinned information from that space.
You can access your pinned items by clicking on the pin next to the space name.Clicking on the file from the pinboard will directly bring you to Miro, not the folder location in the Files mini-app. You can learn more about the pinboard in particular in this dedicated product guide.
Unlink the Miro folder from the Files mini-app
You can unlink folders from your Miro integration by pressing the red unlink button. You can also unlink folders other space members have added as long as you have admin permissions in the space.
Unlinking a folder automatically removes the item from the pinboard, Set Aside panel, and cloud attachments on tasks, notes, and topics.
Manage individual files
You can manage files within a Miro team by clicking on the folder.
Navigate to the file: Directly browse to your document from Rock.
Set Aside a file: Clicking on the object from the Set Aside panel will directly bring you to the on Miro.
Pinboard: Pin relevant files, clicking on them from the pinboard directly brings users to the file on Miro, not its location in the Files mini-app.
Create new drawings/files: Click on the blue + sign in the bottom right corner of your screen. You can then name and create new whiteboards to your Miro team directly from within Rock.
📝 Note: It might take some time for your drawing to appear. We’re working on further building out the Miro integration in one of the upcoming releases.
How to attach cloud files to notes, tasks or topics
You can directly attach cloud files from the Miro integration to the description of notes, tasks and topics. This is convenient if your files are directly related to any communications or workflow on Rock. Instead of adding a link or searching for the relevant files, you can set up a direct connection in the object description.
To add a Miro file to any task, note or topic:
1. Scroll down to the object description and select ‘Add attachment’.
2. Select ‘Link Cloud Storage’ from the option menu.
3. Select the Miro folder you want to attach or click on it to browse to a file stored in it.
4. Select the relevant file(s) to be attached to the task, note or topic description.
5. Confirm ‘Add attachments’ in the bottom right corner of the panel.
Success! Your Miro files are now attached to an object. Users within a space can directly click on it to navigate to the relevant whiteboard. Don’t forget to save the task in the top right corner of your screen.
You can remove an attached file by hovering over it and selecting the (x) on the right side.
How to remove the Miro integration
You can remove your Miro integration from your account through your user settings. Note that this will unauthorize all files and folders that you have so far added to your different Rock spaces.
In order to remove your Miro integration, go to user settings > authorized apps > click disconnect for Miro and confirm. Your integration is now fully removed from your account.
📝 Note: folders are still visible in spaces but cannot be accessed, you will have to manually remove them if you don’t want them in the view.
Questions & Answers
Is the Miro integration free?
The Miro integration is completely free! Integrate your team and add as many whiteboards, brainstorm documents or other files you have stored on Miro!
Do I have to authorize my account multiple times?
No, you only have to authorize your account the first time you add a file. Subsequent uploads in the same or other spaces do not require additional authorization from you.
Can space members directly access the files I add?
File access depends on how you configured permissions on Miro. If a user has access to Miro they will be able to directly browse the file. If not, you might have to adjust your user permissions on Miro for the user to access the information directly from Rock.
Cloud attachments are not appearing in the Tasks mini-app, what should I do?
Switch from board to list view and search for the task. The functionality should appear when entering the task from list view. If you can still not attach a file please reach out to us in the Rock Customer Support space or through this link.
Can I authorize multiple teams to the same Rock account?
No, it is currently only possible to authorize one account at a time.
Do I receive credits for integrating Miro into my account?
Yes! You receive 5 credits for authorizing your account. Learn about other activities in the credit program here.
Can I integrate other cloud file storage providers in the same way?
TO ENTER THE RACE TO ROCK (the “Contest”) you must have an active Rock account. Limit of one (1) entry per individual. If it is discovered that you attempted to enter more than once, all your entries will be void. The contest starts at 12:01am PST on September 28th, 2022 and closes at 11:59pm PST on October 8th, 2022. There are 5 grand prizes available to be won from among all the eligible entries. No purchase is necessary.
To enter the contest, you must be at least 18 years of age or older.
The Prize must be accepted as awarded. The Prize may not be sold, or transferred and is not convertible to cash. Rock reserves the right to substitute the Prize in whole or in part in the event that all or any component of the Prize is unavailable.
The TEAMS Plan offered as part of The Prize is our current TEAMS5 plan. The TEAMS Plan includes 50 PRO spaces, 5 Managers, and 10 workspaces with a limit of 50 spaces per workspace. The TEAMS Plan will be granted for 2 years from the moment that the plan has been activated for the winner. The TEAMS Plan prize can only be claimed by winners who are part of a corporate domain on Rock or are owners of a corporate domain themselves.
If the winner is eligible to receive the “TEAMS” plan, they can also choose a PRO Lifetime Plan instead. The winner can only receive one of the plans as a prize.
If the recipient does not have a corporate domain, they will only have the option to receive the PRO plan. No cash rewards are given.
The PRO Lifetime Plan offered as part of The Prize is the plan we are offering through Rock on the 28th of September 2022. The PRO Lifetime Plan includes 10 PRO spaces, 1 Manager, and 3 workspaces with a limit of 20 spaces per workspace.
Lifetime means that the plan will be available for as long as the plan or company is in existence. No cash reward will be given at any point.
Entrants may not use false or misleading information when promoting Rock. Failure to complain will result in a voided entry.
Entrants may not create additional or fake accounts on Rock as part of this contest. Failure to complain will result in a voided entry.
Any fraudulent activity will result in your removal from the Contest.
Contest Sponsors (“Rock”) reserves the right to terminate or extend the contest at any time.
All activity as part of this contest will adhere to the existing terms of use and privacy policy that govern the platform.
Aside from making collaboration across the usual marketing teams and clients easy, Rock makes it easier for product and development teams to work on projects through various integrations.With our Figma integration, we hope teams can work through wireframes, products, and websites more efficiently and faster.
How to add Figma to Rock ?
The Figma integration on the Files mini-app is nifty because you’ll only need to integrate the service once, and you’ll be able to link projects in any space you’re a part of and have the right to edit tasks, notes, and topics.
Here are the steps to integrate Figma to Rock:
Step 1: Click on the File button
Step 2: Select Figma on the cloud storage selections in the Files mini-app.
Step 3: Once you click on Figma, a new tab or popup will open asking you to sign in to your Figma account if you're not logged in yet.
Step 4: You’ll need to give Rock access to your Figma account. If you cancel, the integration will abort, and you won’t be able to link your files to Rock.
If you allow Rock access to your Figma account, the integration will succeed, and you’ll be redirected to the space where you initially set up the integration.
A window will appear that will list all your projects. You can choose which projects you want to link to your Rock files mini-app.
Adding Figma Projects to spaces ?️
Once you’ve finished the integration of Figma into Rock, you can add your projects into the Files mini-app of a space. Unfortunately, you won’t be able to add individual files to Rock.
When you link a page or a database into Rock, all files within the project will be accessible from the Files mini-app in your space.
All you have to do is click on the file name to view and access the contents in another tab.
📝 Note: Users will not be able to access the projects and files in the spaces you have uploaded them to unless they have permission in Figma. You must ensure that users are part of the space where they need file access. Even if a user has all the necessary drive permissions, they won’t be able to access the files within Rock if they are not part of the space.
To go back to the Files mini-app panel or into a previous folder, press the < Folder on the top left corner of the mini-app’s panel.
Once you’ve successfully linked a cloud storage service and have added files and folders to the Files mini-app in a Space, you can use the blue + button on the lower right-hand corner of the Files view to add more drive services.
Files Hover Buttons?️
In this section, we'll briefly explain the button that appears when you hover over an item on the Files mini-app.If you want to open a project or file in a new tab, you can press this button, which will open the file or folder in Figma.
The second button is the Set Aside button, allowing you to Set Aside a folder or a specific file.
The third button is the pin button, which puts the file into the space’s pinboard. Pinboard is only available for PRO spaces, meaning this button will only appear in PRO spaces.
The fourth button is the unlink button, which allows you to unlink the folder you initially linked to Rock. Unfortunately, you cannot unlink subfolders or files and are only able to unlink the main folders you link in Rock.
Using Your Figma Files Across Your Rock Spaces?
Since you’ve integrated your Figma projects and files to Rock, you can easily add these cloud-based files as attachments to your tasks and notes.
📝 Note: You can also authorize cloud services via this feature if you don’t have anything integrated yet.
You’ll need to click on the “Link Cloud Storage” option to link a folder or file to a specific task or note.
? Note: Linking files or folders to tasks doesn’t work when entering tasks in board view for now.
Removing Documents or the Integration from a Space ✂️
Removing projects or files
You can remove the projects or folders from a Figma integration using the red unlink button.
Everything inside the projects and folders won’t be accessible in the space but will still exist in its owners’ Figma account. If you ever need easy access to Rock again, you can always link a folder to the space if required.
You’ll need to have admin permission in the space to remove others’ pages or databases. However, anyone can remove their uploaded page or database. This includes former members or admins downgraded to guest.
You can’t remove the individual files saved or created within projects. However, if you want to remove access to a particular file, you can either:
Remove the information from the page in Figma.
Or unlink the project and manually add or remove files you want and don’t want space visibility.
Removing the integration
You can remove the Figma integration by going to user settings > Authorized Apps > Disconnect.
Once you remove the integration from your account, the connected project won’t be accessible in the linked spaces but will still exist in the Files mini-app.
You can reauthorize access after disconnecting Figma on a previously connected sheet. Once you re-integrate Figma, all projects in your different spaces will become available again.
If you want your project not to be visible once you remove the integration, you will have to unlink the folders from your spaces manually. You can do this both before and after deauthorizing Figma.
We hope this clears out integrating Rock with Figma for you. If you have more questions, reach out to us in the Rock Support and Updates space!
Frequently Asked Questions for the Figma Integration ?
What happens to projects I linked in the Files mini-app if I leave/am removed from a space?
When you leave or are removed from a space, your linked databases and pages will be unlinked from the Files mini-app. If you re-enter the space, you will have to link the items again.
What would happen to my project if I were to delete my account?
When you delete your Rock account, all cloud services you integrated will be disconnected, and all items you linked will be unlinked.
What happens to folders and files from suspended accounts?
Pages, databases, and subpages from suspended accounts will still be available for access in the space unless they are unlinked or are deleted from their drive services.
What happens if I move my files to a different project on Figma? Will I have to add it again?
The items will still be accessible in a space, but user permissions might change. As a result, some users might gain or lose access depending on your changes or the permissions available in the new destination.
What happens to items in a space if they are deleted from Figma?
It will appear that Rock cannot find the item, and no one will be able to access the information. Folders and files that are contents will disappear when reopened. You can unlink the deleted folder to remove it from your Files mini-app.
Can I give a user permission to access an item from Rock?
No, you’ll need to grant access permissions or send invites to the user through Figma.
Can the Rock Team see what is inside the folders I connect to my spaces?
No, the integration adds the information to your space. We cannot see what documents you have in your database or workspace. Additionally, if users in space don’t have permission, they won’t be able to access information.
Is there an upload limit to my folders in Figma?
Upload limits are irrespective of Rock. Storage limits are dependent on the storage quota of the cloud service.
What happens to the Files items if everyone leaves a group space?
As soon as all members leave the space, all Files mini-app storage information and integrations are removed.
We understand how important it is to visualize meetings, task deadlines, and other essential work events in one place. With Calendar Sync, you can add a space’s tasks with their due dates to your calendar service of choice. Rock tasks can be added to any calendar service that supports the iCalendar format.
📝 Note: This feature is only available for PRO spaces.
This guide will show you how to set up Calendar Sync on Rock and integrate it with two commonly used calendars - Google Calendar and Apple Calendar.
How to Sync Rock Tasks with Your Calendar
Doing this first is essential, as you’ll need the URL this step will generate to get the space’s task to appear on other calendars. In addition, everyone in the space can use the URL to link the space’s due dates with their calendar services.
Follow the steps below to enable Calendar Sync on a Rock PRO space:Go to Space Settings
Click on Calendar Sync
A prompt will appear asking if you want to allow space members to sync the space tasks with their calendars. Click confirm to continue.
Select the parameters you want tasks to be shown on the calendar. You can show your assigned tasks, followed tasks, created tasks, or all of the above.
Copy the URL
Click Done.
Once done, you can go to your chosen iCalendar service to upload the Rock space tasks URL onto the calendar. We’ll show you how to do it in Google Calendar and Apple Calendar.You can check out this article to see which other calendar apps can support Rock’s tasks.
Syncing Rock Tasks with Google Calendar
Since Google Calendar is one of the most used calendar apps out there, thanks to its seamless integration with Gmail and the rest of the Google Suite, we decided to use it as an example with Rock’s Calendar Sync.Here are the steps to integrate with Google Calendar:Go to calendar.google.com on Web (If you are not logged in to the account you want to add your Rock tasks, please do so first!)Select Settings
On the settings page, click Add Calendar > From URL, paste the URL you initially copied from the Calendar Sync window, and click Add Calendar.
Alternatively, to open the Settings page and go straight to the URL page, you can click on the + button on the “Other Calendars” settings and click the “From URL” option. From there, you can follow the step before this, where you paste the URL.
Once you successfully add the calendar, they should be able to see the Space calendar on your calendar lists.
Removing Rock Tasks from Google Calendar
Removing your Rock tasks calendar from your Google Calendar is easy. Hover over the Space’s name on your calendar list and click on ‘x.’
Clicking on the ‘x’ will open a prompt allowing you to remove the calendar.
Don’t worry; you can always add the calendar to your Google calendar again by following the steps above!
Syncing Rock Tasks with Apple Calendar
We also wanted to show that Rock’s calendar sync works with certain built-in desktop calendar apps. This guide will show you how to do it in the macOS built-in Apple Calendar.Open your Apple Calendar App and click on File on the desktop menu bar.
Click on New Calendar Subscription
Paste the URL you initially copied from the Calendar Sync window and click Subscribe.
A popup will appear that will allow you to set the calendar name and some other notification and update settings. Click OK once you’re done.
You should be able to see the Space calendar on your calendar lists after clicking OK.
Removing Rock Tasks from Apple Calendar
To remove your Rock Tasks from your Apple Calendar, click on the name of the space you subscribed to, right-click (or two-finger click on a macOS device), and click Unsubscribe.
A prompt will open asking you to unsubscribe from the Calendar. Confirm the action by clicking Unsubscribe.
Don’t worry! Unsubscribing is not permanent, and you’ll be able to add your Rock calendar again by following the simple steps above.
The steps for other calendars are the same; you’ll need to enter settings or find the option that allows you to add or subscribe to new calendars, and then paste the URL on the space’s Calendar Sync popup. Once confirmed, your calendar should start being populated by the space’s tasks.
Disabling Calendar Sync from a Space
Disabling Calendar Sync from a space disables synchronization with other calendar services. Anyone using this URL will lose the connection to their calendar once it's been disabled.Here are the steps to disable calendar sync:Go to Space Settings
Click on Calendar Sync
Click on Disable
A popup will appear with a warning on the link disabling for all members in the space. Click confirm if you want to continue with disabling calendar sync.
If you want to enable calendar sync again, you can follow the steps above on enabling calendar sync. Note that it will generate a brand new link, so you can’t just reuse the link you had integrated or subscribed to before.
If you have questions or feedback about Calendar Sync or other features, chat with us via the Rock Support and Updates channel.
Frequently Asked Questions about Calendar Sync
My task isn’t appearing on the calendar. Why is that?
Tasks won’t appear in the calendar unless they have set due dates. Double check the task to see if they have due dates.
This guide only shows Google Calendar and Apple Calendar. I don’t use any of those. Can I still sync my Rock tasks?
Yes, as long as they have the iCal specification. You can learn more about iCal here.
Will new tasks that I create be shown on the calendar?
Yes, as long as the integration is live and you don’t remove the subscription from the calendar app, it should automatically update.
Can anyone use the space calendar sync URL to link the tasks to their calendar?
Yes, any space member can sync their calendar with Rock using the URL, provided it’s not been disabled.
Can anyone disable the calendar sync URL?
No, only the admin can disable calendar sync on a space.
If I disable and re-enable calendar sync on a space, will it have the same URL?
No, the URL will be different for every new instance enabling calendar sync in a space.
Link your Rock and Slack communication so nothing falls through the cracks. The Rock bot for Slack allows teams to receive a notification in Slack when new tasks, notes or topics are created or edited in a Rock space.
The following product guide will walk you through the functionality: how to set up the bot, connect it to your Slack workspace, and receive updates in your Slack channels for Rock.
How to create a Slack bot in Rock
The feature is completely free. You can access the Slack bot for Rock from space settings if you have admin permissions.
Click on settings > integrations > Rock bot for Slack.
After selecting the bot, a panel opens up. Click on ‘Add to Slack’ in order to set up a connection between the two apps.
This will bring you to Slack, where you have to allow the Rock bot access to your Slack workspace. This sets up the link for information to be sent between the two apps.
Enabling the link will give the Rock bot access to channels and send notifications to your Slack channels. The connection is completely safe, and the Rock team does in no way have access to or follow any conversations in spaces you connect.
Once you allow the Rock bot access, you are brought back to Rock, where you can configure the Rock bot in your space. There are a few things you can do:
Rename your bot: By default, your bot will be named ‘Rock bot for Slack’, but you can change this if needed
Change the bot avatar: By default, the bot will have the Slack logo as an image. You are free to change this if you wish to do so.
Select events: Decide which activities you want to push notifications for. The panel includes 6 events: task created, task updated, note created, note updated, topic created and topic updated.
Note that after creating the bot you can change its name and avatar, but not the event configurations.
After creating your bot, you still have to enable it in your channels on Slack. In order to do so you have to browse back to Slack > Select the Rock bot > dropdown menu > Add this app to a channel.
Once you select ‘Add this app to a channel’ a new panel opens up. Select the channel you want to add the Rock bot to from the dropdown menu and click on ‘Add’.
You can add the bot to several channels if you wish to do so by repeating these steps. You will know the Rock bot has been correctly added to a channel with a notification message in that channel.
Receiving notifications from the Rock bot on Slack
Now that everything has been configured, you can send notifications from Rock spaces to Slack channels. Notifications that are pushed through depend on the events you chose while configuring the bot.
New object created: Every time a new object is created in your connected Rock space from the chosen events, a message will be pushed into slack with a link to the object, and details. Details include the title, description, and author. Start & due date, priority, assignees, and other task fields are also added.
Object updated: You receive a custom message when the description of notes and topics or other fields in tasks are updated on Rock. The message includes a link to the object so you can quickly navigate to it.
Questions and answers
Is the Rock bot for Slack free?
Yes! The functionality is completely free. Connect your workflows with custom notifications on Slack for updates in your Rock spaces!
Can I add the same Rock bot to multiple channels on Slack?
Yes, feel free to add the Rock bot to any channels where it’s relevant to receive workflow notifications.
Will I receive notifications for new comments on tasks, notes or topics?
No, the functionality does not yet include notifications for new comments on objects.
How many Rock bots can I create?Rock bot for Slack is a completely free feature on our side. Feel free to create as many bots for Rock spaces to keep information up to date across platforms.
Can I have two differently configured bots in my same Rock space?
Yes, feel free to create multiple bots and configure them in different ways if needed.
How can I change my Rock bot settings after it’s created?
You can’t change the event settings. Once your Slack account is authorized you can just add a new Slack bot with desired settings and remove the previous one.
I linked the wrong Slack workspace to Rock bot. How can I change it?
You can disconnect your current Slack account by clicking your avatar in the upper left corner and choosing Settings -> Authorized apps and clicking “disconnect” next to the Slack app.
As more and more teams begin to use Rock across multiple aspects of their operations, we realized the importance of making spaces easy to sort and sift through. Having numerous spaces can be overwhelming and challenging to maintain.
Workspaces, aims to help teams better manage spaces, members within spaces, and space invites. This makes onboarding new teammates, grouping spaces depending on function and focus, and keeping space notifications manageable easier across the board.
This feature is available on both free and paid plans. The main difference lies in the number of spaces you can add to each Workspace.
FREE - 1 Workspace with up to 3 Spaces
UNLIMITED - 50 Workspaces with up to 50 Spaces
Getting Started on Workspaces
Before setting up your workspaces, Rock will list down all your spaces in one interface by default.
If you don’t have a Workspace, there will be an “Add Workspace” button beside the All spaces label on the upper part of your space list.
Clicking on the button will open the “Create a Workspace” prompt. You’ll need to add a Workspace name before proceeding. You can also opt to choose the workspace label color beforehand.
Once you successfully create the Workspace, you’ll see a window where you can set invite links so other people can join your workspace. You can set new workspace members as a member (those with edit rights) or a guest (chat/meetings rights only).
Each workspace has a unique link and pin. You can always reset the link and pin if you feel the workspace has been compromised. However, the existing link and pin will stop working, and you’ll have to send out a new invite containing the new link and pin. Don’t worry; you can change the invite restrictions and permits in the Workspace settings, and it will be discussed further along in this guide.
You can also invite Workspace members manually by clicking the “Invite manually” link.
Clicking on the link will open a new prompt allowing you to input the username or emails of people you want to invite. You can also close the prompt by clicking on the ‘x’ on the upper right-hand side of the window.
Clicking on the < Icon will bring you back to the original window, with the Workspace link and pin.
Once you close the initial Workspace invitation prompt, you can opt to add more spaces to your Workspace as well. You can always click the ‘x’ button on the upper right-hand side if you don't want to.
When you create a new Workspace, it automatically creates four spaces that we think might be beneficial for a Workspace. Namely: Goals and Objectives, Random, All Hands, and Resource Center.
Each of these premade spaces has its own premade notes and task lists to help you get started. Don’t worry. You can always delete these spaces if you don’t want to use them.
You can see your Workspace’s link on the upper part of the space list, right beside the Workspace name.
There is also the option to leave the Workspace. You can access this by clicking on the vertical “...” button beside the Workspace name and link.
When choosing to leave a Workspace, you will get a prompt that will let you know that leaving a Workspace also means leaving all the spaces that are in the Workspace.
Clicking on the ⬅ button beside the space name will take you to the list of all your Workspaces.
All spaces will list all the spaces you’re a part of, regardless of whether they’re in a Workspace or not.
You’ll also have the option to select and add spaces to a Workspace from the All Spaces Workspace. All you need to do is select the space icon, and a checkmark will appear beside it. The “Workspace” button will also appear with the option to add it to an existing Workspace or create a new one.
You can easily see unread activities on the workspace as there would be a blue dot displayed on the back arrow next to All Spaces/Workspaces. In addition, there would be a blue dot with the number of unread activities beside the Workspace name with unread activities on the Workspace list.
Making Changes to Workspaces
You can click the “Edit” button in the upper-right-hand corner of the spaces panel to add (or remove) spaces into Workspaces.
Once you click the “Edit” button, you’ll see four different options to make changes around your Workspace. We’ll explore each option separately below.
Invite
This tab shows the Workspace’s invite link and pin code. You can also copy your Workspace link invitation, reset your Workspace link and pin code.
You can invite people manually by adding their emails or usernames as well.
📝 Note: If a new invite to a Workspace is sent to you, a warning will be displayed on top of the spaces panel. You will join the Workspace automatically if an invitation comes from the same domain user. If it’s from another domain user, you will have the option to accept or decline an invite.
A red dot would be displayed on the back arrow next to the All Spaces/ Workspace name as long as you have an invitation pending.
Members
All members of your workspaces are shown in this tab. Members of spaces you’ve added to the Workspace are automatically added to the Workspace. The user roles of the members throughout the spaces of this WS will also be displayed (so if a user is a member in some and a guest in some other, there would be "Member, Guest" displayed next to that user’s name)
You can change people’s roles by clicking on the vertical “...” icon beside each role. You’ll also get the option to chat with the member (which opens a 1:1 space with them if you don’t have one yet), view the member’s profile, or remove the member from the Workspace.
Remember that changing the role through this panel will reflect across ALL the spaces within the Workspace.
Spaces
Spaces that have been added to the Workspace are listed here. You can also see the workspace quota on the tab itself.
You can add spaces that you’re an admin of by clicking on the “Add Spaces” button.
This then opens a panel that lists all the spaces you can add to the workspace. Spaces where you are an admin not yet part of the Workspace will be displayed in this panel.
Once you select a space and add it, you’ll see it listed in the space list and will take up another space in your quota.
You can also remove spaces through this option by clicking on the checkbox beside each space name. Once you click the check box, an orange “Remove” option will appear beside the “Select all” option.
Once you click remove, the space will disappear from the space list, and you will free up slots from your Workspace quota.
Remember that deleting a space from a Workspace does not delete a space or any members. The space will need to be separately managed from the Workspace.
Settings
You can change your Workspace’s settings through this tab. You’ll be able to change the Workspace name, the label color, rules on who can send invites and set joining restrictions.
When it comes to joining restrictions, you can set how new members join and how they can join the Workspace.
Restricted - Only admins can invite, and they can only invite manually
Open - Anyone in the Workspace can invite (both manually and via URL)
You can also set whether or not you’ll need new members to input a pin code when they click on the link. This can be set by ticking the “Require Pin Code” checkbox.
The option to delete a Workspace is also here.
Once you delete the Workspace, all spaces will still exist but must be managed individually.
If you have any other questions on Workspaces, don’t hesitate to send us a message on the Rock Customer Support and Updates space.
Frequently Asked Questions for Workspaces
Can I put spaces in more than one Workspace?
No. Each space can only be put in one Workspace.
Can I set someone else as Workspace admin?
Setting someone else as a Workspace admin is only possible in Unlimited plan. On the FREE plan, you’ll have to remove the workspace, and somebody else has to create a new one from the same spaces so that that person can get admin rights to the Workspace.
Can other people see the 1:1 spaces I’ve put in a Workspace?
No, the 1:1 spaces stay between you and the other person in the space.
Do all the 1:1 spaces I have with people in the Workspace get put in the Workspace?
All 1:1 spaces with members of the Workspace are displayed inside the Workspace for your convenience.
What happens when there are a member is part of more than one Workspace with me? Does that mean their 1:1 space with me is duplicated into all the Workspaces?
1:1 spaces are just displayed inside the Workspace you share with the member for convenience. So it’s just the same space displayed in a different workspace.
What happens to members' roles in a space when I put the space on a Workspace?
The roles of the space members are unchanged when the space is added to a Workspace. It will only change if you change the roles through the member's tab.
What is the main difference between folders and Workspaces?
Workspace is a feature that allows you to share multiple spaces and invite multiple people to multiple spaces easily. Folders are your way of sorting out spaces in your account and cannot be shared with people.
Will members of spaces that have been removed from Workspaces also be removed as Workspace members?
No, the Workspace members will remain in the Workspace even though the spaces they were originally part of have been removed from the Workspace. Members can only be removed from the Workspace settings panel.
Can I duplicate spaces in a Workspace?
Yes, you can duplicate spaces in a Workspace, provided you’re a space admin and on a PRO or TEAMS account.
Do I have to be a member of all the spaces in a Workspace? Can I leave some of them?
Yes, you can leave separate spaces. As long as the space is in the Workspace and you’re a member of the Workspace, you will always have the possibility to rejoin spaces. However, if you’re a space admin, you first need to promote somebody else to admin.
Can you create spaces that are automatically a part of a Workspace?
Clicking the (+) button on the spaces list adds a new group space, but it's not yet bound to any Workspace, even if it is displayed at that time. This newly created space has to be moved to the Workspace either by selecting it from the space list and moving it to the Workspace or by adding it through the settings panel.
Access important information with a dedicated pinboard in every space. Find important tasks, topics, notes, files or messages without searching across mini-apps and always keep information at hand.
Information stored on the pinboard may include a welcome message, strategy document, a weekly announcement, website link or an important task or note that you want to make easily available to everyone.
How to pin from the object level
Only users with admin level permissions in a PRO space can pin information. You can pin objects by selecting the 📌pin icon which displays to the right corner of objects when you hover over them. Objects you can pin include:
Messages
Tasks
Notes
Topics
Files (this includes everything in your Files mini-app: those uploaded to objects, files directly uploaded in the pinboard and connected cloud file storage folders)
Clicking on the pin icon will store the information in the pinboard. Pinned items are visible to all space members. Guests and members can’t pin items in a space, but they can still browse to, set aside, and @mention pinned items.
If you want to remove an object or added it by accident, you can always undo the pin by clicking on the 📌 pin icon again.
💡 Rock team tip: Newly pinned items are placed on top of the pinboard by default. If you want to move an item up you can quickly unpin it and pin it again.
Managing your pinboard
You can access your space’s pinboard by clicking on the pin icon 📌 next to the space name. Note that if you have not changed your space to PRO, the feature will not work, even if you have an Unlimited account.
Once a user navigates to the pinboard, there are 4 main activities they can do:
Search for items
Filter pinned items
Add new items
Browse to, Remove, @mention or set aside information
Search for items in the pinboard
You can use the search panel to look for specific items within your pinboard. This is especially handy if you are using it as a knowledge base or have a larger number of items stored.
The search function purely queries for text or labels on your objects, so entering @task:2 or the authors’ name will not return a result. Instead, make sure to search for text connected to the task, or use one of the filters to reduce the number of objects displayed.
Filtering in your pinboard
Filter pinned objects to retrieve information or browse based on the object type. You can currently filter for: all, messages, tasks, topics, notes, files and links.
Note that if you pin a message with a link, it will be filtered as a message, and not a link. The same applies for images, they will show as messages and not as files. In order to filter for links you need to directly add a URL through the + in the pinboard panel. Links from the chat can be stored in the pinboard, but will be filtered as messages.
Add new items
The option to add new items is only available to users with admin permissions in the space. Click on the big blue + sign in the bottom right corner to access the functionality.
Once selected, you get the option of adding a new object to the pinboard, there are 4 different categories you can choose from:
Task, note, file or topic: use the @mention anything feature to quickly add relevant objects to your pinboard
URL: Write or paste a dedicated URL into the object. You can filter by the URLs added by clicking on ‘Links’ from the available filters in the top of the panel.
Upload file: upload a file from your device that you want to display in this panel, it will also be added to the files mini-app of the space.
Cloud Storage: Select a file from the folders you have previously added into the space. This includes all cloud storage folders you or anyone else in that space has added to the Files mini-app.
💡 Rock Team tip: Using @mention anything you can add several objects at once. Objects are skipped if they are already present in the list.
Manage your pinned objects
There are a series of actions you can do with your pinned objects, this section will explain:
Removing
Reorganize pinned objects
Browsing through
@mention pinned objects
Set Aside pinned objects
Remove pinned objects
Only users with an admin role can remove pinned items from the pinboard. Once the option to remove appear when hovering over the item they want to remove with a red pin icon 📌.
Reorganize pinned objects
You can change the position of a pinned object by keeping it selected and hovering it to the new position where you want to locate it. This can be useful if you want to bring an older object up or deprioritize a pinned item.
Browse through pinned objects
All users in a space can browse through the different objects in a pinboard and click on them.
When clicking on a message users will be brought to its thread
For tasks, notes, topics or files a user will be brought to the object when clicking on it
Clicking on a link in the panel will redirect the user to the source of the link.
@mention pinned objects
It is also possible @mention pinned options. @mention is available for all objects except messages, links and cloud storage providers in the Files mini-app. Clicking on the button will save a link on your device that directly connects to the object. You can share this link in your space, other spaces and on the web to bring a user to an object in your space.
Set Aside pinned objects
Users can also Set Aside items. This allows them to quickly access important information across different spaces from the Set Aside panel.
Pinning on Mobile
The pinning feature is also available for mobile devices. Here’s how you can pin objects from the mobile apps:
Messages: keep the message you want to pin pressed for a few seconds and click on the pin icon afterwards.
Tasks, notes, files and topics: press the pin button in the top right corner of the object. You can unpin items by selecting the same pin button again. You can also pin from the menu with ellipsis.
Pinned information can be accessed by clicking on the pin next to the space name. You can also filter pinned information to quickly browse through relevant objects by mini-app.
Just like the web version, you can add new items to the pinboard by pressing the blue + button in the bottom right corner of your screen.
Questions & Answers
Pinning does not seem to be available in my space, how come?
The pinboard is only available in spaces that have been upgraded to PRO. If you have a free space you need to upgrade it to PRO in order to access information.
Does my pinboard reset when I change a space back to FREE?
Information will remain viewable, but you won’t be able to add or remove items from the pinboard. You have to change the space back to PRO if you wish to make changes to the pinboard.
What happens to pinned objects if I deauthorize a cloud file?
If you lose authorization of pinned services, they disappear from the list, but the counter for pinboard does not change (they are available "in the background"). After re-authorization, the services reappear on the list in pinboard.
The pin option does not appear on different objects for me, why?
Pinning is reserved for users with admin permissions in spaces that have been changed to PRO. Make sure that both settings are correctly configured in order to see the pinning functionality.
What happens to my pinned information if I’m demoted to member or guest?
Information will remain pinned, but you won’t be able to manage the pinned information anymore. Ask a space admin to upgrade you again if you want to make changes to your pinboard again.
Can guests or members pin information in my space?
No. Pinning is reserved for users with admin permissions in PRO spaces. Guests and members can only browse through objects, @mention them or use the Set Aside function in the pin board.
Can I hide the pinboard for guests?
No, there is currently no functionality to hide the pinboard for guests.
Is there a limit to the number of items I can pin?
You can pin up to 100 items in your pinboard. After that you have to remove an item in order to add a new one. Note that it will be harder to browse and retrieve objects if you add too many to your pinboard.
We understand that people and users need intensive documentation and file management to get things done, especially in a remote and asynchronous work environment. Here at Rock, we want to empower teams to work productively despite being asynchronous by enabling proper documentation practices. This means ensuring that file storage apps and documents are within easy reach and can be easily is an essential aspect of a tool that helps people collaborate and work together better.
Through Notion integration, we want to ensure that teams can link necessary documentation into Rock tasks, topics, notes, and chats more efficiently and faster.
How to add Notion to Rock ?
The beauty of our Notion integration is that you’ll only need to integrate the service once, and you’ll be able to link documents across any space you’re a part of (and have permission to link documents out of!)
Just follow the steps below to integrate Notion to Rock.
Step 1: Click on the mini-app files and select Notion on the cloud storage selections.
Step 2: Click on Notion, and a new tab or popup will open asking you to sign in to your Notion account. If you aren’t already logged in.
Step 3: You’ll be asked to allow Rock access to your Notion account. If you cancel, the integration will be aborted, and you won’t be able to link your Notion files to your Rock spaces.
Step 4: You will be asked to select which pages you want to show in Rock. Everything will then be consolidated in a folder called “Workspace.”
If you allow Rock access to your Notion pages, the integration will be successful, and you’ll be redirected to the space where you initially set up the integration.
Adding Notion Folders to spaces ?️
Once you’ve successfully integrated Notion into Rock, you can add your pages and databases into the Files mini-app of a space. With this, you won’t be able to add individual subpages into Rock.
When you link a page into Rock, all subpages in that item will be accessible from the Files mini-app in your space.
Note: At the moment, all pages and subpages are in one hierarchy, meaning they are not nested. We’re working on improving this behavior.
All you have to do is click on the page name to view and access the contents.
📝 Note: Users will not be able to access the pages and databases in the spaces you have uploaded them to unless they have permission in Notion. You also need to ensure that users are part of the space that they need files access to. Even if a user has all the necessary drive permissions, they won’t be able to access the files within Rock if they are not part of the space.
To go back to the Files mini-app panel or into a previous folder, press the < Folder on the top left corner of the panel.
Once you’ve successfully linked a cloud storage service and have added files and folders to the Files mini-app in a Space, you can use the blue + button on the lower right-hand corner of the Files view to add more drive services.
Files Hover Buttons ?️
If you want to open a Notion page in a new tab, you can press this button to open the file within Notion.
The second button is the Set Aside button, allowing you to Set Aside a folder or a specific file.
The third button is the unlink button, which allows you to unlink the folder you initially linked to Rock. You cannot unlink subfolders or files within the originally linked folder. This means you can only unlink the main folder you initially linked in Rock.
Using Your Notion Pages Across Your Rock Spaces?
Since you’ve integrated your Notion databases and pages onto Rock, you can easily add these cloud-based files as attachments to your tasks and notes.
Note: You can also authorize cloud services via this feature if you don’t have anything authorized yet.
You’ll need to click on the “Link Cloud Storage” option to link a folder or file to a specific task or note.
? Note: Linking files or folders to tasks doesn’t work when entering tasks in board view…for now.
Removing Documents or the Integration from a Space ✂️
Removing pages
As mentioned above, you can't individually remove pages; you can only remove the workspace where it is nested. You can unlink the folder using the red unlink button.
Everything inside the initially uploaded Workspace folder won’t be accessible in the space but will still exist in its owners’ Notion account. Don’t worry; you can always link pages back to the space if needed.
You’ll need to have admin permission in the space to remove others’ pages or databases. However, anyone can release their uploaded page or database - even those former members or admins who have been downgraded to the guest.
Removing the integration
You can remove the Notion integration by going to user settings > Authorized Apps > pressing Disconnect.
Once you remove the integration from your account, the connected pages and databases won’t be accessible in the spaces it's linked to but will still exist in the Files mini-app.You can reauthorize access after disconnecting Notion on a previously connected page or database. Once you re-integrate Notion, all pages and databases in your different spaces will become available again.
If you want your pages not to be visible once you remove the integration, you will have to unlink the pages from your spaces manually. You can do this both before and after deauthorizing Notion.
Frequently Asked Questions on the Notion Integration ?
What happens to pages and databases I linked in the Files mini-app if I leave/am removed from a space?
When you leave or are removed from a space, your linked databases and pages will be unlinked from the Files mini-app. If you re-enter the space, you will have to link the items again.
What would happen to my pages and databases if I were to delete my account?
When you delete your Rock account, all cloud services you integrated will be disconnected, and all items you linked will be unlinked.
What happens to folders and files from suspended accounts?
Pages, databases, and subpages from suspended accounts will still be available for access in the space unless they are unlinked or are deleted from their drive services.
What happens if I move my pages to a different location on Notion. Will I have to add it again?
The items will still be accessible in a space, but user permissions might change. Some users might gain or lose access depending on your changes or the permissions available in the new destination.
What happens to items in a space if they are deleted from Notion?
It will appear that Rock cannot find the item, and no one will be able to access the information. Folders and files that are contents will disappear when reopened. You can unlink the deleted folder to remove it from your Files mini-app.
Can I give a user permission to access an item from Rock?
No, you’ll need to grant access permissions or send invites to the user through Notion.
Can the Rock Team see what is inside the folders I connect to my spaces?
No, the integration adds the information to your space. We cannot see what documents you have in your database or workspace. Additionally, if users in space don’t have permission, they won’t be able to access information.
Is there an upload limit to my folders in Dropbox?
Upload limits are irrespective of Rock. Storage limits are dependent on the storage quota of the cloud service.
What happens to the Files items if everyone leaves a group space?
As soon as all members leave the space, all files, mini-app storage information, and integrations are removed.
In collaborating with different teams and multiple project stakeholders, you’ll run into things that need elaboration beyond chat but don’t necessarily need a meeting to discuss thoroughly. This is where our Loom Meetings mini-app integration becomes helpful.
Loom is a video recording and screen recording tool that helps remote and asynchronous teams work better together by reducing the need to meet at the same time. We believe that having this tool would be a great help to your team’s productivity, as it’s easier to give teammates and other project members a run of detailed run-throughs.
Creating A Loom?
Integrating Loom is easy. Having an account with Loom is unnecessary to start creating and sending looms on Rock.
To start: click on any space in your list and the Meetings button.
That button will open a list that will allow you to choose between the different video conferencing integrations available in Rock. Click on the Loom button.
Once you click on Loom, a prompt will appear asking you permission to allow Rock to use your microphone and camera. These permissions will determine if you can use your microphone and camera on the Loom video.
Note: If you’re on macOS, you might also be prompted to give your browser of choice or the Rock app permission to record the screen.
A screen will pop up in the upper right-hand corner of the screen, where you can fix the recording settings before shooting your Loom. You’ll also have the option to sign in to a Loom account if you have one.
Click on the “Start recording” button to start recording your Loom. If you don’t sign in to an account or if you don’t have a paid plan, you’ll only have a maximum of 5 minutes per recording.When you’re done recording, click on the finish recording button.
Then, your video will render and will appear in a separate prompt where you’ll have the option to: re-record the video
delete the video, or
copy the video link to be shared with others.
You can copy the video link and share it with the space of choice.
Disconnecting Loom from your account ✂️
You don’t need to disconnect Loom from your Rock account because the accounts don’t integrate or link.
You can remove the initial permissions you gave Rock on accessing your camera and microphone through browser settings.
Frequently Asked Questions About Loom ?
Does Loom also work on mobile?
No. You can only record Looms on the desktop - either the desktop app or the browser app. You can view Looms on mobile with no problem.
Can anyone in my space record a Loom and send it?
Regardless of their space role, anyone can record a Loom and send it to space.
Can anyone in my space view the Loom meeting?
Yes, as long as you didn’t change the view permissions from a Loom account, everyone in the space should be able to view the Loom.
Do I need to pay for the Loom integration?
No, the Loom integration is available to all users, regardless of the Rock plan.
As much as we believe in the power of asynchronous working, we understand that there are still things better discussed more synchronously. Projects may need kick-off calls, brainstorming sessions, or catch-up meetings that cannot simply be done over chat.
For remote teams, it’s often impossible to be able to meet face-to-face on such short notice. This is why video conferencing is one of the best ways to collaborate in real-time.
Our Meetings mini-app allows you to integrate various videoconferencing services like Jitsi into your Rock space.
Setting Up a Jitsi Call ?
Integrating Jitsi is easy. Compared to other services, you don’t need to create a Jitsi account to integrate it with Rock. You can create a Jitsi meeting that will take you less than 2 minutes, and here are the steps:
All you need to do is click on any space in your list and the Meetings button.
That button will open a list that will allow you to choose between the different video conferencing integrations available in Rock. Click on the Jitsi button.
Once you click on Jitsi, a prompt will appear asking you to add an optional room name and meeting description. These are not required fields; you can still create the meeting if you don’t add it. The prompt will also have your meeting link.
Clicking the “Create” button will automatically open a new tab or window to your Jitsi meeting. You can now meet with your project members! A message will also be sent in the Chat mini-app with the name and link of your Jitsi call so that everyone in the space can easily access it.
Note: Checking the Add meeting note box will create a meeting note on the Rock space where the call was set up. The note will include the name of the meeting and description (if any).
You can then use this pre-created note to write down essential discussion points and ideas that were put forward during the meeting. This note can be viewed and commented on by anyone in the space, including those who missed the meeting.
Disconnecting Jitsi from your account ✂️
Since you don’t need to link any accounts to create a Jitsi meeting, you don’t need to unauthorize or disconnect Jitsi from Rock
.If you don’t want to use Jitsi anymore, you can choose to use other video conferencing tools.
Frequently Asked Questions About Jitsi ?
Why is it so easy to create Jitsi calls? Does this mean it’s unsafe?
Jitsi’s open-source philosophy has ensured that they are easily accessible to anyone who wants to create a videoconference using their platform. Jitsi is a fully secure platform, and the developers have explained their protocols here.
Can I create different Jitsi meetings in 1 space?
Yes. Follow the steps above if you’d like to create a different meeting link in a space. Otherwise, you can keep reusing one link if you’d like.
Does the Jitsi integration also work on mobile?
Yes, the Jitsi integration also works on mobile devices. People can join the meeting in a space they are in, both from mobile or web.
Can anyone in my space start a Jitsi meeting?
Anyone, regardless of their space role, can start a Jitsi meeting.
Can anyone in my space join a Jitsi meeting?
Yes, anyone in your space can join your Jitsi meeting; no additional account is needed.
Do I need to pay for the Jitsi integration?
No, the Jitsi integration is available to all users, regardless of plan.
The My Tasks panel is a helpful feature for users who want to see all the tasks assigned to them quickly, they are following, or have created without the need to go through all the spaces they are a part of.Tasks from both 1:1 spaces, group spaces, and your personal space are listed in My Tasks.
My Tasks has several sorting and filtering methods to help you quickly sift through all the tasks. In this guide, we’ll teach you how to sort and folder through tasks as well as other essential functions that you can do within the My Task panel.
Sorting Tasks
There are several categories by which you can sort out your tasks based on the columns seen on the list view. We’ll list out all the possible categories you can sort your list through:
Task Name: Sort all tasks in alphabetical order (ascending or descending)
Space Name: Sort all tasks based on the spaces listed in alphabetical order. Note that your personal space will always be listed first in ascending and last in descending order.
List: Sort tasks based on the alphabetical order of the lists the tasks are in (ascending or descending)
Assignees: Sort tasks based on the number of assignees and group the tasks based on the assignees.
Labels: Sort tasks based on the number of labels and group tasks based on the labels.
Priority: Sort tasks based on the assigned priority level
Sprint: Unlimited plan users only. Sort tasks based on the sprint name.
Start Date: Sort tasks based on their start date
Due Date: Sort tasks based on their due date
Updated: Sort tasks based on the date of an update in the task.
Do note that when using the sorting tasks via the list view, only one sort “setting” can be used at any given time. The tasks will be reordered based on the new sort option selected.
Filtering Tasks
Aside from the ability to sort out tasks, Rock also offers several options to filter tasks.
Tasks filtered out can still be sorted based on the categories/columns explained in the earlier section. In addition, filters can be stacked - you can keep adding filters to your task until you can fine-tune your task search to a specific set of filter criteria.
Here are some of the ways you can filter your tasks:
Space: Filter tasks based on the space(s) selected.
Due Date: Filter tasks based on the following due date(s):
Any (No specific due date)
Past due date (All tasks with a past due date) (Overdue Tasks have their date displayed in the due date column as red text and on hover show text "overdue")
No due date (All tasks with no set due date)
Today (All tasks due on the day you set the filter)
Tomorrow (All tasks due tomorrow)
Next 7 days (All tasks due within the next 7 days) (Button "Due in next 7 days (X)" will be displayed next to it if any tasks are meeting this criterion.)
Updated: Filter tasks based on updates or activity that has occurred.
Any (No update date range)
Today (All tasks that have an update on the day the filter was set)
Yesterday (All tasks that had had an update the day before the filter was set)
Last 7 days (All tasks that have an update within the last 7 days)
Last 30 days (All tasks that have an update within the last 30 days)
Priority: Filter tasks based on the assigned priority
Assignee Status: Filter tasks based on the status of the assignees
Due Today: Instantly show only tasks that are due today (If any tasks are due today, this button will turn red and display the number of tasks due today. If any tasks are due today, a red dot should be displayed on the My Tasks icon on the left. In addition, tasks that are due today are shown with a pink background.)
Duration filter: Filter tasks that meet the following age criteria:
Last 3 months.
Last 6 months.
Last year.
Older than a year.
Assigned to me: Show only tasks that are assigned to you.
Created by me: Show only tasks that you have created.
Followed: Show only tasks that you are following.
All: Show tasks that have been assigned to you, created by you, or being followed by you.
Toggles
There are three different toggles you can adjust as well in the panel. They are stackable, meaning you can have information from all three toggles on your My Tasks panel view.
Completed by me toggle: Toggle on/off to show tasks you have completed.
Closed toggle: Toggle on/off to show tasks that have been moved to a list that is considered closed.
Archived: Toggle on/off to show tasks that have been archived.
To clear filters, you can uncheck the box you clicked to filter items.
Alternatively, if the filter popup is open, you can click on clear on each filter to clear it. You can also click on “Clear filters” that appears beside the “Due Today” button if you have filters selected.
Creating Tasks
You can also create tasks via the My Tasks panel. To do this, click on the + button on the lower-right-hand side of your screen.
Once you click the button, you’ll be asked to select the space where you want the task to be created. Remember that you’ll need to add a task title before you can click 'Add task' as it’s a required field.
Deleting or Archiving Tasks
It’s also possible to delete and archive tasks from My Tasks. You must enter the task’s edit panel by clicking on the task’s title. From there, you can delete or archive tasks from the vertical “...” button on the panel's upper-right corner.
Editing Tasks
Like deleting and archiving tasks, you can easily edit tasks from the My Tasks by entering the task’s edit panel and clicking on the task’s title.
Any changes you save to the task will automatically reflect.In addition, you can also do several edits on the task while on the My Task list view, such as:
Changing the list a task is in. This can be done by clicking on the list column of the task. A prompt will allow you to select a new list to place the task in.
You can add additional assignees to a task by clicking on the assignee column of the task.
Calendar View
You can also display My Tasks in the Calendar view, allowing you to visualize your tasks with deadlines easily.
For the Unlimited plan users, there is a “Calendar sync” button in the top right corner of the app. This will automatically show tasks with due dates from all your PRO spaces in any calendar app that supports adding a calendar through the iCal URL.
Frequently Asked Questions for My Tasks
I cannot find a task in My Tasks, why is that?
It could be that you have not toggled it to show, or it’s being filtered out. Some tasks may be filtered out as toggles “Closed” and “ Archived” are by default switched off. In addition, the My Tasks default setting is to show tasks from the last three months, so you will need to change the date manually if you want to see tasks older than three months.
In My Tasks, I also see tasks that I have already completed.
If you don’t want to see already completed tasks, you can filter them out by switching the toggle “Completed by me.”
Is there a way to display my tasks in a board view?
At the moment, there is no way to do so. But we’re working on it!
Losing past documentation during a migration can be frustrating. Rock allows you to migrate Slack workspaces into Rock so you can quickly invite your team and continue the conversation without losing past discussions.Throughout this product guide we explain how you can export your workspace from Slack, and the required steps to import channels onto Rock.
How to export a workspace from Slack?
The breadth of your export depends on your payment plan in slack. To make sure all relevant information can be exported check out Slack’s dedicated guide.
Here’s a quick breakdown on migrating spaces from Slack.
1. Select the workspace name in the top left corner of your screen
2. Click on Settings & administrations from the options in the dropdown menu and next select Workspace settings.
3. Click on Import/Export Data in the top right corner of the panel.
4. Pick the Export tab from the available options.
5. Under Export date range select the option from the dropdown menu that fits the information you want to export.
6. Start Export
Once you have started the export, Slack will send you a dedicated email. Open the email and visit your workspace’s export page to download the zip file with all your information.Click on the ‘Ready to download’ button once it appears and store the zip file on your device.
Accessing the import from Slack panel on Rock
You can access the import from Slack functionality through your user settings. Click on your user image in the top left corner, user settings, and select importers. From the available options in the panel, select ‘Slack’.
Importing your Slack workspace into Rock
A new panel opens up when you select ‘Slack’ where you can upload the zip file you downloaded from Slack. There are two additional fields you can select when importing:
Send email invites to all team members: Send a dedicated invite to the members of channels when migrating so they are directly added to the relevant spaces on Rock.
Add all imported slack channels into a space folder: Automatically create a folder to include spaces you moved from Slack. This makes it easier to separate already existing Rock spaces from your imported Slack workspace.
Rock directly imports all information into the different spaces for you. Additionally, imported messages are tagged with ‘message imported from Slack’ and automatically assigned to team members. Make sure that team members join with the same email address they have on Slack.
Add your Slack files to Rock with a cloud storage integration: Google Drive, Dropbox or OneDrive
While the original import does not directly import your files, you can still make all past files accessible with a Google Drive integration.
1. After exporting your chat, import it to Google Drive or another location.
2. Download the Zip on a device and Unzip it to view all the files.
3. Upload all files from your Zip folder to a Google Drive, Dropbox or OneDrive account.
5. Success! You can now access all your Slack files right from within the Files mini-app.
Questions & Answers
Is importing from Slack free?
Yes, you can import unlimited workspaces from Slack to Rock without any cost.
Will my team members automatically get a folder with spaces as well?
No, invited team members will not get the folder. They can easily create one manually if they are looking into organizing their spaces with folders.
If I import a second time from slack, will it update the messages into the same spaces?
No, it will create a new set of spaces with the information provided in your import.
I'm receiving a 'file not supported' error when importing, what should I do?
Here are two possible solutions for a 'file not supported' error:
Make sure that the Zip file is saved at the correct level, and not through the sub folders.
If your download is not a zip and you’re on Mac, Safari, check your browser settings for downloads. In the menu bar, go Safari -> Preferences. In the "General" tab, uncheck "Open 'safe' files after downloading". This will stop Safari from automatically unzipping your import file.
Why should I import from Slack to Rock?
Rock allows you to combine messages with tasks, notes and files. This means that you can combine your conversations with project management and keep communications more documented, centralized and organized.
Can I import 1:1 spaces from Slack to Rock?
No, it is currently not possible to import 1:1 spaces from Slack into Rock.
A robust file management system ensures the best workflow for remote teams. This is why we allow a mix of in-app file uploads and online drive service integrations to enable teams to get the most out of their documentation and files.
Proper documentation is integral to working asynchronously as it helps people function without needing to ask others for more detail constantly. This is why we’ve enabled Dropbox users to integrate their drive into Rock’s Files mini-app. We’ve made it easy for teams to consistently share files and improve documentation through our Dropbox integration.
How to add Dropbox to Rock ?
Dropbox is an account-based integration which means that once you connect the drive service with rock, you will be able to connect folders and files across different spaces without integrating the drive again.
To add Dropbox to Rock, follow these steps:
Step 1: Enter the files mini-app and select Dropbox.
Step 2: Click on Dropbox, and a new tab or popup will open asking you to sign in to your Dropbox account. Dropbox may ask you to do additional verification steps to prove you’re human.
Step 3: You’ll be prompted to allow Rock to give access to your Dropbox. If you cancel, then the integration will be aborted.
Once you allow the integration and it's completed, you will be redirected to the Rock space where you set up the integration.A prompt in Rock will list all your Dropbox folders. You can then choose which folders you want to link to Rock.
Adding Dropbox Folders to spaces ?️
You can add your own or shared folders to the Files mini-app of a space. You cannot upload individual files. All files you want to upload from your Dropbox onto Rock must be in a folder.
When you link a folder into Rock, all folders and files in that folder will be accessible from the Files mini-app in your space.
All you have to do is click on the folder name to view and access the contents - both files and subfolders.
📝 Note: Users will not be able to access the folders in the spaces you have uploaded them to unless you have given them permission in Dropbox. Ensure that you update user permissions in Dropbox if you want them to access files and folders within Rock. Alternatively, you have to ensure that users are part of the space that they need files access to. Even if a user has all the necessary drive permissions, they won’t be able to access the files within Rock if they are not part of the space.
If you want to go back to the main Files mini-app panel or into a previous folder, press the < Folder on the top left corner of the panel.
Once you’ve successfully linked a drive service and have added files and folders to the Files mini-app in a Space, you can use the blue + button on the lower right-hand corner of the Files view to add more drive services.
Files Hover Buttons ?️
If you want to open a Dropbox folder or file in a new tab, you can press this button, which will open the file or folder within the Dropbox page.
The second button is the Set Aside button, allowing you to Set Aside a folder or a specific file.
The third button is the unlink button, which allows you to unlink the folder you initially linked to Rock. You cannot unlink subfolders or files within the originally attached folder. This means you can only unlink the main folder you initially linked in Rock.
Using Your Dropbox Folders and Files Across Your Rock ?
Since you’ve integrated your Dropbox folders and files onto Rock, you can easily add these cloud-based files as attachments to your tasks and notes.
Note: You can also authorize cloud services via this feature if you don’t have anything authorized yet.
You’ll need to click on the “Link Cloud Storage” option to link a folder or file to a specific task or note.
📝 Note: Linking files or folders to tasks doesn’t work when entering tasks in board view…for now.
Removing Documents or the Integration from a Space ✂️
Removing folders
You can remove folders from a Dropbox integration by pressing the red unlink button.
Everything inside the folder won’t be accessible in the space but will still exist in its owners’ Dropbox. Of course, you can always link a folder back to the space if needed.
You’ll need to have admin permission in the space to remove others’ folders. However, anyone can remove their uploaded folder, even those former members or admins who have been downgraded to guest.
You can only remove the linked folder, not a subfolder or document. If you want to remove access to a particular subfolder or document within a folder, you can either:
Remove the information from the parent folder in Dropbox.
Or unlink the parent folder and manually add subfolders except for the one you don’t want to be visible in the space.
Removing the integration
You can remove the Dropbox integration by going to user settings > Authorized Apps > press Disconnect.
Once you remove the integration from your account, the connected folders and files won’t be accessible in the linked spaces but will still exist in the Files mini-app.
You can reauthorize access after disconnecting Dropbox on a previously connected folder. Once you re-integrate Dropbox, all folders in your different spaces will become available again.
If you want your folders not to be visible once you remove the integration, you will have to unlink the folders from your spaces manually. You can do this both before and after deauthorizing Dropbox.
Frequently Asked Questions on the Dropbox Integration?
What happens to folders I linked in the Files mini-app if I leave/am removed from a space?
When you leave or are removed from a space, your linked folders will be unlinked from the Files mini-app. If you re-enter the space, you must connect the folders again.
What would happen to my folders and files if I were to delete my account?
When you leave a space, all cloud services you integrated will be disconnected, and all folders you linked will be unlinked.
What happens to folders and files from suspended accounts?
Folders from suspended accounts will still be available for access in the space unless they are unlinked or are deleted from their drive services.
What happens if I move my folder to a different location on Dropbox? Will I have to add it again?
The folder will still be accessible in a space, but user permissions might change. Some users might gain or lose access depending on changes to the folder or the permissions available in the new destination.
What happens to folders in a space if they are deleted from Dropbox?
It will appear that Rock cannot find the folder, and no one will be able to access the information. Folders and files that are contents will disappear when reopened. You can unlink the deleted folder to remove it from your Files mini-app.
Can I give a user permission to access a folder from Rock?
No, you’ll need to grant access permissions or send invites to the user through Dropbox.
Can the Rock Team see what is inside the folders I connect to my spaces?
No, the integration adds the information to your space. We are not able to see what documents you have in your folder. Additionally, if users in space don’t have permission, they won’t be able to access information.
Is there an upload limit to my folders in Dropbox?
Upload limits are irrespective of Rock. Make sure to check your storage limits on Dropbox. You can keep uploading files on Dropbox via Rock as long as Dropbox’s storage quota lets you.
What happens to folders and files if everyone leaves a group space?
As soon as all members leave the space, all file storage information and integrations are removed.
Using sprints can be beneficial when work is completed in cycles. Whether you are a product & engineering team or marketing and design looking for an efficient production schedule, sprints on Rock might be your solution.
Sprints are integrated into the tasks mini-app. This feature allows you to walk away from busy excel sheets or discussions that do not easily connect with your collaboration flow and enable you to focus on smaller, more achievable tasks to get more work done quickly.
In this short guide, we’ll work on giving you a quick run-through of the sprints feature so that you can create your own on Rock and manage work more effectively.
This feature is available to all Unlimited plan users. If you want to start using Sprints to improve your workflow and project management, check out our pricing page!
Creating Your Own Sprint
Step 1: Choose an existing team space or create a new one where you want to use sprints.Before creating sprints into spaces, you’ll need to ensure that the space has been upgraded to PRO. Both 1:1 spaces and group spaces can be upgraded to PRO.Rock
Tip💡: When creating a new space, you can pick from various templates for group spaces, allowing you to get started on creating tasks and managing projects faster than ever!
Step 2: Enter the Tasks mini-app and update the list names to ensure that it fits your workflow and project needs.
Step 3: Create a task and select "Add sprint"
Step 4: Name your sprint to create a new sprint or add the task to an already existing sprint
Step 5: If you are creating a new sprint, you can optionally set the start date and due date for the sprint duration.
Step 6: Continue adding tasks to a sprint or create more sprints if your project requires so. You can add already existing tasks onto sprints by opening the task’s edit panel.
Following up on your sprints
In addition to creating sprints, it should also be easy for you to keep track of the activities done within them. Rock has four convenient filtering options in the tasks mini-app to help you keep track of and manage your different sprints:
All tasks: This view provides no filtering on sprints and will display all tasks created in a space and not archived.
All tasks with sprint: Filter to view only those tasks that have been assigned to a sprint. This can help you focus on what needs to get done within your established time frames.
All tasks without sprint: Have some tasks that did not cut the last sprint programming? You can easily find them back by filtering your space for all tasks without a sprint.
Individual sprints: Individual sprints will be displayed at the bottom of the view. When selecting one, your task board will update itself only to show the tasks within that specific sprint. You can use the search bar on top to find a particular sprint back if you have many different sprints.
Note that any archived task will not appear in the board view even when filtered on a specific sprint UNLESS the toggle for archived tasks has been switched.
If you create a task and add it to a sprint with a time frame, then the task’s start and due date will adapt to the sprint start and due date of the sprint it is added to. However, these task dates can be manually changed into other dates from the task editing panel.
If you still have questions about creating and managing your sprints, you can reach out to us through the Rock Team space.
Frequently Asked Questions for Sprints
Can I put a task under more than one sprint?
No. A task can only belong to one sprint.
What happens to my sprints if I downgrade a space from PRO to FREE?
Sprints that have already been created and added to tasks remain but cannot be edited. You cannot attach or remove existing sprints to tasks on a FREE space.
Can I create a task with different start dates and due dates from the sprints they’re in?
Yes, but the due/start date must be adjusted from the task panel after the sprint is added. Adding a sprint changes the dates of the tasks to the ones of the sprint.
Can I delete sprints? If so, how?
Yes, sprints can be removed only when no more tasks are assigned. Once the sprint is empty, you can use the "edit" option displayed next to the sprint name on the "add sprint" dropdown and then remove it by using the "Delete Sprint" button.
What happens to a task if the sprint is a part of it is deleted?
You can't delete a sprint if any task is a part of it. But you can rename it and change dates if needed.
Can I extend the due date for a sprint?
Yes, both a sprint’s start and due dates can be edited. However, editing sprint dates won’t automatically change the start and due dates of tasks already assigned to the sprint. Only newly assigned tasks will take on the sprint's new start and due dates.
What happens to an unfinished task if the sprint it is in is already due? Will it be considered an overdue task?
No, overdue tasks are only marked based on their due date - but since setting a sprint automatically adds a due date, then the task may be marked as overdue if you do not manually change or remove the due date of the task. This feature makes sprints very useful for putting multiple task in the same time frames.
What timezone are the sprint's start and due dates in?
The sprint's start and due dates are based on the timezone of the creator. Don't worry; Rock localizes the time based on the user's local time on the computer so that everyone will see a different due date!
We understand that some users may need to export tasks from specific Rock spaces and import them into other project management systems or other Rock spaces!
Exporting tasks is easy, and we’ll take you through the different export options available through Rock.
❗Important Note: The export option is only available to the space administrator. If you want to export tasks, you'll need to ensure you have the admin role.
There are limitations to the export format of the FREE plan, and if you wish to export tasks in CSV and Excel format, you’ll need to upgrade to the Unlimited plan.
Accessing the Export Menu
You’ll need to enter a space’s Tasks mini-app to access the export features. From there, you click on the kebab menu or the vertical “...” on the upper right-hand side of the app. Once you click on the button, you’ll be able to see the export options depending on your plan.
The option is accessible on both the fullscreen mode…
And compact mode.
Exporting Tasks
To export tasks, click on the format you wish to export your tasks to. Once you click it, the file will automatically download to your device.
Remember that: FREE spaces admin can export tasks to JSON and XML format, while PRO spaces admin can get the FREE export options plus Excel and CSV.
Importing Exported Tasks to Other Spaces
If you’re interested in importing tasks into one space from another within Rock, ensure that you export your tasks in CSV format.
However, you’ll need to ensure that your file is according to Rock’s template as the import cannot recognize other fields.
There are several ways for you to import tasks via CSV on Rock.
To access the import template, go to Space settings…
Then click on the > on the Import Tasks section and then click on Custom CSV.
Alternatively, you can import a CSV file directly from the tasks view.
Or from your Account Settings’ Import option.
However, when importing from this option, you’ll be asked to select the space you want to import to, and the spaces listed are only those you are an admin of.
Once you click on the Custom CSV button, it will open a prompt where you can opt to upload the file or download the template, allowing you to import tasks easily. You’ll need to ensure that your exported CSV file is aligned with the import template for it to be imported into your chosen space.
Once you import the CSV according to the app’s advised template, it should be smooth sailing. Any incorrect formatting found in the file will result in an upload failure. During the import, you can additionally tag tasks with labels available in the space or add new ones.
If you have any other questions regarding exporting tasks on Rock, feel to connect with the Rock team over at Rock Support & Updates space.
Frequently Asked Questions About Exporting Tasks
When I export tasks, does that export all the tasks in the space?
Yes. Exporting tasks happen on a space basis. Therefore, all tasks on the space will be exported according to your selected format.
When I export tasks, does that include tasks that have been completed?
Yes. All tasks are exported, even those that have been completed.
When I export tasks, does that include tasks that have been archived?
Yes. All tasks are exported, even those that have been archived.
I’m on the Unlimited plan. Is it possible for me to export all tasks to our company?
Currently, there is no way to export all tasks across all spaces in your company. Exporting works on a per space basis, so if you want to export all tasks in your company, you’ll have to export all the tasks in every space.
Are you looking to quickly create a large amount of tasks or move documented information over to tasks? The import from CSV functionality makes it easy to quickly import information into Rock.
How to access import from CSV
Import from CSV can be accessed from user settings. Press your user image and click on import. Then select import from CSV from the available options in the panel.
Alternatively, you can also access the import from CSV functionality directly from the space you want to import tasks to. Enter the Tasks mini-app and select the three dots in the top right corner.From the dropdown menu select Custom CSV to access import from CSV.
Managing the CSV import template
After selecting import from CSV from either the Tasks mini-app or your users settings, a panel opens up with a CSV template. You can fill this template in with your own information and then reupload to Rock to import your data as tasks.
The downloaded folder, saved as ‘generic-tasks’, includes the following files:
generic-tasks.csv file with the main template.
generic-tasks.xlsx file with a workbook that includes a shorter version of the template.
readme.txt file with a technical walkthrough of the functionality.
Currently one format is supported:- CSVFuture versions of the feature will include importing from Excel workbook. We will update this help guide once it becomes available.
Managing the Generic-tasks.csv template
The data on the .csv template is formatted as follows:
The first row of the .csv file contains the column names.
Following rows will be converted into dedicated tasks once migrated into your Rock space.
There should be no empty rows between tasks or the header and the tasks, this will break your import. You must fill out the required fields (ID and Title) in every row, other variables can be left empty or be removed if you wish to do so.
When opening the file, you’ll see the available columns for importing information. Required columns (ID & Title) must have a non-empty value for every row/task. Empty values will cause an ‘invalid file’ error when trying to import the tasks.
Adding columns that do not follow the template will cause your import to break with an ‘invalid file’ error.
Column names are case-insensitive, e.g. "title", "TitLe" and "TITLE" are all accepted for the import. You can remove columns (except for those marked as required) from the template if you’re not planning on entering information into the field for any task.
Column names cannot repeat, except those marked as "repeating" (assignees and labels). If you repeat a column not marked as repeating your import will break with an ‘invalid file’ error.
The file includes the following fields: ID (required), title (required), description, status, start date, due date, sprint, priority, assignees (repeating), labels (repeating). Read along for more information on each field.
ID (required)
IDs are unique fields that serve as an identifier to a task. Each field that must be unique among tasks in your CSV. If an ID is duplicated, the task occurring later in the file will overwrite any previous ones.
ID’s can be useful if you plan to update task descriptions, labels or other information from a large set of tasks in your import at a later stage. The ID is a direct link to a task in your import, even for future uploads. Note that comments, cloud attachments and other changes will not save when you override a task with a new import.
This field won’t be visible within Rock, and is also not equivalent to the task number: e.g. @task:1. The order of tasks is instead determined by the row number of your import.
Title (required)
This field becomes the task title once information is added to your space. Don’t forget to add quotation marks (“”) if your task title includes a comma, if not your import will break as an additional column is created.Titles can be at most 1024 characters long. Text will be truncated if information exceeds this limit.
Description
This field will become the task description once imported. Don’t forget to add the information with quotations at both ends if it includes a comma, else your import will break.The description can be up to 10240 characters long. Text will be truncated if information exceeds this limit.
Status
Status determines what list your information will be saved in. If you leave the status list empty, tasks will be added to an unnamed list. You can create new lists with the import, and the import does recognize already existing list names in the space.
Start date & Due date
Information you put under these columns will be converted into the start and due dates of a task. The current import allows you to add start dates and due dates in the following formats:- YYYY-MM-DD - "2020-04-21"- Unix timestamp - "1587462915"
Sprint
Information added to this field will be converted into a sprint. Note that the sprint in question will not have a start and due date, so you have to manually add the dates after your successful import. You can learn how to do so here.
If your space has not been changed to PRO you will not be able to access the functionality until you change the space in question to PRO.
Priority
You can add a priority level to your imported tasks. You can enter the values for priorities either as text, or as a number.
Disclaimer: the assignees field is not functional yet, we will update this help guide once the CSV import accepts this field. You can add information to the column but it won't be migrated into Rock.
Labels (repeating)
Add already existing or completely new labels to tasks. If a label already exists in a space then that same label will be added to your imported tasks.
Labels are marked as "repeating" meaning that it can occur multiple times. They will be combined into a list, with each occurrence being treated as a single item. Duplicates will be removed.
For example, consider the following CSV file:"id","title","labels","labels"1,"Pay rent","bills"2,"Buy gas","bills”,"car"Task #1 will have the title "Pay rent", and one label: "bills".Task #2 will have the title "Buy gas", and two labels: "bills" and "car".
Importing your CSV to Rock
Once you have finished editing your CSV file you can upload the filled out template in the dedicated field.
When uploading from user settings, you have to select a space for the tasks to be imported to. Meanwhile, if you’re uploading tasks from the Tasks mini-app, there is no field for selecting the space.
You can add a dedicated label to imported tasks so you can more easily keep track of them. The functionality currently allows you to add 1 label to your imported tasks. This is not a required field and can be left empty if you wish to do so.
If you upload the CSV in the future again, with the same set of IDs, past information is updated. Note that the import overrides any changes you have made to a task previously, such as comments, cloud file attachments, or list changes (unless specified).
Questions & Answers
How many rows can my CSV have?
There is no limit on the number of rows in an import. Note that the Tasks mini-app functionality might start to slow down when adding too many tasks to a space.
My field includes a comma, how can I still add the information?
For fields that include a comma, please use quotations in your text fields. It’s best practice to add quotations by default to most fields to make sure nothing falls through the cracks.
What is the character limit for an ID?
There is no character limit for an ID, nevertheless, we recommend not making them too long to simplify managing your information.
I’m receiving a ‘wrong file format or file size exceeds limit’ error. What could be causing this?
If you are receiving an error when importing your information make sure that:
All columns in your final file were part of the initial list of variables.
There are no typos in your column names.
It’s best practice to use quotation marks in most text fields, as they allow your import to not create new columns after commas in text.
You have information in all the mandatory fields (ID and task title)
There are no empty rows in your import.
Does the import from CSV functionality accept custom fields?
Import from CSV does not accept custom fields. We are looking into this feature and will update the help guide once it becomes available.
Does import from CSV allow for text formatting in my description?
Current import functionality does not accept formatting such as bolding, bullet lists, cursive or other text modifications in your description.
What information changes when I reupload a CSV into the Tasks mini-app?
All information except for attachments, checklists and comments will be renewed when you reupload your CSV into a space. Note that if you deleted one of the tasks it will not be recreated as the ID was already used once in the space.
Quick Connect (QC) is a Rock feature that allows other users to connect with you (surprise!) quickly.
Users who scan your QR code or click on your personal space.new link will automatically open a space with you, making it easy for you to connect with people both within and outside your organization. Anyone can now quickly open a group space with you using your link which can easily be shared on social media, your website, email, or any other external page.
Not sure how to maximize this feature? Here are some nifty uses for Rock’s Quick Connect:
If you’re a freelancer, it’s easy for you to onboard your clients or agencies you work with onto Rock as it only takes a few seconds in order for them to open a space with you.
If you’re a business or an agency, it’s frictionless onboarding for your clients to join you in Rock.
If you’re into business development, it will be easier for potential leads to connect with you as it only takes a few seconds to open a space with you.
Setting Up Quick Connect
Here's some simple steps to set up your QC.
You can find your Quick Connect link by going to Settings. In Settings, you can find your space.new URL as well as a handy QR code that anyone can scan to instantly set up a group space with you.
Personalize the experience by adding a welcome message to your QC spaces. This can be anything from a 'Welcome to my space' to 'Here's some information I need to get started: [...]'.
Share your space.new link or QR code. When someone clicks on your link or scans your QR code a new group space is created on Rock.
You will see a list of spaces that have been created and can then decide if you want to join. You will have the option to hide your email or phone number in QC spaces.
Keep control over your QC links by toggling the ON/OFF switch.
If the QC is set to OFF, people who try to access your QR code or click your link will not be able to create a space with you. You’ll also have the option to reset your link.
All you need to do is to press the three dots in the top right corner of the panel.
Note that once you reset your link there is no way of restoring it to a previously used Quick Connect link.
Quick Connect Unlimited⚡
Everyone gets their own space.new URL but by default, this is a random combination of characters. However, the Unlimited plan users have the option of claiming their own personalized Quick Connect link.
We’ll explain more about it below:
Claim your own custom Quick Connect link
With Quick Connect Unlimited you can claim your own custom space.new URL (for example, space.new/hello or space.new/yourcompany). Each QC link is unique and is awarded on a first-come, first-served basis.
Go to your Quick Connect settings by tapping on your profile image
Select "Claim your own custom Quick Connect link with PRO" and upgrade your account to Unlimited
Once upgraded go back to your Quick Connect settings and press the ✏️ edit icon.
You are now able to claim your custom QC link.
Use templates for QC spaces
With Quick Connect Unlimited, you have the option to select a template for the space that will be created. This can be useful if you have a specific space in mind to be created when your Quick Connect is used.
For example, you can set your Quick Connect to a Project Management or a Marketing Campaign space in order to easily onboard clients or colleagues onto projects. Custom templates will also be added soon in order to allow you more flexibility with the Quick Connect spaces created with you.
Use cases for QC
There are several immediate use cases where we can see that you can fully make use of our Quick Connect feature. We want you to be able to use this tool and wow teammates and clients alike with it.So… we’re listing them down below to give you some ideas on how you can maximize this tool and capitalize on your custom link:
Add it to social media posters, using the QR code as the call to action. You can then make sure to have a welcome message and a template set up to ensure a smooth experience for leads when they open a space with you.
Add your Quick Connect link to your email signatures - impress your clients and leads by opening a ready-made and polished Rock space with you.
Add your Quick Connect QR or link to your LinkedIn Page will allow leads and potentially interested parties to get in touch with you quickly. Make discovery calls more meaningful by ensuring that you both fill out Notes and Topics and coordinate meetings and discussions all within your space.
Add Quick Connect to your portfolio - closing the deal can be made easier if you can show your potential clients the way you organize and manage your project. What better way to show them than by doing so right when they connect with you, right?
Add Quick Connect to your Customer Support channels - make it easy for anyone to get in touch with you or your support team by adding the Quick Connect link or QR on the appropriate contact us pages.
If you’ve got any nifty use cases for Quick Connect you’d want to share, feel free to drop a message at the Rock Support and Updates space. We promise someone from the Rock team will be more than happy to listen to your suggestions!
Frequently Asked Questions
How many spaces can be opened via QC?
There’s no limit to the number of group spaces that can be opened with you via Quick Connect. However, one person cannot open multiple Quick Connect spaces with you.
Who can create a space with me via QC?
Anyone can create a space with you via Quick Connect. Once the space is created, you’ll have the option to join the space or not.
I have an Unlimited account and it won’t let me claim my space.new URL. Why is that?
It could be that the URL you chose is too short. You’ll need at least 7 characters in your link. The maximum is 30 characters.It could also be that the URL you want has already been taken. Remember that URLs are on a first-come-first-served basis.
Can I change my custom space.new URL once I’ve picked one?
Yes, you can. But note that once you change your custom link, your old one will be available for other users to use.
What happens to my custom URL if my Unlimited plan expires?
The custom link is saved to you for 30 days. After that 30 days, it will be available for anyone to use.
What happens to people who will try to create a space with me in Quick Connect if the toggle is off?
Scanning the QR code or clicking on your Quick Connect link will not open a space with you if the toggle is off. There will be a prompt display that the URL has been changed or disabled if the toggle is set to off.
Can I add other people to the spaces created via Quick Connect?
Yes. Spaces created using Quick Connect are group spaces, which means that you can add as many users as you want to the space.
Can I change the name of the Quick Connect space created?
Yes, you can once the space is created through space settings!
Set Aside is a unique Rock feature that we added to allow users to seamlessly access important information stored in tasks, notes, topics, messages, and files.
To access your set aside items, press the clock button on the bottom left-hand side of the app. It's right on top of Activities and Help.
The items you set aside will appear in chronological order on the Set Aside panel. The more recent items you've set aside will appear on the top of the list, and the older ones will appear further down.
Clicking on each item in the Set Aside panel will directly open the object's edit panel, where you can easily access everything you've set aside.
Aside from teaching you the basics of Set Aside, we'll also teach you how to set aside items to maximize your productivity by ensuring that you don't have to sift through spaces and lists to find items you'll need quickly.
You can Set Aside a whole variety of information on Rock. The panel allows you to quickly access the following objects once added:
Files (Files from cloud services or Rock files, etc.)
Folders
Setting aside messages
You can set aside important messages from chat by hovering over the message you want to set aside. Once you hover, a prompt will appear where you can select Set Aside on the message. Next, click on the Set Aside icon to add the message to your Set Aside list.
Setting aside notes, tasks, and topics
To set aside notes, tasks, and topics, you need to enter the editing panel of the object. Once open, there will be a Set Aside option on the top part of the app, right beside the mention button. The procedure is the same for notes, tasks, and topics.
Setting aside files and folders
Setting aside files and folders requires you to go to the files mini-app.
Once you’re in the mini-app, it will show you all the folders you’ve integrated. Hovering over those folders will give you the option to set them aside. You can also set aside files and subfolders once you enter a folder. You can also set aside files uploaded into Rock.
Similar to other objects, the option to Set Aside will appear when you hover over the items.
Removing Set Aside items
To remove items from your Set Aside panel, click on the “x” on the upper right-hand corner of each item. Clicking the “x” button immediately removes the item from your Set Aside list.
You can remove them by clicking the same set aside button inside a task/topic, etc.
If you remove all items you have set aside, you can use the "Clear all" button on top of the Set Aside panel.
Set Aside Tip
The Set Aside feature can be a powerful tool for task management and prioritization. You can use this feature to set your daily/weekly priorities so that you can work uninterrupted. All the elements and objects you’ll need to complete your work as efficiently and effectively as possible can be set aside.
That way, you don’t have to go through numerous spaces and get distracted by unnecessary chatter, especially when you have deadlines to meet and other things to work on.
Frequently Asked Questions for Set Aside
Can anyone see the objects I set aside?
No, these items are added there only for you. Each user will have a completely different set of set aside items, depending on their priorities.
Can I rearrange objects in my set Aside panel?
No. But if you want to move something to the top of the list, you can open the object from the set aside panel, remove it from set aside, and set it again.
Can I set aside comments?
No, but you can set aside answers in topics.
Can I see the objects I set aside across all devices I use?
Yes, the list is saved on your account. So you will see the same objects on each device as long as they are logged in to the same account.
The duplicate tasks feature allows you to save precious time while managing and setting up your spaces in Rock. You can both duplicate tasks to the same space and duplicate tasks over to other spaces. Duplicate tasks are included in the Unlimited plan.
How to duplicate a task
Step 1: Enter the task you want to duplicate
Step 2: Press the three dots in the top right corner
Step 3:Press "Duplicate Task"
Step 4: Edit any fields you want and choose the list or space you want to see the duplicated task, then click on "Add Task" in the top right corner.
A duplicate task will be assigned to the list the parent task is in (unless changed) and the same space the parent task is in (unless changed).
Fields that are duplicated
Duplicated fields copy the information of the original task. You are still able to make changes to them if you want to do so.
The space a task is in
The list a task is in
Task title
Task priority
Task labels
Task description
Task checklist
Fields that are not duplicated
Some fields are emptied when you duplicate the task. In the duplicate task view, you can still make changes to them and format them according to the work you need to get done.
If a task is moved from a PRO space to a Free space, all exclusive PRO functionality will be lost from that task.
Duplicating tasks across spaces
Duplicating tasks across spaces makes it easier to set up multiple spaces with similar tasks for activities such as client onboardings, marketing projects, or product development. They might also be used when a task has been completed in a previous development phase, and you want to move it over to a new space.
Check out the video below for more information on duplicating tasks across spaces:
The process is the same as duplicate tasks within the same space, but at the top of the view, you can select a drop-down menu to choose what space you would like to move the task to.
You can duplicate tasks both to 1:1 and Group spaces. If you have a lot of different spaces, you can also find the space in the search bar.
You can reach out for help in the Rock Customer Support space on Rock if you have questions about using duplicate tasks.
Frequently Asked Questions on Duplicating Tasks
Is duplicating tasks available for free users?
No. Duplicating tasks is available only to the Unlimited plan users.
Some elements are not duplicated. Why is that?
As mentioned in the guide above, some elements cannot be duplicated and must be set manually. To reiterate, these are:
Custom fields allow you to add more information to your tasks in Rock. You can add custom fields to help add more information to the task to benefit your workflow, project, or team.
This product guide shares everything you should know about using custom fields in Rock.
Getting Started On Custom Fields
Custom Fields are part of the Unlimited plan. To use them, you must upgrade your space to PRO. Check out our pricing page for more information about paid features in Rock.
Once your space has been upgraded, you’ll be able to add custom fields to your tasks.
Accessing Custom Fields
On Rock, there are two ways for you to add custom fields, and we’ll explain them both briefly here:
Task Fields Panel
To access the Custom Fields panel, click on the gear icon ⚙️ found in the top right corner of the tasks mini-app panel.
Once you click it, a new window will appear that will list all the fields in your tasks.
If the space has been upgraded to PRO, an option to add custom fields will be available on the upper-right-hand side of the panel. Unfortunately, the option will not be available to FREE spaces.
Task Panel
You’ll also have the option to add your custom fields when you click on an individual task and open its panel.
Once you click on the “Add Custom Fields,” it will open the task fields panel, where you can see all your available task fields and have the option to add a custom field.
Adding a custom field
You can add a custom field by pressing “Add custom field” on any of the options mentioned above.
Once open, three options different input options appear, depending on the kind of input you’ll need:
? Short Text: Allows 255 characters of text. You can add text and links or quickly mention something important in this field.
? Number: This allows you to store a numerical value.
? Dropdown: Create a dropdown menu with different options. Dropdown menus can be adjusted after being created by pressing the “<” next to the custom dropdown field in the tasks fields panel. Note that labels might be a better choice if you want to add many different options to the dropdown menu.
Repositioning fields
You can change the position of some fields in the task view if you would like to do so. For example, you can swap fields with the "=" sign to the left of the fields. To reposition fields, you only have to drag them by pressing the "=" and positioning them where you’d like to see them on your task.
In addition to the mentioned fields, all custom fields can be positioned wherever preferred between the fields with an "=" icon.
The board view fields panel
The board view fields panel allows you to select which fields you want to see while in the board view of your task board. This way, you can choose how much information is displayed in the task board view.
Whether you want to simplify your view and remove most options or work very technically and see as much as possible, this functionality allows you to do just that.
All you have to do to toggle the view of different views is press the eye icon on the right side of the panel.
All information that can be viewed in the board view can be removed except for:
The task title
The number of comments on the task
The number of attachments in the task
Information removed from the board view will still be visible in the individual task. The image below represents the difference between selecting all fields on the board or hiding all of them.
You can reach out for help in the Rock Support & Updates space on Rock if you have any questions about using custom fields.
Frequently Asked Questions on Custom Fields
What happens to my custom fields if I downgrade a PRO space to FREE?
You won’t be able to add or edit custom fields anymore. Likewise, you won’t be able to fill in the custom fields in the newer tasks.
Can I set specific custom fields to be required so my colleagues don’t forget to put details on it?
Currently, you cannot set specific fields to required or optional. The only required fields are tasks and the list it will be in.
Can I remove non-custom fields from my tasks panel view? I don’t need it because it’s not being used.
Currently, you cannot remove non-custom fields from the tasks panel view. You can only re-arrange the order in which it appears on the panel.
There are a variety of features in notes to structure, personalize and highlight information.
In this guide, we'll go over the different text editing features you can use to format and improve your notes in Rock.
Every written note can contain up to 10.000 characters. If you want to write more you can always create several notes or attach a Google Doc to your space.
Main text features
There are four main text editing features: bolden, cursive, and strikethrough. Besides using the dedicated button in the note you can also enable a few of these features through the use of keyboard shortcuts:
Bold: Hover over and select the text you want to bold, then press control + B on Windows or Command ⌘ + B on Mac to bold text.
Italic: Hover over and select the text your want to change to italic, then press control + I on Windows or Command ⌘ + I on Mac to set text to italic.
Strikethrough: You can currently only stripe through text by pressing the "S" icon next to the underline.
There is currently a bug affecting our underline formatting option. Underlining a text won’t show as underlined even though it’s been saved. We’re aware and we’re looking to work on it.
Advanced text features
Quotes: Add quotes from people or things mentioned in a meeting to reference a person specifically. Press the quote icon to activate it.
Code: Write relevant code in your notes and inverse the view of the information to a black background with white text. Select </> to activate the feature.
Embed Links: Embed links by selecting text and pressing the link icon 🔗. When manually writing a URL (beginning with www) it will also be clickable.
Text position and lists
Decrease indent: Move text forward by one tab position.
Increase indent: Move text back by one tab position.
Bulleted list: Start a bullet list, like this very one you are currently reading.
Numbered lists: Start a numbered list: 1,2,3 and so on...
You can also use indentation with bulleted and numbered lists to build out multilevel lists in order to better detail ideas and sub-ideas within your notes.
Mention anywhere and other features
It’s possible to mention tasks, topics, spaces, attachments, and other notes in a note’s body. This is important especially when you’re trying to cross-reference other materials into the notes.
You can’t mention users in the body of the note but you can mention users in the comments section.Aside from mentions, you can also upload or link attachments to notes which are connected files with relevant information to the note, think of any type of files such as images (JPEG, PNG...), video files, or PDF documents.
Note that a note must have text in order to save it, so if you want to only add attachments you would still have to add text.You can also add labels to note if you wish to further categorize them. Additionally, you can add yourself or other users as followers if you want to receive notifications for comments in the note even when not directly mentioned.
Frequently Asked Questions on Formatting?
Who can use formatting in notes?
At the moment, only users who are in spaces with the member or admin roles can edit notes. Guests can still contribute by leaving comments but edits can only be made by members or admins.
What happens if the note goes beyond 10,240 characters?
Users won't be able to input anything in the note once it reaches 10,240 characters. If you need to write down notes that are longer than 10,240 characters, you can write another note or attach a file to it.
Why is formatting important?
Formatting in notes helps improve the readability and clarity of the text. It will make it easier for everyone in the space to understand or skim through the notes.
Can I use emojis in my notes?
Yes! Emojis are supported in both the note title/name and body/contents. You can put as many emojis as you want as long as it’s within the 10,240 character limit.
How many files/cloud files can I attach to a note?
You can attach up to 100 files on a note. It’s a combined limit of both cloud files and local attachments.
Will people automatically have access to the attached cloud files in my notes?
No. Permission needs to be granted from their cloud service provider (Google, Microsoft, Dropbox, etc.) before people can view the files from their Rock app.
Up to how many levels can you create on lists?
The indent format function allows you to create multilevel lists (both numbered and bulleted) in order to improve note details and enumeration. However, you can only create up to 9 levels. After that, the editor will not allow you to indent further.
Every space in Rock has a notes mini-app for you to document information and share it with team members, clients, partners, and freelancers. You can create up to 50 notes per space on the FREE plan. On the Unlimited plan you create an unlimited amount of notes.
Notes are helpful when you want to keep important information at hand within Rock. Think of How to use Rock explanations for new clients, meeting minutes, or rules/ guidelines for communities.
Creating notes is easy, and anyone in a space can read them. However, only members and admins can create new notes and edit existing ones, so it’s essential to ensure you have your space settings and user permissions appropriately configured.
This product guide will dig into creating your first notes and how you can archive or delete them when they are no longer needed.
Creating a note?
Since notes help store important announcements, updates, or information you don't want to lose in the chat stream, we’ve ensured that there are several ways for you to create a note in a space.
We'll dive more in-depth into the methods for task creation below:
The messaging panel
Use the (+) note option that will allow you to quickly switch and create notes when messages or tasks don't cut it anymore. This option is convenient when you have already written a long message that you wish to convert into a note. Pressing the (+) note button will automatically fill the note with the text from your message.
Notes mini-app
Access the mini-app by clicking “Notes” on the top part of your space. Press the large blue (+) button on the bottom right corner once the panel opens to create a new note. The main difference between the (+) note button and the notes mini-app is that you can also browse previously created notes when you’re in the mini-app.
My Notes
You can also create and add notes through My Notes, which you can access on the left-hand side of your app, under Spaces and My Tasks. Once you click on the large blue (+) button, there will be a box where you can type in your note. You’ll also have the option to select which space you’d want to add the note in. Make sure you’re a member or admin of the space, or else you won’t be allowed to create a note.
Tap to Organize
Another option is to create a note from a message. Click on the button “Change to” next to the message and then click on the Note logo. This will open the Notes panel, where you can add your note. It’s also possible to create a note across multiple messages when you click the checkbox across various messages.
Alternatively, a prompt on the bottom of the screen will also pop up, giving you the option to create a note using a message or move messages to a note's comments section.
Deleting and archiving a note ?️
Notes can be deleted or archived if you want to clean up the Notes mini-app of a space. Once you delete your note, you’ll get a prompt asking you if you really want to delete a note as you won’t be able to retrieve its information and comments.
You can always archive a note if you want to remove a note from your Notes mini-app but don’t want to lose any information in the note.
Archiving a note means removing it from your list while keeping the information within your account. It’s just not in an “active” state.
To access any archived notes, toggle the “Show archived” bar on the upper left-hand corner of a space's notes mini-app, and it will show any archived notes you have.
If you have any archived notes that you want to unarchive, you click the “Unarchive button.” Note that you’re still able to set aside or mention notes that have been archived. If unsure what space the archived note is in, you can always view My Notes and then toggle “Show Archived” to show all the archived notes you have across different spaces.
Note that archived notes will only show on My Notes if you're the creator, an assignee, or a follower of the note.
If you have any other questions or suggestions for improving our notes feature, feel free to reach out to the Rock team via the Rock Customer Support and Updates space.
Frequently Asked Questions on Notes
Who can create, edit, and delete notes?
Anyone with the admin or member role in the space can create, edit, and delete all the notes in that space. Guests can still contribute to the discussion by making comments in the notes.
Is there a limit as to how many notes I can create? Yes. on the FREE plan you can create up to 50 notes. On the Unlimited plan you can create an unlimited number of notes.
Can someone else delete a note I created?
As long as that person is an admin or a member in the space, they can delete notes in that space.
Is there a limit on how much I can type on each note?
Yes. Right now, every written note can contain up to 10,240 characters. Once the note reaches that amount of characters, Rock will now allow your note to be saved.
Oh no! I have a really long note. What can I do given your character limits?
You can always opt to break down your notes into several separate notes or upload attachments to a note. We recommend that you put all the exhaustive details onto a file and attach the file via the Files mini-app. You can learn more about notes here.
Can I insert an image into the note content?
No, you can’t insert an image into the note’s body. However, you can add an attachment to the note if you need to add images.
When I archive a note, will it become hidden from all space members?
Yes, when you archive a note, it will be hidden for all space members unless they have the “Show Archived” option toggled.
How can I retrieve a deleted note on Rock?
Unfortunately, you can’t retrieve a deleted note on Rock. Before deleting a note, we show a popup informing users that deleted notes cannot be recovered and give them the option to archive the note instead. Archived notes can be unarchived, and you can keep all information and comments in the note.
Recurring tasks make managing daily check-ins, weekly reports, monthly invoices, or any other repeating activity easier. No need to remind yourself to create new functions as tasks automatically get set to a new due date once it’s marked as done.
Our recurring task feature takes a completed task and renews its due date to a later one. However, it’s important to note that the feature will only work once the previous task has been marked as completed.
You can use recurring tasks in all PRO spaces. In order to create PRO spaces you need to subscribe to the Unlimited plan. If you are in one of PRO spaces you can still use the recurring tasks feature in that space without subscribing to the Unlimited plan.
Creating your recurring tasks ?
For the recurring tasks feature to appear, you first have to set a due date for the task you want to be repeated. After a due date is set, the recurring tasks icon will appear to the right of the due date.
Time intervals ⏰
After pressing the recurring tasks icon, you can choose in what time interval you want your tasks to be created:
Daily: Repeat the task every day; you can choose whether you want this process to continue for weekends or not by pressing the checkbox. Lastly, you must select what list you want these tasks to be moved to after completing them.
Weekly: Tasks are repeated for certain days of the week. This is handy if you have an activity that happens only a few days a week (e.g., create a task on Mondays and Wednesdays). After selecting the days, you have to choose what list you want these tasks to be moved to as it recurs after they’ve been completed.
Monthly: With the monthly option, you can program the recurring tasks to appear on a particular day of the month; for example, if the same invoice request happens once a month, you can create a recurring task. Once the day is selected, you can choose what list these tasks should be moved to as it recurs after completing them.
Stopping tasks from recurring?
To stop tasks from recurring, you can click on the repeat button, and the prompt to set recurring tasks will appear. Click on the “Remove” button and save task changes.
Reach out to us in the Rock Customer Support space if you still have questions or suggestions about activating, creating, or managing recurring tasks in Rock.
Frequently Asked Questions About Recurring Tasks
Can anyone make recurring tasks?
Yes, anyone with the role of admin or member in a space can make recurring tasks as long as the space that the task is housed has been upgraded to PRO.
Is the task automatically recurred on the chosen day?
No, it is recurred when it’s marked as done (moved to a list in which tasks are considered completed), and at that moment, its list and due date are changed according to the chosen criteria.
Will a new task be created every time I want it recurred?
No. Once completed, the same task will be moved to the chosen list, and its due date will be changed to the desired one. The feature reuses the same task and sets it back as a “to be done” based on your chosen list and your new due date.
My task didn’t recur even though I set it as a recurring task; what happened?
It might be that you haven’t set the task as complete yet. Once you set it as complete, it will be moved as unfinished to the list you selected, and the new due date will reflect.
Can I create a biweekly task /yearly task?
No, there is no way to create a biweekly or yearly task at the moment. Currently, we only offer daily, weekly, and monthly options for tasks.
I don’t see the “Repeat” button and can’t set my task to recurring; why is that?
You’re probably not seeing the “repeat” button because you haven’t set a due date. Once a due date is set, the option to recur tasks will occur.
What happens to my recurring task when space is downgraded from PRO to FREE?
The task's recurring settings are remembered, but you cannot edit it anymore. You can still edit other fields of the tasks as necessary, though.
If you prefer to view your tasks in detail, then the list view is perfect for you. This view comes up when you click on Tasks and then List on any space (as the default view is the Board view).
There are a few filtering and sorting options, and you can scroll the view to the right to see more fields or down to see more tasks.
Fullscreen view and compact view
There are two available view sizes for you when looking at your tasks via the list view: fullscreen and compact. By default, the view of the list view is on fullscreen, which means that it will take the whole area of the app.
You can click on “Compact” in the upper right corner of the UI to set it into Compact view.
The compact view will compress the task list into the same size as the right-hand panel of the app. You can then scroll sideways to view other filtering or sorting categories.
The list view works the same in both views. However, there are some limitations to the compact view:
When you want to apply filters, it automatically switches to the fullscreen view - but when filters are chosen, you can go back to the compact view with the filters you’ve selected with no problem.
Toggles: Completed by me, Closed, and Archived are not displayed at the compact view - but when switched or toggled from the fullscreen view, they can be cascaded onto the compact view.
Creating new tasks
For fullscreen view, you can create a new task by pressing the large blue (+) in the bottom right corner of your screen if you want to make a task in the expanded tasks panel, and a task card will open.
For compact view, there is an “Add Task” button at the bottom of the panel. You’ll need to add the task’s title to the “Add task” bar before a task can be created. Once a task is created, it will appear on your compact view task list, where you can click on it to edit it for more details and descriptions.
Viewing tasks
Viewing tasks is virtually the same for either fullscreen or compact view. You can easily view tasks in the space by clicking on the task name. It will automatically open the task’s details on the right-hand side panel.
From there, you can make edits or updates to the task. Don’t forget to save your changes!
Updating, moving, sorting, and filtering tasks
To edit a task in the expanded list view, you only have to press the field and change it. Note that it is impossible to change a task's name in any of the views. You must enter the task if you want to change its name. Important task details like start dates and due dates can also be added. However, note that you’ll need to add a due date before being able to add a start date.
Editing and updating tasks are quickly done on your list's compact or fullscreen views. As mentioned above, there are just some minor things you’ll need to take note of, such as setting up filters or activating toggles while on compact view.
Here are the filtering options for the list view:
Assigned to me: Filter by all the tasks that have you as an assignee.
Due date: Filter by the past due date, no due date, due today, tomorrow, and in the next 7 days. Only one of the options can be selected at the same time.
Date last updated: Filter by today, yesterday, last 7 days, or last 30 days. Only one of the options can be selected at the same time.
Task lists: Filter by the lists created by you. For example: to-do, doing, and done. All selected lists will appear when filtered.
Labels: Filter by labels created by you. When selecting more than one label, a task must have all selected labels before it can appear.
Assignees: Filter by task assignees. When selecting more than one assignee, all tasks will be displayed where any of the chosen assignees are present, whether they are together or not.
Assignee status: Filter by assignee status: none, doing, blocked, or done. When selecting more than one status, all tasks will display where any of the selected statuses are present, regardless of their presence in the same task.
Created by: Filter by the member who created the task. When selecting more than one person, all tasks will appear created by the individual(s).
Priority: Filter by priority: lowest, low, medium (default), high or highest.
Sprint: Show only tasks assigned to a sprint or tasks not assigned to a sprint.
In addition, you can also sort your listed tasks with the following options:
Task: Sort by the name of your tasks.
Task lists: Sort by the lists created by you. For example: to-do, doing, and done. All selected lists will appear when filtered.
Assignees: Sort by task assignees.
Labels: Sort by labels created.
Priority: Sort by priority: lowest, low, medium (default), high, or highest.
Sprint: Only available for PRO spaces. Sort by the sprint the task is a part of.
Start date: Sort by the start date of your tasks.
Due date: Sort by due dates.
Updated: Sort by the date the task was last updated.
For the list view on My Tasks, you’ll have additional options to filter tasks:
Task age: Option to filter tasks depending on age/duration - Tasks in the last 3 months, Tasks in the previous 6 months, Tasks last year.
Due date: Option to filter tasks depending on their due date - Tasks due today, Tasks due in the next 7 days
Assigned to me: Filter by all the tasks that have you as an assignee
Created by me: Filter to show all tasks you’ve created.
Followed: Filter to show only tasks that you’re following.
All: Show all tasks assigned to you, created by you, or followed by you.
Frequently asked questions for task list view
Why can’t I see tasks completed by me in the list compact view?
By default, the toggle to show tasks completed by me or archived is switched off. However, it can be turned on in the fullscreen view.
Can tasks be deleted or archived directly from the list view?
No, you will need to click on the task and enter its panel to delete or archive it.
Is it only possible to see tasks and list names on the list compact view?
Not at all. All the other columns are also visible on the compact view; you just need to scroll sideways via the scrollbar at the bottom of the panel.
Is it possible to rearrange the column order?
At the moment, it’s not possible to do so. But if this is something you’d like to see, feel free to let us know over at the Rock Support & Updates space.
Tasks are the lifeblood of projects. So here at Rock, we've made it easy for anyone to create tasks. We've also made sure that tasks can easily be created across the different features and mini-apps of our app.
On the FREE plan you can create up to 50 tasks per space. The Unlimited plan allows you to create an unlimited amount of tasks.
In this guide, we’ll explain the different ways you can create tasks and get your team’s projects moving.
Creating tasks from the chat panel
The task box under the message panel comes in handy when you want to make a conversation more actionable. Sometimes during a discussion, next steps or action plans to come up. Thus, we’ve made it easier for you to directly create a task for an action item instead of discussing everything through a conversation or meeting.
The task panel will open for you to document what needs to be done.
Converting chat messages into tasks
You can also turn chat messages into task descriptions. To do this, simply type in the intended description on the chatbox and then click on the +Task button below the chatbox.
Once you do so, a create a task panel will appear and the text you typed in the chat box will automatically appear in the task description field.
Don’t forget to add the task title before hitting the “Add task” button or else you won't be able to create a task!
Using Tap to Organize to create tasks
In line with our rationale of making work quicker by streamlining processes and workflows, we also allow for users like you to easily convert any message on chat into tasks.Creating a task from a message is simple. All you need to do is hover over the message and click on the task icon beside “Change to:”
Once you click the button, the task creation panel will open and the message will automatically be placed in the chat description. Note that if you select more than one message, only the latest message selected will be included in the task.
Task creation from the Tasks mini-app
You should use the tasks mini-app when setting up a space or creating a group of tasks as part of a work cycle, or sub-project. The tasks mini-app is also great for keeping track of your work, but more on that later.
When creating more than one task, the mini-app provides better insight into the different stages of your workflow and gives you a better overview.
Access the tasks mini-app by:
1. Pressing Tasks at the top of your interface
2.a If you're in the compact screen, a small panel will appear that lists all your tasks. You'll be able to add a new task by filling in the "Add task" field and then clicking "Add Task +". The text you'll write in the "Add task" field will automatically become the title of the task.
2.b If you're in fullscreen, click on the + button in the lower-right hand corner of the app. Click "Create A New Task" and the task creation panel will appear.
Use My Tasks to create new tasks
When you’re in the My Tasks panel, you can easily create a task from there. All you need to do is to click on the + button on the lower right-hand corner of the app.
Once you click on the button, a task creation panel will appear, which will then prompt you to assign a space where you want to create your task at.
Before being able to successfully create a task, don’t forget that a task title is required. All the other fields are optional and can be added later on.
You can reach out for help in the Rock Customer Support space on Rock if you have any questions or suggestions about creating tasks.
Frequently Asked Questions on Creating Tasks
Who can create tasks in a space?
As long as you are a member or an admin of the space, you can create tasks in that space.
How many tasks can I create?
On the FREE plan you can create up to 50 tasks per space. The Unlimited plan allows you to create an unlimited amount of tasks.
Who can edit tasks in a space?
Yes, as long as you are a member or an admin of the space, you can edit tasks in that space.
Can I import tasks to Rock?
Yes, we offer several import options for importing tasks to Rock. At the moment you can import tasks from Trello, Asana, Jira, ClickUp, and from custom CSV files.
Can anyone delete my task?
Only members and admins of a space can delete a task. Note that any member or admin of a space can delete tasks, you don’t need to be the task creator to do so.
Who can comment on tasks?
Anyone regardless of roles can leave comments on tasks.
Are you creating new spaces on Rock? This product guide explains all you need to know about setting up communications with new 1:1 or group spaces. Rock allows you to create new spaces with anyone: your team, partners, volunteers, and freelancers.
On the FREE plan you can create up to 3 group spaces and an unlimited number of 1:1 spaces. The Unlimited plan allows you to create an unlimited number of group and 1:1 spaces.
Creating a new space
You can create a new space by pressing the blue ➕ button in the bottom left corner of your screen. After pressing the button, you can choose whether you want to create a 1:1 or group space.
How to create a 1:1 space on Rock?
1:1 spaces are useful for direct communication with team members, partners, clients, freelancers, etc. You can invite anyone to open a 1:1 space with you either by email or phone number. Press ‘invite by phone’ if you want to invite someone by phone number.
The invite button turns blue after entering a valid number or email address. Press it to create a new 1:1 space.
📝Note: there is no way to invite more people to join a 1:1 space later. Create a group space and invite only one person if you plan to include more people in the conversation later.
If you enter an email, the user will receive an invitation in their inbox. When you enter a phone number, the invited number will receive a text message with the required steps to sign up or open a space with you.
How to create a group space on Rock?
You can work alone, with another person, or with multiple people in group spaces. Invite new members to the space later on if you have admin or member permissions.
Setting up your group space
When you press "Create Group Space,” a panel appears with some configuration options.
Select template: You can choose from a variety of template spaces if you want to set up your workflow quicker or if you want to see a space with some edited lists and steps to get started.
There are eight different options for template spaces that you can choose from:
Operations: manage day-to-day activities, tasks, and responsibilities.
Recruiting: Review candidates, set up interviews, and move to offer.
Product Roadmap: Prioritize feature requests and track your product development
Product Design: Discuss new features and design product improvements.
Marketing Campaign: discuss designs, content, and strategy with your team, freelancers or clients.
Engineering: Manage the different stages of the engineering process.
Project Management: manage projects from start to finish.
Customer Support: Complete tickets and keep customers happy with a customer support process that flows.
All template space characteristics can be changed after its creation, and you can create as many template spaces as you want. There are three main elements you can configure when creating a group space:
Space name: provide a display name for your space.
[Optional] Change space image: You can manually change the default space image to a different emoji (press the emoji icon ?) or upload an image from your device (press the cloud icon ☁️).
[Optional] Enter a description: Describe what kind of project, collaboration, or ongoing activities are being completed in your new space.
Different space configurations can be changed after creation, so you can always go back and change the space image, name, or description.
Inviting users to your group spaces
After creating the space, you will be prompted to invite new users by email or invite by a link to join you in the space.
Invite by link: copy the link and share it with anyone you want to invite to your space. Links can be reset in the future if you wish to disable link functionality at any point.
Email: add the email address of the people you want to invite. If they are not on Rock yet, they will receive an invitation to join the platform; if they are already on Rock, they will see the new space appear in the ‘All spaces’ panel.
Name: invite people by name if you already have another space open with them; this way, you don’t have to look for the correct email manually.
If you plan to add many people to a new space, you can paste up to 100 emails separated by comma, semicolon, space, or newlines to save time.
You can also use this method when the space has already been created, in case you want to make changes to your space before inviting people to join or if you're going to collaborate with more than 100 people.
User roles in group spaces
When inviting new people to your space, you can toggle between two different types of permissions:
Guest: Guests can chat, start video calls, and comment on tasks/notes/topics. If guests try to edit or create new tasks/notes/topics, their changes will not save.
Member: Members can invite new members and guests, create/edit/delete tasks/notes/topics, and link/unlink cloud storage providers.
📝 Note: users in a 1:1 space with you will have the same permissions as you. There is no way of changing their permissions in the 1:1 space.
After creating the group, you can upgrade members or guests to admin in the space settings. Admins can remove users and messages and manage user roles. Keep in mind that new admins can downgrade your permissions in the space, even if you are the creator of the space.
Missing a template or have any questions about creating spaces? You are always welcome to contact us in the Rock Team space for anything!
Questions & Answers
How many 1:1 spaces can I create?
You can open unlimited 1:1 spaces with new people on any plan.
How many group spaces can I create?
On the FREE plan you can create up to 3 group spaces. The Unlimited plan allows you to create an unlimited number of spaces.
How many people can I invite to my group spaces?
On the FREE plan you can invite up to 10 people per group space. The Unlimited plan allows you to invite an unlimited number of people to your spaces.
Can I invite users by phone number to a group space?
No, it is currently impossible to invite new users by phone to a group space. First, invite them to join a 1:1 space; then, you can add them by name.
My invitee has not received an email to join me on Rock; what should I do?
Ask the user to check their spam or promotion folders if they have not received anything within 15 minutes of the invite being sent out. If they are still not able to join your group space, you can also send them an invite link.If you invited the user to a 1:1 space and they are not receiving an email, ask them to sign up independently on Rock and check whether the space appears. If not, please reach out to us via the Rock Support space.
Someone invited me to a new space, but I couldn’t see it. What could have caused that?
Ensure you are on the ‘all spaces’ view and not in a folder. Additionally, make sure to ask the person who invited you to the space to enter the correct user details in their invitation.Refreshing the desktop, browser, or mobile app can help display the information.
I’m receiving unwanted space invites from someone. How do I stop this?
You can block a user by entering the space settings of a 1:1 space > more > block peer. Blocked peers cannot send you messages in a 1:1 space or anywhere else. If you want to unblock a user, switch to archived space > the users’ 1:1 space > space settings > more > unblock peer.
The board view provides a Kanban-like view of your different tasks.Lists are displayed in columns highlighting the different stages of your workflow. Before creating your first task make sure to adjust the different lists to the stages of your work.
To access the board view simply click on the Board View button on the upper-right hand side of the app when you click on the Tasks mini-app
Editing Your List
To make it easier to manage tasks, make sure that you adjust and edit your lists according to your workflow and processes before creating your first task.You can do this by pressing the three dots on top of any list.
💡 Rock Team tip: We suggest not using too many lists unless strictly necessary, as more lists further complicate your workflow.
Each task card will display some of the fields in the task cards so you can get a better perspective on who is doing what. Visualizing stages also creates a better overview for your workflow.
Editing the board view settings
You have the option of editing the fields you’d want to see on the board view. To do so, you’ll need to click on the Settings (gear) button while on list or board view, then you’ll have the option of toggling certain fields when looking at the board view.
The board view fields that you set are individual settings, which means that everyone can set their own board view fields without changing it across the space.
Creating a new task
Select "Add task" on the top of each list. If you want to create new tasks in the board view.
💡 Rock Team tip: If you find yourself creating a lot of lists in board view, labels might actually be a better option.
Updating, moving, sorting and filtering tasks
It is not possible to sort or edit tasks in the board view. The only available change is changing the list of a task or changing the task's order within a list.
You can move tasks across lists in the board view or change its order in the list by dragging and dropping them to the lists where you would like to see them.
If you want to make changes to a task you have to enter it so that the task panel comes up or move to the list view.
In the board view it is possible to filter by the following task fields:
Assigned to me: Filter by all the tasks that have you as an assignee.
Due date: Filter by past due date, no due date, due today, due tomorrow and due in the next 7 days. Only one of the options can be selected at the same time.
Date last updated: Filter by today, yesterday, last 7 days or last 30 days. Only one of the options can be selected at the same time.
Task lists: Filter by the lists created by you. For example: to-do, doing and done. All selected lists will appear when filtered but you’ll only see task in the filtered lists.
Labels: Filter by labels added to tasks. When selecting more than one label a task must have all selected labels to appear.
Assignees: Filter by task assignees. When selecting more than one assignee all tasks will display where any of the assignees is present, whether they are together or not.
Assignee status: Filter by assignee status: none, doing, blocked or done. When selecting more than one status all tasks will display where any of the statuses is present, regardless of them being present in the same task.
Created by: Filter by member who created the task. When selecting more than one person all tasks will appear created by either of the individual(s).
Priority: Filter by priority: lowest, low, medium (default), high or highest.
Sprint: Filter by task by the sprint it’s on. Only available for PRO spaces.
Frequently Asked Questions About Board View
I can’t move a task from one list from another, is there something wrong?
It might be that you might not have the appropriate role to be able to edit tasks. Make sure you are a member or an admin of a space in order to move tasks across lists.
Can I edit tasks in the board view?
No, you’ll need to click on the task and open it to edit it. Don’t forget to save any changes you’ve made!
Can I display My Tasks in board view?
No, unfortunately, there’s no board view option for My Tasks at the moment.
Can I display the board on compact view?
No, you can only look at the board view on full screen.
Looking to personalize or make changes to your spaces in Rock? This product guide explains everything you should know about space settings in Rock.
Rock has five different kinds of spaces:
Personal space: This space only includes you, so you can document or keep important information at hand.
1:1 spaces: This space was created for you to collaborate with only one other person.
The 'Rock Support & Updates' space: Use this space to receive and share any information directly with the team.
Group spaces: Work alone, with another person, or as many other people, in- and outside of your company.
'All hands' space: When you sign up with a corporate domain we automatically create an All Hands space so you can more easily connect with other users under the same domain.
You can access space settings in two ways in every space:
Press "Settings" in the top right corner of your space.
Press the name of the space in the top view.
Your personal space
Your personal space is just for you. It is created when you first create your account on Rock. You can use the space to add any messages, tasks, notes or files you want to keep to yourself. If you want to share a task from your personal space with another user you can still duplicate the task across spaces.
Your personal space can't be unpinned, hidden, archived or deleted. It will always be placed first in your pinned spaces section. There are no personalized adjustments in the settings of your personal space such as changing the name or description.
1:1 spaces on Rock
A 1:1 space is just for you and another user. There is no way to invite more people to a 1:1 space in the future. You can invite anyone to join a 1:1 space. Send unlimited messages, tasks, notes, files and meetings. 1:1 spaces are great for individual conversations with team members, clients, freelancers, partners or volunteers.
There are a few settings you can manually adjust in 1:1 spaces:
Mute the space: This will block all space notifications until you manually unmute the space. Notifications from other (not muted) spaces will still work as usual.
Pin/unpin: You can pin a space if you want it to appear in the "? Pinned" section in the top left corner of your screen. This allows you to always keep a space close.
More: The "More" button provides you with two options:
Archive a space if you plan to stop using a 1:1 space.
Block the other user if you don't want to receive 1:1 messages from them or want the space to disappear. Blocking a user does not mean they are blocked across all group spaces. You can unblock a user in the future if you want to do so.
Group spaces
Group spaces allow you to collaborate with as many people as you want. You can create them from a template, or create a completely new one. You can also duplicate them if you have the Unlimited plan. Just like 1:1 spaces you can mute the space if you don't want to receive notifications and pin the space if you want to keep it close at all times.
Once your group space is created you can add people by contact or email. You also receive an invite link which allows you to add members more easily. If you want to invite people later on you can do so from space settings.
Change your space icon
You change the icon of your space in two ways:
Emoji library: Choose an icon from the emoji library. There are hundreds of options to choose from across categories!
Device file: Upload a file from your device as the space image, you can adjust the corners to your liking. Make sure that the image looks good when shown in a circle as the corners will be cut.
You can change the icon as many times as you want, and you need to have member or admin permissions to change the space icon. Make sure to save your changes after you change a space icon!
Invite people to join your Group spaces
You can invite as many people as you want to join your Group spaces. Make sure that you are either a member or admin if you want to add new users. There are two buttons to add new users. One is in the top left of the space settings panel. The second is in the bottom, right under "Members".
After pressing "Invite" or "Add members" a new panel will appear. On the FREE plan you can add up to 10 people per space. The Unlimited plan allows you to ad an unlimited number of people.
If you are planning on adding a large number of people to the space you can paste up to 100 emails separated by commas, semicolons, spaces or new lines.
You can only add users as members or guests when initially inviting them. Click on the dropdown to toggle between the two options. After they join the space you can upgrade users to admins if you are an admin yourself.
Add users through invite links
Add users from the web, social media, discussion boards or anywhere else through invite links. Admins and members can access invite links in the space setting under Members. The option will disappear for members if admins disable this feature for a space.
It is not possible to create an invite link for admin status, but you can always upgrade a user once they join the space if you have admin permissions. There are a few options in the panel:
Copy link: Copy your invite link either by pressing the Copy link button or by selecting the URL and saving it.
Reset my link: Reset your own link, so your current link stops working
Reset all invite links (admin only): Reset all the links in the space, so any existing links stop working.
Disable (admin only): Remove the option to enter a space through a link completely. The panel will disappear for members and any existing link will stop working. Admins can always turn the option back on if needed. Note that new links will be generated once enabled again, and past links will still not work anymore.
Leave, archive, delete or duplicate spaces
Admins have four advanced space settings open up when pressing "More" in the top right corner of your space settings:
Leave a space: Leave a space if you don't want to be part of it anymore. You can only rejoin a space if a member or admin invites you back.
Archive space: If you don't want to see the space anymore or a project has been completed, you can always archive the space. This way you don't lose the conversations, tasks, notes and files in the space.
Delete space: Note that you must be an admin to delete a space. After pressing "delete space" we ask you to confirm once in Rock and once through your email. Deleted spaces, including its contents, cannot be retrieved. So make sure you don't want to use it anymore.
Duplicate space: Note that you must be an Unlimited user to duplicate a space. You can move over all tasks and/or notes to a new space.
Change member roles
If you want to give a user more or fewer permissions you can manually change their role. Note that you must be an admin to change member roles, select the dropdown arrow next to the user and select their new role:
Guest: Guests can chat, start video calls, and comment on tasks & notes. They can also delete their own comments and messages. If guests try to edit or create new tasks, topics or notes their changes will not save. Guests will only be able to remove a folder if the user added a folder while in a different membership tier and was later demoted to guest.
Member: Members can invite new members and guests, create/edit/delete tasks, notes, and link/unlink cloud storage providers. Members can only edit the description of a topic if they created it.
Admin: Administrators have all member permissions. Additionally, they can remove users, messages and manage user roles. Only admins can upgrade spaces to PRO and add new integrations.
Remove users
This feature is only available for users with admin permissions in a space. Users can be removed by pressing the icon which appears when hovering over their name in the member list. Note that users are directly removed after pressing the icon. You can always invite users to join your space again in the future.
Integrations [PRO spaces only]
Integrations are only accessible if your space has been upgraded to PRO. They are also only visible to users with admin permissions in the PRO space. Check out our dedicated guide for Zapier integrations to learn more about bots and automations for Rock spaces.
The 'Rock Support & Updates’ space
The Rock team space is your personal contact point with the Rock support team. Any message you send in this space is directly sent to the team. You can use it to ask questions, share feedback or anything else you want to discuss with the team.
The Rock Support & Updates space cannot be deleted or archived. There are two personalized adjustments you can make to the space:
You can mute the space if you don't want to receive notifications from the space. Note that the messages are still sent through.
You can pin the space if you want to keep the Rock Team close at all times for questions, feedback or anything else.
All Hands space
When you sign up with a unique domain we add all new signups from that domain to an “All Hands” space. This makes it easier to find team members on Rock, especially when starting out.The all hands space cannot be deleted. If you want to remove any users there are a few options:
You can deactivate their account through your domain provider. The user will automatically be removed from the space once their account ceases to exist.
Ask the user to manually delete their account from Rock. This can be done through the user settings panel.
In the Unlimited plan a domain admin can remove other accounts from Rock manually.
Accounts that have been inactive for a prolonged period will be automatically removed from the All Hands space.
The all hands space has the same space settings as a group space, the only difference being that there are no admins. Thus, most of the membership management capabilities are limited, although you can still add new users.
PRO Spaces
Users who upgrade their account to the Unlimited plan can create and upgrade an unlimited number of PRO spaces. Upgrading a space means that PRO functionalities will be enabled for all members within the space that have been upgraded, regardless of their membership plan. Both 1:1 and group spaces can be upgraded to PRO.Each PRO space includes:
Why are there fewer space settings in non-group spaces?
Individual spaces, the Rock Support & Updates, and 1:1 spaces are created for individual interactions and don’t require any invites. They were created as a way for you to either document information or communicate 1:1 with someone in your team or the Rock team.
I want group space settings for my 1:1 space, how do I do that?
You can always create a group space and only invite one other person if you require any group settings that are not available for 1:1 spaces.
I’m looking to invite someone but it does not let me, why could that be?
You might not have the correct permissions to invite people to a space. You can always ask a member or admin for an invite link if it’s not possible to change your permissions within the space.
How do I rejoin a 1:1 space on Rock?
If you leave a 1:1 space, you will not be re-added unless you join the space yourself. You can do this by searching for the contact of the other person whose 1:1 space you left. Then, the space should reopen. This is only possible on mobile currently.
I’m trying to duplicate a space but it does not allow me to do so?
You can only duplicate group spaces. Note that you need to be the purchaser of the Unlimited plan to duplicate a space, as it’s account based and not PRO space based. This also means that FREE group spaces can be duplicated by a paid account purchaser.
Can anyone adjust space settings in a group space?
No, space settings are dependent on user roles.
A guest will only be able to change fields that connect to their own experience: muting, pinning and hiding their email if they wish to do so or archive the space if they have no need for it anymore.
Members can change the space name and image, and invite other members. They cannot remove users or add bots in integrations for PRO spaces.
Admins can toggle all described fields in the article.
How do I downgrade a PRO space?
You can downgrade a PRO space in your user settings. Go to settings -> your paid plan -> PRO spaces -> press the small x to revoke PRO functionality from the space.
There are a wide variety of fields that you can fill in when creating a task. However, it's important to note that there are only two required fields to create a task, which are: 1.) the title and 2.) the list that a task will be created in.
However, once you've created a task, you can edit them and add as much detail as necessary. To begin with this article, we'll first go into the task fields you can see on the task panel and work our way to other things like comments and updating progress.
Task fields
Every task in Rock has the following fields:
Task title: Briefly explain what the task is about.
Task List: One of the stages/lists you created when personalizing your tasks mini-app. For example: to-do, doing or done.
Task priority: How important is this task? Choose between: urgent, high, medium (default), low and lowest.
Task assignees: The team member, client, volunteer, or anyone in your space responsible for completing the task.
Task labels: Categorize, group, or add information. Labels help to filter your task board when you have many different tasks.
Task due date: The deadline to complete the task.
Task start date: When do you want the task to start? (requires a due date to appear).
Task description: Further information or details to understand what work needs to be completed.
Task checklist: Divide your tasks into more manageable steps that contribute to reaching the overall description of a task.
Task attachments: Add images or videos relevant to understanding what needs to be done.
Task followers: have people stay updated with changes and progress in a task without being assigned.
Comments in tasks
Every task in Rock has a comment section. This is handy for capturing feedback, updates, or task movements. Move away from chats and only involve those working on a specific task by leaving comments.
Comments fit asynchronous working styles better than messages as they are easier to find back than task-related chat messages. You can adjust your notifications to receive system notifications related to comments.
Updating progress at the task level
Moving and updating tasks allows everyone to stay informed on the work. Keep things moving to finish projects and celebrate completed work with your team when tasks are finished.
Tasks can be updated as often as you want, but don't forget to save your changes! There are several ways to update your tasks in the mini-app. We will discuss some of the most popular forms of managing your tasks.
When updating your progress at the task level, there are two ways to document work progress: assignee status and list.
Assignee status
Assignee status provides an update on the individual work. It comes in handy when several people work on a task, with people completing different activities within the task.
For example, several people can be added as assignees if a task needs to be reviewed. Their assignee status highlights whether they have had time to review the information or completed work. There are four different statuses available:
None: Use this status when you haven't started with a task or when there are no relevant updates.
In Progress: When you have started working on a task or looking into the different steps to take, you can update your status to "In Progress."
Completed: When you have finished your part of the work, you can update your status to "Completed."
Blocked: Block a task when you cannot start working on it for any reason. This way, everyone knows that this task won't move until your roadblock has been removed.
📝 Note: You can only edit assignee statuses from the task level. It is not possible to update them from the compact, expanded, or board view.
Changing lists
You can also update thelist if you want to move a task to the next stage or when it has been completed. You can make as many lists as you want to represent the different stages a task can be in.
To move a task across lists, select the list dropdown menu and choose the next stage for your task. You can also archive or edit the lists in this panel. Lists with a checkmark are for completed tasks.
📝 Note: If two users edit a task simultaneously, only the last will be recorded.
Frequently Asked Questions for Editing Tasks
Can anyone edit a task?
As long as the person has the role of member or admin within the space, they can change the task. If a person is a guest, they can leave comments on the task’s comment section.
I want to receive notifications about the task even though I’m not working on it. Is that possible?
Yes, it’s possible! If you want to be notified of developments or updates on a task even though you’re not working on it, you can set yourself as a follower.
Can I add custom fields to the tasks? The fields you have available are not enough for my project management needs.
Yes. If you have an Unlimited plan and upgrade your space to PRO, you’ll be able to add custom fields to your tasks.
Can anyone comment on my task? Even those who aren’t following or assigned to it?
Yes. As long as the person is in the space, regardless of role, they can leave comments on the task.
I’m unable to change the assignee status or list. What could have caused that?
You cannot edit task elements like assignee status or list as you might not have the relevant permissions to do so. Note that you need to have member or admin roles to edit tasks. Guest roles can only comment on a task.
Some of my completed tasks are not visible in the List view. How do I access them?
Tasks that have completed assignee status will be hidden from the list view. To view them, you’ll need to toggle the “Completed by me” slider on the upper-right side of the panel.
What happens to the PRO fields of the task when the space is downgraded?
The PRO feature custom fields will still be available on the task, but they will not be editable unless you upgrade your space back to PRO.
The Topics mini-app helps remote and distributed teams discuss work more asynchronously. Think of topics as threads that are more structured and more organized, and make it easier to document essential conversations.
Why were Topics added to Rock?
Messaging is great for short, ad-hoc, and more urgent conversations, but if you don't follow along with these messages in real-time, they can quickly become chaotic and distracting.
The Topics mini-app solves these issues by enabling more structured discussions, providing a better way of documenting information, and preventing notification overload.
More structured discussions
Long threads about different things can quickly get confusing, especially in bigger spaces with many members and even more messages. Keeping track of what's being discussed can become time-consuming and unproductive if you don't follow along in real-time.
Topics allow you to organize your discussions in individual & standalone issues with a title, description, and follow-up posts added underneath each topic.
Documenting information
Most teams discuss a lot of different things in one space. This can range from particular discussions about a feature to decisions on what to do next. This information is then hidden in a long list of other messages.
Topics solve this issue by providing a place where team members can discuss a specific topic in a single place. As the entire discussion is stored at the topic level, all of this information is documented so anyone can read up on this in a very organized and centralized manner.
Notification overload
When you send a message in a space, this message might not be relevant to everyone and has the potential to distract. Muting the space can be tricky as you might miss important messages relating to your project.
By organizing specific conversations into topics, notifications will only come to those who are following the discussion. While you can still read up on the different messages sent on a topic, you won't receive notifications from topics unless you are involved in a conversation as a follower.
How to use Topics in Rock
Creating new topics
You can create a new topic by going to Topics. Topics are composed of three elements: titles, descriptions, and messages:
Title: Shortly describe what your topic is about with a title.
Description: Add a description to any topic to kick off the conversation. You can also add relevant attachments to the description if needed.
Messages: Anyone in the space is welcome to join the discussion on a topic. In addition to all the functionality you typically find in comments, messages in topics also allow for threads, and audio messages.
Tap to Organize for Topics
It is also possible to convert existing chat messages into new topics. This can come in handy if you want to move a conversation into a topic, so it doesn't get lost in the long wall of other messages in space
.Use Tap to Organize by double-clicking the first message and then individually selecting other messages you want to add or move to a topic.
Messages will be added to the topic, and you can change the title and description to what best describes it. Everyone in the conversation is added as a follower in the topic, so they receive notifications for any new messages.
While some features overlap between Notes and Topics, they serve different purposes for your team. Notes are for longer-form content with fewer messaging features, while Topics are intended to organize conversations and reduce the message overload in large group spaces.
You can see the difference in functionality by the richness in messages under topics compared to comments under notes. In addition to the features in Notes, Topics allow you to create threads of messages or add audio messages to the discussion.
Questions about Topics? Reach out to us in the Rock Customer Support Space for any questions or feedback you might have.
Frequently Asked Questions on Topics
Who can create topics in a space?
Any person who is a part of the space with the admin or member role can create a topic.
Who can comment on topics?
Any person who is a part of the space can comment on any topic created in the space. We want to ensure that everyone can contribute meaningful ideas and participate in topic discussions despite their role in the space.
Can anyone edit topics in the space?
No, not everyone can edit topics. Only the topic creator can directly edit a topic’s title and description.
How many topics can I create?
You can create as many topics as you like and in as many spaces as you want, provided that you have the appropriate roles to do so. Remember that you need to be either a member or an admin in a space to create a topic.
Can anyone delete a topic?
No, only the topic creator or a space admin can delete topics.
Can I "set aside" a topic?
You can set aside any topic you want to keep close as long as you have access to those spaces. Set aside can be done by anyone in the space. It doesn't matter if you're a guest, a member, or an admin.
Does @mention work for topics?
Yes, you can @mention topics on tasks, topics, and notes. It's a valuable way for you to make sure that people can utilize the exhaustive conversations and discussions on topics across your workflow.
Can I attach files on topics?
Anyone can attach or upload files from your local drive onto a topic's comment section. At the moment, Rock does not allow for Files mini-app and cloud storage integration onto our topics.
What does it mean when I'm a follower of a topic?
Being added or setting yourself as a follower of a topic means that you get notifications or updates whenever something new comes up. It's a meaningful way to keep yourself updated.
I don’t get notified about topic changes. Why is that?
You might have changed your settings and removed notifications for topic changes and updates. We recommend that you check your notification settings and allow for notifications for topic changes if you prefer to be notified.
Would I know if a topic was updated if I’m not a follower?
Yes, if you’re part of the space and a topic was updated, then a blue dot would be displayed on the space’s topics mini-app.
The @mention anything makes it easier for anyone to discuss tasks or update teammates in-depth. This functionality allows you to easily @mention tasks, topics, notes, users, files, and spaces in a thread or message, allowing you to connect conversations and documentation with tasks better to be completed.
It lets you get teammates' attention as @mentioning them will notify them.You can type @ on the space, the comments section, or the body section to use the function. This will then bring down a popup showing the elements you need to include. You can then find the element (task/topic/note/attachment/etc.) based on its number and name in your space.
@mention items across spaces
You can easily tag users and cross-reference tasks, notes, spaces, and topics by @mentioning them in the chat box or comments section. Since we promote an asynchronous way of working, we want to make it easier for you to quickly reference existing documentation in conversations or call the right person's attention to a message.
On top of that, Rock also has some inter-space mention features that allow you to discuss tasks from other spaces in every chat. You can follow these three easy steps to cross-reference space tasks in the chat:
Select or write @space and choose the space from which you want to mention a task.
Select or write "Task" and choose the task you want to discuss.
When sending your message, the information bar will automatically appear.
You’ll need to remember that users will not be able to access mentioned tasks if they are not part of the said space.Mentioning tasks across spaces is handy when different projects or spaces are interconnected. It can also come in handy if you want to give someone a heads up about a task update from a project in your shared 1:1 space, so don’t discount the power of the specific @mention feature!
Frequently Asked Questions About @mention Anything
Can I mention anything in the comments even though I’m just a guest?
Yes, you can mention elements in the comments section of tasks, topics, and notes. In the comments, you can also mention tasks, topics, notes, and attachments from other spaces. The only restriction you’ll have in this role is being able to mention anything in the body or description of notes, tasks, and topics.
Can I change the mentioned elements in the description or body?
You can only change the description or body of topics, tasks, and notes if you have the member or admin role in a space. If you’re a guest, you can only comment on tasks.
How come I can’t see the item that my colleague mentioned?
It might be that the task/note/topic mentioned is in a space you’re not part of. You won’t be able to see or go to those items unless you’re a part of the space.
The mention doesn’t include the task name. Is there a way to see this without opening the task?
Yes, you can see the task name on the tooltip when hovering over the mention if you’re a part of the space from which the item is being mentioned. If the item is in the message, an object is also created below the message, including extra info for each mentioned task, note, topic, or attachment.
Can I mention everyone in a given space without listing them all by name?
Yes, you can. Use the @everyone mention to get the attention of everyone in the space.
Will the person I mention getting notified?
Mentioned users will get system notifications or email if they have it set in their notifications settings. If a user has muted the space they’re mentioned at; then they won’t be getting notifications. However, an activity will always be created in the user’s Activities panel if they’re mentioned.
As much as we promote asynchronous work by default at Rock, we understand that, sometimes, teams need to meet up synchronously for more creative collaborations like brainstorming.
Rock offers a Zoom integration that you can access in every space through the Meetings mini-app. This way you can meet with colleagues, project stakeholders, or anyone else you are collaborating with on Rock.
Connecting Zoom to your Rock account ?
To integrate Zoom to your Rock account, enter any space and click on the Start meeting button.
Pressing the button will open a prompt on Zoom to sign in to your account. Once you’ve logged in, you’ll need to give Rock permission and access to successfully integrate with Zoom.
📝 Note: You won’t be able to integrate Zoom if it’s not pre-approved by your account admin. Make sure Zoom integrations are allowed by your admin before proceeding.When you’ve successfully integrated Zoom, you can start a meeting from any space.
Setting up productive Zoom meetings on Rock ?
Rock has a built-in option menu that allows you to tweak some of your Zoom settings before starting your meeting.
Ticking the Add meeting note box will create a meeting note on the Rock space where the call was set-up. The note will include the name of the meeting and description so you can easily find it back. You can use the note to jot down ideas, action plans, and other details discussed during the meeting.
You can also configure your meeting room settings from Rock:
Enable waiting room: Your participants will be in a waiting room until you allow them in the meeting room.
Start video when host joins the meeting: Only allow video in the meeting once the host joins.
Start video when participants join the meeting: Toggle if you want participants’ videos to automatically turn on once they join the meeting.
Mute participants upon entry: Participants will have muted audio when they enter the meeting.
Once the meeting has been successfully created, you will see a panel similar to the one below.
A message will also be sent in the space so all space members can directly join your meeting.
Disconnecting Zoom from your account ✂️
You can disconnect a Zoom integration from your Rock profile by following these steps:
Go to your My Account by clicking on your profile photo on the left-hand side of the app.
Click the Authorized apps tab
Click Disconnect
If you want to reconnect Zoom again, you can always follow the instructions on the top of this guide!Happy Zoom-ing ?
Questions and Answers?
Still left with questions? Check whether we answer them here or leave us a message in the `Rock Customer Support` space.
Can I integrate multiple Zoom accounts to my Rock account?
No, you can only integrate one Zoom account per Rock account. If you want to work with more than one account you can unlink the first one and reconnect with a second account.
Can I integrate the same Zoom account to multiple Rock profiles?
Yes, it is possible to add the same Zoom account to multiple Rock accounts.
Zoom says I need pre-approval from an Admin, what should I do?
It might happen that you get an error regarding the pre-approval from an account admin to authorize the integration. If you are not the account admin please reach out to the person in charge. If you are the account admin you can give approval by going to Rock's page on the Zoom Marketplace -> And turning on the toggle.
Does the Zoom integration also work on mobile?
Yes, the Zoom integration also works on mobile devices. Any steps can be replicated from a mobile device. People can join the meeting in a space both from mobile or web as well if they have the Zoom app downloaded.
No one is the host of the meeting I created, what should I do?
If you’re the one who created the meeting, it means you’re automatically the host and you will need to log-in to Zoom to start the meeting.
Can anyone in my space start a Zoom meeting?
Anyone, regardless of their membership status can start a Zoom meeting.
Can anyone in my space join a Zoom meeting?
Yes, anyone in your space can join your Zoom meeting. Note that access still requires a Zoom account and accepting the person into your meeting if needed in Zoom.
Do I have to integrate Zoom to every Rock space?
No, the Zoom integration is account based. Once you have successfully established a connection you can start a new meeting in any space.
Is the Zoom integration free?
Yes, the Zoom integration is accessible to any account in any plan. Users in any plan can set up a connection and start as many meetings as they want.
Is the Zoom integration secure?
The integration is covered by Zoom’s Terms of Service and completely secure. Check out our marketplace page for more details about security and privacy practices.
The unlimited plan allows teams to collaborate on Rock without constraints. Unlock PRO spaces, the time tracker, the management dashboard and so much more. This product guide will share everything you need to know about upgrading your account.
Upgrading your account to Unlimited
Looking to switch to Unlimited? Follow these steps to upgrade your account:
Step 1: Access your user settings by pressing your image in the top left corner.
Step 2: Press the "Upgrade" tab on the My Account panel. You can also access the panel through this link.
Step 3: Select "Upgrade to Unlimited".
Step 4: Confirm the frequency of payment installments: monthly or annually. You can save up to 28% in the price when selecting annual installments.
Step 5: Press "Confirm and pay," which will forward you to the payments page.
Step 6: Fill in your card information through Stripe (our third-party app for credit card payments) and upgrade your account to Unlimited.
You will know the payment was sent through successfully when the unlimited icon appears next to your user image. You can further manage your subscription from this same panel through the three dots if you wish to cancel or change installments between monthly and yearly.
You're on Unlimited! What's next?
You're on unlimited now! With your unlimited plan, you now have the ability to upgrade past spaces to PRO in the space settings, if you have admin privileges. If not, you can request admin permissions from the space owner. Upgrading to PRO unlocks all features of the unlimited plan.
All new spaces you create or any created by managers will automatically be set to PRO. There's no limit to the number of PRO spaces you can have under your unlimited plan, and you can invite anyone, both within and outside your organization, to join without additional charges. PRO spaces include:
You should claim your domain If you are on a corporate domain (i.e. @letsrockhq.com or acme.com). This unlocks advanced member management functionality, online status, and easier team management overall.
To learn more about claiming a domain, check out the following product guide. Note that this is not possible for users under a general email domain (i.e. gmail.com, yahoo.com, etc.)
Workspaces
Now that you are on the Unlimited plan, you can create larger workspaces and configure them to your liking. Workspaces allow you to organize how you get work done on Rock by inviting users to a set of spaces at the same time.
You can easily manage the users and toggle access and permissions from a dedicated workspace panel. This is available to all users under the unlimited plan. Click on this link to learn more about workspaces.
Frequently Asked Questions on Upgrading to an Unlimited Account
What happens to all my PRO spaces and Workspaces if I don’t get to renew unlimited plan in time? Is there a grace period?
We have a grace period of 72h (3 days). All unlimited functionality is frozen if your subscription remains unpaid after this period and your account will have to comply with limits set under the FREE plan.
What happens to all the PRO features on the spaces I upgraded to PRO if my unlimited plan expires or if I downgrade my account?
At the end of the current billing period plus our 72h grace period, PRO spaces will be downgraded and advanced features will be frozen. Your account will also need to comply with limits set on the FREE plan (up to 10 members per space, 3 group spaces, up to 50 tasks and notes, 250MB upload limits, up to 3 spaces per workspace).
Do you offer special discounts to any users?
Yes, we have discounts for educators, students, and non-profit organizations. Check out their respective spaces or open a support space through this link for team assistance on the matter.
After purchasing the Unlimited plan, you must claim your domain. This way, you will get access to different team members and manage them more easily. Claiming your domain is essential to keep your data safe and to confirm that you are indeed managing the domain.
Here's how you can claim your domain:
Step 1: Enter 'Domain Admin' in user settings (you must have purchased the Unlimited plan for it to appear).
Step 2: Copy the TXT code relating to your account.
Step 3: Browse to your domain provider's website and sign in with the domain you use for your Rock account (e.g., Godaddy, Namecheap, or Google). The following guide was done with domains.google.
Step 4: Go to your domain's DNS record panel.
Step 5: You can leave the host name empty, change the type to TXT, and leave the default to TTL (3600) or enter 86400. You can paste the TXT record from your claim domain admin panel in ''Data". Once all information is added, press save.
Step 6: Wait for confirmation. In this case, google confirms that 'These DNS settings are active. Changes are published immediately but may take some time to propagate'.
Step 7: Return to Rock and press 'verify' in the claim domain admin panelIf verified correctly, the panel is renamed 'Domain Admin,' and you will be able to manage the different users who have signed up to Rock with your domain.
That's all! The membership management panel will unlock once you have successfully claimed your domain. You can now convert users in your domain to a manager, admin, suspend and so much more. Click here to learn more about member management.
Frequently Asked Questions
I'm on a general email provider (@gmail.com, @yahoo.com, etc), is it possible for me to claim a domain?
No, it is not possible for you to claim the domain as there is no ownership associated with the domain you are operating on.
The Claim Domain Admin panel is not appearing in my user settings, why is that?
The claim domain admin panel will not appear if you have a general email provider (@gmail.com, @yahoo.com, etc). If you have a custom domain and the panel is still not visible then please reach out to us through the Rock Customer Support space or this link.
Does every manager in my team have to claim our domain?
No. Only the purchaser of the plan has to claim the domain once. After that, all members of your team will appear in the panel and you will be able to upgrade them to manager or admin depending on the functionality to want to share with them.
Integrating with Github on Rock allows everyone to stay up to date on the latest developments on Github. Webhooks through Github are part of the Unlimited plan, and can be added to any space that has been upgraded to PRO.
Note that before being able to add a GitHub bot to your workspace you first have to change it to PRO.
Adding a Github bot in Rock ?
In order to integrate Github to Rock you first have to add a bot to your space. You can add new bots by going to your space settings and pressing Add next to integrations. After selecting Github a panel should open that lets you configure your bot.
📝 Note: The integrations panel is only visible for users in a space with Admin status. Ask an admin to be upgraded or have them create a bot if you don't have access.There are three major configurations for your Github bot:
Upload avatar: Change the image displayed when receiving a message from a bot. This can be useful when you receive updates from different projects/Github bots in the same space.
Name: Customize the name of your bot, so you know directly what project/update flow a message it is connected to.
Note that message configurations cannot be changed later on, so make sure to select the actions you plan to use. You can always create a new bot if you want to change the activities.
Select "Create Bot" after configuring your bot. A new panel will open up with a wehbook link that you have to use in Github. Make sure to save the link somewhere in case you wish to make changes later on as the link can not be retrieved later on.
Connecting your bot to your github workspace
Once your bot has been created you need to add a webhook to the repository where you would like to update messages from. After logging into your account, you can access the panel to add the webhook in two different ways:
You can also access the same panel through your account settings by pressing settings in the main panel, then webhooks, and then press Add webhook in the top right corner (see image below).
A new panel will open up once you press Add webhook. There are a few fields you have to adjust and customize depending on the information you want to receive through the integration.
Paste the webhook URL given from Rock under the section that says Payload URL and set the content type to application/json. You can leave the field that says "Secret" empty.There are a few options for the events that the bot sends to your chat. This is important configure to know in case you want to shorten your message or share the most important information/specific information only. You have access to the following options:
Send just the push event: The bot will only send messages for push events.
Send everything: All the triggers in your repository will be sent to your Rock space.
Select individual events: Select the different events you want Github to share in your PRO space, these include events such as check runs, forks, pushes, releases and more. Check out Github webhook events help docs or event help docs for more information on the different activities you can select.
You can also add the webhook without activating it in case you are not done configuring it yet or when a specific project hasn't started yet but you have already begun configuring your bot and Rock space. You can always activate it later on.
Once you have configured all the different fields you can press Add webhook to create the webhook.
Your bot will appear alongside your other integrations on Github when created successfully. Edit the settings of your webhooks whenever you want by pressing Edit in the same panel. There is also an option to Delete your webhook in case you are ending your project or want to remove the bot from your space/repository.
Questions? You are always welcome to reach out to us in the Rock Customer Support space in case you have any questions about adding a Github bot to a PRO space.
Questions and Answers
Is the Github integration free?
The Github integration is part of our Unlimited plan and is accessible in every space you have changed to PRO.
I purchased the Unlimited plan but cannot see the integrations panel in user settings. What should I do?
First make sure that you changed the space to PRO. Note that only group spaces have integrations from Github enabled.Additionally, the panel is only visible to users that have admin permissions in the space.
Can free users in my PRO spaces make use of the Github integration?
Yes! Anyone in your space, as long as they have the correct permissions, can access the Github integration and add new bots.
Where do I find the webhook URL from my created bot?
Make sure to store the link somewhere after creating the bot as you won’t be able to retrieve this link after closing the panel.
How do I remove a Github bot from my space?
Go to space settings.
Navigate to the integrations panel by clicking on it.
Press ‘Delete’
Note: a bot cannot be restored after it has been deleted. You can always create a new bot with the same settings if needed.
This guide will focus on user management in the Unlimited plan. After claiming your domain, you can efficiently manage your team members who fall under your claimed domain. You can manage user permissions to Rock as a domain administrator. The panel becomes available when you have claimed your domain.
The member management panel is not available for teams operating on Rock with a general domain (i.e. gmail.com or yahoo.com). The reasoning for this is that removing or suspending accounts from Rock is only permitted for accounts that you "own". With general emails, it's not possible on our side to verify whether a user is on Rock solely to collaborate with you or also works together with other users.
Users that are not under your domain can, however, be added to workspaces. Here you can still control user access to all the spaces within that workspace, regardless of domain or affiliation to your organization. Nevertheless, in terms of overall management, you cannot add non-domain users to the user management panel.
Members panel
The members' panel will list all members of the Unlimited plan. There are three levels of permission you can offer users within your domain: member, manager, and admin. Here are the main differences between each level:
Members: Users with this configuration will be able to work together in your team and you can view when they were added to your team and the date they were last active. Members can not create new PRO spaces or large workspaces within your paid plan. Members can freely join PRO spaces and make use of all PRO features. They can also be made admin in PRO spaces if they need access to admin-only functionality.
Manager: This level of permissions allows users to create unlimited PRO spaces and tap into your workspaces Quota. Managers can also view the time tracked and task progress of users in their PRO spaces and workspaces in the management dashboard and time tracker. Note that managers do not have access to the members panel.
Admin: Admins are other users within your domain that, in addition to all the functionality under the manager status, get access to the domain admin panel. This allows the user to manage user permissions. Users with admin permission can also view time tracked and task progress from users in PRO spaces and workspaces owned by different managers within the plan.
You can use the top search bar of the panel to look for users within your domain and see their current permissions, date last active, and date added.
Managing permissions and access to Rock
You can easily change user permissions from member to manager, and admin. With the unlimited plan, you can have a maximum of 5 managers and an equal number of admins. There is no limit on regular members in your organization.
To upgrade a member to admin, they must first be made a manager. To change a member to manager, use the dropdown on the right and assign the role.
You can revoke manager status through the same panel. Note that when a user is downgraded from manager to member, all PRO spaces are converted to FREE. The user will have to manually change them again, even if converted to manager again in the future.
You can further upgrade user permissions from manager to admin by selecting the three dots in the right corner of your view -> promote to admin.
There are a few other options available in the same panel:
View profile: This will give a preview of the user profile
Chat: Selecting this option directly navigates you to a shared 1:1 space. It will automatically create a new space if you do not have a 1:1 space with the user.
Add to spaces: Quickly incorporate the user into individual group spaces
Suspending users: Suspending users will deny the user access to Rock. Their information will keep being associated to the user, but it will not be possible for them to log into Rock. This way, you can more easily safeguard information when team members leave your organization. Suspension can be reversed at any time by a domain admin.
Deleting users: Sent messages and files will remain under a Blank image with the user's last display name. deleting a user will permanently remove a user from your domain. The overall account will be terminated and this action can not be reversed.
Admins panel
The admin's panel will list all the admins of your Unlimited plan. You can view their profile or revoke admin rights from the same panel. There is also a search function at the top of the panel In case you have a large number of admins to search through.
Unlimited plan panel
The unlimited plan panel displays a summary of users who have been designated as managers under your paid plan. Unlike the domain admin panel, it also includes general or third-party domain users assigned as managers. Although they aren't visible in the domain view, their manager status can still be viewed in this panel.
To add a new manager, press the "invite Managers" button. Note that you must have this user in your contacts already, so make sure to open a 1:1 space with them before inviting new users to Rock as a manager.
Users must be added to the contacts list first if they are from a different domain. If the user is from the same domain, they will be automatically recognized as a manager. However, if the user is from another domain, they will have three days to accept the manager invitation before subsequently appearing on the list as a manager.
Frequently Asked Questions on Unlimited Member Management
How many managers do I have on my Unlimited plan?
You can assign 5 managers to your Unlimited plan. At the same time, you also can have up to 5 domain admins.
Can I invite someone from outside of my team as a manager?
Yes, you can use the `Unlimited Plan` panel to invite outside users to your unlimited plan. Note that you must have them in user contacts already by having a 1:1 space with them.
Choose how you want to be notified about activities with email alerts, system notifications, or both. You can access your settings by selecting your user image in the top left corner of your screen and selecting mute notifications or settings.
Managing notifications on Rock
Within the notification panel you can switch between three different views:
System notifications: Device alerts for new activities on mobile, web, and desktop. ?️
Email notifications: Dedicated emails to inform you about new activities or task deadlines. ✉️
Updates: Outreach from the Rock Team regarding product updates or special marketing communications. ?
System notification settings
System notifications will trigger every time a selected activity happens on mobile, web, or desktop. Notifications are sent to your device in the form of audio, vibrations and visual pop-ups.
Audio & vibrations: noises across your different devices or vibrations on mobile to alert you of new activities within Rock.
Visual pop-ups: banners displaying information about new activity on Rock while you are not in the app.
📝 Note: system notifications are dependent on the settings of your device. Make sure that the sound is not muted or on low volume, and that Rock has permissions to send notifications.
Messages ?
You can choose how you are notified for new messages and replies in the chat of your different spaces with three different options.
Direct mentions & replies: This checkbox includes all messages that include your name with an @mention
All new messages: This checkbox includes all messages in the Chat mini-app of the spaces you are a member of.
None: Receive no notifications for new messages in your different spaces.
Other activities
Here are some activities you can choose to receive system notifications for:
Invite to a new space: Receive a system notification when someone invites you to join a 1:1 or group space.
Assigned a new task: Receive a system notification when someone adds you as an assignee to a task.
New reply in thread I’m in: Dedicated notifications for answers in a thread where you have 1 or more messages.
New activity in a mini-app
Receive a notification when a task, note or topic is updated (for example: changes in description, followers or any of the other fields) or when a new comment is added.
Tasks: Decide whether you want to receive notifications for changes in all tasks of the spaces you are in, tasks where you are an assignee or follower, or no notifications for tasks at all.
Notes: Receive system alerts for changes and updates in all notes, notes you are following or receive no notifications for the notes you have access to.
Topics: Choose whether you want notifications for new comments under all topics, only the topics you are following or for none of the topics.
Receiving system notifications on mobile devices
There are a few different ways to receive mobile notifications depending on the selected notification activities. Depending on the system settings, you will receive notifications when not on Rock in the following way:
Notification sounds: Your device will notify you with sound when enabled (volume not muted and mobile device with sound notifications enabled in settings), vibrating if enabled and a message pop-up.
Vibrating: If you have your device set to vibrate enabled, your device will vibrate and you will receive a notification pop-up.
Silent: If your device is set to silent mode, you will only receive the notification messages pop-up.
If you are not receiving notifications on your mobile device, make sure that you have switched on notifications for the Rock app. You can check by going to Notifications in your mobile System Settings. See below for a few examples of system settings on different devices.
After downloading the mobile app, Rock will request notifications permissions when first opening the app after installation. You can also set your preferences at that point.
Receiving system notifications on web
When you have the volume on and notifications enabled, a sound will notify you, which is independent of browser notification settings.If you mute your device, there will be no sound notification but you might still receive notification pop-ups if enabled. Note that Rock needs to be open in one of your tabs to receive a system notification.
❗Important: you must enable the permission for notifications in your browser for the website: https://web.rock.so/ This will allow for pop-up messages for your selected system notifications while not on Rock.
Receiving system notifications on desktop
No notification sound will occur when your device is muted. However, the desktop app will still send pop-ups that inform you of new messages or relevant changes. If Rock is inactive or minimized, a pop-up will notify you that a certain action has happened on Rock.
On your desktop app settings, you have the option to display the number of notifications on the app badge. You can toggle this preference by going: Desktop settings (edit menu on Windows) > Preferences > Notification count in badge.
You can also enable tray mode on your desktop app, that way you still receive notifications when not active on the app. You can enable tray mode in the same panel as the app badge. Desktop setting > Preferences > Tray mode.
Email notifications
Receive dedicated emails with information about new activities on Rock. Note that if you have only been offline for a short period, no email notifications are sent for new activity on Rock.
General email notifications
Invite to a new space: When another user invites you to join a 1:1 or team space you will receive an email with the invite.
Assigned a new task: You will receive an email when new tasks are assigned to you.
Email notifications when not on Rock
Direct mention and replies: You will receive an email if someone mentioned you with the (@) in a message, comment or note if you have been offline for a longer period of time. Comments on tasks and notes you are following or assigned to are also included in this setting.
New activity in followed & assigned tasks: Receive an email for changes (updates, removals, archiving) and new comments under tasks you are assigned to or following.
New activity in followed notes: Receive an email for changes and new comments under notes you are following across spaces.
New activity in followed topics: Dedicated emails for new comments under topics that are followed by you.
Assigned due & start dates
Receive dedicated emails when a task you are assigned to is about to start or reach its due date. Checking the box will let you receive different information on a recurring basis.
Task due in 24 hours: A daily email with all tasks that have a start or due date set for each respective day. Overdue tasks are also included so you can keep up with what still needs to be done.
Overdue tasks will appear for up to two days following the deadline. Emails will not send for tasks that are due if the task is in a completed list (displayed by a checkmark ✅) or archived. A reminder will still be sent when your status is marked as “completed” if the task has not been moved to a completed list.
Tasks due & start within the next 5 days: You receive a daily email with a summary of the tasks you are assigned to that have due or start dates in the next five days. If you don’t have any tasks with a deadline in the next five days, no email will be sent.
Updates from Rock
Toggle your preferences for receiving in-Rock and email outreach from the Rock Team regarding product updates and marketing communications.
Email notifications: Receive a dedicated email with more information about product updates and marketing communications.
Rock Customer Support Messages: Receive messages in the Rock Customer Support space for new product updates and marketing communications.
The activity panel
The activity panel records events in objects you are following, assigned to or directly involved in either through an @mention or a new message in a thread where you have sent one or more messages.
New activity is highlighted with a red dot on the bell. Note that for the red dot to disappear you have to either open every notification in the panel or press ‘Mark all as read’ in the top right corner of the panel.
There are two filters you can apply to the activity panel:
Only mentions: Filter for notifications that directly @mention you.
Only unread: Filter the activity panel to only display notifications you have not seen yet.
📝 Note:Toggling these two options does not remove past notifications, only filter them.
Blue dots
Blue dots display new activities within the different mini-apps and spaces. Blue dot notifications are irrespective of system and email notification settings and apply to changes, chat messages and new comments in the different mini-apps.
Blue dots will show in the following places:
All your spaces: On the folder icon a small number will show for all new changes across all spaces you are a member of, even those outside of the current folder you might be working in.
Pinned spaces: The blue dot represents new changes and updates to the pinned space.
Individual spaces on the list: See updates for individual spaces, note that muted spaces will not display a number for new changes.
Different mini-apps: A blue dot that represents the changes made to the Chat, Tasks, Topics, Notes and Files mini-apps.
Blue dots disappear once you enter the space or specific mini-app where a blue dot is displayed. The number on the Chat mini-app and the space list will clear when you enter a space. For other mini-apps the blue dot remains until you enter each individual mini-app
For the Tasks mini-app, an extra filter is added to the different views when changes have been made to tasks. Press ‘Updated’ to filter the view to recently changed tasks. This filter is available across the different views in the Tasks mini-app. Tasks will only display on Calendar view is they have due dates.
Muting notifications
Mute notifications when you want to have some time to focus, are out of the office, or would like to not receive notifications during certain hours of the day. The settings work simultaneously for the phone, web browser, and desktop application.
Muted notifications apply for visual, sound and sensory cues such as phone vibration. New activity will still be displayed in the activity panel and blue dots.
Muting notifications from space settings
You can mute notifications from a specific space by pressing the Mute option in Space Details. The space will remain muted until the mute is manually turned off.
You can unmute a space by pressing the same button or by clicking on the bell in the top right corner of your screen.
All notifications
In addition to muting the notifications for specific spaces, you also have the option to silence the Rock app for a certain time. Muting Rock notifications only apply for system notifications, including web pop-ups and mobile messages sounds, but you will still receive your selected email notifications.
You can access the panel by going to user settings > mute notifications.
In this panel you can select whether you want to:
Mute notifications for a specific short time frame (1 hour, 2 hours, until tomorrow)
Allow notifications for set timeframes you would like to get notifications (such as always, daily intervals, or weekday intervals).
Frequently Asked Questions
Having particular problems with notifications? Check if we answer your question here. If you are experiencing issues not solved by the product guide please reach out to us in the Rock Customer Support space.
I am not receiving notifications on my device, what could have happened?
It can be frustrating when notifications aren’t being triggered like they’re supposed to. Below we highlight some of the most common issues with notification management and their solutions:
The space you did not receive a notification for might have been muted.
Make sure you have allowed notifications in you device (either in the web browser or for mobile app in your mobile device)
Make sure you have the correct notifications enabled for either mail or system in notification settings. Go to User Settings in Rock and click on Notifications.
The Mute Notifications option is enabled during the period you want to receive notifications. Go to My Account in Rock and click on MuteNotifications to change the time frame where you can receive notifications.
Web and desktop only: Make sure you are logged into the correct account so you don’t receive notifications for other accounts. Go to My Profile in Rock and click Switch Profile. When on mobile, you receive notifications for all logged-in accounts.
I have email notifications turned on but am not receiving anything, how do I fix this?
Check your spam folder and make sure that your email provider accepts emails from Rock. If you are part of a larger organization, check with your IT department to make sure that emails from Rock are correctly filtered and whitelisted.
Does activity in a space I have archived lead to system notifications?
Yes, activity in archived spaces can still lead to notifications. Make sure to also mute the space if you want to stop receiving notifications for new activity. Notifications will still display in your activity panel. If you want to fully remove space-level updates, you have to leave the space.
The blue dots on my space are not disappearing, what do I do?
Space blue dots disappear when a space is opened. For mini-apps, you will have to individually enter each mini-app for the notification bubble to disappear.
I have notifications turned on for mobile in system settings, but am still not receiving anything, what do I do?
If you have all settings turned on for mobile and are still not receiving any notifications, please remove the app and download it again and make sure you have accepted permissions for notifications during the first run. If after that you are still not receiving anything, please reach out to us in the Rock Customer Support space and someone from the team will look into it.
Why am I not receiving notifications on the desktop app even though all settings are turned on?
If you have all necessary settings turned on and are still not receiving notifications on the desktop app try to make sure that you have the latest version or redownload the app. If after that you still don't receive any notifications please reach out to us in the Rock Customer Support space.
Are changes to notification settings immediate?
Changes in the notification panel might take up to 60 seconds to be processed. Additionally, make sure changes are made with an active internet connection for them to be properly saved.
Can I have different notification settings across devices?
It is currently not possible to have different notifications settings across devices. You can always mute your device, or revoke Rock's permissions in one of the devices if you want to stop receiving notifications for only a specific device.
Can I change the default notification sound?
Currently this is only possible for Android. You can change the sound by looking for notifications > notification categories > miscellaneous > sound and select one of the available options.
Zapier makes connecting workflows and activities between Rock and other applications easier. Zapier supports thousands of applications and helps you automate workflows and centralize information from other applications in your Rock workspaces.
Adding a Zapier bot to your Rock workspaces
Zapier bots can be added to your PRO spaces in the space details. To add Zapier, your permissions should be at the Admin level. If your permissions are not admin level, the integration panel will not be visible in your space settings.
Here is how to add a Zapier bot to a PRO space:
1. Go to space details
2. Select the add button next to Integrations
3. Select Zapier from the list
4. You can change your bot’s Name and avatar now or later
5. Click the create bot button
6. Select the copy token button
Connecting Rock to other applications
After you add the Zapier bot into your workspace, go to the Zapier website and create a Zap. Here’s a quick explanation of what a Zap is:
“A Zap connects Rock to other services through an automated workflow. They trigger one or more actions when a certain instance occurs. When a Zap is enabled, it will repeat a certain action (for example, create a task) every time an event (trigger) is recorded (such as when someone fills out a Google Form)”
Google Forms integration will be created for the following explanation guide. You can also connect to hundreds of other applications. For more information, we recommend checking out the different Zapier help pages.
Creating a Zap with Rock
To automate workflows in Rock you need to create a Zap manually at first. After that, you can share Zaps or duplicate them if you want to create similar automations across workflows.We will explain how to create a Zap by integrating a Google Forms sheet into a Rock space.
Creating a trigger
Google Forms has been selected as a trigger in this guide. A trigger is an event that starts a Zap. Once you’ve set up a Zap, Zapier will monitor for that trigger event. If you want to connect other triggers and need help, we recommend checking out the help guides shared in Zapier. Follow the steps below to create a trigger for Google Forms.
3. Create a triggerBelow are some of the common activities you can do in the trigger panel:
Name your Zap in the top left corner (for example, “Rock Google Forms Integration”).
Search for the app that will trigger the Zap.
For this help guide, we selected “Google Forms” since it is the integration we want to create. Check out Zapier’s guide for creating triggers for more information about features not discussed on this page.
4. Select your event from the trigger event dropdown menuDifferent activities are enabled depending on the application that can be triggered with the Zapier application. For our example in this help guide, Google Forms can be triggered when:
A new response is recorded in the spreadsheet (selected in this help guide)
A response is updated or a new response is recorded in the spreadsheet
If there are any activities you would like to trigger with an application that are not displayed in the list, we recommend reaching out to the application. We do not have influence over the available trigger options from third party applications.
5. Sign in to your Google Forms account
6. Select the Google Form you want to addTo add a Google Form you need to create an additional spreadsheet where the responses are recorded. Otherwise, your spreadsheet will not appear in the spreadsheets dropdown menu. Here’s how you can enable it for your forms:
Go to “Answers” in your spreadsheet.
Click the Google Sheets icon in the top right corner to display the answers in a spreadsheet format.
Name the spreadsheet and save it.
After you enable the spreadsheet, it will appear in the dropdown menus for setting up the trigger. First, select a spreadsheet. Second, choose the worksheet that you want to get the information from.
7. Test your triggerTest your trigger to make sure Zapier can retrieve information from the application. After a successful trigger attempt, a green checkmark will be displayed on the icon of the application.
Creating an action in Rock
Once your trigger has been created the next step is to create an action. An action is the automated activity that will be triggered in your Rock spaces.1. Add a new action with the plus sign or select the box
2. Search for Rock and add it
3. Customize the action you want to see in RockThere are three different actions you can trigger in Rock with your Zap:
Create a task: Automatically create a task when the trigger occurs.
Create a note: Automatically create a note when the trigger occurs.
Send a message: Automatically send a message into a space when the trigger occurs.
If you want your Zap to do more than one activity (such as sending both a message and task when an event happens) you can press the (+) sign in the bottom and add a second action.
4. Sign in to your Rock account
5. Enter the Zapier bot token from the space in Rock that you want to add the integration to
The space you want to have the integration in should be displayed in the action panel now. If the wrong space name is displayed you should check if you have used the correct token.
6. Select how Zapier should fill out your object in Rock (task, note or message)Zapier lets you fill out the fields of tasks, notes and messages. By filling out the fields, you can customize the automation more and make the integration connect to your Rock workflow better.
Automating Tasks on Rock
Zapier enables your trigger to fill out the task automatically. You can also opt for manual information entry instead. You can fill out the following fields:
Task Title: Fill this out manually or with a field from your trigger or a combination of both.
Body: Fill this field with manual information or field(s) from your trigger.
Followers: Fill this with guests, members, admins in the connected space.
Assignees: Fill this with guests, members, admins in the connected space.
Task list: Choose the list Zapier should put the tasks in.
Sprint: If the integration is part of a Sprint or renewed every Sprint, you can add it to a Sprint.
Labels: Choose from existing space labels or convert a field in the trigger into a new label.
Due date: Choose if the trigger activities have to be done by a specific deadline. The due date does not have to be a specific date and may also be something like “next Friday at noon”. Check out the Zapier guide to different field types for more information
Checklist: Add a customized checklist if there is a set of activities that need to be completed for every trigger.
Automating Notes on Rock
Zapier enables your trigger to fill out a note automatically. You can also opt for manual information entry instead. You can fill out the following fields:
Body: Add manual text and fields from your trigger to the body of the note.
Labels: Use existing labels or fields from your trigger as a label.
Followers: Choose from the guests, members, or admins in the connected space
Automating Messages on Rock
Zapier enables your trigger to automatically send a message into a space. You can also add manual information, if needed. You can fill out the following fields:
Text: Enter custom text or fields from your trigger
Parent message sequence: Choose whether the message is a reply to an existing message in the chat (use the message # that can be found by hovering over the message) or insert 0 for a message that is not part of a reply.
Testing & activating your Zap
Once your trigger has been activated and your action(s) have been filled in appropriately, you can test the Zap to make sure it is working correctly. Make sure the trigger you are testing has some test fields (for example, test completion of your Google Forms) so Zapier can send a test document to your Rock space.
Testing a taskWhen you are testing a task, it will display in the space you want to see the automation in. If you still want to change any fields you can still edit the fields in Zapier. You’ll be able to make changes to the task in Zapier after automating it.
Testing a noteWhen you are testing a note, it will display in the space you want to see the automation in. If you still want to change any fields you can still edit the fields in Zapier. You’ll be able to make changes to the note in Zapier after automating it.
Testing a messageWhen testing a message it will display in the space you want to see the automation in. If you still want to change any fields you can still edit the fields in Zapier. You’ll be able to make changes to the message in Zapier after automating it.
Activate Your ZapOnce Zapier has successfully tested the actions and you are happy with the objects created in Rock, activate your Zap by simply clicking turn on Zap.
Managing your Zap
You can always turn your Zap off or edit the trigger or action in your Zapier profile settings. You can also remove the Zapier bot in your space settings if the automation is not needed anymore.
If you have any questions about integrating Zapier into one of your Rock spaces, reach out for help in the Rock Customer Support space on Rock.
Frequently Asked Questions
Still left with questions? Check out these frequent questions for further support on the Zapier integration on Rock.
Is the Zapier bot free on Rock?
No, Zapier bots can only be added to PRO spaces which are available under the Unlimited plan. Anyone that is an admin in a PRO space can add Zapier bots.
How many Zapier bots can I add to a space?
You can add up to 20 bots to a space. After that it is not possible to add more Zapier bots to that particular PRO space. This does not affect the limit on your other PRO spaces.Note that the same bot can be used for multiple Zaps as well by choosing the same bot in the dropdown menu for the integration.
Can I add a Zapier bot to any Rock space?
No, it is currently only possible to add a Zapier bot to group spaces. It is currently not possible to add a Zapier bot to your personal space, 1:1 spaces or the Rock Customer Support space.
I don’t see the integration panel in space settings, why is that?
Zapier bots are only accessible to space admins. If you are not an admin you will not see the option to add a bot. Request one of the current admins to upgrade your permissions if you need to access the automation.
Information from Zapier is delayed, what could have caused this?
You can configure the time interval of your Zaps on Zapier. For more information please check out this dedicated resource.
How do I remove a Zapier bot from my Rock space?
Here's how you remove a Zapier bot from your Rock space:
Go to space settings
Select Zapier from integrations
Choose which bot you want to remove
Press ‘Delete’
Note that once a bot has been deleted you cannot recover it. Alternatively you could create a new bot that is configured in the same way as the deleted one.
Where do I find the Rock token for Zapier after the bot has already been created?
Tokens are not retrievable after creation. Make sure to store it on your device or somewhere where you can find it back if you want to access the token at a later point.
Remote working has always been around; it was simply never the first choice for most companies. For most, the number of hours worked or the physical presence in an office equated to productivity. However, the global pandemic has forced companies all around the world to adapt to a more remote or hybrid approach.
The problem with forced adoption is that not all companies were ready to make the shift. While tools like Slack coupled with Notion, Trello, and Google Drive made remote work possible, it simply caused too much context switching between all these different apps.
Paired with that problem, people still tried to work like they were in an office - booking meetings and blocking time off to collaborate. The problem with these meetings is that while it is productive, it has the tendency to go overtime.
People tend to squeeze in catch-up sessions that would have otherwise happened during random watercooler chats.
Instead, teams should look into trying to work things out through a combination of synchronous and asynchronous methods.
The reality is that although the world is slowly going back to normal, remote work and hybrid work are here to stay. This article aims to help those still looking to improve communications and workflow to maximize productivity and help create a better working environment.
So here are six tips you can adopt to improve your communications and improve productivity:
1. Asynchronous by default, synchronous when really needed
Remote work made employees and employers alike rethink how to manage life outside of work. In the office, it’s easy to disconnect work and life because of the physical distance. Unfortunately, in a remote work environment, it can be much harder to draw the line.
A viable solution would be to work on an “asynchronous by default, synchronous when needed” approach. This approach respects people’s time - giving them the flexibility to set work hours while still tending to personal needs and wants.
Spaces on Rock give you the flexibility to use both async and sync methods of communication with the team.
Make use of the Chat mini-app to communicate with colleagues and clients asynchronously. Simply leave a message, and anyone you have invited to join you in the space can reply to your message when they have the bandwidth to do so.
In addition, the Topics, Notes, and Tasks mini-apps provide additional asynchronous, more documented functionality. This ensures that projects are moving forward, even when people are working across different time zones or schedules.
When really needed, you can also catch up synchronously by meeting to brainstorm ideas, discuss tasks, or simply have an informal coffee chat. The Meetings mini-app is available in every space so that you can easily schedule meetings from any space in Rock. The mini-app integrates popular video conferencing platforms like Zoom, Google Meet, and Jitsi.
2. Be deliberate
When you’re working remotely, especially when you’re working from home, it’s easy to be distracted by things you have to do or by the people around you.
To keep yourself focused, set aside a block of time to be productive. When you’re on focus time, make sure not to schedule any meetings or check messages. As a result, you lessen the context switching of dealing with messages and queries for teammates and clients.
When working alone, it’s essential to focus on the important tasks, notes, files or messages you need to attend to. The Set Aside panel on Rock can help you create a dedicated list of things that require your attention for the day. It can also be used to keep something at hand so you don’t have to search across spaces.
When it comes to meetings, one of the best practices you can do to be more deliberate about organizing them is to make sure that you have agendas set up right before. This makes it easier for people to use good judgment to determine whether or not they’re needed in the meeting because they already know the topics to be discussed. In addition, this lets people involved in the meeting prepare ahead of time.
Feel free to use Rock’s Meetings to schedule meetings in Spaces directly. On top of that, don’t forget to utilize the Topics mini-apps to set or discuss agendas ahead of the meeting. Then, you can pair it with Notes to jot down essential minutes throughout the meeting.
3. Documentation, documentation, documentation
As a remote organization, you can’t walk up to a colleague’s cubicle or desk to ask elaborate questions about a task or a project. This is why a remote organization must keep detailed documentation about things to prevent bottlenecks and project delays.
Rock’s multi-function ecosystem allows for robust documentation and note-taking within tasks or projects. For example, you can quickly turn any conversation in-chat to a topic or a note. You can also add messages to a topic or task notes. These allow for better discussions as relevant discussions are grouped according to its subject.
Topics are best used to consolidate in-depth team discussions regarding a specific topic or subject. You can also cross-mention any relevant tasks, notes, and even other topics to the topic. This makes it easy to keep track of everything in one place. Topics also help reduce the noise, as they are not as notification-heavy as the chat and only involve topic followers.
Notes are available to keep important notes, findings, and further information about the subject matter in one place. It also has its comment system within it to make it easier for colleagues or team members to give feedback on the information provided.
It’s easier for project managers and clients to create complete and well-informed tasks using Rock’s Tasks mini-app. Like in the Topics mini-app, you can also mention other relevant tasks, topics, and notes to create a better context for those assigned or following the task. In addition, you can add cloud attachments from Google Drive, Figma, and more via the Files mini-app or upload it directly from your computer.
4. Don’t be afraid to speak up or ask questions
Because remote working does not typically allow for the usual chit-chat that happens in a physical office environment, it’s okay to be a little noisier when chatting. Don’t be afraid to speak up when you have something to say about a topic and don’t be scared to ask questions if something is unclear.
Create group spaces or 1:1 spaces with the colleagues you need to speak with. Group spaces allow you to add colleagues, clients, freelancers, and other external project stakeholders so that you can freely discuss anything. If you prefer to ask someone directly, feel free to open up a 1:1 space with them and discuss things.
Some Space housekeeping tips to remember would be:
Keep discussions relevant to the spaces you’re speaking up in so you don’t confuse everyone.
Open up topics if you want to discuss things in-depth or when a conversation is only relevant to a few in the space.
Set tasks and assign them to the relevant people if action plans have been made.
Mention people if they need to be notified of developments or updates in the project. You can also mention tasks, notes, files, and topics anywhere to reduce searching costs.
Everyone signing up for Rock gets added to an All-Hands space if you’re on a corporate domain. The All-Hands space makes it easier for you to create company wide-announcements without worrying if anyone missed them.
5. Pick and choose your notifications
Notifications are essential because they ensure that assignees, followers, and mentioned people aware of developments in the tasks or projects.
Rock has a robust notification system that informs you of any updates or comments on any task, topic, note you’re part of. In addition, @mention feature allows for anyone to mention or tag a person, topic, note, or task related to the project.
Make sure to allow Rock so send notifications to your device, whether desktop or mobile. That way, you can receive notifications in case something important that needs your attention pops up.
By clicking on your profile photo in the upper-left-hand corner of the app (both desktop and web), you’ll be able to set your preferred notification options for device alerts and email alerts. In addition, you can also have a look at the activity panel, which is the bell icon on the left-hand side of the app.
When it comes to notifications in the app, you can keep track of the blue dots to see new activities within the spaces and mini-apps.This will help you keep track of developments in the spaces and mini-apps.
6. Use the appropriate tools
The tools you use at work set the foundation for the work, culture, and communication your team will have. It can help make or break the way work flows between you and your colleagues. Therefore, you must have the right technologies in place to ensure that it allows your team to maximize productivity and communication.
The proper messaging app will allow you and your team to communicate with each other despite the time difference and the lack of physical interaction. Get an app that enables you to segment messages into different spaces or topics so that everyone can follow through and contribute without getting lost in all the chatter.
Make sure to find the right project management tool so that your team can collaborate and work through projects seamlessly. Tools like Rock enable people to work independently while still being able to discuss things when needed. In addition, a good project management tool will allow project managers and task owners to add as much information to give good context to the assignees.
Rock is an all-in-one tool that combines messaging, project management, and more in one interface. It allows your team to work asynchronously to focus on the things that matter the most - doing good work and being able to make time for things outside of work.Try out Rock for free now and see the difference it will make to your team’s communication and work.
Import task boards from Trello to new and existing spaces and keep all your work in one place. Follow along to learn how to export task boards from Trello, and import them into new or already existing workspaces in Rock.
How to export a task board out of Trello?
The export feature in Trello is available to all board members, including observers. You can access the feature under the Board Menu > More > Print and Export.You can export your task board either in CSV or JSON, but only imports from JSON are supported by Rock.
Export with JSON: Exporting a task board in JSON is available for all plans. When you press export a new tab will open in your browser. Save this page for export by right clicking (make sure no text is selected) and selecting save file to add it to your device.
How to import a Trello task board into an empty space in Rock?
You can import a complete task board with list names, titles, descriptions and checklists into Rock. To access the feature:
Press the three dots in the top right corner of the Tasks mini-app.
Select ‘import tasks’ from the dropdown menu.
Choose Trello from the available options in the list.
After selecting import > Trello a new panel opens up. This is where you can upload your exported file, Rock currently only supports import from JSON. You can also add custom labels to imported tasks by writing a new label in the panel.
The following task information is moved over when importing tasks:
List names
Task titles
Labels
Task descriptions
Checklists
Start and due dates
Custom fields (you won’t be able to edit them if the space has not been changed to PRO)
Tasks with attachments or images in the description will have a link added to the description so you can still access your files.
Importing a task board from your user settings
It is also possible to import tasks to one of your spaces from your user settings panel. Here’s how you access the feature:
Press your user image in the top left corner to access your user settings
Choose settings from the menu
Select import
Select Trello from the option menu
In addition to uploading a file and adding labels to your import, you can also select the space where you want to import new tasks from Trello.
📝 Note: the imported task board adds new lists to your already existing workflow. You can always move tasks around when imported and re-organize the lists.
Questions about importing task boards from Trello? Reach out to us in the Rock Customer Support Space for any questions or feedback you might have.
Questions & Answers
My import did not work, what could have gone wrong?
Check whether you have member or admin permissions in the space you want to import tasks.Also make sure that the file you uploaded was .JSON and not Excel or CSV.
Why can't I see imported tasks even though my upload was successful?I
t can sometimes take a few seconds for the tasks to appear, especially for bigger imports. Try refreshing the app or Tasks mini-app.
Can I import to a space that already has tasks?
Yes, imported tasks will appear in new lists at the end of the task board of that space.
Can I import twice to the same space?
You can import multiple times to the same space. Note that tasks from new imports will appear in newly created lists, even if your space has matching list names.
Can I directly match assignees of Tasks?
It is not possible to match Trello task assignees to imported Rock tasks. After your import has been completed you can always add assignees and followers manually.Is import from Trello free?Import from Trello is free and can be done as many times as you want.
Can I import other formats besides .JSON?
No, Rock currently does not support importing from Trello in other formats.
Can I export from Rock if I end up switching again?
You can export tasks in JSON or XML from free spaces. Exports in CSV or Excel are also enabled for PRO spaces.
A 1:1 space is Rock's equivalent of a Direct Message, which means this space is only for you and the person you invited. You can invite and collaborate with anyone in a 1:1 space. Members of the 1:1 space can access all Rock features within that space: messaging, tasks, topics, notes, files, and meetings.
Creating a 1:1 space ?
We've made creating 1:1 spaces as easy and as intuitive as possible. Follow these steps to get started.Select the big plus in the bottom left corner of your screen, near the space list.
Once you click the button, you'll be prompted to choose whether you want to create a Group Space or a 1:1 Space.
Once you click the 1:1 Space button, you'll be asked to invite based on email, username, or phone number. Once you enter any of the three, you can proceed, and a space will be created.
Two things can happen when you send an invite to a 1:1 space, depending on whether or not they have an existing Rock account.
If the user is already on Rock, they will receive an email if they have it selected in the notification panel. In addition, a Space will be created where the invited user can either accept or decline your invitation.
If the invited user does not have a Rock account yet, they will receive an email invite in their inbox.
Managing your 1:1 spaces ?
The more you use Rock, the more spaces you'll create as you collaborate with different people both within and outside your organization.Here are some tips to manage your 1:1 spaces so that you don't get overwhelmed:
Pinning 1:1 spaces
Pinning spaces helps with keeping important spaces easily accessible. For example, you can pin a 1:1 space by hovering over it or going to the space's settings.
To unpin a space, you can:
Go to the pinned section and press the pin icon again
Click the "x" in the space list
Then go to space settings and click the pin icon
Muting and unmuting 1:1 spaces
You can mute 1:1 spaces if you want to stop receiving notifications for that space. To do this, you can go to Space settings > press mute.
You can unmute in the same place or by pressing the unmute bell in the top right corner of your space view.
Folders
Rock has a spaces folder function where you can group 1:1 spaces for better organization. To do this, hover over a space > select folder > add the space to an existing or create a new folder. To remove a space, go to the folder and uncheck the folder.
Removing a 1:1 space ?
Currently, Rock doesn't support leaving 1:1 spaces. However, if you want to organize your spaces a little, you can archive a space instead. Go to Space settings > three dots > Archive space to do this.
You also have the option to block people. Once you do this, the space will automatically be archived, and you will not receive messages from that person anymore.
Frequently Asked Questions on 1:1 Spaces❓
Can I manage member roles in a 1:1 space?
There are no member roles in 1:1 spaces. An alternative will be to create a group space and only invite the person if you want to have separate member roles.
Can I invite a third person to join my 1:1 space?
No, it is currently impossible to invite a third person to a 1:1 space. An alternative would be to invite the two users you want to collaborate with to a new group space.
How can I bring an archived 1:1 space back?
Go to the spaces toggle menu and select 'Archived'. You can unarchive a space by hovering over it and selecting the third option: 'Unarchive.'
How do I unblock a peer?
To unblock a peer, you have to enter your archived spaces. All spaces > select Archived > search for the space with the blocked peer. You then have to enter the space and select 'unblock peer.' Note that the moment you unblock a peer, your space is automatically unarchived.Alternatively, you can go to Settings > My Contacts >Blocked List and unblock the peer from there.
Can a 1:1 space be upgraded to PRO?
Except for the Rock Customer Support space, all your existing spaces can be upgraded to PRO.
Can a 1:1 space be converted into a group space?
No, 1:1 spaces cannot be converted into a group space.
I want to move tasks from a 1:1 to another space. Is that possible?
For now, you'll need to duplicate tasks to another space if you want to move over tasks to another space. If you're in a PRO account, you can export the complete task board onto a Group Space.
I received an invitation to join a 1:1 space from someone I don't want to connect with. How can I stop this?
You can block a user, which will restrict invitations to 1:1 and group spaces. If you believe that someone is trying to open a space with malicious intentions to spam or promote a product without your consent, please send an email to support@rock.so.
How many 1:1 spaces can I make?
You can create unlimited 1:1 spaces on Rock and invite as many new users as possible.
I want 1:1 spaces separated from group spaces, how can I do this within Rock?
If you want to separate your 1:1 spaces from group spaces you can always create a dedicated folder for it. To create a folder hover over a space and select 'add to folder' you can create a new folder or add spaces to already existing folders. You can remove spaces from a folder by unchecking the folder.
Can I add 1:1 spaces to a folder that has group spaces in it?
All spaces in Rock can be added and combined in your different folders.
Can I add the same 1:1 space to multiple folders?
Yes, you can add a space to as many folders as you want.
Can I add bots or automations to a 1:1 space?
No, it is currently not possible to add Zapier, Github, or other types of bots to PRO 1:1 spaces.
Project management is essential in any successful business, whether remote, onsite, or hybrid. It helps ensure that teams and organizations are on track for deliverables and projects. Proper project management involves documentation, planning, tracking, and communication to deliver work successfully within time, scope, and budget constraints.
It’s also vital to employ remote work tools to succeed with project management. After all, it’s not just about delegating tasks; it's also about ensuring that you can adequately see each task through to completion to make each project a success.
This blog will run you through how you can leverage Rock and its robust features to take your project management to the next level!
How to improve project management with Rock
Utilize Rock's rich features across the different aspects of project management to improve your project workflows, optimize processes, and increase your team's productivity.
Work smarter by using one central app for your company’s communications and projects. Less time spent switching through apps means less cognitive and context switching for people so that they can focus on doing optimal work.
Plan and run your projects in one place
Each Space within Rock is a self-contained project management and messaging environment. Everything you need to get projects running to completion - from planning to implementation - is in one place. Since each project is different and has its own set of tasks, topics, and stakeholders, you can easily create as many spaces as possible.
The Chat mini-app is your central place to message about anything relevant. You can then use the Tap to Organize feature to turn messages into a task, note, or topic if the discussion becomes too detailed or extensive. Properly organizing conversations is essential to ensure that stakeholders can easily track everything relating to the project.
As you continue to talk more about things in-depth, this may become an additional task for the team. The Tasks mini-app will help you set tasks for your teams and spaces. Each task comes with its fields for deadlines, lists, labels, assignees, and followers, making it easy for both project owners and stakeholders to keep track of the task status.
You can also comment directly on tasks to give more direct and actionable feedback on the task itself without going out of context. You can even move conversations from the chat into the comment section of tasks, notes, or topics for them to be better placed.
Better project communication
Effective communication strategies are the key to any successful project. If you’re a remote and distributed team, it will be impossible for you to meet up at an office and talk about work. Remember that project communication isn’t just about chitchats but also proper status updates regarding your ongoing tasks and projects.
You can use spaces to separate teams, departments, or projects. Each space has its own set of mini-apps to help organize projects and deliverables. A variety of mini-apps in one place alongside integrations with popular cloud storage and video conferencing tools makes it easier for you to set up projects.
You have the option to create 1:1 spaces or group spaces depending on the kind of conversations you need. 1:1 spaces are much like direct messaging but with a full-fledged project management suite.
You can use 1:1 spaces to hold communications between you and another team member that don’t necessarily need to go to a group space. However, as mentioned in the title, it’s best for 1:1 conversations or collaborations with colleagues, like talking about specific shared projects, specific performance reviews/comments, or catching up on non-work matters.
On the other hand, you can invite teams and even external stakeholders to group spaces and have shared communications and overview of the project you are running on the page.
Every 1:1 and group space comes equipped with an @mention anything feature. This handy function allows you to cross-reference notes, topics, tasks in messages, comments, or task/note/topic descriptions. @Mention ensures that you can directly reference a person but also reduces the search time for tasks, notes, or topics in any place by directly linking them to the text.
Every space also gives access to the Meetings mini-app, which allows you to start meetings with video conferencing apps like Zoom, Google Meet, and Jitsi. You can also share asynchronous video with Loom. When fully integrated, you’ll be able to start meetings straight from your spaces, and members of those spaces can quickly join synchronous discussions when needed.
How to manage deadlines and deliverables
Project management is also about ensuring that your team can adequately manage their workload to deliver quality output on time. Therefore, it's important to ensure that your team and project stakeholders can easily see task status to manage expectations and set priorities.
Fortunately, Rock’s task management features make it easy for you to check on deliverables through assignees, statuses, lists, followers, and start or due dates.
Teamwork makes the dream work
It’s essential to have a macro-view to continue to see the big picture that everyone is working hard to achieve. There are features on Rock that allow you to keep track of the overall project progress.
Take advantage of task management in every space so that you can easily keep track of the different activities within a project. Each task board has its own set of lists allowing you to move tasks depending on the stage in your defined workflow. In addition, lists will quickly enable you to sort out task status to see which tasks are moving.
The cool thing about lists is that you can edit how your Tasks mini-app is organized depending on your workflow. For example, you can change list names, remove lists you don’t need, change individual list colors, and even change the status of tasks within a list with a checkmark (i.e., you can set a list in such a way that if a task is moved to that list, then the task is marked as complete.)
The Unlimited plan allows teams to plan projects into sprints, allowing for better focus and more manageable project and task delegation. Sprints work well for all kinds of projects as they will enable you to break long-term tasks into smaller and more manageable pieces.
Unlimited Plan tip: Pair up sprints with the recurring tasks feature for easier management of recurring tasks for every new sprint.
Me, myself, and I
Of course, the team's collective success is heavily influenced by the individual efforts of each team member. So it’s crucial that everyone also gets to have their own task management neatly organized. While it’s essential to see the big picture, it can get daunting and paralyzing if you don’t break it into small steps. This is where Rock's project management tools can support individual team members to manage their tasks and get work done in time.
The My Tasks panel is a view that allows you to see all the tasks you are assigned to, have created, or are following. In addition, you can opt to apply filters to all your tasks so you can prioritize tasks of higher importance or those that are about to reach their deadline.
Another helpful feature for personal task management is the Set Aside panel. This nifty tool allows you to set aside topics, tasks, notes, (cloud) files, or messages you want to look over or keep at hand throughout the day. There are many moving parts to any project, and this feature makes it easier for you to set aside those that need your special attention.
Keeping track of documentation
Documentation is essential for remote and asynchronous teams, especially since people aren’t expected to reply to you within seconds. So having the proper documentation and making sure that files are easily accessible is critical to ensuring you’re not a bottleneck, especially when it can take hours for feedback or replies to come through.
Rock’s Files mini-app allows you to have organized and easily accessible files and folders available to anyone in a space. You can integrate services like Google Drive, Dropbox, Figma, Creative Cloud, Onedrive, and Smartsheet to Rock. After adding a cloud folder to a space it will become accessible to the different members. This way, you can finally end never-ending link sharing and document searching.
Cloud files and folders can be directly attached to any relevant task, note, or topic. This way, you can provide easy access and descriptive context to team members and stakeholders.
On top of the built-on Files mini-app, you can also document relevant project or work details in the Notes mini-app. In addition, notes have various features that allow you to provide more detail to your documentation.
The rich-text editor allows you to keep your notes formatted and tidy.
The ability to attach cloud files makes it easier to add relevant files and documents.
Comments allow you to converse with colleagues more in-depth about the note right then and there.
It’s an excellent way to keep information in one place while still making sure that you’re enabling meaningful discussions about the topic. Remember that it’s much better to overshare in asynchronous work setups than to leave people in the dark.
Organizing your Spaces
Once you start working with Rock, you can imagine that the spaces you’re part of will pile up. So you must learn how to organize your spaces to ensure you don’t miss important things and keep your spaces as clutter-free as possible. Here are some best practices that will help you keep your spaces organized:
Pin important spaces: This allows you to put the frequently used spaces on the top of the space list.
Archive unused spaces: At the moment, Rock doesn’t allow users to delete spaces, so if you want to keep your list clean, archive unused or inactive spaces.
Mute spaces: You can opt to mute spaces that you don’t want to receive notifications to, ensuring that you can still easily access them, while getting no notifications.
Organize with folders: Use the Add to Folder function to group spaces easily switch from one group to another depending on the context of your tasks.
Keeping spaces organized is the foundation to maximize your Rock experience as it makes sure that you’re able to stay on top of everything that’s happening.
Monitor project budget
Rock makes everything you need to run and manage a project easily accessible by putting it in one place. This central source of truth makes it easy for project managers and other high-level stakeholders to keep track of the project’s progress. In addition, the improved project tracking and visibility make it easier to make any needed adjustments to the scope and budget.
Speaking of budget, you can also ensure that project management and communication won’t break the bank or run your wallets dry anymore. Rock has two available pricing schemes that you can use depending on your business needs: FREE and Unlimited.
The FREE plan allows you to try most of our features and functions without paying for anything. You can create unlimited 1:1 and up to 3 group spaces, invite up to 10 members to your group spaces, and enjoy all the mini-apps (Notes, Tasks, Files, Topics, and Meetings) and integrations that come with each space. So you can already get to rocking your project management without paying a cent!
If you’re looking for something with more flexibility in member and task management, then the Unlimited plan is for you. This plan allows you to use Rock without any limits:
Unlimited amount of group spaces & unlimited members per space
Unlimited number of tasks in all your spaces
Unlimited number of PRO spaces with advances features and integrations
Management dashboard, time tracker, and easy ways to manage your team on Rock
Recap: what is Rock?
Rock is an all-in-one messaging app that seamlessly combines files, notes, tasks, etc. Asynchronous work by default, synchronous when needed; Rock allows you to focus on the essential things and less on the unnecessary chatter.
Too much context switching between remote work tools can be detrimental to productivity, so combining some of the most critical aspects of project management like communication, deadline management, scope planning, and implementation in one place is crucial.
With Rock, it’s about empowering teams to bring forward their best work by allowing people to focus on the signal and not the noise. Use Rock to maximize your productivity and have more time to connect in meaningful ways with family, friends, and colleagues.
Looking to import tasks from Jira? You can easily move over projects to Rock without losing past documentation and workflows. In this product guide we will walk you through exporting tasks out of Jira and how to add them to your Rock spaces.
How to export tasks out of Jira?
You can export complete projects out of Jira by following these steps:
Step 1: Select filters in the top menu.
Step 2: From the dropdown menu select advanced issue search.
After selecting advanced issue search a new view will open.
Step 3: Select export in the top right corner of the dashboard.
Step 4: Choose ‘Export XML’ from the options menu.
? Note: Rock does currently not support imports from RSS, Word, HTML or Excel/CSV. While you can export your tasks in those formats, you won't be able to import them to Rock.
Saving XML files on your device
After selecting export XML a new tab will open with the raw file information. To save it to your device you only have to download the file. Rock will format the tasks once you import them to a space.
Windows: right-click the page and save the XML file, you can rename it to the name of your project for simplicity.
Mac: Select ‘File’ in the top left corner of the screen and select ‘save as…’. You can give the file any name you find convenient. Make sure to save the file as '.XML'.
Importing tasks from user settings
Now that you have your tasks saved in .XML format you can import them to any space from the user settings panel. To access the import from Jira feature you have to select your user profile in the top left corner, settings, import, and choose Jira from the available options.
After selecting Jira a new panel will open up where you can further define your import and upload the necessary file:
Select your space: Choose the space where you want to import your tasks to. Note that if you are a guest in a space you will not be able to import tasks.
[Optional] Add label to imported tasks: Create a custom label (such as Jira import) to keep track of where tasks come from. You can also add an existing label to the imported tasks by selecting from the menu.
Upload your file: Make sure to upload an .XML file, other types are not yet supported. You can always reupload a file if you added the incorrect file.
Select which project to import: If you have several projects on Jira, you can separately add each one to a different space.
Import: After everything has been configured correctly, press import.
After selecting import the tasks will automatically be added to the space. Imported tasks can carry the following information when added to a Rock space:
The status of an issue is each task list on Rock (note that if there are no issues under a certain status it won't carry over to Rock)
The summary of an issue becomes a task title.
The project name is converted into a custom label.
Descriptions and checklists can be accessed in the task view.
Priorities and due dates are carried over.
Custom fields (you won’t be able to edit them if the space is not PRO)
Attachments are not imported, so make sure to manually add important documents to the Files mini-app or to respective tasks where needed. Check out an example of an imported space below.
Importing through the Tasks mini-app
It is also possible to import tasks while inside of a space. Note that this functionality is only available to those that have admin status in the space.
To access the feature you need to enter the Tasks Mini-app (the feature is available in every view):
Step 1: Select the three dots in the top right corner of your screen
Step 2: Select import tasks
Step 3: Select Jira from the option menuAfter selecting Jira a panel opens up where you can upload the .XML file and specify some additional information regarding your import
Step 4: Upload the .XML file of your Jira tasks
Step 5: [Optional] Add an already existing or custom label to the import
Step 6: Select the project you want to import
Step 7: Press import to add your tasks to a space.
The tasks are added to your space after you select import, and you're good to go! It is now possible to continue working on any project you just moved over and invite anyone to that space for free.Questions about the import from Jira feature? You are always welcome to reach out to us in the 'Rock Customer Support' space.
Questions and Answers ?
My import did not work, what could have gone wrong?
Check whether you have member or admin permissions in the space you want to import tasks. Additionally, make sure that the file you uploaded was .XML and that you have filled in all mandatory fields from the import. Additionally, something that might help is refreshing the app or switching between views for the new tasks to load.
Why can't I see imported tasks even though my upload was successful?
If your import was successful you might have to refresh the app or switch between the available views in the Tasks mini-app. Alternatively, you can also close the Tasks mini-app and reopen it for the tasks to load.
Can I import to a space that already has tasks?
It is possible to import tasks to a space that already has tasks created. Imported tasks will show in separate lists based on the import.
Can I import twice to the same space?
Yes, you can import twice to the same space. Note that the new import will create new lists for tasks, even if those are identical to already existing lists in a space.
Can I directly match assignees of Tasks?
It is currently not yet possible to match assignees from Jira over to imported tasks automatically. After adding the tasks you can still manually add assignees and followers.
What determines the list a task falls in?
Task lists for Jira imports are determined by issue status. Note that you will have to manually add lists for statuses that had no tasks during the import.
Is import from Jira free?
Yes, you can import tasks from Jira for free and as many times as you want.
Can I import in CSV, RSS, Word or HTML?
No, Rock currently does not support importing from Jira from any of these file formats. You can only import tasks from .XML for now.
Can I export from Rock if I end up switching again?
Under the free plan, you can export tasks in JSON or XML. If the space is changed to PRO you can also export tasks in CSV or excel.
Can I import from other project management tools?
Yes, you can import from Asana, Trello, ClickUp, CSV and Slack. Check out the importers page for more information on each one.
If you are moving projects from Asana to Rock you can bring your tasks over with the import feature. Read along for the steps you need to take to export tasks from Asana and how they can be added to spaces on Rock.Looking for another import? You can also add information from Trello, Jira, ClickUp, CSV, Slack and Jira. Click here to learn more.
Exporting tasks from Asana: step-by-step
To export your tasks from Asana, follow these steps:
Step 1: Enter the project you want to export.
Step 2: Press the toggle next to the project name (project actions).
Step 3: Click on export/print from the options in the dropdown menu.
Step 4: Choose ‘JSON’ from the available options.
? Note: It is not yet possible to import tasks to Rock from CSV or print files.
Saving JSON files on your device
Once you press JSON an additional tab will open with text. Save this page to your device so you can import your tasks to Rock. Here are the steps to take depending on your operating system:
Windows: right-click the page and save the JSON file.?
Mac: press control and the page, and select ‘save as…’.
Importing tasks from user settings
With the JSON file stored on your device, it is now possible to move the tasks into a Rock space through your user settings. Import to Asana by going to user settings > settings > import and select import from Asana.
Once you have selected Asana, you can complete your import and upload your downloaded file, make sure to follow these steps:
Choose a space: Select the space where the tasks should be imported to. Note that this functionality is not available when you have guest permissions in a space.
[optional] Add label to imported tasks: Add a custom label (for example: Asana import) to your imported tasks. You can also add an existing label to the imported tasks by selecting from the menu.
Upload your file: Add the downloaded JSON file here, note that uploading files in different formats will lead to an error.
Press import: After configuring the different fields, press import.
After selecting import the tasks will automatically be added to the space. Imported tasks can carry the following information when added to a Rock space:
The section a task is in becomes the task list on Rock (note that if there are no tasks under a certain section it won't carry over to Rock)
The Task name on Asana becomes a task title on Rock.
Descriptions and checklists can be accessed in the task view.
Priorities and due dates are carried over.
Custom fields (you won’t be able to edit them if the space )
If you have any attachments in tasks they are carried over as links in the task description. Check out an example of an imported space below.
Importing through the Tasks mini-app
It is also possible to import tasks while inside of a space. Note that this functionality is only available to those that have admin status in the space.
To access the feature you need to enter the Tasks mini-app (the feature is available in every view):
Step 1: Select the three dots in the top right corner of your screen.
Step 2: Select import tasks.
Step 3: Select Asana from the option menu.
After selecting Asana a panel opens up where you can upload the file and specify some additional information regarding your import.
Step 4: Upload the file of your Asana tasks.
Step 5: [optional] Add an already existing or custom label to the import.
Step 6: Press import to add your tasks to the space.
The tasks are added to your space after you select import, and you're good to go to continue working on any project you just moved over! Questions about the import from Asana feature? You are always welcome to reach out to us in the 'Rock Customer Support' space.
Questions and Answers
Still left with questions regarding the import feature? Check out the Q&A for common questions regarding the functionality.
My import did not work, what could have gone wrong?
Check whether you have member or admin permissions in the space you want to import tasks. Additionally, make sure that the file you uploaded was .JSON and that you have filled in all mandatory fields from the import.
Something that might also help is refreshing the app or switching between views for the tasks to load.
The Tasks mini-app is empty even though the upload was successful?
For the tasks to load you can refresh the app or switch between list and board view in the Tasks mini-app. Something that might help if that does not render tasks is to switch between mini-apps and reopen the Tasks mini-app.
Can I import to a space that already has tasks?
It is possible to import tasks to a space that already has tasks created. Imported tasks will show in separate lists based on the import.
Can I import two different projects to the same Rock space?
Yes, it is possible to import several times to the same space. Each import will create new lists for tasks, even if list names are identical to already existing lists in a space.
Does the import also carry over task assignees?
Unfortunately it is not yet possible to import task assignees. You can still manually add assignees and followers after sucessfully importing your tasks.
Is import from Asana free?
Yes, the import from Asana feature is completely free and available in every space.
Can I export from Rock if I end up switching again?
Under the free plan you can export tasks in JSON or XML. If the space is PRO you can also export tasks in CSV or Excel.
It doesn’t matter if you’re a solopreneur doing the jobs of 3 people or a CEO heading a 100+ man agency. Collaboration is inevitable, whether it's about coordinating project briefs, finding suppliers, or discussing campaign details.In this article, you’ll get an idea of how to improve cross-team communication, communication strategies and collaboration using Rock.
Drop the emails and communicate on Rock
With traditional multi-app/service work models, working across teams meant having long email threads with partners and collaborators on top of messaging each other on instant messaging platforms and commenting on tasks in project management tools.
With Rock, you can keep things neatly organized in one place. From messaging to project management to note-keeping, a task board and files - Rock makes it possible to put everything in one place.
One of the things that will be front and center once you enter the app and see your spaces is the Chat mini-app. With chat, you can send messages and polls to quickly align on tasks and projects without having to go back to email threads or sit in meetings that don’t need to happen.
You can also use the Topics mini-app, which lets users sort more exhaustive discussions into a dedicated discussion block. This ensures that team members who have not been able to participate in discussions can easily catch up on what they missed. After all, when you’re working remotely and asynchronously, it’s understandable that not everyone can be online simultaneously.
You can @mention group members that you want to be notified on a specific thread to improve communications and visibility. The @mention feature makes it easier to grab people's attention and push forward specific conversations, topics, or tasks, ensuring they don’t miss important details.
Aside from all the chat and text communication features that Rock boasts of, the Meetings mini-app allows several meeting and video apps to be integrated into your Rock account.
When asynchronous work isn’t working out, you have the choice to integrate Zoom, Google Meet, or Jitsi for synchronous video conferencing. Loom support is also available for video messages or screen recordings to help with discussions where chatting simply won’t cut it.
Manage Projects Easily
You must be able to properly manage tasks if you want to have successful cross-team collaboration. After all, how will you be able to work together if you’re not able to delegate tasks properly? This is why Rock makes it easy for teams to track tasks and cross-reference information for everyone in the group.
You can use the Tasks mini-app to keep track of everything that needs to be done in a project. Task management on Rock can integrate with all mini-apps and integrations within Rock. So when looking at a specific task for a project, you can cross-reference existing topics, notes, and other tasks to the task.
Remember that since Rock allows you to create unlimited spaces and add an unlimited number of people into group spaces, you’re able to collaborate with all kinds of project stakeholders, both within your team and outside suppliers. Simply create dedicated workspaces for specific projects or specific teams and each space will have its own project management suite for better collaboration.
For more personal project management, you can use My Tasks to look at tasks you have created, are following, or are assigned to across spaces. This is a nifty feature when you are managing many deadlines and tasks across multiple clients or projects.
To make it easier to sift through everything, you can easily use filters to sort out tasks according to spaces, due dates, assignees, priorities, etc. My Tasks will allow you to stay on top of everything you have to do without going through each space’s tasks.
At the same time, your teammates and external stakeholders will be able to appreciate the fact that you can stay on top of things without all the nudges.
Discuss In The Right Place
Working between teams or organizations means that not everyone can be online simultaneously. So it’s vital to ensure that you discuss issues and updates in the appropriate spaces so that anyone can still jump in without losing context or needing to dig through threads.
Here are some Rock Team tips to ensure your teams practice proper knowledge sharing and documentation. After all, working across teams and across organizations means that you’ll need to ensure proper knowledge hand-off in order to keep things moving despite the lack of physical meetings.
Keep appropriate discussions in relevant spaces to reduce the noise while allowing others to retrieve past communications.
When discussions are getting too in-depth in the chat, move to topics to keep it all in one place.
Keep essential details in notes, you can also attach important documents or cloud files to notes to keep documentation easily accessible.
Use the comments section on tasks, topics, and notes to keep things within those discussions, ensuring that people who need to find information can easily find them.
Don’t forget to @mention spaces, tasks, notes, files, or topics so that users can easily cross-check or cross-reference information without having to go looking.
Keep Documentation Robust
Working in a remote setup or cross-organizational means that people can’t just walk up to someone to ask about things, there are typically geographical or logistical barriers to making it happen. Additionally, if you’re working in an asynchronous environment, you can’t just ping people and expect them to answer you right away. The lack of proximity will mean that there will always be a delay in responses.
One thing that can help lessen the need for a back-and-forth between you and any other stakeholder is ensuring that any project or task documentation is exhaustive and up-to-date. Documentation will enable people to move forward without contacting other team members to get a reply as everything is already there.
Within Rock, the Notes mini-app ensures that any needed information is captured and viewed by anyone who needs it. Notes easily allow you to mention a task, a topic, a space, an attachment, or another note to ensure clear instructions and details to everyone who needs it. Any note added to a space is accessible to members of the space, so use this feature often and use it well!
📝 Rock Team tip: The My Notes section shows all the notes you’ve authored and all the notes in the spaces you’re in. Make sure to use this feature to keep track of information across spaces.
In addition to notes, make sure to take advantage of the Files mini-app in order to seamlessly integrate cloud files onto your items like notes or tasks. Files will allow you to integrate accounts from services like Creative Cloud, Figma, Dropbox, Google Drive, Notion, and more. This allows for better information sharing, reducing barriers, and potential information clashes with collaborators.
Start Rocking!
If you’re not sure where to start, the four pointers above should be a good start to help you and your team collaborate better and foster a productive work environment despite the lack of physical contact or communication.
After all, Rock enables teams to work better together despite the differences in geography and timezones.
New tools can be challenging to get started on, especially when you've already got processes and workflows set in place. It's also equally challenging to find remote work tools that will work as well, if not better, than the ones you're currently using.Now that remote and hybrid work is here to stay, you should ensure that your team is well-equipped to last by providing workflows that reduce fatigue while improving productivity.Throughout this post, you'll get a run through some of Rock's essential functions and integrations to help you rock the workplace sooner than later.
📝 Rock Team tip: You can watch our onboarding webinar below if you want to see Rock's features explained by our Product Specialists.
Getting started with Rock is easy. All you need to do is sign up to access spaces, tasks, notes, topics, and files. In the FREE version of Rock you can invite up to 10 people per group space and collaborate with colleagues and external stakeholders at no additional cost. On the Unlimited plan, you can create an unlimited number of group spaces and invite as many people as you need.
In Rock, every space is its self-contained project management, messaging, and note-taking environment in one. Once set up, all of Rock's mini-apps and integrations are available in every space, whether it's a 1:1 space or a Group space.
1:1 spaces: personal chats or direct messages. This space will only be between you and the person you invited to the space. You can create an unlimited amount of 1:1 spaces on both FREE and Unlimited plans.
Group spaces: Invite people relevant to the project so that anyone can stay updated through a combination of messages, tasks, topics, and notes. On the Unlimited plan you can create an unlimited number of group spaces. If you are on the FREE version, you can create up to 3 group spaces.
Frictionless onboarding with imported information
If you're a company jumping ship, there are several import options to allow you to bring data and information to Rock seamlessly. Check out how to import tasks or messages from popular tools through these dedicated product guides.
Spaces are the lifeblood of Rock. Each space has its project management suite to help any team keep track of ongoing task management without constantly checking on different apps.
If you want to look at Rock's project management capabilities more in-depth, you can check out this article that discusses project management on Rock.
When onboarding your team, you can add new people to Rock or spaces in a variety of different ways:
Email: Input their email address, and people receive an invite straight to their inbox.
Invite links: Generate a link that you can send to people. For example, you can have two separate links per role (member or guest).
Phone number: Invite people by their mobile number.
Quick Connect: Share your QR or Quick Connect code anywhere. This will redirect people to open space with you directly. You can access this code by going to settings and selecting quick connect.
You can send invites to people as you create a space or through space settings.
Rethink how you communicate with your team
With Rock, it's easier to improve team communication strategies by enabling better discussions across the board. The app's complete project management suite empowers teams to collaborate better and empowers team members to work independently. In addition, its features allow for more mindful conversations between team members and within projects.
Proper messaging is essential to Rock because it's how teams can build a culture of trust and communication within each other. So each space comes with a chat mini-app which is the central place where people can chat about anything.
Don't forget that if things get a little too detailed, you can use the Topics mini-app to keep all information in one place. Each topic also has its own comments section so space members can have robust discussions without the need to scatter information across spaces.
The Topics mini-app also keeps the chat mini-app clean and tidy as all exhaustive information is housed on a topic.This approach to messaging and putting things in the right place means that teams are primed to do productive work without the need to be online simultaneously because the information is sorted correctly and can easily be found by those who need it.
Connect design and cloud storage providers to your spaces
Rock allows you to easily connect and integrate files from your design and cloud storage providers. Once cloud integration is successful, you can easily link files from those cloud storage into any space.
Linked files can then be attached to chats, tasks, topics, and notes, improving project coordination and collaboration through improved documentation and file sharing.In addition, if there are files uploaded by teammates or other stakeholders that you'd want to keep in handy, you can always set them aside for easy access.
Download Rock on your different devices
Building a habit with a new platform is much easier when you have it accessible across your different devices. Rock is available across various platforms to make sure your team can seamlessly access updates.Make sure to share the different options with you in the first days:
Desktop App: Rock's desktop app is available on Windows, macOS, and Linux.
Mobile App: Rock has a full-fledged mobile app to bring Rock anywhere with you. Available on Google Play and iOS.
Web App: You can access Rock on all major browsers, including Firefox, Opera, Google Chrome, etc.
Start Rocking Your Work Now!
Rock's app onboarding process is as frictionless as possible so that it's easier for individuals and teams alike to jump into an app that will help you work better by allowing you to focus on the signal and not the noise.
Whatever your workflows and needs are, Rock is there to help you keep things organized and in one place.
Rock has an import feature that lets you take your tasks with you. In this guide, we will explain how to export tasks from ClickUp and add them to Rock.
Exporting tasks out of ClickUp
Before looking into exporting tasks out of ClickUp make sure that you are an admin of the workspace. Tasks can be exported in your workspace settings, which can be accessed by pressing your user icon in the bottom left corner and selecting 'import/export'.
After 'Import/Export' is selected, a new panel opens. Click on 'Start Export' to start downloading your information.
Next, you will be prompted to start the export of your workspace. Wait for ClickUp to prepare the file for you and download your export onto your device. This file is all you need to start importing your tasks into Rock
Adding ClickUp tasks to Rock through user settings
With the file saved on your device you can now proceed to add the tasks to Rock through your user settings. Import from ClickUp can be accessed by clicking on your profile picture, then settings, the import bar and selecting ClickUp from the different importers.
After you select ClickUp a panel opens up where you can import your workspace. You have to fill out the following fields:
Choose your space: Select which space you want to import your tasks. It can be any 1:1 or group space you have member or admin permissions.
[Optional] task labels: Add a custom or existing label to the tasks you are importing.
Workspace file: The file you previously downloaded from ClickUp.
Choose which project to import: Select which ClickUp project you want to import into a space.
Import: After pressing import the tasks will automatically be added to your selected space.
After selecting import the tasks will automatically be added to the space. Imported tasks can carry the following information when added to a Rock space:
The status of a task becomes a task list on Rock.
Titles, priorities, and due dates are carried over.
You can access descriptions and checklists by going to the task view.
Custom fields (you won’t be able to edit them anymore if the space has not been changed to PRO)
Rock currently does not support the import of attachments. You can still manually add them to tasks once imported. Below you can see an example of a space that has been imported from ClickUp.
Using the Tasks mini-app for imports
Tasks can also be imported from within the Tasks mini-app. Make sure to have admin permissions in the space if you plan to import tasks.
To get started, enter the Tasks mini-app (the view does not matter):
Step 1: Click on three dots in the corner of your view.
Step 2: Select import tasks.
Step 3: Choose ClickUp from the available importers.
Next a second panel will open up:
Step 4: Upload your .csv file from ClickUp.
Step 5: [Optional] Add a label to your imported tasks.
Step 6: Choose which tasks from ClickUp to import into your space.
Step 7: import your tasks.
Frequently Asked Questions on Importing from ClickUp
My import was successful but I don't see the tasks?
If your import was successful you might have to refresh the app or switch between the available views for all the tasks to load.
Something went wrong, what could it have been?
You'll need to check whether you have the needed permissions in the space. Additionally, make sure that the file you uploaded was exported using the steps in this article, there is other export panels in ClickUp that are not yet supported by the import feature.
Is it possible to import to a space that already has tasks?
Yes, you can import to a space with existing tasks. However, it's important to note that they will show in separate lists based on the status they had on ClickUp.
Do you allow multiple imports to the same space?
Yes, it is possible to import several times to the same space. New imports create new lists, even for identical list names.
Do assignees carry over in the import?
Unfortunately, you can not yet carry over task assignees. After successfully importing the tasks you can manually add assignees to imported tasks.
Is import from ClickUp free?
Yes, you can import tasks from ClickUp for free and as many times as you want.
Can I import from view settings on ClickUp?
No, Rock currently does not support importing from view settings on ClickUp. Make sure to follow the steps in this product guide to import tasks.
Is it possible to export tasks from Rock?
Rock supports free exports in JSON and XML formats in any space. Changing your space to PRO will allow you to support CSV and Excel exports.
Rock offers a Google Drive integration in the Files mini-app to improve asynchronous workflows. Having a mix of file sharing and meeting tools is essential to maximize productivity.
The Google Drive integration in the Files mini-app helps promote better collaboration through robust documentation that team members or space members can easily access.
How to add Google Drive to Rock?
Google Drive is an account-based integration. Once you connect your Drive, you will be able to connect folders and files to different spaces without repeating these steps.Remember that you must have member or admin permissions in a space if you want to add folders or create documents in Google Drive.
To add Google Drive to Rock, follow these steps:
Step 1: enter the files mini-app and select Google Drive
Step 2: Click the Google Drive button, and you'll be redirected to a Google sign-in screen
Step 3: You will be asked to grant Rock permission to connect with your Drive
You will automatically be redirected to the Rock space where you set up the integration once complete. In addition, it is now possible to add folders from your connected Drive to your different Rock spaces.
Adding Google Drive Files and Folders to spaces?️
You can add folders and files that are your own or shared with you to the Files mini-app of a space. However, a file needs to exist in a folder to be uploaded to Rock.
All subsequent folders and files in that parent folder will be accessible from the Files mini-app in your space when you add a folder. All you have to do is click on the folder to access it.
📝 Note:Users will not be able to access the folders in the spaces unless you have given them permission in Google Drive. Ensure that you update user permissions in Drive if you want them to access files and folders within Rock.
If you want to go back while in a subfolder, press the < Folder on the top left corner of the Files view.
You can press this button to open a connected Google Drive folder or file in a new tab.
Once you've successfully linked folders to a Files mini-app in a Space, you can add additional services via the blue + button on the lower right-hand corner of the Files view.
Creating Google Drive Files on Rock ?
Once you've integrated a Google Drive account and successfully linked folders to a space, you'll be able to create Google Drive files from your space.
First, you'll need to add the new files to an existing folder. To create new files or upload files from your device to your Google Drive folders, click on the blue + button on the bottom right-hand corner of the Files view. You'll need to make sure that you're inside a Google Drive folder before doing so.
📝 Note: This is almost similar to how to add other Drive services to your Files mini-app. So make sure that you have clicked on a Google Drive folder first to get the option to add files.
Make sure you have permissions in the folder before uploading a file. Otherwise, you'll be restricted from doing so. Google Drive permissions decide what actions can be done in the folder. So if a guest on Rock has editing rights to a Google Drive folder, they can create new files in that folder, but they cannot remove the folder where they added new files.
Using the Google Drive Integration Across Your Rock Workspace ?
The integration is compatible with other functions within Rock, so you can easily access important information across spaces, tasks, and notes.
Set Aside Google Drive Folders & Files
You can Set Aside files and folders if you want to check up on them at a later time. Go to a file you want to set aside, hover on it, and click on the timer icon.
Once you've set aside a file, you can access them in the Set Aside panel on the left of the Rock screen. You can remove Files from the Set Aside panel by pressing the X or in the Files mini-app by pressing the set aside icon again.
Link to Tasks and Notes
You can add Google Drive cloud folders and files to tasks and notes in the attachments section of the object. Click on the "Link Cloud Storage" option to link a file to a specific task or note.
📝 Note: Linking files or folders to tasks doesn't work when entering tasks in board view.
Removing Documents or the Integration from a Space ✂️
Removing folders
You can remove folders from a Google drive integration by pressing the red unlink button. Everything connected to that folder won't be accessible in the space but will still exist in its owners' Google Drive. Of course, you can always re-add a folder to the space if needed.
You'll need to have member or admin permission in the space to remove folders. If you added a folder when you had admin or members status and have downgraded to a guest, you could still remove your own added folders.
You can only remove the linked folder, not a subfolder or document. If you want to remove access to a particular subfolder or document within a folder, you can either:
Remove the information from the master folder in Google Drive.
Or unlink the master folder and manually add subfolders except for the one you don't want to be visible in the space.
Removing the integration
You can remove the Google Drive integration by going to user settings > Authorized Apps > press Disconnect.Once you remove the integration from your account, the connected folders and files won't be accessible in the spaces it's linked to but will still exist in the Files mini-app.
You can reauthorize access after disconnecting Google Drive on a previously connected folder. Once you re-integrate Google Drive, all folders in your different spaces will become available again.
If you want your folders not to be accessible once you remove the integration, you will have to unlink the folders from your spaces.
Frequently Asked Questions ?
What happens to folders in the Files mini-app when someone leaves/is removed from a space?
When you leave or are removed from a space, your folders will be automatically disconnected from the Files mini-app. If you re-enter the space, you will have to manually add the folders again.
What would happen to my folders and files if I were to delete my account?
When you leave a space, all folders you linked in that space will get unlinked. All files (attachments) uploaded to that space will remain accessible to other space members. If all members leave the space, then the files and folders are fully erased.
What happens to folders and files from suspended accounts?
Folders from suspended accounts will still be available for access in the space unless they are deleted or removed from the spaces where the files exist.
What happens if I move my folder to a different location on Google Drive? Will I have to add it again?
The folder will still be accessible in a space, but user permissions might change. Some users might gain or lose access depending on the changes you make to the folder or the permissions available in the new destination.
What happens to folders in a space if they are deleted from Google Drive?
It will appear that we cannot find the folder, and no one will be able to access the information. Folders and files that are contents will disappear when reopened. You can unlink the deleted folder to remove it from your Files mini-app.
Can I give a user permission to access a folder from Rock?
No, you'll need to grant access permissions to the user through Google Drive.
Can the Rock Team see what is inside the folders I connect to my spaces?
No, the integration adds the information to your space. We are not able to see what documents you have in your folder. Additionally, if users in space don't have permissions, they won't be able to access information, either.
Is there an upload limit to my folders in Google Drive?
Upload limits are irrespective of Rock. Make sure to check your storage limits on Google Drive.
What happens to folders and files if everyone leaves a group space?
As soon as all members leave the space, all file storage information and integrations are removed.